Table of Contents for
Linux Essentials for Cybersecurity, First Edition
 Linux Essentials for Cybersecurity, First Edition
Published by
Pearson IT Certification, 2018
Linux Essentials for Cybersecurity, First Edition
Published by
Pearson IT Certification, 2018
- Cover Page
- Title Page
- Copyright Page
- Contents at a Glance
- Table of Contents
- About the Author
- Dedication
- Acknowledgments
- About the Technical Reviewers
- We Want to Hear from You!
- Reader Services
- Introduction
- Part I: Introducing Linux
- Chapter 1: Distributions and Key Components
- Chapter 2: Working on the Command Line
- Chapter 3: Getting Help
- Chapter 4: Editing Files
- Chapter 5: When Things Go Wrong
- Part II: User and Group Accounts
- Chapter 6: Managing Group Accounts
- Chapter 7: Managing User Accounts
- Chapter 8: Develop an Account Security Policy
- Part III: File and Data Storage
- Chapter 9: File Permissions
- Chapter 10: Manage Local Storage: Essentials
- Chapter 11: Manage Local Storage: Advanced Features
- Chapter 12: Manage Network Storage
- Chapter 13: Develop a Storage Security Policy
- Part IV: Automation
- Chapter 14: Crontab and At
- Chapter 15: Scripting
- Chapter 16: Common Automation Tasks
- Chapter 17: Develop an Automation Security Policy
- Part V: Networking
- Chapter 18: Networking Basics
- Chapter 19: Network Configuration
- Chapter 20: Network Service Configuration: Essential Services
- Chapter 21: Network Service Configuration: Web Services
- Chapter 22: Connecting to Remote Systems
- Chapter 23: Develop a Network Security Policy
- Part VI: Process and Log Administration
- Chapter 24: Process Control
- Chapter 25: System Logging
- Part VII: Software Management
- Chapter 26: Red Hat–Based Software Management
- Chapter 27: Debian-Based Software Management
- Chapter 28: System Booting
- Chapter 29: Develop a Software Management Security Policy
- Part VIII: Security Tasks
- Chapter 30: Footprinting
- Chapter 31: Firewalls
- Chapter 32: Intrusion Detection
- Chapter 33: Additional Security Tasks
- Appendix A: Answers to Review Questions
- Appendix B: Resource Guide
- Glossary
Chapter 4 Editing Files
You might wonder why there is an entire chapter devoted to editing files. The Linux operating system is configured largely by hundreds of text files. User and group accounts, system services, utilities, and many other features rely on text files to hold critical information.
Chapter 2, “Working on the Command Line,” introduced several examples of critical files, including initialization files such as /etc/profile and ~/.bashrc. These initialization files are used to modify the shell environment when a user logs in or opens a new shell process. Each one of these files is a text file that needs to be edited at some point.
In this chapter, you learn how to use text editors. The primary focus will be on the vi/vim editor, but additional editors are also introduced.
After reading this chapter and completing the exercises, you will be able to do the following:
Edit text files using the vi editor.
Become familiar with additional text editors, such as Emacs, joe, and gedit.
The vi Editor
Consider the early days of Unix, the precursor to Linux: A user would sit down at a keyboard, ready to edit a program that she is working on. She stares at the printer (yes, printer, not monitor) considering what commands to execute. Monitors were very rare in the early 1970s, and even if a user had one, it was primarily designed to display the output of executed code, not to interactively edit files.
Instead, the user would use a simple command-based editor, like the ed editor. With this editor a user could perform operations such list the contents of a file (that is, print the file), modify specific characters of a file, or save the contents of a file. However, this was all accomplished in a way that may seem cumbersome today. The user would not see what she was editing, but rather just assumed the commands were successful (or she could print the file to verify).
When monitors became more commonplace, the ed editor seemed like a clumsy way to edit a text file. In the mid-1970s, a replacement editor named vi (short for visual) was introduced to Unix. It was a great improvement over the ed editor because you could actually see your document and move around the document as you edited it.
The vi editor is now a standard text editor for both Linux and Unix environments. Although it may not be as user friendly as other editors, it has a few important advantages:
• The vi editor (or vim, an improved version of the vi editor) is on every Linux distribution. This means if you know how to edit files with the vi editor, you can always edit a file regardless of which distribution you are working on.
• Because the vi editor is a command-line only editor, it does not require a graphical user interface (GUI). This is important because many Linux servers do not have a GUI installed, which means you cannot use GUI-based text editors.
• Once you understand vi, you will find it is an efficient editor, allowing you to edit files quickly compared to most other editors. This is because all commands are short and keyboard-based, so you do not waste time taking your hands off of the keyboard to use the mouse.
• The vi editor is very stable and has not changed much in the last 40+ years. You could take a cryogenically frozen user from the 1970s who used the vi editor, unfreeze her today, and she could edit files using a modern vi editor. Certainly features have been added to the vi editor since the 1970s, but the core functionality of vi does not change, making it very easy for you (or that cryogenically frozen user from the 1970s) to use throughout your career without having to “relearn” how newer versions work.
To edit a new file with the vi editor, you can just type the command with no arguments or type vi filename.
What Is vim?
The vim editor was released in 1991 as a clone of the vi editor. The vim editor has the same base functionality as the vi editor, but it has several additional features. Some of these features can be useful for software developers.
It is possible that your distribution only has the vi editor. Many distributions have both the vi and vim editors. On some distributions, the command vi is actually a link to the vim editor.
There is an easy way to tell if you are using the vi or vim editor. See the Text Support™ dialogue in Figure 4-1 to learn more.
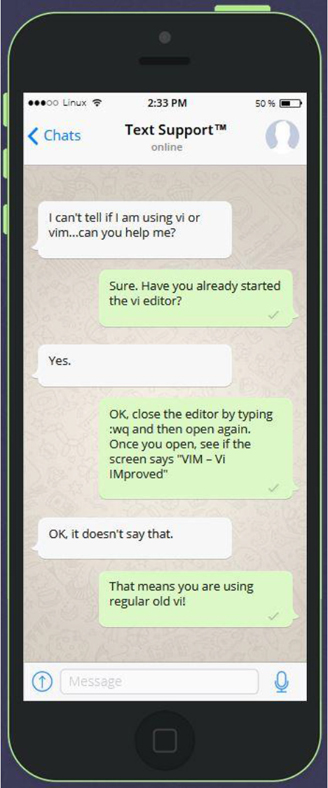
Figure 4-1 Text Support™: Which mode?
Note
Unless stated otherwise, the commands shown in this chapter will work both in the vi and vim editors. Any command that only works in vim will be denoted as such.
Security Highlight
Directly modifying system files can compromise the operating system if you make mistakes while editing the files. As a result, some utilities are designed to edit these files in a safer manner.
For example, in Chapter 6, “Managing Group Accounts,” and Chapter 7, “Managing User Accounts,” you will be introduced to user and group accounts. Information about these accounts is stored in a variety of text-based system files (such as /etc/passwd) that can be edited directly. However, it is safer to use commands like useradd and usermod to modify user accounts or groupadd and groupmod to modify group accounts. These tools will perform error-checking operations before modifying files, and they also often back up the previous version of the file.
Essential vi Commands
Becoming an expert vi user can take a lot of practice, but being able to effectively edit files requires the knowledge of a subset of the large amount of vi commands.
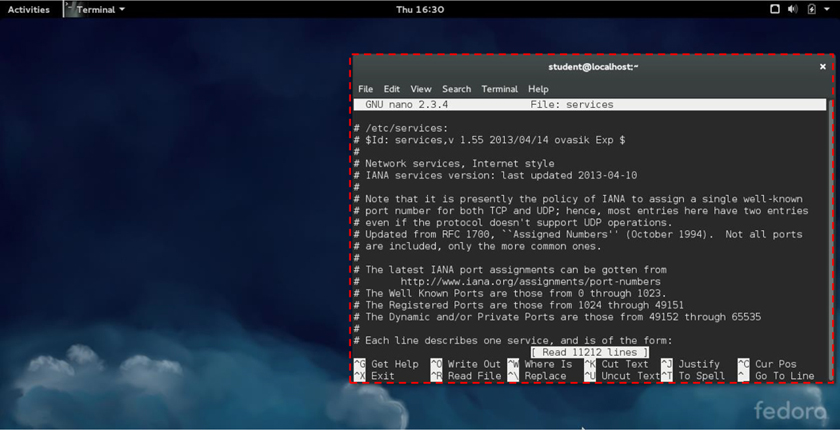
It helps to have a large file to edit. All Linux distributions should come with the /etc/services file, which is typically thousands of lines long. You can start by first copying this file to your home directory and then you can edit the copy with the vi command:
[student@onecoursesource.com ~]$ cp /etc/services .
[student@onecoursesource.com ~]$ vi services
Use Basic vi Modes
Because vi was designed to only use a keyboard, this poses a challenge because sometimes a specific key on the keyboard should execute a command and other times a key should represent a character to insert into the document. To allow the keys to perform different tasks, vi has three modes of operation:
Command mode: This mode is the default mode. When you open vi, you are placed in the command mode. Within this mode you can perform commands that can move around the screen, delete text, and paste text.
Insert mode: While you’re in insert mode, any key typed will appear in your document as new text. When you are finished adding new text, you can return to the default mode (the command mode) by pressing the Escape key. See the “Entering the Insert Mode” section in this chapter for details regarding how to get into the insert mode.
Last line mode: The last line mode, also called ex mode, allows you to perform more complex operations, such as saving a document to a file with a different name. To enter into last line mode from the command mode, press the : key. After you enter your command and press Enter, the command is executed and you are normally returned to the command mode. In some cases, you may need to press the Escape key to return to the command mode. Later sections will explore this mode in more detail.
Note
You cannot move from the insert mode to the last line mode, or vice versa. To move to the insert mode or the last line mode, you first must be in the command mode. Pressing the Escape key places you in the command mode.
See Figure 4-2 for a graphical representation of the three modes of vi.
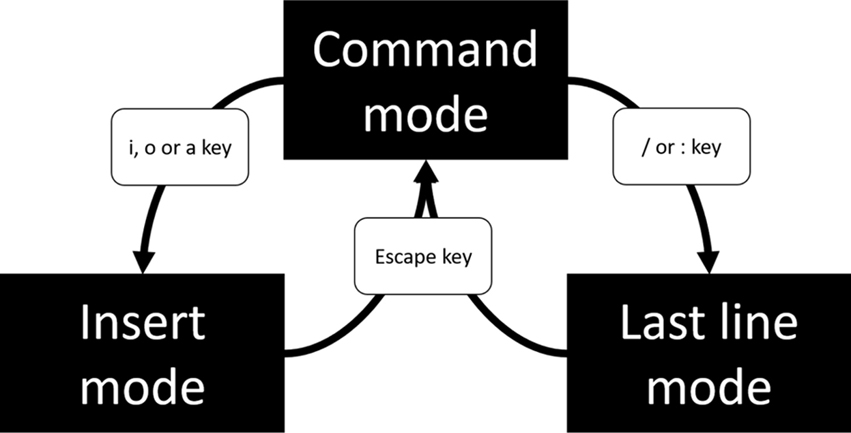
Figure 4-2 The Three Modes of the vi Editor
Entering the Insert Mode
When you first start the vi editor, you are placed in the command mode. This mode is designed to allow you to perform commands, such as navigating the text shown, copying text, and deleting text.
While in the command mode, you cannot insert new text into your document because all of the keyboard keys are assigned to command tasks. To insert new text, you must use the s command to move from command mode to insert mode. These commands include the following:
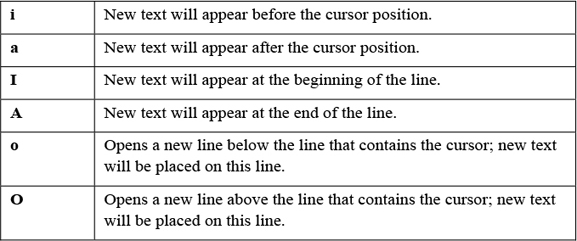
See Figure 4-3 for a visual depiction of how these vi commands work.
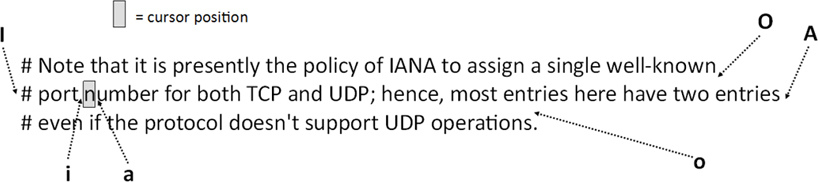
Figure 4-3 vi Commands to Enter Insert Mode
If you are working in a standard vi editor, then “-- INSERT --” does not appear at the bottom of the screen by default. To enable this feature in a standard vi editor, type the following command while in command mode:
:set showmode
When you want to return to the command mode, just press the Escape key. This is normally denoted in documentation as <ESC>. If you return to the command mode, then the “-- INSERT --” should disappear from the bottom of the screen.
Movement Commands
While you are in the command mode, you can move the cursor in your document by using a variety of keys. One of the common methods is to move the cursor one character to the left or right, or one line up or down. This can be done either using the arrow keys on your keyboard or using the h, j, k, and l keys, as shown in Figure 4-4.
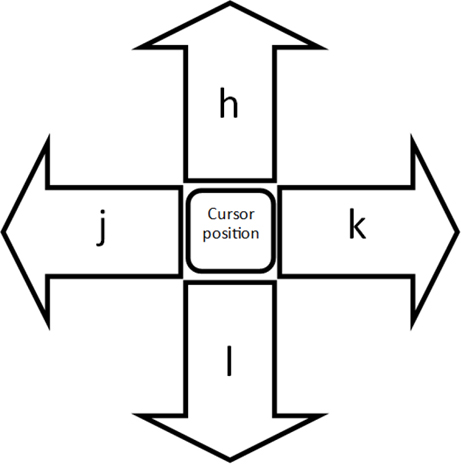
Figure 4-4 vi Movement Commands
There are many additional movement commands, including the following:
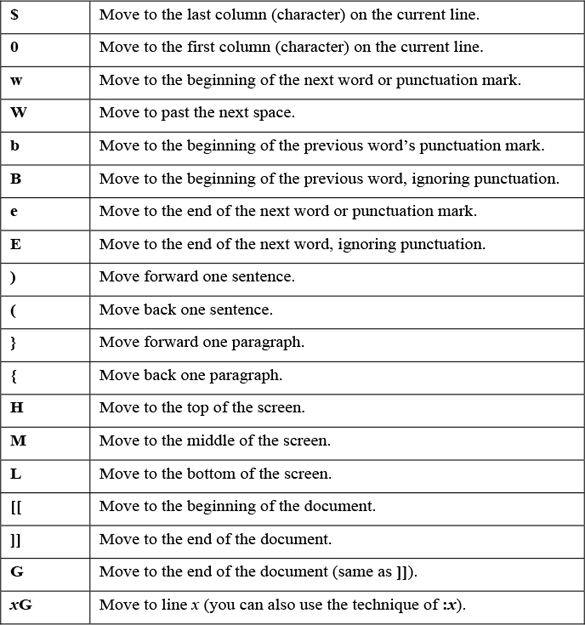
Note that these are just some of the movement commands. Spend some time trying out these movement commands and then create a “cheat sheet” of the commands you feel will be most useful when you edit. Make this a cheat sheet that you can add more commands to as you learn additional useful commands by making it a text document you save in your Linux system. You can also visit the “Vi lovers” page (http://thomer.com/vi/vi.html) and download one of the “reference cards” under the “Vi pages/manuals/tutorials” section.
Repeater Modifiers
In the previous section, you discovered that you can jump to a specific line in a document by typing a number followed by a G while you are in the command mode. For example, the command 7G will take you to line number 7 in the document.
Placing a number before a command acts as a modifier. Modifiers can be used on many different command-mode commands. Here are some examples:
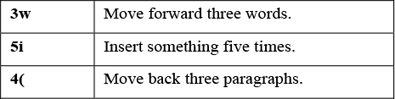
You can also use repeat modifiers on commands like deleting, copying, and pasting. Typically if there is a command-mode command that you would logically want to execute multiple times, then repeat modifiers should work with that command.
Are You Trying These Commands
Recall that we suggested you copy the /etc/services file to your home directory so you can try out the commands. Remember, if you get stuck in the insert mode, just press the <ESC> key to return to the command mode.
Don’t worry if you end up with an unreadable file. It is just a practice file, and you are about to learn how to correct mistakes.
Undoing
You can undo whatever change has been made to the document by tying the u character in the command mode. In the standard vi editor, you can only undo a single action; in fact, the u command acts as an undo/redo key.
If you are using the vim editor, you can undo several actions. Just keep pressing the u character and older modifications will be “undone.” You can perform a “redo,” which undoes the changes performed by the undo command, by using the ^r command (the Control key plus the r key).
Conversational Learning™ — Clearing Out Mistakes Quickly
Gary: Hi, Julia. I’m really stuck here. I think I typed a number before going into the insert mode in vi and when I pressed Escape to return to the command mode, a huge amount of text was duplicated in my document!
Julia: OK, there are a few possible solutions here. If you press the u character in the command mode, then it will undo the last operation.
Gary: But, then I lose all of my work.
Julia: Right, and I’m guessing you don’t want to input all of it again?
Gary: No way!
Julia: OK, so that means the second option won’t work either.
Gary: What was the second option?
Julia: Quit without saving anything. Let’s try another method. Scroll through your document. Let me know if there is any duplicate information.
Gary: OK… let’s see… yes! It looks like the same five pages or so are repeated over and over.
Julia: OK, can you get to where the first set of five pages ends? Then go down to the first line of the second set of five pages.
Gary: OK, I’m there.
Julia: Great, now to delete from the current line to the end of the document, type G$.
Gary: Oh, yes, that worked!
Julia: Excellent. Keep the other two techniques in your back pocket, as they may come in handy some other time.
Gary: Thanks again, Julia. You saved me a ton of work.
Julia: Any time, Gary.
Suppose you made a large number of changes since you opened the document and you want to discard all of them. In this case, you probably want to close the document without saving and then open it again. To close the document without saving changes, type the command :q! (: key, q key, and ! key). More on this command and other ways to quit the vi editor are presented later in this chapter.
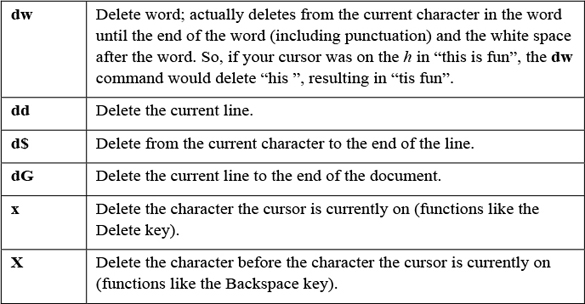
Copying, Deleting, and Pasting
The following is a summary of commonly used copying commands. Keep in mind, these should be executed while in command mode:
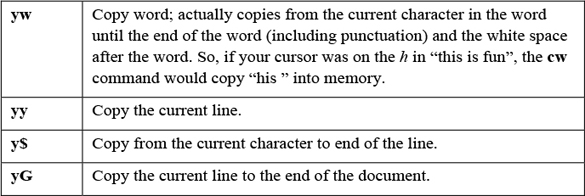
You may be wondering, why use the y character? This is because the process of copying text into the memory buffer used to be called “yanking.”
The following is a summary of commonly used commands for deleting. Keep in mind, these should be executed while in command mode.
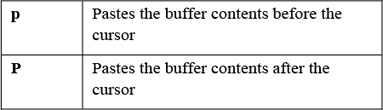
Pasting commands can be a bit trickier because how they work depends on what you are pasting. For example, suppose you had copied a word into the buffer. In this case, the following describes how the paste commands would work:
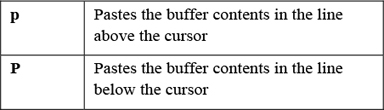
The behavior is a bit different if you copy an entire line (or multiple lines) into the buffer:
Are you wondering where the cut commands are, read the Text Support™ dialogue in Figure 4-5.
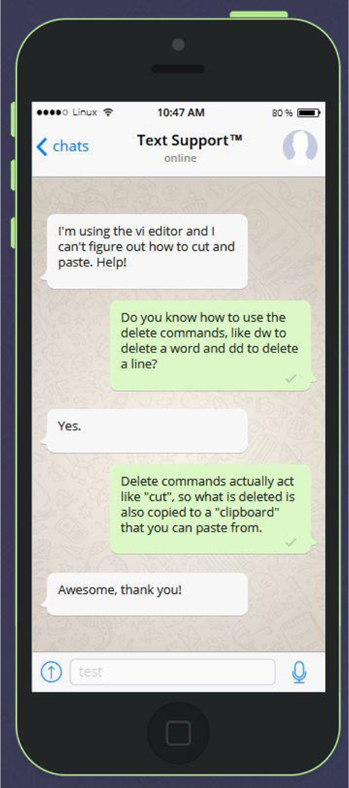
Figure 4-5 Text Support™ Cutting text in vi
Finding Text
Finding text is a critical function for a software developer who is using the vi editor because often error messages that appear when code is executed include bits of code from where the error occurred. You can find text by using one of the following methods:
• While in the command mode, type the / (slash) key and you will see this character appear in the bottom-left corner of the terminal window. Now type what you want to search for and then press <ENTER>. The vi editor will search forward in the document for the text you asked it to look for.
• While in the command mode, type the ? key and you will see this character appear in the bottom-left corner of the terminal window. Now type what you want to search for and then press <ENTER>. The vi editor will search backward in the document for the text you asked it to look for.
Suppose your search didn't find the specific match you were looking for. You can use the n command to find the next match. The n command will search forward when your last search started with the / key and will search backward when your last search started with the ? key.
What if you searched for “/one” and realize you will need to press the n key many times to find what you are looking for. After furiously typing n repeatedly, you realize you went past the match that you wanted. To reverse the current search, use the N character. When you’re searching forward, N will reverse the direction and search backward in the document. When you’re searching backward, N will reverse the direction and search forward in the document.
Case Sensitive
As with just about everything you use in Linux, the search function is case sensitive. In other words, a search of “/the” will not match the following line:
The end is near.
Find and Replace
To search for text and replace it with other text, use the following format:
:x,ys/pattern/replace/
The values of x and y represent the lines in the document upon which you will perform the search. For example, to perform a search and replace on only the first ten lines of the document, use the following syntax:
:1,10s/I/we/
You can use the $ character to represent the last line in the document:
:300,$s/I/we/
So, to perform the substitution on the entire document, use the following:
:1,$s/I/we/
By default, only the first match on each line is replaced. Imagine if the line you are searching for and replacing looks like the following:
The dog ate the dog food from the dog bowl
If the command :s/dog/cat/ was executed on the previous line, then the result would be the following:
The cat ate the dog food from the dog bowl
To replace all occurrences on a line, add a g at the end of the search command:
:s/dog/cat/g
You can think of g as standing for “get them all.” It actually stands for “global.”
Searching and replacing is case sensitive. Imagine if the line you are searching and replacing looks like the following:
The Dog ate the dog food from the dog bowl
If the command :s/dog/cat/ was executed on the previous line, then the result would be the following:
The Dog ate the cat food from the dog bowl
The result matched the second “dog” because the first one has a capital D. To perform a case-insensitive search-and-replace operation, add an i at the end of the search command:
:s/dog/cat/i
Saving and Quitting
In the previous section, you typed a colon (:) character to perform a search-and-replace operation. Complex commands are performed in the last line mode, also called the ex mode in honor of the ex editor. The : character takes you to the bottom of the screen where the command will be displayed as you type it.
Another operation you can perform in this mode is “save and quit” your document:
:wq
Note
You must save before quitting, so you cannot execute the command :qw, as that will attempt to quit and then save.
Security Highlight
Often users who are logged in as root will use :wq! to save and quit. This is sometimes necessary when directly modifying a system file that the root user doesn’t currently have the permissions to change. The ! character after :wq will force write changes to the file (effectively changing the permissions temporarily to writable, saving the changes, and then setting the permissions back to the original (See Chapter 9, “File Permissions,” for more details about permissions).
Unfortunately, :wq! becomes a bad habit for a lot of system administrators. By using this as your default save method, you may end up accidently modifying a key system file, potentially modifying a file that could cause the system to not function properly or make the system vulnerable. Avoid picking up this bad habit and use :wq by default and :wq! only as needed—and after thinking about it carefully.
You may want to just save but continue working:
:w
You can also save to a different document, but there’s a little “gotcha” to this operation. Suppose you want to save changes made to your services file into a file called myservices. Execute the following:
:s myservices
The changes will be placed into this file; however, any further changes will be saved by default into the original services file. Most modern editors “switch” the default save document to whatever the last saved document was, but vi doesn’t do this. To see your current document, type ^G (Control+g).
So, if you want to edit the new file, you should quit the vi editor and open the new file.
If you make changes to a file and then try to quit without saving (:q), you will receive an error message like the following:
E37: No write since last change (add ! to override)
To force-quit (quit without saving changes), execute the following command:
:q!
Expand Your vi Knowledge
Although we have covered many vi commands, we have only really just scratched the surface. The vi editor is a powerful tool with hundreds of commands. In addition, it provides some very advanced features, such as syntax highlighting, the ability to create macros, the ability to edit multiple files at the same time, and much more.
The vim editor has some useful built-in documentation, but you must have a specific software package installed in order to access this documentation. Installing software will be covered in greater detail in Chapter 26, “Red Hat-based software management,” and Chapter 27, “Debian-based software management.” For now, just make sure you are logged in as the root user and execute one of the following commands:
• On Red Hat, Fedora, and CentOS distributions, execute yum install vim-enhanced.
• On Debian, Ubuntu, and Mint distributions, execute apt-get install vim-enhanced.
Note
On Ubuntu and Mint, you could log in to the regular user account that was created during the installation and run the sudo apt-get install vim-enhanced command.
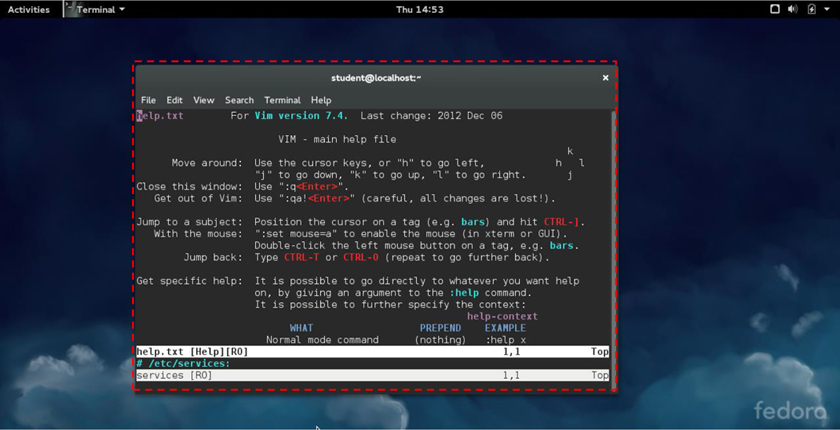
If the vim-enhanced package is installed, you can execute the command :help while in the vim editor and you will see a help document appear. See Figure 4-6 for an example.
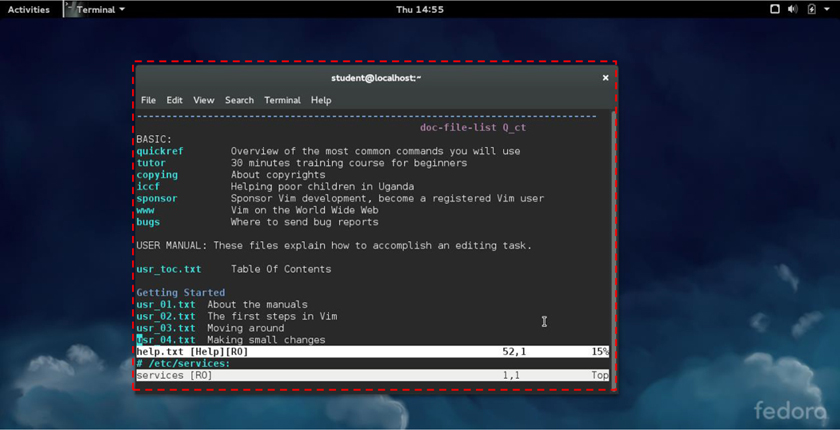
Use your arrow keys (or h, j, k, and l) to scroll through the document. About 20 lines down, you will start to see some subtopics, as shown in Figure 4-7.
Each of these topics, such as quickref or usr_01.txt, is a separate help topic. To view these topics, first exit from the current help document by typing the :q command. Then type a command like the following, replacing topic with the full name of the topic you want to view:
:help topic
For example, to see help on “Using syntax highlighting,” type the following command:
:help usr_06.txt
Additional Editors
There are a large number of editors that you can use in Linux. The focus of this section is to make you aware of these editors, not to teach you how to use each one. Note that it is likely not all of these editors will be installed on your distribution. You may need to install additional software packages to have access to additional editors.
Emacs
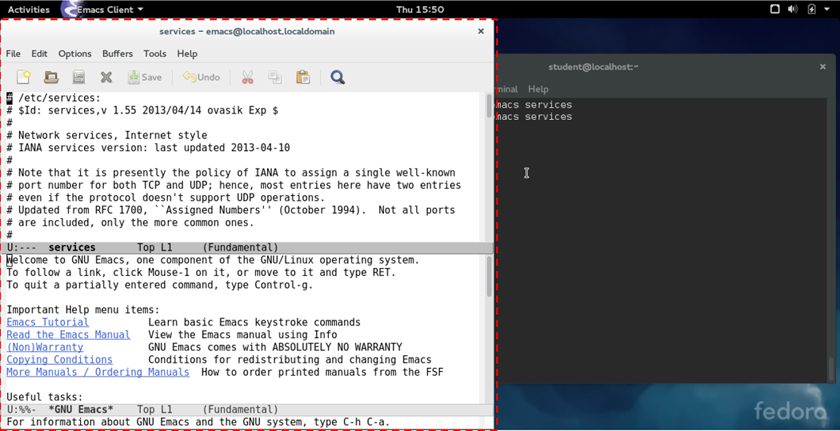
Like the vi editor, the Emacs editor was developed in the mid 1970s. Linux users who like Emacs will praise its ease of use and customization capability. If you launch Emacs (just run the emacs command) while in a GUI-based terminal, a GUI-based version of the program should open, as shown in Figure 4-8. As you can see, the GUI-based version has menus in addition to the commands that can be execute via the keyboard.
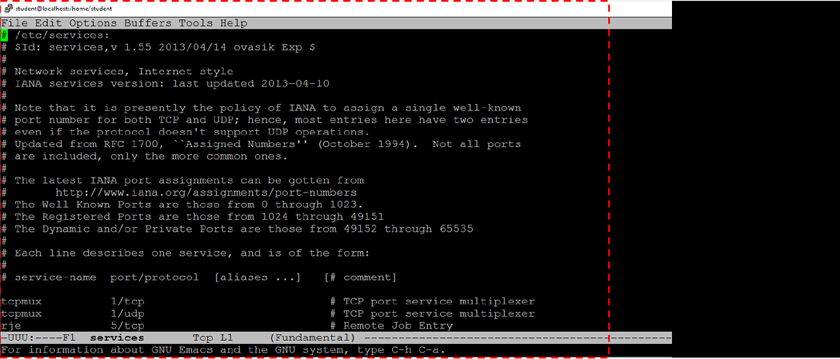
If you execute the Emacs editor in a command line-only environment, the editor will look like Figure 4-9.
GUI vim
If you install the vim-X11 software package, you will have access to a GUI-based version of the vim editor. Just execute gvim or vim -g.
gedit and kwrite
These editors are fairly standard GUI-based editors. If you are used to Notepad on Microsoft Windows, then you will find these editors fairly easy to use (although somewhat limited).
The gedit editor typically is installed on distributions that use the GNOME desktop by default. The kwrite (or KATE) editor typically is installed on distributions that use the KDE desktop by default. However, you can easily install gedit on a system that uses the KDE desktop or install kwrite on a GNOME desktop system.
nano and joe
The vi and Emacs editors are extremely powerful. In some cases, you may find that you want to use a simple editor in a command-line environment. The gedit and kwrite editors only work in GUI-based environments.
The nano and joe editors provide a simple interface for editing text files. These are command-line-only editors, so no GUI is required. See Figure 4-10 for an example of the nano editor.
lime and bluefish
The lime and bluefish editors take the process of editing a text file to the next level by providing tools and features that are really designed to help a developer create code. These tools provide features like syntax highlighting, insertion of code (by clicking a button), and automatic formatting (like automatically indenting code).
If you are going to make a career of coding on Linux, you should start to explore these tools (or many of the other similar editing tools). See Figure 4-11 for an example of the bluefish editor.
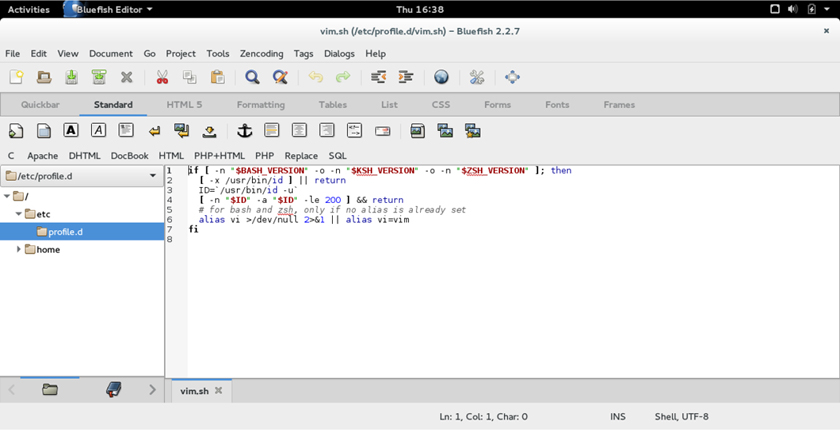
Figure 4-11 The bluefish Editor
Summary
With the large number of text files on a Linux system, it is important to know how to edit such files. In this chapter, you explored a variety of techniques to edit text files, including the vi editor, Emacs, gedit, and kwrite.
Key Terms
Review Questions
1. The _____ mode allows you to enter complex operations while working in the vi editor.
2. Which of the following command-mode commands does not place you in the inset mode?
a. a
b. e
c. i
d. 0
3. To use a repeat modifier, type a _____ before a vi command.
a. letter
b. space
c. number
d. special character
4. The _____ command will copy an entire line in the vi editor.
5. The _____ command will allow you to search for text forward from the current position while using the vi editor.