Table of Contents for
Linux Essentials for Cybersecurity, First Edition
 Linux Essentials for Cybersecurity, First Edition
Published by
Pearson IT Certification, 2018
Linux Essentials for Cybersecurity, First Edition
Published by
Pearson IT Certification, 2018
- Cover Page
- Title Page
- Copyright Page
- Contents at a Glance
- Table of Contents
- About the Author
- Dedication
- Acknowledgments
- About the Technical Reviewers
- We Want to Hear from You!
- Reader Services
- Introduction
- Part I: Introducing Linux
- Chapter 1: Distributions and Key Components
- Chapter 2: Working on the Command Line
- Chapter 3: Getting Help
- Chapter 4: Editing Files
- Chapter 5: When Things Go Wrong
- Part II: User and Group Accounts
- Chapter 6: Managing Group Accounts
- Chapter 7: Managing User Accounts
- Chapter 8: Develop an Account Security Policy
- Part III: File and Data Storage
- Chapter 9: File Permissions
- Chapter 10: Manage Local Storage: Essentials
- Chapter 11: Manage Local Storage: Advanced Features
- Chapter 12: Manage Network Storage
- Chapter 13: Develop a Storage Security Policy
- Part IV: Automation
- Chapter 14: Crontab and At
- Chapter 15: Scripting
- Chapter 16: Common Automation Tasks
- Chapter 17: Develop an Automation Security Policy
- Part V: Networking
- Chapter 18: Networking Basics
- Chapter 19: Network Configuration
- Chapter 20: Network Service Configuration: Essential Services
- Chapter 21: Network Service Configuration: Web Services
- Chapter 22: Connecting to Remote Systems
- Chapter 23: Develop a Network Security Policy
- Part VI: Process and Log Administration
- Chapter 24: Process Control
- Chapter 25: System Logging
- Part VII: Software Management
- Chapter 26: Red Hat–Based Software Management
- Chapter 27: Debian-Based Software Management
- Chapter 28: System Booting
- Chapter 29: Develop a Software Management Security Policy
- Part VIII: Security Tasks
- Chapter 30: Footprinting
- Chapter 31: Firewalls
- Chapter 32: Intrusion Detection
- Chapter 33: Additional Security Tasks
- Appendix A: Answers to Review Questions
- Appendix B: Resource Guide
- Glossary
Chapter 5 When Things Go Wrong
First, the bad news: Something is going to go wrong. Commands will fail, programs will crash, and configurations will have errors.
Now the good news: There are techniques to handle these problems. Troubleshooting is not just taking a “stab in the dark.” You should take specific steps when things go wrong in order to determine the problem and identify the best solution.
In this chapter, you learn the techniques and practices you should follow when things do not work out quite the way you were hoping. You also discover techniques that you can use as an administrator to inform users about system issues.
After reading this chapter and completing the exercises, you will be able to do the following:
Correctly use troubleshooting skills to diagnose system problems.
Notify users of system issues during login or while a user is logged in to the system.
The Science of Troubleshooting
Although troubleshooting may seem like some mystical art known only to those who agree to a code of secrecy, it is more a science for those who are routinely successful at solving problems. This science is not limited to Linux, as you can apply the methods provided here to problems on other operating systems and other areas of Information Technology, as well as to problems you face in life.
To begin with, here are the general steps you should take to troubleshoot a problem:
1. Gather all relevant information related the problem. This is an important step because we tend to want to solve problems quickly without researching the them completely. This can easily result a faulty conclusion, which in turn can further complicate the problem.
2. Determine what is the most likely cause of the problem. Again, avoid jumping to a conclusion about the first possible cause. Really consider what other conditions may have caused the problem and make an educated guess at the most likely cause.
3. Document the actions you plan to perform to solve the problem before taking any action. This is perhaps the most commonly overlooked step in this process, but it’s a critical one. If you document the actions you plan to take, it will be easier to undo anything that did not work correctly. Part of this step could also include making backup copies of critical files before modification.
4. Perform only the documented actions to solve the problem. Note the emphasis on the word only. Do not decided halfway through solving the problem to go off on a different tangent. If you decide your plan is not going to work, back track out of the solution (undo the steps to that point) and form a new plan of attack.
5. Determine if the problem has been correctly solved. This step may seem unnecessary to mention, but you will find that often you think you’ve solved a problem only to discover sometime in the future that you really did not. This is fairly common when you solve problems for others, like if you are a system administrator and attempt to solve a problem for another user.
6. If the problem is not correctly solved, use the documentation from Step 3 to get back to the state the system was in when you started this process. Then go back to Step 2 and perform Steps 2–5 again.
7. If the problem is solved, determine if any additional problems now exist as a result of the actions you took. This is a commonly overlooked step. For example, you may have modified a user account to provide specific access to a directory, but this modification results in the user not having access to other directories that the user previously had access to. You obviously cannot check everything, but think to yourself “what problems could this solution create?” before going on to the next step.
8. Store the documentation that you created, including the actions that did not solve the problem, using a technique that will be easy for you to retrieve in the future. We find that some problems crop up again and again, and our brains just are not adept at remembering the solutions we previously worked so hard at discovering. Create a troubleshooting log or handbook for yourself or your organization to make solving problems easier in the future. Also, keep in mind that your solution could cause more problems, which might not surface until sometime in the future. Having a log of what you did can make life a lot easier in the future.
9. Consider what you can do to prevent this problem from happening in the future. Be proactive, as it can save you time, increase productivity, and protect you (and others) from big headaches down the road.
Step 1: Gathering Information
To explore how you can gather information, consider this scenario. Suppose you tried to copy a file using the cp command, as was described in Chapter 2, “Working on the Command-Line.”
student@onecoursesource:~$ cp /etc/hosts
cp: missing destination file operand after '/etc/hosts'
Try 'cp --help' for more information.
Clearly the previous command failed, and you might be able to determine the reason fairly quickly. However, this is a demonstration of how to gather information when you encounter a problem. One technique is to read the actual message that appears after you attempt to execute the command: cp: missing destination file operand after '/etc/hosts'.
You could also try the suggestion for getting more information:
student@onecoursesource:~$ cp --help
Usage: cp [OPTION]... [-T] SOURCE DEST
  or:  cp [OPTION]... SOURCE... DIRECTORY
  or:  cp [OPTION]... -t DIRECTORY SOURCE...
Copy SOURCE to DEST, or multiple SOURCE(s) to DIRECTORY.

Mandatory arguments to long options are mandatory for short options too.
  -a, --archive                same as -dR --preserve=all
…
We shortened the output of this cp --help command because of its size, but the point is that this command provides more useful information. But, what if this is not enough information? Maybe you could try other commands on the file in question:
student@onecoursesource:~$ ls /etc/hosts
/etc/hosts
Although this was not the case in the previous example, additional errors could result and lead you to the problem.
As you read though this book, you will gather more tools to add to your troubleshooting toolkit. Be ready to develop a “cheat sheet” of commands and techniques that you can use to make troubleshooting easier.
Step 2: Determine the Likely Cause
For this step, if the cause is not clear, you should consider using other sources to point you in the right direction, including the following sources:
• Reading documentation, such as man and info pages
• Asking a coworker for their opinion
• Contacting your system administrator and asking for advice
• Researching your problem on Linux forum sites, like those mentioned in Chapter 3
• Perform Internet searches using information you have gathered, as demonstrated in Figure 5-1
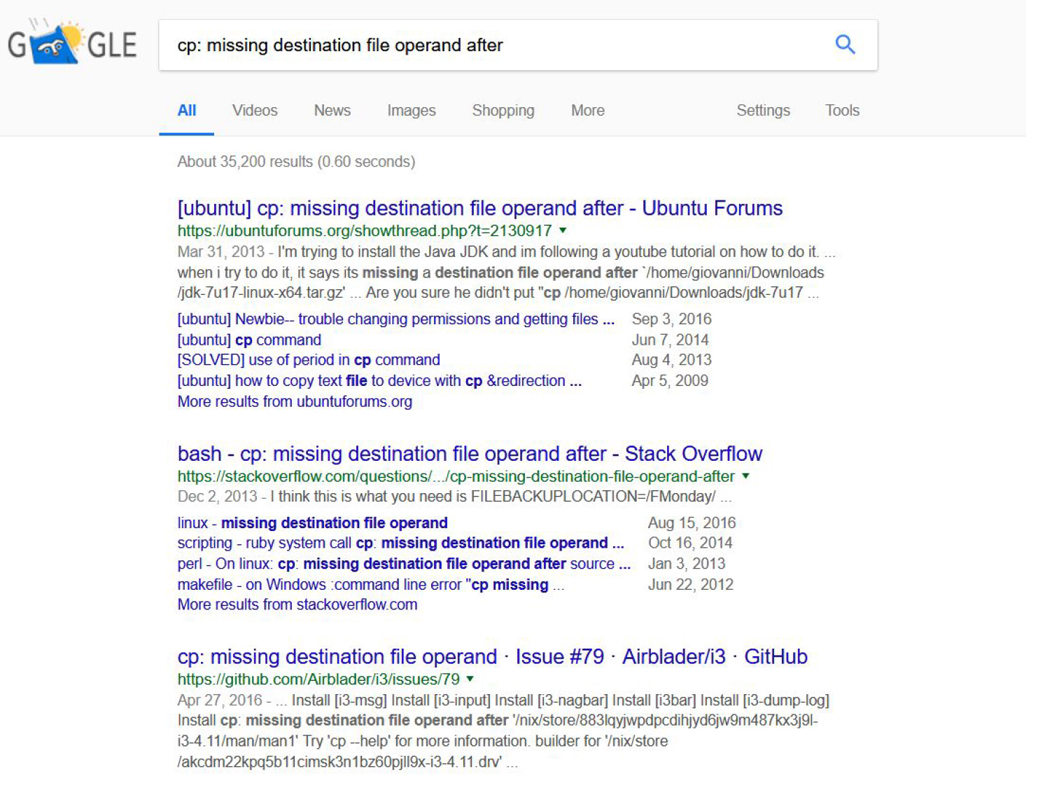
Figure 5-1 Performing an Internet Search
Note
If you plan on asking a coworker or system administrator for assistance, be ready to provide all the information you gathered in the first step so they can understand the problem and its context. Going to your system administrator or IT support staff and saying “I can’t copy a file” is not going to provide enough information to help solve your problem. The more details you gather, the more likely your problem will be solved quickly.
Step 3: Document Your Plan of Attack (POA)
Granted, many problems will not require detailed documentation, but as you learn more complex topics in Linux, you will discover the solutions themselves become more complex. Get in the habit of documenting a POA now because it will be more difficult to pick up this habit in the future.
Consider the following when planning how you will perform the documentation step:
• How can I make the process easy?
• How can I ensure the documentation will be easy to retrieve and reference? (Scrap pieces of paper are a very bad idea.)
• What tools are available? Consider file sharing tools like Google Docs and Dropbox. For an organization, you might consider a tool designed specifically for tracking issues, like Bugzilla (www.bugzilla.org).
Step 4: Perform the Actions
This may seem like an easy step, but you should take into account a few things. First, do not just perform the actions to solve the problem blindly. If you are performing 10 steps, for example, stop after every step and evaluate. Ask yourself the following questions:
• Did that work correctly?
• Did I make any typos?
• Did I get the output that I expected?
• Does something else seem amiss?
This should not require a long, complicated, soul-searching observation on your part—just a momentary sanity check to make sure your solution is on the right track.
Steps 5 & 6: Is the Problem Solved?
Identifying whether the issue is solved is perhaps the easiest step in most cases. Is the problem you were having still an issue? Remember, if it is, you need to undo what you did in the previous step because those actions could further confuse the situation or create even more problems.
Step 7: Are There Other Problems?
In some cases, this step is not required. Recall the issue in a previous example:
student@onecoursesource:~$ cp /etc/hosts
cp: missing destination file operand after '/etc/hosts'
Try 'cp --help' for more information.
The problem was that the cp command requires two arguments—a file to copy and where to put the copy:
student@onecoursesource:~$ cp /etc/hosts /tmp
student@onecoursesource:~$
This solution is unlikely to cause any other problems (unless, of course, you copied the file to the wrong directory). However, as problems and solutions become more complex, you should take more time to ensure no other problems arise as a result of your solution. It is hard to provide an actual example so early in this book, but consider the following scenario: Years ago one of the authors of this book was a young system administrator who was approached by a user who could not log in to a system. This system admin quickly determined the problem was a setting in one of the configuration files for users (the /etc/shadow file, to be precise, which will be covered later in Chapter 7, “Managing User Accounts”). A quick edit of this file solved the problem.
However, this quick solution had an unintended side effect: All of the other users who had accounts on the system could no longer log in to the system. The quick fix ended up causing a much bigger problem. To make matters worse, this young, brash administrator did not document the actions that he took, so other administrators had no idea what caused this problem.
It is not always possible to anticipate all potential problems that a solution may create, but it does not hurt to probe around the edges of the solution, looking for other potential problems that may have cropped up.
Step 8: Store the Documentation
This step is very similar to Step 3 and was covered previously.
Step 9: Prevent Future Problems
It is highly likely that the same problems are going to occur multiple times, possibly to multiple people. One way to prevent future problems is to be proactive in notifying others. This is typically the job of the system administrator, who can either send messages (email, text, and so on) or display messages when users log in to the system. This is the focus of the next topic of this chapter.
Notifying Users
It is important to ensure that users are kept up to date regarding changes in the network or system. Linux has several methods to automate notifying users of this sort of information.
Pre- and Post-login Messages
You may have hundreds of systems in your environment, making it difficult to tell every user useful information such as what each system is designed for, the distribution on each system, and what system they should use. This sort of information can be provided on a system-by-system basis by creating messages that appear either prior to the login process or after the login process.
Consider carefully what information you want to display. Too much information and you risk users only reading a small portion. Too little, and you risk not providing enough information.
The /etc/issue File
Suppose that one day you decide to work on your web server, a system that has no GUI interface. You sit down at the server and are presented with a login screen similar to the one in Figure 5-2.
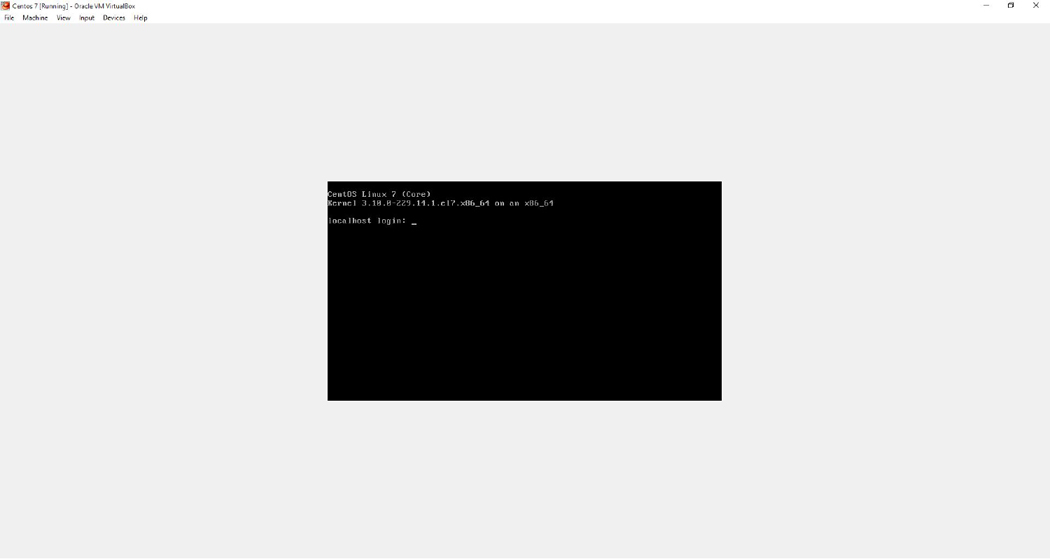
Figure 5-2 Typical Command-Line Login Screen
You begin to wonder why it says the OS name and the kernel version before the prompt. Or, perhaps more important, you wonder how you can change that.
The message that you see comes from the /etc/issue file:
[root@onecoursesource ~]# more /etc/issue
\S
Kernel \r on an \m
As you can probably guess, the values of \S, \r, and \m are translated into something else before being displayed on the login screen. The special values you can place in this file are described in Table 5-1.
Table 5-1 Special Values for the /etc/issue File
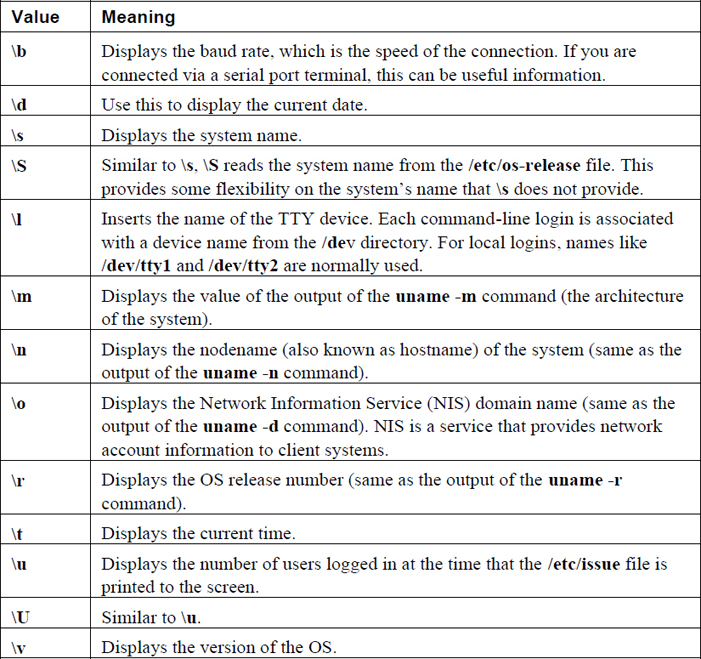
Note that these special values are actually used by a process called agetty. The agetty command is what provides the login prompt.
The /etc/issue file can also be used to provide additional information, such as warning messages regarding the use of the system. Note the changes made to the following /etc/issue file and then look at Figure 5-3 to see the result of these changes.
[root@onecoursesource ~]# more /etc/issue
\S
Kernel \r on an \m

Running on terminal \1

Platform: \m

Note: Secure system - No unauthorized access!  All activity is closely monitored
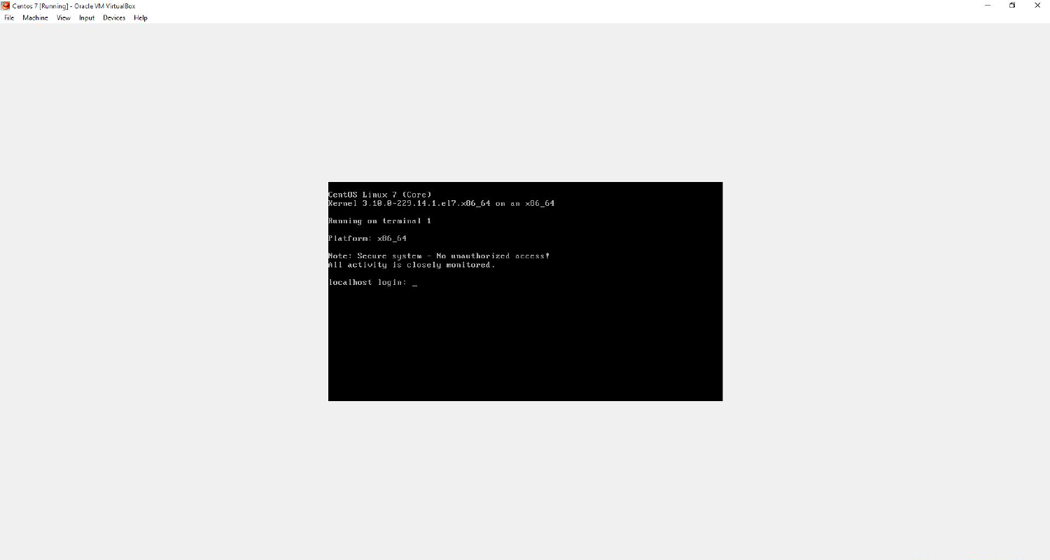
Figure 5-3 Customized Command Line-Login Screen
To test changes in the /etc/issue file, you need to be able to log in via the command line. Most likely you have been logging in via a GUI on your practice system. You should be able to access a command-line login by holding down the Ctrl and Alt keys on your keyboard and pressing the F2 key (or F3, F4, and so on).
To see changes in the /etc/issue file, log in via the command line and then log off. The new /etc/issue display should appear when the login screen is displayed.
To return to the GUI, either use Ctrl+Alt+F1 or Ctrl+Alt+F7 (one of those should work). Typically F2 through F5 are command-line logins. Either F1 or F7 is normally a GUI display (the one that is not the GUI should be another command-line login).
The /etc/issue.net File
The /etc/issue file is only displayed when a user logs in via a local command-line login. If a user logs in from a remote system, you can display a message by placing information in the /etc/issue.net file. Originally this was designed to display a message to a user logging in via telnet, but telnet is largely a dinosaur, having been replaced by the more secure SSH service.
However, you should know that SSH servers do not display the contents of the /etc/issue.net file by default. To make the contents of this file appear when an SSH connection starts, you should modify the Banner setting in the /etc/ssh/sshd_config file. By default this setting looks like this:
[root@onecoursesource ~]# grep Banner /etc/ssh/sshd_config
#Banner none
Display the contents of the /etc/issue.net file by making the following change (be certain to restart the sshd daemon after you modify this file; this is covered in Chapter 28, “System Booting,” and can vary based on distribution):
[root@onecoursesource ~]# grep Banner /etc/ssh/sshd_config
Banner /etc/issue.net
The contents of the /etc/issue.net file are similar to the /etc/issue file:
[root@onecoursesource ~]# more /etc/issue.net
\S
Kernel \r on an \m
The special character sequences work well when connecting via telnet (except for \S, it appears):
[root@onecoursesource ~]# telnet onecoursesource
Trying ::1...
Connected to onecoursesource .
Escape character is '^]'.

Kernel 3.10.0-229.14.1.el7.x86_64 on an x86_64
onecoursesource  login:
However, these character sequences have no special meaning to the Secure Shell server:
[root@onecoursesource ~]# ssh onecoursesource
\S
Kernel \r on an \m
root@onecoursesource 's password:
Unless you are actually allowing telnet connections, you probably want to change the /etc/issue.net file so it contains no special character sequences. If you are allowing both telnet and SSH connections, keep the special character sequences in the /etc/issue.net file and change the Banner setting in /etc/ssh/sshd_config to point to another location:
[root@onecoursesource ~]# grep Banner /etc/ssh/sshd_config
Banner /etc/ssh.banner
Security Highlight
It is actually considered a bad idea to provide system information via a pre-login message on remote connections. Someone probing your system might be able to use that information to gain unauthorized access.
For example, suppose your banner includes information about the kernel version or the distribution. Someone attempting to gain unauthorized access to your system might know of some exploits that work on that kernel version or that specific distribution.
Ask yourself why providing this information before login is important. If you do not have a good reason, do not display the information.
Some administrators have a serious-sounding warning with the intent to scare someone off. Such a warning is likely to backfire because it is like saying “something really good is on this system”—not the sort of message you want to send out to potential bad guys.
Noting that the system is proprietary and contains confidential information is usually sufficient.
You should also consider not allowing telnet connections because of security issues. All telnet-related data is sent in plain text, including the user’s name and password.
Additional Pre-login Messages
Administrators often use the /etc/issue and /etc/issue.net files to display pre-login messages. These files are useful to display pre-login messages when the user is logging in via the local command line, via telnet, and (if configured correctly) via SSH. However, there are other ways that you can access the system, such as via FTP (File Transfer Protocol) and GUI-based login:
FTP: This can depend on your FTP server. Many distributions use the vsftpd server; its configuration file is the /etc/vsftpd/vsftpd.conf file. You can change the ftpd_banner setting to specify a banner (just provide the banner as a value: ftpd_banner=<insert_message_here>) or have a file displayed by changing the banner_file setting.
GUI (gdm): If you are using GDM as your GUI login manager (GDM=Gnome display manager), then either modify the /etc/gdm/custom.conf file (for Red Hat–based systems) or the /etc/gdm/gdm.conf-custom file (for Debian-based systems). For Red Hat–based systems, you may need to add the line Greeter=/usr/libexec/gdmlogin in the [daemon] section. For all distributions, search for the [greeter] section and make the following changes:
DefaultWelcome=false
Welcome=Message for local users
RemoteWelcome=Message for remote login users
Note
Additional GUI display mangers (also known as login managers) have similar approaches to GDM. It is just a matter of finding the configuration file and determining the correct settings. Often this feature is called a banner or a greeter, so use those terms when searching documentation.
The /etc/motd File
The techniques discussed in this chapter so far are all designed to display a message prior to the login process. However, after a user has properly logged in, you may want to display a different sort of message. This can be accomplished by editing the /etc/motd file. (The motd stands for “message of the day.”)
The following gives you some ideas of what you might want to place in the /etc/motd file:
• A friendly welcome message: Let users know you are happy they are here. Seriously, you have no idea how many regular users, especially newbies, are intimidated by logging in to a Linux machine. Offer some friendly advice, provide some helpful resources (like the tech support or help desk information), and let users know they are not alone.
• A “don’t you dare” warning message: Okay, we know this sounds like the opposite of the previous suggestion. However, on your mission-critical servers, you do not want to be all nice and happy. Make sure users know how closely this server is monitored. Let them know that if they break the rules, the results will be severe.
• Upcoming changes: If you are planning on bringing down this system for maintenance next Tuesday, make note of it in the /etc/motd file. If you are adding new software in the coming weeks, indicate that with a notice in the /etc/motd file.
• Purpose of the system: If this is your web server, why not make that clear when the user logs in? Users should know what sort of system they are working on to, and the /etc/motd file is a great place to make this clear. You can only imagine how many times system administrators have heard “Oh, I didn’t know that was our mail server!” when the user is asked “Why did you run this CPU-intensive program on that system?”
These are just a few ideas of what you can place in the /etc/motd file. You can pass on many other useful bits of information to users by placing this information in the /etc/motd file. (Note: The /etc/motd file is empty by default on most distributions.)
To see an example of the /etc/motd file, first look at the output of the following command and then look at the output shown in Figure 5-4:
[root@onecoursesource ssh]# more /etc/motd
Note: This system will be down for maintenance on Friday from 10PM to 10:30PM.
During this time you will not be able to log in and any cron jobs that you
have will not be executed. See Julia if you have any questions.
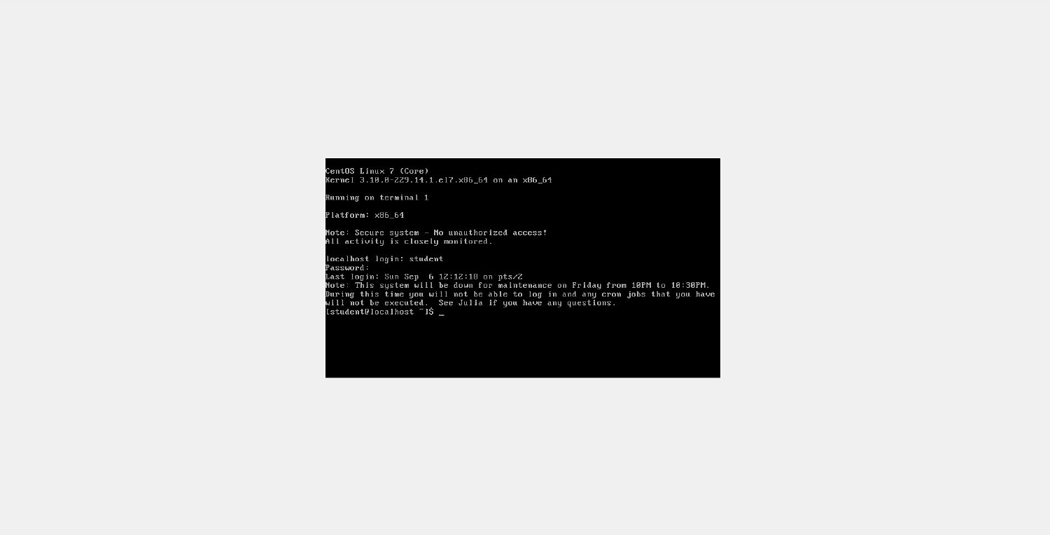
Figure 5-4 Customized Command-Line Login Screen
Broadcasting Messages
The /etc/issue, /etc/issue.net, and /etc/motd files are great for providing useful information during the login process. But what if you have 10 users on the system right now and you need to send them an urgent message. This section focuses on techniques to communicate with users who are currently logged in to the system.
The wall Command
Sometimes you may need to send a message to all users who are currently logged in to the system. The wall command provides you with the ability to broadcast a message to every user’s terminal. An example of the wall command follows:
[root@onecoursesource ~]# wall shutting down in five minutes
Broadcast message from root@onecoursesource (pts/3) (Sun Oct 25 12:44:33 2019):

shutting down in five minutes
Note
The wall message is limited to a total of 20 lines.
To avoid displaying the banner at the top of the message, use the -n option when executing the wall command. The banner is the following part of the message:
Broadcast message from root@onecoursesource (pts/3) (Sun Oct 25 12:44:33 2019):
On many distributions, regular users are also allowed to use the wall command. In some cases this can become annoying:
[student@onecoursesource ~]$ wall today is my birthday!
Broadcast message from student@onecoursesource (pts/3) (Sun Oct 25 12:52:36 2019):

today is my birthday!
All users can use the wall command because it is an SGID program. This is a permission set that will be covered in detail in Chapter 9, “File Permissions.” The “s” character in the following output indicates this is an SGID program:
[root@onecoursesource ~]# ls -l /usr/bin/wall
-r-xr-sr-x. 1 root tty 15344 Jun  9  2019 /usr/bin/wall
All the terminal devices (/dev/tty1, /dev/tty2, /dev/pts/0, and so on) are group-owned by the tty group. The tty group has write access to these files, so when the wall command runs as the tty group, it can write information to these terminal devices directly. To disable regular users’ ability to send wall messages, just take away the SGID permission set:
[root@onecoursesource ~]# ls -l /usr/bin/wall
-r-xr-sr-x. 1 root tty 15344 Jun  9  2019 /usr/bin/wall
[root@onecoursesource ~]# chmod g-s /usr/bin/wall
[root@onecoursesource ~]# ls -l /usr/bin/wall
-r-xr-xr-x. 1 root tty 15344 Jun  9  2019 /usr/bin/wall
[root@onecoursesource ~]# su - student
Last login: Sun Oct 25 12:51:36 PDT 2018 on pts/3
[student@onecoursesource  ~]$ wall today is my birthday!
No error message is displayed to the regular user, but the wall command does not send messages to any user accounts.
It is possible for a user to disable wall messages to a specific terminal. This is something that you may want to do if you are editing a file, reading a man page, or performing some critical task. The wall message will not mess up your work, but it does cause confusion to have a bunch of text appear on your screen when you are trying to edit a file (see Figure 5-5 for an example).
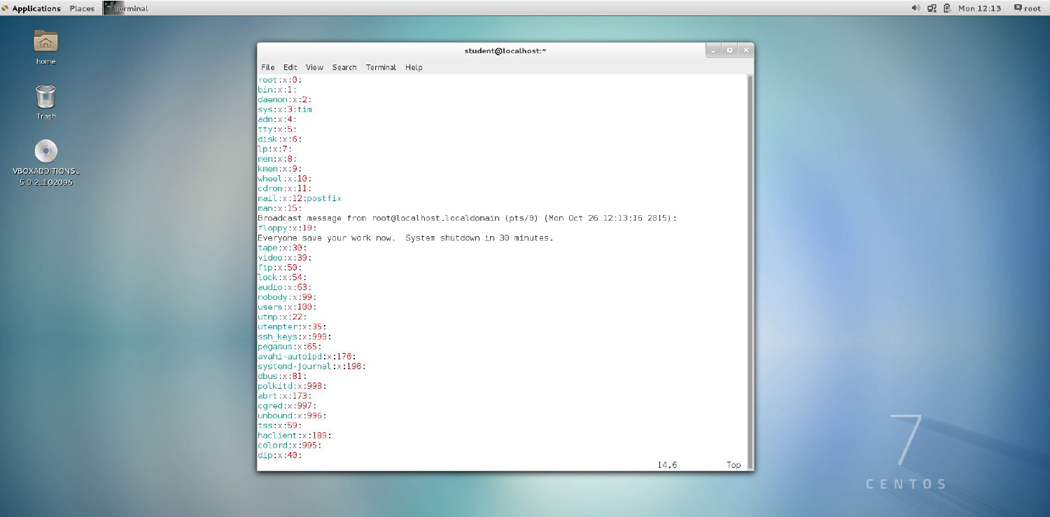
Figure 5-5 Annoying wall Message
To ignore a wall message in a specific terminal, set your mesg value to “no” by executing the following command:
[root@onecoursesource ~]# mesg n
[root@onecoursesource ~]# mesg
is n
You can always change the value back to “yes” at a later point. Remember to do so because critical information about forced shutdowns or reboots will be missed:
[root@onecoursesource ~]# mesg y
[root@onecoursesource ~]# mesg
is y
The shutdown Command
If the purpose for sending users a broadcast message is that you need to bring the system down, consider using the shutdown command. The syntax of the shutdown command is
shutdown [OPTIONS...] [TIME] [WALL...]
The [WALL…] is the broadcast message that you want to send to everyone. Of course, you want to provide the users time to save their work and log off the system, so you can use the [TIME] value to specify how long to wait before actually shutting down the system:
shutdown +5 "system shutdown
The value of +5 tells the shutdown command to wait 5 minutes before actually shutting down. The message displayed to all users is similar to the following:
Broadcast message from root@onecoursesource (Sun 2019-02-11 13:20:09 PDT):

shutting down
The system is going down for power-off at Sun 2019-02-1113:25:09 PDT!
This message will be continuously displayed at regular intervals (5 minutes before shutdown, 3 minutes before, and so on). If you start the shutdown earlier (for example, shutdown +60), then users can continue to log in. However, 5 minutes before the shutdown is to occur, user logins are disabled because the shutdown command creates the /run/nologin file, which prevents additional login attempts.
As the administrator, you can cancel a pending shutdown by using the shutdown -c command:
[student@onecoursesource  ~]$ shutdown -c

Broadcast message from root@onecoursesource (Sun 2019-02-1113:23:32 PDT):

The system shutdown has been cancelled at 2019-02-1113:24:32 PDT!
Here are a few additional useful options:
• -r: Reboot rather than shut down.
• -h: Halt the system (may be the same as a shutdown, depending on your distribution).
• -k: Do not actually shut down; just send a wall message saying the system is shutting down.
Summary
The focus of this chapter was to learn techniques to troubleshoot problems that can arise while working on a Linux distribution. You also learned how to send messages to users, either as they log in or while they are logged in, in order to provide them with important information about the system.
Review Questions
1. The /etc/_____ file is displayed prior to local command-line login attempts.
2. The /etc/_____ file is displayed prior to telnet login attempts.
3. The /etc/_____ file is displayed after a successful login.
4. The _____ command will display a message to all users currently logged in to the system. (Choose two.)
a. wall
b. mesg
c. send
d. shutdown
5. The _____ option to the shutdown command is used to cancel a shutdown operation.