Table of Contents for
Linux Essentials for Cybersecurity, First Edition
 Linux Essentials for Cybersecurity, First Edition
Published by
Pearson IT Certification, 2018
Linux Essentials for Cybersecurity, First Edition
Published by
Pearson IT Certification, 2018
- Cover Page
- Title Page
- Copyright Page
- Contents at a Glance
- Table of Contents
- About the Author
- Dedication
- Acknowledgments
- About the Technical Reviewers
- We Want to Hear from You!
- Reader Services
- Introduction
- Part I: Introducing Linux
- Chapter 1: Distributions and Key Components
- Chapter 2: Working on the Command Line
- Chapter 3: Getting Help
- Chapter 4: Editing Files
- Chapter 5: When Things Go Wrong
- Part II: User and Group Accounts
- Chapter 6: Managing Group Accounts
- Chapter 7: Managing User Accounts
- Chapter 8: Develop an Account Security Policy
- Part III: File and Data Storage
- Chapter 9: File Permissions
- Chapter 10: Manage Local Storage: Essentials
- Chapter 11: Manage Local Storage: Advanced Features
- Chapter 12: Manage Network Storage
- Chapter 13: Develop a Storage Security Policy
- Part IV: Automation
- Chapter 14: Crontab and At
- Chapter 15: Scripting
- Chapter 16: Common Automation Tasks
- Chapter 17: Develop an Automation Security Policy
- Part V: Networking
- Chapter 18: Networking Basics
- Chapter 19: Network Configuration
- Chapter 20: Network Service Configuration: Essential Services
- Chapter 21: Network Service Configuration: Web Services
- Chapter 22: Connecting to Remote Systems
- Chapter 23: Develop a Network Security Policy
- Part VI: Process and Log Administration
- Chapter 24: Process Control
- Chapter 25: System Logging
- Part VII: Software Management
- Chapter 26: Red Hat–Based Software Management
- Chapter 27: Debian-Based Software Management
- Chapter 28: System Booting
- Chapter 29: Develop a Software Management Security Policy
- Part VIII: Security Tasks
- Chapter 30: Footprinting
- Chapter 31: Firewalls
- Chapter 32: Intrusion Detection
- Chapter 33: Additional Security Tasks
- Appendix A: Answers to Review Questions
- Appendix B: Resource Guide
- Glossary
Chapter 11 Manage Local Storage: Advanced Features
The focus of this chapter is managing advanced local storage device features. The first part of this chapter covers encrypting filesystems so you can secure mobile devices.
Next, the feature of autofs is explored. This feature allows you to automatically make devices appear in the directory structure when a user moves into a specific directory. This feature is useful for both local and remote storage devices. Remote storage devices are covered in Chapter 12 “Manage Network Storage.”
Lastly, you learn the basics of logical volume management, a replacement for traditional partitions.
After reading this chapter and completing the exercises, you will be able to do the following:
Create and mount encrypted filesystems
Manage autofs
Manage logical volumes
Set up disk quotas
Manage hard and soft links
Encrypted Filesystems
You may have used software such as the GnuPG to encrypt files. This technology, called file level encryption, is designed to encrypt specific files, normally to ensure they are securely transported. The purpose of encrypting filesystems is similar, but is normally performed for a different reason.
Consider a situation in which you need to transfer thousands of files to another individual on a USB thumb drive. Encrypting each file individually would be a tedious process (as would the decryption process). Encrypting the entire filesystem provides just as much of a security advantage (in fact, more advantages) as encrypting individual files.
How is encrypting the entire filesystem better than encrypting individual files? Consider that when you encrypt a single file, some of the file data (ownership, permissions, timestamps, and so on) is still visible to a potential threat. If you encrypt the entire filesystem, these details wouldn’t be available unless the filesystem was decrypted.
Additionally, if your laptop contains sensitive data, encrypting the filesystems could prevent unauthorized access in the event that your laptop is lost or stolen.
An important technology you want to be aware of when it comes to Linux filesystem encryption is the specification LUKS (Linux Unified Key Setup). When we say that LUKS is a specification, we mean that it describes how filesystems are to be encrypted on Linux. It does not provide any software, and it is not an official standard (although specifications are commonly referred to as “unofficial standards”).
Because it is a specification, LUKS does not force you to use any one specific software tool to encrypt a filesystem. Different tools are available, but for the purposes of this book, we will demonstrate a kernel-based implementation called DMCrypt.
DMCrypt is a kernel module that allows the kernel to understand encrypted filesystems. In addition to the DMCrypt module, you should be aware of two commands you can use to create and mount an encrypted filesystem: the cryptsetup and cryptmount commands. Note that you would only use one of the two commands (most likely the cryptsetup command) to configure an encrypted filesystem.
The following steps demonstrate how to create a new encrypted filesystem using the cryptsetup command. To begin, you may need to load some kernel modules (see Chapter 28, “System Booting,” for details regarding the modprobe command):
[root@onecoursesource ~]# modprobe dm-crypt
[root@onecoursesource ~]# modprobe aes
[root@onecoursesource ~]# modprobe sha256
Next, create a LUKS-formatted password on a new partition. Note that if you are using an existing partition, you first need to back up all data and unmount the partition. The following command overrides data on the /dev/sda3 partition:
[root@onecoursesource ~]# cryptsetup --verbose --verify-passphraseluksFormat /dev/sda3 WARNING! ======== This will overwrite data on /dev/sda3 irrevocably. Are you sure? (Type uppercase yes): YES Enter passphrase: Verify passphrase: Command successful.
Notice from the previous output of the cryptsetup command that you are prompted to provide a passphrase (a string of characters such as a sentence or simple phrase). This passphrase will be needed to decrypt the filesystem whenever you need to mount the filesystem.
Next, you need to run a command to create a new encrypted device file. The following creates a file called /dev/mapper/data, which is used later to mount the encrypted filesystem. The passphrase you type must match the one you created by the previous cryptsetup command.
[root@onecoursesource ~]# cryptsetup luksOpen /dev/sda3 data
Enter passphrase for /dev/sda3:
Now that the filesystem is open (you can think of this as “unlocked” or “decrypted”), create a filesystem on the new device, as shown in Example 11-1.
Example 11-1 Creating a Filesystem
[root@onecoursesource ~]# mkfs -t ext4 /dev/mapper/data
mke2fs 1.42.9 (28-Dec-2013)
Filesystem label=
OS type: Linux
Block size=4096 (log=2)
Fragment size=4096 (log=2)
Stride=0 blocks, Stripe width=0 blocks
34480 inodes, 137728 blocks
6886 blocks (5.00%) reserved for the super user
First data block=0
Maximum filesystem blocks=142606336
5 block groups
32768 blocks per group, 32768 fragments per group
6896 inodes per group
Superblock backups stored on blocks:
    32768, 98304
Allocating group tables: done
Writing inode tables: done
Creating journal (4096 blocks): done
Writing superblocks and filesystem accounting information: done
Notice in the previous command that the device /dev/mapper/data was used as the device to create the filesystem on. It is very important that you not create the filesystem on the partition (/dev/sda3 in this example).
Create the mount point directory and entries in the /etc/crypttab and /etc/fstab files. The /etc/crypttab file matches the new /dev/mapper/data device with the /dev/sda3 partition. This association is used by the system during the boot process to mount /dev/mapper/data under the /data directory.
[root@onecoursesource ~]# mkdir /data
[root@onecoursesource ~]# echo "data /dev/sda3 none" >> /etc/crypttab
[root@onecoursesource ~]# echo "/dev/mapper/data /data ext4 defaults 1 2" >> /etc/fstab
Each time you boot the system, you are prompted for the passphrase to mount the /dev/mapper/data device. See Figure 11-1 for an example.
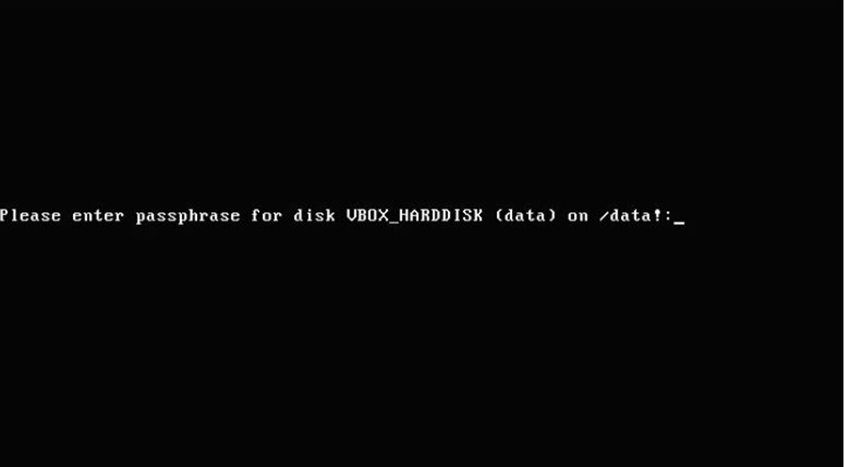
Figure 11-1 Prompting for Password During Boot
It is possible to automate this process by changing none in the /etc/crypttab file to a setting that provides the password, but that defeats the reason why you encrypted the filesystem in the first place.
Managing autofs
The purpose of autofs is to have filesystems automatically mounted when a user (or any process) accesses the mount point. After the mount point has not been used for a period of time, the filesystem is automatically unmounted.
The starting point of autofs is the /etc/auto.master file, which allows you to specify what to mount when a mount point is accessed. Typically your distribution will already have an /etc/auto.master file, but its exact contents may vary slightly from one distribution to another. Example 11-2 shows the /etc/auto.master file on a CentOS 7.x system.
Example 11-2 The /etc/auto.master File on a CentOS 7.x System
[root@onecoursesource Desktop]# more /etc/auto.master
#
# Sample auto.master file
# This is a 'master' automounter map and it has the following format:
# mount-point [map-type[,format]:]map [options]
# For details of the format look at auto.master(5).
#
/misc    /etc/auto.misc
#
# NOTE: mounts done from a hosts map will be mounted with the
#    "nosuid" and "nodev" options unless the "suid" and "dev"
#    options are explicitly given.
#
/net    -hosts
#
# Include /etc/auto.master.d/*.autofs
# The included files must conform to the format of this file.
#
+dir:/etc/auto.master.d
#
# Include central master map if it can be found using
# nsswitch sources.
#
# Note that if there are entries for /net or /misc (as
# above) in the included master map any keys that are the
# same will not be seen as the first read key seen takes
# precedence.
#
+auto.master
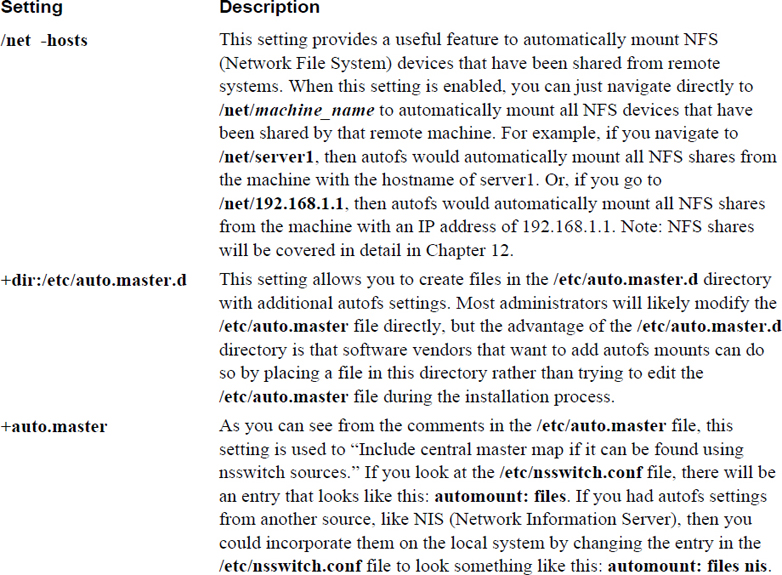
Note that most of the default file is composed of comments and that only four settings currently exist in this file. Three of these settings are fairly basic and are described in Table 11-1.
Table 11-1 Default /etc/auto.master Settings
In addition to the settings from Table 11-1, there is another entry in the typical /etc/auto.master file:
/misc /etc/auto.misc
This entry is the beginning of what is called an indirect autofs map. An indirect map requires settings in two files: the /etc/auto.master file and the file specified as the second value of the line (/etc/auto.misc in this example). To the automount daemon, this means “if a user or process changes into a subdirectory under the /misc directory, then look at the entries in /etc/auto.misc for the rest of the information.”
If there is an entry that refers to the /etc/auto.misc file in your default /etc/auto.master file, then there should also be a default /etc/auto.misc file. Example 11-3 demonstrates the default /etc/auto.misc file on a CentOS 7.x system.
Example 11-3 The /etc/auto.misc File on a CentOS 7.x System
[root@onecoursesource Desktop]# more /etc/auto.misc
#
# This is an automounter map and it has the following format
# key [ -mount-options-separated-by-comma ] location
# Details may be found in the autofs(5) manpage

cd        -fstype=iso9660,ro,nosuid,nodev  :/dev/cdrom

# the following entries are samples to pique your imagination
#linux        -ro,soft,intr        ftp.example.org:/pub/linux
#boot         -fstype=ext2         :/dev/hda1
#floppy       -fstype=auto         :/dev/fd0
#floppy       -fstype=ext2         :/dev/fd0
#e2floppy     -fstype=ext2         :/dev/fd0
#jaz          -fstype=ext2         :/dev/sdc1
#removable    -fstype=ext2         :/dev/hdd
Most of these lines are commented out, but one line does provide a setting that is currently enabled:
cd -fstype=iso9660,ro,nosuid,nodev :/dev/cdrom
The first field (cd in this example) contains the rest of the path to generate the mount point. The second field contains the mount options, and the third field is the device to mount. In other words, based on the entry in Example 11-3, if a user or process were to enter the /misc/cd directory, then the local /dev/cdrom device would be mounted with the -fstype=iso9660,ro,nosuid,nodev mount options.
On modern Linux distributions that have a GUI running, the GUI automatically mounts CD-ROMs. However, this would not happen on a server that was not running a GUI, so this setting might make it easier for regular users to access the CD-ROM (normally they would not be allowed to mount the CD-ROM).
Suppose you wanted to create an automount that mounts the NFS share of server1:/usr/share/doc under the /nfs/doc directory and creates an automount that mounts the NFS share of plan9:/aliens under the /nfs/aliens directory. First add the following entry in the /etc/auto.master file:
/nfs /etc/auto.custom
Then add the following entries in the /etc/auto.custom file:
Doc        -fstype=nfs    server1:/usr/share/doc
Aliens     -fstype=nfs    plan9:/aliens
Next, create the /nfs directory (note that on modern systems, this step might not be necessary, but it does no harm either):
mkdir /nfs
Do not create any subdirectories; /nfs/doc and /nfs/aliens will be created by the automount daemon as required (and then deleted when no longer required).
Finally, either start or restart the autofs service. Assuming you are working on a SysVinit system, execute the following:
/etc/init.d/autofs start
Note that you can also create a direct map, which is less complex and recommended for simple mounts. For direct maps, you add an entry like the following in the /etc/auto.master file:
/- /etc/auto.direct
Then you place the complete mount point, mount options, and device to mount in the /etc/auto.direct file:
/remote/aliens -fstype=nfs plan9:/aliens
Remember to restart the autofs services whenever you make changes to any of these map files.
Logical Volume Manager
The partitioning technology that has been used on x86 platforms for decades has limitations. For example, the entire partition must reside on a single disk, making it difficult to take advantage of disk space when a new hard drive is added to the system. It is also not easy to resize traditional partitions.
Logical Volume Manager (LVM) is a technology that can be used in place of traditional partitions. Using LVM you can incorporate new storage space into an existing storage device, essentially extending the capacity of a device that already contains a filesystem. LVM also allows you to create “snapshots,” enabling you to create backups of live filesystems.
Logical Volume Manager Concepts
Note
This section introduces some terms that are critical to understand: Logical Volume Manager (LVM), volume group, physical volume, physical extent, and so on. When reading documentation on LVM, you will almost always see these terms abbreviated (volume group = VG, physical volume = PV, and so on). As a result, this chapter follows the same convention of using abbreviations after introducing a term. This is designed to help you become comfortable with this convention.
You have been tasked with installing a new database server on an existing system. You inform your manager that you need 100GB of additional storage space, to which he replies, “No problem, I will have that sent to your office.” The next day a package arrives, containing three new 40GB hard drives. You realize a problem immediately, as the database software requires a single 100GB storage container. When you inform your boss about this problem, you are told that you must make do with what you have been provided. Now what?
You could put the three hard disks into a software RAID 0 device, but you realize that this will pose problems if more space is required for the database server in the future. You also know that getting a solid backup of the database while it is being used is important. Fortunately, you know of a technology that allows you to add more space on the fly and provides a technique to make backups on live filesystems: LVM (Logical Volume Manager).
Typically, two mental barriers seem to stop administrators from embracing LVM:
• Understanding why LVM is so much better than regular partitions
• Understanding the concept of how LVM works
So, before diving into the commands that you need to know to implement LVM, we explore the advantages and concepts of this technology.
Note
There are two primary implementations of LVM: LVM1 and LVM2. Most of the topics in this chapter apply to both. When there are differences, they are covered. To avoid confusion, the term LVM refers to both LVM1 and LVM2.
The following list describes some of the advantages of LVM:
• LVM can be used to take multiple storage devices and merge them together into a device that the kernel perceives as a single storage device. This means you can take three hard drives of 40GB and merge them into a single storage device that is 120GB. In fact, the devices don’t all have to be the same size or the same type, so you can combine a 30GB hard drive, a 20GB USB drive (just don’t remove it!), and a 25GB iSCSI device into a single storage device. You can even use part of a hard disk by creating a partition and adding that to the LVM.
• With LVM, you can add space to existing filesystems by adding a new physical storage device and adding this device to the LVM. Examples of this are provided later in this chapter.
• Even if you don’t need really large storage containers and are not worried about increasing the size of your filesystems, LVM can still be useful if you have multiple hard disks in your system. By using the LVM feature of striping, you can have data written to multiple hard disks concurrently, which can increase your I/O (input/output) speed substantially.
• Backing up a live filesystem is often problematic because of how backup tools work. These tools often back up filesystem metadata first and then back up the file contents. On live filesystems this can cause problems if the files’ contents change between backing up the metadata and backing up the file contents. LVM has a feature called a snapshot that allows you to back up a frozen image of the filesystem while the real filesystem remains active. This is explained in greater detail later in this chapter.
It sounds like LVM is perfect for everything. Granted, in most cases you probably should use LVM instead of traditional partitions, but LVM has a couple of disadvantages that you should consider:
• LVM doesn’t provide redundancy like RAID does (then again, neither do traditional partitions). However, you can solve this problem by creating software RAID 1 devices and including them as the storage devices used within your LVM. LVM2 also has a feature that incorporates software RAID (but for level 4, 5, or 6, not for level 1).
• Some older firmware and bootloaders don’t know how to access LVM devices. As a result, you often see the /boot filesystem placed on a regular partition. However, this has started to change recently as more modern firmware and bootloaders can access LVM devices.
Advantages of LVM on a System with a Single Drive
You may be wondering why you should use LVM on a system that has just a single hard disk. To answer that question, let us tell you about a situation that we have had to deal with many times in our careers as system administrators.
We were often tasked with installing a new system, and we always try to create partitions that make sense given the situation. For example, if we are installing a mail server, we would make sure to create a separate /var filesystem. If we are installing a machine that has multiple users, we would make sure the /home filesystem is on a separate partition. Therefore, it wouldn’t be uncommon to end up with a partition layout that looks like the layout described in Table 11-2.
Table 11-2 Sample Partition Layout
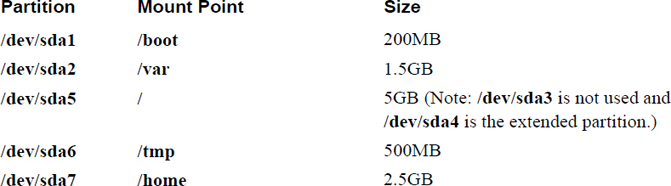
Typically, the filesystem layout described in Table 11-2 works just fine for some time. However, that doesn’t always last because the filesystem space needs change over time. For example, on one occasion it was discovered that the /tmp filesystem was filling up on a regular basis, but the /home filesystem wasn’t even 10% full. It would be great to take some of the space from the /home filesystem (located in the /dev/sda7 partition) and give it to the /tmp filesystem (located in the /dev/sda6 partition), but that is not an easy task. The general steps would be as follows:
Step 1. Back up the data in /home (/tmp is temporary data, so backing up that filesystem should not be necessary).
Step 2. Unmount both /home and /tmp (which likely requires switching to single user mode).
Step 3. Destroy the /dev/sda7 and /dev/sda6 partitions.
Step 4. Create new, resized /dev/sda7 and /dev/sda6 partitions.
Step 5. Create filesystems on the new partitions.
Step 6. Restore the data.
Step 7. Mount the /home and /tmp filesystems.
If you think that is a lot of work, consider taking space from the /home (/dev/sda7) filesystem and giving it to the /var (/dev/sda2) filesystem. This would require having to change all partitions except the /dev/sda1 partition, which would take a lot of time and effort.
If these were LVM storage devices instead of regular partitions, the process would be much easier, requiring much less data backup and downtime. You can easily reduce the space of an LVM storage device and give that space to another LVM storage device, or you can just add a new storage device to the system and provide that space to the filesystem that needs more space.
LVM Essentials
Hopefully by now you are convinced of the benefits of LVM and are at least willing to abandon regular partitions in favor of LVM. The next hurdle is to understand the concepts of LVM.
Note
If you want to practice LVM commands, consider using virtual machines. If you are using a virtual machine, you can easily create three new virtual hard drives to practice the LVM commands, which are described in this chapter.
Returning to the original scenario: You have three 40GB hard disks and you need to make the kernel treat a total of 100GB of this space as a single storage device. The first step to this process, after installing these devices, is to convert them to physical volumes (PVs). This is accomplished by executing the pvcreate command. For example, if you have three drives with device names of /dev/sdb, /dev/sdc, and /dev/sdd, you can convert them to PVs by executing the following command:
[root@onecoursesource Desktop]# pvcreate /dev/sdb /dev/sdc /dev/sdd
  Physical volume "/dev/sdb" successfully created
  Physical volume "/dev/sdc" successfully created
  Physical volume "/dev/sdd" successfully created
To think of this conceptually, look at what has been created so far in Figure 11-2.
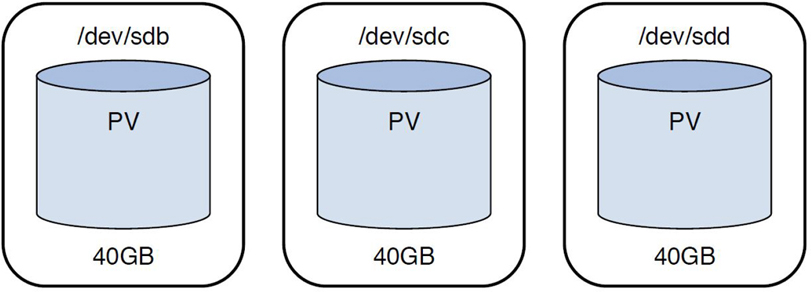
Figure 11-2 Physical Volumes
Now that you have formatted the PVs, you need to place them inside a new volume group (VG). You can create this VG and place the PVs inside it by executing the following command:
[root@onecoursesource ~]# vgcreate VG0 /dev/sdb /dev/sdc /dev/sdd
  Volume group "VG0" successfully created
The VG is a container used to group PVs together. The space available within the VG can be used to create logical volumes (LVs). Logical volumes work just like partitions; you can create filesystems on LVs and mount them just like regular partitions.
Before exploring how to create an LV, look at Figure 11-3 to see a visual representation of a VG.
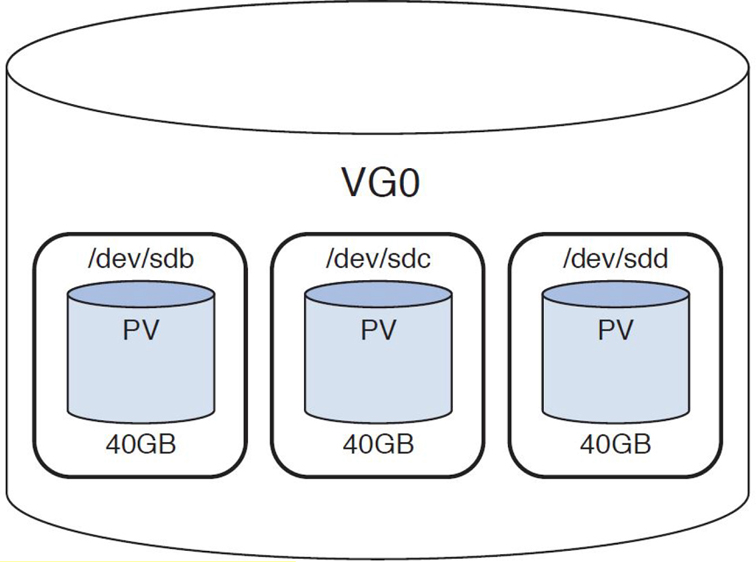
Figure 11-3 The VG0 Volume Group
Extents
When the VG was created, the space made available by the PVs was broken into small chunks called physical extents. By default, the extent size is 4MB, but this is something you can specify when you create the VG by using the -s option:
[root@onecoursesource ~]# vgcreate -s 16MB VG0 /dev/sdb /dev/sdc /dev/sdd
Note that the extent size is not something that can be adjusted at a later time. For LVM1, this is an important feature because you build the LVs using these extents and there is a limit of how many extents you can use for each LV. For example, if the VG has extents that are 4MB, you could build a 20MB LV by using five extents from the VG.
If your system is using LVM1, it is critical to know that each LV can have at most 65,534 extents. If you do the math, this means if your VG has 4MB extents, the largest an LV can be is 256GiB (see http://wintelguy.com/gb2gib.html for a review of the difference between GB and GiB). In most cases that should be plenty, but in the event that it isn’t, create the VG with a larger extent size.
The 65,534 extent limitation was removed in LVM2, which is most likely the version of LVM that you are using if you are using a modern distribution. However, using small extents on large LVs can slow down the LVM tools (although it should have no impact on input/output performance).
The largest extent size is 16GiB, so you might wonder why you wouldn’t just use the largest extent size. The problem with this approach is that each LV must use a whole multiple of the extent size. In other words, if your extent size is 16GiB, then your LVs can be 16GiB, 32GiB, 48GiB, and so on. This isn’t a flexible approach.
To visualize the concept of physical extents, look at the black boxes in Figure 11-4 (but imagine a lot more of them, because each PV in our scenario is 40GB and each extent is only 4MB).
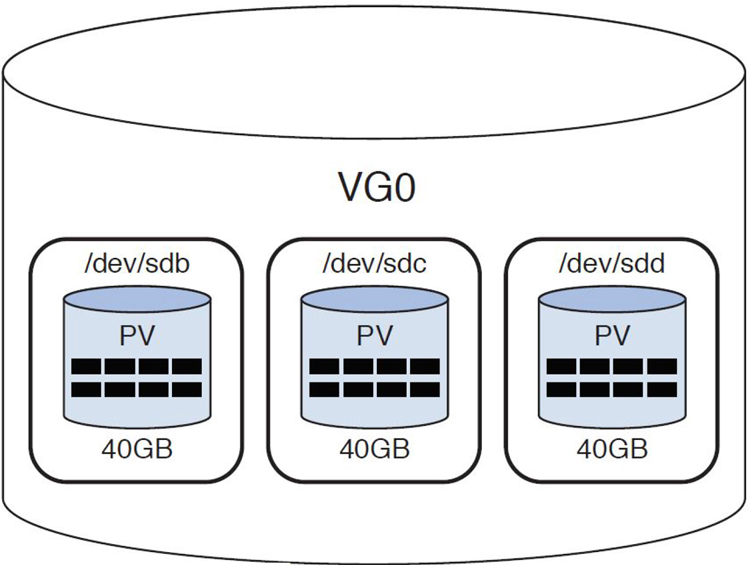
Figure 11-4 Physical Extents
If you want to see the size of the extents, as well as other useful VG information, execute the vgdisplay command, as shown in Example 11-4.
Example 11-4 The vgdisplay Command
[root@onecoursesource ~]# vgdisplay VG0
  --- Volume group ---
  VG Name               VG0
  System ID
  Format                lvm2
  Metadata Areas        3
  Metadata Sequence No  1
  VG Access             read/write
  VG Status             resizable
  MAX LV                0
  Cur LV                0
  Open LV               0
  Max PV                0
  Cur PV                3
  Act PV                3
  VG Size               1.49 GiB
  PE Size               4.00 MiB
  Total PE              381
  Alloc PE / Size       0 / 0
  Free  PE / Size       381 / 1.49 GiB
  VG UUID               AbRpPe-vaV3-1SKI-eFMB-IN48-Fdkt-U54OW7
Note
Although the original scenario was to use three 40GB hard disks, this example uses three 500MB virtual hard disks. If you are practicing these commands on a virtual machine, we suggest using small virtual hard disks rather than wasting space creating huge virtual hard disks.
Notice that the format is set to lvm2, so on this system we don’t have a limitation of 65,534 extents per LV. The VG Size value indicates how much space is available in the VG, and the Total PE value indicates the total number of physical extents available to assign to LVs.
If you use the -v option to the vgdisplay command, you also see information about any PVs and LVs associated with the VG. At this point we haven’t created any LVs, so executing the vgdisplay -v command provides the additional information shown in Example 11-5.
Example 11-5 The vgdisplay -v Command
  --- Physical volumes ---
  PV Name               /dev/sdb
  PV UUID               K6ikZy-yRxe-mwVf-ChQP-0swd-OvNA-L56QNT
  PV Status             allocatable
  Total PE / Free PE    127 / 127

  PV Name               /dev/sdc
  PV UUID               1eCbvm-FzNb-479B-5OAv-CTje-YWEe-gJhcyK
  PV Status             allocatable
  Total PE / Free PE    127 / 127

  PV Name               /dev/sdd
  PV UUID               7KUVBt-Un5l-0K3e-aeOy-deqP-iUW4-24fXwI
  PV Status             allocatable
  Total PE / Free PE    127 / 127
You can also see detailed information about a PV by executing the pvdisplay command, as shown in Example 11-6.
Example 11-6 The pvdisplay Command
 [root@onecoursesource ~]# pvdisplay /dev/sdb
  --- Physical volume ---
  PV Name               /dev/sdb
  VG Name               VG0
  PV Size               512.00 MiB / not usable 4.00 MiB
  Allocatable           yes
  PE Size               4.00 MiB
  Total PE              127
  Free PE               127
  Allocated PE          0
  PV UUID               K6ikZy-yRxe-mwVf-ChQP-0swd-OvNA-L56QNT
Note
When referring to extents on a PV, we call them physical extents. When an LV is using these physical extents, they are called logical extents. They aren’t two different things, but rather the same thing from two different perspectives. They are typically just called extents, but you should be aware that some LVM documentation uses either the term PE or the term LE.
Logical Volumes
To create an LV using space from a VG, execute the lvcreate command. You can enable several options when you create an LV. A simple example would be to create an LV specifying how many extents you want to use:
[root@onecoursesource ~]# lvcreate -l 6 -n lv0 VG0
  Logical volume "lv0" created.
The -n option is used to specify a name for the LV. The -l option is used to specify how many extents to use to create the LV. To specify the size of the new LV, use the -L option instead of the -l option (for example, lvcreate -L 120M -n lv0 VG0).
To understand what happens when you executed the lvcreate command, look at Figure 11-5.
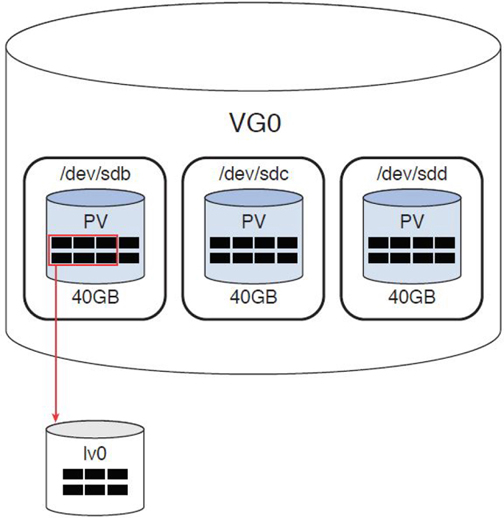
Figure 11-5 Logical Volume
The new LV was built using six PEs from the first PV in the VG. You could have chosen to use two PEs from each PV by using the -i option to the lvcreate command. The -i option is used to indicate how many PVs (referred to as stripes) to use when creating the LV. Here’s an example:
 [root@onecoursesource ~]# lvcreate -i 3 -l 6 -n lv1 VG0
  Using default stripesize 64.00 KiB.
  Logical volume "lv1" created.
Device Naming
Now that there are two new devices, lv0 and lv1, you can see the device names that have been created in the /dev directory structure. In fact, you now have three methods to refer to each device: the LVM1 method, the LVM2 method, and the “real” device name.
In LVM1, a directory is created under the /dev directory that matches the name of the VG, and within that directory files are created that match the name of the LVs. So, if you have a VG named VG0 and two LVs named lv0 and lv1, then you should see the following files:
[root@onecoursesource ~]# ls /dev/VG0
lv0  lv1
However, these are not the real device names, but rather symbolic links to the real device names. You can see this by looking at the output of the following command:
[root@onecoursesource ~]# ls -l /dev/VG0
total 0
lrwxrwxrwx. 1 root root 7 Oct 27 09:14 lv0 -> ../dm-3
lrwxrwxrwx. 1 root root 7 Oct 27 09:24 lv1 -> ../dm-4
The real device names are /dev/dm-3 and /dev/dm-4. Why create the symbolic link instead of using the device names of /dev/dm-3 and /dev/dm-4? Because it is easier for you to remember names that you create.
LMV2 introduced a new naming convention (although the LMV1 naming convention of /dev/VG/LV still exists). The newer naming technique is /dev/mapper/VG-LV. So, if you have a VG named VG0 and two LVs named lv0 and lv1, then you should see the following files:
[root@onecoursesource ~]# ls -l /dev/mapper/VG0*
lrwxrwxrwx. 1 root root 7 Oct 27 09:14 /dev/mapper/VG0-lv0 -> ../dm-3
lrwxrwxrwx. 1 root root 7 Oct 27 09:24 /dev/mapper/VG0-lv1 -> ../dm-4
Most Linux distributions use LVM2, so both naming conventions should be available. It doesn’t matter which one you use because they both point to the same dm-* files.
Using Logical Volumes and Additional LVM Commands
Now comes the easy part: Think of /dev/VG0/lv0 (or /dev/mapper/VG0-lv0) as if it were a regular partition. What would you do with a partition to make it available to the operating system?
1. Create a filesystem.
2. Make a mount point.
3. Mount the filesystem under the mount point.
4. Verify the mount.
5. Make an entry in /etc/fstab to mount the filesystem at bootup.
Start by creating a filesystem, as shown in Example 11-7.
Example 11-7 Creating the Filesystem
[root@onecoursesource ~]# mkfs -t ext4 /dev/mapper/VG0-lv0
mke2fs 1.41.12 (17-May-2010)
Filesystem label=
OS type: Linux
Block size=1024 (log=0)
Fragment size=1024 (log=0)
Stride=0 blocks, Stripe width=0 blocks
6144 inodes, 24576 blocks
1228 blocks (5.00%) reserved for the super user
First data block=1
Maximum filesystem blocks=25165824
3 block groups
8192 blocks per group, 8192 fragments per group
2048 inodes per group
Superblock backups stored on blocks:
        8193
Writing inode tables: done
Creating journal (1024 blocks): done
Writing superblocks and filesystem accounting information: done
This filesystem will be automatically checked every 20 mounts or
180 days, whichever comes first. Use tune2fs -c or -i to override.
Now create a mount point, mount the filesystem, and verify the mount, like so:
[root@onecoursesource ~]# mkdir /storage-lv0
[root@onecoursesource ~]# mount /dev/mapper/VG0-lv0 /storage-lv0
[root@onecoursesource ~]# mount | grep lv0
/dev/mapper/VG0-lv0 on /storage-lv0 type ext4 (rw)
Finally, add an entry like the following to the /etc/fstab file:
/dev/mapper/VG0-lv0 /storage ext4 defaults 0 2
Displaying LVM Information
Several commands display LVM information, including a couple we already introduced. For example, recall that the vgdisplay command provides information about a VG. Now that two new LVs have been created, notice the difference in the output from when the vgdisplay command was previously executed by looking at Example 11-8.
Example 11-8 The vgdisplay Command After LV Creation
[root@onecoursesource ~]# vgdisplay -v VG0
    Using volume group(s) on command line.
  --- Volume group ---
  VG Name               VG0
  System ID
  Format                lvm2
  Metadata Areas        3
  Metadata Sequence No  5
  VG Access             read/write
  VG Status             resizable
  MAX LV                0
  Cur LV                2
  Open LV               1
  Max PV                0
  Cur PV                3
  Act PV                3
  VG Size               1.49 GiB
  PE Size               4.00 MiB
  Total PE              381
  Alloc PE / Size       12 / 48.00 MiB
  Free  PE / Size       369 / 1.44 GiB
  VG UUID               AbRpPe-vaV3-1SKI-eFMB-IN48-Fdkt-U54OW7

  --- Logical volume ---
  LV Path                /dev/VG0/lv0
  LV Name                lv0
  VG Name                VG0
  LV UUID                m3cZlG-yydW-iNlh-I0Ky-HL3C-vWI8-AUKmRN
  LV Write Access        read/write
  LV Creation host, time onecoursesource.localdomain, 2017-10-27 09:14:21 -0700
  LV Status              available
  # open                 1
  LV Size                24.00 MiB
  Current LE             6
  Segments               1
  Allocation             inherit
  Read ahead sectors     auto
  - currently set to     256
  Block device           253:3

  --- Logical volume ---
  LV Path                /dev/VG0/lv1
  LV Name                lv1
  VG Name                VG0
  LV UUID                GBhvzW-osp5-hf0D-uY1n-7KuA-Ulix-U3vaJ7
  LV Write Access        read/write
  LV Creation host, time onecoursesource.localdomain, 2017-10-27 09:24:42 -0700
  LV Status              available
  # open                 0
  LV Size                24.00 MiB
  Current LE             6
  Segments               1
  Allocation             inherit
  Read ahead sectors     auto
  - currently set to     768
  Block device           253:4

  --- Physical volumes ---
  PV Name               /dev/sdb
  PV UUID               K6ikZy-yRxe-mwVf-ChQP-0swd-OvNA-L56QNT
  PV Status             allocatable
  Total PE / Free PE    127 / 119

  PV Name               /dev/sdc
  PV UUID               1eCbvm-FzNb-479B-5OAv-CTje-YWEe-gJhcyK
  PV Status             allocatable
  Total PE / Free PE    127 / 125

  PV Name               /dev/sdd
  PV UUID               7KUVBt-Un5l-0K3e-aeOy-deqP-iUW4-24fXwI
  PV Status             allocatable
  Total PE / Free PE    127 / 125
Note that some of the changes include information regarding the new LVs and changes to the information provided for the PVs. This information can also be viewed by using the pvdisplay and lvdisplay commands, as shown in Example 11-9.
Example 11-9 The pvdisplay and lvdisplay Commands
[root@onecoursesource ~]# pvdisplay /dev/sdb
  --- Physical volume ---
  PV Name               /dev/sdb
  VG Name               VG0
  PV Size               512.00 MiB / not usable 4.00 MiB
  Allocatable           yes
  PE Size               4.00 MiB
  Total PE              127
  Free PE               119
  Allocated PE          8
  PV UUID               K6ikZy-yRxe-mwVf-ChQP-0swd-OvNA-L56QNT

[root@onecoursesource ~]# lvdisplay /dev/mapper/VG0-lv0
  --- Logical volume ---
  LV Path                /dev/VG0/lv0
  LV Name                lv0
  VG Name                VG0
  LV UUID                m3cZlG-yydW-iNlh-I0Ky-HL3C-vWI8-AUKmRN
  LV Write Access        read/write
  LV Creation host, time onecoursesource.localdomain, 2017-10-27 09:14:21 -0700
  LV Status              available
  # open                 1
  LV Size                24.00 MiB
  Current LE             6
  Segments               1
  Allocation             inherit
  Read ahead sectors     auto
  - currently set to     256
  Block device           253:3
Additional LVM Commands
There are dozens of additional LVM commands (LVM is a huge topic). It is useful to know that almost all LVM-related commands are subcommands of the lvm command.
The LVM commands demonstrated in this chapter are normally executed by symbolic links that refer to the /sbin/lvm command:
[root@onecoursesource ~]# which pvcreate
/sbin/pvcreate
[root@onecoursesource ~]# ls -l /sbin/pvcreate
lrwxrwxrwx. 1 root root 3 Oct 22 10:55 /sbin/pvcreate -> lvm
This can be critical to know in rescue environments, where the lvm command exists but the link commands to the lvm command do not exist. (Note: A rescue environment is on in which you boot the system from a recovery CD and attempt to fix system problems.)
When executing the lvm command with no arguments, you are provided an lvm> prompt where you can also execute these subcommands, as demonstrated in Example 11-10.
[root@onecoursesource ~]# lvm
lvm> help
  Available lvm commands:
  Use 'lvm help <command>' for more information

  dumpconfig      Dump active configuration
  formats         List available metadata formats
  help            Display help for commands
  lvchange        Change the attributes of logical volume(s)
  lvconvert       Change logical volume layout
  lvcreate        Create a logical volume
  lvdisplay       Display information about a logical volume
  lvextend        Add space to a logical volume
  lvmchange       With the device mapper, this is obsolete and does nothing.
  lvmdiskscan     List devices that may be used as physical volumes
  lvmsadc         Collect activity data
  lvmsar          Create activity report
  lvreduce        Reduce the size of a logical volume
  lvremove        Remove logical volume(s) from the system
  lvrename        Rename a logical volume
  lvresize        Resize a logical volume
  lvs             Display information about logical volumes
  lvscan          List all logical volumes in all volume groups
  pvchange        Change attributes of physical volume(s)
  pvresize        Resize physical volume(s)
  pvck            Check the consistency of physical volume(s)
  pvcreate        Initialize physical volume(s) for use by LVM
  pvdata          Display the on-disk metadata for physical volume(s)
  pvdisplay       Display various attributes of physical volume(s)
  pvmove          Move extents from one physical volume to another
  pvremove        Remove LVM label(s) from physical volume(s)
  pvs             Display information about physical volumes
  pvscan          List all physical volumes
  segtypes        List available segment types
  vgcfgbackup     Backup volume group configuration(s)
  vgcfgrestore    Restore volume group configuration
  vgchange        Change volume group attributes
  vgck            Check the consistency of volume group(s)
  vgconvert       Change volume group metadata format
  vgcreate        Create a volume group
  vgdisplay       Display volume group information
  vgexport        Unregister volume group(s) from the system
  vgextend        Add physical volumes to a volume group
  vgimport        Register exported volume group with system
  vgmerge         Merge volume groups
  vgmknodes       Create the special files for volume group devices in /dev
  vgreduce        Remove physical volume(s) from a volume group
  vgremove        Remove volume group(s)
  vgrename        Rename a volume group
  vgs             Display information about volume groups
  vgscan          Search for all volume groups
  vgsplit         Move physical volumes into a new or existing volume group
  version         Display software and driver version information
lvm> quit
Resizing Logical Volumes
Resizing an LV is a two-step process. If you are making the LV smaller, you first need to shrink the size of the filesystem and then shrink the LV with the lvreduce command. Some filesystems don’t permit you to shrink the filesystem size, but making an LV smaller is rare anyway.
Most likely you are going to increase the size of the LV. In this case, you first increase the LV and then “grow” the filesystem. Note that these steps are the opposite order of the steps you take to decrease the size of an LV.
Not only do most filesystems permit growth, but many of them allow this to take place without you having to unmount the filesystem.
Before beginning this process, view the current size of the filesystem; in this example, it is about 23MB:
[root@onecoursesource ~]# df -h /dev/mapper/VG0-lv0
Filesystem           Size  Used Avail Use% Mounted on
/dev/mapper/VG0-lv0   23M  204K   21M   1% /storage-lv0
Also look at the size of the LV as displayed in Example 11-11, which is slightly larger because the filesystem requires some space for metadata, making the available size smaller than the container that holds the filesystem.
Example 11-11 Logical Volume Display Size
 [root@onecoursesource ~]# lvdisplay /dev/mapper/VG0-lv0
  --- Logical volume ---
  LV Path                /dev/VG0/lv0
  LV Name                lv0
  VG Name                VG0
  LV UUID                m3cZlG-yydW-iNlh-I0Ky-HL3C-vWI8-AUKmRN
  LV Write Access        read/write
  LV Creation host, time onecoursesource.localdomain, 2017-10-27 09:14:21 -0700
  LV Status              available
  # open                 1
  LV Size                24.00 MiB
  Current LE             6
  Segments               1
  Allocation             inherit
  Read ahead sectors     auto
  - currently set to     256
  Block device           253:3
Notice that this filesystem is currently mounted and contains files. This is to demonstrate that you can perform the process of increasing the size of the LV and filesystem even though the filesystem is currently being used:
[root@onecoursesource ~]# mount | grep lv0
/dev/mapper/VG0-lv0 on /storage-lv0 type ext4 (rw)
[root@onecoursesource ~]# ls /storage-lv0
group  hosts  lost+found  words
Increase the size of the LV by using the lvextend command. In this case, the size is increased by 40MB:
[root@onecoursesource ~]# lvextend -L +40M /dev/mapper/VG0-lv0
  Size of logical volume VG0/lv0 changed from 24.00 MiB (6 extents) to 64.00 MiB (16 extents).
  Logical volume lv0 successfully resized
Verify that the LV is now larger:
[root@onecoursesource ~]# lvdisplay /dev/mapper/VG0-lv0 | grep Size
  LV Size                64.00 MiB
Note that the filesystem size is unchanged:
[root@onecoursesource ~]# df -h /dev/mapper/VG0-lv0
Filesystem           Size  Used Avail Use% Mounted on
/dev/mapper/VG0-lv0   23M  5.0M   17M  24% /storage-lv0
Now resize the filesystem with the resize2fs command (use the xfs_growfs command if you are resizing an xfs filesystem) and verify that this command was successful, as shown in Example 11-12.
Example 11-12 Resizing the Filesystem
[root@onecoursesource ~]# resize2fs /dev/mapper/VG0-lv0
resize2fs 1.41.12 (17-May-2010)
Filesystem at /dev/mapper/VG0-lv0 is mounted on /storage-lv0; on-line resizing required
old desc_blocks = 1, new_desc_blocks = 1
Performing an on-line resize of /dev/mapper/VG0-lv0 to 65536 (1k) blocks.
The filesystem on /dev/mapper/VG0-lv0 is now 65536 blocks long.

[root@onecoursesource ~]# df -h /dev/mapper/VG0-lv0
Filesystem           Size  Used Avail Use% Mounted on
/dev/mapper/VG0-lv0   61M  5.3M   53M  10% /storage-lv0
[root@onecoursesource ~]# df -h /dev/mapper/VG0-lv00
Filesystem            Size  Used Avail Use% Mounted on
/dev/mapper/VG0-lv0    62M  6.3M   53M  11% /storage-lv0
[root@onecoursesource ~]# ls /storage-lv0
group  hosts  lost+found  words
Although you can tell the resize2fs command what size to grow to, the command is smart enough to grow to the size of its container. Only if you are making the filesystem smaller do you need to specify a size value for the resize2fs command.
To shrink the size of an LV, there are five important steps, and they must be executed in order; otherwise, the procedure will fail and potentially cause filesystem damage:
1. Unmount the mount point or logical volume with the umount command.
2. Force fsck to check the filesystem.
3. Use resize2fs to reduce the filesystem.
4. Use lvreduce to reduce the size of the logical volume.
5. Mount the filesystem with the mount command.
See Example 11-13 for a demonstration of this process.
Example 11-13 Reducing the Size of a Logical Volume
[root@onecoursesource ~]# umount /storage-lv0/
[root@onecoursesource ~]# fsck -f /dev/mapper/VG0-lv0
fsck from util-linux-ng 2.17.2
e2fsck 1.41.12 (17-May-2010)
Pass 1: Checking inodes, blocks, and sizes
Pass 2: Checking directory structure
Pass 3: Checking directory connectivity
Pass 4: Checking reference counts
Pass 5: Checking group summary information
/dev/mapper/VG0-lv0: 14/16384 files (0.0% non-contiguous), 8429/65536 blocks
[root@onecoursesource ~]# resize2fs /dev/mapper/VG0-lv0 24M
resize2fs 1.41.12 (17-May-2010)
Resizing the filesystem on /dev/mapper/VG0-lv0 to 24576 (1k) blocks.
The filesystem on /dev/mapper/VG0-lv0 is now 24576 blocks long.

[root@onecoursesource ~]# lvreduce -L -40M /dev/mapper/VG0-lv0
  WARNING: Reducing active logical volume to 24.00 MiB
  THIS MAY DESTROY YOUR DATA (filesystem etc.)
Do you really want to reduce lv0? [y/n]: y
  Reducing logical volume lv0 to 24.00 MiB
  Logical volume lv0 successfully resized
[root@onecoursesource ~]# mount /dev/mapper/VG0-lv0 /storage-lv0
[root@onecoursesource ~]# df -h /dev/mapper/VG0-lv0
Filesystem            Size  Used Avail Use% Mounted on
/dev/mapper/VG0-lv0    24M  6.0M   17M  27% /storage-lv0
Note: You can grow ext3, ext4, and xfs filesystems while they are mounted. To make these filesystems smaller, you need to unmount them first.
LVM Snapshots
Many backup utilities take the following approach to backing up a filesystem:
1. Record the metadata for the files being backed up.
2. Record the metadata for the directories being backed up.
3. Back up the directories (which really is the list of files that belong in each directory).
4. Back up the file’s contents.
You can see this with a utility like the dump command. Note the highlighted lines in the output of Example 11-14.
Example 11-14 The dump Command
 [root@onecoursesource ~]# dump -f /tmp/backup /storage-lv0
  DUMP: Date of this level 0 dump: Tue Oct 27 22:17:18 2017
  DUMP: Dumping /dev/mapper/VG0-lv0 (/storage-lv0) to /tmp/backup
  DUMP: Label: none
  DUMP: Writing 10 Kilobyte records
  DUMP: mapping (Pass I) [regular files]
  DUMP: mapping (Pass II) [directories]
  DUMP: estimated 4880 blocks.
  DUMP: Volume 1 started with block 1 at: Tue Oct 27 22:17:18 2017
  DUMP: dumping (Pass III) [directories]
  DUMP: dumping (Pass IV) [regular files]
  DUMP: Closing /tmp/backup
  DUMP: Volume 1 completed at: Tue Oct 27 22:17:18 2017
  DUMP: Volume 1 4890 blocks (4.78MB)
  DUMP: 4890 blocks (4.78MB) on 1 volume(s)
  DUMP: finished in less than a second
  DUMP: Date of this level 0 dump: Tue Oct 27 22:17:18 2017
  DUMP: Date this dump completed:  Tue Oct 27 22:17:18 2017
  DUMP: Average transfer rate: 0 kB/s
  DUMP: DUMP IS DONE
The problem with this technique is when live (mounted) filesystems are backed up. It is possible that between backing up the metadata and the file data that changes take place in the filesystem. For example, after the metadata is backed up for the /storage-lv0/hosts file, if the file was deleted before its contents were backed up, this would cause problems with the backup.
It is best to unmount the filesystem before backing it up, but this isn’t always possible on production machines. So instead you can make use of an LVM snapshot. A snapshot provides a “frozen image” of the filesystem within an LV. By backing up the frozen image, you ensure a good (error free) backup.
To create a snapshot, use the lvcreate command with the -s option:
[root@onecoursesource ~]# lvcreate -L 20M -s -n snap0 /dev/mapper/VG0-lv0
  Logical volume "snap0" created.
Now there is a new device named /dev/mapper/VG0-snap0. The -s option specifies that you want a snapshot LV. The -n option specifies the name of the new LV. The last argument is the name of the LV that the new LV is a snapshot of.
Create a mount point for this new device and mount it as read-only so no changes take place in the “frozen” filesystem:
[root@onecoursesource ~]# mkdir /backup
[root@onecoursesource ~]# mount -o ro /dev/mapper/VG0-snap0 /backup
You can now back up the /backup filesystem with the backup utility of your choice. You can see that it currently contains the same data as the original LV:
[root@onecoursesource ~]# ls /backup
group  hosts  lost+found  words
[root@onecoursesource ~]# ls /storage-lv0
group  hosts  lost+found  words
So, how is backing up the /backup filesystem any different than backing up the /storage-lv0 filesystem? Whereas the /storage-lv0 filesystem is live and can be modified, the /backup filesystem cannot be changed, as demonstrated by the following commands:
[root@onecoursesource ~]# rm /storage-lv0/hosts
rm: remove regular file `/storage-lv0/hosts'? y
[root@onecoursesource ~]# ls /storage-lv0
group  lost+found  words
[root@onecoursesource ~]# rm /backup/words
rm: remove regular file `/backup/words'? y
rm: cannot remove `/backup/words': Read-only file system
[root@onecoursesource ~]# ls /backup
group  hosts  lost+found  words
After completing the backup, you should destroy the LVM snapshot by first unmounting the snapshot VM and then executing the lvremove command:
[root@onecoursesource ~]# lvremove /dev/mapper/VG0-snap0
Knowing how to create and use an LVM snapshot is an important skill. Knowing how it works is not critical, but it can help you understand why backing up a snapshot LV is better than backing up a live filesystem.
To begin with, assume you just created the /dev/mapper/VG0-snap0 snapshot and have mounted it under the /backup directory. A way to conceptualize this process is to look at the graphic in Figure 11-6.
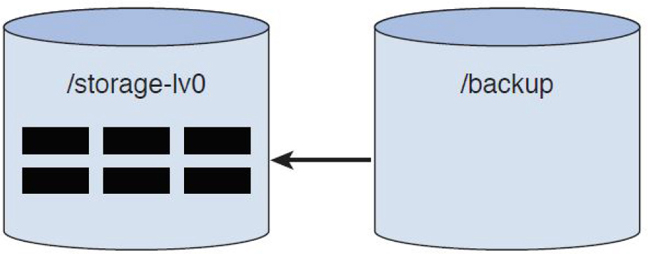
Figure 11-6 Initial LVM Snapshot
The boxes in the LV represented by the /storage-lv0 cylinder are files. As you can see, all the files are initially stored in the LV mounted under the /storage-lv0 mount point. If someone lists the files under that /backup mount point, the kernel knows to look at files from the /storage-lv0 directory.
When a file is removed from the /storage-lv0 directory, it is not immediately deleted from that LV. First, it is copied over to the snapshot LV and then removed from the original LV. Figure 11-7 demonstrates what happens during the removal of the file from the /storage-lv0 directory, and Figure 11-8 demonstrates how the LVs look after the removal.
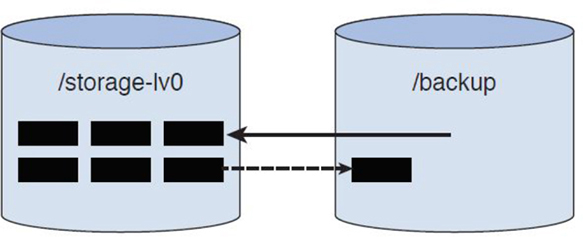
Figure 11-7 LVs During File Removal
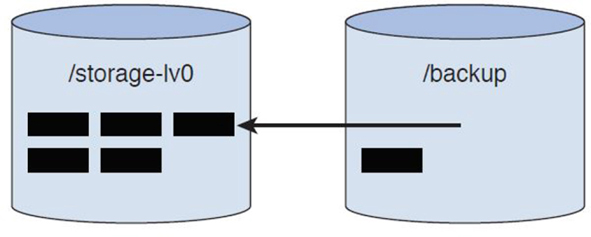
Figure 11-8 LVs After File Removal
Now you might be wondering how the file is copied over to the snapshot when it was mounted as read-only. The read-only mount process means you can’t make changes to the filesystem via the mount point. However, this file is being copied over “under the hood,” not by a simple filesystem cp command. Although you can’t make any changes to files under the /backup mount point, the kernel certainly can make changes in the /dev/mapper/VG0-snap0 device. It is the kernel that ends up copying this file.
Disk Quotas
Regular users can have a negative impact on a filesystem by creating many large files. A user can completely fill an entire filesystem with large files, making the filesystem unusable for others.
Disk quotas are designed to eliminate this problem. As an administrator, you can limit how much space a user can use in each filesystem. The limitation can be applied to individual users or all member of a group.
For example, you can enable disk quotas for the user ted that limits him to 300MB of space by creating a hard limit. You can also create a soft limit, which would result in a warning if the user exceeds this limit (but doesn’t prevent additional file creation until the hard limit is reached).
If you create disk quotas for a group, the quota applies individually for each member of the group. For example, if the nick, sarah, and julia users were members of the payroll group and there was a 100MB hard limit in the /home filesystem, then each user could use up to 100MB in that filesystem.
It is also important to limit how many files a user can create. Each file requires an inode, the part of the file that stores the file’s metadata, such as file ownership, permissions, and timestamps. Each filesystem has a limited number of inodes, and although this limit is typically very generous, a determined user could create a large number of empty files that could result in using up all the possible inodes. So, even if there is more space available, without any additional inodes, no one else can create files in that filesystem.
Lastly, note that this discussion has been using the term filesystem. This is because disk quotas are applied on an entire filesystem, not on a directory.
Setting Up a Disk Quota for a Filesystem
To enable user quotas, you must mount the filesystem with the usrquota mount option. This can be accomplished by adding usrquota to the mount option field of the /etc/fstab file:
/dev/sdb1 / ext4 usrquota 1 1
Then, remount the filesystem with the following command (the following commands must be executed by the root user):
[root@localhost ~]$ mount -o remount /
After mounting the filesystem with the usrquota option enabled, you need to create the initial quota databases by executing the following quotacheck command:
[root@localhost ~]$ quotacheck -cugm /dev/sdb1
This will result in new files in the mount point directory of the filesystem:
[root@localhost ~]$ ls /aquota*
/aquota.group  /aquota.user
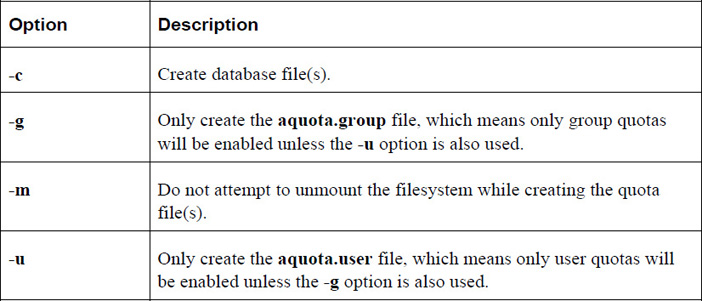
Important options for the quotacheck command are shown in Table 11-3.
Table 11-3 Options for the quotacheck Command
Editing, Checking, and Generating User Quota Reports
After setting up disk quotas as described in the previous section, follow these steps to enable and display quotas for users:
1. Turn on disk quotas by executing the quotaon command.
2. Create or edit a user quota by using the edquota command.
3. Display quota information by using the quota or repquota command.
quotaon
The quotaon command is used to turn quotas on for a filesystem. Normally when the system is booted, this will happen automatically. However, you may turn off quotas by executing the quotaoff command following by the name of the filesystem (the following commands must be executed by the root user):
[root@localhost ~]$ quotaoff /dev/sdb1
[root@localhost ~]$ quotaon /dev/sdb1
edquota
To create or edit a user’s quotas, execute the edquota command followed by the username (the following command must be executed by the root user):
[root@localhost ~]$ edquota sarah
The edquota command will enter an editor (vi is typically the default) and display all the user’s quotas. The output will appear to be something like the following:
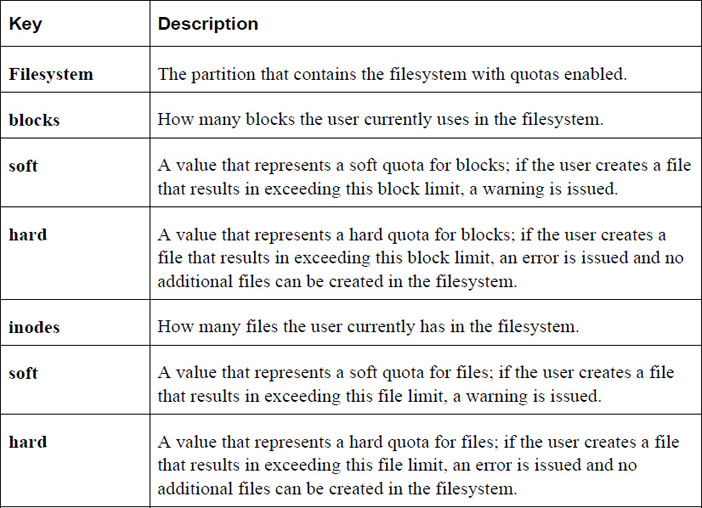
Disk quotas for user sarah (uid 507):
  Filesystem  blocks   soft   hard   inodes   soft   hard
  /dev/sdb1   550060      0      0    29905      0      0
Table 11-4 describes the fields of the quota.
Note
The grace period can be set by executing the edquota –t command. See the “quota” section for more details regarding the grace period.
quota
The quota command can be executed by a user to display the quotas for the account:
[sarah@localhost ~]$ quota
Disk quotas for user sarah (uid 507):
     Filesystem  blocks   quota   limit   grace   files   quota   limit   grace
      /dev/sda1   20480   30000   60000               1       0       0
Note the output when a user has exceeded a soft quota; in the following example, the user sarah is above the soft limit for block size:
[sarah@localhost ~]$ quota
Disk quotas for user sarah (uid 507):
     Filesystem  blocks   quota   limit   grace   files   quota   limit   grace
      /dev/sda1   40960*  30000   60000   7days       2       0       0
Once the user has exceeded a soft quota, a grace period is provided. The user must reduce the space used in the filesystem to be below the soft quota within the grace period or else the current usage converts to a hard quota limit.
Note
The grace period can be set by the root user by executing the edquota –t command.
Here are some important options for the quota command:
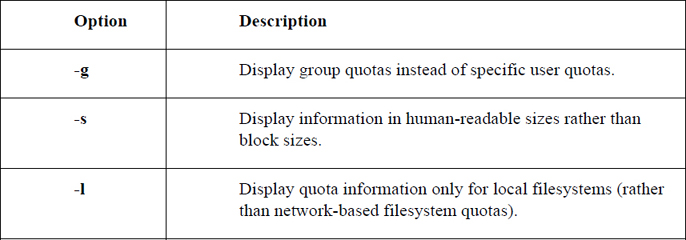
repquota
The repquota command is used by the root user to display quotas for an entire filesystem (the following command must be executed by the root user):
[root@localhost ~]$ repquota /
*** Report for user quotas on device /dev/sda1
Block grace time: 7days; Inode grace time: 7days
                        Block limits                File limits
User            used    soft    hard  grace    used  soft  hard  grace
----------------------------------------------------------------------
root      -- 4559956       0       0         207396     0     0
daemon    --      64       0       0              4     0     0
man       --    1832       0       0            145     0     0
www-data  --       4       0       0              1     0     0
libuuid   --      40       0       0              6     0     0
syslog    --    3848       0       0             23     0     0
messagebus --      8       0       0              2     0     0
landscape --       8       0       0              2     0     0
pollinate --       4       0       0              1     0     0
vagrant   --  550060       0       0          29906     0     0
colord    --       8       0       0              2     0     0
statd     --      12       0       0              3     0     0
puppet    --      44       0       0             11     0     0
ubuntu    --      36       0       0              8     0     0
sarah     +-   40960   30000   60000  6days       2     0     0
Important options for the repquota command include:
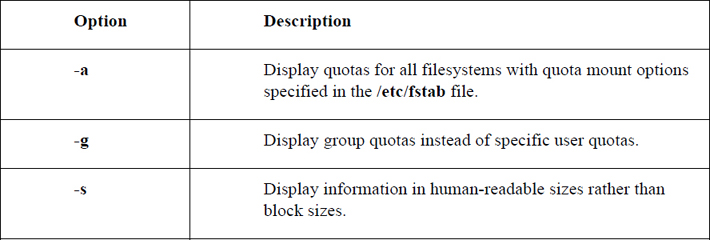
Hard and Soft Links
There are two different types of file links on Linux:
• Hard links: When you create a hard link to a file, there is no way to distinguish the “original” file from the “linked” file. They are just two filenames that point to the same inode, and hence the same data. If you have 10 hard-linked files and you delete any nine of these files, the data is still maintained in the remaining file.
Figure 11-9 demonstrates hard links.

Figure 11-9 Hard Links
In Figure 11-9, the abc.txt and xyz.txt files are hard-linked together. This means that they share the same inode tables. The ellipsis (…) in the inode table represents metadata—information about the file such as the user owner and permissions. Included with this metadata are pointers that refer to blocks within the storage device where the file data is stored.
• Soft links: When you create a soft link, the original file contains the data while the link file “points to” the original file. Any changes made to the original will also appear to be in the linked file because using the linked file always results in following the link to the target file. Deleting the original file results in a broken link, making the link file worthless and resulting in complete data loss.
Figure 11-10 demonstrates soft links.
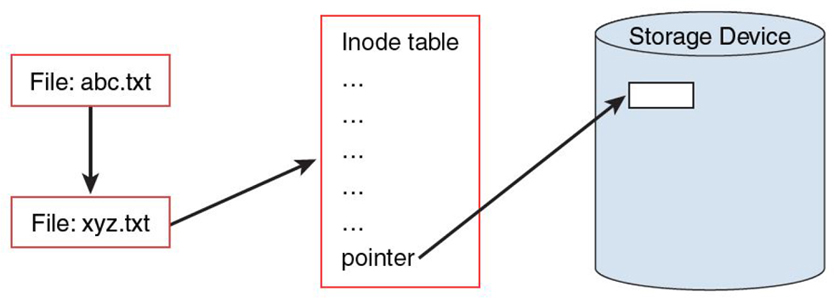
Figure 11-10 Soft Links
In Figure 11-10, the abc.txt file is soft-linked to the xyz.txt file. The abc.txt file points to the filename xyz.txt, not the same inode table (although not shown in this figure, the abc.txt file has its own inode table). By following the link, the data for the xyz.txt file is accessible via the abc.txt file.
Why Use Links?
One common use of links for system administration tasks is when an administrator decides to move the location of a key file to a different directory location (or give the file a different name). This can cause some confusion for users who are used to the original file location and name.
For example, suppose a key configuration file is named /etc/setup-db.conf and the administrator wants to move this file into the /etc/db directory. After the file has been moved, a symbolic link can be created to help other users (and perhaps programs) to find the correct data (be sure to run the following command as the root user):
[root@onecoursesource ~]$ ln -s /etc/db/setup-db.conf /etc/setup-db.conf
The /etc directory has several example of this use of links:
[root@onecoursesource ~]$ ls -l /etc | grep "^l"
lrwxrwxrwx   1 root root          12 Jan 26  2017 drupal -> /etc/drupal6
lrwxrwxrwx   1 root root          56 Dec 17  2017 favicon.png -> /usr/share/icons/hicolor/16x16/apps/fedora-logo-icon.png
lrwxrwxrwx   1 root root          22 Jan 23  2017 grub2.cfg -> ../boot/grub2/grub.cfg
lrwxrwxrwx   1 root root          22 Dec 17  2017 grub.conf -> ../boot/grub/grub.conf
lrwxrwxrwx   1 root root          11 Jan 23  2017 init.d -> rc.d/init.d
lrwxrwxrwx   1 root root          41 Feb 18  2017 localtime -> ../usr/share/zoneinfo/America/Los_Angeles
lrwxrwxrwx   1 root root          12 Dec 17  2017 mtab -> /proc/mounts
lrwxrwxrwx   1 root root          10 Jan 23  2017 rc0.d -> rc.d/rc0.d
lrwxrwxrwx   1 root root          10 Jan 23  2017 rc1.d -> rc.d/rc1.d
lrwxrwxrwx   1 root root          10 Jan 23  2017 rc2.d -> rc.d/rc2.d
lrwxrwxrwx   1 root root          10 Jan 23  2017 rc3.d -> rc.d/rc3.d
lrwxrwxrwx   1 root root          10 Jan 23  2017 rc4.d -> rc.d/rc4.d
lrwxrwxrwx   1 root root          10 Jan 23  2017 rc5.d -> rc.d/rc5.d
lrwxrwxrwx   1 root root          10 Jan 23  2017 rc6.d -> rc.d/rc6.d
lrwxrwxrwx   1 root root          14 Sep 10 12:58 redhat-release -> fedora-release
lrwxrwxrwx   1 root root          14 Sep 10 12:58 system-release -> fedora-release
Creating Links
To create a link, execute the ln command in the following manner: ln [-s] target_file link_file. For example, to create a hard link from the /etc/hosts file to a file in the current directory called myhosts, execute the following command:
[root@onecoursesource ~]$ ln /etc/hosts myhosts
Hard-link files share the same inode. You can only make a hard link to a file (not a directory) that resides on the same filesystem as the original file. Creating hard links to files on other filesystems or to directories will result in errors:
[root@onecoursesource ~]$ ln /boot/initrd.img-3.16.0-30-generic initrd
ln: failed to create hard link 'initrd' => '/boot/initrd.img-3.16.0-30-generic': Invalid cross-device link
[root@onecoursesource ~]$ ln /etc myetc
ln: '/etc': hard link not allowed for directory
Soft links (also called symbolic links) are files that point to other files (or directories) via the filesystem. You can create a soft link to any file or directory:
[root@onecoursesource ~]$ ln -s /boot/initrd.img-3.16.0-30-generic initrd
Displaying Linked Files
The ls command can be used to display both soft and hard links. Soft links are very easy to see, as the target file is displayed when the ls -l command is executed:
[root@onecoursesource ~]$ ls -l /etc/vtrgb
lrwxrwxrwx 1 root root 23 Jul 11  2015 /etc/vtrgb -> /etc/alternatives/vtrgb
Hard links are more difficult because a hard-link file shares an inode with another filename. For example, the value 2 after the permissions in the following output indicates this is a hard-link file:
[root@onecoursesource ~]$ ls -l myhosts
-rw-r--r-- 2 root root 186 Jul 11  2015 myhosts
To view the inode number of a file, use the -i option to the ls command:
[root@onecoursesource ~]$ ls -i myhosts
263402 myhosts
Then use the find command to search for files with the same inode:
[root@onecoursesource ~]$  find / -inum 263402 -ls 2> /dev/null
263402    4 -rw-r--r--   2 root     root       186 Jul 11  2015 /root/myhosts
263402    4 -rw-r--r--   2 root     root       186 Jul 11  2015 /etc/hosts
Summary
In this chapter, you learned about encrypting filesystems and the value of encrypting an entire filesystem over individual files for security. Additional topics covered in this chapter included autofs, the management of logical volumes, disk quotas, and links.
Key Terms
Review Questions
1. The _____ command is used to create volume groups.
2. Which option to the vgcreate command specifies the extent size for the physical volumes?
a. -e
b. -t
c. -s
d. -p
3. On an LVM1 system, what is the maximum number of extents that can be assigned to a logical volume?
a. 100,000
b. 97,400
c. 65,534
d. None of the above
4. The _____ command displays information about a physical volume.
5. Which option to the vgdisplay command provides detailed information about a volume group, including information about which physical volumes are in the volume group?
a. -t
b. -d
c. -V
d. None of the above
6. The _____ option to the lvcreate command is used to specify the name of the logical volume.
a. -i
b. -l
c. -s
d. -n
7. Which command allows you to add a new physical volume to an existing volume group?
a. pvadd
b. pvextend
c. vgadd
d. vgextend
8. The _____ command is used change the size of an ext4 filesystem.