Table of Contents for
Linux Essentials for Cybersecurity, First Edition
 Linux Essentials for Cybersecurity, First Edition
Published by
Pearson IT Certification, 2018
Linux Essentials for Cybersecurity, First Edition
Published by
Pearson IT Certification, 2018
- Cover Page
- Title Page
- Copyright Page
- Contents at a Glance
- Table of Contents
- About the Author
- Dedication
- Acknowledgments
- About the Technical Reviewers
- We Want to Hear from You!
- Reader Services
- Introduction
- Part I: Introducing Linux
- Chapter 1: Distributions and Key Components
- Chapter 2: Working on the Command Line
- Chapter 3: Getting Help
- Chapter 4: Editing Files
- Chapter 5: When Things Go Wrong
- Part II: User and Group Accounts
- Chapter 6: Managing Group Accounts
- Chapter 7: Managing User Accounts
- Chapter 8: Develop an Account Security Policy
- Part III: File and Data Storage
- Chapter 9: File Permissions
- Chapter 10: Manage Local Storage: Essentials
- Chapter 11: Manage Local Storage: Advanced Features
- Chapter 12: Manage Network Storage
- Chapter 13: Develop a Storage Security Policy
- Part IV: Automation
- Chapter 14: Crontab and At
- Chapter 15: Scripting
- Chapter 16: Common Automation Tasks
- Chapter 17: Develop an Automation Security Policy
- Part V: Networking
- Chapter 18: Networking Basics
- Chapter 19: Network Configuration
- Chapter 20: Network Service Configuration: Essential Services
- Chapter 21: Network Service Configuration: Web Services
- Chapter 22: Connecting to Remote Systems
- Chapter 23: Develop a Network Security Policy
- Part VI: Process and Log Administration
- Chapter 24: Process Control
- Chapter 25: System Logging
- Part VII: Software Management
- Chapter 26: Red Hat–Based Software Management
- Chapter 27: Debian-Based Software Management
- Chapter 28: System Booting
- Chapter 29: Develop a Software Management Security Policy
- Part VIII: Security Tasks
- Chapter 30: Footprinting
- Chapter 31: Firewalls
- Chapter 32: Intrusion Detection
- Chapter 33: Additional Security Tasks
- Appendix A: Answers to Review Questions
- Appendix B: Resource Guide
- Glossary
Chapter 22 Connecting to Remote Systems
Several different types of network servers can be found on most networks, and you will need to be able to create connections to these servers and maintain them. Lightweight Directory Access Protocol (LDAP) servers provide database-like access to key network information, such as network users and groups. File Transfer Protocol (FTP) servers are used to transfer files between systems. When you need to connect to any remote Linux system in order to run commands on that system, Secure Shell (SSH) is the most common method.
This chapter discusses the essential setup and configuration of these servers as well as how to connect and communicate with each from the client side.
After reading this chapter and completing the exercises, you will be able to do the following:
Configure an LDAP server.
Define values in an LDAP server.
Connect a client system to an LDAP server.
Configure and connect to an FTP server.
Establish secure connections via SSH.
LDAP
LDAP (Lightweight Directory Access Protocol) is a distributed directory service. Directory services are often compared to databases in the sense that directory services store information in an organized manner, much like a database program. However, a database is simply a collection of information. Databases do not really provide any sort of service to client systems; databases provide information that can be accessed using various tools.
There are several differences between a directory service and a database. Databases are normally designed to be equally efficient at writing data as reading data. Directory services are designed to provide an efficient method of reading data. Directory services are also specifically designed to provide sets of records organized in a hierarchical structure (much like the Internet’s domain structure). As a result, directory services provide company data that mirrors the company structure.
Several different types of LDAP-based software programs are available. For example, Microsoft’s Active Directory is an LDAP-based directory service. For Linux, OpenLDAP is the most commonly used open source directory service (there are also several commercial LDAP-based Linux programs).
Before you can connect to an LDAP server, you first have to have one available. As a result, we will first discuss the fundamentals of LDAP, then its installation and configuration, and lastly how to connect to an LDAP server.
The OpenLDAP software is not installed by default on most Linux distributions. The first step in configuring an OpenLDAP server is to install the openldap-server package (see Chapter 26, “Red Hat-based software management,” and Chapter 27, “Debian-based software management,” for information on how to install software packages).
After you have installed the software, a configuration file for the OpenLDAP server should have been saved to the system. Typically, this is located in the /etc/openldap directory, and the filename is slapd.conf. The name of the OpenLDAP server is slapd.
Key LDAP Terms
One aspect of LDAP that makes it challenging for new LDAP administrators is learning the many LDAP terms. These terms, listed in Table 22-1, are important to understanding the concept of LDAP and properly administering it.
Before you configure your LDAP server, you really should consider what sort of structure you are going to use. Choose wisely; it is not easy to change this structure at a later date!
You can organize your LDAP directory structure in several different ways. Figure 22-1 demonstrates one technique, which is used to mirror the company’s domain name structure (a grey circle denotes a DC and a white circle denotes a CN).
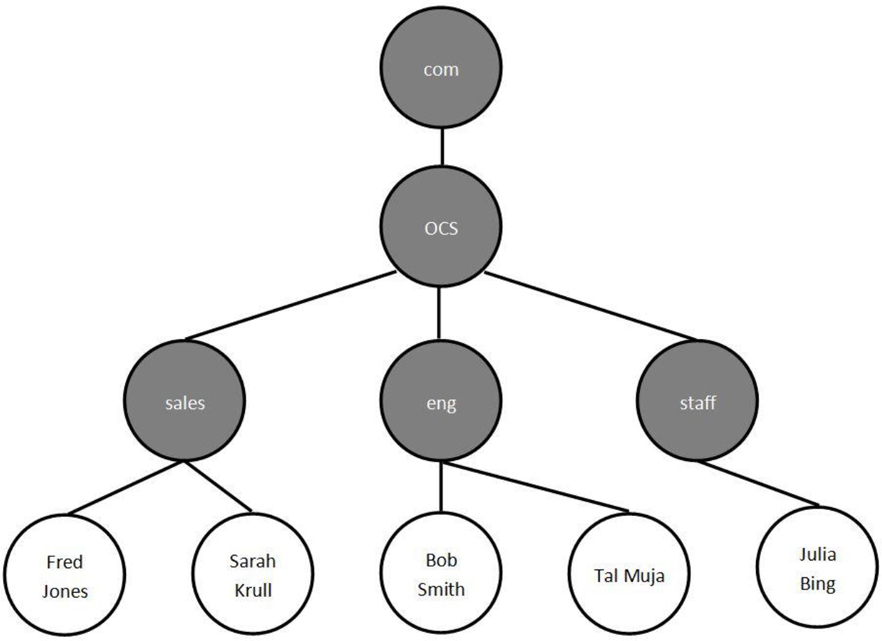
Figure 22-1 Domain name–based LDAP structure
Figure 22-2 demonstrates another technique in which the LDAP directory structure is designed to mirror the company’s geographic locations (a grey circle denotes a DC and a white circle denotes a CN).
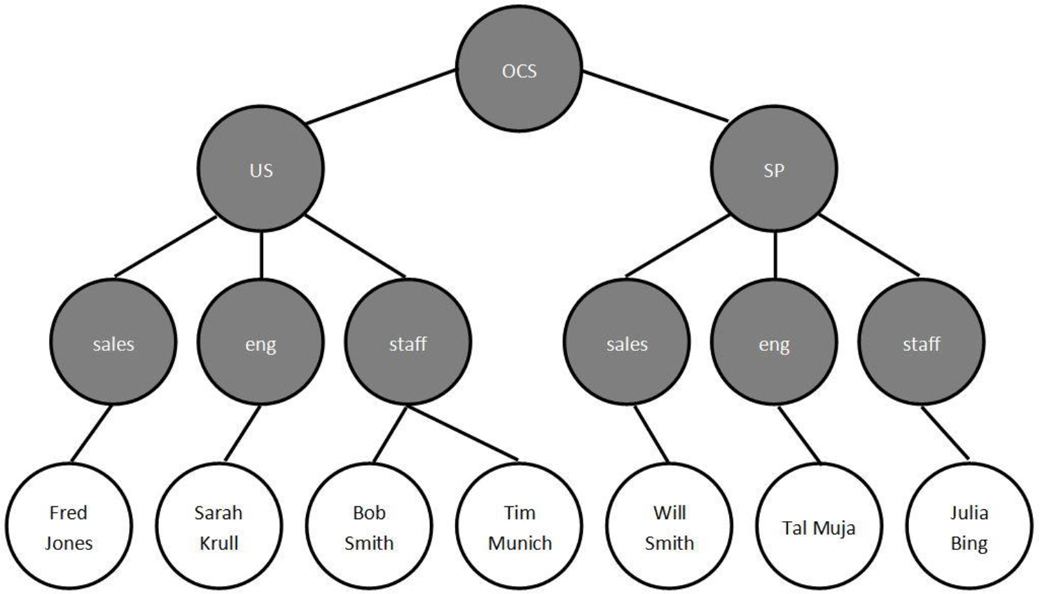
Figure 22-2 Geographic-based LDAP structure
The slapd.conf File
The slapd.conf file has several components. In many cases you will not make changes to certain sections and you do not need to know all of the sections for basic LDAP configuration. The first component that you should know about includes some lines that import the LDAP schema:
include         /etc/openldap/schema/core.schema
include         /etc/openldap/schema/cosine.schema
include         /etc/openldap/schema/inetorgperson.schema
include         /etc/openldap/schema/nis.schema
These schemas could be placed directly in the slapd.conf file, but they are large and would make it difficult to manage the primary OpenLDAP configuration file. Also, by using these include statements, you can add more schemas to LDAP by downloading (or creating) a schema file and using the include statement in the slapd.conf file to import the schema.
Customizing Your LDAP Domain
You may likely never make any schema changes, but you should know how to include new schemas in the event your company requires new object types. However, the following highlighted settings are definitely ones you should consider changing:
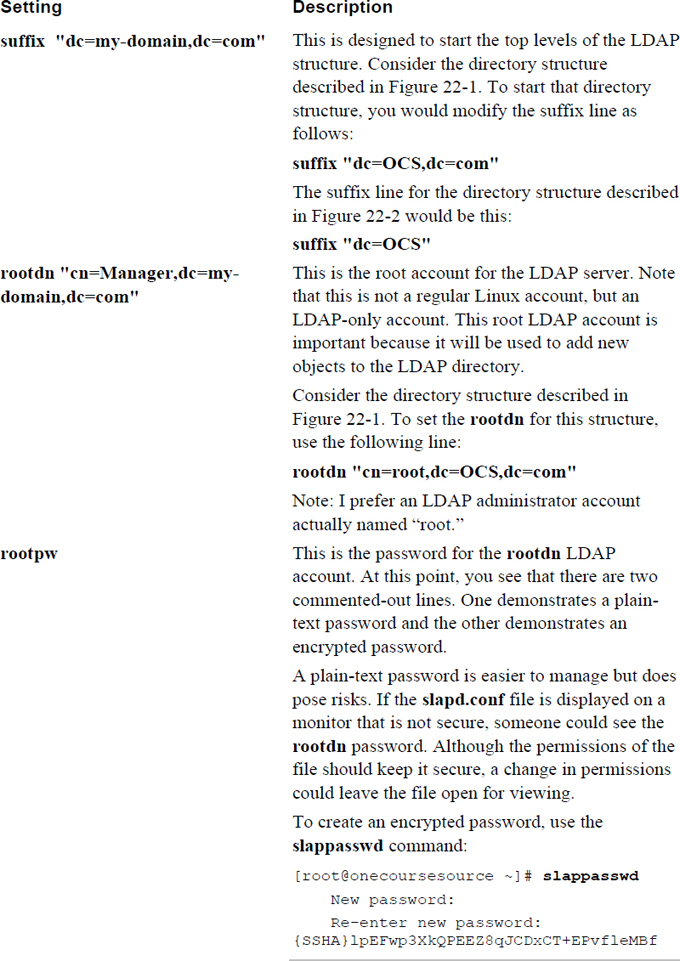
database        bdb
suffix          "dc=my-domain,dc=com"
rootdn          "cn=Manager,dc=my-domain,dc=com"
# Cleartext passwords, especially for the rootdn, should
# be avoided. See slappasswd(8) and slapd.conf(5) for details.
# Use of strong authentication encouraged.
# rootpw                secret
# rootpw                {crypt}ijFYNcSNctBYg
Table 22-2 describes the bolded lines from this example.
Table 22-2 LDAP Configuration Settings
Configuring Logging
A slapd.conf configuration setting you should be aware of that is not in the default configuration file is the loglevel setting. The loglevel setting allows you to specify the sort of logging information you want to have sent to the system logger.
This setting is a bit more complicated than how most Linux services define what is logged. Log messages are placed in categories; the following describes these categories as defined within the slapd.conf man page:
1      (0x1 trace) trace function calls
2      (0x2 packets) debug packet handling
4      (0x4 args) heavy trace debugging (function args)
8      (0x8 conns) connection management
16     (0x10 BER) print out packets sent and received
32     (0x20 filter) search filter processing
64     (0x40 config) configuration file processing
128    (0x80 ACL) access control list processing
256    (0x100 stats) stats log connections/operations/results
512    (0x200 stats2) stats log entries sent
1024   (0x400 shell) print communication with shell backends
2048   (0x800 parse) entry parsing
4096   (0x1000 cache) caching (unused)
8192   (0x2000 index) data indexing (unused)
16384  (0x4000 sync) LDAPSync replication
32768  (0x8000 none) only messages that get logged whatever log level is set
Each category can be described in one of three different ways: decimal, hexadecimal, or name. For example, the entry parsing can be referred to as the integer value 2048, the hexadecimal value 0x800, or the name parse:
loglevel 2048
loglevel 0x800
loglevel parse
More than one category can be defined. Each of the following lines would have the LDAP server log entry parsing and LDAPSync replication messages:
loglevel 204816384
loglevel 0x800 0x4000
loglevel parse sync
Configuring the Database Directory
This is a setting that will probably not need any changes, but you should be aware of it because if it is not set up correctly, the LDAP server will not start correctly. The directory setting in the /etc/openldap/slapd.conf file is used to specify where the LDAP database files are stored:
# The database directory MUST exist prior to running slapd AND
# should only be accessible by the slapd and slap tools.
# Mode 700 recommended.
directory       /var/lib/ldap
Here are a few considerations you should be aware of:
• If this directory does not exist, slapd will not start.
• If the OpenLDAP package was installed correctly, this directory should already exist. However, it is a good idea to double-check after installation.
• It is common to keep the directory setting assigned to the /var/lib/ldap directory.
• If you read the comment in the slapd.conf file, above the directory setting, you see that it says “# Mode 700 recommended.” This is important because you do not want users to access this data directly and mode (or permission) 700 only gives access to the slapd service (and the root user, of course).
Starting the LDAP Server
After you have saved the changes to the slapd.conf file, you should run the slaptest command to verify there are no problems with the file:
[root@onecoursesource ~]# slaptest -u -v
config file testing succeeded
Normally if there are any problems, the slaptest command provides some clue as to what the problem is (unfortunately, sometimes you only get the “bad configuration file!” error, leaving you to look through the configuration file by hand). The following error occurred because the rootdn setting was not configured correctly:
[root@onecoursesource ~]# slaptest -u -v /etc/openldap/slapd.conf: line 93: <rootpw> can only be set when rootdn isunder suffix slaptest: bad configuration file!
If the test is successful, start the OpenLDAP server using the correct technique for your distribution. Note that although the process name is slapd, the name of the startup script will likely be ldap. The following example is from a system with traditional SysV-init scripts (see Chapter 28, “System booting,” for more details about starting services):
[root@onecoursesource ~]# /etc/init.d/ldap start
Starting slapd:                                            [  OK  ]
The ldapsearch command is designed to search for directory information from the client system. Although details for this command are discussed later in this chapter, it is useful to use this command to verify that the OpenLDAP server is responding to queries. To perform this verification, first install the openldap-clients package and then run the command demonstrated in Example 22-1. If the DN result matches what you placed in the configuration file, the server is working correctly.
Example 22-1 Testing the OpenLDAP Server
[root@onecoursesource ~]# ldapsearch -x -b '' -s base '(objectclass=*)' namingContexts
# extended LDIF
#
# LDAPv3
# base <> with scope baseObject
# filter: (objectclass=*)
# requesting: namingContexts
#

#
dn:
namingContexts: dc=OCS,dc=com

# search result
search: 2
result: 0 Success

# numResponses: 2
# numEntries: 1
The following options are used in the ldapsearch command demonstrated in Example 22-1:
• -x: Indicates to use simple authentication instead of SASL (Simple Authentication and Security Layer). In this case, no additional authentication is necessary.
• -b: The search base. The value of a null string (two single quotes, as shown in Example 22-1) starts the search at the top level of the LDAP domain structure.
• -S: Determines the return order of the values. See the man page for ldap_sort for additional details.
OpenLDAP Objects
To create an object in OpenLDAP, you first need to create an LDIF (LDAP Data Interchange Format) file. The format of this file is as follows:
dn: dc=OCS,dc=com
dc: OCS
description: A training company
objectClass: dcObject
objectClass: organization
o: OCS, Inc.
In some ways you may find parts of the LDIF file understandable based on what you have learned about objects. For example, you should realize now that the first line in the previous example ( dn: dc=OCS,dc=com) specifies a container that already exists. To understand the rest, you need to understand a bit about schemas.
Security Highlight
The LDIF file can be stored in any directory because it is just used to create the object. However, you should either remove the file after you have created the object or make sure this file is located in a secure directory (only root should have access) as it may contain sensitive account date stored in it.
OpenLDAP Schemas
Recall that the schema is used to organize how data is stored in the OpenLDAP directory. More specifically, it is used to define the object types and which attributes make up the components of the objects.
For casual LDAP configuration you do not need to know specifics about the format of the schemas. However, if you really want to administer an OpenLDAP server, you should learn about how schemas are formatted. The core schema (located in the /etc/openldap/schema/core.schema file) contains the entry shown in Example 22-2.
Example 22-2 Formatting Schemas
objectclass ( 2.5.6.4 NAME 'organization'
        DESC 'RFC2256: an organization'
        SUP top STRUCTURAL
        MUST o
        MAY ( userPassword $ searchGuide $ seeAlso $ businessCategory $
                x121Address $ registeredAddress $ destinationIndicator $
                preferredDeliveryMethod $ telexNumber $ teletexTerminalIdentifier $
                telephoneNumber $ internationaliSDNNumber $
                facsimileTelephoneNumber $ street $ postOfficeBox $ postalCode $
postalAddress $ physicalDeliveryOfficeName $ st $ l $ description ) )
You do not need to worry about all these settings. The following are the most important:
• Each object type definition is referred to as an objectclass. Each objectclass has a unique object ID (2.5.6.4 in the previous example). This object ID is supposed to be globally unique. These unique IDs are maintained by the Internet Assigned Numbers Authority (IANA).
• Know how to determine the name of the object (NAME 'organization').
• Read the DESC to determine the object’s use.
• Understand that MUST specifies what attributes are required and MAY describes what attributes are allowed but not required.
Recall the LDIF file shown previously and notice the lines highlighted in bold:
dn: dc=OCS,dc=com
dc: OCS
description: A training company
objectClass: dcObject
objectClass: organization
o: OCS, Inc.
These two lines create an organization object with the required o attribute. What is the o attribute type? The following is according to the schema:
attributetype ( 2.5.4.10 NAME ( 'o' 'organizationName' )
        DESC 'RFC2256: organization this object belongs to'
        SUP name )
You may encounter the term schema white page, which refers to a schema specifically designed to provide information about users. The term comes from the “white pages” used by telephone companies to publish the phone numbers of people in a geographic area.
OpenLDAP Database Changes
To add the content of an LDIF file into the LDAP directory, execute the ldapadd command, as shown in Example 22-3.
Example 22-3 The ldapadd Command
[root@onecoursesource ~]# more ldif.txt
dn: dc=OCS,dc=com
dc: OCS
description: A training company
objectClass: dcObject
objectClass: organization
o: OCS, Inc.
[root@onecoursesource ~]# ldapadd -x -D "cn=root,dc=OCS,dc=com" -W -f ldif.txt
Enter LDAP Password:
adding new entry "dc=OCS,dc=com"
The options used in the ldapadd command demonstrated in Example 22-2 are as follows:
• -x: Indicates to use simple authentication instead of SASL (Simple Authentication and Security Layer). In this case, because changes are being made to the data, you must supply the password for the rootdn account.
• -D: The DN of the OpenLDAP account authorized to administer the server (in other words, the DN of the rootdn).
• -W: Has the ldapadd command query for the rootdn password.
• -f: Used to specify the name of the file that contains the LDIF information.
You can verify these changes by running the slapcat command, as shown in Example 22-4.
Example 22-4 The slapcat Command
[root@onecoursesource ~]# slapcat
dn: dc=OCS,dc=com
dc: OCS
description: A training company
objectClass: dcObject
objectClass: organization
o: OCS, Inc.
structuralObjectClass: organization
entryUUID: 2159172e-4ab6-1035-90c7-df99939a0cfb
creatorsName: cn=root,dc=OCS,dc=com
createTimestamp: 20160109004614Z
entryCSN: 20160109004614Z#000000#00#000000
modifiersName: cn=root,dc=OCS,dc=com
modifyTimestamp: 20160109004614Z
Note
A benefit of the slapcat command is that the output format is LDIF. This means you can use this information to create your own LDIF files, which you can then modify to generate new content.
You should also be aware of the additional commands designed to make modifications to the OpenLDAP database:
• ldapmodify: Using an LDIF file, this command changes an existing object.
• ldapdelete: Used to delete an existing object. No LDIF file is required for this command; the object is specified on the command line.
• slapindex: An index is used to make it easier to find data. Remember that LDAP, as a directory service, is optimized for reading data. Having data indexed makes reading data quicker. The slapindex command creates this index for the objects in the database.
The ability to execute these commands successfully depends on a security feature called access control. Within the slapd.conf file you can create rules that define who can modify what within the LDAP database. When your organization becomes large and this database becomes difficult to manage, it is useful to be able to offload some work to other people.
The downside to this is that the syntax of access control is complex. The slapd.access man page describes the details; however, a complete discussion of these details is beyond the scope of this book. To give you an idea of the complexity of configuring access control, look at Example 22-5, which shows the syntax of the oclAccess directive, as provided by the OpenLDAP documentation.
Example 22-5 An Access Control Example
        olcAccess: <access directive>
<access directive> ::= to <what>
                [by <who> [<access>] [<control>] ]+
<what> ::= * |
                [dn[.<basic-style>]=<regex> | dn.<scope-style>=<DN>]
                [filter=<ldapfilter>] [attrs=<attrlist>]
<basic-style> ::= regex | exact
<scope-style> ::= base | one | subtree | children
<attrlist> ::= <attr> [val[.<basic-style>]=<regex>] | <attr> , <attrlist>
<attr> ::= <attrname> | entry | children
<who> ::= * | [anonymous | users | self
                        | dn[.<basic-style>]=<regex> | dn.<scope-style>=<DN>]
                [dnattr=<attrname>]
                [group[/<objectclass>[/<attrname>][.<basic-style>]]=<regex>]
                [peername[.<basic-style>]=<regex>]
                [sockname[.<basic-style>]=<regex>]
                [domain[.<basic-style>]=<regex>]
                [sockurl[.<basic-style>]=<regex>]
                [set=<setspec>]
                [aci=<attrname>]
<access> ::= [self]{<level>|<priv>}
<level> ::= none | disclose | auth | compare | search | read | write | manage
<priv> ::= {=|+|-}{m|w|r|s|c|x|d|0}+
<control> ::= [stop | continue | break]
Using the ldapdelete Command
After populating your database, you might decide that you want to delete an entry in the database. This does not require creating an LDIF file. Instead, you specify on the command line what you want to delete:
[root@onecoursesource ~]# ldapdelete "uid=named,ou=People,dc=OCS,dc=com"
This is one of those cases in which no news is good news. If the object was not deleted, you would see an error message:
[root@onecoursesource ~]# ldapdelete "uid=named,ou=People,dc=OCS,dc=com"
You can make sure the entry is deleted by using the slapcat command:
[root@onecoursesource ~]# slapcat | grep named
Again, no news is good news. If the named object was in the database, something would be displayed by the grep command.
You can also use the ldapsearch tool, described in the next section.
The following breaks down the different components of the ldapdelete command:
• "uid=named,ou=People,dc=OCS,dc=com" is what you want to delete.
• -x means “use simple authentication.” Because a change is being made to the database, a password is required.
• -D "cn=root,dc=OCS,dc=com" specifies the LDAP account that can make changes (the rootdn).
• -W specifies to prompt the user for the password. You could also include the password on the command line with the -w option, but that poses potential security problems (someone nearby looking over your shoulder, the line is recorded in your history, and so on).
Using the ldapsearch Command
After you have a database populated with information, you will find the slapcat command to be difficult to use:
[root@onecoursesource ~]# slapcat | wc -l
1077
The previous command produces more than 1000 lines of output, and that is just a handful of entries. Expect to have tens (or hundreds) of thousands of output lines when running the slapcat command on a live database.
The ldapsearch tool provides a much better way to view details from the OpenLDAP database (however, unlike the slapcat command, this command requires the LDAP server to be running). Many search options are available; Example 22-6 demonstrates viewing all objects that are account object types and returning the uid attribute of those objects.
Example 22-6 Searching for account Objects
[root@onecoursesource ~]# ldapsearch -x -b 'ou=People,dc=OCS,dc=com'
Here are some important notes regarding the output of Example 22-5:
• Recall that using -x means “use simple authentication.” In this case, no password is required.
• The -b option is used to specify the base to search from. You could have just used 'dc=OCS,dc=com' and the results would have been the same. However, the search could have taken longer if there were additional DCs or OUs (Organization Units). Plus, on a real OpenLDAP server, additional results from other DCs or OUs may have appeared. It is best to use the “deepest” possible base when performing searches.
• The '(objectclass=account)' is the filter—essentially what records to search inside. The uid is what attribute to return.
• Many additional results were returned. However, to avoid a large amount of output, only the first three results are displayed.
You can also search by CN. Remember that the CN (or common name) is the name of an object without specifying the domain (DM) to which it belongs. See Example 22-7 to see a demonstration of searching by CN.
[root@onecoursesource ~]# ldapsearch -x -b 'ou=People,dc=OCS,dc=com' '(cn=bin)' uid
# extended LDIF
#
# LDAPv3
# base <ou=People,dc=OCS,dc=com> with scope subtree
# filter: (cn=bin)
# requesting: uid
#

# bin, People, OCS.com
dn: uid=bin,ou=People,dc=OCS,dc=com
uid: bin

# search result
search: 2
result: 0 Success

# numResponses: 2
# numEntries: 1
The output of the ldapsearch command is likely more information than you really need. You can use one or more -L options to limit how much additional information is displayed or change how it is displayed:
• -L: Display output in an older version (LDAP, version 1).
• -LL: Display only the results and the version of LDAP.
• -LLL: Display only the results.
See Example 22-8 for a demonstration of using the -LL option.
[root@onecoursesource ~]# ldapsearch -LL -x -b 'ou=People,dc=OCS,dc=com'
You can use Boolean operators when specifying the filter:
• | is the logical OR operator
• & is the logical AND operator.
• ! is the logical NOT operator.
However, you may find the syntax of these complex filters to be a bit strange:
[root@onecoursesource ~]# ldapsearch -LLL -x -b 'ou=People,dc=OCS,dc=com'
There is also flexibility in the filter expression:
• =: Must match exactly.
• =string*string: Asterisk acts as a wildcard.
• >=: Equal to or greater than.
• <=: Equal to or less than.
• ~=: Approximate match.
Here’s an example:
[root@onecoursesource ~]# ldapsearch -LLL -x -b 'ou=People,dc=OCS,dc=com'
Using the ldappasswd Command
As you can see from the following command, user accounts in the OpenLDAP database have passwords stored in the userPassword attribute:
[root@onecoursesource ~]# ldapsearch -LLL -x -b 'ou=People,dc=OCS,dc=com'
You can change the password for an OpenLDAP user by executing the ldappasswd command:
[root@onecoursesource ~]# ldappasswd -x -D "cn=root,dc=OCS,dc=com" -s
The -x, -D, and -W options have the same meanings as with the ldapdelete an ldapadd commands. The -s option allows you to specify the new password for the OpenLDAP user. The output of the command should be “Success,” and you can verify the change by running the ldapsearch command again:
[root@onecoursesource ~]# ldapsearch -LLL -x -b 'ou=People,dc=OCS,dc=com'
If you want to avoid specifying the new password on the command line when you execute the ldappasswd command, use the -S option instead of the -s option:
[root@onecoursesource ~]# ldappasswd -x -D "cn=root,dc=OCS,dc=com" -S -W
The first two password prompts are for the new password for the OpenLDAP user. The third prompt is for the rootdn password.
Connecting to an LDAP Server
LDAP servers can be used in a variety of ways because the purpose of an LDAP server is to provide information to client systems, and the LDAP server has the flexibility to store a wide variety of information. With that said, there are two specific operations that LDAP servers are commonly used for: as a replacement for DNS internally within an organization and as a means to provide login information for client systems.
Different distributions have different tools to help you manage an LDAP client. For example, if you are working on an Ubuntu system, the general steps and tools you would use to configure access to LDAP user and group accounts are as follows:
1. Make sure the ldap-auth-client package is installed.
2. Make sure the nscd package is installed. This includes software that helps the system manage user, group, and host lookups.
3. Execute the auth-client-config command to tell the system to authenticate via an LDAP server.
4. Modify settings in the /etc/ldap/ldap.conf file.
Some Red Hat–based distributions make use of a utility named authconfig to configure access to an LDAP server.
Additional considerations when setting up LDAP on the client side include the following:
• Setting up automounting to mount network home directories
• Modifying PAM (Pluggable Authentication Modules) features to provide more functionality and security on LDAP clients
• Modifying the lookup order of accounts (local accounts first, network accounts second, and so on)
Because the techniques and tools vary from one distribution to another, specific examples are not provided in this book. This is one of the areas where you really need a “deep dive” into the documentation for the distribution on which you are working.
FTP Servers
An FTP (File Transfer Protocol) server is used to provide an easy and standard way to transfer files across the network. Several different FTP servers are available for Linux:
• vsftpd: The Very Secure FTP daemon is a popular Linux-based FTP server (it exists on many UNIX-based flavors as well). This server is the default for most of the major Linux distributions. Keep in mind that the standard FTP protocol itself is not secure because data is sent via the network in unencrypted format. The vsftpd process is considered very secure because of how the process interacts with the filesystem. The vsftpd software also provides additional features, including bandwidth throttling, limitations based on source IP, and per-user configuration. There is a reason why it is the default for so many distributions!
• Pure-FTPd: This software is designed to be a simpler (yet secure) FTP server. Although it may not have the robust features that vsftpd has, it provides the key components needed for most organizations that implement an FTP server.
• ProFTPd: This software is designed to be more user friendly in the sense that it opens configuration options to end users. It is known for being highly configurable.
Although there are differences between how these servers are configured, they are all designed to perform the same function. As a result, only the vsftpd server will be covered in detail in this book.
Configuring vsftpd
You should be able to use either the yum or apt-get commands on just about any distribution to install the vsftpd software package (see Chapters 27 and 28 for details on installing software). In fact, it may already be installed on your system. The /etc/vsftpd/vsftpd.conf file is used to configure this server.
As with any server discussed in this book, many configuration settings are available for vsftpd, but you only need to know some of them to perform essential administration tasks.
Anonymous FTP
The feature called anonymous FTP allows people to connect to the FTP server even if they do not have a local user account. Typically, this is set up to allow the anonymous user only to download content, not upload, as that can pose legal issues and other problems.
Security Highlight
It is a bad idea to allow the anonymous account to upload content. In the event that this is discovered, people could use your FTP server for illegal activity, such as sharing copyrighted content (movies, music, books, and so on). That puts your organization at risk.
Additionally, allowing anonymous accounts to upload content can result in the /var partition becoming full quickly. This can have an impact on system services that require the capability to write data to the /var partition, such as mail, log files, and print spooling.
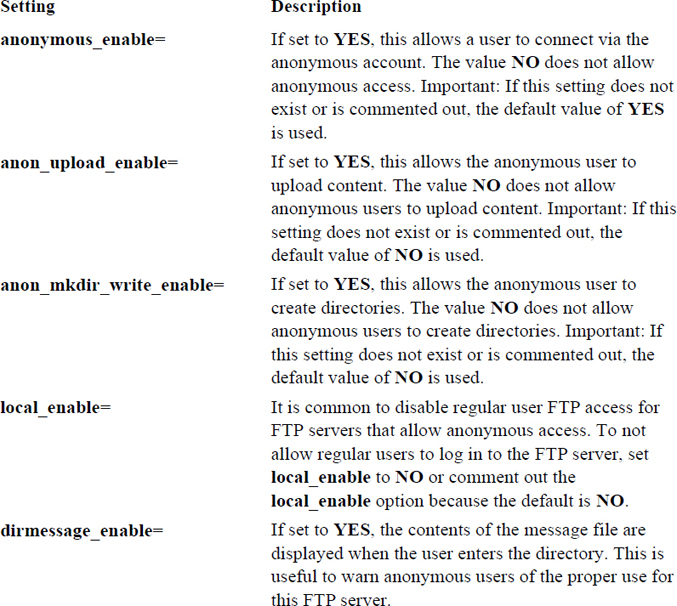
Several settings in the /etc/vsftpd/vsftpd.conf file are related to anonymous FTP. See Table 22-3 for the details regarding these settings.
Table 22-3 Anonymous FTP Settings
To test whether your vsftpd server has the correct anonymous settings, either start or restart the server and then attempt to connect using either the anonymous account or the ftp account (they are the same account from FTP’s perspective). Example 22-9 demonstrates an FTP server that permits anonymous access.
Example 22-9 Anonymous Access Permitted
[root@onecoursesource ~]# ftp localhost
Connected to localhost.localdomain.
220 (vsFTPd 2.0.5)
530 Please login with USER and PASS.
530 Please login with USER and PASS.
KERBEROS_V4 rejected as an authentication type
Name (localhost:root): anonymous
331 Please specify the password.
Password:
230 Login successful.
Remote system type is UNIX.
Using binary mode to transfer files.
ftp>
Note that the password can be anything. In the “olden days,” it was supposed to be your email address, but that is no longer necessary. (How did it know whether it was your email address anyway?)
Example 22-10 demonstrates an FTP server that does not permit anonymous access.
Example 22-10 Anonymous Access Not Permitted
[root@onecoursesource ~]# ftp localhost
Connected to localhost.localdomain.
220 (vsFTPd 2.0.5)
530 Please login with USER and PASS.
530 Please login with USER and PASS.
KERBEROS_V4 rejected as an authentication type
Name (localhost:root): anonymous
331 Please specify the password.
Password:
530 Login incorrect.
Login failed.
ftp>
Limiting User Accounts
You may choose to limit which regular users can access the FTP server. This can be accomplished either by using a feature provided by PAM (see Chapter 7, “Managing User Accounts,” for details about PAM) or by using a feature embedded in the vsftpd server.
The PAM feature allows you to add a user account name to the /etc/vsftpd.ftpusers file to prevent the user from logging in via FTP. This feature exists because of the pam_listfile.so line in the /etc/pam.d/vsftpd file, as shown in Example 22-11.
[root@onecoursesource ~]# more /etc/pam.d/vsftpd
#%PAM-1.0
session    optional     pam_keyinit.so    force revoke
auth       required     pam_listfile.so item=user sense=deny file=/etc/vsftpd/ftpusers onerr=succeed
auth       required     pam_shells.so
auth       include      system-auth
account    include      system-auth
session    include      system-auth
session    required     pam_loginuid.so
The /etc/vsftpd.ftpusers file should include one username per line:
[root@onecoursesource ~]# more /etc/vsftpd.ftpusers
root
student
Security Highlight
This PAM technique is useful because normally you want to limit access to a few users. However, what if you only want to allow access for a few users? If you have 100 users and only five should be able to log in via FTP, it would be a pain to have to add 95 usernames to the /etc/vsftpd.ftpusers file. Also, you would have to remember to add any new user to this file unless they are supposed to be allowed to use FTP as well.
Another solution is to use the userlist_enable, userlist_file, and userlist_deny directives:
• When set to YES, the userlist_enable directive allows you to use the file defined by the userlist_file directive to either allow or block user access to the FTP server. The userlist_enable directive is set to NO by default.
• The userlist_file directive allows you to specify a filename where the list of user accounts is stored. If this is not set, the default /etc/vsftpd/user_list is used.
• The userlist_deny directive allows you to specify whether the users in the file are allowed or denied access. If set to YES, this essentially does the same thing as the PAM /etc/vsftpd.ftpusers file, denying access to the FTP server for these users. If it is set to NO, only users in the file can access the FTP server. The default for this directive is YES.
The most common use of these directives is shown in the following output. This allows you to place the names of users authorized to access the FTP server in the /etc/vsftpd/user_list file (all other users would be denied):
userlist_enable=YES
# userlist_file  - commented out because most administrators use the default file
userlist_deny=NO
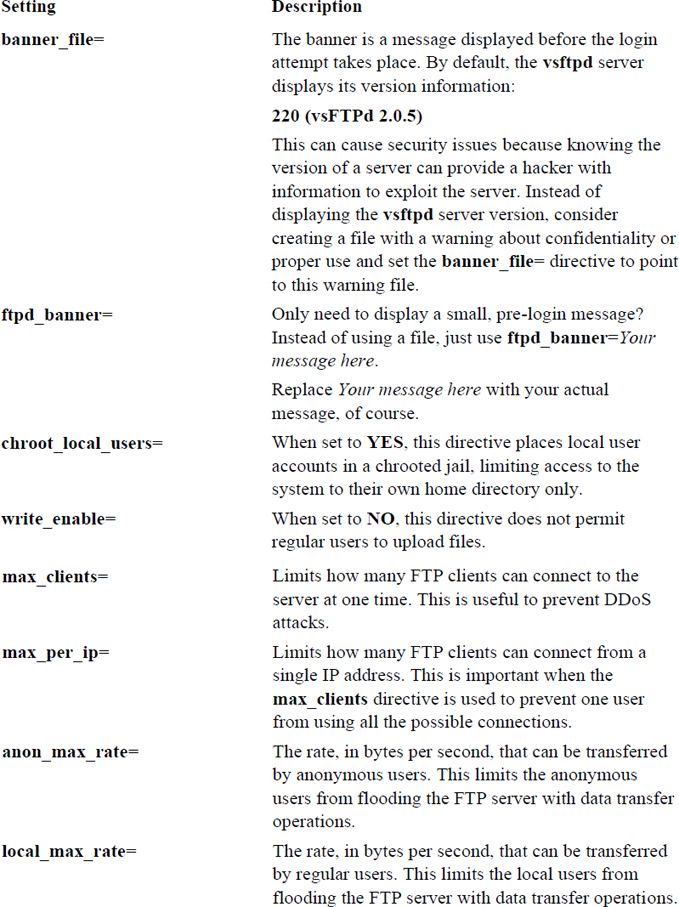
Additional Settings
You can set numerous directives in the /etc/vsftpd/vsftpd.conf file. Table 22-4 provides a brief summary of some of the more important ones.
Table 22-4 vsftpd.conf Directives
Connecting to an FTP server
As previously demonstrated, you connect to an FTP server by executing the ftp command followed by the hostname or IP address of the FTP server. Once you have successfully logged in, there are a series of commands you can execute to transfer files or perform other tasks on the remote system. To see a summary of these commands, use the help command at the ftp> prompt, as shown in Example 22-12.
Example 22-12 Using ftp>help to See a Summary of Commands
ftp>help
Commands may be abbreviated.  Commands are:

!        dir         mdelete    qc         site
$        disconnect  mdir       sendport   size
account  exit        mget       put        status
append   form        mkdir      pwd        struct
ascii    get         mls        quit       system
bell     glob        mode       quote      sunique
binary   hash        modtime    recv       tenex
bye      help        mput       reget      tick
case     idle        newer      rstatus    trace
cd       image       nmap       rhelp      type
cdup     ipany       nlist      rename     user
chmod    ipv4        ntrans     reset      umask
close    ipv6        open       restart    verbose
cr       lcd         prompt     rmdir      ?
delete   ls          passive    runique
debug    macdef      proxy      send
To see a brief description of one of these commands, execute a command like the following:
ftp>help ls
ls            list contents of remote directory
It is important to note that when a command performs an operation on the “remote” system, it is performing the operation on the FTP server. For example, the cd command changes directories on the remote server:
ftp>help cd
cd            change remote working directory
ftp>cd /tmp
250 Directory successfully changed.
When a command performs an operation on the “local” system, it is performing on the system on which you originally ran the ftp command to connect to the server:
ftp>help lcd
lcd           change local working directory
ftp>lcd /etc
Local directory now /etc
Many of the commands are very similar to the Linux commands you have already learned:
ftp>help ls
ls            list contents of remote directory
ftp>ls
200 PORT command successful. Consider using PASV.
150 Here comes the directory listing.
-rw-------    1 1000     1000            0 Jan 21 15:44 config-err-qCpjfZ
226 Directory send OK.
Security Highlight
Note the warning “Consider using PASV.” This is an important security feature that is discussed in the next section, titled “Active versus Passive Mode.”
To copy a file from the current local directory to the current remote directory, use the put command: put file123. Multiple files can be copies using the mput command and wildcards: mput *.txt.
To copy files from the current remote system to the current local directory, use the get command: get file123. Multiple files can be copied using the mget command and wildcards: mget *.txt.
What Could Go Wrong
Unlike regular Linux commands, you do not ever use the pathname when copying files. The commands always work only on the current local and remote directories.
Active versus Passive Mode
To understand the difference between active and passive mode, you first need to understand a common feature used in firewalls. Administrators often want to permit internal machines to establish connections to external machines, but prevent the reverse, except in a few rare cases.
For example, your company web server may be behind the company firewall, so the firewall might be configured to allow inbound connections for ports 80 and 443. Other communications that initiate on any other port from outside the firewall are blocked.
Normally any communication initiated from within the firewall, regardless of the port, is permitted. So, if you were on a host within the firewall and attempted to connect to an SSH server outside the firewall, that connection should be permitted by the firewall.
This works well for almost all servers, with FTP being an exception. By default, FTP connections use a feature called “active.” In an active FTP connection, the FTP client uses a random unprivileged port (a port number greater than 1023) to initiate the connection to port 21 (called the command port) on the FTP server. The FTP server initially responds to the port the client provided, handling the login process for the user.
See Figure 22-3 for a diagram of how the active FTP connection is established.
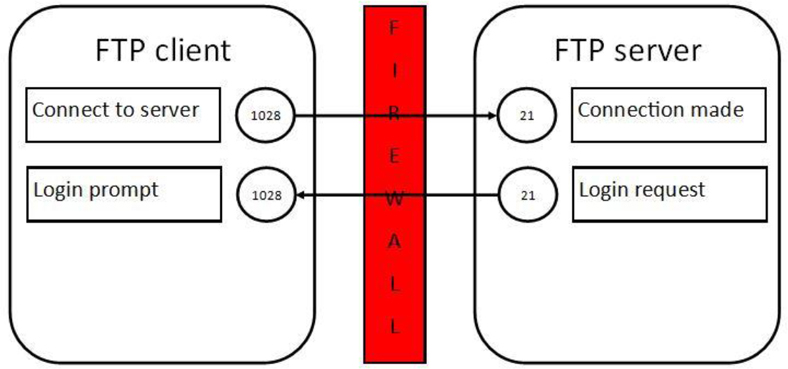
Figure 22-3 Establishing an active FTP connection
Once this initial connection is established, some additional actions take place. The user is prompted for a username and a password to log in to the FTP server. Once the user is successfully logged in, any data transfer (uploading or downloading of files, for example) takes place on different ports. On the server, port 20 is used. On the client, the port number is one higher than the connection port. So, for the example in Figure 22-4, this is port 1029.
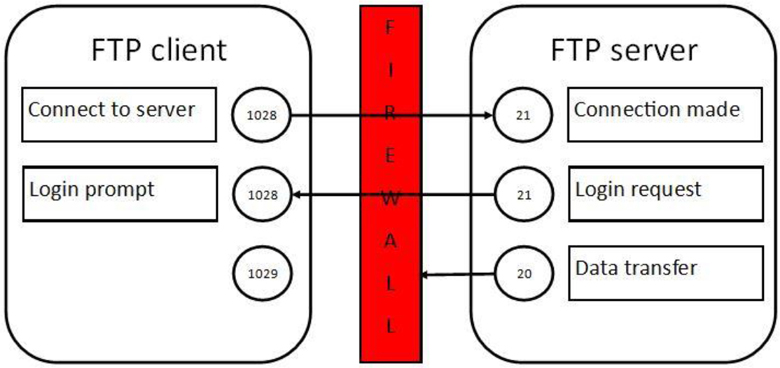
All commands issued from the client (and responses from the server) continue to be sent via the original ports. But data transfer uses the new ports and is initiated by the server. This is a problem because firewalls on the client side are typically designed to block these sorts of connections. You might think you could just allow the inbound connection for that port, but remember that this port is a moving target. The client randomly picks the client-side ports when the connection is first established.
The result of this is that the FTP server appears to freeze when the client attempts to download or upload a file. Everything else to that point appears to work just fine.
When passive mode is used, the FTP server is told to not initiate the data transfer communication and to wait for the client to establish the connection. This satisfies the firewall rules (if they are configured correctly) because the data being set by the FTP server is deemed a response to the FTP client’s connection request (firewall rules normally allow for responses from connections that are established on the client side).
The way you establish passive mode is to log in to the FTP server and then issue the passive command, as demonstrated in Example 22-13.
Example 22-13 Enabling Passive Mode
[root@onecoursesource ~]# ftp localhost
Connected to localhost.localdomain.
220 (vsFTPd 2.0.5)
530 Please login with USER and PASS.
530 Please login with USER and PASS.
KERBEROS_V4 rejected as an authentication type
Name (localhost:root): anonymous
331 Please specify the password.
Password:
230 Login successful.
Remote system type is UNIX.
Using binary mode to transfer files.
ftp>passive
Passive mode on.
ftp>
Secure Shell
Secure Shell is designed to replace unsecure remote communication operations, such as the telnet, ftp, rlogin, rsh, rcp, and rexec commands/protocols. The primary issue with previous communication methods is that these methods send data across the network in plain text, rather than encrypted format. In some cases, such as telnet and ftp, this can include sending user account data (name and password) across the network in plain text.
The Secure Shell (SSH) protocol provides a better level of security by encrypting the data sent across the network. SSH has become such a standard in Linux that almost all distributions include both the client and server software by default. In the event that you do not have this software installed on your system, you should install the openssh, openssh-server, openssh-clients, and openssh-askpass software packages (see Chapters 27 and 28 for more details regarding installing software).
Configuring the Secure Shell Server
The /etc/ssh directory is the location where the Secure Shell configuration files are stored. The configuration file for the SSH server is the /etc/ssh/sshd_config file. Don’t confuse this with the /etc/ssh/ssh_config file, which is used to configure client utilities, such as the ssh, scp, and sftp commands.
Basic Configuration Settings
The two different SSH protocols are numbered 1 and 2. These are not versions, but rather two separate protocols developed to provide secure data connections. There was a time when both protocols were commonly used, but now almost all SSH clients use only protocol 2. To set the protocol that your SSH server accepts, use the Protocol keyword:
Protocol 2
If you have some older SSH clients that require protocol 1, you can configure your SSH server to accept both protocol connections by using the following keyword setting in the /etc/ssh/sshd_config file:
Protocol 1,2
Security Highlight
Protocol 1 is no longer supported and should be avoided if possible. Protocol 2 has better security features and is actively receiving improvements. In general, you should always stay away from software that is no longer supported or actively maintained because security holes are not fixed when discovered by hackers.
In some cases, you may have multiple network cards (or virtual interfaces) and you want to limit the SSH server to listen to only some of the network cards. To do this, use the ListenAddress keyword and specify the IP address assigned to the network cards that SSH should accept connections on. Here is an example:
ListenAddress 192.168.1.100:192.168.1.101
The standard port number that the SSH server listens to is port 22. You can modify the SSH server to listen to another port by using the Port keyword:
Port 2096
Security Highlight
Using a nonstandard port makes it a bit more difficult for a hacker to discover a service. However, there are tools that allow hackers to probe a system for ports that are “open” (that is, ports to which services are responding). Therefore, changing the port will not completely hide the SSH service. However, many hackers also just use scripts with hardcoded values (like port numbers), so you might be able to avoid a casual hacking attempt by using a different port number.
You might need to change what sort of log messages you want the SSH server to record. This can be set by using the LogLevel keyword. Here are the levels available:
• QUIET
• FATAL
• ERROR
• INFO
• VERBOSE
• DEBUG
• DEBUG1 (same as DEBUG)
• DEBUG2
• DEBUG3
Like system logging (see Chapter 25, “System logging,” for details about system logs), these levels build on each other. For example, the INFO level includes all the logs generated at the ERROR and FATAL levels (technically QUIET as well, but there are no messages at this level). Be careful when changing to DEBUG, DEBUG2, or DEBUG3, as this may cause security issues on real SSH servers.
Security Highlight
The sshd_config man page states, “Logging with a DEBUG level violates the privacy of users and is not recommended.” If you set the LogLevel keyword to DEBUG on a test machine and then restart the SSH server, connect to the SSH server, and look at the /var/log/secure file (Red Hat–based systems) or /var/log/auth.log file (Debian), you should see why (data such as usernames and passwords are captured).
Settings That Affect User Access
To disallow the root user from logging in via SSH, change the PermitRootLogin value to no:
PermitRootLogin no
Security Highlight
You might want to consider not allowing the root user to log in directly via SSH, especially if the system is connected to the Internet. Allowing root login via SSH provides potential hackers with the ability to use a brute-force attack by trying multiple passwords to gain access.
A better choice is to permit regular user login, allowing the user to switch to the root account using the su or sudo command. Although the brute-force attack can still be attempted with the regular user, the hacker would have to know the account exists and then, after gaining access, attempt to hack into the root account.
What if you have a regular user who has no reason to log in via SSH? In this case, you have two choices: AllowUsers or DenyUsers. Both of these keywords allow you to specify a list of usernames:
AllowUsers bob sue ted
If you use the AllowUsers keyword, only those users are allowed to connect to the SSH server. If you use the DenyUsers keyword, all users can connect to the SSH server except for those users listed. Note that if you use both keywords, DenyUsers takes precedence.
You can use wildcard characters to match patterns:
DenyUsers guest*#denies any user with a name that begins with "guest"
DenyUsers ????app#denies any user with a name that contains 4 characters
and ends with "app"
Security Highlight
You can also use the AllowGroups and DenyGroups keywords.
Several different authentication methods are available for the SSH server. Here are the critical ones you should know about:
• PasswordAuthentication: When set to yes (the default), this setting allows users to log in by providing their username and password. If set to no, users can log in using an Authentication key only. Authentication keys will be covered in detail later in this chapter.
• PubkeyAuthentication: When this is set to yes, a user can store a public key on the server. The public key is generated by the ssh-keygen command on the user’s client system. This process is covered in greater detail in a later section of this chapter.
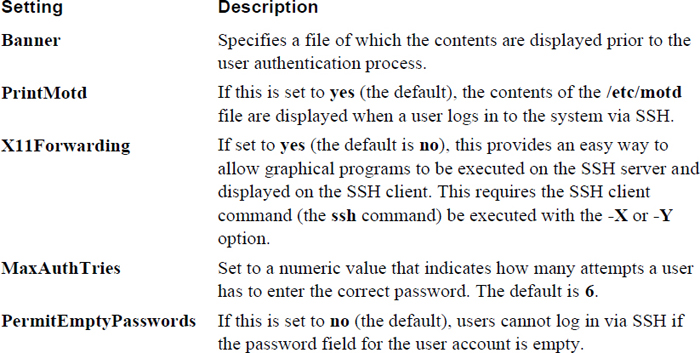
Table 22-5 describes additional useful SSH server settings that affect user login.
Table 22-5 SSH Server Settings
Secure Shell Client Commands
You need to be aware of several different SSH client commands, including the following:
• ssh: Allows you to log in to an SSH server and work on the server via the command line
• scp: Allows you to transfer files to and from an SSH server via the command line
• sftp: Allows you to connect to an SSH server and execute FTP-like commands
You should be aware of the function of each of these commands as well as some of the key settings in the /etc/ssh/ssh_config file.
The ssh_config File
A few components of the ssh_config file are different from the sshd_config file. To begin with, there is the systemwide /etc/ssh/ssh_config file, which applies to all users. Additionally, each user can create a file in their home directory (~/.ssh/config) that can be used to override the settings in the /etc/ssh/ssh_config file.
In addition to the files, command-line options can override the values specified in the configuration files. Here is the order in which all this information is parsed:
1. Command-line options
2. The user’s ~/.ssh/config file
3. The /etc/ssh/ssh_config file
Important
The first parameter found is the one used. For example, if ConnectTimeout is set in the user’s ~/.ssh/config file and a different value is set in the /etc/ssh/ssh_config file, the user’s configuration file is used to set this value.
Another important difference between the ssh_config file and the sshd_config file is that most of the settings in the ssh_config file are subsettings of the Host setting. The Host setting allows you to specify different rules for different SSH servers you are connecting to. For example, the following would apply the ConnectTimeout value of 0 when connecting to server1.onecoursesource.com and a value of 600 when connecting to test.example.com:
Host server1.onecoursesource.com
ConnectTimeout 0
Host test.example.com
ConnectTimeout 600
Many of the settings in the ssh_config file are related to settings in the SSH server configuration file. Recall, for example, the following /etc/ssh/sshd_config file setting:
X11Forwarding yes
On the client side, this feature is typically enabled by using the -X or -Y option when executing the ssh-based commands. However, if you want this feature to be the default, the following settings could be used in either the /etc/ssh/ssd_config or the ~/.ssh/config file:
ForwardX11 and ForwardX11Trusted
The ssh Command
The first time you attempt to connect to a machine via the ssh command, you are prompted to verify the RSA key fingerprint:
[student@onecoursesource ~]$ ssh 192.168.1.22
The authenticity of host '192.168.1.22 (192.168.1.22)' can't be established.
RSA key fingerprint is 7a:9f:9b:0b:7b:06:3a:f0:97:d1:c7:e9:94:a8:84:03.
Are you sure you want to continue connecting (yes/no)? yes
Warning: Permanently added '192.168.1.22' (RSA) to the list of known hosts.
student@192.168.1.22's password:
[student@testmachine ~]$
Consider the RSA key fingerprint to be like an actual fingerprint. Many modern laptops and phones have fingerprint scanners to verify your identity as a means of logging on to or unlocking the device. To use this feature, you first need to register it. This is what is happening when you answer yes to the ssh prompt “Are you sure you want to continue connecting (yes/no)?”
When you register your fingerprint on your laptop or phone, the device just assumes you are who you claim to be (the owner of the account or device). Essentially, this is what happens when you accept the RSA key fingerprint. You are accepting that the computer you are connecting to is the correct computer.
Future attempts to connect to this computer invoke a process in which the current fingerprint on the SSH server matches the one that you accepted when you first connected. This fingerprint is stored in the ~/.ssh/known_hosts file (each user has a separate set of accepted fingerprints):
[student@onecoursesource ~]$ cat .ssh/known_hosts
192.168.1.22 ssh-rsa AAAAB3NzaC1yc2EAAAABIwAAAQEAz98zgUakM93uWfXw/iF5QhCsPrSnNKHVBD/o9qwSTh8sP6MKtna8vMw1U2PltXN3/BMm7hrT0sWe1hjkAqFjrx7Hp6uzjs1ikfPSRerybsE+CAR+KywbiiInvp4ezm/IHPjhwjasskSzcWHwdQ+1YaYNkoaoGrRz87/xbiXUxWVb7VVn6RZKxiVIh2+XgCr4dWct0ciJf3eM9eel2SL81G5M1jUMB8g9jzUpWITvuj2e86LJw8RwpqRZ9oUaCwZFkp8FaBpLvA1xBTaGIjB6J9qBAoERfTv5TChqGMoK1zyz/KF9LC/22dwZ2hnU21fdS34COJ6RuxNA4P/hSGFxrw==
As a user, you do not really need to know specifics about the fingerprint; this process is handled by the SSH client utility and the SSH server. However, this is a situation regarding the fingerprint that you should be aware of. It is related to the following message:
@@@@@@@@@@@@@@@@@@@@@@@@@@@@@@@@@@@
@ WARNING: REMOTE HOST IDENTIFICATION HAS CHANGED! @
@@@@@@@@@@@@@@@@@@@@@@@@@@@@@@@@@@@
IT IS POSSIBLE THAT SOMEONE IS DOING SOMETHING NASTY!
Someone could be eavesdropping on you right now (man-in-the-middle attack)!
It is also possible that the RSA host key has just been changed.
The fingerprint for the RSA key sent by the remote host is
7a:9f:9b:0b:7b:06:3a:f0:97:d1:c7:e9:94:a8:84:03
Please contact your system administrator.
This error message could appear for several reasons:
• The SSH server software was reinstalled; this could result in a new RSA key fingerprint.
• The SSH server itself was reinstalled or replaced with a new system.
• The man-in-the-middle from the warning could be the cause.
Security Highlight
A “man-in-the-middle” is a hacking technique in which a rouge computer will insert itself in between the client and server. The goal is to gather information for a hacker so they can further compromise systems.
The administrator of the SSH server should know whether one of the first two situations has occurred. If that is the case, the solution is to delete the entry for this SSH server from the ~/.ssh/known_hosts file. If the first two situations have not occurred, it is time to do some exploring to determine what is really going on.
To log in as a different user from the user you are logged in as on the client machine, use one of the following syntax methods:
ssh -l username ssh_server
ssh username@ssh_server
To execute a command on the remote system, but immediately return to your client system, use the following syntax:
ssh ssh_server command
The scp and sftp Commands
The scp command uses many of the same options and features provided by the ssh command. To copy a file from your current system to a remote system, use the following syntax:
[student@onecoursesource ~]$ scp /etc/hosts 192.168.1.22:/tmp
student@192.168.1.22's password:
hosts                                                      100%  187     0.2KB/s   00:00
Here are a few useful scp options:
• -r: Copies entire directory structures
• -v: Verbose mode; displays details helpful in debugging transfer issues
• -q: Quiet mode
• -p: Preserves timestamps and permissions
The sftp command connects to an SSH server and provides an FTP-like client interface. See Example 22-14 for a demonstration.
Example 22-14 Anonymous Access Permitted
[student@onecoursesource ~]$ sftp 192.168.1.22
Connecting to 192.168.1.22...
student@192.168.1.22's password:
sftp>cd /tmp
sftp>ls
gconfd-root            hosts                  keyring-GhtP1j         mapping-root
nis.6788.ldif          nis.6818.ldif          nis.6836.ldif          orbit-root
ssh-ysXgwO2672         uplist                 virtual-root.9QNCsb
sftp>get hosts
Fetching /tmp/hosts to hosts
/tmp/hosts                                          100%  187     0.2KB/s   00:00
sftp>ls h*
hosts
sftp>quit
Advanced SSH Features
A question often asked by novice administrators is, how can SSH encrypt the data transfer to ensure it is secure? The technique used involves public and private keys. When the SSH client connects to the SSH server, the server provides the client with its public key.
As a session is being established, a symmetric session key is generated by the client and server, which is then used to encrypt all the data exchanged between the hosts. The client then encrypts all data with the public key before sending it to the server. The data can only be decrypted by the private key, which is stored only on the server.
These keys are created when the SSH server is installed, and they are stored in the /etc/ssh directory.
If a user routinely logs in to a specific SSH server, that user may want to set up passwordless logins. To do this, you would follow these steps:
Step 1. On the SSH client machine, execute the ssh-keygen command, as shown in Example 22-15. When prompted for a passphrase, press the Enter key to leave this blank (or, you could use the -N option with the ssh-keygen command, which results in no passphrase prompt).
Example 22-15 The ssh-keygen Command
[student@onecoursesource ~]$ ssh-keygen -t rsa
Generating public/private rsa key pair.
Enter file in which to save the key (/home/student/.ssh/id_rsa):
Enter passphrase (empty for no passphrase):
Enter same passphrase again:
Your identification has been saved in /home/student/.ssh/id_rsa.
Your public key has been saved in /home/student/.ssh/id_rsa.pub.
The key fingerprint is:
b4:77:29:40:b8:aa:d1:1c:3a:cb:e6:b8:5d:9b:07:fb student@localhost.localdomain
The key's randomart image is:
+--[ RSA 2048]----+
|       ..       |
|      ..        |
|       .o        |
|    . .. o   .  |
|   + o  S o o    |
|  + =    . o     |
| . =.o           |
| o=..o.         |
|o+o ooE          |
+-----------------+
Step 2. There is now a public key in the ~/.ssh/id_rsa.pub file. This needs to be copied to the remote server, into the ~/.ssh/authorized_keys file of your account on the remote machine (you may need to create this directory and set the permissions to 770). This can be done with the following commands:
student@localhost ~]$ cat .ssh/id_rsa.pub | ssh 192.168.1.22 'cat >> .ssh/authorized_keys'
student@192.168.1.22's password:
Step 3. Set the permissions of the authorized_keys file to 640:
[student@onecoursesource ~]$ ssh 192.168.1.22 'chmod 640 /home/student/.ssh/authorized_keys'
student@192.168.1.22's password:
Security Highlight
On some distributions, you can use the ssh-copy-id command to complete both Step 2 and Step 3. However, you should also know how to use the manual method described in these steps.
You now should be able to log in to the SSH server without any password:
[student@onecoursesource ~]$ ssh 192.168.1.22 date
Mon Jan 11 16:59:32 PST 2019
Some security experts point out that having no passphrase for your key poses a security risk. However, if you do have a passphrase, each time you try to connect to the SSH server from the client, instead of being asked for your password, you are asked for the passphrase (and having to type a password/passphrase is what you were trying to avoid in the first place):
[student@onecoursesource ~]$ ssh 192.168.1.22 date
Enter passphrase for key '/home/student/.ssh/id_rsa':
Mon Jan 11 17:17:00 PST 2019
A method that you can use to have a passphrase for the RSA key and avoid having to type it for each connection is to use a utility called ssh-agent. The following steps demonstrate how this works:
Step 1. Start a new BASH shell with the ssh-agent utility:
ssh-agent /bin/bash
Step 2. Execute the following command:
ssh - add ~/.ssh/id_rsa
From this point on, when you use the ssh-agent shell to remotely connect to the SSH server, the connection takes place without the passphrase.
Summary
The focus of this chapter was to configure, secure, and connect to key servers. You learned about the LDAP server and how it provides directory-based information for features like networked user accounts. You also learned how to share files using an FTP server. Lastly, you learned how to connect to a remote Linux system via SSH. With SSH, you were able to log into a remote system and execute commands.
Key Terms
Review Questions
1. An _____ is a component of an object.
2. The format of the file used to create LDAP objects is called _____.
a. schema
b. LDAP
c. LDIF
d. DN
3. Which command is used to create a rootdn password?
a. rootpw
b. slappasswd
c. ldappasswd
d. rootpasswd
4. The permissions of the OpenLDAP database directory should be set to _____. (Provide an octal value.)
5. The _____ command can be used to test the OpenLDAP configuration file before starting the server.
6. Fill in the blank to provide the rootdn password on the command line:
ldapadd -x -D "cn=root,dc=OCS,dc=com" _____ rootdnpw -f newpasswd.ldif
a. -p
b. -r
c. -a
d. -w
7. Which option means “use simple authentication” when using one of the ldap-based commands (such as ldapsearch)?
a. -S
b. -x
c. -p
d. -a
8. The _____directive in the vsftpd.conf file is used to allow anonymous FTP connections.
9. Which of the following vsftpd.conf directives are related to creating a list that allows specific users to access the FTP server? (Choose all that apply.)
a. userlist_enable
b. userlist_file
c. userlist_allow
d. userlist_deny
10. The _____ setting in the /etc/ssh/sshd_config file is used to specify which interfaces to accept SSH connections on.
11. The _____ setting of the /etc/ssh/sshd_config file is used to specify which users can connect to the SSH server.