Table of Contents for
Linux Essentials for Cybersecurity, First Edition
 Linux Essentials for Cybersecurity, First Edition
Published by
Pearson IT Certification, 2018
Linux Essentials for Cybersecurity, First Edition
Published by
Pearson IT Certification, 2018
- Cover Page
- Title Page
- Copyright Page
- Contents at a Glance
- Table of Contents
- About the Author
- Dedication
- Acknowledgments
- About the Technical Reviewers
- We Want to Hear from You!
- Reader Services
- Introduction
- Part I: Introducing Linux
- Chapter 1: Distributions and Key Components
- Chapter 2: Working on the Command Line
- Chapter 3: Getting Help
- Chapter 4: Editing Files
- Chapter 5: When Things Go Wrong
- Part II: User and Group Accounts
- Chapter 6: Managing Group Accounts
- Chapter 7: Managing User Accounts
- Chapter 8: Develop an Account Security Policy
- Part III: File and Data Storage
- Chapter 9: File Permissions
- Chapter 10: Manage Local Storage: Essentials
- Chapter 11: Manage Local Storage: Advanced Features
- Chapter 12: Manage Network Storage
- Chapter 13: Develop a Storage Security Policy
- Part IV: Automation
- Chapter 14: Crontab and At
- Chapter 15: Scripting
- Chapter 16: Common Automation Tasks
- Chapter 17: Develop an Automation Security Policy
- Part V: Networking
- Chapter 18: Networking Basics
- Chapter 19: Network Configuration
- Chapter 20: Network Service Configuration: Essential Services
- Chapter 21: Network Service Configuration: Web Services
- Chapter 22: Connecting to Remote Systems
- Chapter 23: Develop a Network Security Policy
- Part VI: Process and Log Administration
- Chapter 24: Process Control
- Chapter 25: System Logging
- Part VII: Software Management
- Chapter 26: Red Hat–Based Software Management
- Chapter 27: Debian-Based Software Management
- Chapter 28: System Booting
- Chapter 29: Develop a Software Management Security Policy
- Part VIII: Security Tasks
- Chapter 30: Footprinting
- Chapter 31: Firewalls
- Chapter 32: Intrusion Detection
- Chapter 33: Additional Security Tasks
- Appendix A: Answers to Review Questions
- Appendix B: Resource Guide
- Glossary
Chapter 27 Debian-Based Software Management
In Chapter 26, “Red Hat–Based Software Management,” you learned how to manage software packages on distributions that make use of RPM. Another popular package management system, originally created on Debian Linux, is found on distributions like Ubuntu and Mint. Instead of using commands like rpm, yum, and dnf, this package management system has commands named dpkg, apt, apt-get, and apt-cache.
Conceptually, the two package management systems are very similar. The differences can be found in the specific commands, options, and, in some cases, features that are provided by each system. This chapter focuses on the Debian-based package management system and highlights the primary differences between Debian and Red Hat software management.
Important Note
Because this is the second chapter in this book that covers software packages, the focus is more on the “how to” rather than the theories and concepts of package management. Be sure to review Chapter 26 for information related to theories and concepts.
After reading this chapter and completing the exercises, you will be able to do the following:
View, install, and remove packages using the dpkg command.
Create software sources for APT commands.
View, install, and remove packages using APT commands.
Managing Packages with dpkg
In many ways, the Debian package management tools are very much like the Red Hat package management tools. For example, the equivalent to the rpm command is the dpkg command. Both commands are good for displaying information about installed packages as well as installing locally downloaded package files.
The Debian package manager is used on many Linux distributions, including Debian, Ubuntu, and Mint. Software package files are distributed with a .deb extension.
Listing Package Information with dpkg
To view all the packages that are currently installed, use the dpkg command with the -l option, as shown in Example 27-1.
Example 27-1 dpkg Command with the -l Option
root@onecoursesource:~# dpkg -l | head Desired=Unknown/Install/Remove/Purge/Hold | Status=Not/Inst/Conf-files/Unpacked/halF-conf/Half-inst/trig-aWait/Trig-pend |/ Err?=(none)/Reinst-required (Status,Err: uppercase=bad) ||/ Name Version Architecture Description +++-=========================================-===================================================-============-================================================================================ ii account-plugin-aim 3.8.6-0ubuntu9.2amd64 Messaging account plugin for AIM ii account-plugin-google 0.11+14.04.20140409.1-0ubuntu2
The output displayed when all packages are listed can be a bit difficult to follow because of the formatting of the output. Viewing a single package is a bit easier, as demonstrated in Figure 27-1.

Figure 27-1 Output of the dkpg -l Command
The first character of the last line of output displayed in Figure 27-1 is related to Desired=Unknown/Install/Remove/Purge/Hold. This i indicates that the normal (desired) state of this package is “install.” Consider this to be a suggestion of what the state of the package should be.
The second character of the last line of output displayed in Figure 27-1 is related to Status=Not/Inst/Conf-files/Unpacked/halF-conf/Half-inst/trig-aWait/Trig-pend. In this case, the i indicates the package is currently installed.
The third character of the last line of output displayed in Figure 27-1 is used to indicate any problems or errors with the package. In this case, this is a space, which means there are no errors for this package.
The rest of the output of the last line displayed in Figure 27-1 is fairly straightforward: package name, version of the installed package, the architecture the package was built for, and a description of the package.
To display detailed information about a package, use the -s option, as shown in Example 27-2.
Example 27-2 Viewing Package Information
root@onecoursesource:~# dpkg -s joe | head -n 20
Package: joe
Status: install ok installed
Priority: optional
Section: editors
Installed-Size: 1313
Maintainer: Ubuntu Developers <ubuntu-devel-discuss@lists.ubuntu.com>
Architecture: amd64
Version: 3.7-2.3ubuntu1
Depends: libc6 (>= 2.14), libtinfo5
Breaks: jupp (<< 3.1.18-2~)
Conffiles:
 /etc/joe/ftyperc 3c915f0bb617c0e4ac2bc10a7c4e649b
 /etc/joe/jicerc.ru b7db1f92397dc0a7598065442a6827c1
 /etc/joe/jmacsrc dd24e67b67c03810922d740cebc258cc
 /etc/joe/joerc 6f9cf4e8ce4649d31c2c2dae6a337852
 /etc/joe/jpicorc 0be5c286a0a9a14b733e2fa4e42d5828
 /etc/joe/jstarrc 2fbf22c556f6199e3a49cc526300c518
 /etc/joe/rjoerc 158e89ba1c65f7089b21e567cc6368ff
Description: user friendly full screen text editor
 Joe, the Joe's Own Editor, has the feel of most PC text editors: the key
The output of the dpkg -s command includes a list of the configuration files for the package. To see a list of all the files included with a package, use the -L option:
root@onecoursesource:~# dpkg -L joe | head -n 10
/.
/etc
/etc/joe
/etc/joe/jicerc.ru
/etc/joe/rjoerc
/etc/joe/jstarrc
/etc/joe/ftyperc
/etc/joe/jpicorc
/etc/joe/joerc
/etc/joe/jmacsrc
You can also determine which package provides a specific file by using the -S command:
root@onecoursesource:~# dpkg -S /etc/joe/joerc
joe: /etc/joe/joerc
Changes to files that were installed from a package can be displayed by using the -V option:
root@onecoursesource:~# dpkg -V joe
??5?????? c /etc/joe/joerc
The output is very similar to the output of the rpm -V command that was covered in Chapter 26, as you can see from the following snippet from the man page of the dpkg command:
The output format is selectable with the --verify-format option,
which by default uses the rpm format, but that might  change  in
the  future,  and  as  such programs parsing this command output
should be explicit about the format they expect.
To view the contents (a list of files) of a package that has not been installed, use the -c option, as shown in Example 27-3.
Example 27-3 Using the -c Option
root@onecoursesource:~# dpkg -c /tmp/joe_3.7-2.3ubuntu1_amd64.deb | head
drwxr-xr-x root/root         0 2014-02-17 14:12 ./
drwxr-xr-x root/root         0 2014-02-17 14:12 ./etc/
drwxr-xr-x root/root         0 2014-02-17 14:12 ./etc/joe/
-rw-r--r-- root/root     38076 2014-02-17 14:12 ./etc/joe/jicerc.ru
-rw-r--r-- root/root     32368 2014-02-17 14:12 ./etc/joe/rjoerc
-rw-r--r-- root/root     32215 2014-02-17 14:12 ./etc/joe/jstarrc
-rw-r--r-- root/root      9327 2014-02-17 14:12 ./etc/joe/ftyperc
-rw-r--r-- root/root     30127 2014-02-17 14:12 ./etc/joe/jpicorc
-rw-r--r-- root/root     37722 2014-02-17 14:12 ./etc/joe/joerc
-rw-r--r-- root/root     34523 2014-02-17 14:12 ./etc/joe/jmacsrc
Security Highlight
You should list the contents of a package before installing it, especially if you obtained the package from a less than reliable source. Look for suspicious files such as /etc/passwd and /etc/shadow. Hackers interject malicious files in software packages to compromise systems.
To display information about a software package that has not already been installed, use the -I option, as shown in Example 27-4.
Example 27-4 Using the -I Option
root@onecoursesource:~# dpkg -I /tmp/joe_3.7-2.3ubuntu1_amd64.deb | head
 new debian package, version 2.0.
 size 350818 bytes: control archive=1821 bytes.
     118 bytes,     7 lines      conffiles
    1812 bytes,    34 lines      control
    1400 bytes,    28 lines   *  postinst             #!/bin/sh
     133 bytes,     7 lines   *  postrm               #!/bin/sh
     357 bytes,    13 lines   *  preinst              #!/bin/sh
     310 bytes,     9 lines   *  prerm                #!/bin/sh
 Package: joe
 Version: 3.7-2.3ubuntu1
Installing Software with dpkg
To install a software package with the dpkg command, use the -i option, as shown in Example 27-5.
Example 27-5 dpkg Command Using the -i Option
root@onecoursesource:~# dpkg -i /tmp/joe_3.7-2.3ubuntu1_amd64.deb
Selecting previously unselected package joe.
(Reading database ... 177428 files and directories currently installed.)
Preparing to unpack .../joe_3.7-2.3ubuntu1_amd64.deb ...
Unpacking joe (3.7-2.3ubuntu1) ...
Setting up joe (3.7-2.3ubuntu1) ...
update-alternatives: using /usr/bin/joe to provide /usr/bin/editor (editor) in auto mode
Processing triggers for man-db (2.6.7.1-1ubuntu1) ...
You can also specify a directory as an argument to the -i option. If the argument is a directory, then all files that end in .deb within that directory will be installed as packages.
What Could go Wrong?
It is easy to confuse the -I option (display information about a package file) and the -i option (install a software package). Be careful here, because both options are used on package files, so you can easily install a package when you really intended to display information about the package.
Reconfiguring Software with dpkg
One of the features of package management is the ability to perform custom operations during the installation (and removal) process. This is accomplished by scripts that are often interactive. In some cases, it can be useful to execute these scripts again at some point after the package installation.
For example, the keyboard-configuration package is designed to configure the default system keyboard. If you decided to ship a system to another country that has a different keyboard layout, then it would be useful to execute the configuration script for this package again. You can do this by executing the dpkg-reconfigure command. Figure 27-2 provides a demonstration of the result of executing the dpkg-reconfigure keyboard-configuration command.
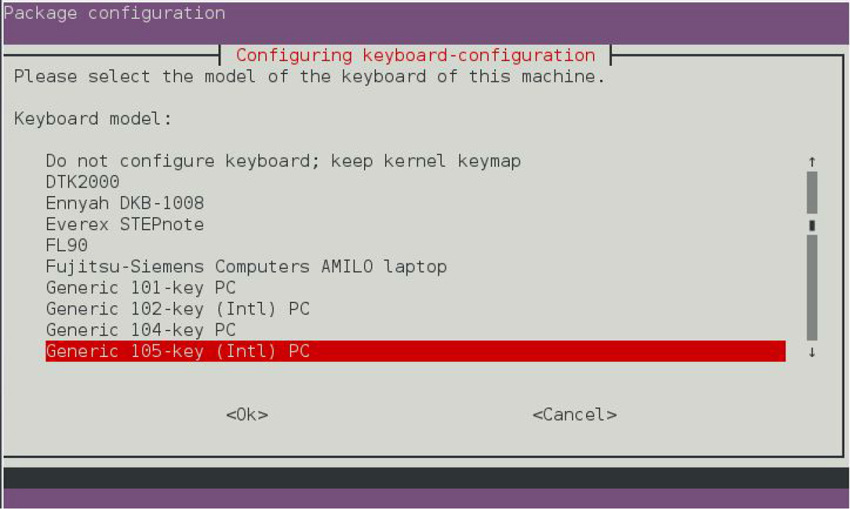
Figure 27-2 The dpkg-reconfigure keyboard-configuration Command
What Could Go Wrong?
Be careful when using the dpkg-reconfigure command because you could “blow away” a configuration that took some time and effort to fine-tune.
Extracting Files from a Debian Package
Recall from Chapter 26 that you could extract files from an RPM package without installing the package on the system. This is useful for exploring the package files (looking for malicious code) and replacing missing or corrupted system files.
The technique to perform this task on Debian-based systems is to use the -x option to the dpkg command:
root@onecoursesource:~# mkdir /tmp/joe_files root@onecoursesource:~# dpkg -x /tmp/joe_3.7-2.3ubuntu1_amd64.deb
Security Highlight
Because -x is an option to the dpkg command, there is always a concern that you could accidently omit it when trying to extract package files. This would result in installing the package, which can cause serious problems if the package contains malicious software.
Removing Packages with the dpkg Command
There are two methods for removing packages on Debian-based systems:
• dpkg -r pkg_name: This method removes the package but keeps its configuration files on the system.
• dpkg –P pkg_name: This method removes the package, including all of the package’s configuration files.
Example 27-6 demonstrates using the dpkg -r command.
Example 27-6 Removing a Package with the dpkg -r Command
root@onecoursesource:~# dpkg -r joe
(Reading database ... 177514 files and directories currently installed.)
Removing joe (3.7-2.3ubuntu1) ...
update-alternatives: using /usr/bin/jmacs to provide /usr/bin/editor (editor) in auto mode
update-alternatives: using /usr/bin/jpico to provide /usr/bin/editor (editor) in auto mode
update-alternatives: using /bin/nano to provide /usr/bin/editor (editor) in auto mode
Processing triggers for man-db (2.6.7.1-1ubuntu1) ...
root@onecoursesource:~# ls /etc/joe
editorrc  ftyperc  jicerc.ru  jmacsrc  joerc  jpicorc  jstarrc  rjoerc
Compare the output of the ls command from Example 27-6 to the output of the ls command in Example 27-7 when the -P option is used to remove a package.
Example 27-7 Removing a Package with the dpkg -P Command
root@onecoursesource:~# dpkg -P joe
(Reading database ... 177514 files and directories currently installed.)
Removing joe (3.7-2.3ubuntu1) ...
update-alternatives: using /usr/bin/jmacs to provide /usr/bin/editor (editor) in auto mode
update-alternatives: using /usr/bin/jpico to provide /usr/bin/editor (editor) in auto mode
update-alternatives: using /bin/nano to provide /usr/bin/editor (editor) in auto mode
Purging configuration files for joe (3.7-2.3ubuntu1) ...
Processing triggers for man-db (2.6.7.1-1ubuntu1) ...
root@onecoursesource:~# ls /etc/joe
ls: cannot access /etc/joe: No such file or directory
The lack of an /etc/joe directory (the location for configuration files for the joe package) indicates that these files have been removed from the system.
Conversational Learning™ — Using the ping Command
Gary: Hi, Julia. I just learned about the -r and -P options to the dpkg command, and I have a question.
Julia: Fire away!
Gary: I’m trying to understand why I would want to use one option versus the other.
Julia: Ah, well, the advantage using the -r option is that any customizations that have been made in the configuration files will be available in case the package is installed again in the future.
Gary: So, if I think I will install the package again and I want to use the previous configuration files, I should use the -r option, right? Can you give me an example?
Julia: Sure, suppose you have a fully configured web server, but you want to remove that software for now. It took a long time to configure that web server and you don’t want to have to do that work again or try to retrieve the configuration from backups.
Gary: OK, then why use the -P option?
Julia: Consider when you know for certain that you will not be installing the package again in the future or when you want to make sure you get a “clean” installation when the package is installed again.
Gary: Ah, OK. Thanks for the information, Julia.
Managing Packages with APT
The Advanced Package Tool (APT) is a collection of commands that provide the same functionality that yum or dnf provides on Red Hat–based systems. Many tools are included in APT, but the following are the primary ones:
• apt: This utility can be used for most basic package management commands.
• apt-get: This utility provides additional features for more advanced package management operations.
• apt-cache: This utility provides additional features for more advanced operations and package queries.
APT Repositories
As with the yum and dnf commands, the APT commands make use of repositories from where packages can be downloaded. These repositories are called sources in APT and can either be placed on local drives (CD-ROMs, USB drives, and so on) or made available across the network.
To configure a system to access an APT source, you can edit either the /etc/apt/sources.list file or files located in the /etc/apt/sources.list.d directory. On some distributions, the use of the /etc/apt/sources.list file has been deprecated in favor of files in the /etc/apt/sources.list.d directory. On those systems, the /etc/apt/sources.list file might not exist at all or it may be an empty file.
On systems that do have a /etc/apt/sources.list file, it is typically a well-documented configuration file. Each line defines one source. Example 27-8 displays some typical entries (note that blank lines and commented lines were removed with the grep commands).
Example 27-8 /etc/apt/sources.list
root@onecoursesource:~# grep -v "^$" /etc/apt/sources.list | grep -v "^#" | head
deb http://us.archive.ubuntu.com/ubuntu/ trusty main restricted
deb-src http://us.archive.ubuntu.com/ubuntu/ trusty main restricted
deb http://us.archive.ubuntu.com/ubuntu/ trusty-updates main restricted
deb-src http://us.archive.ubuntu.com/ubuntu/ trusty-updates main restricted
deb http://us.archive.ubuntu.com/ubuntu/ trusty universe
deb-src http://us.archive.ubuntu.com/ubuntu/ trusty universe
deb http://us.archive.ubuntu.com/ubuntu/ trusty-updates universe
deb-src http://us.archive.ubuntu.com/ubuntu/ trusty-updates universe
deb http://us.archive.ubuntu.com/ubuntu/ trusty multiverse
deb-src http://us.archive.ubuntu.com/ubuntu/ trusty multiverse
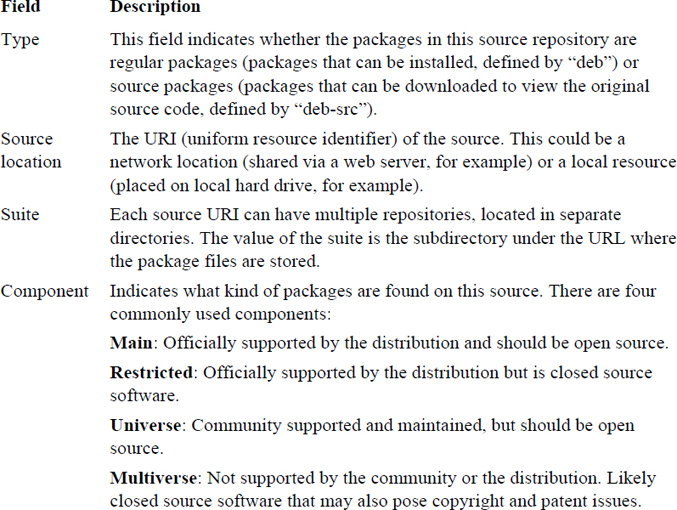
Figure 27-3 shows the typical fields of data of an APT source configuration file.

Figure 27-3 Fields of an APT Source Configuration File
The fields of an APT source configuration file are described in more detail in Table 27-1.
Table 27-1 Description of the Fields of an APT Configuration File
The APT source configuration file described in Figure 27-3 and Table 27-1 use a style called the “one-line” style. Some distributions make use of a newer style called the DEB822 style. The format for this style looks like the following:
Types: deb deb-src
URIs: uri
Suites: suite
Components: [component1] [component2] [...]
option1: value1
option2: value2
As a result, the example described using the one-line style in Figure 27-3 could be written using the DEB822 style in the following manner:
Types: deb
URIs: http://us.archive.ubuntu.com/ubuntu/
Suites: trusty
Components: main restricted
Several different options can be used with both styles. For example, you can specify the architectures of the packages for a source by using the following DEB822 style:
Types: deb
URIs: http://us.archive.ubuntu.com/ubuntu/
Suites: trusty
Components: main restricted
Architectures: amd64
There are many possible options; consult the sources.list man page for more details.
Creating a Source Repository
The following steps describe how to create a source repository:
1. Install the dpkg-dev package (if it isn’t already installed). Example: apt-get install dpkg-dev.
2. Create a directory. Example: mkdir /var/packages.
3. Copy packages into the new directory. These packages can be downloaded from an existing source (this technique is described later in this chapter), or you can find the packages you need in the /var/cache/apt/archives directory (this is the location where packages are download before being installed on the local system).
4. Run the following command in the directory that contains the packages: dpkg-scanpackages . /dev/null | gzip -9c > Packages.gz.
Listing Package Information with APT Commands
To list all packages, both installed and available to be installed, use the apt list command, as shown in Example 27-9.
Example 27-9 The apt list Command
root@onecoursesource:~# apt list | head

WARNING: apt does not have a stable CLI interface yet. Use with caution in scripts.

Listing...
0ad/trusty 0.0.15+dfsg-3 amd64
0ad-data/trusty 0.0.15-1 all
0ad-data-common/trusty 0.0.15-1 all
0ad-dbg/trusty 0.0.15+dfsg-3 amd64
0xffff/trusty 0.6~git20130406-1 amd64
2ping/trusty 2.0-1 all
2vcard/trusty 0.5-3 all
3270-common/trusty 3.3.10ga4-2build2 amd64
389-admin/trusty 1.1.35-0ubuntu1 amd64
Here are two key options to the apt list command:
• --installed: Used to display packages that are currently installed
• --upgradable: Used to display packages that are installed and have a newer version available
The apt command also supports listing packages using a search term. However, a more powerful way to search for packages is to use the apt-cache command, which provides a method to search for packages using a regular expression:
root@onecoursesource:~# apt-cache search "^joe"
joe - user friendly full screen text editor
joe-jupp - reimplement the joe Debian package using jupp
scheme2c - Joel Bartlett's fabled Scheme->C system
Consider using the apt command for simple package listings and the apt-cache command for more complex package listings.
To display information about a specific package, use the apt show command, as demonstrated in Example 27-10.
Example 27-10 Listing Packaging Information with the apt show Command
root@onecoursesource:~# apt show joe | head -n 16

WARNING: apt does not have a stable CLI interface yet. Use with caution in scripts.

Package: joe
Priority: optional
Section: universe/editors
Installed-Size: 1,345 kB
Maintainer: Ubuntu Developers <ubuntu-devel-discuss@lists.ubuntu.com>
Original-Maintainer: Josip Rodin <joy-packages@debian.org>
Version: 3.7-2.3ubuntu1
Depends: libc6 (>= 2.14), libtinfo5
Breaks: jupp (<< 3.1.18-2~)
Download-Size: 351 kB
Homepage: http://joe-editor.sourceforge.net/
Bugs: https://bugs.launchpad.net/ubuntu/+filebug
Origin: Ubuntu
APT-Sources: http://us.archive.ubuntu.com/ubuntu/ trusty/universe amd64 Packages
Description: user friendly full screen text editor
 Joe, the Joe's Own Editor, has the feel of most PC text editors.
Note
The apt-cache show command provides a similar output. Both commands accept a glob (wildcard) as an argument to the command. So, to display all packages that begin with “vi”, you can execute either the apt show vi* or apt-cache show vi* command.
The apt-cache command provides an option to display dependencies and reverse dependencies of a package, as shown in Example 27-11.
Example 27-11 Listing Dependency Information with the apt-cacheshowpkg Command
root@onecoursesource:~# apt-cache showpkg joe Package: joe Versions: 3.7-2.3ubuntu1 (/var/lib/apt/lists/us.archive.ubuntu.com_ubuntu_dists_trusty_universe_binary-
To display the dependencies of a package, use the apt-cache depends command:
root@onecoursesource:~# apt-cache depends joe
joe
  Depends: libc6
  Depends: libtinfo5
  Breaks: jupp
  Breaks: jupp:i386
  Conflicts: joe:i386
To display the reverse dependencies of a package, use the apt-cache rdepends command:
root@onecoursesource:~# apt-cache rdepends joe
joe
Reverse Depends:
  jupp:i386
  joe:i386
  jupp
  joe-jupp
    joe-jupp
  joe-jupp
Installing Packages with APT Commands
The apt install command will install a package from a source, as shown in Example 27-12.
Example 27-12 The apt install Command
root@onecoursesource:~# apt install joe
Reading package lists... Done
Building dependency tree
Reading state information... Done
The following NEW packages will be installed:
  joe
0 upgraded, 1 newly installed, 0 to remove and 587 not upgraded.
Need to get 351 kB of archives.
After this operation, 1,345 kB of additional disk space will be used.
Get:1 http://us.archive.ubuntu.com/ubuntu/ trusty/universe joe amd64 3.7-2.3ubuntu1 [351 kB]
Fetched 351 kB in 2s (156 kB/s)
Selecting previously unselected package joe.
(Reading database ... 177428 files and directories currently installed.)
Preparing to unpack .../joe_3.7-2.3ubuntu1_amd64.deb ...
Unpacking joe (3.7-2.3ubuntu1) ...
Processing triggers for man-db (2.6.7.1-1ubuntu1) ...
Setting up joe (3.7-2.3ubuntu1) ...
update-alternatives: using /usr/bin/joe to provide /usr/bin/editor (editor) in auto mode
The apt install command supports the following options:
• =pkg_version_number: Used to indicate the specific version to install. Example: apt-get install joe=1.2.3.
• /target_release: Used to indicate which version of the distribution to use for the package version. Each distro version has a list of designed for that specific distro version. Example: apt-get install joe/trusty.
Note
The apt-get install command can be used to install software packages, and it supports the =pkg_version_number and /target_release options. However, the apt-get install command also supports the following options:
• -f: Fix broken dependencies.
• -s: Dry run; demonstrates what would happen if the installation was performed.
• -y: Assume yes (the apt-get command normally prompts for confirmation before installing any packages).
• --no-upgrade: Install if the package is new, but do not upgrade an existing package.
• --only-update: Upgrade if an older version of the package is already installed, but don't install if the package is new.
• --reinstall: Reinstall the package.
The apt command also provides a feature that upgrades all packages on the system: apt full-upgrade. This feature also removes old packages that are considered obsolete, so use this option with care.
To download, but not install, a package, use the apt-get download command. Notice that this command will download the package into the /var/cache/apt/archives directory:
root@onecoursesource:~# apt-get download joe
root@onecoursesource:~# ls /var/cache/apt/archives/j*
/var/cache/apt/archives/joe_3.7-2.3ubuntu1_amd64.deb
You may be wondering about package groups, like those that the yum command in Chapter 26 provides. For APT, groups work a bit different. Groups are available in the interactive aptitude utility, as shown in Figure 27-4.
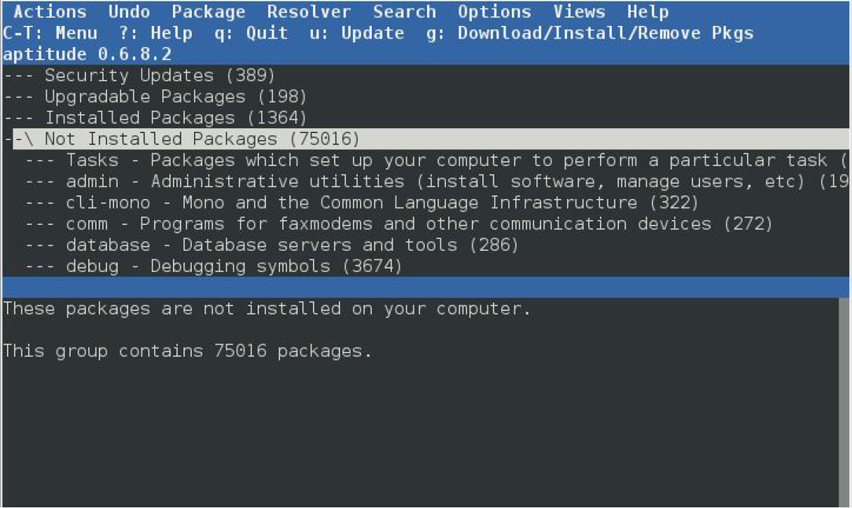
Figure 27-4 The aptitude Utility
The aptitude utility is normally installed by default. A similar utility, called tasksel, is also available, but is not normally installed by default (run apt-get install tasksel if you want this utility). See Figure 27-5 for a demonstration of the tasksel utility.
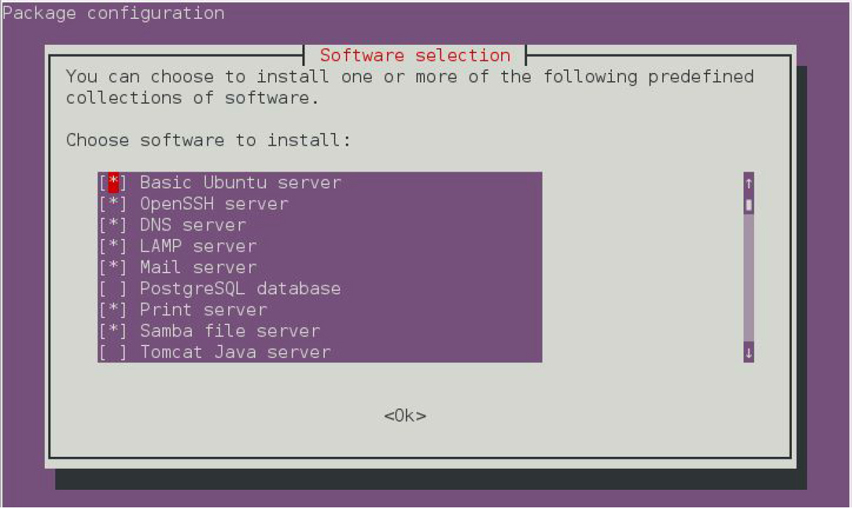
Figure 27-5 The tasksel Utility
Another option is to use the synaptic utility, a GUI-based package management tool. An example of this tool is displayed in Figure 27-6.

Figure 27-6 The synaptic Utility
Note
The aptitude, tasksel, and synaptic utilities can be used to remove package and display information about packages (although the details about the packages might not be available in all the tools). Also, many distributions provide a separate GUI-based package management tool, so be sure to consult your distro’s documentation.
What Could Go Wrong?
Becoming dependent on GUI-based package management tools can limit your ability to perform package management tasks on different systems. These tools are often not installed on production systems because the GUI itself requires a large amount of system resources (RAM, CPU, and so on). So, you really should focus your study on the command-line APT utilities.
Removing Packages with APT Commands
To remove a package, but keep its configuration files, use either the apt remove or apt-get remove command. Here’s an example:
apt remove joe
To purge a package (remove all the package files, including configuration files), use the apt-get purge command, as demonstrated in Example 27-13.
Example 27-13 Purging a Package with the apt-getpurge Command
root@onecoursesource:~# apt-get purge joe
Reading package lists... Done
Building dependency tree
Reading state information... Done
The following packages will be REMOVED:
  joe*
0 upgraded, 0 newly installed, 1 to remove and 587 not upgraded.
After this operation, 1,345 kB disk space will be freed.
Do you want to continue? [Y/n] y
(Reading database ... 177514 files and directories currently installed.)
Removing joe (3.7-2.3ubuntu1) ...
update-alternatives: using /usr/bin/jmacs to provide /usr/bin/editor (editor) in auto mode
update-alternatives: using /usr/bin/jpico to provide /usr/bin/editor (editor) in auto mode
update-alternatives: using /bin/nano to provide /usr/bin/editor (editor) in auto mode
Purging configuration files for joe (3.7-2.3ubuntu1) ...
Processing triggers for man-db (2.6.7.1-1ubuntu1) ...
Additional APT Features
Here are a few additional features available with APT that are important to know about:
• apt-get check: This command is used to check for broken dependencies on all installed packages.
• apt-get clean: This command clears out information regarding cached source (repository) information.
• apt-get autoclean: This command removes old packages information.
Summary
In this chapter, you learned several different methods of managing packages on Debian-based distributions. You learned about the dkpg command, which is primarily used to view package information, but can also be used for simple package installations and removals. You also learned about the advanced package management tools that the APT commands provides, including tools for downloading software packages from repositories and handling package dependencies.
Key Terms
URI (uniform resource identifier)
Review Questions
1. The _____ option to the dpkg command is used to display information about a package file.
2. Which option to the dkpg command will remove a package but keep its configuration files?
a. -u
b. -r
c. -P
d. -c
3. The _____ command is used to create a source repository for APT.
4. Which of the following is not a valid APT command?
a. apt-cache
b. apt-get
c. apt-install
d. apt-remove
5. The _____ option to the apt list command will only display packages that are currently installed on the system.