Table of Contents for
Linux Essentials for Cybersecurity, First Edition
 Linux Essentials for Cybersecurity, First Edition
Published by
Pearson IT Certification, 2018
Linux Essentials for Cybersecurity, First Edition
Published by
Pearson IT Certification, 2018
- Cover Page
- Title Page
- Copyright Page
- Contents at a Glance
- Table of Contents
- About the Author
- Dedication
- Acknowledgments
- About the Technical Reviewers
- We Want to Hear from You!
- Reader Services
- Introduction
- Part I: Introducing Linux
- Chapter 1: Distributions and Key Components
- Chapter 2: Working on the Command Line
- Chapter 3: Getting Help
- Chapter 4: Editing Files
- Chapter 5: When Things Go Wrong
- Part II: User and Group Accounts
- Chapter 6: Managing Group Accounts
- Chapter 7: Managing User Accounts
- Chapter 8: Develop an Account Security Policy
- Part III: File and Data Storage
- Chapter 9: File Permissions
- Chapter 10: Manage Local Storage: Essentials
- Chapter 11: Manage Local Storage: Advanced Features
- Chapter 12: Manage Network Storage
- Chapter 13: Develop a Storage Security Policy
- Part IV: Automation
- Chapter 14: Crontab and At
- Chapter 15: Scripting
- Chapter 16: Common Automation Tasks
- Chapter 17: Develop an Automation Security Policy
- Part V: Networking
- Chapter 18: Networking Basics
- Chapter 19: Network Configuration
- Chapter 20: Network Service Configuration: Essential Services
- Chapter 21: Network Service Configuration: Web Services
- Chapter 22: Connecting to Remote Systems
- Chapter 23: Develop a Network Security Policy
- Part VI: Process and Log Administration
- Chapter 24: Process Control
- Chapter 25: System Logging
- Part VII: Software Management
- Chapter 26: Red Hat–Based Software Management
- Chapter 27: Debian-Based Software Management
- Chapter 28: System Booting
- Chapter 29: Develop a Software Management Security Policy
- Part VIII: Security Tasks
- Chapter 30: Footprinting
- Chapter 31: Firewalls
- Chapter 32: Intrusion Detection
- Chapter 33: Additional Security Tasks
- Appendix A: Answers to Review Questions
- Appendix B: Resource Guide
- Glossary
Chapter 6 Managing Group Accounts
Because Linux is a multiuser operating system, security is often based on accounts. Each person is provided a user account (see Chapter 7, “Managing User Accounts,” for details), and each user account is a member of one or more group accounts.
The group accounts are used to provide access or apply restrictions to user accounts that are members of a group. This access/restriction can be applied to files, directories, or other operating system features. By using group accounts, you can easily apply a security policy to multiple user accounts.
In this chapter, you learn more about the concept of group accounts. You also explore how to create, modify, and delete group accounts.
After reading this chapter and completing the exercises, you will be able to do the following:
Understand the concept of Linux groups
Manage groups, including creating, modifying, and deleting group accounts
Understand the security feature called User Private Groups (UPGs)
Learn how to create group administrators
What Are Groups Used For?
Each person who has access to a Linux system is provided a user account. This user account offers several different features, including a user name and a password. Additionally, each user is a member of one or more group accounts.
Being a member of a group allows a user special access to system resources, such as files, directories, or processes (programs) that are running on the system. This group membership can also be used to prevent access to system resources because several security features in Linux make use of groups to impose security restrictions. These security features are covered in later chapters of this book.
Primary versus Secondary Groups
Every user is a member of at least one group. This first group is called the user’s primary group. Any additional groups a user is a member of are called the user’s secondary groups.
Group membership can be displayed by executing either the id or groups command:
student@onecoursesource:~$ id
uid=1002(student) gid=1002(student)
groups=1002(student),60(games),1001(ocs)
student@onecoursesource:~$ groups
student games ocs
The output of the id command is described in Table 6-1.
Table 6-1 Output of the id Command
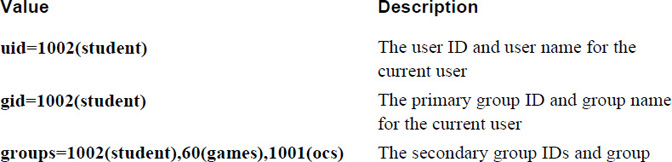
The output of the groups command includes every group the current user is a member of. The primary group is always listed first.
Security Highlight
Both the id and groups commands display information about the current user by default. Both commands also accept an argument of another user account name:
student@onecoursesource:~$ id root
uid=0(root) gid=0(root) groups=0(root)
student@onecoursesource:~$ groups root
root : root
The most important difference between primary and secondary group membership relates to when a user creates a new file. Each file is owned by a user ID and a group ID. When a user creates a file, the user’s primary group membership is used for the group ownership of the file:
student@onecoursesource:~$ groups
student games ocs
student@onecoursesource:~$ touch sample.txt
student@onecoursesource:~$ ls -l sample.txt
-rw-rw-r-- 1 student student 0 Sep 15 11:39 sample.txt
After a file has been created, a user can change the group ownership of the file to another group by using the chgrp command:
student@onecoursesource:~$ ls -l sample.txt
-rw-rw-r-- 1 student student 0 Sep 15 11:39 sample.txt
student@onecoursesource:~$ chgrp games sample.txt
student@onecoursesource:~$ ls -l sample.txt
-rw-rw-r-- 1 student games 0 Sep 15 11:39 sample.txt
What Could Go Wrong
Although users can change group membership of their own files to a group they are a member of, they cannot change the group membership of files owned by other users because this poses a security risk. The following commands demonstrate a typical error message when a user attempts to change another user’s file group ownership:
student@onecoursesource:~$ ls -l /etc/hosts
-rw-r--r-- 2 root root 199 Sep 15 11:24 /etc/hosts
student@onecoursesource:~$ chgrp games /etc/hosts
chgrp: changing group of '/etc/hosts': Operation not permitted
Another potential issue is when a user tries to change the group ownership of one of their own files to a group that the user isn’t a member of. A similar error message will appear:
student@onecoursesource:~$ ls -l sample.txt
-rw-rw-r-- 1 student games 0 Sep 15 11:39 sample.txt
student@onecoursesource:~$ id
uid=1002(student) gid=1002(student)
groups=1002(student),60(games),1001(ocs)
student@onecoursesource:~$ chgrp users sample.txt
chgrp: changing group of 'sample.txt': Operation not permitted
A user might be able to temporarily change their primary group to another group, but this depends on a security feature known as the /etc/group file, covered next.
The /etc/group File
Group information is stored in several files:
• The /etc/passwd file contains user account information, including the primary group membership for each user. Details regarding the contents of this file are discussed in Chapter 7. For the purpose of discussing groups in this chapter, this primary group membership is stored using the GID of the group, as shown in the following example:
student@onecoursesource:~$ grep student /etc/passwd
student:x:1002:1002::/home/student:
• The /etc/group file stores information about each group, including the group name, group ID (GID) and secondary user membership.
• The /etc/gshadow file stores additional information for the group, including group administrators and the group password. Details regarding the contents of this file are discussed later in this chapter in the section titled “The /etc/gshadow File.”
Example 6-1 demonstrates part of a typical /etc/group file.
Example 6-1 The /etc/group File
student@onecoursesource:~$ head /etc/group
root:x:0:
daemon:x:1:
bin:x:2:
sys:x:3:
adm:x:4:syslog,bo
tty:x:5:
disk:x:6:
lp:x:7:
mail:x:8:
news:x:9:
Security Highlight
As demonstrated in Example 6-1, regular (non-administrator) users can view the /etc/group file. This highlights the need to prevent unauthorized access to the system because even a regular user can gain valuable information about the system by viewing the /etc/group file. Note that administrators should not change file permissions for the /etc/group file because this will cause some programs to not work correctly.
Keep in mind, this is not uncommon for operating systems, as regular users can see basic group information on other operating systems, including Unix, macOS and Microsoft Windows.
Each line in the /etc/group file describes one group. Each line is separated into fields of data, with the colon (:) character as the field separator. Table 6-2 describes these fields using the adm:x:4:syslog,bo line as an example.
Table 6-2 Fields of the /etc/group File

Security Highlight
Normally the /etc/group file isn’t manually modified. Administrators use commands like groupadd, groupdel, and groupmod to change the contents of the /etc/group file. However, the /etc/group file can be changed manually; as a result, errors in the file can occur. To see if there are any errors in the /etc/group file, execute the grpck command while logged in as the root user.
Special Groups
A typical Linux system will have many default group accounts. These default group accounts typically have GID values under 1000, making it easy for an administrator to recognize these as special accounts.
Additionally, if you add new software to the system, more groups may be added as software vendors make use of both user and group accounts to provide controlled access to files that are part of the software.
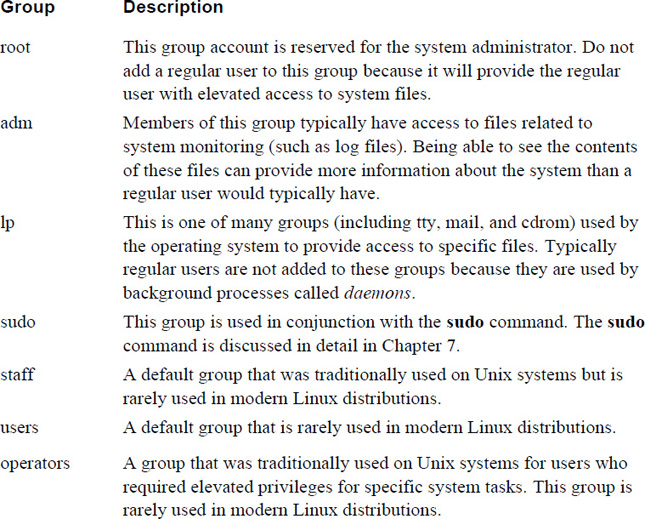
Administrators who are focused on security should be aware of these special group accounts because these accounts can provide either security features or pose security threats. Table 6-3 highlights the more important special group accounts (it is beyond the scope of this book to cover every special group).
Table 6-3 Special Group Accounts
Security Highlight
As an administrator, you should be aware of what each group is designed to do. Take the time to explore all the groups listed in your /etc/group file and carefully consider the impact of adding a user to a special group. Also, after adding software to the system, review the contents of the /etc/group file to determine if new groups were added. If new accounts were added, explore the purpose of these new groups.
User Private Groups
Typically when a user account is created, a group for that user is also created. This is designed to overcome a scenario that was common in the early days of Linux where system administrators would routinely add all users to one group (typically called “users” or “staff”).
This practice resulted in a situation where users were provided access to files that they shouldn’t have access to. By placing everyone in a single group, every new file that every user created was owned by that group, which meant that either everyone in the organization had access to the file via the group permissions or the user had to remember to remove all permissions for the group for each new file created. Figure 6-1 demonstrates the problems that this scenario creates (file1.txt demonstrates the security risk, and file2.txt demonstrates when a user remembers to remove all permissions for the group).
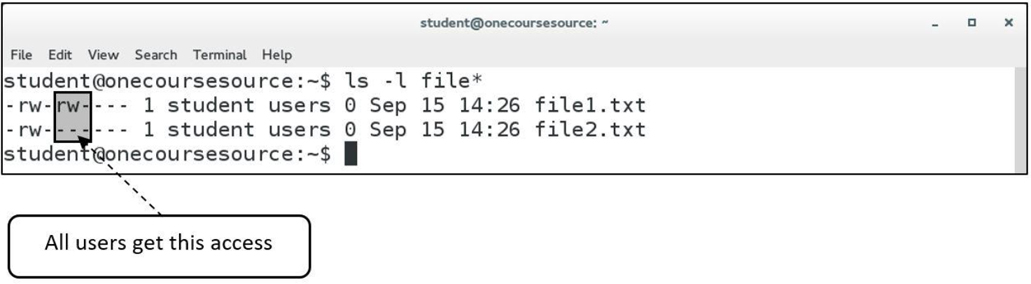
Figure 6-1 The Issue with Having a Global Group for Everyone
The concept of creating a group for each user is called User Private Groups (UPGs), where each user has their own group as their private group, meaning the security risk of all users being able to access the files of all other users is limited.
Unfortunately, this approach also poses security risks if the system administrator doesn’t handle group membership correctly. UPG essentially makes the user’s primary group worthless (at least by default) because the user is the only member of this private group. If the user isn’t a member of additional groups, then to give access to a file for a specific user, the others permission set is often used. This ends up giving access to everyone on the system, which is the very problem that UPG was designed to avoid. Figure 6-2 demonstrates the problems that this scenario creates.
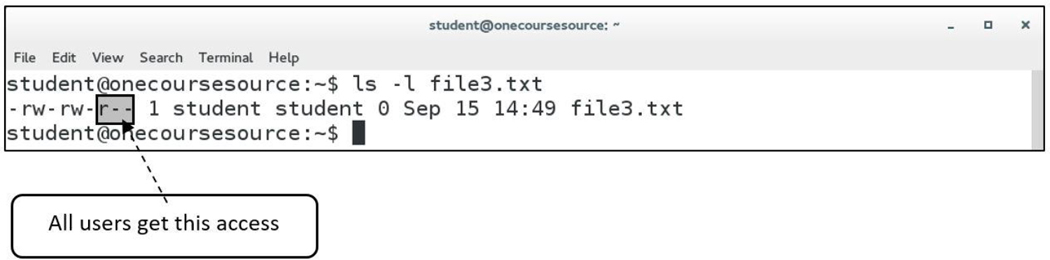
Figure 6-2 Potential issue with UPG
UPG does provide a solution, but only a partial one. The administrator must also implement a security policy to include one or more of the following:
A procedure to place users into additional groups to make it easier for people who work together to share access to files.
A plan to teach proper use of permissions to all users. A detailed discussion of this topic can be found in Chapter 9, “File Permissions.”
The administrator should consider allowing users the ability to add new users to their own private group. A detailed discussion of this topic is provided in the next section, “The /etc/gshadow File.”
A plan to teach users how to use access control lists (ACLs), a method of assigning permissions to specific users or groups. A detailed discussion of this topic can be found in Chapter 9.
Conversational Learning™ — Planning Groups
Gary: Hi, Julia. Do you have a moment so I can pick your brain?
Julia: Sure, what do you need?
Gary: I’m trying to make a plan to create the Linux groups that our organization needs, but I’m not really sure where to start.
Julia: Typically Linux groups are created so users can share files between each other using group permissions. For example, each department in your organization should probably have its own group.
Gary: That’s it? Just make a group for each department?
Julia: No, there are other factors to consider. For example, two people from different departments might need to share files. If they are in different groups, this presents a challenge. If they are working on a project together, it makes sense to create a group for that specific project.
Gary: OK, so create groups for each department and also for projects that need shared file access. Anything else?
Julia: Even if a project doesn’t involve people from different departments, you may want to create a group for it. So, instead of the files being shared with everyone in the department, only a select few within the department can access the files.
Gary: Any other common reason to create groups?
Julia: You also may want to consider job titles when creating groups. Companies often have different groups for managers, engineers, contractors, and so forth.
Gary: OK, great. This gives me a good idea of where to start. Thanks for your help!
Julia: Anytime!
The /etc/gshadow File
The /etc/group file contains some of the group account information, but more can be found in the /etc/gshadow file. This file is only viewable by the root user, so more sensitive data is stored in the /etc/gshadow file.
Example 6-2 demonstrates part of a typical /etc/gshadow file.
Example 6-2 The /etc/gshadow File
root@onecoursesource:~# head /etc/gshadow
root:*::
daemon:*::
bin:*::
sys:*::
adm:*:student:syslog,bo,student
tty:*::
disk:*::
lp:*::
mail:*::
news:*::
Each line in the /etc/gshadow file describes one group. Each line is separated into fields of data, with the colon (:) character as the field separator. Table 6-4 describes these fields using the adm:*:student:syslog,bo,student line as an example.
Table 6-4 Fields of the /etc/gshadow File
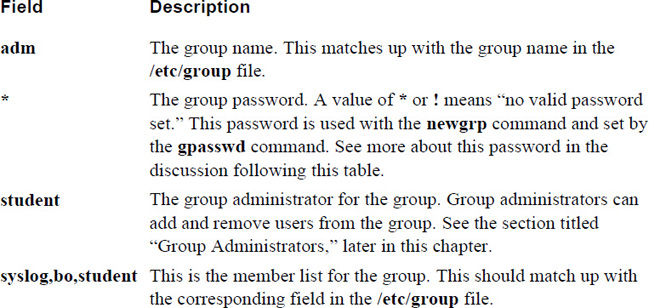
The purpose of the password field in the /etc/gshadow file is to allow users to temporarily change their primary group by using the newgrp command. By default, any user who is a member of a group can switch their primary group:
student@onecoursesource:~$ groups
student adm games ocs
student@onecoursesource:~$ newgrp games
student@onecoursesource:~$ groups
games adm ocs student
Users cannot switch their primary group membership to a group they don’t belong to, unless they know the password for that group. This password is set by the administrator using the gpasswd command:
root@onecoursesource:~# gpasswd staff
Changing the password for group staff
New Password:
Re-enter new password:
root@onecoursesource:~# grep staff /etc/gshadow
staff:$6$iv.gICgaA$iWGw611b/ZqKhu4WnMfA9qpNQvAQcljBFGuB1iXdWBhMWqgr2yQn7hn6Nu8BTrtErn734wLDhWzS6tNtJmkV/::
Once the password has been set, a user can change their primary group by entering the group password at the prompt when running the newgrp command:
student@onecoursesource:~$ groups
student adm games ocs
student@onecoursesource:~$ newgrp staff
Password:
student@onecoursesource:~$ groups
staff adm games ocs student
Although you can use the group password method, consider this: If you want to allow a user to switch to a new primary group, why not just add them to that group? Because of this logic, group passwords are not very often used on Linux systems.
See Figure 6-3 for additional information.

Figure 6-3 Text Support Changing Primary Groups
Managing Groups
The process of managing groups includes creating new groups, modifying existing groups, and deleting groups. These operations require the privilege provided by the root account.
Managing groups can also include the process of adding a user to a group or removing a user from a group. Typically, these operations require the privilege provided by the root account, but if group administrators are created, then a group administrator can also perform these tasks for specific groups.
Creating Groups
Create a new group by using the groupadd command, like so:
root@onecoursesource:~# groupadd -g 5000 payroll
root@onecoursesource:~# tail -1 /etc/group
payroll:x:5000:
Note
The -g option is used to assign a GID to the group. If the -g option is omitted, then the next available GID above 1000 will be used (on some systems, the next available above 500 may be used). Best practice is to use the -g option and use a higher value (5000 or above) so this won’t impact the GIDs used for User Private Groups.
What Could Go Wrong
When creating a group, you must use a GID and name that is not currently used or you will get errors:
root@onecoursesource:~# groupadd -g 4000 payroll
groupadd: group 'payroll' already exists
root@onecoursesource:~# groupadd -g 5000 test
groupadd: GID '5000' already exists
Modifying Groups
The most typical change an administrator would make to a group, besides adding and removing members, is to change the group name. The reason for this change may be because the original name isn’t descriptive enough, so another name would be better.
To change a group’s name, use the groupmod command with the -n option, as shown here:
root@onecoursesource:~# tail -1 /etc/group
payroll:x:5000:
root@onecoursesource:~# groupmod -n payables payroll
root@onecoursesource:~# tail -1 /etc/group
payables:x:5000:
Deleting Groups
Deleting a group is accomplished by executing the groupdel command. However, before deleting a group, the administrator should search the filesystem for all files owned by the group and change the ownership to another group. If this step isn’t taken, then files owned by that group end up being owned just by the GID of the group, making group permissions worthless. Here’s an example:
root@onecoursesource:~# ls -l /tmp/example
-rw-r--r-- 1 root payables 0 Sep 15 16:07 /tmp/example
root@onecoursesource:~# groupdel payables
root@onecoursesource:~# ls -l /tmp/example
-rw-r--r-- 1 root 5000 0 Sep 15 16:07 /tmp/example
See Figure 6-4 for information on how to search for files by group ownership.

Figure 6-4 Text Support—How to Find a File by Group Ownership and Change the Ownership
Adding Users to Groups
The -G option to the usermod command is used to add a user to a group. However, be careful because by default this option will override existing group membership. Here’s an example:
root@onecoursesource:~# id student
uid=1002(student) gid=1002(student)
groups=1002(student),60(games),1001(ocs)
root@onecoursesource:~# usermod -G adm student
root@onecoursesource:~# id student
uid=1002(student) gid=1002(student) groups=1002(student),4(adm)
To add a user to a group while maintaining the user’s current group membership, use the -a option in conjunction with the -G option:
root@onecoursesource:~# id student
uid=1002(student) gid=1002(student)
groups=1002(student),60(games),1001(ocs)
root@onecoursesource:~# usermod -G adm -a student
root@onecoursesource:~# id student
uid=1002(student) gid=1002(student)
groups=1002(student),4(adm),60(games),1001(ocs)
Security Highlight
Don’t add a user to a group unless there is a valid need because this would provide the user with unnecessary escalated privileges.
Group Administrators
By default, the only person who can add or remove users from a group is the person who is logged in as the root user. To allow a user to manage a group, you need to add them as a group administrator by using the -A option to the gpasswd command:
root@onecoursesource:~# grep games /etc/gshadow
games:::student
root@onecoursesource:~# gpasswd -A student games
root@onecoursesource:~# grep games /etc/gshadow
games::student:student
Now the student user can add users to the games group by using the -a option to the gpasswd command:
student@onecoursesource:~$ gpasswd -a bo games
Adding user bo to group games
student@onecoursesource:~$ grep games /etc/group
games:x:60:student,bo
Using the -d option to the gpasswd command, the student user can remove users from the games group:
student@onecoursesource:~$ grep games /etc/group
games:x:60:student,bo
student@onecoursesource:~$ gpasswd -d bo games
Removing user bo from group games
student@onecoursesource:~$ grep games /etc/group
games:x:60:student
Note
Group administrators can use the gpasswd command to administer groups that they are an administrator for only. They also can’t use the groupadd, groupmod, and groupdel commands.
Summary
The Linux operating system makes use of group accounts to control access to key components, including files and directories. In this chapter, you learned how to manage these group accounts. This included how to create, modify, and delete group accounts, as well as how to use special group account features such as User Private Groups and group administrators.
Key Terms
Review Questions
1. Every user is a member of at least _____ group(s).
2. Which of the following commands will display the groups that the user nick is a member of?
a. id
b. groupinfo
c. info groups
d. groups
3. Which files are used to store group information?
a. /etc/groupoinfo
b. /etc/shadow
c. /etc/groups
d. /etc/gshadow
4. Special groups are groups with GID numbers typically under the numeric value of _____.
5. If the system is using UPG, the group name of the user account named jake should be _____.