Table of Contents for
Linux Essentials for Cybersecurity, First Edition
 Linux Essentials for Cybersecurity, First Edition
Published by
Pearson IT Certification, 2018
Linux Essentials for Cybersecurity, First Edition
Published by
Pearson IT Certification, 2018
- Cover Page
- Title Page
- Copyright Page
- Contents at a Glance
- Table of Contents
- About the Author
- Dedication
- Acknowledgments
- About the Technical Reviewers
- We Want to Hear from You!
- Reader Services
- Introduction
- Part I: Introducing Linux
- Chapter 1: Distributions and Key Components
- Chapter 2: Working on the Command Line
- Chapter 3: Getting Help
- Chapter 4: Editing Files
- Chapter 5: When Things Go Wrong
- Part II: User and Group Accounts
- Chapter 6: Managing Group Accounts
- Chapter 7: Managing User Accounts
- Chapter 8: Develop an Account Security Policy
- Part III: File and Data Storage
- Chapter 9: File Permissions
- Chapter 10: Manage Local Storage: Essentials
- Chapter 11: Manage Local Storage: Advanced Features
- Chapter 12: Manage Network Storage
- Chapter 13: Develop a Storage Security Policy
- Part IV: Automation
- Chapter 14: Crontab and At
- Chapter 15: Scripting
- Chapter 16: Common Automation Tasks
- Chapter 17: Develop an Automation Security Policy
- Part V: Networking
- Chapter 18: Networking Basics
- Chapter 19: Network Configuration
- Chapter 20: Network Service Configuration: Essential Services
- Chapter 21: Network Service Configuration: Web Services
- Chapter 22: Connecting to Remote Systems
- Chapter 23: Develop a Network Security Policy
- Part VI: Process and Log Administration
- Chapter 24: Process Control
- Chapter 25: System Logging
- Part VII: Software Management
- Chapter 26: Red Hat–Based Software Management
- Chapter 27: Debian-Based Software Management
- Chapter 28: System Booting
- Chapter 29: Develop a Software Management Security Policy
- Part VIII: Security Tasks
- Chapter 30: Footprinting
- Chapter 31: Firewalls
- Chapter 32: Intrusion Detection
- Chapter 33: Additional Security Tasks
- Appendix A: Answers to Review Questions
- Appendix B: Resource Guide
- Glossary
Chapter 31 Firewalls
One of the major components of securing a system or network is keeping the “bad guys” out while letting the “good guys” have the access they need. This means you need to make sure that network access to your systems is secure and stable.
Creating firewalls gives you the ability to allow or block network connections. A firewall can inspect each network packet and determine if the packet should be allowed in. In this chapter, you learn the essentials to creating firewalls.
After reading this chapter and completing the exercises, you will be able to do the following:
Identify the essential components of a firewall.
Create a firewall to control access to a system or network.
Block access to external systems.
Configure NAT (Network Address Translation)
Introduction to Firewalls
A firewall is a network appliance that is designed to either allow or block network traffic. Firewalls can be implemented on a variety of devices, including routers, network servers, and users’ systems.
A large variety of firewall software is available within the IT industry. Any organization that creates router devices will have some form of firewall software available. This includes wireless accesses devices such as your home wireless router.
Even within Linux, there are several choices when it comes to firewall software. Dozens of open source and commercial software packages are available. Having so many choices can complicate matters, both in terms of the content within this book and in real-world implementation of firewalls.
For the purposes of learning firewalls, this chapter focuses on iptables, a firewall that is normally available by default on most Linux distributions. In a real-world scenario, iptables is a good solution and is commonly used. However, you should also consider exploring other firewall software, as the requirements for your environment may necessitate a different solution.
Essentials of the iptables Command
To create firewall rules on a system, you can use the iptables command. This command allows you to create rules that provide one or more of the following functions:
• Block network packets.
• Forward network packets to another system. In this case, the local system would act as both a firewall for another network and a router.
• Perform NAT (Network Address Translation) operations. NAT offers a method to provide hosts within a private network access to the Internet.
• Mangle (modify) network packets. Although this can be a useful feature, it is beyond the scope of this book.
What Could Go Wrong?
Keep in mind that when you use the iptables command to create firewall rules, the rules take effect immediately. This can be an issue if you are remotely logged in to a system and create a rule that ends up immediately blocking access to your own session.
Overview of Filtering Packets
Before you start creating rules with the iptables command, you should understand how the firewall service works. Start by reviewing Figure 31-1 to see how packets that are sent to the system are filtered.
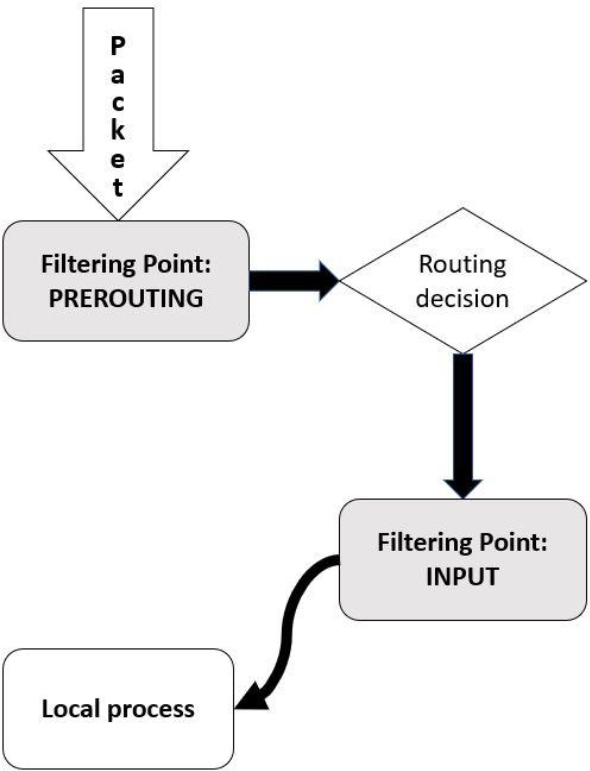
Figure 31-1 Packet Filtering—Incoming Packets
In Figure 31-1, the process starts in the upper-left corner when the packet is sent to the system. The iptables service uses sets of rules to determine what to do with this packet. The first set of rules takes place on the PREROUTING filtering point. These rules can be used either to allow the packet to continue to the next step or to block the packet.
If the packet is allowed to continue past the PREROUTING filtering point, the kernel determines if the packet is designed to be sent to the local system or if it should be passed to another network (in other words, routed to another network). Figure 31-1 does not include what happens to the packet if it is routed to another network, but this is included in a figure later in this chapter.
For packets destined for the local system, another filtering point is used to determine if the packets are allowed or blocked. The INPUT filtering point rules are applied to these packets.
You may be wondering why there are two sets of rules (so far—there will be more). Consider this: There may be some packets you want to entirely block, regardless of whether they are destined for the local system or will be routed to a different network. You can place rules to block these packets on the PREROUTING filtering point. But, if you only want to block some packets that will be sent to the local system, then you can place rules on the INPUT filtering point.
Figure 31-2 demonstrates what happens with a packet that’s routed to another network.

Figure 31-2 Packet Filtering—Routed Packets
Packets that are routed to another network first must pass through a set of rules on the FORWARD filtering point. This allows you to create a set of rules that will only apply to packets that are routed to another network.
Conversational Learning™ — Configuring a Router
Gary: Hey, Julia. I am setting up a firewall that also needs to act as a router. I know how to create the firewall, but how do I get the system to act as a router?
Julia: Hi, Gary. That is a feature of the kernel. Take a look at contents of the file /proc/sys/net/ipv4/ip_forward.
Gary: It contains a 0.
Julia: Right, 0 means “this system isn’t a router,” and 1 means “this system is a router.” Of course, you also need to have two network interfaces defined as well.
Gary: Do I just change this number directly?
Julia: You can use this command to make the change: echo 1 > /proc/sys/net/ipv4/ip_forward. However, if the system is rebooted, it will revert back to a 0.
Gary: Can I make this a permanent change?
Julia: Yes, edit the /etc/sysconf.conf file and set net.ipv4.ip_forward = 1.
Gary: OK. Thanks again, Julia.
Note that after the FORWARD filtering point, the packets are sent to another filtering point (POSTROUTING). It may seem strange to have two filtering points with two separate sets of rules, but the reason for this is shown in Figure 31-3.
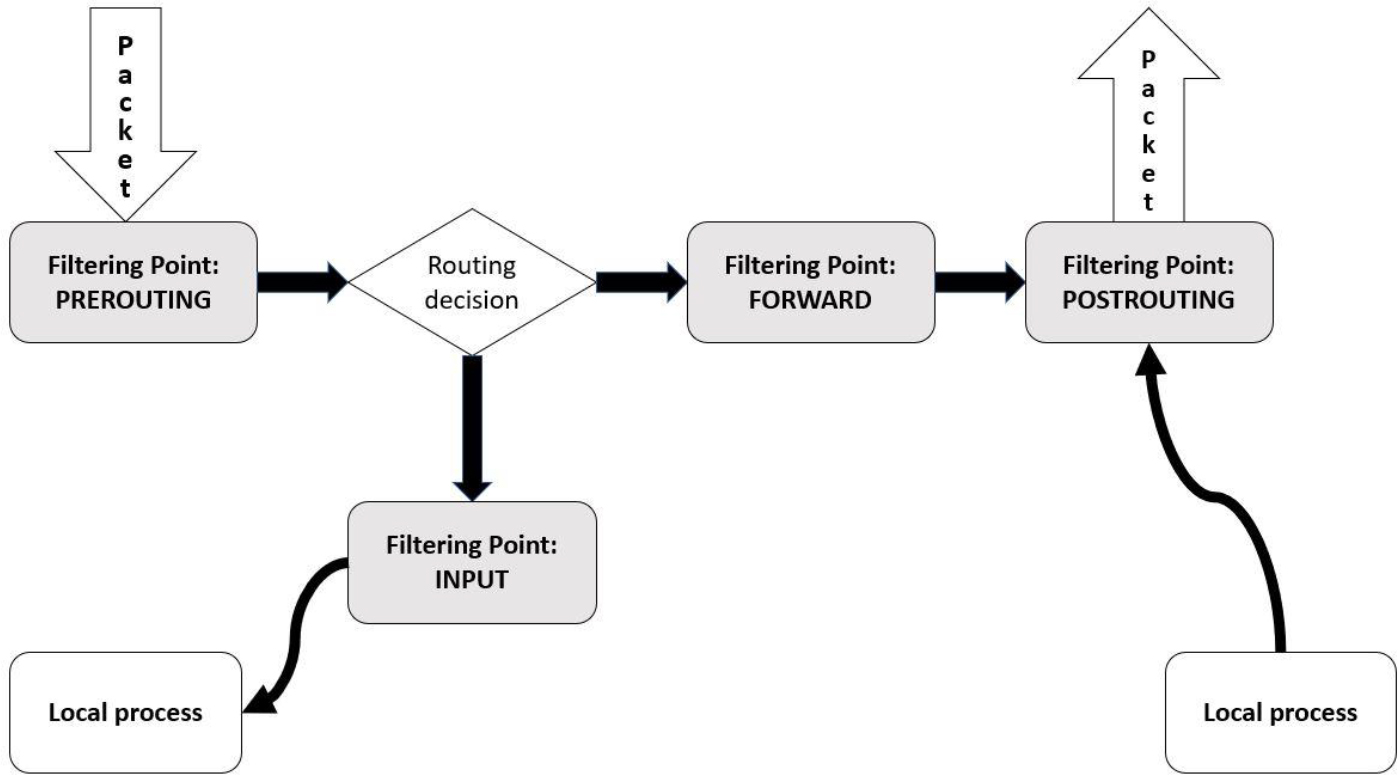
Figure 31-3 Packet Filtering—Outbound Packets
Packets are not only subject to filtering when they are sent to a host, but also when packets are sent from the host. Rules can be applied on the OUTPUT filtering point for any packet that originates from a process that is running on the local system. If you want to have a rule that applies to all outbound packets (both routed packets and packets that originate from the local system), then place rules on the POSTROUTING filtering point.
Important Terms
In the previous section, you were introduced to the term filtering point. Types of rules, referred to as a table, can be placed on a filtering point. A filtering point can have one or more sets of rules because iptables performs multiple functions: either filter (block or allow) the data, perform a NAT operation on the packet, or mangle the packet. The combination of the filtering point plus the table (filter, nat, or mangle) are combined into a single set of rules called a chain.
Consider a chain to be a set of rules that determines what actions to take on a specific packet. For example, a rule on the “filter INPUT” chain could block an incoming packet based on the source IP address. Another rule could be used to allow packets destined for a specific network port.
The order of the rules is also important. Once a matching rule is found, an action (called a target) takes place and additional rules are ignored (with one exception, as noted next). Here are the different types of targets:
• ACCEPT: Allow the packet to continue to the next step (filtering point, routing decision, and so on).
• DROP: Do not allow the packet to continue to the next step; just discard it.
• REJECT: Do not allow the packet to continue to the next step but send a response message to the origin of the packet informing it of the rejection. This is different than DROP because with DROP the origin of the packet is never informed of what happens with the packet.
• LOG: Create a log entry. Note that a target of ACCEPT, DROP, or REJECT results in no further rules being evaluated, but LOG will result in creating the log entry and then continuing to evaluate additional rules. So, you can create a rule to log a connection attempt and then DROP or REJECT the attempt with another rule.
Security Highlight
Typically DROP is considered a more secure method than REJECT because hackers will use REJECT responses as a means to probe a system or network. Even a negative response provides the hacker with useful information. For example, a REJECT could indicate that the destination machine might be worth hacking into (why secure an unimportant system), or it could indicate that some ports are blocked but others are allowed.
Each chain also has a default chain policy. If you have not edited a chain, this should be set to ACCEPT. This means that if a packet does not match any DROP or REJECT rules in the chain, the default policy of ACCEPT will allow it to continue to the next step.
On systems where security is paramount, you might want to change this default rule to DROP. This means that the only packets that are allowed to move to the next step in the process are those that match an ACCEPT rule in the chain.
All of these terms (filtering point, table, chain, rule, and default chain policy) will become clearer as examples are provided during this chapter. So, if some of these terms are a bit fuzzy now, they should make more sense as you explore using the iptables command to implement firewall rules.
Note
The firewall created by iptables can be very complex, well beyond the scope of this book. For example, besides filter, nat, and mangle, there is a table called “raw” that will not be covered in this book. Also, filter points can have multiple rules—for example, a set of rules for OUTPUT-filter, one for OUTPUT-nat, and one for OUTPUT-mangle. However, not every table can be used to create rules (for example, you cannot have a PREROUTING-filter rule). While these complex situations would belong in a book that focuses purely on firewalls, the discussion in this book will include specific scenarios of firewalls.
Lastly, consider a situation in which multiple rule sets appear at one filter point. Clearly, one rule set must be applied first, then another, and so on. An excellent diagram by Jan Engelhardt describes this process. It can be found at the following link: https://upload.wikimedia.org/wikipedia/commons/3/37/Netfilter-packet-flow.svg.
Using iptables to Filter Incoming Packets
A common firewall task involves configuring a system to either allow or block incoming packets. This is something that could be applied to a single host or an entire network (if the current system also acts as a router). To perform this task, you place rules on the INPUT-filter chain.
What Could Go Wrong?
Keep in mind that iptables is not the only possible firewall solution. There could be another solution already installed and enabled on your system. You should only have one firewall service active on a segment of the system at a time. As a result, you may need to disable an existing firewall.
For example, many Red Hat–based distributions have firewalld instead of iptables enabled by default. This can be disabled on modern distributions by executing the systemctl disable firewalld command.
The examples in this chapter were performed on a Ubuntu system that uses iptables by default. Consult the documentation for your distribution to determine if another firewall solution is used by default.
It is fairly common on modern Linux distributions to include some default firewall rules. You can see the current rules by executing the following command:
root@onecoursesource:~# iptables -t filter -L INPUT
Chain INPUT (policy ACCEPT)
target     prot opt source               destination
ACCEPT     udp  --  anywhere             anywhere  udp dpt:domain
ACCEPT     tcp  --  anywhere             anywhere  tcp dpt:domain
ACCEPT     udp  --  anywhere             anywhere  udp dpt:bootps
ACCEPT     tcp  --  anywhere             anywhere  tcp dpt:bootps
At this point, we are not going to worry about what these rules do; they will be described later. To take these rules out of the chain, you could delete them individually. For example, the following command deletes the first rule in the INPUT-filter chain (note that you do not need to include -t filter because filter is the default table):
root@onecoursesource:~# iptables -D INPUT 1
root@onecoursesource:~# iptables -L INPUT
Chain INPUT (policy ACCEPT)
target     prot opt source               destination
ACCEPT     tcp  --  anywhere             anywhere  tcp dpt:domain
ACCEPT     udp  --  anywhere             anywhere  udp dpt:bootps
ACCEPT     tcp  --  anywhere             anywhere  tcp dpt:bootps
You can also remove all rules in a chain by using the -F option (F stands for flush):
root@onecoursesource:~# iptables -F INPUT
root@onecoursesource:~# iptables -L INPUT
Chain INPUT (policy ACCEPT)
target     prot opt source               destination
To block all network packets that originate from a specific host, use the following command:
root@onecoursesource:~# iptables -A INPUT -s 192.168.10.100 -j DROP
root@onecoursesource:~# iptables -L INPUT
Chain INPUT (policy ACCEPT)
target     prot opt source               destination
DROP       all  --  192.168.10.100        anywhere
The -s option stands for “source.” This value can either be an IP address or a network:
root@onecoursesource:~# iptables -A INPUT -s 192.168.20.0/24 -j DROP
root@onecoursesource:~# iptables -L INPUT
Chain INPUT (policy ACCEPT)
target     prot opt source               destination
DROP       all  --  192.168.10.100       anywhere
DROP       all  --  192.168.20.0/24      anywhere
Using the -A option will place the new rule at the end of the chain. Recall that this is important because the rules are evaluated in order. Suppose you want to allow one machine in the 192.168.20.0/24 network access to this system. Use the -I option to insert a new rule above the rule that blocks that network; for example, -I INPUT 2 states “insert this rule as Rule 2 and move all remaining rules down by one):
root@onecoursesource:~# iptables -I INPUT 2 -s 192.168.20.125 -j ACCEPT
root@onecoursesource:~# iptables -L INPUT
Chain INPUT (policy ACCEPT)
target     prot opt source               destination
DROP       all  --  192.168.10.100       anywhere
ACCEPT     all  --  192.168.20.125       anywhere
DROP       all  --  192.168.20.0/24      anywhere
Filtering by Protocol
It is common to filter packets by the protocol. This could either be a protocol like ICMP, TCP, or UDP, or a protocol associated with a specific port (like telnet, which uses port 22). To block a protocol like ICMP, use a command like the following (the first command flushes previous rules so you can focus on the rule being discussed):
root@onecoursesource:~# iptables -F INPUT
root@onecoursesource:~# iptables -A INPUT -p icmp -j DROP
root@onecoursesource:~# iptables -L INPUT
Chain INPUT (policy ACCEPT)
target     prot opt source               destination
DROP       icmp --  anywhere             anywhere
See the /etc/protocols file for a list of protocols that can be used in conjunction with the -p option.
To block a specific port, you need to provide the -m option and either --sport (source port) or --dport (destination port). For incoming packets, you typically use the --dport option because you are concerned about connections established on a specific port on the local system:
root@onecoursesource:~# iptables -A INPUT -m tcp -p tcp --dport 23 -j DROP
root@onecoursesource:~# iptables -L INPUT
Chain INPUT (policy ACCEPT)
target     prot opt source               destination
DROP       icmp --  anywhere             anywhere
DROP       tcp  --  anywhere             anywhere  tcp dpt:telnet
The -m option is required for iptables to make use of an extension module, an optional add-on feature for iptables. In the previous example, the TCP match extension module was used. See Figure 31-4 for information about iptables extensions.

Figure 31-4 Text Support—Extensions for iptables
Note
You can also specific a range of ports: --dport 1:1024
The output of the iptables -L command automatically converts port numbers into names (for example, 23 is converted to “telnet”). It also converts IP addresses into hostnames if it can perform a DNS lookup. To avoid these conversations, use the -n option:
root@onecoursesource:~# iptables -L INPUT -n
Chain INPUT (policy ACCEPT)
target     prot opt source               destination
DROP       icmp --  anywhere             anywhere
DROP       tcp  --  anywhere             anywhere  tcp dpt:23
Remember that you can also look up port numbers in the /etc/services file.
Multiple Criteria
You can combine multiple criteria to create a more complex rule. For the rule to match, all the criteria must match. For example, suppose you want to create a rule that matches both a protocol and a source IP address. The following rule would perform this task:
root@onecoursesource:~# iptables -A INPUT -p icmp -s 192.168.125.125 -j DROP
root@onecoursesource:~# iptables -L INPUT
Chain INPUT (policy ACCEPT)
target     prot opt source               destination
DROP       icmp --  anywhere             anywhere
DROP       tcp  --  anywhere             anywhere  tcp dpt:telnet
DROP       icmp --  192.168.125.125      anywhere
The rule added in this example states “drop any ICMP packet that originates from the 192.168.125.125 host.”
Filtering Based on Destination
If you look at the output of the iptables -L INPUT command, you will see that there is a “destination” column:
root@onecoursesource:~# iptables -L INPUT
Chain INPUT (policy ACCEPT)
target     prot opt source               destination
DROP       icmp --  anywhere             anywhere
DROP       tcp  --  anywhere             anywhere  tcp dpt:telnet
DROP       icmp --  192.168.125.125      anywhere
In situations where you have multiple network cards or multiple IP addresses for a network card, you may want to create different rules for different network interfaces. In a situation where each network card has a single IP address, you can create different rules for each network interface:
root@onecoursesource:~# iptables -F INPUT
root@onecoursesource:~# iptables -A INPUT -i eth0 -s 192.168.100.0/24 -j DROP
root@onecoursesource:~# iptables -A INPUT -i eth1 -s 192.168.200.0/24 -j DROP
root@onecoursesource:~# iptables -L INPUT
Chain INPUT (policy ACCEPT)
target     prot opt source               destination
DROP       all  --  192.168.100.0/24     anywhere
DROP       all  --  192.168.200.0/24     anywhere
The output of the previous iptables -L INPUT command does not display the different network ports. To see them, you have to use the -v option (for “verbose”):
root@onecoursesource:~# iptables -L INPUT -v
Chain INPUT (policy ACCEPT 2 packets, 144 bytes)
 pkts bytes target   prot opt in     out   source               destination
    0     0 DROP     all  --  eth0   any   192.168.100.0/24     anywhere
    0     0 DROP     all  --  eth1   any   192.168.200.0/24     anywhere
The -v option provides more information, including hope that many network packets have matched the specified rule. This can be useful while testing the firewall rules.
In a situation where an interface is assigned multiple IP addresses, use the -d option to indicate the rule applies to a destination address:
root@onecoursesource:~# iptables -F INPUT
root@onecoursesource:~# iptables -A INPUT -d 192.168.50.1 -s 192.168.200.0/24 -j DROP
root@onecoursesource:~# iptables -L INPUT
Chain INPUT (policy ACCEPT)
target     prot opt source               destination
DROP       all  --  192.168.200.0/24     192.168.50.1
Changing the Default Policy
A more common use of a firewall is to allow specific packets and deny all others by default. This can be accomplished by changing the default policy. For example, suppose the current system is on an internal network and you want to make sure only a handful of systems can access it. The following rules would perform that task:
root@onecoursesource:~# iptables -F INPUT
root@onecoursesource:~# iptables -A INPUT -s 10.0.2.0/24 -j ACCEPT
root@onecoursesource:~# iptables -P INPUT DROP
root@onecoursesource:~# iptables -L INPUT
Chain INPUT (policy DROP)
target     prot opt source               destination
ACCEPT     all  --  10.0.2.0/24          anywhere
What Could Go Wrong?
Be very careful when setting the default policy to DROP. If you are remotely logged in to the system and you did not create a rule that allows your login session’s packets to “get through,” your new default policy could end up blocking your access to the system.
Revisiting the Original Rules
Now that you have learned some of the basics of creating firewall rules, recall from earlier in this chapter that the system has some rules in place by default:
root@onecoursesource:~# iptables -t filter -L INPUT
Chain INPUT (policy ACCEPT)
target     prot opt source               destination
ACCEPT     udp  --  anywhere             anywhere  udp dpt:domain
ACCEPT     tcp  --  anywhere             anywhere  tcp dpt:domain
ACCEPT     udp  --  anywhere             anywhere  udp dpt:bootps
ACCEPT     tcp  --  anywhere             anywhere  tcp dpt:bootps
Part of knowing firewalls is not just writing rules, but also understanding how the rules apply. For example, if you review the rules from the previous output, you will see that several ports (“domain,” which is port 53, and “bootps,” which is port 67) are allowed to pass through the INPUT filtering point because the target is ACCEPT. This really has no impact on the firewall because the default policy for the chain is also ACCEPT. If the policy was changed to DROP, then the rules would have an impact on which packets are allowed and which are blocked.
Saving the Rules
Up until now, all changes that have been made only affect the currently running firewall. If the system was rebooted, all changes made using the iptables command would be lost and the rules would revert back to the default.
You can save the rules into a file by using the iptables-save command. Normally the output of this command is sent to the screen, but you can redirect the output to a file:
root@onecoursesource:~# iptables-save > /etc/iptables.rules
Where exactly you should save the rules and how these are loaded automatically is dependent on your distribution. Some distributions make use of front-end utilities, such as firewalld on Red Hat Enterprise Linux or UFW (uncomplicated firewall) on Ubuntu. These utilities are not only used to configure firewall rules (running iptables commands on your behalf), but they also save rules. The rules are also automatically restored during a system reboot.
Note
Because there are so many of these “iptables helper” utilities (including GUI-based utilities), the authors decided to just cover the iptables command. You can always use this command to implement a firewall, and you are welcome to explore the “iptables helper” utilities for the distribution you are working on by consulting the documentation.
If you are not using one of these utilities, there may be another solution enabled on your system. If not, you can just create a shell script that restores the rules from the saved file by using the following command:
root@onecoursesource:~# iptables-restore> /etc/iptables.rules
Then you would use the techniques covered in Chapter 28, “System Booting,” to execute the script during the boot process.
Using iptables to Filter Outgoing Packets
You may wonder why you would want to block outgoing packets. Consider that in many organizations, one of the biggest security concerns is users who visit Internet sites that could result in compromising security. For example, suppose there is a file-sharing site that your organization does not permit users to access because it lacks the proper security restrictions. To prevent this access, you can create a firewall rule on the OUTPUT-filter chain:
root@onecoursesource:~# iptables -F OUTPUT root@onecoursesource:~# iptables -A OUTPUT -m tcp -p tcp -d 10.10.10.10--dport 80 -j DROP root@onecoursesource:~# iptables -L OUTPUT Chain OUTPUT (policy ACCEPT) target prot opt source destination DROP tcp -- anywhere 10.10.10.10 tcp dpt:http
If you are going to disallow access to a remote system, it might be considered more “user friendly” to use the REJECT target rather than the DROP target. Recall that with DROP, no response is returned to the origin of the packet. Therefore, if a user goes to a website and the DROP target is used, it appears that the website is just hanging. However, a REJECT target would respond with an error message, so the web browser would display an error message to the user.
Perhaps you want to allow this access but create a log entry so you can determine what systems are attempting to access the remote system:
root@onecoursesource:~# iptables -F OUTPUT root@onecoursesource:~# iptables -A OUTPUT -m tcp -p tcp -d 10.10.10.10
Implementing NAT
There are several different forms of NAT:
• DNAT: Destination NAT; used when you want to place servers behind a firewall and still provide access from an external network. DNAT rules are placed on the PREROUTING filtering point. Further discussion of this topic is beyond the scope of this book.
• SNAT: Source NAT; used when you have an internal network with statically assigned private IP addresses. Using SNAT, you can funnel access to the Internet via a single machine that has a live IP address (an address that is routable on the Internet). This system is configured with SNAT, which is used to map internal address with external communication. SNAT rules are placed on the POSTROUTING filtering point. Further discussion of this topic is beyond the scope of this book.
• MASQUERADE: Used when you have an internal network with dynamically assigned private IP addresses (for example, using DHCP). Using MASQUERADE, you can funnel access to the Internet via a single machine that has a live IP address (an address that is routable on the Internet). This system is configured with MASQUERADE, which is used to map internal address with external communication. MASQUERADE rules are placed on the POSTROUTING filtering point.
Because most internal networks use DHCP to assign IP addresses, MASQUERADE is more common than SNAT. It is also easier to configure because SNAT requires you to create rules for each internal system. With MASQUERADE, a single command handles all the internal systems:
root@onecoursesource:~# iptables -t nat -A POSTROUTING -j MASQUERADE
Summary
The focus of this chapter was firewalls, specifically iptables. You learned how to secure a system or network from hackers by creating rules on the INPUT-filter chain. You also learned how to block access to external hosts by creating rules on the OUTPUT-filter chain. Lastly, you learn how to configure NAT to allow internals private systems access to the Internet.
Key Terms
Review Questions
1. If no iptables rules match, the _____ target is used.
2. Which of the following is not a valid iptables target?
a. REFUSE
b. REJECT
c. ACCEPT
d. LOG
3. The _____ option to the iptables command will display current firewall rules.
4. Which of the following options need to be used to create a rule that will filter based on a destination port? (Choose two.)
a. -p
b. --dport
c. -d
d. -m
5. To view port numbers and IP addresses instead of names, use the _____ option.