Table of Contents for
Linux Essentials for Cybersecurity, First Edition
 Linux Essentials for Cybersecurity, First Edition
Published by
Pearson IT Certification, 2018
Linux Essentials for Cybersecurity, First Edition
Published by
Pearson IT Certification, 2018
- Cover Page
- Title Page
- Copyright Page
- Contents at a Glance
- Table of Contents
- About the Author
- Dedication
- Acknowledgments
- About the Technical Reviewers
- We Want to Hear from You!
- Reader Services
- Introduction
- Part I: Introducing Linux
- Chapter 1: Distributions and Key Components
- Chapter 2: Working on the Command Line
- Chapter 3: Getting Help
- Chapter 4: Editing Files
- Chapter 5: When Things Go Wrong
- Part II: User and Group Accounts
- Chapter 6: Managing Group Accounts
- Chapter 7: Managing User Accounts
- Chapter 8: Develop an Account Security Policy
- Part III: File and Data Storage
- Chapter 9: File Permissions
- Chapter 10: Manage Local Storage: Essentials
- Chapter 11: Manage Local Storage: Advanced Features
- Chapter 12: Manage Network Storage
- Chapter 13: Develop a Storage Security Policy
- Part IV: Automation
- Chapter 14: Crontab and At
- Chapter 15: Scripting
- Chapter 16: Common Automation Tasks
- Chapter 17: Develop an Automation Security Policy
- Part V: Networking
- Chapter 18: Networking Basics
- Chapter 19: Network Configuration
- Chapter 20: Network Service Configuration: Essential Services
- Chapter 21: Network Service Configuration: Web Services
- Chapter 22: Connecting to Remote Systems
- Chapter 23: Develop a Network Security Policy
- Part VI: Process and Log Administration
- Chapter 24: Process Control
- Chapter 25: System Logging
- Part VII: Software Management
- Chapter 26: Red Hat–Based Software Management
- Chapter 27: Debian-Based Software Management
- Chapter 28: System Booting
- Chapter 29: Develop a Software Management Security Policy
- Part VIII: Security Tasks
- Chapter 30: Footprinting
- Chapter 31: Firewalls
- Chapter 32: Intrusion Detection
- Chapter 33: Additional Security Tasks
- Appendix A: Answers to Review Questions
- Appendix B: Resource Guide
- Glossary
Chapter 19 Network Configuration
Now that you have learned some of the essential networking principles in Chapter 18, “Networking Basics,” you will explore how to configure network devices in this chapter. We primarily focus on Ethernet devices—the most common network device you will find on Linux systems.
You learn how to assign an IP address and subnet mask to a network interface. You also discover how to configure routes as well as define the DNS servers your system will use.
This chapter also explore wireless network device configuration in the event you need to configure networking on a laptop.
After reading this chapter and completing the exercises, you will be able to do the following:
Configure network devices, both on the fly and persistently.
Define network routes.
Perform network troubleshooting tasks.
Configure wireless network devices.
Ethernet Network Interfaces
One of the most common network devices is the Ethernet port. If your desktop or laptop does not communicate on the network wirelessly, then you probably connect a blue network cable, like the one shown in Figure 19-1, into your computer.
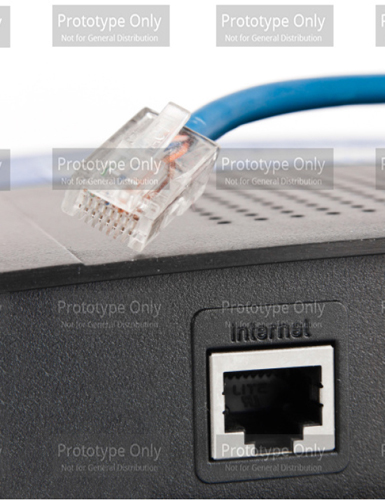
Figure 19-1 Ethernet Connection
In this section, you learn how to configure Ethernet port devices.
Displaying Ethernet Port Configurations
One of the commonly used commands to display network information is the ifconfig command. When executed with no arguments, it lists active network devices, as shown in Example 19-1.
Example 19-1 Using ifconfig to Display Network Information
[root@onecoursesource ~]# ifconfig
eth0: flags=4163<UP,BROADCAST,RUNNING,MULTICAST>  mtu 1500
        inet 192.168.1.16  netmask 255.255.255.0  broadcast 192.168.1.255
        inet6 fe80::a00:27ff:fe52:2878  prefixlen 64  scopeid 0x20<link>
        ether 08:00:27:52:28:78  txqueuelen 1000  (Ethernet)
        RX packets 20141  bytes 19608517 (18.7 MiB)
        RX errors 0  dropped 0  overruns 0  frame 0
        TX packets 2973  bytes 222633 (217.4 KiB)
        TX errors 0  dropped 0 overruns 0  carrier 0  collisions 0

lo: flags=73<UP,LOOPBACK,RUNNING>  mtu 65536
        inet 127.0.0.1  netmask 255.0.0.0
        inet6 ::1  prefixlen 128  scopeid 0x10<host>
        loop  txqueuelen 0  (Local Loopback)
        RX packets 3320  bytes 288264 (281.5 KiB)
        RX errors 0  dropped 0  overruns 0  frame 0
        TX packets 3320  bytes 288264 (281.5 KiB)
        TX errors 0  dropped 0 overruns 0  carrier 0  collisions 0
The output shows network information for two devices: the primary Ethernet network card (eth0) and the local loopback address (lo). If the system had additional Ethernet network cards, they would be displayed as eth1, eth2, and so on. The purpose of the loopback address is to allow software to communicate with the local system using protocols and services that would normally require the communication to occur on a network. In most cases, there is not much for you to administer or troubleshoot in regard to the loopback address.
What Could Go Wrong?
If you are working on a virtual machine, you may see something like enp0s3 instead of eth0. This is because the virtual machine manager does not always treat the virtual machine as if it was a true network card (it depends on what sort of network interface you configure within the virtual machine). Consider enp0s3 to be the same as eth0; the commands in this chapter should work just fine on this device.
You should understand the lines of output for the eth0 section. Table 19-1 describes the key portions of this output in detail.
Table 19-1 Output of the ifconfig Command

Many different flags can be assigned an interface. Some of the more important flags include the following:
• UP: Indicates the interface is active. When the interface is down, the flags line is not displayed at all.
• BROADCAST: Indicates that the broadcast address has been set for the device.
• MULTICAST: Indicates whether the multicast address is enabled on this device.
• PROMISC: Indicates whether the device is in promiscuous mode. Normally a device only listens to network packets sent to its own IP address. In promiscuous mode, the device listens for all network traffic. This can be helpful for analyzing network traffic.
Security Highlight
Enabling promiscuous mode allows you to sniff the network. This means you can observe network traffic either to determine issues or to discover a potential security breech.
Changing Ethernet Port Settings
The ifconfig command can also be used to change network settings temporarily; these changes are not persistent across reboots. For example, the following command sets the IPv4 address, netmask, and broadcast addresses:
[root@onecoursesource ~]# ifconfig eth0 192.168.1.16 netmask 255.255.255.0 broadcast 192.168.2.255
To enable promiscuous mode, execute the following command:
[root@onecoursesource ~]#ifconfig eth0 promisc
The previous command changes the flags section of the ifconfig command output. This can be verified by executing the ifconfig command without any arguments:
[root@onecoursesource ~]# ifconfig | grep eth0
eth0: flags=4163<UP,BROADCAST,RUNNING,PROMISC,MULTICAST>  mtu 1500
To disable promiscuous mode, execute the following command:
[root@onecoursesource ~]#ifconfig eth0 -promisc
An upcoming section describes the Address Resolution Protocol (ARP). In a nutshell, ARP is for keeping track of IP-to-MAC-address resolution. Normally this feature is turned on automatically for Ethernet devices. You can temporarily turn off this protocol by executing the following command:
[root@onecoursesource ~]#ifconfig eth0 -arp
The previous command changes the flags section of the ifconfig command output. This can be verified by executing the ifconfig command without any arguments:
[root@onecoursesource ~]# ifconfig | grep eth0
eth0: flags=4163<UP,BROADCAST,RUNNING,NOARP,MULTICAST>  mtu 1500
To enable ARP, execute the following command:
[root@onecoursesource ~]#ifconfig eth0 arp
Note that you can also activate (bring up) a network interface with the ifup command (ifup eth0) and deactivate (bring down) a network interface with the ifdown command (ifdown eth0).
Network Configuration Tools
Some modern systems include additional automated tools that configure your network settings. For example, your Linux distribution may have a tool called Network Manager installed. This tool is designed to configure the network without any interaction on your part.
These tools can be helpful in some cases, such as when end users have Linux laptops. However, on servers, these tools can make it difficult to define the network settings that you want to use.
To determine if the Network Manager is running on your system, use the following command:
[root@onecoursesource ~]# nmcli device status
Error: NetworkManager is not running.
As you can see from the output of the previous command, Network Manager is not running on this system. If it was running, you could stop it by executing the following command:
[root@onecoursesource ~]# systemctl stop NetworkManager
This is only a temporary solution. After a system reboot, the Network Manager will be running again. To disable the Network Manager from starting at boot, execute the following command:
[root@onecoursesource ~]# systemctl disable NetworkManager
See Figure 19-2 for information about how Network Manager can affect a system.

Figure 19-2 Text Support—Problem Setting Network Configuration
The arp Command
Most users and administrators use hostnames to communicate with remote systems. This hostname must be translated into an IP address because the Internet Protocol (IP) uses IP addresses rather than hostnames. This function is provided by a resolver, such as a DNS server. More details regarding DNS servers are provided in Chapter 20, “Network Service Configuration: Essential Services.”
The IP is part of a seven-layer networking model called the ISO-OSI (International Organization of Standardization–Open System Interconnection) network model. At Layer 2 of this model, devices communicate using the network card’s MAC address. In most cases, for two hosts to communicate, not only do they need to know each other’s IP addresses, but they also need to know each other’s MAC addresses.
Initially the local system does not know the MAC addresses of any other host. When a remote IP address is first used, a broadcast request is sent on the network that matches that IP address. The machine with the matching IP address responds to the original request, reporting to the original host what its MAC address is. The original system then stores this MAC address and corresponding IP address in a memory address called the ARP table.
The arp command is used to view the ARP table or make changes to it. When executed with no arguments, the arp command displays the ARP table:
[root@onecoursesource ~]# arp
Address               HWtype  HWaddress           Flags Mask      Iface
192.168.1.11          ether   30:3a:64:44:a5:02   C                eth0
What Could Go Wrong?
In the event that a remote system has its network card replaced, it may be necessary to delete an entry from the ARP table. This can be accomplished by using the –d option to the arp command:
[root@onecoursesource ~]# arp -i eth0 -d 192.169.1.11
Once the address has been removed from the ARP table, there should be no need to add the new address manually. The next time the local system uses this IP address, it sends a broadcast request on the appropriate network to determine the new MAC address.
The route Command
When a network packet is destined for a host on the local network, it is broadcast on that network and picked up by the appropriate host. When the network packet is destined for a host not on the local network, the packet needs to be passed through a gateway (also called a router). The gateway has a live IP address on both the local network and at least one other network.
The gateway is connected either to the Internet (either directly or through additional gateways) or to an internal, private network. The local system keeps track of the gateways it can directly communicate with by storing information in the routing table.
The route command either displays or modifies the routing table. To display the routing table, execute the route command without any arguments:
[root@onecoursesource ~]# route
Kernel IP routing table
Destination    Gateway        Genmask         Flags Metric Ref    Use Iface
default        192.168.1.1    0.0.0.0         UG    100    0        0 eth0
192.168.1.0    0.0.0.0        255.255.255.0   U     100    0        0 eth0
The line from the output of the previous command that begins with 192.168.1.0 specifies how to handle network traffic destined for the 192.168.1.0/255.255.255.0 network. The gateway for this line is 0.0.0.0, which means “broadcast these network packets on the local network.”
The default line from the output of the previous command means “unless specified by another rule, use this line.” The gateway on this line indicates where to send the network traffic. In this example, if the network packet is not destined for the 192.168.1.0/255.255.255.0 network, it should be sent to the 192.168.1.1 gateway. The flags setting of UG means Up + Gateway (an active gateway).
Suppose there was a gateway with the IP address of 192.168.1.100 connected to an internal network of 192.168.2.0/255.255.255.0. You could add this gateway by running the following command:
[root@onecoursesource ~]# route add -net 192.168.2.0 netmask 255.255.255.0 gw 192.168.1.100
[root@onecoursesource ~]# route
Kernel IP routing table
Destination    Gateway         Genmask         Flags Metric Ref    Use Iface
default        192.168.1.1     0.0.0.0         UG    100    0        0 eth0
192.168.1.0    0.0.0.0         255.255.255.0   U     100    0        0 eth0
192.168.2.0    192.168.1.100   255.255.255.0   U     0      0        0 eth0
To delete this gateway, execute the following command:
[root@onecoursesource ~]# route del -net 192.168.2.0 netmask 255.255.255.0 gw 192.168.1.100
[root@onecoursesource ~]# route
Kernel IP routing table
Destination     Gateway         Genmask         Flags Metric Ref    Use Iface
default         192.168.1.1     0.0.0.0         UG    100    0        0 eth0
192.168.1.0     0.0.0.0         255.255.255.0   U     100    0        0 eth0
192.168.2.0     0.0.0.0         255.255.255.0   U     0      0        0 eth0
You can also delete and add the default gateway using the following syntax:
[root@onecoursesource ~]# route del default
[root@onecoursesource ~]# route add default gw 192.168.1.1
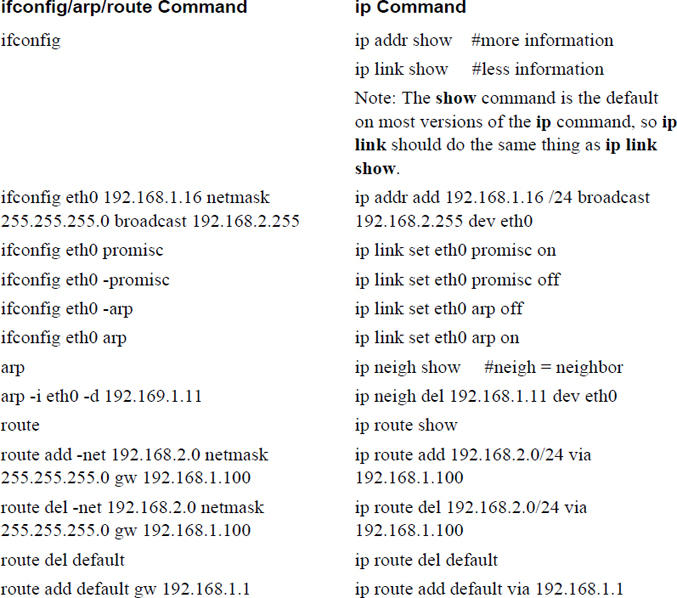
The ip Command
Now that you have learned all about the ifconfig, arp, and route commands, we have some bad news (sort of) for you. If you look at the man page of any of these commands while working on a modern distribution of Linux, you will likely see the following statement:
NOTE
       This  program  is obsolete!
Now, you might be wondering why you spent the time learning about these programs if they are obsolete. That is a good question, and we have several good answers:
• Although the ip command is designed to replace the ifconfig, arp, and route commands (and some other network tools), on most distributions these tools still exist (and likely will for a long time). The reason for this is that many shell scripts have been written over the years that use these programs. Upgrading all these programs to use the new ip command takes time and, in the opinion of a good number of script maintainers, is not worth the trouble. If you come across one of those scripts, you should know what these commands do, even if you use the ip command yourself normally.
• Although the ifconfig, arp, and route commands are no longer under development, they still work just fine. You should know that the ip command provides more features and is an active project. However, many administrators already know how to use the ifconfig, arp, and route commands and use these on a regular basis. As a result, you should be aware of these tools as well.
• If you inherit an older or legacy system, the ip command might not exist. So, knowing the older commands is useful.
The ip command can do essentially everything that the ifconfig, arp, and route commands can do, plus a lot more. Table 19-2 demonstrates how to execute the ip command to perform any of the ifconfig, arp, and route commands demonstrated in this chapter. Try both the ip command and the corresponding “older” command to see how they can be slightly different in the way they display information.
The hostname Command
The hostname command can display or change the system hostname:
[root@onecoursesource ~]# hostname
onecoursesource
[root@onecoursesource ~]# hostname myhost
[root@myhost ~]# hostname
myhost
What Could Go Wrong?
Note that this change is temporary and, after a system reboot, will return to the original value. Later in this chapter you will see how to make this a persistent change.
The host Command
The host command is normally used to perform simple hostname-to-IP-address translation operations (also called DNS queries):
[root@onecoursesource ~]# host google.com
google.com has address 172.217.4.142
google.com has IPv6 address 2607:f8b0:4007:800::200e
google.com mail is handled by 30 alt2.aspmx.l.google.com.
google.com mail is handled by 50 alt4.aspmx.l.google.com.
google.com mail is handled by 20 alt1.aspmx.l.google.com.
google.com mail is handled by 10 aspmx.l.google.com.
google.com mail is handled by 40 alt3.aspmx.l.google.com.
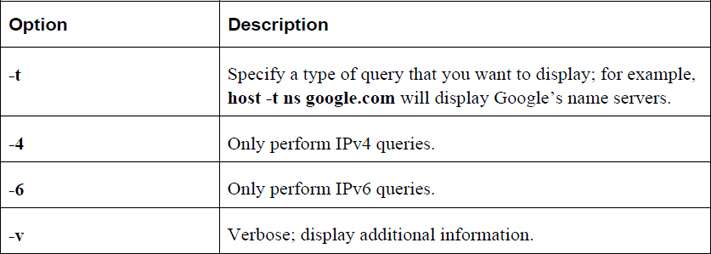
Table 19-3 describes common options for the host command.
Table 19-3 Options for the host Command
The dig Command
The dig command is useful for performing DNS queries on specific DNS servers. Think of it as a more powerful version of the host command. The format of the command is demonstrated here:
[root@onecoursesource ~]# dig google.com

; <<>> DiG 9.9.4-RedHat-9.9.4-38.el7_3 <<>> google.com
;; global options: +cmd
;; Got answer:
;; ->>HEADER<<- opcode: QUERY, status: NOERROR, id: 56840
;; flags: qr rd ra; QUERY: 1, ANSWER: 1, AUTHORITY: 0, ADDITIONAL: 1

;; OPT PSEUDOSECTION:
; EDNS: version: 0, flags:; udp: 512
;; QUESTION SECTION:
;google.com.            IN    A

;; ANSWER SECTION:
google.com.        268    IN    A    216.58.217.206

;; Query time: 36 msec
;; SERVER: 192.168.1.1#53(192.168.1.1)
;; WHEN: Sun Mar 05 17:01:08 PST 2018
;; MSG SIZE  rcvd: 55
Note that the output of this command will become clear when DNS servers are covered in Chapter 20.
To query a specific DNS server, rather than the default DNS servers for your host, use the following syntax: dig @server host_to_lookup.
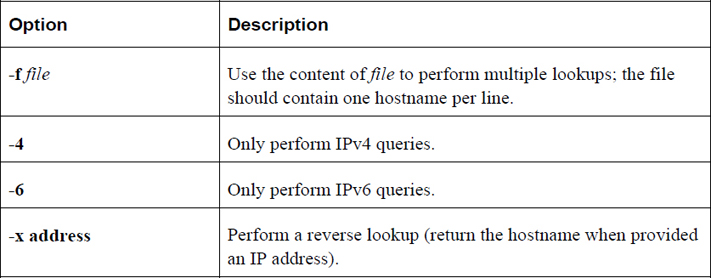
Table 19-4 describes common options for the dig command.
Table 19-4 Options for the dig Command
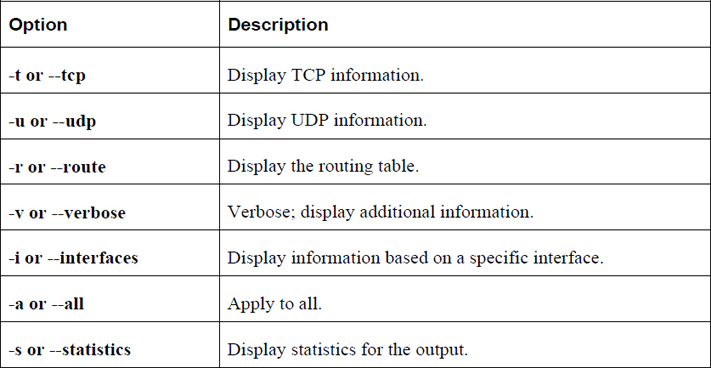
The netstat Command
The netstat command is useful for displaying a variety of network information. It is a key utility when troubleshooting network issues. Table 19-5 describes common options for the netstat command.
Table 19-5 Options for the netstat Command
For example, the following command will display all active TCP connections:
[root@onecoursesource ~]# netstat -ta
Active Internet connections (servers and established)
Proto Recv-Q Send-Q Local Address           Foreign Address         State
tcp        0      0 192.168.122.1:domain    0.0.0.0:*               LISTEN
tcp        0      0 0.0.0.0:ssh             0.0.0.0:*               LISTEN
tcp        0      0 localhost:ipp           0.0.0.0:*               LISTEN
tcp        0      0 localhost:smtp          0.0.0.0:*               LISTEN
tcp6       0      0 [::]:ssh                [::]:*                  LISTEN
tcp6       0      0 localhost:ipp           [::]:*                  LISTEN
tcp6       0      0 localhost:smtp          [::]:*
Persistent Network Configurations
In many cases, the content presented in this book works equally well on most any Linux distribution. However, there are some situations when that is not the case. For example, in order to set or modify network configuration, you will need to edit a series of files. Some of these files will be “universal,” working on most Linux distributions, but in some cases these files will be different on different distributions.
Typically there are two major varieties: Red Hat (which includes Red Hat Enterprise Linux, Fedora, CentOS, and others) and Debian (Debian, Mint OS, Ubuntu, and others). In this section, each file discussed will be marked as “universal”, “Red Hat,” or “Debian.”
The /etc/hostname File (Universal)
The /etc/hostname file is where the local system's hostname is stored:
[root@onesourcesource ~]#more /etc/hostname
server.sample999.com
The /etc/hosts File (Universal)
The /etc/hosts file is where hostname-to-IP-address translation is defined:
[root@onesourcesource ~]#more /etc/hosts
192.168.1.24 server.sample999.com
127.0.0.1   localhost onesourcesource
::1         localhost onesourcesource
Each line describes one translation. The first field is the IP address, the second field is the hostname, and the optional third field shows the alias addresses.
In most cases, this file is only used for the local host itself or for hosts on the local network. Normally hostname-to-IP-address translation is handled by a DNS server.
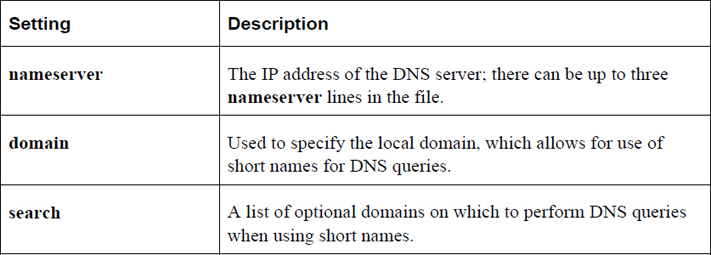
The /etc/resolv.conf File (Universal)
The /etc/resolv.conf file contains a list of the DNS servers for the system. A typical file looks like the following:
[root@onesourcesource ~]# cat /etc/resolv.conf
search sample999.com
nameserver 192.168.1
If your system is a DHCP client, then this file is normally dynamically populated using data from the DHCP server. For servers that use static IP address settings, this file is typically manually defined. See more details about static versus dynamic IP settings later in this chapter.
Table 19-6 describes common settings for the /etc/resolv.conf file.
Table 19-6 Common Settings for the /etc/resolv.conf File
The /etc/nsswitch.conf File (Universal)
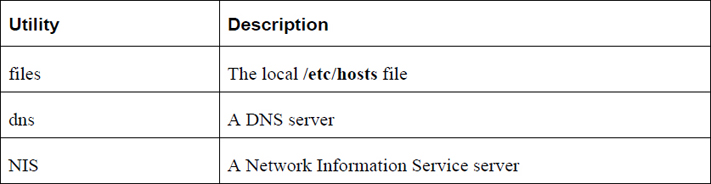
The Name Service Switch (NSS) configuration file, /etc/nsswitch.conf, is used by applications to determine the sources from which to obtain name-service information, as well as in what order. For example, for networking, this file contains the location of the name server resolver, the utility that provides hostname-to-IP-address translation:
[root@onesourcesource ~]#grep hosts /etc/nsswitch.conf
#hosts:     db files nisplus nis dns
hosts:      files dns
The value of files dns means “look at the local /etc/hosts file first, then look at the DNS server if the required translation isn’t in the local file.”
Table 19-7 describes common hostname-to-IP-address translation utilities.
Table 19-7 Common Hostname-to-IP-Address Translation Utilities
The /etc/sysctl.conf File (Universal)
The /etc/sysctl.conf file is used to define parameters for the kernel. The kernel is the component of the operating system that controls many of its functions, such as system boot and communicating with hardware devices.
There are hundreds of possible kernel settings, some of which can affect networking. For example, if you decide that you want to completely turn off IPv6 networking for the system, you should include the following two settings in the /etc/sysctl.conf file:
net.ipv6.conf.all.disable_ipv6=1
net.ipv6.conf.default.disable_ipv6=1
A complete discussion of all possible network configuration settings for the /etc/sysctl.conf file is beyond the scope of this book. Consult the kernel documentation for additional details.
See Figure 19-3 for details on how to disable responses to ping requests.

Figure 19-3 Text Support—Disable ping Responses
The /etc/sysconfig/network File (Red Hat)
By default, this Red Hat–based configuration file contains two settings: the system hostname and a setting that determines if networking should be started automatically during the boot process:
[root@onesourcesource ~]#more /etc/sysconfig/network
HOSTNAME=onecoursesource
NETWORKING=yes
Note
If you want to permanently change the hostname on Red Hat–based systems, you should change this file. You could also change the /etc/hostname file, but that file should be autogenerated by the system during the boot process from the HOSTNAME setting in the /etc/sysconfig/network file.
There are other possible settings that you can place in this file. For example, the following entry would define a default router (also called a default gateway):
GATEWAY=192.168.100.1
However, in most cases this setting is placed in a different file (the /etc/sysconfig/network-scripts/ifcfg-eth0 file), so it is rare to see the GATEWAY setting in the /etc/sysconfig/network file.
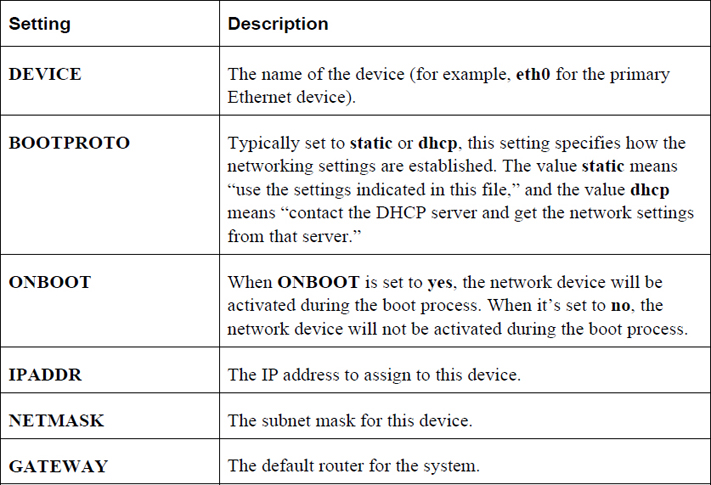
The /etc/sysconfig/network-scripts/ifcfg-interface-name Files (Red Hat)
For each network interface (eth0, eth1, and so on), there is a separate configuration file on Red Hat–based systems. For example, to configure the primary interface for a static IP address, use the following:
[root@onesourcesource ~]#more /etc/sysconfig/network-scripts/ifcfg-eth0
DEVICE=eth0
BOOTPROTO=static
ONBOOT=yes
IPADDR=192.168.100.50
NETMASK=255.255.255.0
GATEWAY=192.168.100.1
A static IP address is one that is the same each time the system is booted and the network interface is brought up. Another option is to have the IP address (and other corresponding network values, such as the subnet mask) provided by a DHCP (Dynamic Host Configuration Protocol) server. In a DHCP client configuration, the ifcfg-eth0 file would look like the following:
[root@onesourcesource ~]#more /etc/sysconfig/network-scripts/ifcfg-eth0
DEVICE=eth0
BOOTPROTO=dhcp
ONBOOT=yes
The possible settings in this configuration file include those shown in Table 19-8.
Table 19-8 Settings for the Configuration File
The /etc/network/interfaces File (Debian)
On Debian systems, a single file is used to specify the IP address settings for all interfaces. In the following example, the local loopback address (lo) and two network interfaces (eth0 and eth1) are defined:
[root@onesourcesource ~]#more /etc/network/interfaces
auto lo
iface lo inet loopback

auto eth0
iface eth0 inet static
    address 192.0.2.7
    netmask 255.255.255.0
    gateway 192.0.2.254

auto eth1
allow-hotplug eth1
iface eth1 inet dhcp
In the previous example, the eth0 device was set with a static IP address, and the eth1 device was configured via DHCP. Here are some important settings of the /etc/network/interfaces file:
• auto: This means to activate the device during the boot process if the device exists and is attached to the network. In some cases, like on laptops, the device might not currently be attached.
• allow-hotplug: This means to activate the device automatically if detected while the operating system is running.
Network Troubleshooting Commands
In situations when there are network configuration errors, it is helpful to know some network troubleshooting commands. This section focuses on some of these commands.
The ping Command
The ping command is used to verify that a remote host can respond to a network connection:
[root@onesourcesource ~]#ping -c 4 google.com
PING google.com (172.217.5.206) 56(84) bytes of data.
64 bytes from lax28s10-in-f14.1e100.net (172.217.5.206): icmp_seq=1 ttl=55 time=49.0 ms
64 bytes from lax28s10-in-f206.1e100.net (172.217.5.206): icmp_seq=2 ttl=55 time=30.2 ms
64 bytes from lax28s10-in-f14.1e100.net (172.217.5.206): icmp_seq=3 ttl=55 time=30.0 ms
64 bytes from lax28s10-in-f206.1e100.net (172.217.5.206): icmp_seq=4 ttl=55 time=29.5 ms

--- google.com ping statistics ---
4 packets transmitted, 4 received, 0% packet loss, time 3008ms
rtt min/avg/max/mdev = 29.595/34.726/49.027/8.261 ms
By default, the ping command will continuously send “pings” to the remote system until the user cancels the command (Ctrl+C). The -c option specifies a count of how many ping requests to send.
Conversational Learning™ — Using the ping Command
Gary: Hey, Julia. I have a question about pinging a system.
Julia: What’s your question?
Gary: I used ping to determine if a system is up and it didn’t respond. But when I went to the system, it was up and running.
Julia: OK, well first of all, keep in mind that ping isn’t meant to determine if a host is running. It is designed to determine if the host is reachable via the network.
Gary: How could it be up but not reachable?
Julia: It might have an issue with its network configuration. Or the network cable could simply be unplugged. Or there could be a firewall blocking access. Some administrators block ping requests via the firewall.
Gary: Are there any other reasons why it might not respond?
Julia: Yes, there is also a kernel setting that says “don’t respond to ping requests.” Plus, the problem might not be with the machine you are trying to ping at all. The host you are running the ping command on may have network issues.
Gary: Hmmm… so, really what ping does is determine if the remote host is reachable from the local system only. It could be responding to other hosts or it could respond to other network connections, just not ping?
Julia: Exactly. If ping responds back successfully, that means it is reachable, but a failure to respond doesn’t necessarily mean there is a problem. Further exploring is required.
Gary: OK. Thanks again, Julia.
Note
The ping6 command is similar to the ping command, except it is used to ping IPv6 addresses, whereas the ping command is used to ping IPv4 addresses.
The traceroute Command
The traceroute command is used to display the router hops from one system to another (in other words, from one router to another):
 [root@onesourcesource ~]#traceroute google.com
traceroute to google.com (172.217.4.142), 30 hops max, 60 byte packets
 1  * * *
 2  * * *
 3  * * *
 4  * * *
 5  * * *
 6  * paltbprj02-ae1-308.rd.pt.cox.net (68.105.31.37)  49.338 ms  53.183 ms
 7  108.170.242.83 (108.170.242.83)  53.041 ms 108.170.242.82 (108.170.242.82)  57.529 ms 108.170.242.227 (108.170.242.227)  60.106 ms
 8  209.85.246.38 (209.85.246.38)  56.051 ms 209.85.246.20 (209.85.246.20)  59.853 ms 209.85.249.63 (209.85.249.63)  64.812 ms
 9  64.233.174.204 (64.233.174.204)  59.018 ms 64.233.174.206 (64.233.174.206)  59.307 ms 64.233.174.204 (64.233.174.204)  57.352 ms
10  64.233.174.191 (64.233.174.191)  67.186 ms  66.823 ms 209.85.247.0 (209.85.247.0)  65.519 ms
11  108.170.247.193 (108.170.247.193)  65.097 ms 108.170.247.225 (108.170.247.225)  65.039 ms 108.170.247.193 (108.170.247.193)  38.324 ms
12  72.14.238.213 (72.14.238.213)  41.229 ms  40.340 ms  41.887 ms
13  lax17s14-in-f142.1e100.net (172.217.4.142)  43.281 ms  40.650 ms  43.394 ms
Note
The value of * means that the data for that hop could not be retrieved.
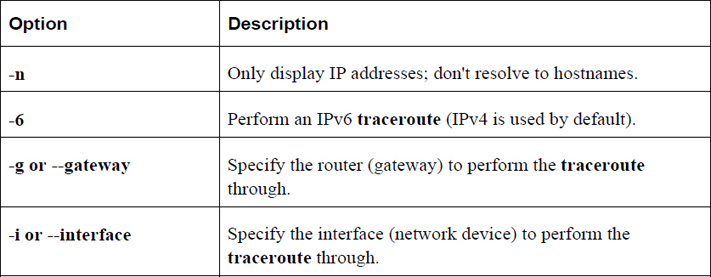
Table 19-9 describes common options for the traceroute command.
Table 19-9 Common Options for the traceroute Command
The traceroute6 command is the same as the traceroute command when the -6 option is used.
The netcat Command
The netcat command (just nc or ncat on many distributions) is a utility that can be used for debugging network issues. For example, you can have the nc command act as a server that is listening on a specific port:
[root@onesourcesource ~]#nc -l 9000
You can also use the nc command to connect to a server on a specific port:
[root@onesourcesource ~]#nc localhost 9000
Now whatever messages you send on the client side show up on the server side, and vice versa. This utility allows you to test interactions with existing servers as well as allows you to create your own simple network server.
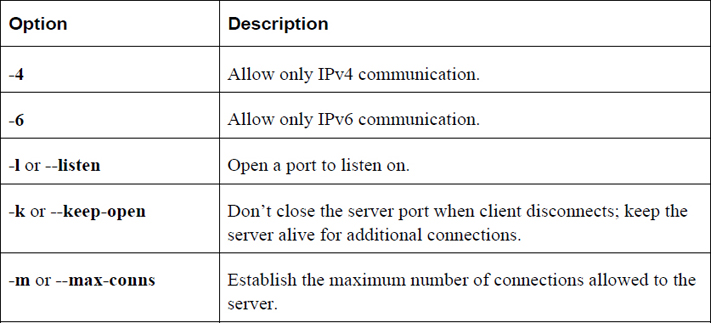
Table 19-10 describes common options for the nc command.
Table 19-10 Options for the nc Command
Access to Wireless Networks
Note
Practicing the following commands can be difficult for a few reasons. To begin with, you need a system that has wireless devices, which likely means either a laptop or a system with a supported external wireless device (like a USB wireless network dongle). Using a virtual machine will not be possible because wireless devices from the host operating system appear as Ethernet devices within the virtual machine.
Wireless networks can be trickier to configure than Ethernet devices. This is normally due to the fact that hardware vendors have struggled to develop true standards for wireless devices, whereas Ethernet devices have been standardized for many years now. There are certainly some wireless standards, but it is not uncommon for vendors to include nonstandard features in their wireless devices.
The iwconfig Command
To display the parameters of your wireless network interface, execute the iwconfig command, as shown in Example 19-2.
Example 19-2 The iwconfig Command
[root@onecoursesource~]# iwconfig
lo        no wireless extensions.
eth0      no wireless extensions.
wlan0     IEEE 802.11bgn  ESSID:"test1"
          Mode:Managed  Frequency:2.412 GHz  Access Point: Not-Associated
          Tx-Power=20 dBm
          Retry min limit:7   RTS thr:off   Fragment thr=2352 B
          Power Management:off
          Link Quality:0  Signal level:0  Noise level:0
          Rx invalid nwid:0  Rx invalid crypt:0  Rx invalid frag:0
          Tx excessive retries:0  Invalid misc:0   Missed beacon:0
Because the lo and eth0 devices are not wireless devices, no data is provided for them. Based on the output of the previous command, the wlan0 device supports wireless types b, g, and n, which is important when determining which wireless routers to connect to. The ESSID parameter indicates that this device is already attached to a wireless router named test1.
You could specify several different values for the Mode setting. This setting is well described in the man page for the iwconfig command:
“Set the operating mode of the device, which depends on the network topology. The mode can be Ad-Hoc (network composed of only one cell and without Access Point), Managed (node connects to a network composed of many Access Points, with roaming), Master (the node is the synchronisation master or acts as an Access Point), Repeater (the node forwards packets between other wireless nodes), Secondary (the node acts as a backup master/repeater), Monitor (the node is not associated with any cell and passively monitor all packets on the frequency) or Auto.”
You can change wireless network settings with the iwconfig command. For example, to change the mode to Ad-Hoc, execute the following command:
[root@onecoursesource~]# iwconfig wlan0 mode Ad-Hoc
The iwlist Command
If you are trying to attach a wireless device to a wireless access point (wireless router), you could execute the iwlist command to see a list of available wireless routers, as shown in Example 19-3.
Example 19-3 The iwlist Command
[root@onecoursesource ~]# iwlist scan
lo        Interface doesn't support scanning.

eth0      Interface doesn't support scanning.

wlan0     Scan completed :
          Cell 01 - Address: 08:00:27:FF:E7:E1
                    ESSID:"test1"
                    Mode:Master
                    Channel:1
                    Frequency:2.412 GHz (Channel 1)
                    Quality=42/100  Signal level:-84 dBm  Noise level=-127 dBm
                    Encryption key:on
                    IE: WPA Version 1
                        Group Cipher : TKIP
                        Pairwise Ciphers (1) : TKIP
                        Authentication Suites (1) : PSK
                    IE: IEEE 802.11i/WPA2 Version 1
                        Group Cipher : TKIP
                        Pairwise Ciphers (2) : CCMP TKIP
                        Authentication Suites (1) : PSK
                    IE: Unknown: 2D1A2C0217FFFF000000000000000000000000000000000000000000
                    Bit Rates:1 Mb/s; 2 Mb/s; 5.5 Mb/s; 11 Mb/s; 6 Mb/s
                              9 Mb/s; 12 Mb/s; 18 Mb/s; 24 Mb/s; 36 Mb/s
                              48 Mb/s; 54 Mb/s
                    Extra:tsf=0000003d7dfe8049
                    Extra: Last beacon: 1840ms ago
          Cell 02 - Address: 08:00:27:93:6F:3D
                    ESSID:"test2"
                    Mode:Master
                    Channel:6
                    Frequency:2.437 GHz (Channel 6)
                    Quality=58/100  Signal level:-73 dBm  Noise level=-127 dBm
                    Encryption key:on
                    IE: WPA Version 1
                        Group Cipher : TKIP
                        Pairwise Ciphers (2) : CCMP TKIP
                        Authentication Suites (1) : PSK
                    IE: IEEE 802.11i/WPA2 Version 1
                        Group Cipher : TKIP
                        Pairwise Ciphers (2) : CCMP TKIP
                        Authentication Suites (1) : PSK
                    Bit Rates:1 Mb/s; 2 Mb/s; 5.5 Mb/s; 11 Mb/s; 18 Mb/s
                              24 Mb/s; 36 Mb/s; 54 Mb/s; 6 Mb/s; 9 Mb/s
                              12 Mb/s; 48 Mb/s
                    Extra:tsf=0000007a7d5a1b80
                    Extra: Last beacon: 1616ms ago
          Cell 03 - Address: 08:00:27:93:6F:DD
                    ESSID:"test3"
                    Mode:Master
                    Channel:6
                    Frequency:2.437 GHz (Channel 6)
                    Quality=84/100  Signal level:-49 dBm  Noise level=-127 dBm
                    Encryption key:on
                    IE: WPA Version 1
                        Group Cipher : TKIP
                        Pairwise Ciphers (2) : CCMP TKIP
                        Authentication Suites (1) : PSK
                    IE: IEEE 802.11i/WPA2 Version 1
                        Group Cipher : TKIP
                        Pairwise Ciphers (2) : CCMP TKIP
                        Authentication Suites (1) : PSK
                    Bit Rates:1 Mb/s; 2 Mb/s; 5.5 Mb/s; 11 Mb/s; 18 Mb/s
                              24 Mb/s; 36 Mb/s; 54 Mb/s; 6 Mb/s; 9 Mb/s
                              12 Mb/s; 48 Mb/s
                    Extra:tsf=000001b2460c1608
                    Extra: Last beacon: 1672ms ago
The iwlist command probes your system’s network devices; if it finds one that’s a wireless device, it attempts to scan the networks available to the device. The output of this command can depend on the remote routers because different types of wireless routers provide different features.
Each cell section of the output describes a wireless router. Here are some of the important values:
• ESSID: Extended Service Set Identification; this is essentially a name given to the wireless router to distinguish it between other wireless routers nearby. Some vendors refer to this as simply SSID. This is the name that administrators assign to the wireless access point.
• IE: WPA Version 1: WPA (Wi-Fi Protected Access) is an encryption specification used to secure the wireless router from unauthorized users. WEP (Wireless Encryption Protocol) is an older encryption specification; WPA was designed to replace WEP.
Summary
In this chapter, you explored several key networking concepts. The goal of this chapter was not to make you a networking expert, but to introduce you to these concepts to make the process of configuring, maintaining, troubleshooting and securing a network easier.
Key Terms
Review Questions
1. Based on the output of the ifconfig command shown next, _____ is the IPv4 address for the eth0 device.
eth0: flags=4163<UP,BROADCAST,RUNNING,MULTICAST>  mtu 1500
        inet 192.168.1.16  netmask 255.255.255.0  broadcast 192.168.1.255
        inet6 fe80::a00:27ff:fe52:2878  prefixlen 64  scopeid 0x20<link>
        ether 08:00:27:52:28:78  txqueuelen 1000  (Ethernet)
        RX packets 20141  bytes 19608517 (18.7 MiB)
        RX errors 0  dropped 0  overruns 0  frame 0
        TX packets 2973  bytes 222633 (217.4 KiB)
        TX errors 0  dropped 0 overruns 0  carrier 0  collisions 0
2. Which device name represents the local loopback device?
a. eth0
b. eth1
c. lo
d. loop
3. The _____ command displays information about the table that contains IP-address-to-MAC-address translation.
4. Which command can display the default gateway? (Choose two.)
a. arp
b. ifconfig
c. ip
d. route
5. Fill in the blank in the following command to add a gateway for the 192.168.2.0/255.255.255.0 network:
route add _____ 192.168.2.0 netmask 255.255.255.0 gw 192.168.1.100
6. The _____ command is the replacement command for the ifconfig, arp, and route commands.
7. Which option to the iwlist command provides a list of available routers?
a. display
b. search
c. find
d. scan