Table of Contents for
Linux Essentials for Cybersecurity, First Edition
 Linux Essentials for Cybersecurity, First Edition
Published by
Pearson IT Certification, 2018
Linux Essentials for Cybersecurity, First Edition
Published by
Pearson IT Certification, 2018
- Cover Page
- Title Page
- Copyright Page
- Contents at a Glance
- Table of Contents
- About the Author
- Dedication
- Acknowledgments
- About the Technical Reviewers
- We Want to Hear from You!
- Reader Services
- Introduction
- Part I: Introducing Linux
- Chapter 1: Distributions and Key Components
- Chapter 2: Working on the Command Line
- Chapter 3: Getting Help
- Chapter 4: Editing Files
- Chapter 5: When Things Go Wrong
- Part II: User and Group Accounts
- Chapter 6: Managing Group Accounts
- Chapter 7: Managing User Accounts
- Chapter 8: Develop an Account Security Policy
- Part III: File and Data Storage
- Chapter 9: File Permissions
- Chapter 10: Manage Local Storage: Essentials
- Chapter 11: Manage Local Storage: Advanced Features
- Chapter 12: Manage Network Storage
- Chapter 13: Develop a Storage Security Policy
- Part IV: Automation
- Chapter 14: Crontab and At
- Chapter 15: Scripting
- Chapter 16: Common Automation Tasks
- Chapter 17: Develop an Automation Security Policy
- Part V: Networking
- Chapter 18: Networking Basics
- Chapter 19: Network Configuration
- Chapter 20: Network Service Configuration: Essential Services
- Chapter 21: Network Service Configuration: Web Services
- Chapter 22: Connecting to Remote Systems
- Chapter 23: Develop a Network Security Policy
- Part VI: Process and Log Administration
- Chapter 24: Process Control
- Chapter 25: System Logging
- Part VII: Software Management
- Chapter 26: Red Hat–Based Software Management
- Chapter 27: Debian-Based Software Management
- Chapter 28: System Booting
- Chapter 29: Develop a Software Management Security Policy
- Part VIII: Security Tasks
- Chapter 30: Footprinting
- Chapter 31: Firewalls
- Chapter 32: Intrusion Detection
- Chapter 33: Additional Security Tasks
- Appendix A: Answers to Review Questions
- Appendix B: Resource Guide
- Glossary
Chapter 9 File Permissions
Understanding file and directory permissions is critical for Linux security because Linux is a multiuser environment, and permissions are designed to protect your work from others. To understand permissions, you first need to know the types of permissions available in Linux and how they differ when applied to files versus to directories.
Once you understand the different permissions, you need to know how to set them. Linux provides two methods: the symbolic method and the octal (or numeric) method.
You also learn about special permissions in this chapter, including SUID, SGID, and sticky bit. These permissions provide special access to files and directories and are typically managed by the system administrator.
Several permission-related topics will also be introduced, including default permissions, access control lists (ACLs), and changing the user and group ownership of files and directories.
After reading this chapter and completing the exercises, you will be able to do the following:
Display and set standard Linux permissions.
Use special Linux permissions to accomplish advanced security operations.
Create an umask value for setting default permissions.
Use access control lists to fine-tune the permissions on files and directories.
Use file attributes to limit access to system files.
Perform basic SELinux operations.
Standard Permissions
Every file and directory has standard permissions (also called “read, write, and execute” permissions) that either allow or disallow a user access. Using these standard permissions is something that every Linux user should understand how to do, as this is the primary way a user will protect their files from other users.
Viewing Permissions
To view the permissions of a file or directory, use the ls -l command:
[student@localhost ~]$ ls -l /etc/chrony.keys
-rw-r-----. 1 root chrony 62 May  9  2018 /etc/chrony.keys
The first 10 characters of the output denote the file type (recall that if the character in the first position is a hyphen [–], it denotes a plain file, and d denotes a directory) and the permissions for the file. Permissions are broken into three sets: the user owner of the file (root in the previous example), the group owner (chrony), and all other users (referred to as “others”).
Each set has three possible permissions: read (symbolized by r), write (w) and execute (x). If the permission is set, the character that symbolizes the permission is displayed. Otherwise, a hyphen (–) character is displayed to indicate that permission is not set. Thus, r-x means “read and execute are set, but write is not set.”
Files Versus Directories
What read, write, and execute permissions really mean depends on whether the object is a file or directory. For files, these permissions mean the following:
• Read: Can view or copy file contents.
• Write: Can modify file contents.
• Execute: Can run the file like a program. After you create a program, you must make it executable before you can run it.
For directories, they mean the following:
• Read: Can list files in the directory.
• Write: Can add and delete files in the directory (requires execute permission).
• Execute: Can “cd” into the directory or use it in a pathname.
Security Highlight
The write permission on directories is potentially the most dangerous. If a user has write and execute permissions on one of your directories, then that user can delete every file in that directory.
Changing Permissions
The chmod command is used to change permissions on files. It can be used in two ways: symbolic method and octal method. With the octal method, the permissions are assigned numeric values:
• Read = 4
• Write = 2
• Execute = 1
With these numeric values, one number can be used to describe an entire permission set:
• 7 = rwx
• 6 = rw-
• 5 = r-x
• 4 = r--
• 3 = -wx
• 2 = -w-
• 1 = --x
• 0 = ---
So, to change the permissions of a file to rwxr-xr--, you would execute the following command:
chmod 754 filename
With octal permissions, you should always provide three numbers, which will change all the permissions. But, what if you only want to change a single permission of the set? For that, use the symbolic method by passing three values to the chmod command, as shown in Table 9-1.
Table 9-1 Symbolic Method Values
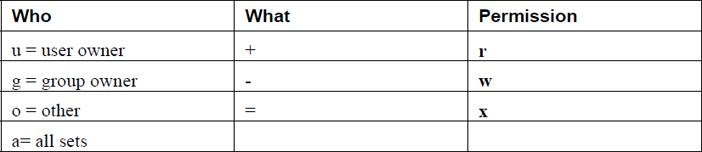
The following demonstrates adding execute permission to all three sets (user owner, group owner, and others) using the symbolic method:
[student@localhost ~]$ ls -l display.sh
-rw-rw-r--. 1 student student 291 Apr 30 20:09 display.sh
[student@localhost ~]$ chmod a+x display.sh
[student@localhost ~]$ ls -l display.sh
-rwxrwxr-x. 1 student student 291 Apr 30 20:09 display.sh
Conversational Learning™ — Octal and Symbolic Permissions
Gary: Hi, Julia. I’m confused about something. Why do we have two methods that can be used to change permissions?
Julia: Hi, Gary. Do you mean octal and symbolic permissions?
Gary: Yes! It seems like only one is really needed.
Julia: Technically, yes. You can always use octal or always use symbolic if you want to. However, knowing both is going to make life easier for you.
Gary: What do you mean?
Julia: Let’s say you just want to add read permission for the group owners and you choose to use the octal method. In that case, before you even run the chmod command, what would you need to do first?
Gary: Well, I’d have to list the current permissions to determine what values to use to add the new permission.
Julia: Exactly. Wouldn’t it be easier to just use g+r in this case?
Gary: OK, so making small permission changes like that would be easier using the symbolic method. But why use the octal method then?
Julia: Well, what if you wanted to completely change the permission, or even just change a few. It would probably be easier to just determine the octal value and use that rather than doing something complicated like u+wx,g-xo-wx.
Gary: Oh, yeah, symbolic could get ugly in that situation. Got it. Thanks for the advice!
Julia: You are welcome!
Default Permissions
When a user creates a file or directory, the shell automatically sets default permissions. The default permissions are a configurable option. The umask command sets a value that is used to determine the default permissions for files and directories. Note that these default permissions are applied only when the file or directory is initially created.
The umask command is used to specify which default permissions to mask (not include) when creating a new file or directory.
The umask command accepts one argument: the mask value. The mask value is an octal value that is applied against the maximum possible permissions for new files or new directories, as shown in Table 9-2.
Table 9-2 Maximum Possible Permissions

As Table 9-2 demonstrates, new files are never given execute permissions. This permission set must always be added after the new file is created.
Figure 9-1 describes how a umask value of 027 would apply to new files versus how it would apply to new directories.
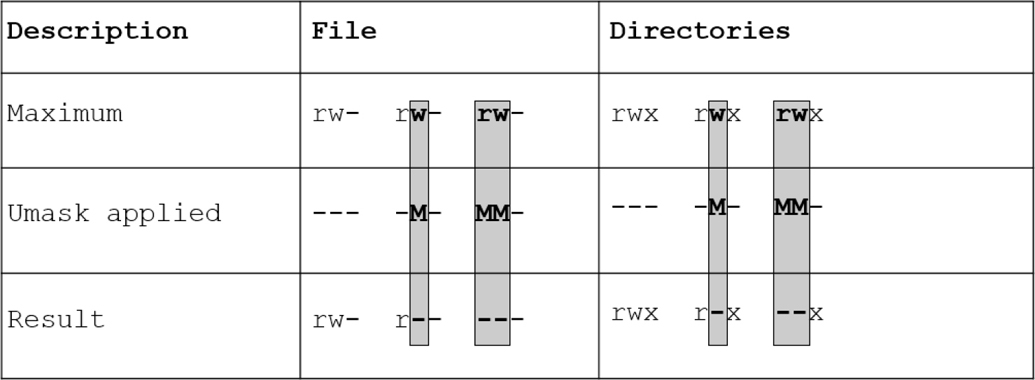
Figure 9-1 Applying a umask value of 027 to Files and Directories
While any octal value can be used to determine the permission mask, there are values that are more commonly used. Table 9-3 demonstrates the effect of these commonly used umask values have on new files and directories.
Table 9-3 Commonly Used umask Values
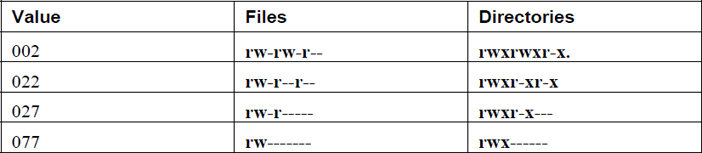
Note that you can also use symbolic methods of specifying a umask. For example, the umask rw-rwr--- command is the same as the umask 002 command.
Each shell has its own umask value. If you change the umask in one shell, it will not affect the umask value in any other shell. To make a persistent change to your umask across logins, add the umask command to the ~/.bash_profile file.
It is important that you understand that the umask value is only to provide an easy way to specify default permissions for files and directories. After a file or directory has been created, the chmod command can be used to adjust the permissions to meet a specific situation.
What Could Go Wrong?
Sometimes it can be really frustrating to determine why you cannot access a file or directory. For example, consider the following command:
bob@onecoursesource:~# cp sample /etc/skel
cp: cannot create regular file '/etc/skel/sample1': Permission denied
What is the problem? Keep in mind that several permissions are checked, like the read permission on the sample file, the execute permissions on the /, etc, and skel directories, as well as the write permissions on the skel directory.
To discover the error, first look closely at the output of the error message. In this case, the problem seems to be with creating the file in the /etc/skel directory, not with the sample file itself (which would have resulted in an error like “cannot open 'sample1' for reading”).
Next, determine if you can get into all of the directories by either looking at the permissions for each one or using the cd command to move into each directory. Lastly, look for the write permission on the destination directory
Special Permissions
Whereas regular (non-administrative) users typically focus on standard permissions (read, write, and execute), system administrators must also be well aware of special permission sets. These special permissions are only used in very specific situations, and you should carefully monitor the system for these permission sets. An example of how to monitor the system is provided at the end of the “SUID” section.
SUID
To understand the SUID (also called “Set User ID”), consider the following situation. Suppose you are logged in to a Linux system as a regular user, such as the “student” user, and you run the passwd command to change your password:
student@onecoursesource:~$ passwd
Changing password for user student.
Changing password for student.
Current password:
New password:
Retype new password:
passwd: all authentication tokens updated successfully.
The fancy “all authentication tokens updated successfully” message indicates that the password for the “student” user was changed. But, if you think about it logically, this command should have failed. To understand why, look at the permissions for the /etc/shadow file:
student@onecoursesource:~$ ls -l /etc/shadow
----------. 1 root root 1726 Jan 23 14:02 /etc/shadow
According to these permissions, no user should be able to see the contents of this file, much less modify it:
student@onecoursesource:~$ more /etc/shadow
more: cannot open /etc/shadow: Permission denied
This seems odd, because as you learned in Chapter 7, “Managing User Accounts,” user account passwords are stored in the /etc/shadow file. In order to modify the contents of this file, a user would need read and write permission. However, when a user runs a command, the access they would get to files is based on their account (UID and GIDs). So, how was the student user able to modify a file that he normally cannot even view?
The answer lies with the permissions of the passwd command itself:
student@onecoursesource:~$ which passwd
/usr/bin/passwd
student@onecoursesource:~$ ls -l /usr/bin/passwd
-rwsr-xr-x. root root 27768 Nov 25 06:22 /usr/bin/passwd
The “s” character in place of the owner’s execute permission means that SUID permission has been placed on this file. With SUID permission, the command performs a “run as” feature, which allows the passwd command to access files as if it is either the student user account or the user account that owns the /usr/bin/passwd file (the root user in this case). Because the passwd command has “root access,” it is able to modify the permissions of the /etc/shadow file temporarily in order to modify the contents.
Security Highlight
The SUID permission is often applied to files that are owned by the root user. For security reasons, it is important to be aware of SUID programs on your system.
You can use the find command shown in Example 9-1 to discover these programs (note: the head command is used to limit the output because this command could produce dozens of SUID programs).
Example 9-1 Using find to Discover Programs
student@onecoursesource:~$ find / -perm -4000 -ls | head
    13972     40 -rws--x--x   1  root     root        40248 Feb 11  2018 /usr/sb
in/userhelper
    13964     36 -rwsr-xr-x   1  root     root        36176 Mar 10  2018 /usr/sb
in/unix_chkpwd
    13802     92 -rwsr-xr-x   1  root     root        89472 Mar  2  2018 /usr/sb
in/mtr
    13830     12 -rwsr-xr-x   1  root     root        11152 Mar 10  2018 /usr/sb
in/pam_timestamp_check
    13974     12 -rwsr-xr-x   1  root     root        11192 May 26  2018 /usr/sbin/usernetctl
Security Highlight
When should you run the find command to discover SUID programs? Initially after installation of the OS is the first time. Take notice of each SUID program and determine which ones do not really need to be SUID. For instance, the newgrp command that was discussed in Chapter 6, “Managing Group Accounts,” is a SUID program. If you do not have the need for users to use this command, consider disabling the SUID feature because it would result in a more secure system.
Also run the find command when new software is installed. Software vendors like to add SUID programs to the system that might not really be needed. This results in a false escalation of privilege and a vulnerability within the software.
Lastly, run the find command whenever you suspect the system has been compromised. Hackers like to create SUID programs to create “back doors” for future access to the system.
To set the SUID permission, use one of the following methods (note that xxx refers to the standard read, write, and execute permissions):
chmod u+s file
or
chmod 4xxx file
To unset the SUID permission, use one of the following methods:
chmod u-s file
or
chmod 0xxx file
SGID
Similar to the SUID permission, the SGID permission can be used to execute a command that has access to files and directories using the group ownership of the command. For example, consider the following:
student@onecoursesource:~$ ls -l /usr/bin/write
-rwxr-sr-x 1 root tty 19544 Nov 27  2018 /usr/bin/write
The write command has the SGID permission set (notice the s in the execute permission location for the group), which means when it is executed, it can use the group permissions of the “tty” group. This permission is important for this particular command because it sends data to terminal windows, which are represented by files that are group owned by the tty group.
In addition to SGID allowing group permission access, this special permission set has a different purpose when set on a directory. To understand this purpose, consider the following scenario:
Your company has three users who are part of different groups: bob (a member of the “staff” group), susan (a member of the “payroll” group), and julia (a member of the “admin” group). They approach you (the system administrator) because they need to be able to have a shared directory where they, and only they, can share files for a joint project they are working on. Your solution is to take the following steps:
Step 1. Create a group called “project” and add all these users to this group.
Step 2. Create a directory named /home/groups/project.
Step 3. Change the /home/groups/project directory to be owned by the project group.
Step 4. Change the permissions of the /home/groups/project directory to “rwxrwx---” so that only members of the project group have access to this directory.
Example 9-2 is an example of these steps in action (note that the chgrp command is covered later in this chapter).
Example 9-2 Creating a Private Project Group
root@onecoursesource:~# groupadd project
root@onecoursesource:~# usermod -G project -a bob
root@onecoursesource:~# usermod -G project -a susan
root@onecoursesource:~# usermod -G project -a julia
root@onecoursesource:~# mkdir -p /home/groups/project
root@onecoursesource:~# chgrp project /home/groups/project
root@onecoursesource:~# chmod 660 /home/groups/project
root@onecoursesource:~# ls -ld /home/groups/project
drwxrwx--- 2 root project 40 Dec 23 14:05 /home/groups/project
This may appear to be a good solution to the problem, but it is missing one component. Consider what happens when the user bob creates a file in the /home/groups/project directory by copying a file from his home directory:
bob@onecoursesource:~$ cd /home/groups/project
bob@onecoursesource:project$ cp ~/bob_report .
bob@onecoursesource:project$ ls -l bob_report
-rw-r----- 1 bob staff 1230 Dec 23 14:25 bob_report
It looks like everything worked just fine, until either the susan or julia user attempts to view the bob_report file:
julia@onecoursesource:project$ more bob_report
bob_report: Permission denied
The problem is that when the bob user copied the file into the /home/groups/project directory, his umask setting resulted in no permissions for the “others” permission set. This means that no one else can view this file. This problem could be fixed by the bob user by either changing the permission or group ownership of the file, but this would have to be done every time a file is created.
The solution would be to add SGID permission to the /home/groups/projects directory. When applied to a directory, the SGID permission will give the group ownership of all new files and directories to the group that owns the SGID directory. Here’s an example:
root@onecoursesource:~# chmod g+s /home/groups/project
root@onecoursesource:~# ls -ld /home/groups/project
drwxrws--- 2 root project 40 Dec 23 14:05 /home/groups/project
root@onecoursesource:~# su – bob
bob@onecoursesource:~$ cd /home/groups/project
bob@onecoursesource:project$ cp ~/bob_report2 .
bob@onecoursesource:project$ ls -l bob_report2
-rw-r----- 1 bob project 1230 Dec 23 14:25 bob_report2
Now any new file created within the /home/groups/project directory will be group-owned by the project group.
To set the SGID permission, use one of the following methods (where xxx refers to the standard read, write, and execute permissions):
chmod g+s file
or
chmod 2xxx file
To unset the SUID permission, use one of the following methods:
chmod g-s file
or
chmod 0xxx file
Sticky Bit
To understand the “sticky bit” permission, consider a situation where you need a directory in which all users are able to share files. In other words, all users should be able to get into the directory (execute permission), see all files in the directory (read permission), and add new files into the directory (write permission):
root@onecoursesource:~# mkdir /home/shareall
root@onecoursesource:~# chmod 777 /home/shareall
root@onecoursesource:~# ls -ld /home/shareall
drwxrwxrwx 2 root project 40 Dec 23 14:05 /home/shareall
The problem with these permissions lies in the write permission for the directory. This permission allows the user to add new files to the directory, but it also allows a user to delete any file in the directory (regardless of whether or not they own the file). Clearly this poses a problem (and a potential security risk) if users start deleting each other’s files.
There is a solution to the sticky bit permission. When applied to a directory, this permission changes the behavior of the write permission. A user can still add a file to the directory (assuming that would not overwrite an existing file owned by another user), but for the user to delete a file from a directory would require one of the following:
• The user would have to own the file, OR
• The user would have to own the directory, OR
• The user would have to be the system administrator.
The sticky bit permission should already be placed on at least one directory on your system: the /tmp directory. This directory is a place where users (or software programs) can place a file temporarily:
root@onecoursesource:~# ls -ld /tmp
drwxrwxrwt 16 root root 320 Dec 23 16:35 /tmp
To set the sticky bit permission, use one of the following methods (where xxx refers to the standard read, write, and execute permissions):
chmod o+t file
or
chmod 1xxx file
(Note that the number 1 is used here, not the lowercase letter l.)
To unset the SUID permission, use one of the following methods:
chmod o-t file
or
chmod 0xxx file
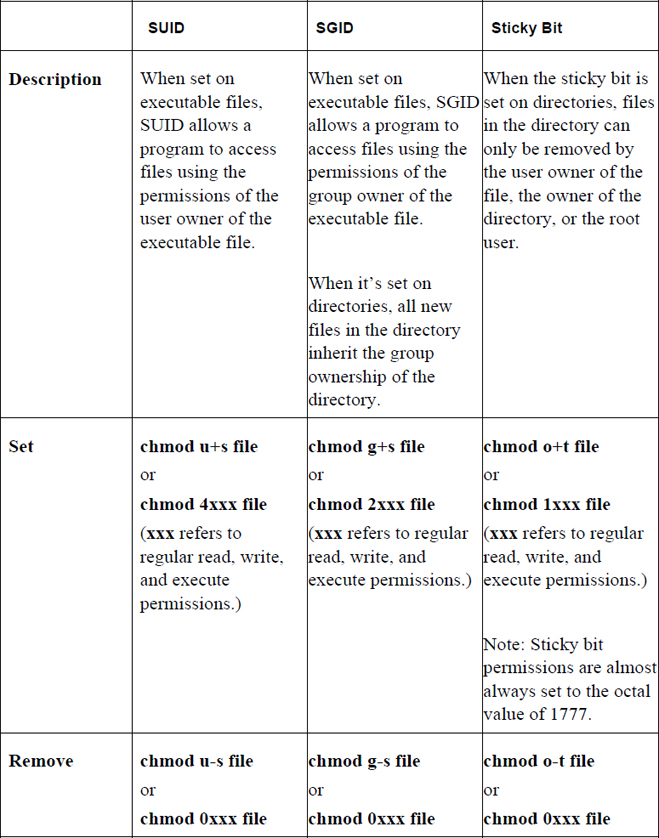
Table 9-4 summarizes the special permission sets of SUID, SGID, and sticky bit.
Table 9-4 Special Permission Sets of SUID, SGID, and Sticky Bit
Access Control Lists (ACLs)
There is a fundamental problem with traditional read, write, and execute permissions. Consider the scenario in which an organization has 1000 users. One of the user accounts is the sarah user, who is a member of the “sales” group. There are 29 other members of the sales group besides the sarah user.
Now suppose the sarah user creates a new file that has permissions like the following:
sarah@onecoursesource:~$ ls -l sales_report
-rw-r----- 1 sarah sales 98970 Dec 27 16:45 sales_report
Based on the output of the previous command, you should be able to tell that the sarah user has read and write access to the file while the members of the sales group only have read access to the file. That means the rest of the organization (970 users) has the access provided by the last permission set (others). In other words, they have no access at all.
Suppose Sarah’s boss (user account william) needs to be able to view the contents of this file, but his account isn’t a member of the sales group. How would the sarah user grant this access?
The sarah user could give read access to the last permission set, like so:
sarah@onecoursesource:~$ chmod o+r sales_report
sarah@onecoursesource:~$ ls -l sales_report
-rw-r--r-- 1 sarah sales 98970 Dec 27 16:45 sales_report
The problem with this solution is that now everyone in the organization can view the contents of this file.
There is a better solution. If the sarah user was a group administrator of the sales group, she could add the william user to the sales group (or, she could ask an administrator to perform this task). However, this solution also has flaws, because now the william user would have access to all files that are group-owned by the sales group. So, this solution isn’t really ideal either.
The best solution is to use access control lists (ACLs), which allow the owner of a file to give permissions for specific users and groups. The setfacl command is used to create an ACL on a file or directory:
sarah@onecoursesource:~$ setfacl -m user:dane:r-- sales_report
The -m option is used to make a new ACL for the file. The format of the argument to the -m option is what:who:permission. The value for what can be one of the following:
• user or u when applying an ACL for a specific user.
• group or g when applying an ACL for a specific group.
• others or o when applying an ACL for “others.”
• mask or m when setting the mask for the ACL. (The mask will be explained later in this section.)
The value for who will be the user or group to which the permission will be applied. The permission can either be provided as a symbolic value (r--) or octal value (4).
Once an ACL has been applied on a file or directory, a plus sign (+) character will appear after the permissions when the ls -l command is executed, as shown here:
sarah@onecoursesource:~$ ls -l sales_report
-rw-rw-r--+ 1 sarah sales 98970 Dec 27 16:45 sales_report
To view the ACL, use the getfacl command:
sarah@onecoursesource:~$ getfacl sales_report
# file: sales_report
# owner: sarah
# group: sarah
user::rw-
user:william:r--
group::rw-
mask::rw-
other::r--
See Example 9-3 for an example of setting an ACL for a group.
Example 9-3 Setting an ACL for a Group
student@onecoursesource:~$ setfacl -m g:games:6 sales_report
student@onecoursesource:~$ getfacl sales_report
# file: sales_report
# owner: sarah
# group: sarah
user::rw-
user:william:r--
group::rw-
group:games:rw-
mask::rw-
other::r--
The mask Value
Note the mask value (rw-) in the output of Example 9-3. The mask is used to temporarily disable or restrict ACLs. Consider a situation in which you want the ACL value to not apply for a short period of time. If there were many ACLs, it would be difficult to remove every instance and then later reapply each one again. Instead, just change the mask value, as shown in Example 9-4.
Example 9-4 Changing the mask Value
sarah@onecoursesource:~$ setfacl -m mask:0 sales_report
sarah@onecoursesource:~$ getfacl sales_report
# file: sales_report
# owner: sarah
# group: sarah
user::rw-
user:william:r--                   #effective:---
group::rw-                      #effective:---
group:games:rw-                 #effective:---
mask::---
other::r--
The mask specifies the maximum permissions that anyone besides the user owner and “others” have on the file. Notice the “effective” part of the previous output that demonstrates the effect that the mask value has on the permissions for the william user, the “games” group, and the group that owns the file (“group::”).
To undo these restrictions, set the mask to what it was previously (rw- in this case), as shown in Example 9-5.
Example 9-5 Resetting the mask Value
sarah@onecoursesource:~$ setfacl -m mask:rw- sales_report
sarah@onecoursesource:~$ getfacl sales_report
# file: sales_report
# owner: sarah
# group: sarah
user::rw-
user:william:r--
group::rw-
group:games:rw-
mask::rw-
other::r--
Default ACLs
For regular permissions, the umask value is used to determine the default permissions applied for new files and directories. For ACLs, you can define a default ACL set for all new files and directories that are created within a shell by using the -m option with the setfacl command. In this case, the following syntax is used for the argument: default:what:who:permission.
The example in Example 9-6 will create a default ACL for the reports directory.
Example 9-6 Setting a Default ACL for a Directory
sarah@onecoursesource:~$ mkdir reports
sarah@onecoursesource:~$ setfacl -m default:g:games:r-x reports
sarah@onecoursesource:~$ setfacl -m default:u:bin:rwx reports
sarah@onecoursesource:~$ getfacl reports
# file: reports
# owner: sarah
# group: sarah
user::rwx
group::rwx
other::r-x
default:user::rwx
default:user:bin:rwx
default:group::rwx
default:group:games:r-x
default:mask::rwx
default:other::r-x
Example 9-7 demonstrates how new files and directories will inherit the ACLs that were created in the commands executed in Example 9-6.
sarah@onecoursesource:~$ mkdir reports/test
sarah@onecoursesource:~$ getfacl reports/test
# file: reports/test
# owner: sarah
# group: sarah
user::rwx
user:bin:rwx
group::rwx
group:games:r-x
mask::rwx
other::r-x
default:user::rwx
default:user:bin:rwx
default:group::rwx
default:group:games:r-x
default:mask::rwx
default:other::r-x
sarah@onecoursesource:~$ touch reports/sample1
sarah@onecoursesource:~$ getfacl reports/sample1
# file: reports/sample1
# owner: bo
# group: bo
user::rw-
user:bin:rwx                    #effective:rw-
group::rwx                      #effective:rw-
group:games:r-x                 #effective:r--
mask::rw-
other::r--
Security Highlight
Note that the mask value for the reports/sample1 file in Example 9-7 is set to rw-, effectively disabling the execute permission for the “bin” group. This is because the maximum permissions that are ever placed on a new file are rw-. You will always need to manually set execute permissions on any new file.
Changing Ownership
Permissions are based on file and directory ownership, so it is important to know how to change the user and group owner. This section introduces the chown and chgrp commands to perform these tasks.
chown
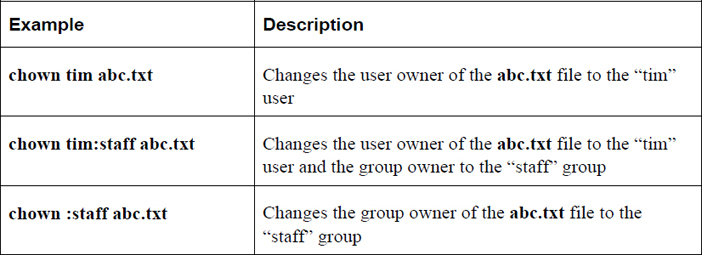
The chown command is used to change the user owner or group owner of a file or directory. Table 9-5 demonstrates different ways to use this command.
Table 9-5 Using the chown Command
Note
Only the root user can change the user owner of a file. To change the group owner of a file, the user who executes the command must own the file and be a member of the new group receiving ownership of the file.
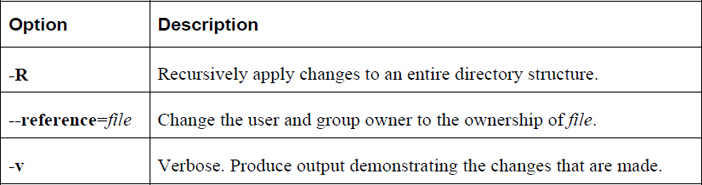
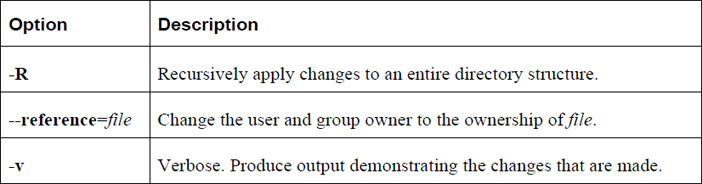
Important options for the chown command include those shown in Table 9-6.
Table 9-6 Options for the chown Command
It is not possible for a user to give a file that they own to another user—but why? See Figure 9-2 for the answer.
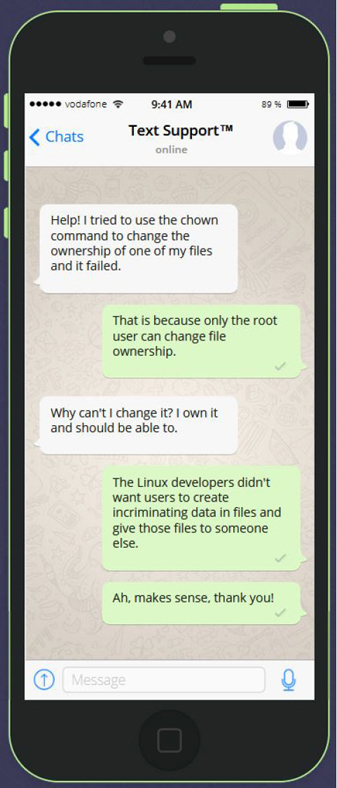
Figure 9-2 Text Support—Changing File Ownership
chgrp
The chgrp command is designed to change the group ownership of a file. The syntax of this command is chgrp [options] group_name file. In the following example, the group ownership of the abc.txt file is changed to the “staff” group:
root@onecoursesource:~# chgrp staff abc.txt
To change the group owner of a file, the user who executes the command must own the file and be a member of the group receiving ownership of the file. (One exception is that the “root” user can always change the group ownership of any file.)
Important options for the chgrp command include those shown in Table 9-7.
Table 9-7 Options for the chgrp Command
File Attributes
Although not technically permissions, file attributes do affect how users access files and directories, so they logically belong in any discussion regarding permissions. With file attributes, the system administrator can modify key features of file access.
For example, a useful file attribute is one that will make a file “immutable.” An immutable file is completely unchangeable; it cannot be deleted or modified by anyone, including the root user. To make a file immutable, use the chattr command:
root@onecoursesource:~# chattr +i /etc/passwd
Note that now no user can change the /etc/passwd file, which means no new users can be added to the system (and existing users cannot be removed). This may seem like an odd thing to do, but imagine a situation in which a system is publicly available (like a kiosk in a mall). There is no need for new users, and you do not want anyone to remove users either.
Security Highlight
In the situation where we applied the immutable attribute to the /etc/passwd file, you may be asking yourself, “isn’t this file already protected by permissions?” Although it is, adding the immutable attribute provides an additional layer of security, making the system overall more secure.
To see the attributes for a file, use the lsattr command:
root@onecoursesource:~# lsattr /etc/passwd
----i--------e-- /etc/passwd
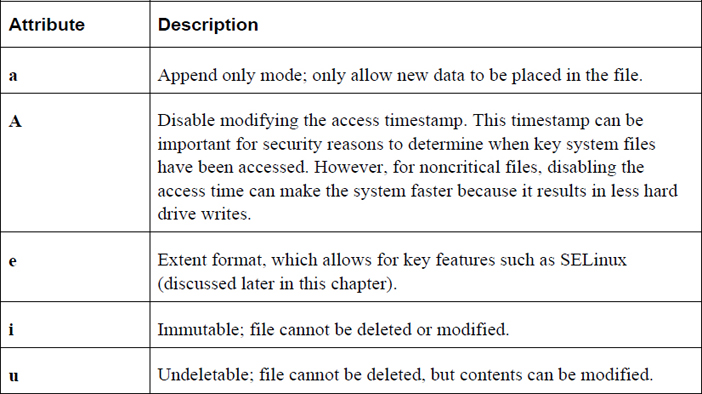
The hyphen (-) characters indicate file attributes that are not set. A complete list of attributes can be found in the man page for the chattr command. Table 9-8 describes the file attributes that are important for system security.
Table 9-8 File Attributes for System Security
To remote the immutable file attribute, use the following command:
root@onecoursesource:~# chattr -i /etc/passwd
root@onecoursesource:~# lsattr /etc/passwd
-------------e-- /etc/passwd
Important options for the chattr command include those shown in Table 9-9.
Table 9-9 Options for the chattr Command

Introduction to SELinux
Like file attributes, SELinux (Security Enhanced Linux) is not a “file permission,” but the topic belongs in this chapter because SELinux can also have a major impact on access to files and directories. It is important to note that SELinux is a potentially huge topic, and a full discussion of SELinux is well beyond the scope of this book (and, in fact, should be an entire book by itself). The purpose of this section is to introduce you to the concepts of SELinux and demonstrate how it works.
To understand SELinux, you’ll first want to learn about some potential flaws to Linux’s traditional method of securing files using permissions.
Users Create Security Holes
Files and directories may be compromised by users who either do not understand permissions or accidently provide more access than intended. This is a reflection of an old system administration saying: “If we didn’t have users, nothing would break and the system would be more secure.” Of course the response to this saying is, "Without users, we wouldn’t have a job!" Users’ mistakes often do provide unintended access to the data that is stored in files.
SELinux can be configured to accommodate for this flaw by providing an additional level of security when processes (programs) are used to access files. An SELinux security policy can be applied that will require processes to be a part of an SELinux security context (think “security group”) in order to be able to access files and directories. Regular permissions will still be used to further define access, but for accessing the file/directory, this SELinux policy would be applied first.
However, although an SELinux policy can be configured to limit access to files and directories when regular users run processes, this is considered to be a very restrictive policy and is not nearly as common as the scenario we will discuss next. When a very secure filesystem is paramount, consider this more restrictive policy, but also consider that regular users may find the system much less useable and much more complex.
Daemon Processes Create Security Holes
A bigger concern, and one that most SELinux policies are designed to address, is how daemon (or system) processes present a security risk. Consider a situation where you have many active processes that provide a variety of services. For example, one of these processes may be a web server, like the Apache Web Server displayed in Example 9-8.
Example 9-8 Apache Web Server Processes
root@onecoursesource:~# ps -fe | grep httpd
root      1109     1  0  2018 ?        00:51:56 /usr/sbin/httpd
apache    1412  1109  0 Dec24 ?        00:00:09 /usr/sbin/httpd
apache    4085  1109  0 05:40 ?        00:00:12 /usr/sbin/httpd
apache    8868  1109  0 08:41 ?        00:00:06 /usr/sbin/httpd
apache    9263  1109  0 08:57 ?        00:00:04 /usr/sbin/httpd
apache   12388  1109  0 Dec26 ?        00:00:47 /usr/sbin/httpd
apache   18707  1109  0 14:41 ?        00:00:00 /usr/sbin/httpd
apache   18708  1109  0 14:41 ?        00:00:00 /usr/sbin/httpd
apache   19769  1109  0 Dec27 ?        00:00:15 /usr/sbin/httpd
apache   29802  1109  0 01:43 ?        00:00:17 /usr/sbin/httpd
apache   29811  1109  0 01:43 ?        00:00:11 /usr/sbin/httpd
apache   29898  1109  0 01:44 ?        00:00:10 /usr/sbin/httpd
Note that in the preceding output, each line describes one Apache Web Server process (/usr/sbin/httpd) that is running on the system. The first part of the line is the user who initiated the process. The process that runs as root is only used to spawn additional /usr/sbin/httpd processes. The others, however, respond to incoming web page requests from client utilities (web browsers).
Imagine for a moment that a security flaw is discovered in the software for the Apache Web Server that allows a client utility to gain control of one of the /usr/sbin/httpd processes and issue custom commands or operations to that process. One of those operations could be to view the content of the /etc/passwd file, which would be successful because of the permissions placed on this file:
root@onecoursesource:~# ls -l /etc/passwd
-rw-r--r-- 1 root root 2690 Dec 11  2018 /etc/passwd
As you can see from the output of the preceding command, all users have the ability to view the contents of the /etc/passwd file. Ask yourself this: Do you want some random person (usually called a hacker) to have the ability to view the contents of the file that stores user account data?
Security Highlight
Do not think of this problem as just related to the Apache Web Server. Any process running on your system can potentially be compromised and provide unintended access to someone who has bad intentions. Run the ps -fe command on your system to get an idea of how many processes are operational at any time.
With an SELinux policy, the /usr/sbin/httpd processes can be “locked down” so each can only access a certain set of files. This is what most administrators use SELinux for: to secure processes that may be compromised by hackers making use of known (or, perhaps, unknown) exploits.
SELinux Essentials
Not all Linux distributions have SELinux installed. One way you can tell if it is available (and actively being used) is to use the getenforce command:
root@onecoursesource:~# getenforce
Enforcing
The result “Enforcing” means SELinux is installed and the security policy is currently active. You can disable the security policy (useful when testing a new policy or troubleshooting SELinux problems) with the setenforce command:
root@onecoursesource:~# setenforce 0
root@onecoursesource:~# getenforce
Permissive
While in “Permissive” mode, SELinux will not block any access to files and directories, but warnings will be issued and viewable in the system log files.
Security Context
Each process runs with a security context. To see this, use the -Z option to the ps command (the head command is used here simply to limit the output of the command):
root@onecoursesource:~# ps -fe | grep httpd | head -2
system_u:system_r:httpd_t:s0 root      1109     1  0  2018 ?        00:51:56 /usr/sbin/httpd
system_u:system_r:httpd_t:s0 apache    1412  1109  0 Dec24 ?        00:00:09 /usr/sbin/httpd
The security context (system_u:system_r:httpd_t:s0) is complicated, but for understanding the basics of SELinux, the important part is httpd_t, which is like a security group or domain. As part of this security domain, the /usr/sbin/httpd process can only access files that are allowed by the security policy for httpd_t. This policy is typically written by someone who is an SELinux expert, and that expert should have proven experience regarding which processes should be able to access specific files and directories on the system.
Files and directories also have an SELinux security context that is also defined by the policy. To see a security context for a specific file, use the -Z option to the ls command (note that the SELinux context contains so much data that the filename cannot fit on the same line):
root@onecoursesource:~# ls -Z /var/www/html/index.html
unconfined_u:object_r:httpd_sys_content_t:s0 /var/www/html/index.html
Again, there are many pieces to a full SELinux security context, but the most important part for this book is httpd_sys_content_t. A process running with the httpd_t security context can access files that are part of the httpd_sys_content_t security context, according to the rules of the security policy.
To see an example of this access in action, first look at Figure 9-3, which demonstrates the Apache Web Server’s ability to access the /var/www/html/index.html file.
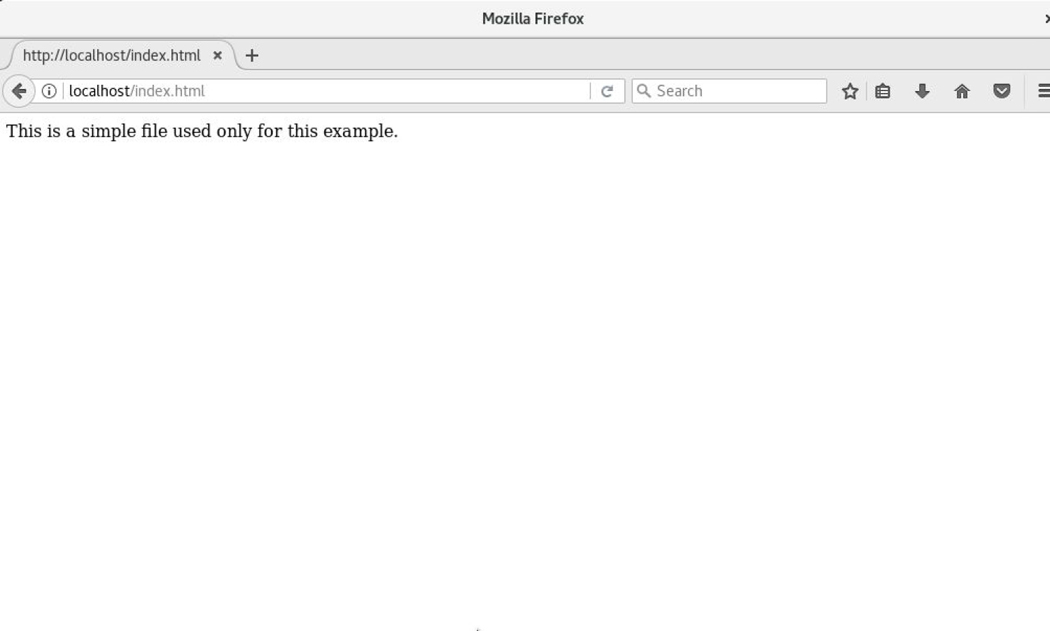
Figure 9-3 Successful Display of the index.html File
Next, the following command is used to change the SELinux security context to a different type:
root@onecoursesource:~# semanage fcontext -a -t user_home_t/var/www/html/index.html root@onecoursesource:~# restorecon -v /var/www/html/index.html Relabeled /var/www/html/index.html from unconfined_u:object_r:httpd_sys_content_t:s0 to unconfined_u:object_r:user_home_t:s0
Some notes about the previous commands:
• Typically you would not apply this security context to this particular file this as this security context is reserved for files found in users’ home directories. However, the purpose of this is to demonstrate how SELinux protects files, so it makes sense to use a context like this
• The semanage command applies the context of the file to the security policy, but to make this a permanent change on the file itself, the restorecon command must be executed.
Now look at Figure 9-4 which demonstrates how the Apache Web Server can no longer access the index.html file.
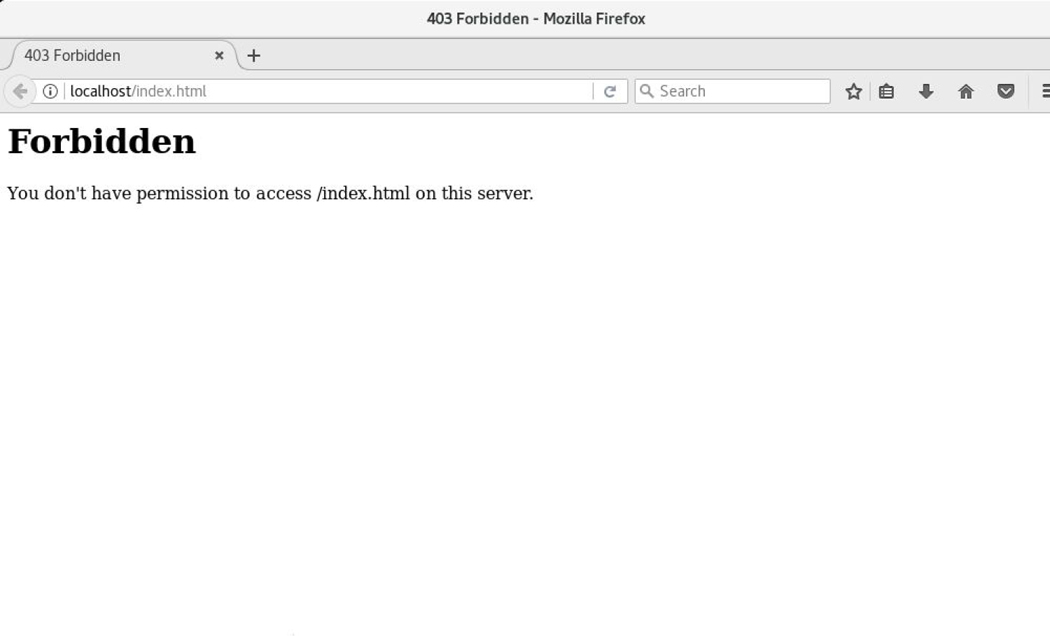
Figure 9-4 Failure to Display the index.html File
You can see why this failure happened by looking at the log entry:
root@onecoursesource:~# journalctl | grep index.html | tail -1
Dec 11 13:41:46 localhost.localdomain setroubleshoot[13444]: SELinux is preventing httpd from read access on the file index.html. For complete SELinux messages run: sealert -l afac171c-27bb-4dbc-9bec-994f44275fd3
Note that the sealert command mentioned in the output of the previous command is useful in providing additional information as to why the failure occurred.
SELinux Conclusion
The discussion in this book of SELinux provides a quick introduction to this powerful security tool. There is much more you can learn, including details regarding security policies and a host of commands that allow you to administer SELinux. With this introduction you should have an idea of what SELinux is, an understanding of what contexts are and how to view and set them, as well as how to use log entries to perform basic troubleshooting of SELinux.
Summary
In this chapter,you learned how to view and set standard permissions, the umask value, access control lists (ACLs), and special permissions. You also learned how to use file attributes to enhance the security of key system files. Lastly, you were introduced to the concepts behind SELinux, an advanced method for securing files and directories on a Linux operating system.
Key Terms
Review Questions
1. The _____ option to the crontab command will remove all entries in the current user’s crontab.
2. The _____ option to the ls command will display basic file permissions.
3. Which permission would allow a user to delete a file in a directory?
a. Execute permission on the file
b. Write permission on the file
c. Write permission on the directory
d. Read permission on the directory
4. Which permission is used to modify the behavior of the write permission on a directory?
a. SUID
b. SGID
c. Sticky bit
d. None of these
5. The _____ command is used to specify which default permissions to mask (not include) when creating a new file or directory.
6. Fill in the blank to set the SGID permission set for the /data directory: chmod _____ /data.