Table of Contents for
Linux Essentials for Cybersecurity, First Edition
 Linux Essentials for Cybersecurity, First Edition
Published by
Pearson IT Certification, 2018
Linux Essentials for Cybersecurity, First Edition
Published by
Pearson IT Certification, 2018
- Cover Page
- Title Page
- Copyright Page
- Contents at a Glance
- Table of Contents
- About the Author
- Dedication
- Acknowledgments
- About the Technical Reviewers
- We Want to Hear from You!
- Reader Services
- Introduction
- Part I: Introducing Linux
- Chapter 1: Distributions and Key Components
- Chapter 2: Working on the Command Line
- Chapter 3: Getting Help
- Chapter 4: Editing Files
- Chapter 5: When Things Go Wrong
- Part II: User and Group Accounts
- Chapter 6: Managing Group Accounts
- Chapter 7: Managing User Accounts
- Chapter 8: Develop an Account Security Policy
- Part III: File and Data Storage
- Chapter 9: File Permissions
- Chapter 10: Manage Local Storage: Essentials
- Chapter 11: Manage Local Storage: Advanced Features
- Chapter 12: Manage Network Storage
- Chapter 13: Develop a Storage Security Policy
- Part IV: Automation
- Chapter 14: Crontab and At
- Chapter 15: Scripting
- Chapter 16: Common Automation Tasks
- Chapter 17: Develop an Automation Security Policy
- Part V: Networking
- Chapter 18: Networking Basics
- Chapter 19: Network Configuration
- Chapter 20: Network Service Configuration: Essential Services
- Chapter 21: Network Service Configuration: Web Services
- Chapter 22: Connecting to Remote Systems
- Chapter 23: Develop a Network Security Policy
- Part VI: Process and Log Administration
- Chapter 24: Process Control
- Chapter 25: System Logging
- Part VII: Software Management
- Chapter 26: Red Hat–Based Software Management
- Chapter 27: Debian-Based Software Management
- Chapter 28: System Booting
- Chapter 29: Develop a Software Management Security Policy
- Part VIII: Security Tasks
- Chapter 30: Footprinting
- Chapter 31: Firewalls
- Chapter 32: Intrusion Detection
- Chapter 33: Additional Security Tasks
- Appendix A: Answers to Review Questions
- Appendix B: Resource Guide
- Glossary
Chapter 10 Manage Local Storage: Essentials
The focus of this chapter is the key concepts and essential management of local storage devices.
You start by learning some key concepts, including what partitions and filesystems are and how they play an essential role on a Linux operating system. You then learn how to create partitions and filesystems, followed by how to make these new storage devices available to the operating system.
We complete this chapter by diving into the topic of swap devices, which are devices used to provide virtual memory space.
After reading this chapter and completing the exercises, you will be able to do the following:
Create partitions and filesystems.
Perform advanced filesystem manipulation tasks.
Mount partitions manually and automatically.
Create and activate swap devices.
Filesystem Essentials
The process of mounting makes a filesystem available by placing it under a directory location. Before you learn how to accomplish this, you should know some basics regarding filesystems.
Partitions
Partitions are used to separate a hard disk into smaller components. Each component can then be treated as a different storage device. On each partition, a separate filesystem (btrfs, xfs, etx4, and so on) can be created.
Traditional PC-based partitions have limitations regarding the number you can create. Originally only four partitions were permitted. These are referred to as primary partitions. As more partitions were needed, a technique was created that allows you to convert one of the primary partitions into an extended partition. Within an extended partition, you can create additional partitions called logical partitions.
In Figure 10-1, /dev/sda1, /dev/sda2, and /dev/sda3 are primary partitions. The /dev/sda4 partition is an extended partition that is used as a container for the /dev/sda5, /dev/sda6, and /dev/sda7 logical partitions.
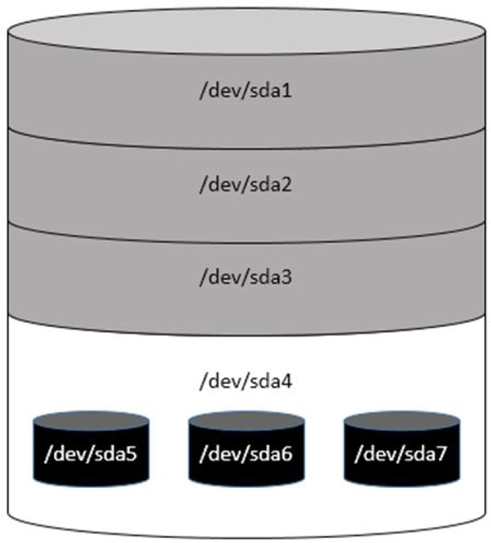
Figure 10-1 Traditional Partition Structure
On most distributions that use traditional partitions, you will be limited to a total of 15 partitions, but a kernel tweak (modification) can increase this number to 63.
Traditional partition tables are stored on the Master Boot Record (MBR). A newer partition table, called the GUID partition table (GPT), does not have the same limitations or layout as an MBR partition table.
Several different tools can be used to create or view partitions, including fdisk, parted, and a GUI-based tool provided by the installation program. The available GUI-based tools can vary based on the distribution.
Both fdisk and parted support command-line options, and both can be executed as an interactive tool. The fdisk and parted tools will be covered later in this chapter.
Filesystems
The term filesystem itself can be somewhat confusing. There are really two general types of filesystems: physical and virtual.
Physical filesystems are structures used to organize data on a device, such as a partition, logical volume, or RAID (redundant array of independent disks) device. Typically when the term filesystem is used, the reference is to a physical filesystem. There are many different types of physical filesystems, as described later in this chapter.
Virtual filesystems are what regular users see when they are looking at files and directories on the operating system. A virtual filesystem consists of several physical filesystems, merged together via the directory tree.
To understand this concept, first look at Figure 10-2.
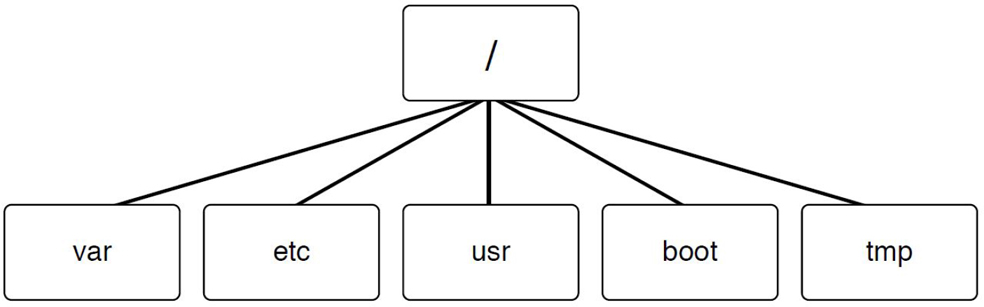
Figure 10-2 A Virtual Filesystem
Figure 10-2 shows a portion of a typical Linux virtual filesystem. This is how regular users view the filesystem, as a collection of directories that store data in a hierarchical manner. The top of the virtual filesystem structure is the / directory, and subdirectories and files are stored inside the / directory.
But as an administrator, you should know that there is more to this story. The / directory is a mount point for a physical filesystem. A mount point is how physical filesystems are merged together into the virtual filesystem, which is what the user sees as the directory structure. Other directories, such as /var and /usr, can also be mount points. In this case, you may want to consider the filesystem to be something like what is shown in Figure 10-3.
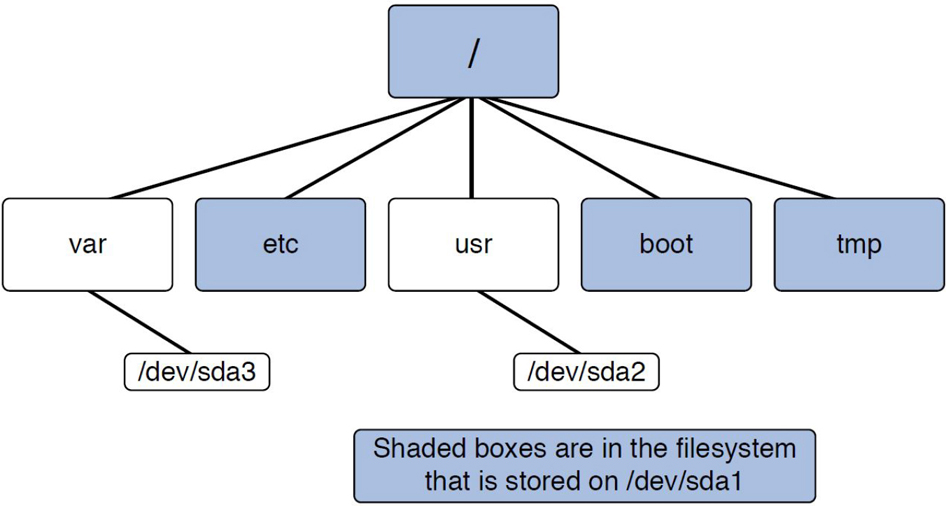
Figure 10-3 A Virtual Filesystem with Mount Points Highlighted
Figure 10-3 provides more insight about what is happening behind the scenes of the virtual filesystem. The directories highlighted in gray are in the filesystem stored on the /dev/sda1 partition. Within the var directory is the filesystem that is stored on the /dev/sda2 partition. Within the usr directory is the filesystem stored on the /dev/sda3 partition.
Placing the filesystem under a directory is completed through a process called mounting. Mounting can be performed manually with the mount command or automatically by entries in the /etc/fstab file. The mounting process will be covered in more detail later in this chapter.
Why So Many Partitions/Filesystems?
You will discover that many Linux installations have several partitions—each, of course, with a separate filesystem. There are several reasons why you would want to create multiple partitions:
• Mount options: Each partition, when mounted, can have different mount options. This allows for more flexibility, as you may want to use a specific mount option for a specific situation. Later in this chapter we explore mount options and revisit this topic.
• Filesystem types: Each partition can have a different type of filesystem. Some filesystems are better for security, some are better for handling larger files, and some are better for performance. Picking the right filesystem for a given situation can result in a more secure system that performs its tasks more efficiently. Filesystem types are discussed later in this chapter.
• Disk quotas: This Linux feature allows you to limit how much space a user can use in a filesystem. The quota limit is per filesystem, so having multiple physical filesystems allows you the option of having different quota limits for different areas of the virtual filesystem.
• Backup strategies: Many backup utilities allow you to specify different frequencies when backups will occur on a filesystem-by-filesystem basis. For example, if the /home directory was the mount point of one filesystem and /boot was the mount point of another filesystem, you could create a strategy to back up the files in /home directory daily (files change often in this directory) while backing up the files in the /boot directory monthly (because files rarely change in this directory).
• Limit possible full filesystems: Consider a situation where the /home directory is a separate filesystem and a user generates a significant number of very large files. They could fill up the entire filesystem, making it impossible for other users to create files in their own home directories. However, if the /home directory wasn’t a separate filesystem, but rather part of a single filesystem for the entire operating system, then this user could make the entire system unusable, as the entire hard drive would be full. This is one of the primary reasons why /home, /var, and /tmp are typically separate filesystems, as these are all directory structures where regular users have the rights to create files.
Security Highlight
Creating a virtual filesystem structure in which a single user can fill up the entire hard drive is considers a serious security risk. When the entire hard drive is full, the operating system can’t function properly because many processes need the ability to write data to the hard drive.
Which Partitions/Filesystems Should Be Created?
The answer to this question really depends on several factors. You should consider the advantages of the different mount options, filesystem types, disk quotas, and backup strategies when determining which partitions you will create. Also take into consideration what these filesystems will contain. At the very least, consider making the following directories mount points for separate physical filesystems:
• / (root) filesystem: The top level of the virtual filesystem. The size of this filesystem depends greatly on which other filesystems are created. This is a required partition.
• /var filesystem: The /var filesystem contains data that is variable in nature (that is, it changes often). This includes log files, mail files, and spools (such as the print spools). The size of this filesystem depends on many factors, including if this is a mail server, which log files are created on the system and if the system functions as a printer server. Consider making /var a separate filesystem for backup strategies and to limit the risk of the hard disk space becoming completely full.
• /home filesystem: The /home filesystem is where regular user home directories are stored. The size of this filesystem depends on many factors, including the number of users who work on the system and what functions these users perform. Consider making /home a separate filesystem for backup strategies and to limit the risk of the hard disk space becoming completely full.
• /boot filesystem: Location of where the boot files, including the kernel, bootloader, and initramfs files are stored. When /boot is a separate filesystem, it is normally about 100–200MB in size. Because this filesystem must be easily accessible during the boot process, it is on a separate filesystem.
Note
The preceding isn’t a complete list of all possible filesystems. There are good arguments for making other directories, such as /usr and /opt, mount points for physical filesystems. Expect some trial and error until you find a good combination of physical filesystems that meets your needs.
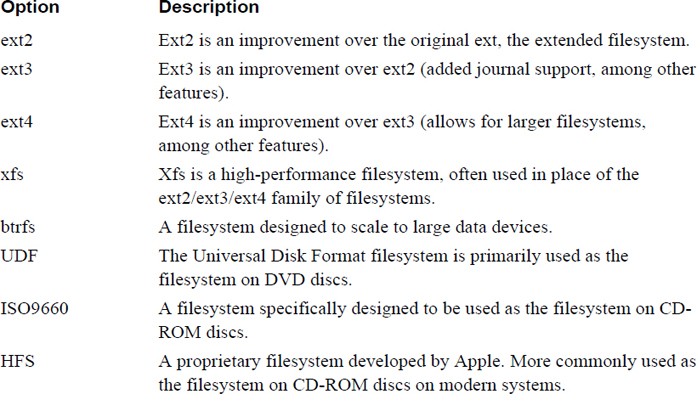
Filesystems Types
Filesystems are used to organize the data (files and directories) on the system. Many different types of filesystems are available for Linux. Table 10-1 provides a brief summary of these filesystems.
Conversational Learning™ — Which Filesystem Type?
Gary: Hi, Julia. Can you provide me with some assistance? I’m trying to determine which filesystem to use on the new partition I created. There are so many that I just don’t know which to pick.
Julia: Hey, Gary! I’m assuming you are talking about a traditional partition, like on a hard drive? Not something like a CD-ROM or DVD, right?
Gary: Correct.
Julia: OK, that rules out a bunch of filesystems, like UDF, ISO9660, and HFS. So, the first step is to determine what your distribution supports.
Gary: You mean not all distributions support all filesystems?
Julia: Nope. At least not by default. Often you can install additional software, but it may be better to choose one that is already part of the distro.
Gary: How can I figure this out?
Julia: Typically the documentation for the distribution will indicate this. You can also just try using some of the specific commands for creating the filesystem you are interested in.
Gary: Let’s assume that I have a large choice of options. What do I choose? Ext4? Xfs?
Julia: There really isn’t a simple answer to this question. You really need to consider what you want to use the filesystem for and do a bit of research to determine which filesystem best fits your needs.
Gary: Can you give me an example?
Julia: Sure. Suppose you will have very large files on your filesystem. In that case, you may find that xfs has better performance than other filesystems. Of course, you want to explore the other features, but that gives you an idea of what to look for.
Gary: OK, sounds like doing the “pre-work” is important here. Any other advice?
Julia: Yes, if it is a critical filesystem, consider creating several different types and performing benchmark testing to find which works best. Also, don’t forget to consider key security features, especially if the filesystem will be accessible to the public, like a shared drive, or contain files for a web server.
Gary: Got it. Thanks again, Julia.
Managing Partitions
In order to create a filesystem, you first will want to create one or more partitions. Partitions are used to logically break up a hard disk or other storage media into smaller pieces. By creating partitions, you have more flexibility in features like mounting, backup, and filesystem security. The full collection of partitions on a single storage device is called the partition table.
Before using tools to create partitions, you should be aware that there are two different partition methods: MBR (Master Boot Record) and GPT (GUID partition table).
MBR
MBR partition tables are often referred to as “traditional” partitions as opposed to newer partition tables such as the GUID partition table. An MBR partition table has the restriction of only permitting four partitions by default. This is an extremely limiting factor for operating systems like Linux.
However, one of the primary partitions in an MBR partition table can be converted into an extended partition. Within this extended partition, additional partitions can be added. These additional partitions are called logical partitions. See Figure 10-4 for a visual example.
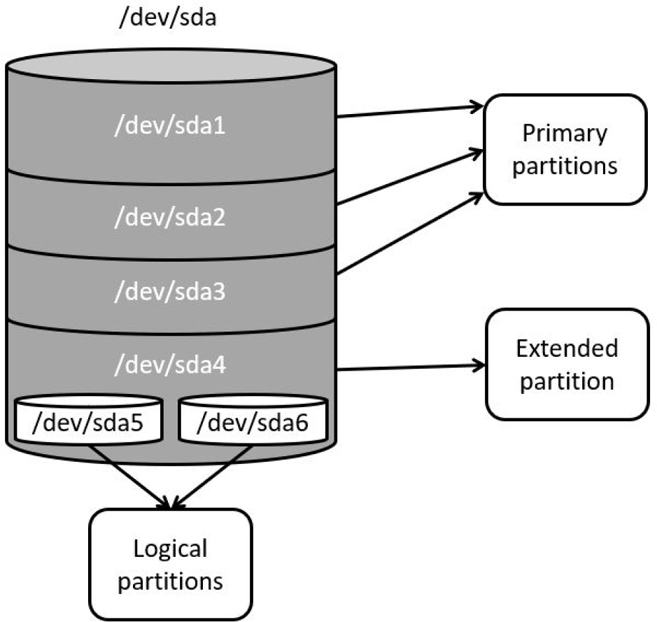
Figure 10-4 Master Boot Record
A note regarding hard disk device names: Hard disks are referred to via devices names in the /dev directory. IDE-based devices have names that start with /dev/hd, whereas SETA, SCSI, and USB devices have names that start with /dev/sd. The first drive on the system is named “a,” so the first SETA device would be /dev/sda. The second SETA device would be /dev/sdb, and so on. Partitions are numbered sequentially, starting from 1, as in /dev/sda1, /dev/sda2, and /dev/sda3.
GPT
There are several differences between GPT and MBR partitions. However, in this instance, the most important one you should be aware of is the structure of the partitions table. GPT supports creating many more partitions than MBR and doesn’t have the “four primary, one extended, multiple logical” structure. All partitions in GPT are just simply partitions, and there is no need to overcome the legacy issues associated with MBR partitions.
Creating MBR Partitions
To create an MBR partition, you can use the fdisk command.
Note
Normally the entire hard disk is used during the installation process, making it difficult to make partitions to practice creating filesystems. If you are using a virtual machine, you can add a new disk to the system fairly easily (consult the documentation for VirtualBox, VMware, or whatever virtualization software you are using). If that is not an option, you can always use a small thumb drive for practice—just make sure to remove all important data from the thumb drive first!
To display the current partition table for a device, use the -l option to the fdisk command, as shown in Example 10-1.
Example 10-1 The fdisk -l Command
 [root@onecoursesource ~]# fdisk -l /dev/sdb

Disk /dev/sdb: 209 MB, 209715200 bytes
255 heads, 63 sectors/track, 25 cylinders
Units = cylinders of 16065 * 512 = 8225280 bytes
Sector size (logical/physical): 512 bytes / 512 bytes
I/O size (minimum/optimal): 512 bytes / 512 bytes
Disk identifier: 0xccd80ba5

   Device Boot      Start         End      Blocks   Id  System
The device in Example 10-1 currently has no partitions, so the data under the “Device boot Start End…” line is empty. To add partitions to this device, use the fdisk command without the -l option:
[root@onecoursesource ~]# fdisk /dev/sdb
WARNING: DOS-compatible mode is deprecated. It's strongly recommended to
         switch off the mode (command 'c') and change display units to
         sectors (command 'u').
Command (m for help):
Note the warning that is displayed. Depending on your distribution, you might not receive this warning because the recommendations (switch off the mode and change display units to sectors) are sometimes the default for the fdisk command. If you do receive this warning, quit from the fdisk utility by entering quit at the command prompt and start the fdisk command again with the -c and -u options:
Command (m for help): quit
[root@onecoursesource ~]# fdisk -cu /dev/sdb
Command (m for help):
Note
Instead of quitting the fdisk utility, consider using the c and u options at the command prompt to toggle to the correct mode.
To create a new partition, enter n at the command prompt:
Command (m for help): n
Command action
   e   extended
   p   primary partition (1-4)
p
Partition number (1-4): 1
First sector (2048-409599, default 2048):
Using default value 2048
Last sector, +sectors or +size{K,M,G} (2048-409599, default 409599):
Using default value 409599
To save these changes, enter the w command at the command prompt:
Command (m for help): w
The partition table has been altered!
Calling ioctl() to re-read partition table.
Syncing disks.
Creating MBR Partitions
The parted utility is an interactive tool that allows you to display and modify both traditional and GUID partition tables. It can also create a filesystem on a partition.
To display a partition table, use the -l option (run this command as the root user):
 [root@onecoursesource ~]# parted -l /dev/sda
Model: ATA VBOX HARDDISK (scsi)
Disk /dev/sda: 42.9GB
Sector size (logical/physical): 512B/512B
Partition Table: msdos

Number  Start   End     Size    Type     File system  Flags
 1      1049kB  42.9GB  42.9GB  primary  ext4         boot


Model: Linux device-mapper (thin) (dm)
Disk /dev/mapper/docker-8:1-264916-f9bd50927a44b83330c036684911b54e494e4e48efbc2329262b6f0e909e3d7d: 107GB
Sector size (logical/physical): 512B/512B
Partition Table: loop

Number  Start  End    Size   File system  Flags
 1      0.00B  107GB  107GB  ext4


Model: Linux device-mapper (thin) (dm)
Disk /dev/mapper/docker-8:1-264916-77a4c5c2f607aa6b31a37280ac39a657bfd7ece1d940e50507fb0c128c220f7a: 107GB
Sector size (logical/physical): 512B/512B
Partition Table: loop

Number  Start  End    Size   File system  Flags
 1      0.00B  107GB  107GB  ext4
To modify the partition table of a drive, run the parted command without the -l option:
[root@onecoursesource ~]# parted  /dev/sda
GNU Parted 2.3
Using /dev/sda
Welcome to GNU Parted! Type 'help' to view a list of commands.
(parted)
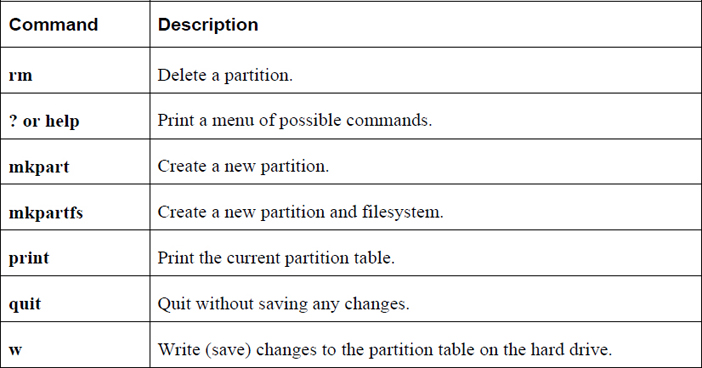
There are several useful commands you can type at the parted prompt, some of which are shown in Table 10-2.
Table 10-2 Useful Commands at the parted Prompt
Creating Filesystems
Now that you have a partition, you can create a filesystem using the mkfs command. For example, to create an ext4 filesystem on the /dev/sdb1 partition, execute the mkfs command as shown in Example 10-2.
[root@onecoursesource ~]# mkfd -t ext4 /dev/sdb1
-bash: mkfd: command not found
[root@onecoursesource ~]# mkfs -t ext4 /dev/sdb1
mke2fs 1.41.12 (17-May-2010)
Filesystem label=
OS type: Linux
Block size=1024 (log=0)
Fragment size=1024 (log=0)
Stride=0 blocks, Stripe width=0 blocks
51000 inodes, 203776 blocks
10188 blocks (5.00%) reserved for the super user
First data block=1
Maximum filesystem blocks=67371008
25 block groups
8192 blocks per group, 8192 fragments per group
2040 inodes per group
Superblock backups stored on blocks:
    8193, 24577, 40961, 57345, 73729

Writing inode tables: done
Creating journal (4096 blocks): done
Writing superblocks and filesystem accounting information: done

This filesystem will be automatically checked every 38 mounts or
180 days, whichever comes first. Use tune2fs -c or -i to override.
The mkfs command is a front-end command to commands designed to make specific filesystems. For example, the mkfs -t ext4 command runs the mkfs.ext4 command. You can see what filesystems the mkfs command can create by typing mkfs. and then pressing the <TAB> key twice:
[root@onecoursesource ~]# mkfs.
mkfs.cramfs   mkfs.ext3     mkfs.ext4dev  mkfs.vfat
mkfs.ext2     mkfs.ext4     mkfs.msdos
You can run any of these commands directly, but often it is just easier to execute the mkfs command.
The mkfs command by itself has few options. However, each of the mkfs.* commands has several options that modify how the filesystem is created. When specifying options with the mkfs command, any option that isn’t part of the mkfs command is passed to the mkfs.* command. For example, the -m option to the mkfs.ext4 command specifies how much of the filesystem (percentage of filesystem) is reserved for the superuser (the default is 5%). The following command ends up executing the mkfs.ext4 command and passing in the -m option to that command:
mkfs -t ext4 -m 10 /dev/sdb1
Security Highlight
Filesystems have many options, and we highly recommend you explore the options available for the filesystems on your systems. Which options are enabled can make a big difference for system performance and sometimes for security.
For instance, consider the -m option for ext-based filesystems, which is used to specify how much of the filesystem is reserved for the superuser. The purpose for this is so the root user (or daemons running as root) is able to store files on a filesystem, even if regular users “fill up” the filesystem.
Suppose you have a separate filesystem for /home and that it is a 500GB filesystem. The default reserved for the superuser is 5%, unless you use the -m option and specify a different value. If you don’t use this option when this filesystem is created, that would mean that 25GB are reserved for the root user, a user who will likely never place a single file in the /home filesystem!
To learn more about these options, read the man page specific to your filesystem. For example, to learn more about ext4, you could execute the following command: man mkfs.ext4.
Ext-Based Filesystem Tools
Several tools allow you to change and view ext-based filesystems. These include the following:
fsck.*
dumpe2fs
tune2fs
debugfs
fsck.*
The purpose of the fsck command (and related fsck.* commands) is to fix filesystem issues. A filesystem becomes corrupt or broken when the operating system is not properly shut down. This could be the result of a power outage or a careless employee who accidentally kicks the power cord.
The reason why this causes a problem is that changes to the filesystem metadata (data about the file such as its name, permissions, ownership, timestamp, and so on) are initially stored in memory. At regular intervals this data is written to the hard disk. However, if the system is improperly shut down while this data is still in memory, the data on the hard disk is out of date, resulting in a corrupted filesystem.
When the system is booted after an improper shutdown, a utility called fsck (filesystem check) checks all filesystems. In some cases it makes changes to the filesystem, but normally any error results in a failed boot (startup) process. You need to fix the filesystem errors manually.
The fsck utility is straightforward. For example, to execute it on the first partition of the first SATA (Serial Advanced Technology Attachment) drive, execute the following command:
fsck /dev/sda1
You might get a lot of questions that look like “blah, blah, blah is broken. Do you want to fix this problem?” The answer should always be “yes” (otherwise you won’t be able to mount or use this filesystem). As a result, you probably always want to run the fsck utility with the -y option to answer yes to each question:
fsck -y /dev/sda1
Security Highlight
Do not run the fsck utility on live filesystems. Live filesystems do not have filesystem corruption; only filesystems that are not properly unmounted will have this issue. Running the fsck utility on a live filesystem can cause problems, rather than fix problems. Remember the saying “if it ain’t broke, don’t try to fix it!”
You should also know that the fsck utility, just like the mkfs utility, is really just a front-end utility for filesystem-specific fsck utilities. For example, if you execute fsck on an ext4 filesystem, the fsck.ext4 utility is executed.
Note that there are different options for the different fsck utilities, so review the man pages to determine which options you can use.
dumpe2fs
The dumpe2fs command can display details regarding the ext* filesystem. The output of this command is huge and by default includes a great deal of information regarding block group descriptors, typically something that you don’t need to see. To view this information while omitting the block group descriptors, use the -h option, as shown in Example 10-3.
Example 10-3 The dumpe2fs Command
[root@onecoursesource ~]# dumpe2fs -h /dev/sdb1
dumpe2fs 1.41.12 (17-May-2010)
Filesystem volume name:   <none>
Last mounted on:          <not available>
Filesystem UUID:          7d52c9b6-28a8-40dc-9fda-a090fa95d58f
Filesystem magic number:  0xEF53
Filesystem revision #:    1 (dynamic)
Filesystem features:      has_journal ext_attr resize_inode dir_index filetype extent flex_bg sparse_super huge_file uninit_bg dir_nlink extra_isize
Filesystem flags:         signed_directory_hash
Default mount options:    (none)
Filesystem state:         clean
Errors behavior:          Continue
Filesystem OS type:       Linux
Inode count:              51000
Block count:              203776
Reserved block count:     10188
Free blocks:              191692
Free inodes:              50989
First block:              1
Block size:               1024
Fragment size:            1024
Reserved GDT blocks:      256
Blocks per group:         8192
Fragments per group:      8192
Inodes per group:         2040
Inode blocks per group:   255
Flex block group size:    16
Filesystem created:       Tue Sep 15 00:12:17 2017
Last mount time:          n/a
Last write time:          Tue Sep 15 00:12:18 2017
Mount count:              0
Maximum mount count:      38
Last checked:             Tue Sep 15 00:12:17 2017
Check interval:           15552000 (6 months)
Next check after:         Sat Mar 12 23:12:17 2017
Lifetime writes:          11 MB
Reserved blocks uid:      0 (user root)
Reserved blocks gid:      0 (group root)
First inode:              11
Inode size:               128
Journal inode:            8
Default directory hash:   half_md4
Directory Hash Seed:      a3bbea7e-f0c2-43b2-a5e2-9cd2d9d0eaad
Journal backup:           inode blocks
Journal features:         (none)
Journal size:             4096k
Journal length:           4096
Journal sequence:         0x00000001
Journal start:            0
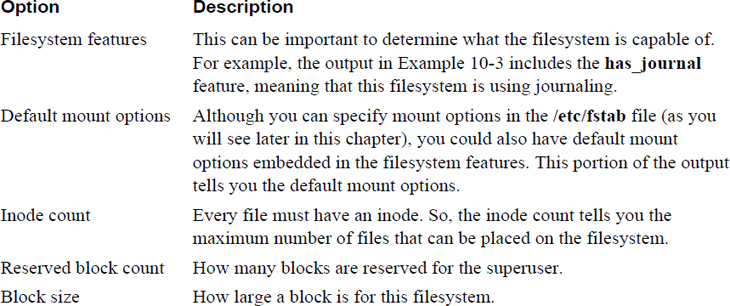
As you can see from Example 10-3, a huge amount of information is provided by the dumpe2fs command. Table 10-3 describes some of the more important filesystem features.
Table 10-3 Filesystem Features
In most cases, the block group descriptors information is not necessary, but there is one case in which you might want to display this information. When using the fsck utility to fix a filesystem, you might get a “bad superblock” error. The superblock is critical for filesystem health, so backups are made of this information in the block group descriptors. If you run the dumpe2fs command without the -h option, you see many sections of output like the following:
Group 1: (Blocks 8193-16384) [INODE_UNINIT, ITABLE_ZEROED]
  Checksum 0x12f5, unused inodes 2040
  Backup superblock at 8193, Group descriptors at 8194-8194
  Reserved GDT blocks at 8195-8450
  Block bitmap at 260, Inode bitmap at 276
  Inode table at 546-800
  7934 free blocks, 2040 free inodes, 0 directories, 2040 unused inodes
  Free blocks: 8451-16384
  Free inodes: 2041-4080
Note the “backup superblock” location of 8193. If your superblock contains an error, you can use this backup superblock, as shown here:
fsck -b 8193 /dev/sdb1
tune2fs
To make changes to a filesystem, use the tune2fs command. For example, to change the percentage of a filesystem reserved for the superuser, execute a command like the following:
 [root@onecoursesource ~]# tune2fs -m 0 /dev/sdb1
tune2fs 1.41.12 (17-May-2010)
Setting reserved blocks percentage to 0% (0 blocks)
It is important to realize that not all filesystem features can be changed by the tune2fs command. For example, the number of inodes (each file must have an inode, which is used to store information about a file) in the filesystem is set when the filesystem is created and cannot be changed. If you need more inodes, you have to back up the filesystem, create a new filesystem, and restore the data.
debugfs
The debugfs command is a useful tool that allows you to perform debugging operations in an interactive environment. The tool is designed to be executed on filesystems not currently active (mounted).
Start the tool by executing the command with the partition device name:
[root@onecoursesource ~]# debugfs /dev/sdb1
debugfs 1.41.12 (17-May-2010)
debugfs:
The debugfs tool provides many useful tools, including several that act similarly to regular Linux commands. Example 10-4 illustrates the feature of listing files in the current directory with the ls command.
debugfs:  ls
 2  (12) .   2  (12) ..   11  (20) lost+found    12  (20) asound.conf
 13  (32) autofs_ldap_auth.conf    14  (24) cgconfig.conf
 15  (20) cgrules.conf    16  (36) cgsnapshot_blacklist.conf
 17  (20) dnsmasq.conf    18  (20) dracut.conf    19  (20) fprintd.conf
 20  (16) gai.conf    21  (20) grub.conf    22  (24) gssapi_mech.conf
 23  (16) hba.conf    24  (20) host.conf    25  (20) idmapd.conf
 26  (20) kdump.conf    27  (20) krb5.conf    28  (20) ld.so.conf
 29  (24) libaudit.conf    30  (20) libuser.conf    31  (24) logrotate.conf
 32  (20) mke2fs.conf    33  (20) mtools.conf    34  (20) named.conf
 35  (24) nfsmount.conf    36  (24) nsswitch.conf    37  (16) ntp.conf
 38  (20) openct.conf    39  (36) pm-utils-hd-apm-restore.conf
 40  (20) prelink.conf    41  (24) readahead.conf    42  (20) reader.conf
 43  (24) request-key.conf    44  (20) resolv.conf    45  (20) rsyslog.conf
 46  (24) sestatus.conf    47  (20) smartd.conf    48  (16) sos.conf
 49  (20) sudo.conf    50  (24) sudo-ldap.conf    51  (20) sysctl.conf
 52  (24) Trolltech.conf    53  (24) updatedb.conf    54  (24) warnquota.conf
 55  (20) xinetd.conf    56  (20) yum.conf
You can get information about this file by using the stat command, as shown in Example 10-5.
debugfs:  stat yum.conf
Inode: 56   Type: regular    Mode:  0644   Flags: 0x80000
Generation: 1017195304    Version: 0x00000001
User:     0   Group:     0   Size: 969
File ACL: 4385    Directory ACL: 0
Links: 1   Blockcount: 4
Fragment:  Address: 0    Number: 0    Size: 0
ctime: 0x55f863e0 -- Tue Sep 15 11:30:56 2015
atime: 0x55f863e0 -- Tue Sep 15 11:30:56 2015
mtime: 0x55f863e0 -- Tue Sep 15 11:30:56 2015
EXTENTS:
(0): 8553
One of the most useful features of the debugfs command is the capability to undelete a file—if you act quickly! For example, consider the situation in Example 10-6, where a file is accidentally deleted.
Example 10-6 Using debugfs to Undelete
[root@onecoursesource ~]# ls /data
asound.conf                host.conf       nfsmount.conf                 smartd.conf
autofs_ldap_auth.conf      idmapd.conf     nsswitch.conf                 sos.conf
cgconfig.conf              kdump.conf      ntp.conf                      sudo.conf
cgrules.conf               krb5.conf       openct.conf                   sudo-ldap.conf
cgsnapshot_blacklist.conf  ld.so.conf      pm-utils-hd-apm-restore.conf  sysctl.conf
dnsmasq.conf               libaudit.conf   prelink.conf                  Trolltech.conf
dracut.conf                libuser.conf    readahead.conf                updatedb.conf
fprintd.conf               logrotate.conf  reader.conf                   warnquota.conf
gai.conf                   lost+found      request-key.conf              xinetd.conf
grub.conf                  mke2fs.conf     resolv.conf                   yum.conf
gssapi_mech.conf           mtools.conf     rsyslog.conf
hba.conf                   named.conf      sestatus.conf
[root@onecoursesource ~]# rm /data/yum.conf
rm: remove regular file `/data/yum.conf'? y
To recover this file, first unmount the filesystem and start the debugfs command with the -w option (which opens the filesystem in read-write mode):
[root@onecoursesource ~]# umount /data
[root@onecoursesource ~]# debugfs /dev/sdb1
debugfs 1.41.12 (17-May-2010)
debugfs:
Now list deleted files with the lsdel command and recover the file with the undel command. Keep in mind you must do this soon after you delete the file; otherwise, the data blocks may be used by a new file.
Xfs-Based Filesystem Tools
Just as there are tools to help you view and modify ext-based filesystems, there are tools that allow you to perform these tasks on xfs-based filesystems. These include the following:
• xfsdump
• xfsrestore
• xfs_info
• xfs_check
• xfs_repair
Note
Not all Linux distributions have the xfs filesystem available. If you want to practice xfs commands, use CentOS 7 because xfs is the default filesystem for that distribution.
xfsdump and xfsrestore
The xfsdump command is used to back up a filesystem, either to a tape device or some other storage location. Assuming that it is unlikely you have access to tape devices, the examples provided in this section use a regular file as the storage location of the backup.
Example 10-7 demonstrates creating a full backup of the /boot directory (which is the mount point of /dev/sda1 on this system) and placing the backup into the /tmp/boot_back file.
Example 10-7 The xfsdump Command
[root@onecoursesource ~]# xfsdump -f /tmp/boot_back /boot
xfsdump: using file dump (drive_simple) strategy
xfsdump: version 3.1.4 (dump format 3.0) - type ^C for status and control

 ============================= dump label dialog ==============================

please enter label for this dump session (timeout in 300 sec)
 -> /boot test
session label entered: "/boot test"

 --------------------------------- end dialog ---------------------------------

xfsdump: level 0 dump of onecoursesource.localdomain:/boot
xfsdump: dump date: Mon Oct 19 20:31:44 2017
xfsdump: session id: 5338bd39-2a6f-4c88-aeb8-04d469215767
xfsdump: session label: "/boot test"
xfsdump: ino map phase 1: constructing initial dump list
xfsdump: ino map phase 2: skipping (no pruning necessary)
xfsdump: ino map phase 3: skipping (only one dump stream)
xfsdump: ino map construction complete
xfsdump: estimated dump size: 191212416 bytes
xfsdump: /var/lib/xfsdump/inventory created

 ============================= media label dialog =============================

please enter label for media in drive 0 (timeout in 300 sec)
 ->
media label entered: ""

 --------------------------------- end dialog ---------------------------------

xfsdump: WARNING: no media label specified
xfsdump: creating dump session media file 0 (media 0, file 0)
xfsdump: dumping ino map
xfsdump: dumping directories
xfsdump: dumping non-directory files
xfsdump: ending media file
xfsdump: media file size 190911592 bytes
xfsdump: dump size (non-dir files) : 190666096 bytes
xfsdump: dump complete: 17 seconds elapsed
xfsdump: Dump Summary:
xfsdump:   stream 0 /tmp/boot_back OK (success)
xfsdump: Dump Status: SUCCESS
Notice that in the execution of the xfsdump command in Example 10-7 the user was prompted to enter a label and a media label. The label is a name for the backup, whereas the media label is a name for the device (like a backup tape). If the backup spans multiple tapes, multiple medial labels can be provided.
By default, a full backup is made. This is referred to as a level 0 (full) backup. A level 1 backup (incremental backup) would back up all files that had changed since the last level 0 backup. A level 2 backup (differential backup) would back up all files that had changed since the last lower-level backup (either 0 or 1, whichever one is more recent). Use the -l option to specify the level of the backup (0 is the default if you don’t specify the -l option).
The xfsrestore command can be used to restore files from a backup. In the following example, all the files from the backup would be restored in the current directory, designated by a dot (.) character in the following example:
xfsrestore -f /backup/location .
You can list the files in the backup by using the -t (for “table of contents”) option (the grep command is to avoid displaying header information), as shown in Example 10-8.
[root@onecoursesource ~]# xfsrestore -t -f /tmp/boot_back | grep -v "^xfsrestore" | head
.vmlinuz-3.10.0-229.11.1.el7.x86_64.hmac
.vmlinuz-3.10.0-229.el7.x86_64.hmac
System.map-3.10.0-229.el7.x86_64
config-3.10.0-229.el7.x86_64
symvers-3.10.0-229.el7.x86_64.gz
vmlinuz-3.10.0-229.el7.x86_64
initrd-plymouth.img
initramfs-3.10.0-229.el7.x86_64.img
initramfs-0-rescue-affb8edd5c9a4e829010852a180b0dc9.img
vmlinuz-0-rescue-affb8edd5c9a4e829010852a180b0dc9
Often you just want to restore a single file. One way of doing this is to use the interactive mode of the xfsrestore command. See a demonstration of this in Example 10-9 (note that for brevity, some output was omitted).
Example 10-9 The xfsrestore Command
 [root@onecoursesource ~]# xfsrestore -i -f /tmp/boot_back /tmp

 ========================== subtree selection dialog ==========================

the following commands are available:
    pwd
    ls [ <path> ]
    cd [ <path> ]
    add [ <path> ]
    delete [ <path> ]
    extract
    quit
    help
-> ls
###Omitted###
             135 config-3.10.0-229.el7.x86_64
             134 System.map-3.10.0-229.el7.x86_64
             133 .vmlinuz-3.10.0-229.el7.x86_64.hmac
          524416 grub2/
             131 grub/
-> add config-3.10.0-229.el7.x86_64

 -> extract

 --------------------------------- end dialog ---------------------------------

xfsrestore: restoring non-directory files
xfsrestore: restore complete: 2807 seconds elapsed
xfsrestore: Restore Summary:
xfsrestore:   stream 0 /tmp/boot_back OK (success)
xfsrestore: Restore Status: SUCCESS
[root@onecoursesource ~]# ls /tmp/config*
/tmp/config-3.10.0-229.el7.x86_64
Note
On some distributions, there are also commands designed to back up ext-based filesystems: the dump and restore commands. These commands work similarly to the xfsdump and xfsrestore commands.
xfs_info
The xfs_info command provides some basic filesystem information on xfs filesystems that are currently mounted, as seen in Example 10-10.
Example 10-10 The xfs_info Command
[root@onecoursesource ~]# xfs_info /dev/sda1
meta-data=/dev/sda1              isize=256    agcount=4, agsize=32000 blks
         =                       sectsz=512   attr=2, projid32bit=1
         =                       crc=0        finobt=0
data     =                       bsize=4096   blocks=128000, imaxpct=25
         =                       sunit=0      swidth=0 blks
naming   =version 2              bsize=4096   ascii-ci=0 ftype=0
log      =internal               bsize=4096   blocks=853, version=2
         =                       sectsz=512   sunit=0 blks, lazy-count=1
realtime =none                   extsz=4096   blocks=0, rtextents=0
xfs_check and xfs_repair
Similar to the fsck utility, the xfs_repair utility fixes unmounted xfs filesystems. See Example 10-11 for a demonstration.
Example 10-11 The xfs_repair Command
[root@onecoursesource ~]# xfs_repair /dev/sda1
Phase 1 - find and verify superblock...
Phase 2 - using internal log
        - zero log...
        - scan filesystem freespace and inode maps...
        - found root inode chunk
Phase 3 - for each AG...
        - scan and clear agi unlinked lists...
        - process known inodes and perform inode discovery...
        - agno = 0
        - agno = 1
        - agno = 2
        - agno = 3
        - process newly discovered inodes...
Phase 4 - check for duplicate blocks...
        - setting up duplicate extent list...
        - check for inodes claiming duplicate blocks...
        - agno = 0
        - agno = 1
        - agno = 2
        - agno = 3
Phase 5 - rebuild AG headers and trees...
        - reset superblock...
Phase 6 - check inode connectivity...
        - resetting contents of realtime bitmap and summary inodes
        - traversing filesystem ...
        - traversal finished ...
        - moving disconnected inodes to lost+found ...
Phase 7 - verify and correct link counts...
done
If you just want to check for filesystem problems, but not fix any problems, run the xfs_check command instead of the xfs_repair command.
You may find that your distribution does not include the xfs_check command, instead allowing the -n option (no repair) to the xfs_repair command, as it performs the same tasks that the xfs_check command performs. Regardless of which command you use, make sure the filesystem is unmounted before executing the command.
Additional Filesystem Tools
The du and df commands are designed to display information about filesystem. These tools are independent of the filesystem type.
du
The du command provides an estimated amount of disk space usage in a directory structure. For example, the following command displays the amount of space used in the /usr/lib directory:
[root@localhost ~]$ du -sh /usr/lib
791M    /usr/lib
Important options for the /usr/lib command include those shown in Table 10-4.
Table 10-4 Options for the /usr/lib Command

df
The df command displays usage of partitions and logical devices:
[root@localhost ~]$ df
Filesystem          1K-blocks      Used Available Use% Mounted on
udev                  2019204        12   2019192   1% /dev
tmpfs                  404832       412    404420   1% /run
/dev/sda1            41251136   6992272  32522952  18% /
none                        4         0         4   0% /sys/fs/cgroup
none                     5120         0      5120   0% /run/lock
none                  2024144         0   2024144   0% /run/shm
none                   102400         0    102400   0% /run/user
Important options for the df command are shown in Table 10-5.
Table 10-5 Options for the df Command

Mounting Filesystems
In this section, you are introduced to the commands used to mount and unmount filesystems manually. You also learn how to modify the system to automatically mount filesystems during the boot process by creating entries in the /etc/fstab file.
The umount Command
Before discussing how to mount a filesystem, a brief demonstration of the umount command is in order. To unmount a filesystem, you can specify the umount command followed by either the mount point or the device name. For example, if the /dev/sda1 device is mounted under the /boot directory, either of the following commands should unmount the filesystem:
umount /boot
umount /dev/sda1
More discussion regarding the umount command appears after the mount command is explored.
The mount Command
The mount command can be used to mount a filesystem as well as display which filesystems are currently mounted. When used with no arguments, the mount command displays mounted filesystems as well as some of the mount attributes (also called mount options), as shown in Example 10-12.
Example 10-12 The mount Command
[root@onecoursesource ~]# mount
/dev/mapper/vg_livecd-lv_root on / type ext4 (rw)
proc on /proc type proc (rw)
sysfs on /sys type sysfs (rw)
devpts on /dev/pts type devpts (rw,gid=5,mode=620)
tmpfs on /dev/shm type tmpfs (rw,rootcontext="system_u:object_r:tmpfs_t:s0")
/dev/sda1 on /boot type ext4 (rw,usrquota,grpquota)
none on /proc/sys/fs/binfmt_misc type binfmt_misc (rw)
sunrpc on /var/lib/nfs/rpc_pipefs type rpc_pipefs (rw)
/dev/sr0 on /media/VBOXADDITIONS_5.0.2_102096 type iso9660 ↲
    (ro,nosuid,nodev,uhelper=udisks,uid=500,gid=500,iocharset=utf8,mode=0400,dmode=0500
Each line describes one mounted device and is broken down into four fields, highlighted in bold:
device on mount_point type fs_type (mount_options)
Table 10-6 describes these fields in more detail.
Table 10-6 Fields of the mount Command Output

Note that the mount command knows what is currently mounted on the system because this information is stored in the /etc/mtab file, as shown in Example 10-13.
Example 10-13 The /etc/mtab File
[root@onecoursesource ~]# more /etc/mtab /dev/mapper/vg_livecd-lv_root / ext4 rw 0 0 proc /proc proc rw 0 0 sysfs /sys sysfs rw 0 0 devpts /dev/pts devpts rw,gid=5,mode=620 0 0 tmpfs /dev/shm tmpfs rw,rootcontext="system_u:object_r:tmpfs_t:s0" 0 0 none /proc/sys/fs/binfmt_misc binfmt_misc rw 0 0 sunrpc /var/lib/nfs/rpc_pipefs rpc_pipefs rw 0 0 /dev/sr0 /media/VBOXADDITIONS_5.0.2_102096 iso9660ro,nosuid,nodev,uhelper=udisks,uid=500,gi d=500,iocharset=utf8,mode=0400,dmode=0500 0 0 /dev/sda1 /boot ext4 rw,usrquota,grpquota 0 0
Whenever a filesystem is mounted or unmounted, the /etc/mtab file is updated. Another file that contains mounted filesystem information is the /proc/mounts file, shown in Example 10-14.
Example 10-14 The /proc/mounts File
[root@onecoursesource ~]# more /proc/mounts rootfs / rootfs rw 0 0 proc /proc proc rw,relatime 0 0 sysfs /sys sysfs rw,seclabel,relatime 0 0 devtmpfs /dev devtmpfs rw,seclabel,relatime,size=247568k,nr_inodes=61892,mode=755 0 0 devpts /dev/pts devpts rw,seclabel,relatime,gid=5,mode=620,ptmxmode=000 0 0 tmpfs /dev/shm tmpfs rw,seclabel,relatime 0 0 /dev/mapper/vg_livecd-lv_root / ext4 rw,seclabel,relatime,barrier=1,data=ordered 0 0 none /selinux selinuxfs rw,relatime 0 0 devtmpfs /dev devtmpfs rw,seclabel,relatime,size=247568k,nr_inodes=61892,mode=755 0 0 /proc/bus/usb /proc/bus/usb usbfs rw,relatime 0 0 none /proc/sys/fs/binfmt_misc binfmt_misc rw,relatime 0 0 sunrpc /var/lib/nfs/rpc_pipefs rpc_pipefs rw,relatime 0 0 /etc/auto.misc /misc autofs
Although both of these files contain information about currently mounted filesystems, there are some differences that you should be aware of:
• The /etc/mtab file is managed by the mount and umount commands. The mount command has an option (-n) that means “do not update the /etc/mtab file,” so it is possible that this file might not be accurate.
• The /proc/mounts file is managed by the kernel and is more likely to be accurate.
• The /proc/mounts file typically has more information (for example, look at the mount options for the /dev/sda1 device in Example 10-13 and compare that to Example 10-14).
Mounting Filesystems Manually
To mount a filesystem, you should specify two arguments to the mount command: the device to mount and the mount point. For example, the following commands first demonstrate that /dev/sda1 is mounted, then unmount the /dev/sda1 device, and then remount it under the /boot partition:
[root@onecoursesource ~]# mount | grep /dev/sda1
/dev/sda1 on /boot type ext4 (rw,usrquota,grpquota)
[root@onecoursesource ~]# umount /dev/sda1
[root@onecoursesource ~]# mount /dev/sda1 /boot
[root@onecoursesource ~]# mount | grep /dev/sda1
/dev/sda1 on /boot type ext4 (rw)
If you look closely, you see a difference between how the device is mounted originally and how it was mounted the second time. The usrquota and grpquota options are missing in the output of the second mount command. The reason for this is that the /dev/sda1 device was originally mounted with these options enabled as a result of an entry in the /etc/fstab file, a file covered later in this chapter.
To enable mount options manually, use the -o option:
[root@onecoursesource ~]# mount | grep /dev/sda1
/dev/sda1 on /boot type ext4 (rw)
[root@onecoursesource ~]# umount /dev/sda1
[root@onecoursesource ~]# mount -o usrquota,grpquota /dev/sda1 /boot
[root@onecoursesource ~]# mount | grep /dev/sda1
/dev/sda1 on /boot type ext4 (rw,usrquota,grpquota)
Security Highlight
Another useful mount option is the ro option, which allows you to mount a filesystem as read-only. If the filesystem is currently mounted as read-write, you can change it to read-only by executing the mount -o remount,ro /dev/device_name command. Mounting a filesystem as read-only can be useful for troubleshooting a problem or attempting to identify a hacker’s backdoor without allowing problematic code to be executed.
As previously mentioned, there are many mount options, and these options can either apply to multiple filesystem types or are specific to an individual filesystem type. Mount options are discussed in more detail later in this chapter.
Another command-line option of the mount command is the -t option, which allows you to specify the filesystem type. In most cases, the mount command is smart enough to choose the right filesystem type by probing the filesystem before mounting it. However, if you need to specify a filesystem type, use the following syntax:
mount -t ext4 /dev/sda1 /boot
Problems Unmounting Filesystems
A filesystem cannot be unmounted if it is currently in use. There are several reasons why a filesystem may be in use, including the following:
• A file is open from the filesystem.
• A process is running from the filesystem.
• A user shell is “in” the filesystem. In other words, either the mount point directory or a subdirectory under the mount point is the current directory for a user’s shell.
This can be frustrating for the sysadmin who needs to unmount a filesystem. You do not want to see the following error message:
[root@onecoursesource ~]# umount /boot
umount: /boot: device is busy.
        (In some cases useful info about processes that use
         the device is found by lsof(8) or fuser(1))
Note that the error message includes a suggestion of using either the lsof or fuser command. The lsof command is a great command for listing open files (excellent for troubleshooting many different problems), but the fuser command is more useful in this case.
Executing the fuser command with the mount point of the filesystem as an argument reveals which process is currently using the filesystem:
[root@onecoursesource ~]# fuser /boot
/boot:                4148c
The value 4148 in this example indicates the PID of the process and the c indicates how the process is being used. The following comes directly from the fuser man page documentation:
c      current directory.
e      executable being run.
f      open file. f is omitted in default display mode.
F      open file for writing. F is omitted in  default display mode.
r      root directory.
m      mmap'ed file or shared library.
So, c means that the process with the PID of 4148 is using the /boot directory (or a subdirectory of the /boot directory) as the current directory. If you use the -v option (for “verbose”), you can see more detail:
[root@onecoursesource ~]# fuser -v /boot
                     USER        PID ACCESS COMMAND
/boot:               bob        4148 ..c.. bash
So, now you can hunt down the user bob and ask him to get out of the /boot directory. Or, you can use another useful option to the fuser command to kill the process that is causing you headaches:
[root@onecoursesource ~]# fuser -k /boot
/boot:                4148c
[root@onecoursesource ~]# fuser -v /boot
[root@onecoursesource ~]# umount /boot
Security Highlight
When the fuser -k command is executed, it sends a signal to all processes on the filesystem that are preventing you from unmounting the filesystem. This signal is called a SIGKILL signal, and it poses a potential security issue because it forces all these processes to be stopped without providing any opportunity to gracefully shut down. This means that if a process were to perform cleanup operations (such as deleting temporary files or saving data into files or databases) normally when it exits, the process wouldn’t have the opportunity to perform these tasks.
It is better to attempt a graceful shutdown of all processes first. This can be accomplished by including the -15 option when using the -k option to the fuser command. If the processes don’t stop within a short period of time after running fuser -k -15, then execute fuser -k without the -15 option.
More details about process control are covered in Chapter 24, “Process Control.”
Mounting Filesystems Automatically
Several filesystems are mounted automatically at boot. Which filesystems are mounted depends on the settings in the /etc/fstab file. See Example 10-15 for a sample /etc/fstab file.
Example 10-15 The /etc/fstab File
[student@onecoursesource ~]$ more /etc/fstab # Accessible filesystems, by reference, are maintained under '/dev/disk' # See man pages fstab(5), findfs(8), mount(8) and/or blkid(8) for more info # /dev/mapper/vg_livecd-lv_root / ext4 defaults 1 UUID=974e2406-eeec-4a49-9df7-c86d046e97f9 /boot ext4 usrquota,grpquota,defaults
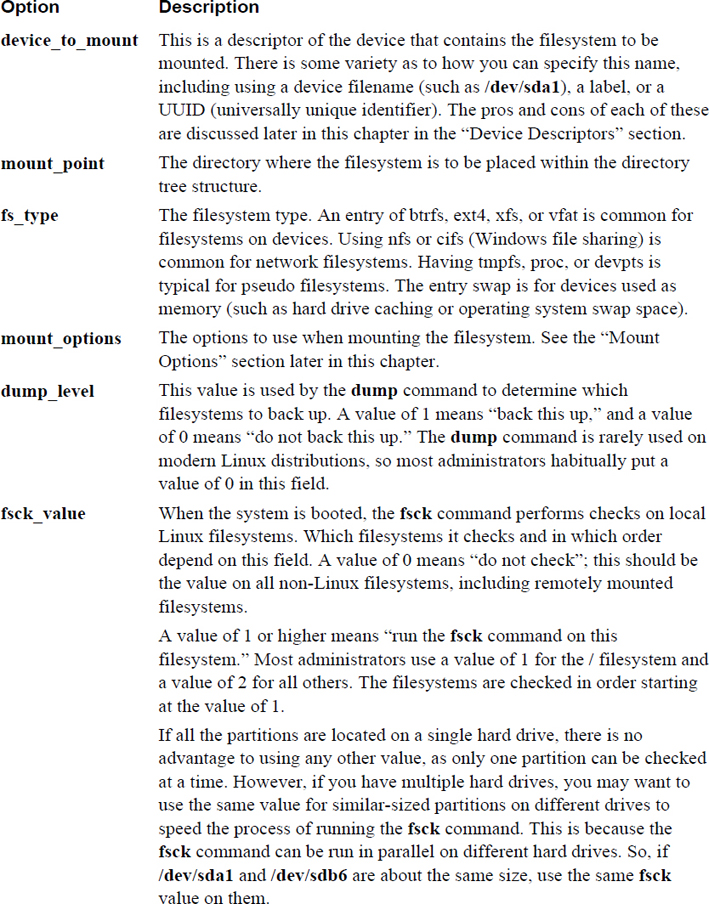
Each line of the /etc/fstab file contains six fields of data, separated by whitespace, that are used to describe the location of the filesystem, the filesystem type, where to mount the filesystem (mount point), and how to mount it (mount options). The six fields are
device_to_mount   mount_point   fs_type   mount_options
dump_level   fsck_value
Table 10-7 describes these fields in more detail.
Table 10-7 Fields of the /etc/fstab File
Device Descriptors
If you add a new filesystem, you should carefully consider what device descriptor you use to mount that filesystem. For example, suppose you added a new hard drive to your system, created a partition with a device name of /dev/sdb1, and placed an ext4 filesystem on the partition. You could then add a line like the following to the /etc/fstab file:
/dev/sdb1 /data ext4 defaults 0 1
Most likely this will work just fine from this point on, but there is a potential problem: Device names can change. If you add or remove hard disks to or from your system, the firmware program (BIOS, for example) might think that new hard disk is the “first” disk, resulting in the device names of existing disks being changed. Even deleting partitions on a device might cause the existing partitions to be renumbered.
So, instead of using device names for regular partitions, you could use labels. A label is a name that you place on a partition. If the device name changes, the label will still “stick” to that partition, making this a better method of mounting. To create a label, use the e2label command:
[root@onecoursesource ~]# e2label /dev/sdb1 data
Use the following syntax in the /etc/fstab file:
LABEL="data" /data ext4 defaults 0 1
Note that you can display labels using either the e2label command or the blkid command:
[root@onecoursesource ~]# e2label /dev/sda2
data
[root@onecoursesource ~]# blkid | grep sda2
/dev/sda2: UUID="974e2406-eeec-4a49-9df7-c86d046e97f9" TYPE="ext4" LABEL="data"
Although using labels to mount devices is better than using device names, it still is not ideal. If you take this disk from the current system and add it to another system, it is possible that there could be a label conflict. If the new system also has a partition with the label of “data,” this causes problems.
The most stable solution is to use UUID numbers. The universally unique identifier is a number assigned to the device when it is created. Because of how large this number is (128 bits) and how it is generated, it is virtually impossible that two devices will have the same number. The blkid command displays a device’s UUID:
[root@onecoursesource ~]# blkid | grep sda2
/dev/sda2: UUID="974e2406-eeec-4a49-9df7-c86d046e97f9" TYPE="ext4" LABEL="data"
To use the UUID in the /etc/fstab file, use the following syntax:
UUID=974e2406-eeec-4a49-9df7-c86d046e97f9 /data ext4 defaults 0 1
Finally, it is important to note that not all devices require the use of UUIDs or labels. Consider the following line from the /etc/fstab file:
/dev/mapper/vg_livecd-lv_swap swap swap defaults 0 0
The /dev/mapper/vg_livecd-lv_swap device is a logical volume (logical volumes are discussed in detail later in Chapter 11, “Manage Local Storage: Advanced Features”). Logical volume device names do not change unless you, the administrator, change the names. Other devices, such as network drives and software RAID devices, also do not require UUIDs or labels.
Mount Options
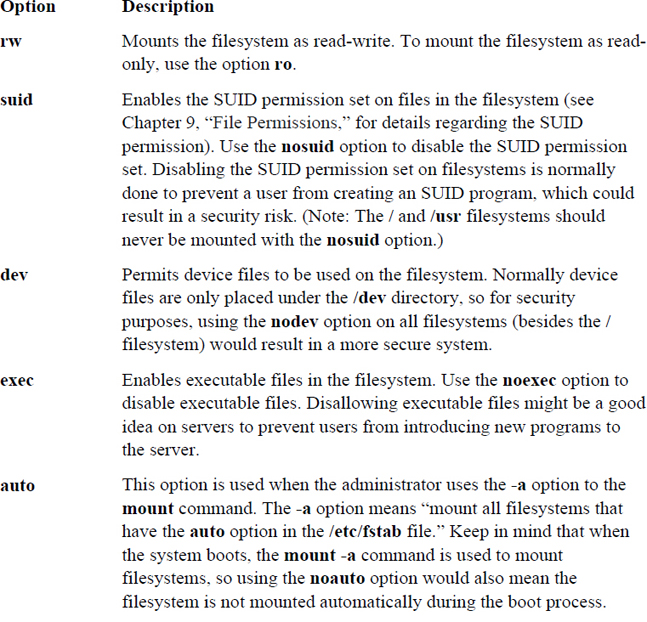
How a filesystem behaves is partly based on the mount options you provide. Dozens of different mount options are available. The most important options to know are those related to the keyword defaults. When you specify defaults as a mount option in the /etc/fstab file, you are really specifying the options rw, suid, dev, exec, auto, nouser, async, and relatime. Table 10-8 describes these options in more detail.
As previously mentioned, these are not the only options; there are in fact many more. To discover these additional options, explore the man page for the mount command. First look at the section titled “Filesystem Independent Mount Options,” as this covers options that work for most filesystems. Then search for the filesystem you are using. Example 10-16 shows a portion of the mount man page related to ext4 filesystems.
Example 10-16 Mount Options for ext4 Filesystems
Mount options for ext4
       The ext4 filesystem is an advanced  level  of  the  ext3  filesystem
       which  incorporates  scalability  and reliability enhancements for sup-
       porting large filesystem.

       The  options  journal_dev,  noload,  data,  commit,  orlov,   oldalloc,
       [no]user_xattr [no]acl, bsddf, minixdf, debug, errors, data_err, grpid,
       bsdgroups, nogrpid sysvgroups,  resgid,  resuid,  sb,  quota,  noquota,
       grpquota,  usrquota  and  [no]bh are backwardly compatible with ext3 or
       ext2.

       journal_checksum
              Enable checksumming of  the  journal  transactions.  This  will
              allow  the recovery code in e2fsck and the kernel to detect cor-
              ruption in the kernel. It is a compatible change  and  will  be
              ignored by older kernels.

       journal_async_commit
              Commit block can be written to disk without waiting for descrip-
              tor blocks. If enabled older kernels cannot  mount  the  device.
Mounting Removable Media
When removable media, such as a CD-ROM or DVD, is automatically mounted, it is typically made available under the /media directory. There is no need to configure this process on a modern Linux distribution that is using a GUI, such as Gnome or KDE, as these software programs recognize new removable media and automatically mount.
However, on a system that does not have a running GUI, this automatic mount process does not take place. You can configure the system so a regular user can mount a removable device by using the following /etc/fstab entry:
/dev/cdrom /media udf,iso9660 noauto,owner 0 0
Swap Space
Swap space is used by the operating system when available RAM runs low. Data in RAM not currently being used is “swapped” to the dedicated space on the hard drive reserved for this use to make room for other processes to use RAM.
Typically you create a swap partition as part of the installation process. At some point after installation, you may decide to add additional swap space. This can be in the form of another swap partition or a swap file.
To see your currently active swap devices, execute the swapon command with the -s option:
[root@onecoursesource ~]# swapon -s
Filename            Type          Size       Used      Priority
/dev/dm-1           partition     1048568
From the output of the swapon -s command, you can see the device name (/dev/dm-1) that holds the swap filesystem, the size (in bytes) of the swap filesystem, and how much of this space has been used. The priority indicates which swap filesystem should be used first.
Creating Swap Devices
A swap device can be either a storage device (a partition, logical volume, RAID, and so on) or a file. Typically storage devices are a bit quicker than swap files because the kernel doesn’t have to go through a filesystem to access swap space on a storage device. However, you are not always able to add a new device to the system, so you may find swap files are more often used for secondary swap devices.
Assuming that you have already created a new partition with a tag type of 82 (/dev/sdb1 in this example), you can format it as a swap device by executing the following command:
[root@onecoursesource ~]# mkswap /dev/sdb1
Setting up swapspace version 1, size = 203772 KiB
no label, UUID=039c21dc-c223-43c8-8176-da2f4d508402
You can add this to existing swap space with the swapon command:
[root@onecoursesource ~]# swapon -s
Filename                    Type          Size          Used          Priority
/dev/dm-1                 partition     1048568     37636          -1
root@onecoursesource ~]# swapon /dev/sdb1
[root@onecoursesource ~]# swapon -s
Filename                  Type          Size          Used          Priority
/dev/dm-1                 partition     1048568      37636          -1
/dev/sdb1                 partition      203768          0          -2
Remember that the swapon command is only a temporary solution. Add an entry like the following to /etc/fstab to make this a permanent swap device:
UUID=039c21dc-c223-43c8-8176-da2f4d508402 swap defaults 0 0
To create a swap file, you first need to create a large file. This is most easily accomplished by using the dd command. Example 10-17 shows how to create a 200MB file named /var/extra_swap and then enable it as swap space.
Example 10-17 Creating a File and Enabling Swap Space
[root@onecoursesource ~]# dd if=/dev/zero of=/var/extra_swap bs=1M count=200
200+0 records in
200+0 records out
209715200 bytes (210 MB) copied, 4.04572 s, 51.8 MB/s
[root@onecoursesource ~]# mkswap /var/extra_swap
mkswap: /var/extra_swap: warning: don't erase bootbits sectors
        on whole disk. Use -f to force.
Setting up swapspace version 1, size = 204796 KiB
no label, UUID=44469984-0a99-45af-94b7-f7e97218d67a
[root@onecoursesource ~]# swapon /var/extra_swap
[root@onecoursesource ~]# swapon -s
Filename             Type          Size         Used       Priority
/dev/dm-1            partition     1048568      37664      -1
/dev/sdb1            partition     203768       0          -2
/var/extra_swap      file          204792       0          -3
If you decide that you want to manually remove a device from current swap space, use the swapoff command:
[root@onecoursesource ~]# swapon -s
Filename         Type          Size        Used          Priority
/dev/dm-1        partition     1048568     27640         -1
/var/extra_swap  file          204792      0             -2
[root@onecoursesource ~]# swapoff /var/extra_swap
[root@onecoursesource ~]# swapon -s
Filename        Type          Size        Used          Priority
/dev/dm-1       partition     1048568     27640         -1
Summary
In this chapter, you learned how to create partitions and filesystems and to perform essential filesystem manipulation tasks. This was done through mounting partitions both manually and automatically and using different options available during the mounting and unmounting operations.
Key Terms
Review Questions
1. Which of the following is a filesystem used on CD-ROM discs? (Choose two.)
a. ext2
b. HFS
c. ISO9660
d. UDF
2. The _____ command is used to unmount a filesystem.
3. Which commands can be used to determine what is preventing you from unmounting a filesystem? (Choose two.)
a. mount
b. umount
c. fuser
d. lsof
4. Which option to the fuser command displays the owner of the process that is keeping the filesystem busy?
a. -k
b. -o
c. -v
d. All of the above
5. Which of the following commands displays the UUID of a device?
a. e2label
b. mount
c. sync
d. blkid
6. The _____ command removes a swap device from current use.
7. Which filesystem supports files up to 2TB in size?
a. ext2
b. ext3
c. ext4
d. None of the above
8. Which of the following commands can be used to create a partition?
a. mkfs
b. fsck
c. dumpe2fs
d. fdisk
9. Fill in the blank to make an ext4 filesystem: _____
10. The _____ option to the tune2fs command allows you to change the percentage of the filesystem reserved for the superuser.