Table of Contents for
Linux Essentials for Cybersecurity, First Edition
 Linux Essentials for Cybersecurity, First Edition
Published by
Pearson IT Certification, 2018
Linux Essentials for Cybersecurity, First Edition
Published by
Pearson IT Certification, 2018
- Cover Page
- Title Page
- Copyright Page
- Contents at a Glance
- Table of Contents
- About the Author
- Dedication
- Acknowledgments
- About the Technical Reviewers
- We Want to Hear from You!
- Reader Services
- Introduction
- Part I: Introducing Linux
- Chapter 1: Distributions and Key Components
- Chapter 2: Working on the Command Line
- Chapter 3: Getting Help
- Chapter 4: Editing Files
- Chapter 5: When Things Go Wrong
- Part II: User and Group Accounts
- Chapter 6: Managing Group Accounts
- Chapter 7: Managing User Accounts
- Chapter 8: Develop an Account Security Policy
- Part III: File and Data Storage
- Chapter 9: File Permissions
- Chapter 10: Manage Local Storage: Essentials
- Chapter 11: Manage Local Storage: Advanced Features
- Chapter 12: Manage Network Storage
- Chapter 13: Develop a Storage Security Policy
- Part IV: Automation
- Chapter 14: Crontab and At
- Chapter 15: Scripting
- Chapter 16: Common Automation Tasks
- Chapter 17: Develop an Automation Security Policy
- Part V: Networking
- Chapter 18: Networking Basics
- Chapter 19: Network Configuration
- Chapter 20: Network Service Configuration: Essential Services
- Chapter 21: Network Service Configuration: Web Services
- Chapter 22: Connecting to Remote Systems
- Chapter 23: Develop a Network Security Policy
- Part VI: Process and Log Administration
- Chapter 24: Process Control
- Chapter 25: System Logging
- Part VII: Software Management
- Chapter 26: Red Hat–Based Software Management
- Chapter 27: Debian-Based Software Management
- Chapter 28: System Booting
- Chapter 29: Develop a Software Management Security Policy
- Part VIII: Security Tasks
- Chapter 30: Footprinting
- Chapter 31: Firewalls
- Chapter 32: Intrusion Detection
- Chapter 33: Additional Security Tasks
- Appendix A: Answers to Review Questions
- Appendix B: Resource Guide
- Glossary
Chapter 12 Manage Network Storage
There are many ways to provide users with the ability to transfer files from one system to another. For example, on Linux you can make use of a SAMBA server. The advantage of using a SAMBA server is that the protocol used to perform the transfer is not just a “Linux thing.” This makes it easier to transfer files between different operating systems, such as between Linux and Microsoft Windows.
In this chapter, you learn about the SAMBA server, including key configuration settings. After completing this chapter, you should be able to share a directory or a printer using the SAMBA server. You should also understand how to secure these shares with SAMBA user accounts.
Once a SAMBA share has been made, you should know how to access it. You will learn a variety of methods, including how to mount a SAMBA share to make it appear to be part of the local filesystem.
Another method for sharing files that is more common within Linux and Unix is Network File System (NFS). This method allows an administrator to share a directory structure with other systems that have the NFS client software installed.
You learn how to set up an NFS server and connect to it from an NFS client. You also learn how to secure portmap, the service that grants access to NFS servers.
Lastly, you learn how to use iSCSI to provide network storage devices to client systems.
After reading this chapter and completing the exercises, you will be able to do the following:
Create and access Samba shares.
Create and access NFS shares.
Share storage locations via iSCSI.
Use an iSCSI resource on a client system.
Samba
One of the ways to share files between different systems is by using a protocol called SMB (Server Message Block). This protocol was invented in the mid-1980s by IBM for the purpose of being able to share directories between hosts on a local area network (LAN). The term used to describe sharing files and directories across a network is DFS (Distributed File System). In addition to SMB, NFS (Network File System) is a popular DFS for Linux (NFS is covered later in this chapter).
You may often hear the acronym CIFS (Common Internet File System) used in conjunction with SMB. CIFS is an SMB-based protocol made popular on Microsoft Windows systems. Typically, the two abbreviations are used interchangeably (or collectively, as in SMB/CIFS), but there are subtle differences between the protocols. In this book, the term SMB will be used from this point on.
You can also share printers using SMB as well as share files between different operating system types. In fact, one common SMB task is to share printers between Linux and Microsoft Windows systems.
The Linux-based software that allows SMB sharing is called SAMBA. Typically, there are three separate SAMBA packages you should consider installing:
• SAMBA: This package contains the SAMBA server software.
• SAMBA-client: This package contains the SAMBA client programs, which allow you to connect to SAMBA servers or Microsoft Windows DFS.
• SAMBA-common: This package contains software used by both the SAMBA server and client utilities.
For the purposes of testing SAMBA, we suggest installing all three of these packages. Another useful package is SAMBA-swat, which provides a web-based interface SAMBA administration tool.
SAMBA Configuration
The configuration file for SAMBA is /etc/SAMBA/smb.conf (on some older systems, it may be /etc/smb/smb.conf). It is a bit different from most other configuration files that you find in Linux. Here are some key points to note:
• The file is well documented. You will not need to consult the standard SAMBA documentation because the configuration file has detailed descriptions.
• The file is broken into sections defined using the following format:
• [name]: This is often referred to as “the section” and denotes the shared item or service.
• [options and attributes]: Each line is a separate configuration option for the shared item or service named above it.
• Two comment characters are used for this configuration file: the # and ; characters. The # character is used for regular comments, whereas the ; character is used for converting to comment lines any actual configuration settings that you do not want to use but that you should maintain in case you ever need these settings at a later time. This way, the proper naming convention and appropriate attributes are preserved within the configuration file.
To give you an idea of what a typical smb.conf file looks like, look at the output of Example 12-1, which demonstrates a typical default smb.conf file with all comment and blank lines removed.
Example 12-1 Default smb.conf File
[root@onecoursesource ~]# grep -v "#" /etc/SAMBA/smb.conf | grep -v ";" | grep -v "^$"
[global]
        workgroup = MYGROUP
        server string = SAMBA Server Version %v
        security = user
        passdb backend = tdbsam
        load printers = yes
        cups options = raw
[homes]
        comment = Home Directories
        browseable = no
        writable = yes
[printers]
        comment = All Printers
        path = /var/spool/SAMBA
        browseable = no
        guest ok = no
        writable = no
        printable = yes
What exactly did the command line in Example 12-1 do? Recall that the grep command is a filtering tool and that the -v option is an “inverted” grep. When the -v option is used, the grep command displays all lines except the ones matching the pattern. So, the first grep pattern matched any line with a # comment character and filtered out those lines. The second grep pattern matched any line with a ; comment character and filtered out those lines. The last grep pattern matched blank lines and filtered out those lines. So, the output is composed of all the real configuration settings in the file (no comments and no blank lines). Repeat after us: “grep is my friend!” Learning to master commands like grep to allow the system to filter information you desire will make it much easier to administer your Linux system.
Note that there are three sections: [global], [homes], and [printers]. Additional sections are added as directories and individual printers are shared.
The [global] Section
The Samba server’s primary settings are placed in the [global] section. Recall the default values shown in Example 12-1:
[global]
        workgroup = MYGROUP
        server string = SAMBA Server Version %v
        security = user
        passdb backend = tdbsam
        load printers = yes
        cups options = raw
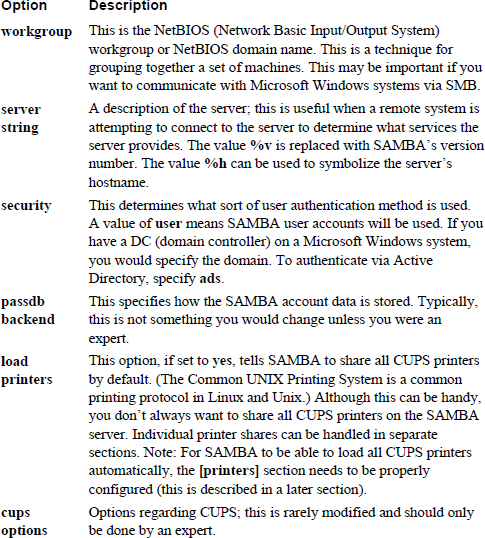
You will find that the default options are enough to start the SAMBA server, but you will likely want to change at least a few of these options to fit your system needs. Table 12-1 describes these default options.
Table 12-1 Typical [global] Options
The [homes] Section
In a later section of this chapter, you learn how to create SAMBA user accounts. These SAMBA users are associated with Linux user accounts (typically sharing the same name, but this is not a requirement), and of course these Linux user accounts have home directories.
To make it easier for these users to share their home directories via the SAMBA server, the [homes] section is designed to automatically share these directories. Keep in mind that normal Linux permissions apply, so these shares normally only make the home directory available for the user who owns the home directory.
The default [homes] share typically looks like this:
[homes]
        comment = Home Directories
        browseable = no
        writable = yes
The values in this section are defined in the following list:
• comment: The description of the share.
• browseable: If this is set to yes, the share would be visible via a client utility that’s displaying information about available shares on the SAMBA server. If it’s set to no, the share is available, but the user who is using the client utility must know about the share.
Security Highlight
Using the feature browseable = no provides some additional security, but keep in mind that it just obfuscates the share. It doesn’t make it completely protected, and a determined hacker may be able to guess the share name and access the share as a result.
• writable: If this is set to yes, the home directories are shares with read-write access. Remember that regular permissions still apply. If it’s set to no, the home directories are shares with read-only access. Keep in mind that underlying filesystem permissions still apply. As a result, access could be granted via this SAMBA setting, but denied by the filesystem.
What Could Go Wrong?
If you connect to a system via SAMBA and can’t access a file or directory, try to log directly in to the system via local login or Secure Shell (see Chapter 22, “Connecting to Remote Systems,” to learn about Secure Shell) and then try to access the file directly. If you can’t, then what went wrong was the local file permissions. If you can, then what went wrong was how the SAMBA share was created.
The [printers] Section
Recall the load printers setting in the [global] section. When that setting is yes, SAMBA looks for the [printers] section to automatically share all the CUPS printers. A typical [printers] section would look like this:
[printers]
        comment = All Printers
        path = /var/spool/SAMBA
        browseable = no
        guest ok = no
        writable = no
        printable = yes
In most cases, you are unlikely to make changes to this section. However, you should realize what the default settings in this section mean:
• comment: The description of the share.
• path: The location of the CUPS spool directory (this is where the items sent to the printer are stored prior to printing).
• browseable: If this is set to yes, the share would be visible via a client utility that’s displaying information about available shares on the SAMBA server. If it’s set to no, the share is available, but the user who is using the client utility must know about the share.
• guest ok: This permits access to the CUPS printers to the guest account. More details regarding that account are given later in this chapter.
• writable: Should be set to no because this is not a directory share.
• printable: Should be set to yes because this is a printer share.
Custom Shares
You can create custom shares of directories or printers. For directory shares, the syntax is much like the [homes] section. You start by creating a section name and then set the parameters. In the following example, the /usr/share/doc directory is shared as read-only. This is useful when you want to save space and have just one system that contains documentation:
[doc]
    comment = System documentation
    path = /usr/share/doc
    guest ok = yes
    browseable = yes
    writeable = no
For this share, the resource is shared as read-only because there is no need to make changes to the resource. Users who have a SAMBA account are the only users who are able to view the documentation.
If you want to add more security to the share, you can limit which SAMBA users can access it (and how) by using the following options:
• valid users: A list of SAMBA users who can access this share. Example: valid users = bob, ted. Think of this like “whitelisting” users by explicitly noting the usernames.
• invalid users: A list of SAMBA users who cannot access this share. All other SAMBA users are allowed access. Think of this like “blacklisting” users by explicitly noting the usernames.
• read list: A list of SAMBA users who can access the share, but as read-only.
• write list: A list of SAMBA users who have read-write access to the share.
To share a specific printer, first make sure that the loadprinters setting in the [global] section is set to no. Then create a section like the following:
[hp-101]
       path = /var/spool/SAMBA/
       browseable = yes
       printable = yes
       printer name = hp-101
SAMBA Server
After you have made changes to the /etc/SAMBA/smb.conf file and before starting the SAMBA server, you should execute the testparm command. This command verifies the syntax of the configuration file, as shown in Example 12-2.
Example 12-2 The testparm Command
[root@onecoursesource ~]# testparm
Load smb config files from /etc/SAMBA/smb.conf
Processing section "[homes]"
Processing section "[printers]"
Processing section "[doc]"
Loaded services file OK.
Server role: ROLE_STANDALONE
Press enter to see a dump of your service definitions

[global]
        workgroup = MYGROUP
        server string = SAMBA Server Version %v
        passdb backend = tdbsam
        cups options = raw

[homes]
        comment = Home Directories
        read only = No
        browseable = No

[printers]
        comment = All Printers
        path = /var/spool/SAMBA
        printable = Yes
        browseable = No

[doc]
        comment = System documentation
        path = /usr/share/doc
        guest ok = Yes
What Could Go Wrong?
If there are any errors that the testparm command can discover, you will see messages in the output like the following (in this case, the error occurred because the value of lp_bool had to be a Boolean; in other words, a value of 0 or 1):
[root@onecoursesource ~]# testparm
Load smb config files from /etc/SAMBA/smb.conf
Processing section "[homes]"
Processing section "[printers]"
Processing section "[doc]"
ERROR: Badly formed boolean in configuration file: "nope".
lp_bool(nope): value is not boolean!
Once you have a valid configuration file, start the SAMBA server (the service is called “smb,” not “SAMBA”). You see two services start: smbd and nmbd. The smbd service handles the shares, and the nmbd process handles NetBIOS operations:
[root@onecoursesource ~]# ps -fe | egrep "smbd|nmbd"
root     20787     1  0 12:18 ?        00:00:00 smbd -D
root     20790     1  0 12:18 ?        00:00:00 nmbd -D
root     20792 20787  0 12:18 ?        00:00:00 smbd -D
Security Highlight
Often, seeing multiple processes of the same name may indicate a problem. For example, a hacker may have placed a rogue program on the system that has spawned multiple processes.
In this case, don’t be concerned about multiple smbd processes. Each client request results in the spawning of a new smbd process to handle that client’s request.
Both nmbd and smbd have separate log files under the /var/log/SAMBA directory:
[root@onecoursesource ~]# ls /var/log/SAMBA
nmbd.log  smbd.log
Note
If you are used to administering Active Directory on Microsoft Windows systems, you may be familiar with a command-line utility called net. The SAMBA software also provides this utility to manage SAMBA and CIFS-based servers.
For example, the following command lists all the users in the test domain:
net rpc user -S 10.0.2.20 -U test/user%pw -n myname -W test
SAMBA Accounts
Before users can access the SAMBA server, you need to create a SAMBA user account. This account also needs to be associated with a system account. For this example, the system already has a “student” user account:
[root@onecoursesource ~]# grep student /etc/passwd
student:x:500:500::/home/student:/bin/bash
To create a new SAMBA account for a Linux user account, use the smbpasswd command (note that after the “password” prompts, a password is entered, but not displayed on the screen):
[root@onecoursesource ~]# smbpasswd -a student
New SMB password:
Retype new SMB password:
Added user student.
The -a option is used to add a new account. If you wanted to change the password of an existing SAMBA account, omit the -a option.
Mapping Local Accounts
Using the same name for the system account and the SAMBA account is normal and causes less confusion for the user. However, if you want to have a different name for each, you can use a username map. Start by including a setting in the [global] section:
username map = /etc/SAMBA/usermap.txt
In the /etc/SAMBA/usermap.txt file, create entries like the following:
bobsmith = student
nickjones = teacher
The first value is the Linux account name, and the second value is the SAMBA account name. Do not forget that you need to create the SAMBA accounts for this to work, and because you made a change in the [global] section, you need to restart SAMBA.
Keep in mind that if you are using a Microsoft Windows Active Directory or domain server to authenticate SAMBA users, the left side of the = character should be the Microsoft Windows account name.
Recall the guest ok setting previously discussed:
[doc]
    comment = System documentation
    path = /usr/share/doc
    guest ok = yes
    browseable = yes
    writeable = no
One way to identify which SAMBA user that this guest account is linked to is to use the following entry in a shared section, such as the [doc] section:
guest account = test
Then create the “test” SAMBA account using the smbpasswd command.
Accessing SAMBA Servers
To discover SAMBA servers in your workgroup, execute the nmblookup command:
[root@onecoursesource ~]# nmblookup MYGROUP
querying MYGROUP on 10.0.2.255
10.0.2.15 MYGROUP<00>
After you have discovered a SAMBA server, you can see what shares are available on the SAMBA server by executing the smbclient command, as shown in Example 12-3.
Example 12-3 Displaying SAMBA Server Shares
[root@onecoursesource ~]# smbclient -U student -L 10.0.2.15
Password:
Domain=[ONECOURSESOURCE] OS=[Unix] Server=[SAMBA 3.0.33-3.40.el5_10]

        Sharename       Type      Comment
        ---------       ----      -------
        doc             Disk      System documentation
        IPC$            IPC       IPC Service (SAMBA Server Version 3.0.33-3.40.el5_10)
        student         Disk      Home Directories
Domain=[ONECOURSESOURCE] OS=[Unix] Server=[SAMBA 3.0.33-3.40.el5_10]

        Server               Comment
        ---------            -------

        Workgroup            Master
        ---------            -------
        MYGROUP              ONECOURSESOURCE
In Example 12-3, the -U option allows you to specify the SAMBA account you will use to access the server. Note that you are prompted for a password for this SAMBA account. The -L option is used to state that you want to list the files and services available on the server. The server is identified by providing the IP address (10.0.2.15 in this example).
To access a specific share, execute the following smbclient command:
[root@onecoursesource ~]# smbclient -U student //10.0.2.15/doc
Password:
Domain=[ONECOURSESOURCE] OS=[Unix] Server=[SAMBA 3.0.33-3.40.el5_10]
smb: \>
Once you have connected, you can execute commands similar to FTP commands. See Example 12-4 for a brief demonstration.
Example 12-4 Using the smbclient Command
smb: \> help
?              altname        archive        blocksize   cancel
case_sensitive cd             chmod          chown       close
del            dir            du             exit        get
getfacl        hardlink       help           history     lcd
link           lock           lowercase      ls          mask
md             mget           mkdir          more        mput
newer          open           posix          posix_open  posix_mkdir
posix_rmdir    posix_unlink   print          prompt      put
pwd            q              queue          quit        rd
recurse        reget          rename         reput       rm
rmdir          showacls       setmode        stat        symlink
tar            tarmode        translate      unlock      volume
vuid           wdel           logon          listconnect showconnect
!
smb: \> cd zip-2.31
smb: \zip-2.31\> ls
  .                D        0  Fri Oct  9 18:22:37 2018
  ..               D        0  Sat Jan  2 21:29:14 2018
  CHANGES               60168  Tue Mar  8 20:58:06 2018
  TODO                   3149  Sun Feb 20 21:52:44 2018
  WHERE                 19032  Tue Apr 18 18:00:08 2018
  README                 8059  Sat Feb 26 19:22:50 2018
  LICENSE                2692  Sun Apr  9 15:29:41 2018
  WHATSNEW               2000  Tue Mar  8 20:58:28 2018
  algorith.txt           3395  Sat Dec 14 05:25:34 2018
  BUGS                    356  Sat Dec 14 05:25:30 2018
  MANUAL                40079  Sun Feb 27 23:29:58 2018

                46868 blocks of size 131072. 13751 blocks available
smb: \zip-2.31\> get README
getting file \zip-2.31\README of size 8059 as README (231.5 kb/s) (average 231.5 kb/s)
smb: \zip-2.31\> quit
Most of the commands demonstrated in Example 12-4 are similar to Linux commands that you already know. One that is different—the get command—downloads a file from the remote system to the local system.
You can see the status of the SAMBA server, including which machines are connected to it and what resource is being accessed, by executing the smbstatus command. As you can see from the following output, the SAMBA server was connected to by someone on the local system (hence the same IP address of 10.0.2.15):
[root@onecoursesource zip-2.31]# smbstatus
SAMBA version 3.0.33-3.40.el5_10
PID     Username      Group         Machine
-------------------------------------------------------------------
21662   student       student       onecoursesource    (10.0.2.15)
Service      pid     machine       Connected at
-------------------------------------------------------
doc          21662   onecoursesource     Sun Jan  3 17:45:24 2016
No locked files
Mounting SAMBA Shares
Instead of requiring users to connect manually to the SAMBA or Microsoft Windows share, you can have these shares appear within the local filesystem by mounting each one. For example:
[root@onecoursesource ~]# mkdir /doc
[root@onecoursesource ~]# mount -t cifs -o user=student //10.0.2.15/doc /doc
Password:
The mount process should be straightforward because it is similar to mounts you have performed in the past (for more information on mounting, review Chapter 10, “Manage Local Storage: Essentials”). The -t option is used to specify the filesystem type. The -o option is used to provide options—in this case, the name of the SAMBA user account. The //10.0.2.15/doc argument is the device to mount, and the /doc argument is the mount point.
What Could Go Wrong?
Notice that the path to the share is preceded with two slash (/) characters, not one like a directory path. Using just one / character will cause this command to fail.
In most cases, you want to mount the SAMBA share automatically during the boot process. The following line added to the /etc/fstab file can accomplish this task:
//10.0.2.15/doc /doc cifs user=student,password=sosecret 0 0
Of course, it is a horrible idea to include the SAMBA password directly in the /etc/fstab file, which is what the setting password=sosecret does. All users on the local system can see the contents of the /etc/fstab file, so instead you should use a credentials file:
//10.0.2.15/doc /doc cifs credentials=/etc/SAMBA/student 0 0
In the /etc/SAMBA/student file, you place entries like the following:
user=student
password=sosecret
Security Highlight
Make sure the permissions for the file that holds the SAMBA username and password are correctly secured. The permissions should only allow the root user to view the contents of this file, so consider securing it with a command like the following: chmod 600 /etc/SAMBA/student.
Network File System
Network File System (NFS) is a Distributed File System (DFS) protocol that has been in use for more than 40 years. NFS was originally created by Sun Microsystems in 1984 to provide an easy way for administrators to share files and directories from one UNIX system to another.
Since its inception, NFS has been ported to several different operating systems, including Linux and Microsoft Windows. Although it may not be as popular as SAMBA, there are many organization that still use NFS to share files.
Configuring an NFS Server
On most Linux distributions, the NFS software is installed by default; you can simply start NFS via the nfs, nfsserver, or nfs-kernel-service startup script (the script name depends on the distribution; you will learn more about scripting in Chapter 15, “Scripting”). In some cases, you may need to install the nfs-utils or nfs-kernel-server package, but typically the NFS software is installed by default. See Chapter 26, “Red Hat-Based Software Management,” and Chapter 27, “Debian-Based Software Management,” if you are unsure how to install this software.
There is a little trick to NFS, though. It requires another service called RPC (Remote Procedure Call). RPC acts as a go-between for interactions between the NFS client and NFS server. The RPC service is provided by a utility called portmap; if the portmap server is not running when you try to start the NFS server, you get an error message similar to the following:
Cannot register service: RPC: Unable to receive; errno = Connection refused
rpc.rquotad: unable to register (RQUOTAPROG, RQUOTAVERS, udp).
The /etc/exports File
The primary configuration for the NFS server is the /etc/exports file. This is the file that you use to specify what directories you want to share with the NFS clients. The syntax of this file is
Directory hostname(options)
The value of Directory should be replaced with the name of the directory you want to share (for example, /usr/share/doc). The value hostname should be a client hostname that can be resolved into an IP address. The options value is used to specify how the resource should be shared.
For example, the following entry in the /etc/exports file would share the /usr/share/doc directory with the NFS client jupiter (with the options of read-write) and the NFS client mars (with the option of read-only):
/usr/share/doc jupiter(rw) mars(ro)
Note that there is a space between the jupiter and mars name/options, but no space between the hostname and its corresponding option. A common mistake of novice administrators is to provide an entry like the following:
/usr/share/doc jupiter (rw)
The previous line would share the /usr/share/doc directory with the jupiter host with the default options, and all other hosts would have access to this share as read-write.
When you’re specifying a hostname in the /etc/exports file, the following methods are permitted:
• hostname: A hostname that can be resolved into an IP address.
• netgroup: An NIS netgroup using the designation of @groupname.
• domain: A domain name using wildcards. For example, *.onecoursesource.com would include any machine in the onecoursesource.com domain.
• Network: A network defined by IP addresses using either VLSM (Variable Length Subnet Mask) or CIDR (Classless Inter-Domain Routing). Examples: 192.168.1.0/255.255.255.0 and 192.168.1.0/24.
There are many different NFS sharing options, including these:
• rw: Share as read-write. Keep in mind that normal Linux permissions still apply. (Note that this is a default option.)
• ro: Share as read-only.
• sync: File data changes are made to disk immediately, which has an impact on performance, but is less likely to result in data loss. On some distributions this is the default.
• async: The opposite of sync; file data changes are made initially to memory. This speeds up performance but is more likely to result in data loss. On some distributions this is the default.
• root_squash: Map the root user and group account from the NFS client to the anonymous accounts, typically either the nobody account or the nfsnobody account. See the next section, “User ID Mapping,” for more details. (Note that this is a default option.)
• no_root_squash: Map the root user and group account from the NFS client to the local root and group accounts. See the next section, “User ID Mapping,” for more details.
User ID Mapping
To make the process of sharing resources from the NFS server to the NFS client as transparent as possible, make sure that the same UIDs (user IDs) and GIDs (group IDs) are used on both systems. To understand this concept, first look at Figure 12-1.
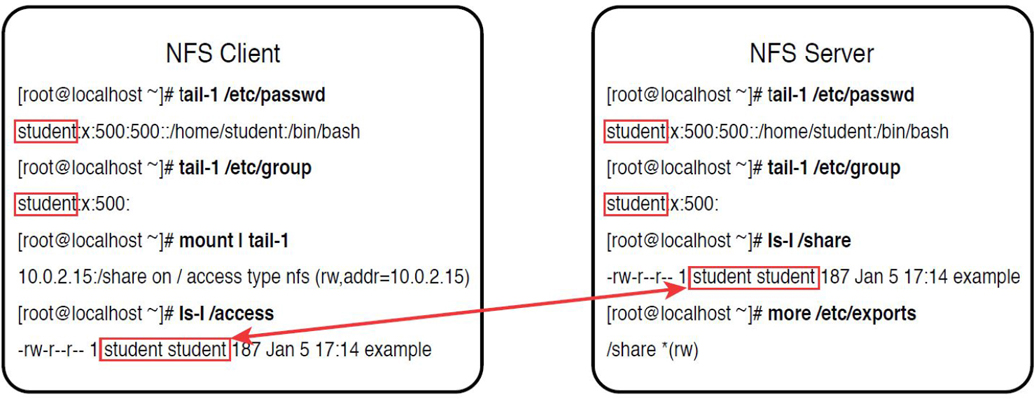
Figure 12-1 NFS ID Mapping—Same User and Group Name
In Figure 12-1, the NFS server and NFS client both have the same student user and group account. Both systems are using the UID of 500 and the GID of 500 for these accounts. The NFS server has the /share directory shared with the NFS client, which has it mounted under the /access directory. Now when the student user tries to access the /access/example file, that user will have rw- permissions on that file.
Now consider the situation described in Figure 12-2.
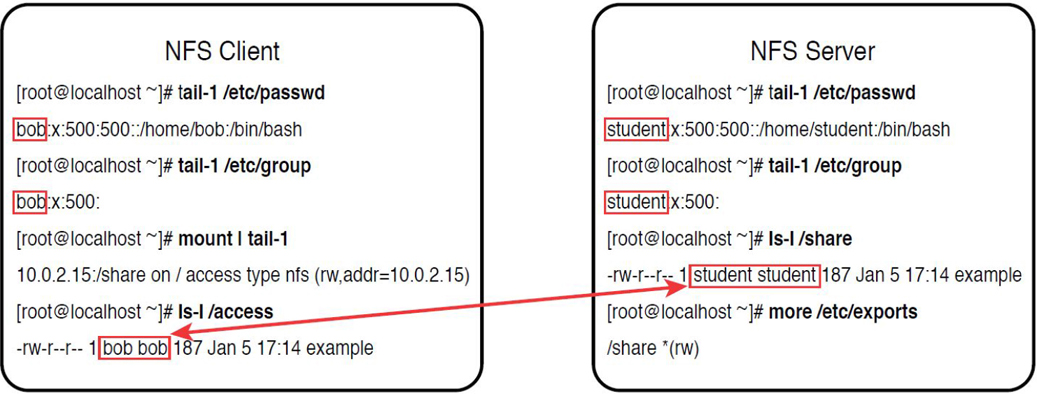
Figure 12-2 NFS ID Mapping—Different User and Group Name
The NFS client in the example in Figure 12-2 has a user and group named bob assigned to the UID and GID of 500. This means when the bob user on the NFS client accesses the /access/example file, which is really the /share/example file on the NFS server, bob is provided with ownership access to the file. In other words, the user bob on the NFS client has read and write permissions to the file owned by the student user on the NFS server!
This is one of the reasons why you do not see NFS used outside a LAN. There are other reasons (such as security issues), but this UID and GID mapping is an important aspect of NFS to understand.
Security Highlight
One way to avoid mismatched accounts is to use a central authentication system, such as an NIS or LDAP server. Using a central authentication system is also better for security than using local accounts on multiple systems (image the headache of deleting or locking the same account on dozens of systems, not to mention that you could forget one or more).
NIS and LDAP configuration are covered in Chapter 19, “Network Configuration.”
Recall that one of the share options for the /etc/exports file is root_squash. This is because you likely do not want the root account on the NFS client to have root privileges on the files on the NFS server. The root_squash share option results in a rare case where a regular user has more rights to something on the filesystem than the root user does. Here’s an example:
[root@onecoursesource ~]# mount | tail -1
192.168.1.22:/share on /access type nfs (rw,addr=192.168.1.22)
 [root@onecoursesource ~]# ls -l /access/example
-rw-r--r--. 1 student student 187 Jan  5 17:14 /access/example
[root@onecoursesource ~]# echo "no way" > /access/example
bash: /access/example: Permission denied
NFS Server Processes
So far you have learned that to have a system be an NFS server, you need to perform the following steps:
1. Create at least one share entry in the /etc/exports file.
2. Start the portmap service.
3. Start the NFS service.
The NFS service actually consists of several different processes working together, as demonstrated from the output shown in Example 12-5.
Example 12-5 NFS Server Processes
[root@onecoursesource ~]# ps -fe | grep 'rpc\.'
rpcuser   2074     1  0 Jan03 ?        00:00:00 rpc.statd
root     26445     1  0 17:15 ?        00:00:00 rpc.rquotad
root     26460     1  0 17:15 ?        00:00:00 rpc.mountd
root     26515     1  0 17:15 ?        00:00:00 rpc.idmapd
[root@onecoursesource ~]# ps -fe | grep nfs
root     26449    15  0 17:15 ?        00:00:00 [nfsd4]
root     26450     1  0 17:15 ?        00:00:00 [nfsd]
root     26451     1  0 17:15 ?        00:00:00 [nfsd]
root     26452     1  0 17:15 ?        00:00:00 [nfsd]
root     26453     1  0 17:15 ?        00:00:00 [nfsd]
root     26454     1  0 17:15 ?        00:00:00 [nfsd]
root     26455     1  0 17:15 ?        00:00:00 [nfsd]
root     26456     1  0 17:15 ?        00:00:00 [nfsd]
root     26457     1  0 17:15 ?        00:00:00 [nfsd]
Depending on what RPC-based services you have running on your system, you may see some additional lines of output if you run the commands shown in Example 12-5. The list provided in Example 12-5 is just displaying the processes related to NFS. The process are as follows:
• rpc.statd: This process handles the recovery process if the NFS server is rebooted when NFS clients are actively using the NFS server’s resources.
• rpc.rquotad: This process works in conjunction with the filesystem’s quota system.
• rpc.mountd: This process handles the initial NFS client mount requests. (Note that this is listed as just mountd on the LPIC-2 exam objectives, so expect it to be referred to either way when taking the exam.)
• rpc.idmapd: This process exists only on systems that run NFSv4. It can be used to modify the way user and group names are mapped between systems.
• nfsd: Also referred to as rpc.nfsd, this process handles the bulk of the client/server relationship. If your system uses both NFSv3 and NFSv4, you will also see an nfsd4 or rpc.nfsd4 process.
Understanding portmap
Think of the portmap utility as one of those old-fashioned telephone operators. You may have seen these in older movies, where someone picks up the phone and says, “Operator, connect me to Boston 4567.” The operator knows which connection to make to connect the parties. If you cannot envision that example, consider that portmap provides a map of the ports in use by the various services and programs on the computer, much like a legend on a map identifies each element.
That is portmap’s primary job. When an RPC-based service starts, it tells portmap how it can be reached by providing portmap with a network port number. When a client system tries to connect to a server, it asks the portmap utility which port the service is using.
If you are logged in to the NFS server, you can see this information by executing the rpcinfo command, as shown in Example 12-6.
Example 12-6 The rpcinfo Command
[root@onecoursesource ~]# rpcinfo -p
   program vers proto   port
    100000    2   tcp    111  portmapper
    100000    2   udp    111  portmapper
    100021    1   udp  56479  nlockmgr
    100021    3   udp  56479  nlockmgr
    100021    4   udp  56479  nlockmgr
    100021    1   tcp  36854  nlockmgr
    100021    3   tcp  36854  nlockmgr
    100021    4   tcp  36854  nlockmgr
    100011    1   udp    758  rquotad
    100011    2   udp    758  rquotad
    100011    1   tcp    761  rquotad
    100011    2   tcp    761  rquotad
    100003    2   udp   2049  nfs
    100003    3   udp   2049  nfs
    100003    4   udp   2049  nfs
    100003    2   tcp   2049  nfs
    100003    3   tcp   2049  nfs
    100003    4   tcp   2049  nfs
    100005    1   udp    772  mountd
    100005    1   tcp    775  mountd
    100005    2   udp    772  mountd
    100005    2   tcp    775  mountd
    100005    3   udp    772  mountd
    100005    3   tcp    775  mountd
Security Highlight
You can also see this information from a remote system by including the IP address of the server (for example, rpcinfo -p 192.168.1.22). This is one of the reasons why some administrators prefer to use Samba over NFS (having many visible network ports open poses a potential security risk).
You can also block access to the NFS server for specific NFS clients by blocking access to the portmap service. The portmap service uses a library called TCP Wrappers, also known as libwrap.
TCP Wrappers uses two files to provide you with the means to allow or block access to services: the /etc/hosts.allow and /etc/hosts.deny files. Each of these files contains rules designed to match a connection attempt. For example, the following rule matches an attempt to connect to the portmap service from the machine 192.168.1.100:
portmap: 192.168.1.100
The rules are applied in the following manner:
1. If the rule matches in the /etc/hosts.allow file, the connection is granted.
2. If the rule matches in the /etc/hosts.deny file, the connection is not allowed.
3. If no rule matches from either file, the connection is granted.
So, no rules in either file means all connections from all systems are granted. Suppose you wanted to deny access to all machines in the 192.168.1.0/24 network, except allow one machine in that network (192.168.1.100) and allow all other machines outside that network access to the portmap utility. You could use the following rules:
root@onecoursesource ~]# more /etc/hosts.allow
portmap: 192.168.1.100
root@onecoursesource ~]# more /etc/hosts.deny
portmap: 192.168.1.0/24
In most cases, you want to grant access to a few machines and deny all others. For example, the following rulesets would allow all machines in the 192.168.1.0/24 network access to the portmap utility and deny all others:
root@onecoursesource ~]# more /etc/hosts.allow
portmap: 192.168.1.0/24
root@onecoursesource ~]# more /etc/hosts.deny
portmap: ALL
Note
There is more to TCP Wrappers than what is discussed in this chapter. For a more complete coverage of TCP Wrappers, see Chapter 23, “Develop a Network Security Policy.”
NFS Server Commands
The exportfs command can be used on the NFS server to display what is currently shared:
[root@onecoursesource ~]# exportfs
/share          <world>
The exportfs command can also be used to temporarily share a resource, assuming the NFS services have already been started:
[root@onecoursesource ~]# exportfs -o ro 192.168.1.100:/usr/share/doc
[root@onecoursesource ~]# exportfs
/usr/share/doc  192.168.1.100
/share          <world>
The -o option is used to specify the share options. The argument includes the name of the systems to share with, as well as the directory to share, separated by a colon (:) character.
If you make changes to the /etc/exports file, any newly added share will be enabled after a reboot. If you want to enable these changes immediately, execute the following command: exportfs –a.
The nfsstat command can display useful NFS information. For example, the following command displays what is currently mounted by NFS clients:
[root@onecoursesource ~]# nfsstat -m /access from 10.0.2.15:/share Flags: rw,vers=3,rsize=131072,wsize=131072,hard,proto=tcp,timeo=600,retrans=2,sec=sys,addr=10.0.2.15
The showmount command displays similar information:
[root@onecoursesource ~]# showmount -a
All mount points on onecoursesource.localdomain:
10.0.2.15:/share
Configuring an NFS Client
Mounting an NFS share is not much different from mounting a partition or logical volume. First create a regular directory:
[root@onecoursesource ~]# mkdir /access
Next, use the mount command to mount the NFS share:
[root@onecoursesource ~]# mount 192.168.1.22:/share /access
You can verify the mount was successful either by executing the mount command or by viewing the /proc/mounts file. The advantage of viewing the /proc/mounts file is that it provides more detail:
[root@onecoursesource ~]# mount | tail -1 192.168.1.22:/share on /access type nfs (rw,addr=192.168.1.22) [root@onecoursesource ~]# tail -1 /proc/mounts 192.168.1.22:/share /access nfs rw,relatime,vers=3,rsize=131072,wsize=131072,namlen=255,hard,proto=tcp,
If the NFS client was rebooted, this mount would not be reestablished after the system boots. To make this a persistent mount across reboots, add an entry like the following in the /etc/fstab file:
[root@onecoursesource ~]# tail -1 /etc/fstab
192.168.1.22:/share      /access  nfs      defaults      0      0
After adding this entry to the /etc/fstab file, unmount the NFS share (if necessary) and test the new entry by only providing the mount point when executing the mount command:
[root@onecoursesource ~]# umount /access
[root@onecoursesource ~]# mount /access
[root@onecoursesource ~]# mount | tail -1
192.168.1.22:/share on /access type nfs (rw,addr=192.168.1.22)
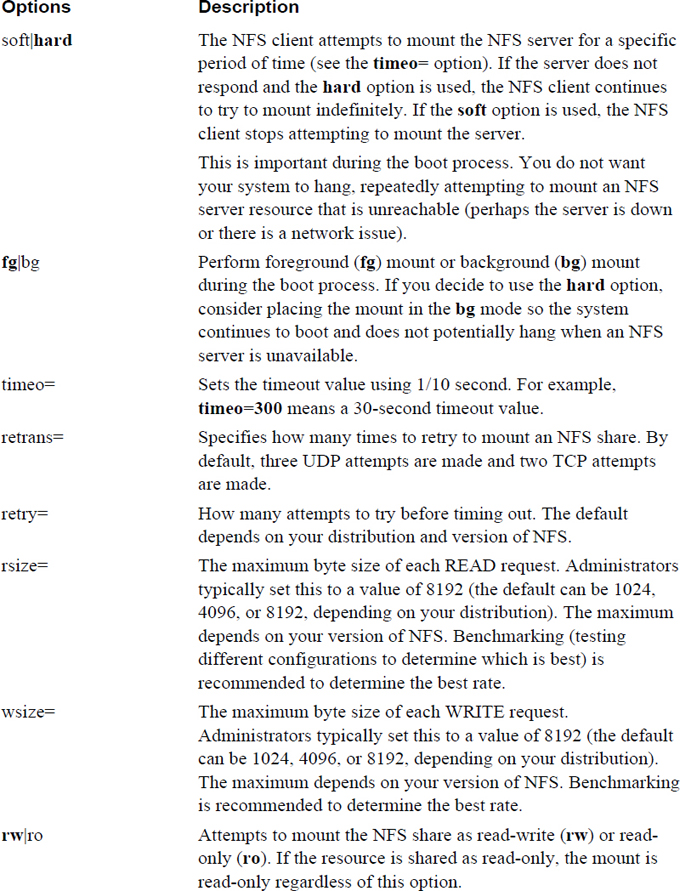
Recall that the fourth field of the /etc/fstab file contains the mount options. Several mount options are available for NFS, including some default mount options. Table 12-2 describes these options, with the default option in bold.
iSCSI
iSCSI (Internet Small Computer System Interface) is a network storage solution based on the communication protocol provided by SCSI. Recall that SCSI is a protocol designed to provide an interface between the kernel and a SCSI device.
Conversational Learning™ — Advantages of iSCSI
Gary: Hey, Julia. Can I pick your brain?
Julia: Anytime.
Gary: I am trying to understand what advantages iSCSI provides.
Julia: Well, first thing you really need to think about is what advantages remote storage provides over local storage. Keep in mind that unlike a local hard disk, iSCSI provides access to a remote storage device.
Gary: OK, that I understand. For example, local disk space can be very limited, whereas remote storage can make use of large datacenter devices, right?
Julia: That is one advantage. There are others, but you are on the right track. For example, consider how reliable network connectivity is. That’s very important if you are using remote storage.
Gary: So, if I decide to go with remote storage, what choices do I have?
Julia: You can use a file-sharing service like Samba or NFS. These are commonly referred to as NAS, or Network-Attached Storage. Although these services have some advantages, they are really designed to share a portion of a filesystem. iSCSI provides the client system with a device that works like a local hard disk, but is obviously remotely located.
Gary: OK, so are there alternatives to iSCSI that I should also consider?
Julia: Yes, you could also go with Fibre Channel, which is commonly referred to as FC.
Gary: So, what are the advantages and disadvantages of FC?
Julia: It isn’t always a cut-and-dry answer, but typically FC is going to have very strong performance and reliability, but with a higher cost than NAS and iSCSI solutions. Also, FC provides a good solution in a local area network, but NAS and iSCSI are better solutions for wide area networks.
Gary: OK, this gives me a good starting point. It sounds like I really should get more details for each solution before making a decision.
Julia: Yes, this is something you don’t want to just jump into. Map out your network storage requirements and determine which solution fits best before taking any action.
Gary: More homework! I suppose I should be getting used to that.
Julia: Just do what you can to avoid getting an “F”!
To understand iSCSI, you first need to know about some key terms:
• Target: This term describes the storage device, which resides on a server. The server can either be on a LAN or a WAN. Think of the target as the storage device being shared. Also, keep in mind that a target is considered a device, not a filesystem. When the client system accesses this device, it can be treated as if it was a hard disk.
• Initiator: This is the client that connects to the target. In some cases, the initiator is referred to as the iSCSI client.
• WWID: World Wide Identifier; this is an identifier guaranteed to be unique throughout the world. This unique number is important for iSCSI devices connected to the Internet to ensure that no other iSCSI device has that same identification number. It is similar in concept to the MAC address on your network card (which is a unique identifier that no other network card has). On the iSCSI server, there would be an association made via a symbolic link file and the actual device filename. The term WWN (Word Wide Name) is sometimes used interchangeably with WWID.
• LUN: Logical Unit Number; this is a value used by the target to identify a iSCSI device. The concept originates with SCSI, where on each system a SCSI device can be identified by a LUN that looks like this: /dev/dsk/c0t0d0s0. The c0t0d0s0 indicates the controller card, target, disk, and slice (partition) of the SCSI device that you want to access. For iSCSI, it is important to understand that WWID is a name unique on the Internet, whereas LUN is only unique on the local system.
Target Configuration
To configure your system as an iSCSI server, you first need to install the scsi-target-utils package and its dependencies. This package is not normally installed by default on most distributions (See Chapter 26, “Red Hat-Based Software Management,” and Chapter 27, “Debian-Based Software Management,” for information on how to manage software packages.) Keep in mind that the scsi-target-utils package also has some dependency packages that also need to be installed. See Chapters 26 and 27 if you are unsure how to install this software.
After installing the software package, edit the /etc/tgt/targets.conf file to create the target. The entry should look something like the following:
<target iqn.2018-10.localdomain.onecoursesource:test1>
        backing-store /dev/VolGroup/iscsi
        initiator-address 10.0.2.15
</target>
Here, iqn.2018-10.localdomain.onecoursesource:test1 is a method of creating a unique name for this target, similar to the WWID mentioned previously. The format of this should be iqn.year-month.domain_in_opposite_order:name_for_target. For example, if you wanted to create a target called firefly on the machine test.sample.com and it is October, 2018, then the name you create is iqn.2018-10.com.sample.test:firefly.
The backing-store value should be a device that has no data or filesystem stored on it, such as a newly created partition or logical volume. Remember, you are creating a device target, not sharing an existing filesystem.
The initiator-address describes which systems are permitted to access this target.
Next, start the tgtd daemon. On a SysVinit system, execute the following:
[root@onecoursesource ~]# /etc/init.d/tgtd start
Starting SCSI target daemon:                            [  OK  ]
Finally, execute the tgt-admin --show command to verify that the target has been enabled, as shown in Example 12-7.
Example 12-7 The tgt-admin --show Command
[root@onecoursesource ~]# tgt-admin --show
Target 1: iqn.2018-10.localdomain.onecoursesource:test1
    System information:
        Driver: iscsi
        State: ready
    I_T nexus information:
    LUN information:
        LUN: 0
            Type: controller
            SCSI ID: IET     00010000
            SCSI SN: beaf10
            Size: 0 MB, Block size: 1
            Online: Yes
            Removable media: No
            Prevent removal: No
            Readonly: No
            Backing store type: null
            Backing store path: None
            Backing store flags:
        LUN: 1
            Type: disk
            SCSI ID: IET     00010001
            SCSI SN: beaf11
            Size: 264 MB, Block size: 512
            Online: Yes
            Removable media: No
            Prevent removal: No
            Readonly: No
            Backing store type: rdwr
            Backing store path: /dev/VolGroup/iscsi
            Backing store flags:
    Account information:
    ACL information:
        10.0.2.20
Initiator Configuration
To configure your system as an iSCSI initiator, you first need to install the iscsi-initiator-utils package and its dependencies. This package is not normally installed by default on most distributions.
After you have installed the package, you can use the iscsiadm command to see the name of the targets provided by a iSCSI server. To perform this task, use the following iscsiadm command:
[root@onecoursesource ~]# iscsiadm -m discovery -t sendtargets -p 10.0.2.15
Starting iscsid:                                      [  OK  ]
10.0.2.20:3260,1 iqn.2018-10.localdomain.onecoursesource:test1
Note that the first time you execute this command, it automatically starts the iscsid daemon.
What you are looking for in the output of the iscsiadm command is which machine(s) can act as an initiator (10.0.2.20, in this case) and the IQN (iSCSI qualified name). The list of initiators should include the machine you are executing commands on (the client) for you to be able to attach to the iSCSI target.
Now that the target has been discovered, an easy way to connect to it is to start the iscsi service:
[root@onecoursesource ~]# /etc/init.d/iscsi restart
The iscsi script starts the iscsid daemon, which manages iSCSI targets on the initiator side. Although you probably will not change the configuration script for the iscsid daemon, you should be aware that it is located in the /etc/iscsi/iscsid.conf file.
The iscsi script is also a great way to determine the device name that the target has been assigned on the local system, as the highlighted output in Example 12-8 demonstrates.
Example 12-8 Determining Local Device Name for iSCSI Target
[root@onecoursesource ~]# /etc/init.d/iscsi status
iSCSI Transport Class version 2.0-870
version 6.2.0-873.13.el6
Target: iqn.2018-10.localdomain.onecoursesource:test1 (non-flash)
        Current Portal: 10.0.2.15:3260,1
        Persistent Portal: 10.0.2.15:3260,1
                **********
                Interface:
                **********
                Iface Name: default
                Iface Transport: tcp
                Iface Initiatorname: iqn.1994-05.com.redhat:392559bc66c9
                Iface IPaddress: 10.0.2.15
                Iface HWaddress: <empty>
                Iface Netdev: <empty>
                SID: 1
                iSCSI Connection State: LOGGED IN
                iSCSI Session State: LOGGED_IN
                Internal iscsid Session State: NO CHANGE
                 *********
                 Timeouts:
                 *********
                 Recovery Timeout: 120
                 Target Reset Timeout: 30
                 LUN Reset Timeout: 30
                 Abort Timeout: 15
                 *****
                 CHAP:
                 *****
                 username: <empty>
                 password: ********
                 username_in: <empty>
                 password_in: ********
                 ************************
                 Negotiated iSCSI params:
                 ************************
                 HeaderDigest: None
                 DataDigest: None
                 MaxRecvDataSegmentLength: 262144
                 MaxXmitDataSegmentLength: 8192
                 FirstBurstLength: 65536
                 MaxBurstLength: 262144
                 ImmediateData: Yes
                 InitialR2T: Yes
                 MaxOutstandingR2T: 1
                 ************************
                 Attached SCSI devices:
                 ************************
                 Host Number: 3    State: running
                 scsi3 Channel 00 Id 0 Lun: 0
                 scsi3 Channel 00 Id 0 Lun: 1
                         Attached scsi disk sdb      State: running
Recall that the udev system creates and manages device files. In this case, the udev daemon works in conjunction with the scsi_id command to map the target with the sdb device (the /dev/sdb file), hence the output in Example 12-8: Attached scsi disk sdb. Although you can execute the scsi_id command yourself, it is normally used by the udev daemon to create the device file.
The nice thing about the target is that it appears as a regular device to the local filesystem. You can make a partition on it, create a filesystem, and mount the filesystem, as shown in Example 12-9.
Example 12-9 Using the iSCSI Target on the Local System
[root@onecoursesource ~]# fdisk /dev/sdb
Device contains neither a valid DOS partition table, nor Sun, SGI or OSF disklabel
Building a new DOS disklabel with disk identifier 0xafa8a379.
Changes will remain in memory only, until you decide to write them.
After that, of course, the previous content won't be recoverable.

Warning: invalid flag 0x0000 of partition table 4 will be corrected by w(rite)

WARNING: DOS-compatible mode is deprecated. It's strongly recommended to
       switch off the mode (command 'c') and change display units to
       sectors (command 'u').

Command (m for help): n
Command action
   e   extended
   p   primary partition (1-4)
p
Partition number (1-4): 1
First cylinder (1-1024, default 1):
Using default value 1
Last cylinder, +cylinders or +size{K,M,G} (1-1024, default 1024):
Using default value 1024

Command (m for help): w
The partition table has been altered!

Calling ioctl() to re-read partition table.
Syncing disks.
[root@onecoursesource ~]# mkfs -t ext4 /dev/sdb1
mke2fs 1.41.12 (17-May-2010)
Filesystem label=
OS type: Linux
Block size=1024 (log=0)
Fragment size=1024 (log=0)
Stride=0 blocks, Stripe width=0 blocks
64512 inodes, 258020 blocks
12901 blocks (5.00%) reserved for the super user
First data block=1
Maximum filesystem blocks=67371008
32 block groups
8192 blocks per group, 8192 fragments per group
2016 inodes per group
Superblock backups stored on blocks:
        8193, 24577, 40961, 57345, 73729, 204801, 221185
Writing inode tables: done
Creating journal (4096 blocks): done
Writing superblocks and filesystem accounting information: done
This filesystem will be automatically checked every 22 mounts or
180 days, whichever comes first. Use tune2fs -c or -i to override.
[root@onecoursesource ~]# mkdir /test
[root@onecoursesource ~]# mount /dev/sdb1 /test
Here are a few important notes to consider:
• Make sure you enable the iscsi script to start automatically at boot (that is, use the chkconfig command if you are working on a SysVinit system).
• Make sure you enable the filesystem mount in the /etc/fstab file. You should probably include the _netdev mount option, as this ensures networking is up before trying to mount the resource.
• There is more to iSCSI than discussed in this book. If you are thinking about implementing iSCSI in your environment, you may want to consider other features, such as ways to secure the target. For example, there is a way to enable an authentication technique called CHAP (Challenge-Handshake Authentication Protocol), which would need to be configured on the target and on the initiator (by modifying the /etc/iscsi/iscsid.conf file).
• You do not need two systems to test iSCSI. The system that acts as the target can also be the initiator. This is not normally done outside of testing, but it does provide you with an easy way to test these commands.
• You may find some subtle differences in how iSCSI works on different distributions. The iSCSI examples provided in this book were performed on a CentOS 7.x system.
Summary
In this chapter, you learned how to administer remote storage devices. First, you were introduced to SAMBA, a tool that allows you to share directories between Linux and other operating systems. You also learned how to share directory structures between Linux systems using NFS. Lastly, you learned how to create a shared storage device using iSCSI.
Key Terms
Review Questions
1. The _____ software package provides SAMBA client utilities.
2. Which of the following characters can be used for commenting a line in the /etc/SAMBA/smb.conf file? (Choose two.)
a. #
b. *
c. ;
d. /
3. Which of the following is used to specify a description of the SAMBA server when placed in the [global] section of the smb.conf file?
a. comment =
b. server =
c. description =
d. server string =
4. The _____ section of the smb.conf file is used to share a SAMBA user’s home directories by default.
5. Which of the following is used to share a directory as read-only when placed in a directory share within the smb.conf file?
a. read-only = yes
b. unwritable = yes
c. writable = no
d. changeable = no
6. The _____ setting in a SAMBA share section of the smb.conf file permits guest user account access.
a. guest = yes
b. unsecure = yes
c. guest ok = yes
d. guest access = yes
7. Fill in the missing setting for the following SAMBA printer share:
[hp-101]
_____ = /var/spool/SAMBA/
browseable = yes
printable = yes
printer name = hp-101
8. Starting the SAMBA server results in two server processes starting: _____ and _____.
9. Fill in the blank for the following command to create a new SAMBA user account named student:
smbpasswd _____student
a. -c
b. -a
c. -n
d. -s
10. The _____ setting can be used to match Windows account names to local user accounts when placed in the [global] section of the smb.conf file.
11. The _____ service provides the functionality of RPC.
12. Which of the following are valid NFS software package names? (Choose two.)
a. nfs
b. nfs-server
c. nfs-utils
d. nfs-kernel-server
13. Fill in the blank in the following entry in the /etc/exports file to share the /share directory with the test machine with read-only access:
/share test(_____)
a. read-only
b. readonly
c. norw
d. ro
14. The _____ share option results in better performance but has the potential for data loss.
15. Based on the following share from the /etc/exports file, which systems have the capability to access the share as read-write?
/share test (rw)
a. Only the test machine.
b. Only machines in the local network.
c. No machines because the entry is invalid.
d. All machines.
16. Which of the following are valid ways to specify NFS clients in the /etc/exports file? (Choose two.)
a. domain
b. URL
c. ADS name
d. IP network
17. The _____ process handles the NFS client mount requests.
18. You can see RPC port information on the system by executing the _____ command.
19. You can secure the portmap service by modifying which of the following files? (Choose two.)
a. /etc/hosts
b. /etc/hosts.allow
c. /etc/hosts.access
d. /etc/hosts.deny
20. The _____ mount option attempts to mount the share once and then stops trying.
21. Which file would you edit to define your iSCSI targets?
a. /etc/targets.conf
b. /etc/tgt/targets.conf
c. /etc/tgt/tgt.conf
d. /etc/tgt.conf
22. The _____ command is used by the udev daemon to map an iSCSI target to a local device file.