Table of Contents for
Linux Essentials for Cybersecurity, First Edition
 Linux Essentials for Cybersecurity, First Edition
Published by
Pearson IT Certification, 2018
Linux Essentials for Cybersecurity, First Edition
Published by
Pearson IT Certification, 2018
- Cover Page
- Title Page
- Copyright Page
- Contents at a Glance
- Table of Contents
- About the Author
- Dedication
- Acknowledgments
- About the Technical Reviewers
- We Want to Hear from You!
- Reader Services
- Introduction
- Part I: Introducing Linux
- Chapter 1: Distributions and Key Components
- Chapter 2: Working on the Command Line
- Chapter 3: Getting Help
- Chapter 4: Editing Files
- Chapter 5: When Things Go Wrong
- Part II: User and Group Accounts
- Chapter 6: Managing Group Accounts
- Chapter 7: Managing User Accounts
- Chapter 8: Develop an Account Security Policy
- Part III: File and Data Storage
- Chapter 9: File Permissions
- Chapter 10: Manage Local Storage: Essentials
- Chapter 11: Manage Local Storage: Advanced Features
- Chapter 12: Manage Network Storage
- Chapter 13: Develop a Storage Security Policy
- Part IV: Automation
- Chapter 14: Crontab and At
- Chapter 15: Scripting
- Chapter 16: Common Automation Tasks
- Chapter 17: Develop an Automation Security Policy
- Part V: Networking
- Chapter 18: Networking Basics
- Chapter 19: Network Configuration
- Chapter 20: Network Service Configuration: Essential Services
- Chapter 21: Network Service Configuration: Web Services
- Chapter 22: Connecting to Remote Systems
- Chapter 23: Develop a Network Security Policy
- Part VI: Process and Log Administration
- Chapter 24: Process Control
- Chapter 25: System Logging
- Part VII: Software Management
- Chapter 26: Red Hat–Based Software Management
- Chapter 27: Debian-Based Software Management
- Chapter 28: System Booting
- Chapter 29: Develop a Software Management Security Policy
- Part VIII: Security Tasks
- Chapter 30: Footprinting
- Chapter 31: Firewalls
- Chapter 32: Intrusion Detection
- Chapter 33: Additional Security Tasks
- Appendix A: Answers to Review Questions
- Appendix B: Resource Guide
- Glossary
Chapter 13 Develop a Storage Security Policy
Securing storage devices poses a challenge because often the individuals who compromise these devices already have valid access to these systems. This chapter focuses on how to secure data using the skills you learned in Chapters 9–12.
The security of storage devices is not just about keeping people from seeing sensitive data. It also includes ensuring that critical data is not lost. You also learn how to create backups of files and directories as well as develop a backup policy to ensure you can recover lost data.
After reading this chapter and completing the exercises, you will be able to do the following:
Develop a security plan for securing storage devices.
Create a backup strategy.
Utilize backup utilities.
Developing the Plan
While developing a security plan for storage devices, you should consider the following:
• Sensitive data needs to be secure from prying eyes, including users who have valid access to the system.
• Consider where all data should be stored. For example, a critical database with private company data should not be stored in an external-facing web server (or any external-facing server for that matter).
• All critical data needs to be backed up on a regular basis in the event that a storage device fails or a disaster (such as fire or flood) destroys the storage devices.
• A data recovery system should be put in place to allow for the quick recovery of lost data.
The essentials you need to know to protect data have already been covered in previous chapters (Chapters 9–12), and more information will be provided in later chapters. The following is a summary of these essentials and how you should consider them when developing a security plan:
• Protect files from users who already have access to the system using a combination of file permissions, file attributes, and SELinux (covered in Chapter 9, “File Permissions”). Your security policy should clearly define these security settings on every system-critical file and all files that contain sensitive data.
• Create scripts (covered in Chapter 15, “Scripting”) to run automatically (covered in Chapter 14, “Crontab and At”) to probe key files to determine whether the file permissions and attributes are correctly set. (Note that you can find scripts like this via Internet searches; Kali Linux does not include tools that provide these functions.)
• For any mobile devices such as laptops, make sure you enable filesystem encryption (covered in Chapter 11, “Manage Local Storage: Advanced Features”).
• For any network storage device, make sure you use features such as a firewall (covered in Chapter 31, “Firewalls”) to best limit access to the storage devices.
Backing Up Data
Almost all seasoned system administrators, as well as many end users, have horror stories that revolve around lost data. Millions of dollars have been lost and heads have rolled because either no backup strategy was put in place or the backup strategy was insufficient or not properly followed.
Securing data is a serious business, and you do not want to be the one, hat in hand, explaining why critical company data has been lost forever. You must create a solid backup strategy and make sure it is implemented correctly.
Creating a Backup Strategy
As an administrator, it is your responsibility to develop a solid backup strategy. To create this strategy, you need to answer the following questions:
• What needs to be backed up? This is a critical question because it has an impact on the answers to the rest of the questions. While answering this question, you should consider breaking down your filesystem into smaller logical components to create a more efficient backup strategy.
• How often? Several factors come into play when answering this question. If you have broken down your filesystem into smaller logical components, you should answer this question for each component, as the answer varies depending on what type of data is backed up.
• Full or incremental? A full backup is when everything is backed up, regardless of whether any changes have been made since the last backup. An incremental backup is when a backup is performed only on the files that have changed since a previous backup. Some backup utilities allow for complex backup strategies based on several different levels of incremental backups. Incremental backups are faster, but a full backup allows for easier reinstatement of data in the event of a loss or accident.
• Where will the backup be stored? Will you use tape devices, optical devices (CD-ROMs/DVDs), external storage devices (USB drives), or network-accessible storage locations? Each storage location has inherent advantages and disadvantages.
• What backup tool will be used? The decision that you make regarding the backup tool has a significant impact on the process of backing up and restoring data. Most Linux distributions come with several tools installed by default, such as the dd and tar commands. In many cases, additional tools are freely available; you just need to install each tool from the distribution repository. In addition to the tools that come with the distribution, you may want to consider exploring third-party tools, which typically offer more robust solutions.
What Needs to Be Backed Up?
One of the reasons why administrators tend to use multiple partitions (or logical volumes) when installing the operating system is that this lends to developing good backup strategies. Certain directories change more often than others. By making these separate filesystems, you can make use of filesystem features to perform the backup.
For example, it is normally a good idea to back up data not actively being modified. However, this can pose challenges when backing up users’ home directories. By making /home a separate partition, you can then unmount the partition and perform a backup directly from the partition. Even better, you can make the /home filesystem on a logical volume and use Logical Volume Manager (LVM) snapshots to create a “frozen” view of the filesystem in the /home directory. This allows users to continue to work on the filesystem while you back up the data.
This does not mean that you will always make separate filesystems for each directory structure that you want to back up. In fact, in some cases (for example, the /etc directory), this is not even possible (/etc must be in the same filesystem as the / filesystem). However, whenever possible, it is generally a good idea to create separate filesystems for directory structures that you are incorporating into your backup strategy.
Note
You will see that we tend to use the terms directory and filesystem interchangeably in this chapter. As you know, not all directories represent entire filesystems—just those that are mount points. However, because we strongly suggest that the directories in Table 13-1 be mount points for filesystems, we decided to use the terms directory, directory structure, and filesystem interchangeably when discussing these sorts of directories.
So, what directories/filesystems should you consider including in your backup strategy? Table 13-1 highlights those that are commonly part of a backup strategy.
Table 13-1 Directories/Filesystems to Consider Including in Your Backup Strategy
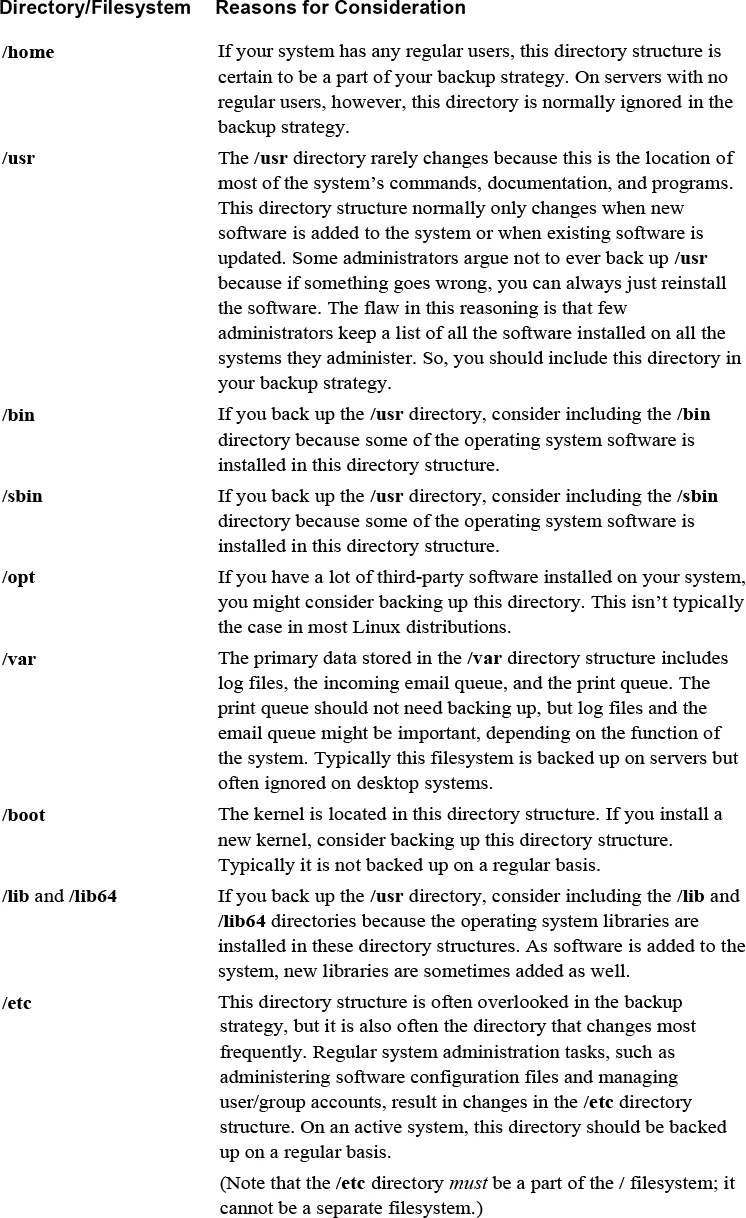
Which directories/filesystems should you never back up? The following directories either are not stored on the hard drive or contain temporary information that never needs to be backed up:
• /dev
• /media
• /mnt
• /net
• /proc
• /srv
• /sys
• /var/tmp
How Often?
There is no exact rule that tells you how often to perform backups. To determine how often to perform backups, determine which directories/filesystems you are going to back up and then get an idea of how often data changes on each.
Based on your observations, you should be able to determine how often to perform backups. It will likely be a different schedule for different directories, and you also need to consider how often to perform full versus incremental backups.
Full or Incremental?
Not all software tools provide the flexibility to perform incremental backups. But if you are using one that does provide this feature, consider including it in your backup strategy.
If the backup tool does provide incremental backups, there are probably several different levels available. Here are some examples:
• A Level 0 backup would be a full backup.
• A Level 1 backup would back up all files that have changed since the last lower-level backup (Level 0).
• A Level 2 backup would back up all files that have changed since the last lower-level backup (Level 0 or 1).
Typically these incremental backups would include the values 1–9. So a Level 9 backup would back up all files that have changed since the last lower-level backup (which could be Level 0, Level 1, Level 2, and so on).
To better understand incremental backups, first look at Figure 13-1.

Figure 13-1 Backup Strategy #1
The strategy in Figure 13-1 demonstrates a four-week backup period. Every four weeks, this cycle repeats. On the first day of the period, a full (Level 0) backup is performed. The next day, Monday, a Level 2 backup is performed. This backs up everything that has changed since the last lower-level backup (Level 0). This is essentially one day’s worth of changes.
On Tuesday, a Level 3 back up is performed. This backs up everything that has changed since the last lower-level backup (the Level 2 performed on Monday). Each day during the week, a backup is performed that backs up the last 24 hours of changes to the directory/filesystem.
The following Sunday, a Level 1 backup is performed. This backs up all changes since the last lower-level backup (the Level 0 performed at the beginning of the cycle). Essentially, this backs up a week’s worth of changes.
The advantage of this backup plan is that the backups each night take comparatively little time. Sunday’s backups take longer each week, but the rest of the week is a relatively small backup. Because most businesses close earlier on Sunday, this presents little impact to the need for business access to these systems.
The disadvantage of this backup plan is in the recovery. If the filesystem must be restored because the data was lost on Friday of the third week, then the following restores must be performed, in this order:
• The Level 0 backup
• The Level 1 backup performed on Sunday of Week 3
• The Level 2 backup performed on Monday of Week 3
• The Level 3 backup performed on Tuesday of Week 3
• The Level 4 backup performed on Wednesday of Week 3
• The Level 5 backup performed on Thursday of Week 3
Now compare the backup strategy from Figure 13-1 with the backup strategy shown in Figure 13-2.

Figure 13-2 Backup Strategy #2
With the backup strategy on Figure 13-2, you also perform a full backup on the first day of the cycle. The backups performed Monday through Saturday back up all files that have changed since Sunday. The backup performed on the following Sunday includes all files that have changed since the first backup of the cycle.
The disadvantage of this method is that each backup takes more time as the week progresses. The advantage is the recovery process is easier and quicker. If the filesystem must be restored because the data was lost on Friday of the third week, then the following restores must be performed, in order:
• The Level 0 backup
• The Level 1 backup performed on Sunday of Week 3
• The Level 5 backup performed on Thursday of Week 3
There are many other backup strategies, including the famous Tower of Hanoi, which is based on a mathematical puzzle game. The important thing to remember is that you should research the different methods and find the one that is right for your situation.
Where Will the Backup Be Stored?
You have many options for media on which you can store backup data. Table 13-2 describes the most popular media and provides some of the advantages and disadvantages you should consider.
Table 13-2 Backup Storage Locations

Note
Consider following the 3-2-1 Rule: Store three copies of all important backup data. Use at least two types of media for the backups. Make sure at least one backup is offsite.
What Backup Tool Will Be Used?
You can use many different tools to back up data, including those that are already a part of most Linux distributions, as well as third-party tools. In this chapter, we cover the following tools:
• dd
• tar
• rsync
• Amanda
• Bacula
In addition to the backup tools, you should be aware of a few other tools used for creating and restoring files:
• dump/restore: Not used as often as in the past, these tools were designed to back up and restore entire filesystems. These tools support both full and incremental backups, which makes them some of the few standard backup tools that have this feature.
• cpio: Similar to the tar command, the cpio command can be used to merge files from multiple locations into a single archive.
• gzip/gunzip: Although the gzip command does not provide an essential feature that you want in a backup tool (namely, it does not merge files together), it does compress files. As a result, it could be used to compress a backup file.
• bzip2/bunzip2: Although the bgzip2 command does not provide an essential feature that you want in a backup tool (namely, it does not merge files together), it does compress files. As a result, it could be used to compress a backup file.
• zip/unzip: An advantage of this tool is that it merges files together and compresses those files; plus, it uses a standard compression technique employed on multiple operating systems, including many non-Linux operating systems.
Standard Backup Utilities
These utilities are considered standard because you can expect them to be on just about every distribution of Linux. The advantage of this is that you use the tools to perform a backup on just about every system, but even more importantly, you can view and restore the backups on just about every system. It is frustrating and time consuming to deal with an esoteric backup file for which you lack the software to even determine the contents of the backup.
The dd Command
The dd command is useful to back up entire devices, whether entire hard disks, individual partitions, or logical volumes. For example, to back up an entire hard disk to a second hard disk, execute a command like the following:
[root@onecoursesource~]# dd if=/dev/sda of=/dev/sdb
The if option is used to specify the input device. The of option is used to specify the output device. Make sure when you execute this command so that the /dev/sdb hard disk is at least as large as the /dev/sda hard disk.
What if you do not have a spare hard disk, but you have enough room on a device (such as an external USB hard disk)? In this case, place the output into an image file:
[root@onecoursesource ~]# dd if=/dev/sda of=/mnt/hda.img
You can also use the dd command to back up the contents of a CD-ROM or DVD into an ISO image:
[root@onecoursesource ~]# dd if=/dev/cdrom of=cdrom.iso
The ISO image file can be used to create more CD-ROMs, or it can be shared via the network to make the contents of the CD-ROM easily available (rather than passing the disc around the office).
It is also helpful to know that both image and ISO files can be treated as regular filesystems in the sense both types can be mounted and explored:
[root@onecoursesource ~]# mkdir /test
[root@onecoursesource ~]# mount -o loop /mnt/had.img /test
One of the advantages of the dd command is that it can back up anything on the hard disk, not just files and directories. For example, at the beginning of each disk is an area called the MBR (Master Boot Record). For the boot disk, the MBR contains the bootloader (GRUB) and a copy of the partition table. It can be useful to have a backup of this data:
[root@onecoursesource ~]# dd if=/dev/sda of=/root/mbr.img bs=512 count=1
The bs option indicates the block size, and the count indicates how many blocks to back up. The values of 512 and 1 make sense because the MBR size is 512 bytes.
We suggest storing the MBR image on an external device. If the system fails to boot because of a corrupted MBR, you can boot off a recovery CD-ROM and restore the MBR with a single command:
[root@onecoursesource ~]# dd if=mbr.img of=/dev/sda
The tar Command
The tape archive (tar) command was originally designed to back up filesystems to tape devices. Although many people now use the tar command to back up to non-tape devices, you should be aware of how to use tape devices as well.
Tape device names in Linux follow the /dev/st* and /dev/nst* convention. The first tape device is assigned the device name of /dev/st0, and the second tape device is accessible via the /dev/st1 device name.
The name /dev/nst0 also refers to the first tape device, but it sends a “no rewind” signal to the tape device. This is important for when you need to write multiple volumes to the tape. The default behavior of the tape drive is to automatically rewind when the backup is complete. If you wrote another backup to the same tape, you would overwrite the first backup unless you used the /dev/nst0 device name when performing the first backup.
If you are working with tape devices, you should be aware of the mt command. This command is designed to allow you to directly manipulate the tape devices, including moving from one volume to another and deleting the contents of a tape. Here are some common examples:
[root@onecoursesource ~]# mt -f /dev/nst0 fsf 1     #skip forward one file (AKA, volume)
[root@onecoursesource ~]# mt -f /dev/st0 rewind     #rewinds the tape
[root@onecoursesource ~]# mt -f /dev/st0 status     #prints information about tape device
[root@onecoursesource ~]# mt -f /dev/st0 erase      #erases tape in tape drive
Note
For the following examples, we assume that you do not have a tape drive in your system. The examples provided for the tar command place the tar ball (the result of the tar command) in a regular file; however, if you have a tape drive, you can just replace the filename with your tape device file.
To create a backup (or tar ball) with the tar utility, use the -c (create) option in conjunction with the -f (filename) option:
[root@onecoursesource ~]# tar -cf /tmp/xinet.tar /etc/xinetd.d
tar: Removing leading `/' from member names
The leading / characters are removed from the filenames, so instead of absolute pathnames being backed up, the pathnames are relative. This makes it easier to specify where the files are restored. Having the leading / would result in files always being stored in the exact same location.
To see the contents of a tar ball, use the -t (table of contents) option in conjunction with the -f option, as shown in Example 13-1.
Example 13-1 Contents of a Tar Ball Using tar -tf
[root@onecoursesource ~]# tar -tf /tmp/xinet.tar
etc/xinetd.d/
etc/xinetd.d/rsync
etc/xinetd.d/discard-stream
etc/xinetd.d/discard-dgram
etc/xinetd.d/time-dgram
etc/xinetd.d/echo-dgram
etc/xinetd.d/daytime-stream
etc/xinetd.d/chargen-stream
etc/xinetd.d/daytime-dgram
etc/xinetd.d/chargen-dgram
etc/xinetd.d/time-stream
etc/xinetd.d/telnet
etc/xinetd.d/echo-stream
etc/xinetd.d/tcpmux-server
You often want to see detailed information when listing the contents of the tar ball. Include the -v (verbose) option to see additional information, as shown in Example 13-2.
Example 13-2 The –v Option to See Details of the Tar Ball
[root@onecoursesource ~]# tar -tvf /tmp/xinet.tar
drwxr-xr-x root/root         0 2018-11-02 11:52 etc/xinetd.d/
-rw-r--r-- root/root       332 2017-03-28 03:54 etc/xinetd.d/rsync
-rw------- root/root      1159 2016-10-07 10:35 etc/xinetd.d/discard-stream
-rw------- root/root      1157 2016-10-07 10:35 etc/xinetd.d/discard-dgram
-rw------- root/root      1149 2016-10-07 10:35 etc/xinetd.d/time-dgram
-rw------- root/root      1148 2016-10-07 10:35 etc/xinetd.d/echo-dgram
-rw------- root/root      1159 2016-10-07 10:35 etc/xinetd.d/daytime-stream
-rw------- root/root      1159 2016-10-07 10:35 etc/xinetd.d/chargen-stream
-rw------- root/root      1157 2016-10-07 10:35 etc/xinetd.d/daytime-dgram
-rw------- root/root      1157 2016-10-07 10:35 etc/xinetd.d/chargen-dgram
-rw------- root/root      1150 2016-10-07 10:35 etc/xinetd.d/time-stream
-rw------- root/root       302 2018-11-02 11:52 etc/xinetd.d/telnet
-rw------- root/root      1150 2016-10-07 10:35 etc/xinetd.d/echo-stream
-rw------- root/root      1212 2016-10-07 10:35 etc/xinetd.d/tcpmux-server
To extract all the contents of the tar ball into the current directory, use the -x (extract) option in conjunction with the -f option, as shown in Example 13-3.
Example 13-3 Using tar –xf for Extracting Contents from the Tar Ball
[root@onecoursesource ~]# cd /tmp
[root@onecoursesource tmp]# tar -xf xinet.tar
[root@onecoursesource tmp]# ls
backup          pulse-iqQ3aLCZD30z   virtual-root.MLN2pc  virtual-root.zAkrYZ
etc             pulse-lZAnjZ6xlqVu   virtual-root.o6Mepr  xinet.tar
keyring-9D6mpL  source               virtual-root.vtPUaj  zip-3.0-1.el6.src.rpm
orbit-gdm       virtual-root.7AHBKz  virtual-root.y6Q4gw
orbit-root      virtual-root.EaUiye  virtual-root.Ye1rtc
[root@onecoursesource tmp]# ls etc
xinetd.d
[root@onecoursesource tmp]# ls etc/xinetd.d
chargen-dgram   daytime-stream  echo-dgram   tcpmux-server  time-stream
chargen-stream  discard-dgram   echo-stream  telnet
daytime-dgram   discard-stream  rsync        time-dgram
Suppose your tar ball contains thousands of files and you only need a few files. You can list the filenames at the end of the tar command to perform this partial restore:
[root@onecoursesource tmp]# tar -xf xinet.tar etc/xinetd.d/rsync
[root@onecoursesource tmp]# ls etc/xinetd.d
rsync
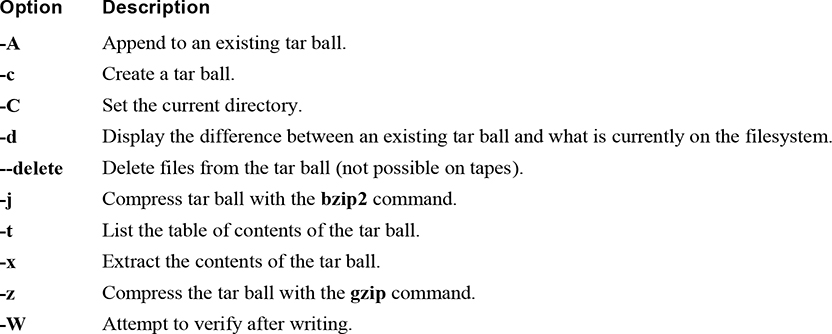
The tar command has many options; consult Table 13-3 to learn about some of the more useful ones (including those already covered).
The rsync Command
The rsync command provides a different set of backup features than those provided by the tar and dd commands. It is designed to back up files to a remote system. It can communicate via Secure Shell (SSH), making the backup process secure. Additionally, it only backs up files that have changed since the last backup.
For example, the command shown in Example 13-4 performs a recursive backup of the /etc/xinetd.d directory to the /backup directory of the server1 machine.
Example 13-4 The rsync Command
[root@onecoursesource ~]# rsync -av -e ssh /etc/xinetd.d server1:/backup
root@server1's password:
sending incremental file list
xinetd.d/
xinetd.d/chargen-dgram
xinetd.d/chargen-stream
xinetd.d/daytime-dgram
xinetd.d/daytime-stream
xinetd.d/discard-dgram
xinetd.d/discard-stream
xinetd.d/echo-dgram
xinetd.d/echo-stream
xinetd.d/rsync
xinetd.d/tcpmux-server
xinetd.d/telnet
xinetd.d/time-dgram
xinetd.d/time-stream

sent 14235 bytes  received 263 bytes  1159.84 bytes/sec
total size is 13391  speedup is 0.92
The options used from the previous command are -v (verbose), -a (archive), -e ssh (execute via SSH). The first argument is what to copy, and the second argument is where to copy it.
Suppose a change takes place to one of the files in the /etc/xinetd.d directory:
[root@onecoursesource ~]# chkconfig telnet off #changes /etc/xinetd.d/telnet
Note that when the rsync command is executed again, only the modified file is transferred:
[root@onecoursesource ~]# rsync -av -e ssh /etc/xinetd.d server1:/backup
root@server1's password:
sending incremental file list
xinetd.d/
xinetd.d/telnet

sent 631 bytes  received 41 bytes  192.00 bytes/sec
total size is 13392  speedup is 19.93
Third-party Backup Utilities
Many third-party backup utilities are available for Linux. The following is a brief summary of two of the more popular utilities.
Amanda
The Advanced Maryland Automatic Network Disk Archiver (aka Amanda) is an open source software tool popular on both Unix and Linux distributions. Although there is a freely available community version, an enterprise version is available that provides support (for a fee, of course).
Amanda provides a scheduler, making it easier for system administrators to automate the backup process. It also supports writing to either tape device or hard disk.
Bacula
Bacula is an open source product that supports clients from different platforms, including Linux, Microsoft Windows, macOS, and Unix. One of the compelling features of Bacula is the capability to automate backup, freeing the system administrator from this routine task.
Configuration of Bacula on the server side can be accomplished via a web interface, GUI-based tools, or command-line tools.
One disadvantage of Bacula is that the format of the backup data is not compatible with other backup formats, such as the tar command’s format. This makes it difficult to deal with the backup data unless you have the Bacula tools installed on the system.
Summary
In this chapter, you explored how to create a storage device security plan. Many of the topics from Chapters 9–12 included security features for storage devices. These features are the heart of a solid security plan. This chapter reviewed these key features as well as introduced how to create data backups and restore data from these backups.
Key Terms
Review Questions
1. For tools that use numbers to specify full and incremental backups, the number _____ specifies a full backup.
2. Which of the following directories do not need to be backed up? (Choose two.)
a. /etc
b. /var
c. /dev
d. /sys
3. Which of the following directories do not need to be backed up? (Choose two.)
a. /usr
b. /tmp
c. /proc
d. /boot
4. The _____ command is used to remotely back up data; by default, it only backs up data that has changed since the last time the command was used.
5. Which of the following backup storage locations is likely to be the fastest?
a. CD-ROM
b. Tape
c. Hard disk
d. Remote network location
6. Which option to the dd command specifies the device that you are backing up?
a. count=
b. bs=
c. of=
d. if=
7. The “no rewind” device name for the first tape device on the system is /dev/_____.
8. Which option to the tar command is used to extract data from a tar ball?
a. -a
b. -x
c. -e
d. -X
9. The _____ option to the rsync command is used to enable data transfer via SSH.