Table of Contents for
Linux Essentials for Cybersecurity, First Edition
 Linux Essentials for Cybersecurity, First Edition
Published by
Pearson IT Certification, 2018
Linux Essentials for Cybersecurity, First Edition
Published by
Pearson IT Certification, 2018
- Cover Page
- Title Page
- Copyright Page
- Contents at a Glance
- Table of Contents
- About the Author
- Dedication
- Acknowledgments
- About the Technical Reviewers
- We Want to Hear from You!
- Reader Services
- Introduction
- Part I: Introducing Linux
- Chapter 1: Distributions and Key Components
- Chapter 2: Working on the Command Line
- Chapter 3: Getting Help
- Chapter 4: Editing Files
- Chapter 5: When Things Go Wrong
- Part II: User and Group Accounts
- Chapter 6: Managing Group Accounts
- Chapter 7: Managing User Accounts
- Chapter 8: Develop an Account Security Policy
- Part III: File and Data Storage
- Chapter 9: File Permissions
- Chapter 10: Manage Local Storage: Essentials
- Chapter 11: Manage Local Storage: Advanced Features
- Chapter 12: Manage Network Storage
- Chapter 13: Develop a Storage Security Policy
- Part IV: Automation
- Chapter 14: Crontab and At
- Chapter 15: Scripting
- Chapter 16: Common Automation Tasks
- Chapter 17: Develop an Automation Security Policy
- Part V: Networking
- Chapter 18: Networking Basics
- Chapter 19: Network Configuration
- Chapter 20: Network Service Configuration: Essential Services
- Chapter 21: Network Service Configuration: Web Services
- Chapter 22: Connecting to Remote Systems
- Chapter 23: Develop a Network Security Policy
- Part VI: Process and Log Administration
- Chapter 24: Process Control
- Chapter 25: System Logging
- Part VII: Software Management
- Chapter 26: Red Hat–Based Software Management
- Chapter 27: Debian-Based Software Management
- Chapter 28: System Booting
- Chapter 29: Develop a Software Management Security Policy
- Part VIII: Security Tasks
- Chapter 30: Footprinting
- Chapter 31: Firewalls
- Chapter 32: Intrusion Detection
- Chapter 33: Additional Security Tasks
- Appendix A: Answers to Review Questions
- Appendix B: Resource Guide
- Glossary
Chapter 28 System Booting
System booting is a fairly large topic that incorporates the operations that take place during the boot process. In this chapter, you learn about the different stages of system booting, including the boot loader phase, the kernel loading phase, and the “init” phase.
After reading this chapter and completing the exercises, you will be able to do the following:
Describe the four stages of the boot process.
Configure Legacy GRUB and GRUB 2.
Modify key components of the kernel.
Load and unload kernel modules.
Modify services that are enabled at boot.
Phases of the Boot Process
The boot process of a Linux operating system has four primary phases:
• BIOS/UEFI phase
• Boot loader phase
• Kernel phase
• Post-kernel phase
The BIOS/UEFI Phase
When a Linux system is first turned on, a software program is started to boot the system. This software program is not part of Linux, but rather it’s a program that came with your system hardware. The two different types are BIOS (Basic Input/Output System) and UEFI (Unified Extensible Firmware Interface). While both perform similar tasks (starting the boot process), each has different features and is configured using different interfaces.
BIOS is the older of the two and is slowly being phased out. BIOS is considered firmware, a program embedded within the hardware. BIOS has been around for more than 30 years and has some limitations, including the devices it recognizes, limited support for large boot devices, and limits regarding partition tables.
UEFI is newer and considered a replacement for BIOS. However, because it is not firmware, but rather a software program that extends firmware, it can be used on systems that have BIOS. UEFI has several advantages over BIOS, including support for larger boot partitions, the capability to read data from different devices (RAID, LVM, and so on), and the capability to read partition tables that are GUI based.
The Bootloader Phase
The bootloader is a software program provided by the operating system that is designed to access files on the hard drive (specifically the kernel) and start the booting of the operating system. Several bootloaders are available, including LILO (which stands for Linux Loader, an older bootloader that will not be covered in this book), GRUB 2, and Legacy GRUB (Grand Unified Boot Loader)
Bootloaders can be installed on devices like hard disks (common) or USB drives (rare). If installed on a hard disk, the bootloader is normally stored in a special location called the Master Boot Record (MBR), a reserved location at the beginning of the hard disk (specifically the first 215 bytes of the boot disk). This is also where the partition table is stored.
In some cases, the bootloader might be stored in the first sector of a partition, typically when multiple bootloaders are installed on the system. It is rare to store a bootloader on a removable device, but this could be done to allow for more flexible booting (different bootloaders could be installed on different removable devices, such as a USB flash drive).
Typically the bootloader is installed during the boot process, but it is possible that the bootloader could become corrupt and require reinstallation. To install the bootloader, execute the grub-install command and provide the device where you want to install GRUB. For example, the following installs GRUB on the first SATA hard drive:
grub-install /dev/sda
Further details regarding configuring and using GRUB 2 and Legacy GRUB appear later in this chapter.
The Kernel Phase
The bootloader loads the kernel and passes control of the boot process to the kernel. During the kernel phase, the kernel configures itself and loads kernel modules. In general this includes the following tasks:
1. Configures the system so it can start assigning memory addresses to software.
2. Probes hardware and performs configuration operations.
3. Uncompresses the initrd or initramfs image; these files contain kernel modules that are required at boot time.
4. Initializes meta-devices such as LVM and RAID devices.
5. Mounts the root filesystem as read-only.
6. Starts the post-kernel phase, which includes starting a program that will boot the system the rest of the way.
There is not a lot an administrator will do to modify the kernel phase. You can change the behavior of the kernel by either recompiling the kernel or by passing parameters to the kernel from the bootloader. This is discussed in the GRUB sections later in this chapter.
You should be aware of the function of the initrd and initramfs images. A Linux kernel is fairly small by default, and kernel modules, which are separate software components, provide more features to the kernel. Typically the Linux kernel is configured with few kernel modules enabled by default. Additional modules are normally required during the boot process before the filesystems are mounted. These additional modules are stored within a compressed file, either initrd or initramfs.
The older of the two is initrd, and it is being replaced by initramfs. One disadvantage of initrd is that its image is based on a filesystem (like ext2), requiring the kernel to have filesystem support natively enabled. Another disadvantage of initrd is that it must be treated as a disk device, requiring I/O operations to be buffered in memory (which is redundant because the initrd “disk” is actually loaded into memory).
If your system uses initrd, you can generate a new initrd file by using the mkinitrd command. If your system uses initramfs, use the dracut command to create a new initramfs file. You rarely need to do this because the initrd or initramfs file created by your installer program should work just fine. Only when you add a new device that is required at initial boot would you need to create a new initrd or initramfs file. More details regarding this topic can be found later in this chapter.
The Post-Kernel Phase
Once the kernel has completed all its tasks, it starts a process that finishes booting the operating system. What process the kernel starts depends on which distribution of Linux you are using. Three bootup technologies are commonly used on modern Linux systems: SysVinit, systemd, and Upstart. Most modern systems use systemd.
GRUB
Legacy GRUB has been available for many years and was once hailed as a great replacement for older bootloader technologies, such as LILO. However, as hardware has become more sophisticated, limitations have begun to appear in Legacy GRUB’s design. As a result, Legacy GRUB is no longer actively developed, but it is still available (and bug fixes are still released) for older Linux distributions.
GRUB 2 was developed to overcome the limitations of Legacy GRUB. There are actually quite a few differences between the two technologies—not only in how each functions but also in configuration. Here are a few key differences:
• GRUB 2 supports more operating systems.
• GRUB 2 can use UUIDs (universally unique identifiers) to identify disk devices; UUIDs are more reliable than the physical and logical addresses Legacy GRUB uses. For example, adding a new hard disk to the system could mess up the configuration of Legacy GRUB because the address may change for the original hard disks. This does not happen when using UUIDs. Note: Some newer versions of Legacy GRUB can make use of UUIDs, but this is a fairly recent change.
• GRUB 2 supports LVM and RAID devices, whereas Legacy GRUB cannot access these devices.
• The configuration files are different. Legacy GRUB uses a single, simple configuration file. GRUB 2 uses a more complex system in which you should not edit the actual configuration file; rather, you edit other files that are used to build the real configuration file.
Legacy GRUB Configuration
Note
Because most mainstream distributions no longer use Legacy GRUB, practicing the topics in this chapter may be a bit more challenging. We recommend you use CentOS 5.x to gain hands-on experience with Legacy GRUB.
The primary configuration file for Legacy GRUB is the /boot/grub/grub.conf file, as shown in Example 28-1.
Example 28-1 The /boot/grub/grub.conf File
[root@onecoursesource grub]# more grub.conf
# grub.conf generated by anaconda
#
# Note that you do not have to rerun grub after making changes to this file
# NOTICE:  You have a /boot partition. This means that
#          all kernel and initrd paths are relative to /boot/, eg.
#          root (hd0,0)
#          kernel /vmlinuz-version ro root=/dev/VolGroup00/LogVol00
#          initrd /initrd-version.img
#boot=/dev/sda
default=0
timeout=5
splashimage=(hd0,0)/grub/splash.xpm.gz
hiddenmenu
title CentOS (2.6.18-406.el5)
        root (hd0,0)
        kernel /vmlinuz-2.6.18-406.el5 ro root=/dev/VolGroup00/LogVol00 rhgb quiet
        initrd /initrd-2.6.18-406.el5.img
title CentOS (2.6.18-398.el5)
        root (hd0,0)
        kernel /vmlinuz-2.6.18-398.el5 ro root=/dev/VolGroup00/LogVol00 rhgb quiet
        initrd /initrd-2.6.18-398.el5.img
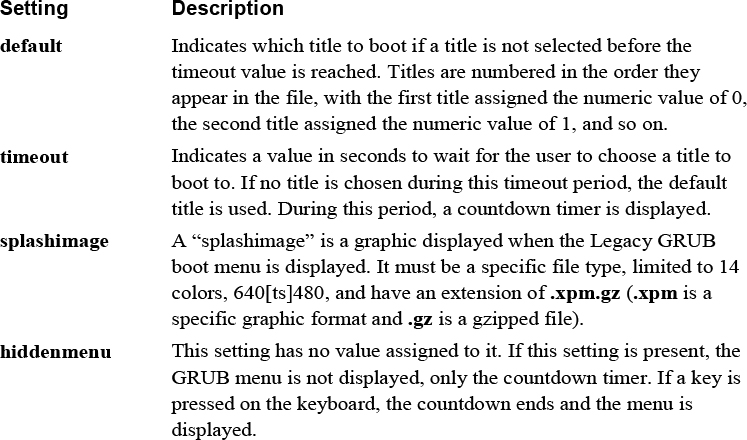
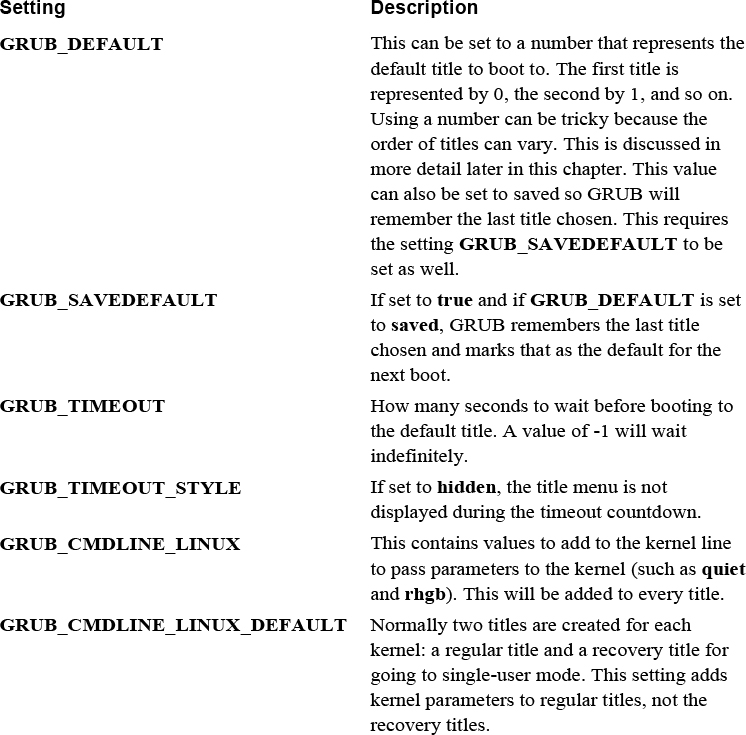
The first portion of this file contains general configuration information for Legacy GRUB. Table 28-1 describes the more common of these configuration settings.
Table 28-1 Common Legacy GRUB Configuration Settings
Each title section consists of several lines:
title CentOS (2.6.18-406.el5)
    root (hd0,0)
    kernel /vmlinuz-2.6.18-406.el5 ro root=/dev/VolGroup00/LogVol00 rhgb quiet
initrd /initrd-2.6.18-406.el5.img
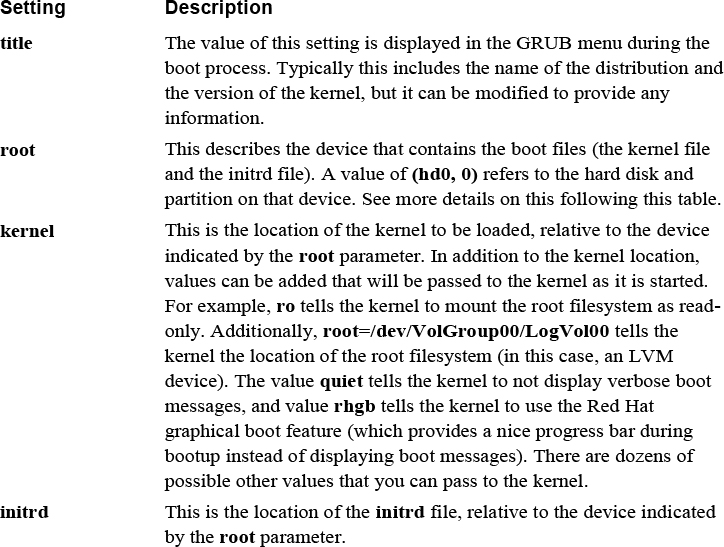
Table 28-2 describes the settings for the title section.
Table 28-2 Legacy GRUB title Settings
The device specified by the root parameter may cause confusion. Recall that partitions in Linux are typically referred to as device files (for example, /dev/hda1).
Typically hard disks are either IDE (/dev/hda, /dev/hdb, and so on) or SATA (/dev/sda, /dev/sdb). The devices are represented by a letter (a = first, b = second), and partitions are numbered starting from the value 1 (/dev/hda1, /dev/hda2, and so on).
The naming convention is different in GRUB. There is no distinction between IDE and SATA drives. All drives are “hd” devices. Numbers are assigned to drives instead of letters (0 = /dev/[hs]da, 1=/dev/[hs]db). Partitions are numbered starting from the value 0, not from 1, which is standard for device files.
As a result, a device that you may refer to as /dev/sda1 would be (hd0, 0) in Legacy GRUB. The /dev/hdb2 device is (hd1, 2) in Legacy GRUB.
You might be wondering what you would change in this configuration file. Consider the following scenarios:
• The system is in a location that is not physically secure and you want to limit the ability of someone to make changes to GRUB during the boot process. One way of doing that is to change the timeout value to 0. The default title will be automatically and immediately used by GRUB. This may seem like a dangerous thing to do because you cannot interrupt the boot process, but keep in mind that you could boot off an external device. The point of this step is that your system is not physically secure, so making it hard to perform an alternative boot is the goal.
• You may discover a useful kernel parameter that you want to enable. In this case, you would add this parameter to the kernel line of one of the titles.
• If the system is a lab machine on which you are testing new kernel features (such as recompiling new kernels), seeing verbose kernel messages during the boot process can help you troubleshoot problems that may arise during your testing. Remove the quiet and rhgb kernel parameters from one of the titles to enable verbose kernel messages.
Security Highlight
Setting the GRUB timeout value to 0 is a good security measure on systems that are not physically secure because it lessens the chance of someone compromising the system during the boot process. Here are other steps you should take:
• Remove any external drives and ports, such as CD-ROM drives and USB ports.
• Place a password on the BIOS to prevent booting from other devices.
• Place a physical lock on the case of the system so the hard drive can’t be removed and used in a different system.
• Place a password on GRUB (this method will be covered later in this chapter).
Changing Legacy GRUB During Boot
During the boot process, you can perform operations that change how the system boots. These operations include
• Selecting an alternative title for booting
• Modifying parameters for a title
• Executing GRUB commands via the GRUB command line
The most common task is to choose an alternative title to boot from. After the GRUB menu appears, use the arrow keys to select a title and then press the Enter key when you are ready to boot the system. See Figure 28-1 for an example of the screen that permits you to choose a title.
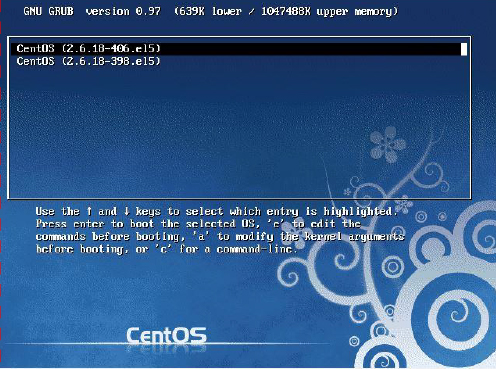
Figure 28-1 Legacy GRUB Title Screen
There are two ways to modify the parameters for a title. One technique is to use the e command to edit the titles before booting. Most often you are changing the kernel line, so the other technique, using the a command to modify the kernel arguments, might be more useful. See Figure 28-2 for an example of editing a title when using the e command.
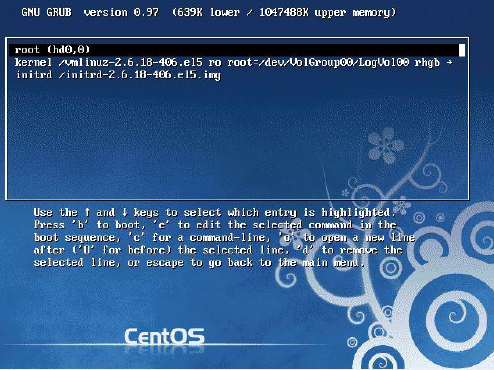
Figure 28-2 Editing a Legacy GRUB Title
Note that when you are editing a title, use your arrow keys to move to the line that you want to edit. Once you’re on the correct line, use the e command to edit the selected line. See Figure 28-3 for an example of editing a line within a title.

Figure 28-3 Editing a Legacy GRUB Title Line
After making your changes, press Enter to return to the previous screen. Pressing the Esc key cancels any changes.
Once back to the previous screen, use the b command to boot the system using your customized title parameters.
Finally, you can simply execute GRUB commands by using the c command. If you do this, you get a grub> prompt where you can execute GRUB commands.
One of the more useful GRUB commands to remember is help. This command displays all the possible GRUB commands, as demonstrated in Figure 28-4.
Booting to Single-User Mode in Legacy GRUB
Congratulations are in order! Your company’s system administrator has moved on to another job and you have been promoted to this position. It is an exciting day for you, and you are eager to impress your boss. Your first task: Update software on your company web server (a task that should have been done months ago).
You sit down at the console for the web server, ready to get to work. And then you realize: When the previous administrator left, he took the knowledge of the root password with him. Your dream promotion has quickly turned into a nightmare.
Fear not, there is a solution. By modifying parameters to GRUB during the boot process, you can recover the root password. The following describes the process:
1. Begin by booting the system and pressing a key on the keyboard once the GRUB menu appears. Now, edit the first title of the GRUB title screen, adding an s to the end of the kernel parameters. See Figure 28-5 for an example.
Figure 28-5 Editing the Kernel Line
2 Press Enter to accept the changes and then boot the system using the b command. The system boots to single-user mode, logging you in as root automatically without asking you for any password.
3 Once you’re provided a shell prompt, just execute the passwd command to change the root password. See Figure 28-6 for an example.
Figure 28-6 Changing the Root Password in Single-User Mode
4 After changing the root password, you can either reboot the system or press Ctrl+D to continue booting the system to the default runlevel.
Note
The previous example works on older systems that use Legacy GRUB. Newer systems may require a more complex sequence of commands to reset the root password.
Securing Legacy GRUB
You just cleared your first hurdle as a system administrator! You mentally pat yourself on the back and then you suddenly come to a gut-wrenching realization: Although your web server is physically secure, several other key servers are located in areas that have public access. What prevents someone else from walking up to one of those machines and using the same technique to “recover” the root password?
Fortunately, there is a technique that will prevent someone from accessing single-user mode. You can assign a password to GRUB, which prevents users from modifying titles unless they know the GRUB password.
Step 1 of securing GRUB is to generate an MD5 encrypted password. Although you can use a plain-text password, an encrypted password is more secure. Note the permissions on the Legacy GRUB configuration file:
[root@onecoursesource ~]# ls -l /boot/grub/grub.conf
-rw------- 1 root root 760 Oct  9 23:38 /boot/grub/grub.conf
The good news is that only the root user can view the contents of this file. The GRUB password goes in this file, so you may consider a plain-text password to be secure enough. However, if you are editing this file, someone could see it on your screen (remember, this system is probably not physically secure). So, an encrypted password really is best.
To create the encrypted password, execute the grub-md5-crypt command, as shown here:
[root@onecoursesource ~]# grub-md5-crypt
Password:
Retype password:
$1$KGnIT$FU80Xxt3lJlqU6FD104QF/
Next, add a line like the following to the /boot/grub/grub.conf file in the section above the title sections:
password --md5 $1$KGnIT$FU80Xxt3lJlqU6FD104QF/
Note
If you put the password setting within a title section, it will prevent someone from booting to that title unless they know the password.
The /boot/grub/grub.conf file should now look something like what’s shown in Example 28-2.
Example 28-2 Revised /boot/grub/grub.conf File
[root@onecoursesource ~]# more /boot/grub/grub.conf
# grub.conf generated by anaconda
#
# Note that you do not have to rerun grub after making changes to this file
# NOTICE:  You have a /boot partition. This means that
#          all kernel and initrd paths are relative to /boot/, eg.
#          root (hd0,0)
#          kernel /vmlinuz-version ro root=/dev/VolGroup00/LogVol00
#          initrd /initrd-version.img
#boot=/dev/sda
default=0
timeout=5
splashimage=(hd0,0)/grub/splash.xpm.gz
hiddenmenu
password --md5 $1$KGnIT$FU80Xxt3lJlqU6FD104QF/
title CentOS (2.6.18-406.el5)
        root (hd0,0)
        kernel /vmlinuz-2.6.18-406.el5 ro root=/dev/VolGroup00/LogVol00 rhgb quiet
        initrd /initrd-2.6.18-406.el5.img
title CentOS (2.6.18-398.el5)
        root (hd0,0)
        kernel /vmlinuz-2.6.18-398.el5 ro root=/dev/VolGroup00/LogVol00 rhgb quiet
        initrd /initrd-2.6.18-398.el5.img
Reboot the system to test this new setting. The GRUB title screen should now look different. Note the message below the titles that states you need to enter the p command followed by the password to unlock additional features. If you do not know the password, you cannot edit the titles or enter GRUB commands. See Figure 28-7 for a demonstration.
Figure 28-7 Password Required for Legacy GRUB
Security Highlight
So, what if you really need to recover the root password, but you do not know the GRUB password? You could boot from a CD-ROM or DVD that has a bootable Linux image, bypassing the hard drive’s GRUB program. Once you have done that, you can mount the hard drive and modify the root password.
Clearly, this is another possible security risk. You can limit this risk by removing the CD-ROM/DVD drive, but then someone could also boot from a USB disk. You could modify BIOS to prevent booting from USB devices (and password-protect the BIOS), but then someone could remove the hard drive and take it to another system that has a CD-ROM/DVD drive or allows bootable USB devices.
The point is that no system is entirely secure. Use techniques to limit access and always be prepared for that dreaded hack.
GRUB 2 Configuration
Most modern Linux distributions use GRUB 2. In some ways, GRUB 2 is similar to Legacy GRUB, but there are many differences as well. Perhaps the biggest difference you will notice is how you configure GRUB 2.
On Red Hat–based distributions, the primary configuration file for GRUB 2 is /boot/grub2/grub.cfg. On Debian-based distributions, the primary configuration file for GRUB 2 is /boot/grub/grub.cfg. However, you should never edit these files directly because each is generated from other configuration files. Instead, edit the /etc/default/grub file or files in the /etc/grub.d directory.
The file for global GRUB 2 configuration changes is the /etc/default/grub file. The files in the /etc/grub.d directory are for specific changes, such as for adding a new title. Example 28-3 shows an example of the /etc/default/grub file.
Example 28-3 The/etc/default/grub File
[root@onecoursesource ~]# more /etc/default/grub
# If you change this file, run 'update-grub' afterwards to update
# /boot/grub/grub.cfg.
# For full documentation of the options in this file, see:
#   info -f grub -n 'Simple configuration'

GRUB_DEFAULT=0
#GRUB_HIDDEN_TIMEOUT=0
GRUB_HIDDEN_TIMEOUT_QUIET=true
GRUB_TIMEOUT=10
GRUB_DISTRIBUTOR=`lsb_release -i -s 2> /dev/null || echo Debian`
GRUB_CMDLINE_LINUX_DEFAULT="quiet splash"
GRUB_CMDLINE_LINUX=""

# Uncomment to enable BadRAM filtering, modify to suit your needs
# This works with Linux (no patch required) and with any kernel that obtains
# the memory map information from GRUB (GNU Mach, kernel of FreeBSD ...)
#GRUB_BADRAM="0x01234567,0xfefefefe,0x89abcdef,0xefefefef"

# Uncomment to disable graphical terminal (grub-pc only)
#GRUB_TERMINAL=console

# The resolution used on graphical terminal
# note that you can use only modes which your graphic card supports via VBE
# you can see them in real GRUB with the command 'vbeinfo'
#GRUB_GFXMODE=640x480

# Uncomment if you don't want GRUB to pass "root=UUID=xxx" parameter to Linux
#GRUB_DISABLE_LINUX_UUID=true

# Uncomment to disable generation of recovery mode menu entries
#GRUB_DISABLE_RECOVERY="true"

# Uncomment to get a beep at grub start
#GRUB_INIT_TUNE="480 440 1"
This file contains many possible settings in the form of shell variable settings. Table 28-3 describes the common settings you are likely to change in the /etc/default/grub file.
Table 28-3 Common /etc/default/grub Settings
Saving GRUB 2 Changes
If you make changes to the /etc/default/grub file and reboot the machine, you will note that these changes do not affect GRUB 2 immediately. You first need to run a command that takes the values in the /etc/default/grub file (and values from the files in the /etc/grub.d directory) and creates a new GRUB 2 configuration file.
On Red Hat–based systems, execute the grub2-mkconfig command. On Debian-based systems, execute the update-grub command.
Note
After executing the appropriate command to update the GRUB 2 configuration file, you can see these changes in the grub.cfg file (in either the /boot/grub or /boot/grub2 directories). You will notice that this is not a typical Linux configuration, but more like a script. You may be tempted to edit this script, but if you do, then your change will be lost the next time the grub2-mkconfig or the update-grub command is executed (which could happen when a new kernel is installed, for example).
GRUB 2 Titles
Creating and specifying GRUB 2 titles are a bit tricky. For example, you can set the default title by setting the GRUB_DEFAULT parameter in the /etc/defaults/grub file to a numeric value. But, how do you determine which title is first, which is second, and so on? You could reboot the machine and look at the order of the titles, but that does not solve another problem: This order could change when your kernel is updated or you manually add additional titles.
When you execute the grub2-mkconfig or update-grub command, it probes the system for kernels and creates menuentry settings in the grub.cfg file. An example of one of these entries is shown in the highlighted section of Figure 28-8 for a demonstration.
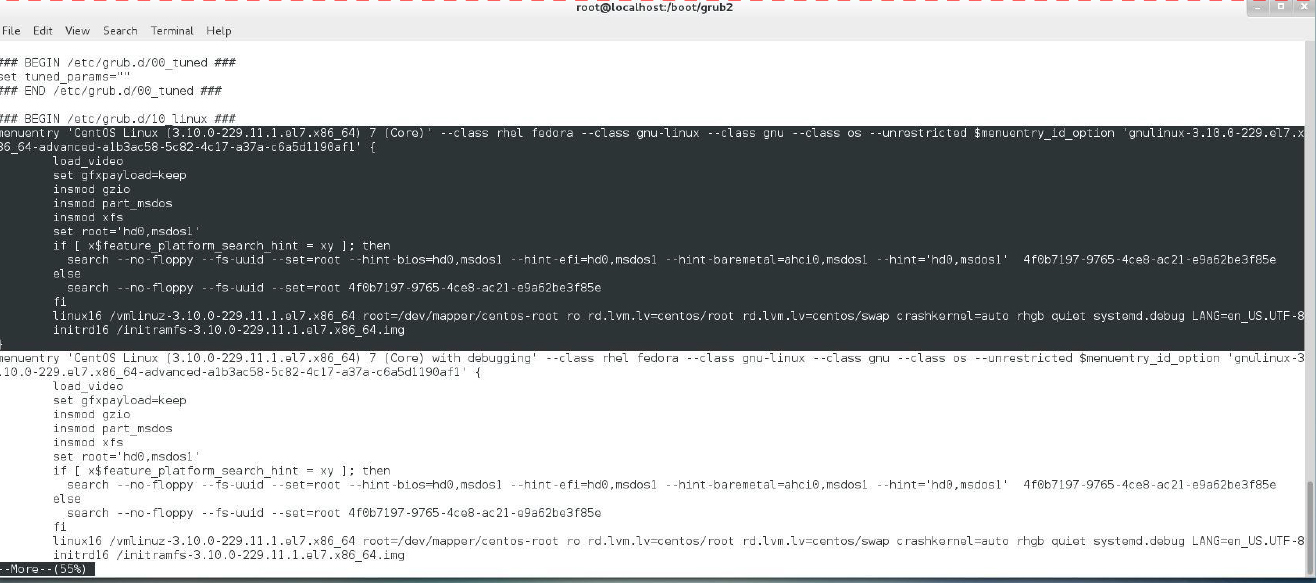
Figure 28-8 The menuentry Setting in grub.cfg
Based on the order of the menuentry groups in the grub.cfg file, you could determine the correct numeric value to assign to GRUB_DEFAULT. Just realize that certain changes to the system, such as installing a new kernel, will result in a new order of these menuentry groups. So, it might be better to use the name associated with the menuentry, for example:
GRUB_DEFAULT='CentOS Linux (3.10.0-229.11.1.e;7.x86.64) 7 (Core)'
If you want to create your own custom title, add an entry in the /etc/grub.d/40_custom file. The entry is just like the menuentry from the grub.cfg file, so you could copy and paste one of those examples to create your own. Remember to run the grub2-mkconfig or update-grub command after you make changes to the /etc/grub.d/40_custom file.
Booting to Single-User Mode in GRUB 2
Earlier in this chapter, you learned how to boot to single-user mode to recover the root password on a system that uses the Legacy GRUB system. If your system is using GRUB 2 for a boot system, the process is going to be different.
Step 1 is the same as with Legacy GRUB: Boot the system and edit the title of your choice by using the e command. Next, edit the line that begins with linux or linux16 and add init=/bin/sh to the end of that line. Boot the system with Ctlr+x.
Remount the root filesystem as read-write with the following command:
mount -o remount,rw /
Change the root password by executing the passwd command. You will also need to run the following command if you have SELinux enabled on your system (if you do not know if SELinux is enabled, there is no harm to running this command, so it’s best to do so):
touch /.autorelabel
Finally, reboot the machine by executing the following command:
exec /sbin/reboot
Note
This process may vary slightly from one distribution to another. Consult the documentation for your distribution before attempting this process.
Securing GRUB 2
Securing Legacy GRUB is straightforward compared to securing GRUB 2. Recall that you want to limit what can be done in the interactive GRUB environment that is provided during the boot process. With Legacy GRUB, you just provide a password in the /boot/grub/grub.conf file. With GRUB 2, you provide users and passwords, which allows you to fine-tune the access.
You should create at least one “superuser” account that has full access to all GRUB features during boot. You can do this by adding the following at the bottom of the /etc/grub.d/01_users file:
cat <<EOF
set superusers="bo"
password bobospassword
EOF
To allow for regular users, use the following format:
cat <<EOF
set superusers="bo"
password bobospassword
password sarah sarahspassword
EOF
Now to assign access to specific users for a specific title, modify the /etc/grub.d/40_custom file. In Example 28-4, no restriction is placed on test1, so anyone could edit this title. Only the “superuser” and the “sarah” account can edit test2. If no option is provided, only the superuser can edit the menuentry, so test3 can only be edited by the superuser.
Example 28-4 The menuentry Setting
menuentry 'test1' --unrestricted {
set root=(hd0,1)
linux   /vmlinuz
}
menuentry 'test2' --users sarah {
set root=(hd0,2)
linux   /vmlinuz
}
menuentry 'test3' {
set root=(hd0,3)
linux   /vmlinuz
}
If you do not want to use plain-text passwords, you can create an encrypted password by executing the grub2-mkpasswd-pbkdf2 command. The format of the /etc/grub.d/01_users file should be changed to the following:
cat <<EOF
set superusers="bo"
password_ pbkdf2 bo
grub.pbkdf2.sha512.10000.19074739ED80F115963D984BDCB35AA671C24325755377C3E9B014D862DA6ACC77BC110EED41822800A87FD3700C037320E51E9326188D53247EC0722DDF15FC.C56EC0738911AD86CEA55546139FEBC366A393DF9785A8F44D3E51BF09DB980BAFEF85281CBBC56778D8B19DC94833EA8342F7D73E3A1AA30B205091F1015A85
EOF
Kernel Components
To understand the Linux kernel, it might be good to start by stating what the kernel is not. The kernel is not one single, massive program. Instead, the kernel consists of a core program and a collection of smaller programs, called kernel modules or LKMs (Loadable Kernel Modules), that can be loaded and unloaded as required.
Recall that the kernel performs several critical system tasks, including managing hardware devices such as hard drives, network cards, and Bluetooth devices. To manage each of these hardware devices, the kernel needs a program (called a driver or a module) to be available in memory. However, there is rarely a case in which all kernel modules need to be stored in memory. As a result, these modules are often only loaded into memory as required.
For example, if you have a desktop machine or a server, it is unlikely that you have a Bluetooth device because these devices are normally only available on laptops. It would serve no purpose to have the Bluetooth module loaded into memory for these systems. Not only would it result in less usable RAM, but booting the system may be much slower if all kernel modules were loaded.
More details about how these modules are loaded and unloaded are provided later in this chapter. However, it is important to understand what modules are before you can start to make changes to the kernel.
Kernel Documentation
If you plan on making changes to the kernel or compile a custom kernel, you really want to have access to the kernel documentation. There are several locations where this can be found:
• The /usr/src/linux/Documentation directory: For older versions of the kernel (typically before version 3.0), the documentation is installed with the kernel source files. The kernel source files are what you use when you compile a custom kernel. To obtain the source file (and the documentation), you need to install the kernel-devel package.
• The /usr/share/doc/kernel-doc*/Documentation directory: For newer versions of the kernel (typically after version 3.0), the documentation files are no longer bundled with the source files. To obtain the documentation, you need to install the kernel-doc package.
• The https://www.kernel.org/doc site: You can also access kernel documentation from the kernel.org website.
The good news is there is documentation for the Linux kernel! The bad news is it is not very well organized. For example, if you look at the Documentation directory, you see a collection of text files with names like magic-number.txt, zorro.txt, and bt8xxgpio.txt (no, we did not make those up). If you are not already comfortable with the grep command, it is time take the plunge because that command will be your greatest ally in finding what you need. There is a massive amount of information within the kernel documentation; you just need to be patient to find what you need.
Tweaking the Kernel
In the real world, you need to learn how to make use of kernel documentation. To give you an example of what this information can provide, we are going to introduce a feature that exists in the /proc/sys directory.
If you look in the /proc/sys directory, you see directories like the following:
[root@onecoursesource sys]$ ls
crypto  debug  dev  fs  kernel  net  sunrpc  vm
Each one of these directories contains files (and subdirectories) that you can use to modify the behavior of the kernel without having to perform a recompile. For example, if you look in the /proc/sys/fs directory, you see a bunch of files, including one named file-max:
[root@onecoursesource fs]$ ls
aio-max-nr    dir-notify-enable  inode-nr          leases-enable  overflowuid
aio-nr        epoll              inode-state       mqueue         quota
binfmt_misc   file-max           inotify           nr_open        suid_dumpable
dentry-state  file-nr            lease-break-time  overflowgid
[root@onecoursesource fs]$ more file-max
49305
You may wonder what this file means. The answer to this question is found within the /usr/share/doc/kernel-doc-2.6.32/Documentation/sysctl/fs.txt file:
“The value in file-max denotes the maximum number of file-handles that the Linux kernel will allocate. When you get lots of error messages about running out of file handles, you might want to increase this limit.”
A file-handle is an identifier assigned to an open file, for example, when a process opens a file, either for reading or writing. So in the previous example, the maximum number of files that can be opened at any given time for this system is 49,305, the value stored in the file-max file. You can temporarily change this value by changing the value in the file-max file:
[root@onecoursesource fs]$ echo 60000 > file-max
[root@onecoursesource fs]$ more file-max
60000
Later in this chapter, you will see how to make this a permanent change.
If you start poking around in the kernel documentation, you are going to discover some discouraging information:
• Not everything is documented.
• Some documentation is out of date. Remember that zorro.txt file? If you read it, you will discover that “The Zorro bus is the bus used in the Amiga family of computers.” Yes, the Amiga. (Amiga was discontinued in 1996, but who knows, maybe there is still one in your parent’s garage?)
Despite these drawbacks, the kernel documentation is still useful. If you make a lot of changes to the kernel, you will explore this documentation frequently.
Kernel Images
By now you should realize that the kernel is really a collection of software pieces that have been merged together. The core of the kernel is a comparatively small software program that does not have a lot of functionality. To be able to perform more advanced tasks, the kernel needs to be augmented by kernel modules.
There are two primary ways that the kernel modules can be merged with the core kernel software. The first method is called LKMs (Loadable Kernel Modules). This is when the kernel modules are in separate files from the kernel and loaded into memory as needed. LKMs can either be loaded into memory during the kernel phase of the boot process or later as needed. LKMs are explored in greater detail later in this chapter.
The second method is to create a kernel that includes the core kernel software as well as necessary kernel modules. The result of merging the kernel with modules is a file called the kernelimage. There are several different types of kernel images in use in Linux, but here are the two most common:
• zImage: On Intel-based hardware architectures, the first 640KB of RAM is referred to as low memory. Older systems required that the kernel be stored in low memory, so the zImage was a compressed kernel image limited to 512KB (this is the post-compressed image size), so the kernel would fit in low memory.
• bzImage: The low memory limitation is rarely a factor anymore because most systems allow the kernel to be stored in high memory (memory above 1MB of RAM). This is fortunate because most kernel images are much larger than 512KB in size. The bzImage type is designed for kernel images larger than 512KB.
Note
Some folks will tell you that the “bz” in bzImage stands for bzip2 compression. This is incorrect. Prior to kernel 2.6.30, images were normally compressed using the gzip utility, and as of 2.6.30, images are compressed with the bzip2 utility. The term bzImage actually stands for “big zImage.”
The kernel image file is typically named with the following format: vmlinuz-version.arch.
The vmlinuz just tells you it is a kernel image. It could be either a zImage or bzImage file. You can tell which type it is by executing the file command on the file:
[root@onecoursesource ~]# file /boot/vmlinuz-2.6.32-573.el6.x86_64
/boot/vmlinuz-2.6.32-573.el6.x86_64: Linux kernel x86 boot executable
bzImage, version 2.6.32-573.el6.x86_64 (mockbuil, RO-rootFS, swap_dev 0x4,
Normal VGA
You could probably also tell by the size of the file that zImage files should be smaller than 512KB, so the following is clearly a bzImage file because of its size:
[root@onecoursesource ~]# ls -lh  /boot/vmlinuz-2.6.32-573.el6.x86_64
-rwxr-xr-x. 1 root root 4.1M Jul 23 09:13 /boot/vmlinuz-2.6.32-573.el6.x86_64
The version part of the image filename typically includes the base kernel version (2.6.32.573 in this example) and the distribution release (el6 in this case). The arch part of the image filename specifies the architecture that the kernel was built for. The value x86 means Intel 32-bit architecture and compatible architectures, and x86_64 means Intel 64-bit architecture and compatible architectures.
Kernel Modules
In most cases, you will not need to worry about kernel modules because these are normally maintained automatically for you. If a module is needed, it is automatically loaded into memory in almost all cases. And, because modules are small, these rarely need to be unloaded from memory.
Sometimes you may want to adjust how a module is used. Many modules have parameters (sometimes called options) that can be used to adjust how a module behaves.
Module Files
Modules are stored in the /lib/modules directory. Each kernel has its own subdirectory under the /lib/modules directory:
[root@onecoursesource ~]# ls /lib/modules
2.6.32-573.7.1.el6.x86_64  2.6.32-573.el6.x86_64  2.6.32.68
When you’re working with modules, it is important to pick the correct subdirectory. This is when the uname command is useful because its output tells you which kernel you are currently using:
[root@onecoursesource ~]# uname -a
Linux localhost.localdomain 2.6.32-573.7.1.el6.x86_64 #1 SMP Tue Sep 22
22:00:00 UTC 2015 x86_64 x86_64 x86_64 GNU/Linux
The contents of a typical /lib/modules/kernel_version directory look like what’s shown in Example 28-5.
Example 28-5 The /lib/modules/kernel_version Directory Contents
[root@onecoursesource 2.6.32-573.7.1.el6.x86_64]# pwd
/lib/modules/2.6.32-573.7.1.el6.x86_64
[root@onecoursesource 2.6.32-573.7.1.el6.x86_64]# ls
build              modules.drm          modules.softdep
extra              modules.ieee1394map  modules.symbols
kernel             modules.inputmap     modules.symbols.bin
misc               modules.isapnpmap    modules.usbmap
modules.alias      modules.modesetting  source
modules.alias.bin  modules.networking   updates
modules.block      modules.ofmap        vdso
modules.ccwmap     modules.order        weak-updates
modules.dep        modules.pcimap
modules.dep.bin    modules.seriomap
You do not need to be concerned about all the files in this directory, but there are a few that you should be aware of. The modules are stored in subdirectories under the kernel directory:
[root@onecoursesource kernel]# pwd
/lib/modules/2.6.32-573.7.1.el6.x86_64/kernel
[root@onecoursesource kernel]# ls
arch  crypto  drivers  fs  kernel  lib  mm  net  sound
These subdirectories provide a means of breaking the modules into categories. For example, all the filesystem modules are located in the /lib/modules/kernel_version/kernel/fs directory:
[root@onecoursesource fs]# pwd
/lib/modules/2.6.32-573.7.1.el6.x86_64/kernel/fs
[root@onecoursesource fs]# ls
autofs4     configfs  exportfs  fat      jbd    mbcache.ko  nls       xfs
btrfs       cramfs    ext2      fscache  jbd2   nfs         squashfs
cachefiles  dlm       ext3      fuse     jffs2  nfs_common  ubifs
cifs        ecryptfs  ext4      gfs2     lockd  nfsd        udf
Knowing exactly where the modules are stored is important in the event that you ever need to copy a module manually onto your system. Normally, additional modules are installed via a software management tool, but occasionally you will manually copy these to your system.
After you copy a module, it is critical that you execute the depmod command. The depmod command probes all the modules under the /lib/modules/kernel_version/kernel directory and generates the /lib/modules/kernel_version/modules.dep file and the /lib/modules/kernel_version/*map files.
The modules.dep file is important because it contains a list of all the kernel modules and module dependencies. A dependency is when a module requires another module to work successfully. For example, consider the output in Example 28-6.
Example 28-6 The modules.dep File
[root@onecoursesource 2.6.32-573.7.1.el6.x86_64]# head modules.dep
kernel/arch/x86/kernel/cpu/mcheck/mce-inject.ko:
kernel/arch/x86/kernel/cpu/cpufreq/powernow-k8.ko:
kernel/drivers/cpufreq/freq_table.ko kernel/arch/x86/kernel/cpu/cpufreq/mperf.ko
kernel/arch/x86/kernel/cpu/cpufreq/mperf.ko:
kernel/arch/x86/kernel/cpu/cpufreq/acpi-cpufreq.ko:
kernel/drivers/cpufreq/freq_table.ko kernel/arch/x86/kernel/cpu/cpufreq/mperf.ko
kernel/arch/x86/kernel/cpu/cpufreq/pcc-cpufreq.ko:
kernel/arch/x86/kernel/cpu/cpufreq/speedstep-lib.ko:
kernel/arch/x86/kernel/cpu/cpufreq/p4-clockmod.ko:
kernel/drivers/cpufreq/freq_table.ko kernel/arch/x86/kernel/cpu/cpufreq/speedstep-lib.ko
kernel/arch/x86/kernel/cpu/cpufreq/intel_pstate.ko:
kernel/arch/x86/kernel/test_nx.ko:
kernel/arch/x86/kernel/microcode.ko:
The first line lists the module mce-inject.ko, which has no dependencies because there is nothing listed after the colon (:) character. On the second line, you can see that the powernow-k8.ko module depends on the freq_table.ko module.
Important Note
The depmod command only executes on the current kernel. If you need to have depmod create the appropriate files for another kernel, specify the kernel name as an argument:
[root@onecoursesource ~]# depmod 2.6.32.68
Listing Modules That Are Loaded
When a module is loaded into memory, you can see it in the output of the lsmod command. See Example 28-7 for the output of the lsmod command.
Example 28-7 The lsmod Command
[root@onecoursesource ~]# lsmod | head
Module                  Size  Used by
fuse                   79892  2
vboxsf                 37663  0
autofs4                27000  3
8021q                  20362  0
garp                    7152  1 8021q
stp                     2218  1 garp
llc                     5418  2 garp,stp
ipt_REJECT              2351  2
nf_conntrack_ipv4       9154  2
There are three columns of output:
• The first column (Module) lists the name of the module loaded in memory. Note that the filename of the module is slightly different because the filename includes an extension, such as .ko.
• The second column (Size) is the size of the module in bytes. Typically modules are small and do not take up much memory.
• The last column (Used by) is how many “things” are using this module. These things can be processes, other modules, or the kernel itself. If these things are other modules, the output of the lsmod command lists those module names. You can only unload a module from memory if the value of this third column is 0, meaning it is currently not being used.
Loading Modules into Memory
Before showing you how to load modules into memory, we first want to show you an example of why you rarely ever need to do this. In most cases, modules are loaded into memory as needed. For example, take a look at the output of the following command:
[root@onecoursesource ~]# lsmod | grep fat
[root@onecoursesource ~]#
As you can see, there is no module named “fat” loaded into memory. The fat module is one of the modules needed to read the FAT (File Allocation Table) filesystem (a Windows-based filesystem that you may find on removable devices like USB drives). None of the currently mounted filesystems are FAT filesystems, so there is no need for this module to be loaded into memory.
In Example 28-8, you can see what happens in the system log file when a USB disk with a FAT filesystem is added to the system.
Example 28-8 System Log File Entry When Adding a USB Disk
[root@onecoursesource linux-2.6.32.68]# tail /var/log/messages Nov 9 22:22:04 localhost kernel: USB Mass Storage support registered. Nov 9 22:22:05 localhost kernel: scsi 7:0:0:0: Direct-Access Generic Flash Disk8.07 PQ: 0 ANSI: 2 Nov 9 22:22:05 localhost kernel: sd 7:0:0:0: Attached scsi generic sg6 type 0 Nov 9 22:22:05 localhost kernel: sd 7:0:0:0: [sdf] 7831552 512-byte logical blocks:
The device is recognized by the system and then several actions take place. One action is to create a device file for the USB disk. The USB disk is also automatically mounted. You can see this based on the last line of output of the mount command shown in Example 28-9.
Example 28-9 The mount Command
[root@onecoursesource linux-2.6.32.68]# mount /dev/mapper/VolGroup-lv_root on / type ext4 (rw) proc on /proc type proc (rw) sysfs on /sys type sysfs (rw) devpts on /dev/pts type devpts (rw,gid=5,mode=620) tmpfs on /dev/shm type tmpfs (rw,rootcontext="system_u:object_r:tmpfs_t:s0") /dev/sda1 on /boot type ext4 (rw) none on /proc/sys/fs/binfmt_misc type binfmt_misc (rw) gvfs-fuse-daemon on /root/.gvfs type fuse.gvfs-fuse-daemon (rw,nosuid,nodev) /dev/sdf1 on /media/CENTOS63 type vfat
Notice the filesystem type: vfat. The vfat filesystem is one of several variations of the FAT filesystem. How was the kernel able to recognize this filesystem and mount the USB device when the appropriate module was not loaded into memory? Because it was loaded into memory automatically when the kernel tried to mount the filesystem. As you can see from the output of the following command, the vfat module is now loaded into memory:
[root@onecoursesource ~]# lsmod | grep fat
vfat                   10584  1
fat                    54992  1 vfat
The value of 1 in the third column of the vfat module indicates one thing is using the module. In this case, that one thing is the mount process itself. Unmount that filesystem and you see this value drop to 0:
[root@onecoursesource ~]# umount /media/CENTOS63
[root@onecoursesource ~]# lsmod | grep fat
vfat                   10584  0
fat                    54992  1 vfat
As you can see from the previous example, the kernel is normally able to load modules into memory automatically, as required. But, suppose you really want to load the vfat module manually. There are two commands you can use: the insmod command (the “hard way”) and the modprobe command (the “easy way”).
If you use the insmod command, you need to provide a complete pathname to the module (note that before this command is executed, the module is unloaded from memory, a process that will be covered later in this section):
[root@onecoursesource ~]# insmod /lib/modules/2.6.32-
Unfortunately, sometimes the command fails, as you can see from the output of the previous command. This “Unknown symbol in module” error is due to the fact that the vfat module has a dependency module. How do you know what this dependency module is? By looking at the /lib/modules/kernel-version/modules.dep file, like so:
[root@onecoursesource ~]# grep vfat /lib/modules/2.6.32-
So, if you load the fat module first, then you can load the vfat module. Of course you first need to check to make sure that the fat module doesn’t have any dependencies (the first lsmod command in the following example is just to verify that these modules are not loaded into memory):
[root@onecoursesource ~]# lsmod | grep fat [root@onecoursesource ~]# grep fat.ko /lib/modules/2.6.32-
The insmod command is a pain. Not only do you have to load dependency modules, you have to know exactly where the modules are. A much easier command to use is the modprobe command:
[root@onecoursesource ~]# lsmod | grep fat
[root@onecoursesource ~]# modprobe vfat
[root@onecoursesource ~]# lsmod | grep fat
vfat                   10584  0
fat                    54992  1 vfat
The modprobe command searches the modules.dep file to find the location of the module that you want to load. The command also uses the modules.dep file to determine any dependencies that the module has and loads these dependency modules first.
Conversational Learning™ — Loading Modules
Gary: Hi, Julia. Do you have much experience with kernel modules?
Julia: A bit… are you having a difficult time with one?
Gary: No, but I have been using modprobe to load modules and now I see that the insmod command can also load modules. Which one should I use and why?
Julia: I would recommend using modprobe in most cases. It does a great job of determining dependency modules, and you don’t have to specify the complete path to the module.
Gary: Then I should completely ignore the insmod command?
Julia: There are a couple of reasons why you should know about the insmod command. To begin with, some older scripts may use insmod to load modules.
Gary: Any other reason to know about this command?
Julia: Yes, one advantage of insmod is that you can use it to quickly test a new module, as long as it doesn’t have any dependencies. With the modprobe command, you have to first install the module in the right location, then run the depmod command so the modprobe command knows where the module is located and what its dependencies are. The insmod command doesn’t require that, so it can be good for testing a new module—perhaps one that you or another developer in your organization created.
Gary: OK, sounds like I will be mostly using modprobe, but there are some use cases for insmod. Thanks, Julia.
Unloading Modules from Memory
Before demonstrating how to unload a module from memory, you should consider why you would need to unload a module:
• The module could cause some sort of conflict or error. This could be possible for third-party modules, but it is unlikely for any module that comes with the kernel.
• You can free up memory space by unloading a module. Keep in mind that modules tend to be small. If you have to free up memory by unloading modules, you really should consider adding more memory to that system.
It is highly unlikely that either of these reasons will be compelling enough to unload modules from memory. Keep in mind that even if you do unload a module, it is going to be reloaded when it is required again. However, on the rare occasion when you do have a need to unload a module from memory, you should be aware of how to accomplish this task.
To unload a module manually, you can use the rmmod command:
[root@onecoursesource ~]# rmmod fat
ERROR: Module fat is in use by vfat
Unfortunately, if the system is using the module, you will receive an error message, as shown in the previous example.
Instead of using the rmmod command, consider using the modprobe -r command:
[root@onecoursesource ~]# rmmod fat
This should remove both the fat and vfat modules from memory (assuming that the vfat module is not currently being used). You still get an error if the module is being used by a process or by the kernel.
Listing Module Information
In the real world, you will not load and unload modules from memory often. However, you may find it useful to understand modules—particularly module parameters.
A module parameter is a feature that allows you to modify the behavior of a module. Not all modules have parameters, but for those that do, knowing the parameters can help you customize how your system behaves.
To view a module’s parameters (and additional information), execute the modinfo command, as shown in Example 28-10.
Example 28-10 The modinfo Command
[root@onecoursesource ~]# modinfo cdrom
filename:       /lib/modules/2.6.32-573.7.1.el6.x86_64/kernel/drivers/cdrom/cdrom.ko
license:        GPL
srcversion:     6C1B1032B5BB33E30110371
depends:
vermagic:       2.6.32-573.7.1.el6.x86_64 SMP mod_unload modversions
parm:           debug:bool
parm:           autoclose:bool
parm:           autoeject:bool
parm:           lockdoor:bool
parm:           check_media_type:bool
parm:           mrw_format_restart:bool
This is the module that allows the kernel to utilize the CD-ROM drive. The lines that start with parm are the parameters. For example, you are probably used to the fact that the CD-ROM drive door is locked on Linux systems when a CD-ROM disc is inserted and mounted. This can be controlled by the lockdoor parameter for the cdrom module.
One way of setting this parameter is to load the module with the modprobe command, passing the parameter as an argument:
[root@onecoursesource ~]# modprobe cdrom lockdoor=0
Because lockdoor is a bool (Boolean) type, it can be set to either 1 (lock the door) or 0 (don’t lock the door).
The modprobe technique is only temporary and requires you to unload and reload the module. If you reboot the system, the parameter will be set to the default. Later in this chapter, you see another way to change the parameter without having to unload the module and a different method to make the change persistent across reboots.
Remember the modinfo command; it is a useful way to gather information about a module, including the parameters it supports.
The /proc/sys Filesystem
Earlier in this chapter, the /proc/sys directory structure was introduced. This directory is part of the memory-based filesystem that is mounted under the /proc mount point. Everything under the /proc mount point is information related to the kernel, including kernel modules. This information is not stored on the hard drive, but rather in RAM.
Kernel parameters can be modified on the fly by changing files in the /proc/sys directory. Recall the earlier example that demonstrated how you can temporarily change the number of file handles by modifying the value in the /proc/sys/fs/file-max file:
[student@localhost fs]$ echo 60000 > file-max
[student@localhost fs]$ more file-max
60000
Modules can also be modified by changing files in the /proc/sys directory structure. For example, consider the output of the following commands:
[root@onecoursesource ~]# ls /proc/sys/dev/cdrom
autoclose  autoeject  check_media  debug  info  lock
[root@onecoursesource ~]# modinfo cdrom | grep parm
parm:           debug:bool
parm:           autoclose:bool
parm:           autoeject:bool
parm:           lockdoor:bool
parm:           check_media_type:bool
parm:           mrw_format_restart:bool
Note that most of the parm values have corresponding files in the /proc/sys/dev/cdrom directory (although why the file for the lockdoor parameter is called lock and not “lockdoor” is a bit of a mystery). By changing the value of a file, you can change the behavior of the module without having to unload and reload the module:
[root@onecoursesource ~]# cat /proc/sys/dev/cdrom/lock
1
[root@onecoursesource ~]# echo "0" > /proc/sys/dev/cdrom/lock
[root@onecoursesource ~]# cat /proc/sys/dev/cdrom/lock
0
Security Highlight
There are over a thousand kernel parameters. Some are designed to provide better security to the system. For example, setting the contents of the /proc/sys/net/ipv4/icmp_echo_ignore_all file to a value of 1 will result in the system ignoring request from commands like the ping command. The security advantage of this is that a flood of ping requests can result in a denial of service (DoS) as the system attempts to keep up on the responses to a large number of ping requests. Take some time to explore other kernel parameters to learn more about how you can better secure the system.
You can also view and change parameters by using the sysctl command. For example, to view all the kernel and kernel module parameters, execute the sysctl command with the -a option, as shown in Example 28-11.
Example 28-11 The sysctl –a Command
[root@onecoursesource ~]# sysctl -a | head
kernel.sched_child_runs_first = 0
kernel.sched_min_granularity_ns = 1000000
kernel.sched_latency_ns = 5000000
kernel.sched_wakeup_granularity_ns = 1000000
kernel.sched_tunable_scaling = 1
kernel.sched_features = 3183
kernel.sched_migration_cost = 500000
kernel.sched_nr_migrate = 32
kernel.sched_time_avg = 1000
kernel.sched_shares_window = 10000000
The name of the parameter (kernel.sched_child_runs_first, for example) is a relative pathname that starts from /proc/sys and has a dot (.) character between the directory and filename rather than a slash (/) character. For example, the /proc/sys/dev/cdrom/lock file is named the dev.cdrom.lock parameter:
[root@onecoursesource ~]# sysctl -a | grep dev.cdrom.lock
dev.cdrom.lock = 1
You can change the value of this parameter by using the sysctl command:
[root@onecoursesource ~]# sysctl dev.cdrom.lock=0
dev.cdrom.lock = 0
[root@onecoursesource ~]# sysctl -a | grep dev.cdrom.lock
dev.cdrom.lock = 0
It is actually safer to use the sysctl command rather than modifying the file directly because the sysctl command knows which values for the parameter are valid and which ones are not:
[root@onecoursesource ~]# sysctl dev.cdrom.lock="abc"
error: "Invalid argument" setting key "dev.cdrom.lock"
The sysctl command knows which parameter values are valid because it can look at the modinfo output. For example, the value of the lock file must be a Boolean (0 or 1) according to the output of the modinfo command:
[root@onecoursesource ~]# modinfo cdrom | grep lock
parm:           lockdoor:bool
If you modify the file directly or use the sysctl command, the changes are temporary. When the system is rebooted, the values go back to the defaults, unless you make changes in the /etc/sysctl.conf file; see Example 28-12 for a sample of this file.
Example 28-12 The /etc/sysctl.conf File
[root@onecoursesource ~]#head /etc/sysctl.conf
# Kernel sysctl configuration file for Red Hat Linux
#
# For binary values, 0 is disabled, 1 is enabled. See sysctl(8) and
# sysctl.conf(5) for more details.

# Controls IP packet forwarding
net.ipv4-ip_forward = 0

# Controls source route verification
net.ipv4.conf.default.rp_filter = 1
To disable CD-ROM locking across reboots, add the following line to the /etc/sysctl.conf file:
dev.cdrom.lock=0
On some distributions, you can make a file in the /etc/sysctl.d directory and provide customized kernel and kernel module parameters. Check your sysctl man pages to see whether your distribution supports this method.
The init Phase
As previously mentioned, once the kernel has finished, the init phase is started. Historically there have been several different init phase technologies:
• SysVinit: An older method that originated in Unix. Although this method was used for many years, it is rare to come across a modern Linux distribution that uses SysVinit. As a result, this method will not be covered in this book.
• Upstart: Designed as a replacement for SysVinit, Upstart has been used in distributions like Debian, Ubuntu, Fedora, and SUSE. However, almost all distributions have migrated to the newest init phase software: systemd. As a result, Upstart will not be covered in this book.
• systemd: Although more complex than SysVinit and Upstart, systemd has become the standard init phase technology and will be the focus in this chapter.
Security Highlight
If you are experiencing problems during the boot process, consider viewing the /var/log/boot.log file. This file should contain the messages that appear on the screen during the boot process. This information can help you troubleshoot boot issues.
Configuring Systemd
By itself, systemd is a fairly large topic. At its core, systemd is a process for managing what processes (also called “services”) are started during system boot, but it also provides other features, such as the logging tool journald. The focus of this chapter is on understanding the essentials of systemd and learning how to change the boot process.
One of the core features of systemd is the unit, and there are many different types of units available. The following unit types are the most critical to understand for system booting:
• Service: A service unit is used to describe a process to start (or stop). For example, the Apache web service is considered a service unit for systemd. Service units are described in files that end in .service. The exact location of these service files depends on other factors, but you can search for them using the find or locate command.
• Target: A target unit is a collection of other units. One of the purposes of a target unit is to build a “boot level” that defines all the services to start when the system is taken to the defined boot level. These boot levels used to be referred to as “runlevels” in SysVinit and Upstart, so you may see mention of that term in some documentation.
Using Service Units
A service file is used to describe different elements of a service unit. Typically these files are provided when you install the software package for the utility, so you do not need to know how to make them from scratch. However, it can be useful to know some of the features of this file. For a demonstration, view the output of Example 28-13.
Example 28-13 A Service Unit File
[root@onecoursesource:~ ]# more /etc/systemd/system/sshd.service
[Unit]
Description=OpenBSD Secure Shell server
After=network.target auditd.service
ConditionPathExists=!/etc/ssh/sshd_not_to_be_run

[Service]
EnvironmentFile=-/etc/default/ssh
ExecStart=/usr/sbin/sshd -D $SSHD_OPTS
ExecReload=/bin/kill -HUP $MAINPID
KillMode=process
Restart=on-failure

[Install]
WantedBy=multi-user.target
Alias=sshd.service
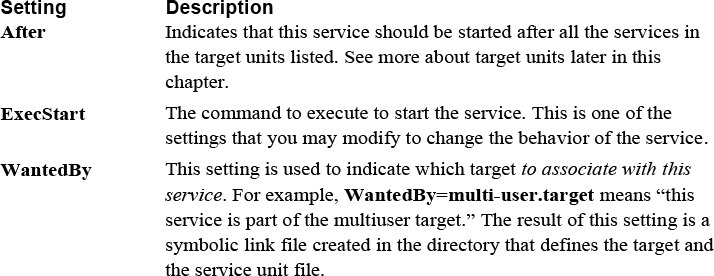
The key settings for the service file are described in Table 28-4.
Table 28-4 Key Settings of a Service Unit File
Although you can modify the service file to change how the service is started, you can also start, stop, and view the status of the service manually using the systemctl command, as demonstrated in Example 28-14.
Example 28-14 The systemctl Command
[root@onecoursesource ~]# systemctl start sshd
[root@onecoursesource ~]# systemctl status sshd
● sshd.service - OpenSSH server daemon
   Loaded: loaded (/usr/lib/systemd/system/sshd.service; disabled;
   Active: active (running) since Mon 2018-12-11 20:32:46 PST; 6s
     Docs: man:sshd(8)
           man:sshd_config(5)
 Main PID: 13698 (sshd)
    Tasks: 1 (limit: 4915)
   CGroup: /system.slice/sshd.service
           └─13698 /usr/sbin/sshd -D

Dec 11 20:32:46 localhost.localdomain systemd[1]: Starting OpenSSH
Dec 11 20:32:46 localhost.localdomain sshd[13698]: Server listening
Dec 11 20:32:46 localhost.localdomain sshd[13698]: Server listening
Dec 11 20:32:46 localhost.localdomain systemd[1]: Started OpenSSH
[root@onecoursesource ~]# systemctl stop sshd
[root@onecoursesource ~]# systemctl status sshd
● sshd.service - OpenSSH server daemon
   Loaded: loaded (/usr/lib/systemd/system/sshd.service; disabled;
   Active: inactive (dead)
     Docs: man:sshd(8)
           man:sshd_config(5)

Dec 11 20:32:46 localhost.localdomain systemd[1]: Starting OpenSSH
Dec 11 20:32:46 localhost.localdomain sshd[13698]: Server listening
Dec 11 20:32:46 localhost.localdomain sshd[13698]: Server listening
Dec 11 20:32:46 localhost.localdomain systemd[1]: Started OpenSSH
Dec 11 21:10:26 localhost.localdomain sshd[13698]: Received signal
Dec 11 21:10:26 localhost.localdomain systemd[1]: Stopping OpenSSH
Dec 11 21:10:26 localhost.localdomain systemd[1]: Stopped OpenSSH
Other systemctl options include restart (to stop and start the service) and reload (to have a service reload its configuration files without stopping the service).
Using Target Units
Recall that a target unit is a collection of other units (typically service units). You can list all the different target units by executing the systemctl list-unit-files --type=target command, as demonstrated in Example 28-15.
[root@onecoursesource ~]# systemctl list-unit-files --type=target | head
UNIT FILE                  STATE
anaconda.target            static
basic.target               static
bluetooth.target           static
busnames.target            static
cryptsetup-pre.target      static
cryptsetup.target          static
ctrl-alt-del.target        disabled
default.target             enabled
emergency.target           static
There are dozens of defined targets on a typical system. For the purposes of understanding the boot process, the following targets are the most important:
• default.target: The standard set of services needed to boot the system. Normally this target has core software pieces, but full functionality requires additional services provided by other targets.
• multi-user.target: The set of services that provide a fully functional system (not including a GUI). The default.target unit is a requisite of the multi-user.target unit.
• graphical.target: The set of services that provides a GUI.
To get a good idea of all of the currently enabled targets (and corresponding services), execute the systemctl list-dependencies command as demonstrated in Example 28-16.
Example 28-16 Listing Target Dependencies
[root@onecoursesource~]# systemctl list-dependencies | head
default.target
● ├─accounts-daemon.service
● ├─gdm.service
● ├─livesys-late.service
● ├─livesys.service
● ├─rtkit-daemon.service
● ├─switcheroo-control.service
● ├─systemd-update-utmp-runlevel.service
● └─multi-user.target
●   ├─abrt-journal-core.service
Security Highlight
Spend some time learning about what each of these services is designed to do. The more services you have running on a system, the more potential vulnerabilities. Carefully consider each service to determine which you can disable to make the system more secure.
You can add a service to a target by using the systemctl enable command:
[root@onecoursesource ~]# systemctl list-dependencies | grep sshd
[root@onecoursesource ~]# systemctl enable sshd
Created symlink /etc/systemd/system/multi-user.target.wants/sshd.service → /usr/
lib/systemd/system/sshd.service.
[root@onecoursesource ~]# systemctl list-dependencies | grep sshd
●   ├─sshd.service
The target that the service is added to is based on the WantedBy setting in the service’s configuration file:
[root@onecoursesource:~ ]#grep WantedBy /etc/systemd/system/sshd.service
WantedBy=multi-user.target
Summary
The boot-up process for a Linux operating system is a multistep process. In this chapter, you learned some of the areas you can modify to change the boot behavior as well as make the system more secure.
Key Terms
Review Questions
1. The _____ command is used to create a new initramfs file.
2. Which device name is valid in a Legacy GRUB configuration file?
a. hd0,0
b. (hd0,0)
c. (hd0.0)
d. (hd0:0)
3. The _____ command is used to create a GRUB2 encrypted password.
4. Which commands can load kernel modules into memory? (Choose two.)
a. lsmod
b. insmod
c. ldmod
d. modprobe
5. The _____ command is used to change systemd units, such as start and enable a service.