Table of Contents for
Linux Essentials for Cybersecurity, First Edition
 Linux Essentials for Cybersecurity, First Edition
Published by
Pearson IT Certification, 2018
Linux Essentials for Cybersecurity, First Edition
Published by
Pearson IT Certification, 2018
- Cover Page
- Title Page
- Copyright Page
- Contents at a Glance
- Table of Contents
- About the Author
- Dedication
- Acknowledgments
- About the Technical Reviewers
- We Want to Hear from You!
- Reader Services
- Introduction
- Part I: Introducing Linux
- Chapter 1: Distributions and Key Components
- Chapter 2: Working on the Command Line
- Chapter 3: Getting Help
- Chapter 4: Editing Files
- Chapter 5: When Things Go Wrong
- Part II: User and Group Accounts
- Chapter 6: Managing Group Accounts
- Chapter 7: Managing User Accounts
- Chapter 8: Develop an Account Security Policy
- Part III: File and Data Storage
- Chapter 9: File Permissions
- Chapter 10: Manage Local Storage: Essentials
- Chapter 11: Manage Local Storage: Advanced Features
- Chapter 12: Manage Network Storage
- Chapter 13: Develop a Storage Security Policy
- Part IV: Automation
- Chapter 14: Crontab and At
- Chapter 15: Scripting
- Chapter 16: Common Automation Tasks
- Chapter 17: Develop an Automation Security Policy
- Part V: Networking
- Chapter 18: Networking Basics
- Chapter 19: Network Configuration
- Chapter 20: Network Service Configuration: Essential Services
- Chapter 21: Network Service Configuration: Web Services
- Chapter 22: Connecting to Remote Systems
- Chapter 23: Develop a Network Security Policy
- Part VI: Process and Log Administration
- Chapter 24: Process Control
- Chapter 25: System Logging
- Part VII: Software Management
- Chapter 26: Red Hat–Based Software Management
- Chapter 27: Debian-Based Software Management
- Chapter 28: System Booting
- Chapter 29: Develop a Software Management Security Policy
- Part VIII: Security Tasks
- Chapter 30: Footprinting
- Chapter 31: Firewalls
- Chapter 32: Intrusion Detection
- Chapter 33: Additional Security Tasks
- Appendix A: Answers to Review Questions
- Appendix B: Resource Guide
- Glossary
Chapter 2 Working on the Command Line
One of the more amazing features of Linux is the vast number of command-line utilities. There are literally thousands of commands, each of which is designed to perform a specific task. Having so many commands provides a great deal of flexibility, but it also makes the process of learning Linux a bit more daunting.
The goal of this chapter is to introduce you to some of the more essential command-line utilities. You learn commands used to manage files and directories, including how to view, copy, and delete files. You also learn the basics of a powerful feature called regular expressions, which allows you to view and modify files using patterns. This chapter introduces some of the more commonly used file-compression utilities, such as the tar and gzip utilities.
After reading this chapter and completing the exercises, you will be able to do the following:
Manage files and directories.
Use shell features such as shell variables.
Be able to re-execute previous commands using the shell feature called history.
Identify regular expressions and know how to use them with commands like find, grep, and sed.
Manage file-compression utilities.
File Management
The Linux operating system includes a large number of files and directories. As a result, a major component of working on a Linux system is knowing how to manage files. In this section, you learn some of the essential command-line tools for file management.
The Linux Filesystem
Most likely you are already familiar with Microsoft Windows. That operating system makes use of drives to organize the different storage devices. For example, the primary hard drive is typically designated the C: drive. Additional drives, such as CD-ROM drives, DVD drives, additional hard drives, and removable storage devices (USB drives) are assigned D:, E:, and so on. Even network drives are often assigned a “drive letter” in Microsoft Windows.
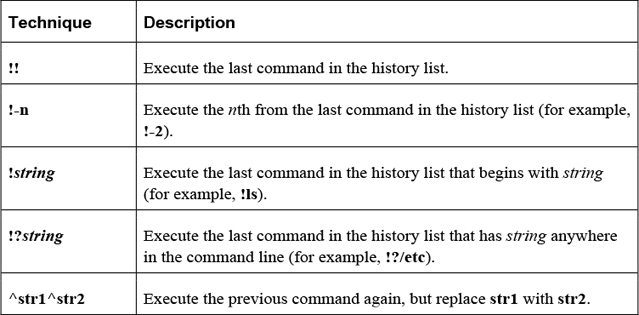
In Linux, a different method is used. Every storage location, including remote drives and removable media, is accessible under the top-level directory, named root. The root directory is symbolized by a single slash (/) character. See Figure 2-1 for a demonstration of a small portion of a Linux filesystem (a full Linux filesystem would contain hundreds, if not thousands, of directories).

Figure 2-1 Visual Example of a Small Portion of a Linux Filesystem
Using the example in Figure 2-1, the boot, bin, etc, home, and usr directories are considered to be “under” the / directory. The julia and sarah directories are considered to be “under” the home directory. Often the term subdirectory or child directory is used to describe a directory that is under another directory. The term parent directory is used to describe a directory that contains subdirectories. Hence, the home directory is the parent directory of the julia subdirectory.
To describe the location of a directory, a full path is often used that includes all the directories up to the root directory. For example, the julia directory can be described by the /home/julia path. In this path, the first / represents the root directory and all further / characters are used to separate additional directories in the path.
You may be wondering what is stored in these different directories. That is a good question, but also a difficult one to answer at this point given that you are just starting to learn about the Linux operating system. So although the answer will be provided here, realize this isn’t something you should worry about too much right now—these locations will make more sense as you explore Linux further.
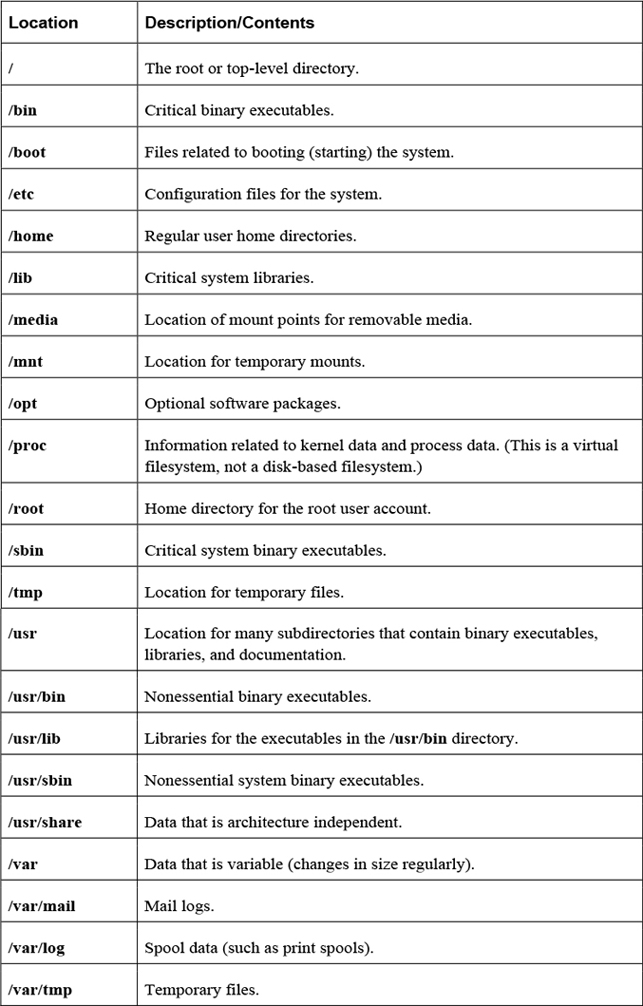
The Filesystem Hierarchy Standard (FHS) is a definition of where files and directories are supposed to be place on Unix and Linux operating systems. A summary of some of the more important locations is provided in Table 2-1.
Command Execution
The standard way of executing a shell command is to type the command at a command prompt and then press the Enter key. Here’s an example:
[student@localhost rc0.d]$ pwd
/etc/rc0.d
Commands also accept options and arguments:
• An option is a predefined value that changes the behavior of a command. How the option changes the behavior of the command depends on the specific command.
• Typically options are a single character value that follow a hyphen (-) character, as in -a, -g, and -z. Often these single-character options can be combined together (for example, -agz). Some newer commands accept “word” options, such as --long or --time. Word options start with two hyphens.
• Arguments are additional information, such as a filename or user account name, that is provided to determine which specific action to take. The type of argument that is permitted depends on the command itself. For example, the command to remove a file from the system would accept a filename as an argument, whereas the command to delete a user account from the system would accept a user name as an argument.
• Unlike options, arguments do not start with a hyphen (or hyphens).
To execute a sequence of commands, separate each command with a semicolon and press the Enter key after the last command has been entered. Here’s an example:
[student@localhost ~]$ pwd ; date ; ls
/home/student
Fri Dec  2 00:25:03 PST 2016
book   Desktop    Downloads  Music     Public  Templates
class  Documents  hello.pl   Pictures  rpm     Videos
The pwd Command
The pwd (print working directory) command displays the shell’s current directory:
[student@localhost rc0.d]$ pwd
/etc/rc0.d
The cd Command
To move the shell’s current directory to another directory, use the cd (change directory) command. The cd command accepts a single argument: the location of the desired directory. For example, to move to the /etc directory, you can execute the following command:
[student@localhost ~]$ cd /etc
[student@localhost etc]$
The cd command is one of those “no news is good news” sort of commands. If the command succeeds, no output is displayed (however, note that the prompt has changed). If the command fails, an error will be displayed, as shown here:
 [student@localhost ~]$ cd /etc
bash: cd: nodir: No such file or directory
[student@localhost ~]$
Security Highlight
For security reasons, users cannot cd into all directories. This will be covered in greater detail in Chapter 9, “File Permissions.”
When the argument you provide starts with the root directory symbol, it is considered to be an absolute path. An absolute path is used when you provide directions to where you want to go from a fixed location (the root directory). For example, you could type the following command:
cd /etc/skel
You can also give directions based on your current location. For example, if you are already in the /etc directory and want to go down to the skel directory, you could execute the cd skel command. In this case, the skel directory must be directly beneath the etc directory. This form of entering the pathname is called using a relative pathname.
If you think about it, you have given directions in one of these ways many times in the past. For example, suppose you had a friend in Las Vegas and you wanted to provide directions to your house in San Diego. You wouldn’t start providing directions from the friend’s house, but rather from a fixed location that you both are familiar with (like a commonly used freeway). But, if that same friend was currently at your house and wanted directions to a local store, you would provide directions from your current location, not the previously mentioned fixed location.
In Linux, there are a few special characters that represent directories to commands like the cd command:
• Two “dot” (period) characters (..) represent one level above the current directory. So, if the current directory is /etc/skel, the command cd .. would change the current directory to the /etc directory.
• One dot (.) represents the current directory. This isn’t very useful for the cd command, but it is handy for other commands when you want to say “the directory I am currently in.”
• The tilde character (~) represents the user’s home directory. Every user has a home directory (typically /home/username) where the user can store their own files. The cd ~ command will return you to your home directory.
The ls Command
The ls command is used to list files in a directory. By default, the current directory’s files are listed, as shown in the following example:
[student@localhost ~]$ ls
Desktop   Downloads  Pictures  Templates
Documents Music      Public    Videos
As with the cd command, you can provide a directory argument using either an absolute or relative path to list files in another directory.
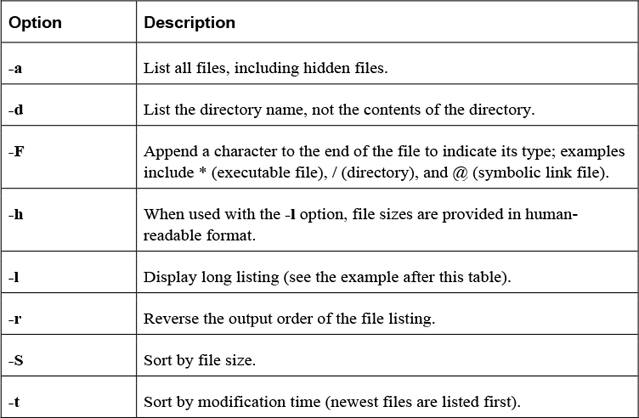
The ls command has many options. Some of the most important options are shown in Table 2-2.
What Could Go Wrong
In Linux, commands, options, filenames, and just about everything else is case sensitive. This means that if you try to execute the command ls -L, you will get different output (or an error message) than if you type the command ls -l.
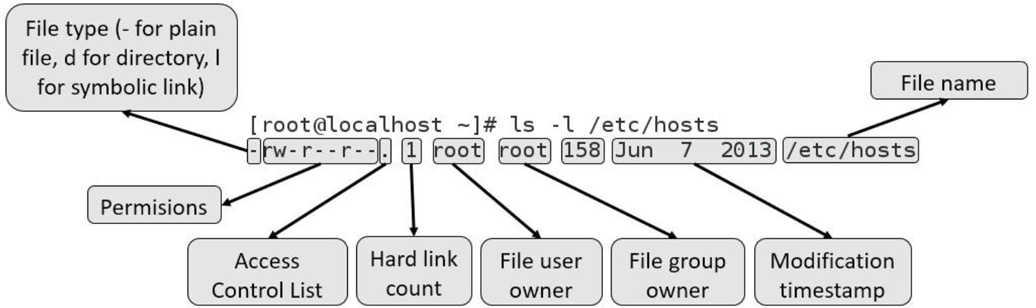
The output of the ls -l command includes one line per file, as demonstrated in Figure 2-2.
File Globbing
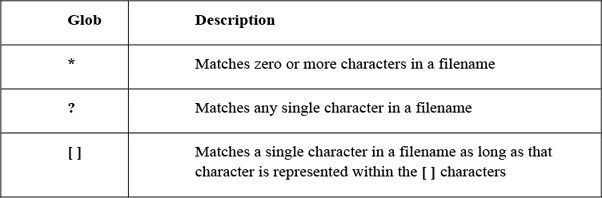
A file glob (also called a wildcard) is any character provided on the command line that represents a portion of a filename. The following globs are supported:
This example displays all files in the current directory that begin with the letter D:
[student@localhost ~]$ ls -d D*
Desktop   Documents   Downloads
The next example displays all files in the current directory that are five characters long:
[student@localhost ~]$ ls -d ?????
Music
The file Command
The file command will report the type of contents in the file. The following commands provide some examples:
[student@localhost ~]$ file /etc/hosts
/etc/hosts: ASCII text
[student@localhost ~]$ file /usr/bin/ls
/usr/bin/ls: ELF 64-bit LSB executable, x86-64, version 1 (SYSV),
dynamically linked (uses shared libs), for GNU/Linux 2.6.32,
BuildID[sha1]=aa7ff68f13de25936a098016243ce57c3c982e06, stripped
[student@localhost ~]$ file /usr/share/doc/pam-1.1.8/html/sag-author.html
/usr/share/doc/pam-1.1.8/html/sag-author.html: HTML document,
UTF-8 Unicode text, with very long lines
Why use the file command? The next few commands in this chapter are designed to work only on text files, such as the /etc/hosts file in the previous example. Nontext files shouldn’t be displayed with commands such as the less, tail, and head commands.
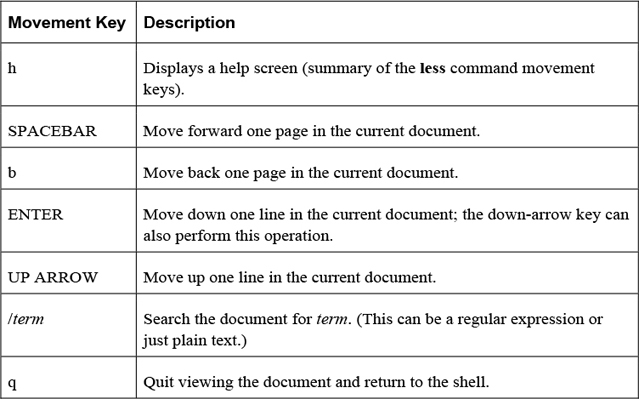
The less Command
The less command is used to display large chunks of text data, pausing after displaying the first page of information. Keys on the keyboard allow the user to scroll through the document. Table 2-3 highlights the more useful movement keys:
Note
You may also see documentation regarding the more command. It uses many of the same movement options as the less command, but has fewer features.
The head Command
The head command displays the top part of text data. By default, the top ten lines are displayed. Use the -n option to display a different number of lines:
[student@localhost ~]$ head -n 3 /etc/group
root:x:0:
bin:x:1:student
daemon:x:2:
Security Highlight
The /etc/group file was purposefully chosen for this example. It is designed to hold group account information on the system and will be explored in detail in Chapter 6, “Managing Group Accounts.” It was included in this example to start getting you used to looking at system files, even if right now the contents of these files might not be clear.
The tail Command
The tail command displays the bottom part of text data. By default, the last ten lines are displayed. Use the -n option to display a different number of lines:
[student@localhost ~]$ tail -n 3 /etc/group
slocate:x:21:
tss:x:59:
tcpdump:x:72:
Important options of the tail command include those shown in Table 2-4.
Table 2-4 Options of the tail Command

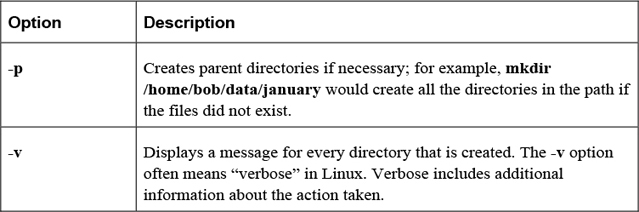
The mdkir Command
The mkdir command makes (creates) a directory.
Example:
mkdir test
Important options of the mkdir command are shown in Table 2-5.
Table 2-5 Options of the mkdir Command
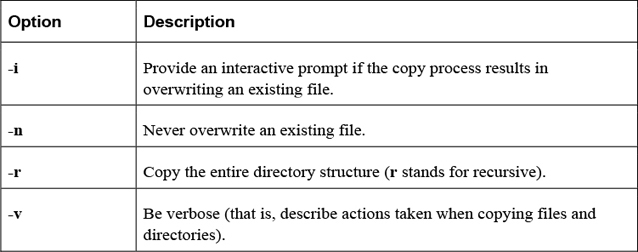
The cp Command
The cp command is used to copy files or directories. The syntax for this command is
cp [options] file|directory destination
where file|directory indicates which file or directory to copy. The destination is where you want the file or directory copied. The following example copies the /etc/hosts file into the current directory:
[student@localhost ~]$ cp /etc/hosts .
Note that the destination must be specified.
Table 2-6 provides some important options for the cp command.
Table 2-6 Options for the cp Command
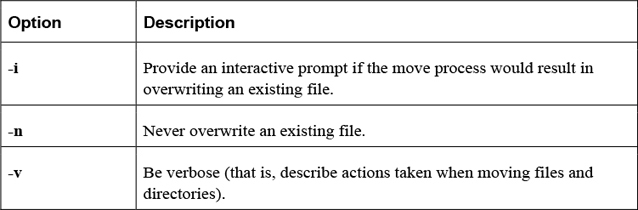
The mv Command
The mv command will move or rename a file.
Example:
mv /tmp/myfile ~
Important options include those shown in Table 2-7.
Table 2-7 Options for the mv Command
The rm Command
The rm command is used to remove (delete) files and directories.
Example:
rm file.txt
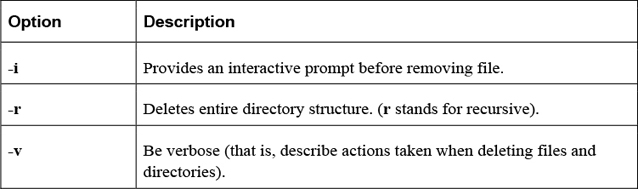
Important options include those shown in Table 2-8.
Table 2-8 Options for the rm Command
The rmdir Command
The rmdir command is used to remove (delete) empty directories. This command will fail if the directory is not empty (use rm -r to delete a directory and all the files within the directory).
Example:
rmdir data
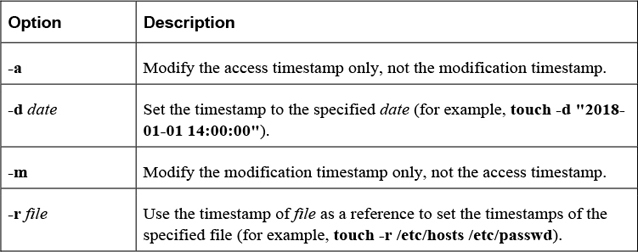
The touch Command
The touch command has two functions: to create an empty file and to update the modification and access timestamps of an existing file. To create a file or update an existing file’s timestamps to the current time, use the following syntax:
touch filename
Important options include those shown in Table 2-9.
Table 2-9 Options for the touch Command
Security Highlight
The touch command is very useful for updating the timestamps of critical files for inclusion in automated system backups. You will learn more about system backups in Chapter 10, “Manage Local Storage: Essentials.”
Shell Features
The BASH shell provides many features that can be used to customize your working environment. This section focuses on these features.
Shell Variables
Shell variables are used to store information within the shell. This information is used to modify the behavior of the shell itself or external commands. Table 2-10 details some common useful shell variables.
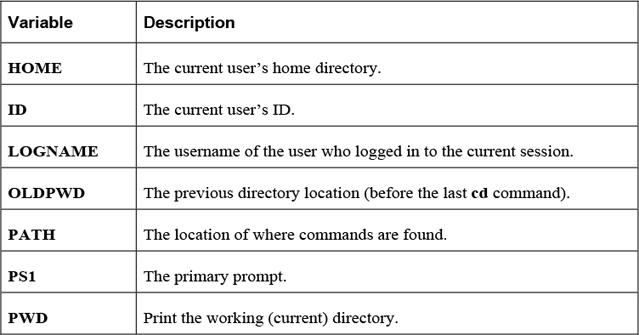
Note
There are many shell variables in addition to those listed in the previous table. More details regarding the PATH and PS1 variables are provided later in this section of the chapter.
echo
The echo command is used to display information. Typically it is used to display the value of variables.
Example:
[student@localhost ~]$ echo $HISTSIZE
1000
The echo command has only a few options. The most useful one is the -n option, which doesn't print a newline character at the end of the output.
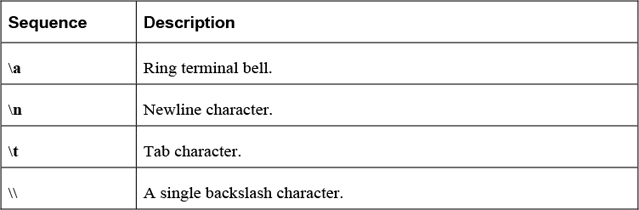
Some special characters sequences can be incorporated within an argument to the echo command. For example, the command echo "hello\nthere" will send the following output:
hello
there
Table 2-11 describes some useful character sequences for the echo command.
Table 2-11 Character Sequences of the echo Command
Security Highlight
The echo command can offer valuable troubleshooting information when attempting to debug a program or a script because the user can ring the terminal bell at various points as the program executes, to denote to the user that various points in the program were reached successfully.
set
The set command displays all shell variables and values when executed with no arguments. To see all shell variables, use the set command, as demonstrated here:
[student@localhost ~ 95]$ set | head -n 5
ABRT_DEBUG_LOG=/dev/null
AGE=25
BASH=/bin/bash
BASHOPTS=checkwinsize:cmdhist:expand_aliases:extglob:extquote:force_fignore:
histappend:interactive_comments:progcomp:promptvars:sourcepath
BASH_ALIASES=()
Note
The | head -n 5 part of the previous command means “send the output of the set command into the head command as input and only display the first five lines of this output.” This is a process called redirection, which will be covered in detail in a later section of this chapter. It was included in the previous example because the output of the set command would end up taking several pages of this book.
The set command can also be used to modify the behavior of the shell. For example, using a variable that currently isn’t assigned a value normally results in displaying a “null string” or no output. Executing the command set -u will result in an error message when undefined variables are used:
[student@localhost ~]$ echo $NOPE

[student@localhost ~]$ set -u
[student@localhost ~]$ echo $NOPE
bash: NOPE: unbound variable
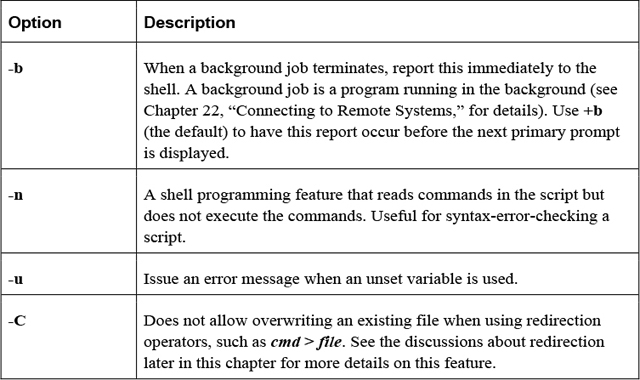
Table 2-12 provides some additional useful set options.
Table 2-12 Options for the set Command
unset
Use the unset command to remove a variable from the shell (for example, unset VAR).
The PS1 Variable
The PS1 variable defines the primary prompt, often using special character sequences (\u = current user’s name, \h = host name, \W = current directory). Here’s an example:
[student@localhost ~]$ echo $PS1
[\u@\h \W]\$
Note that variables are defined without a dollar sign character but are referenced using the dollar sign character:
[student@localhost ~]$ PS1="[\u@\h \W \!]\$ "
[student@localhost ~ 93]$ echo $PS1
[\u@\h \W \!]$
The PATH Variable
Most commands can be run by simply typing the command and pressing the Enter key:
[student@localhost ~]# date
Thu Dec  1 18:48:26 PST 2016
The command is “found” by using the PATH variable. This variable contains a comma-separated list of directory locations:
[student@localhost ~]$ echo $PATH
/usr/local/bin:/usr/local/sbin:/usr/bin:/usr/sbin:/bin:/sbin:
/home/student/.local/bin:/home/student/bin
This “defined path” is searched in order. So, when the previous date command was executed, the BASH shell first looked in the /usr/local/bin directory. If the date command is located in this directory, it is executed; otherwise, the next directory in the PATH variable is checked. If the command isn’t found in any of these directories, an error is displayed:
[student@localhost ~]$ xeyes
bash: xeyes: command not found...
Security Highlight
In some cases when a command isn’t found, you may see a message like the following:
Install package 'xorg-x11-apps' to provide command 'xeyes'? [N/y]
This is a result of when the command you are trying to run isn’t on the system at all, but can be installed via a software package. For users who use Linux at home or in a noncommercial environment, this can be a useful feature, but if you are working on a production server, you should always carefully consider any software installation.
To execute a command that is not in the defined path, use a fully qualified path name, as shown here:
[student@localhost ~]$ /usr/xbin/xeyes
To add a directory to the PATH variable, use the following syntax:
[student@localhost ~]$ PATH="$PATH:/path/to/add"
The value to the right of = sign ("$PATH:/path/to/add") first will return the current value of the PATH variable and then append a colon and a new directory. So, if the PATH variable was set to /usr/bin:/bin and the PATH="$PATH:/opt" command was executed, then the result would be to assign the PATH variable to /usr/bin:/bin:/opt.
Security Highlight
Adding "." (the current directory) to the PATH variable poses a security risk. For example, suppose you occasionally mistype the ls command by typing sl instead. This could be exploited by someone who creates an sl shell script (program) in a common directory location (for example, the /tmp directory is a common place for all users to create files). With "." in your PATH variable, you could end up running the bogus sl “command,” which could comprise your account or the operating system (depending on what commands the hacker placed in the script).
Environment Variables
When a variable is initially created, it is only available to the shell in which it was created. When another command is run within that shell, the variable is not “passed in to” that other command.
To pass variables and their values in to other commands, convert an existing local variable to an environment variable with the export command, like so:
[student@localhost ~]$ echo $NAME
Sarah
[student@localhost ~]$ export NAME
If the variable doesn’t already exist, the export command can create it directly as an environment variable:
[student@localhost ~]$ export AGE=25
When a variable is converted into an environment variable, all subprocesses (commands or programs started by the shell) will have this variable set. This is useful when you want to change the behavior of a process by modifying a key variable.
For example, the crontab -e command allows you to edit your crontab file (a file that allows you to schedule programs to run sometime in the future; see Chapter 14, “Crontab and at,” for details). To choose the editor that the crontab command will use, create and export the EDITOR variable: export EDITOR=gedit.
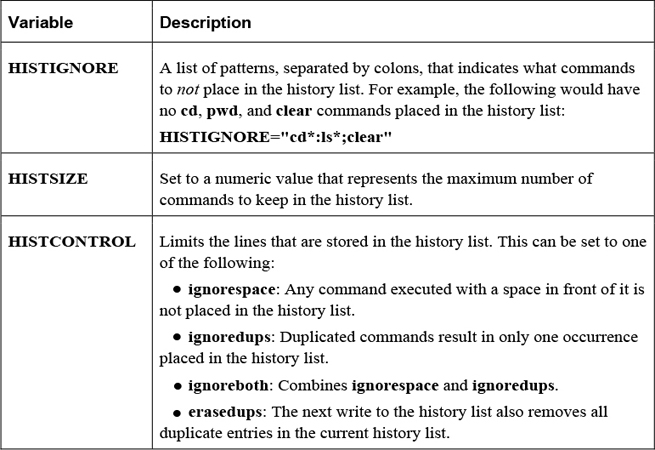
See Figure 2-3 for a visual example of local versus environment variables.
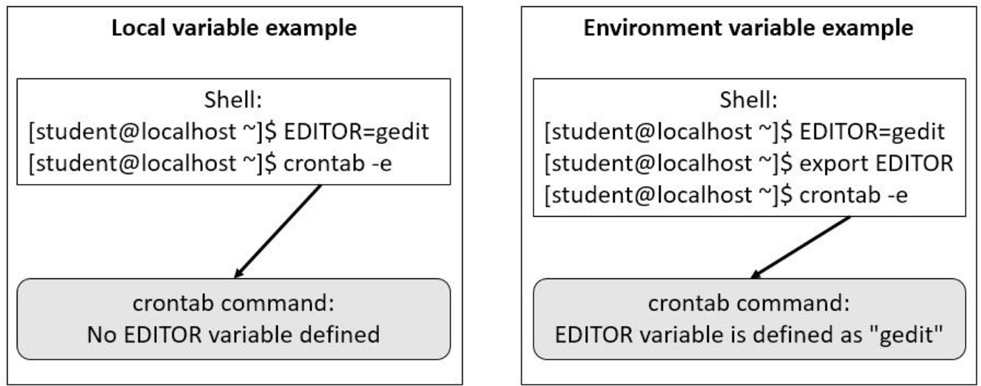
Figure 2-3 Local versus Environment Variables
The export command can also be used to display all environment variables, like so:
export -p
env
The env command displays environment variables in the current shell. Local variables are not displayed when the env command is executed.
Another use of the env command is to temporarily set a variable for the execution of a command.
For example, the TZ variable is used to set the timezone in a shell. There may be a case when you want to temporarily set this to a different value for a specific command, such as the date command shown here:
[student@localhost ~]# echo $TZ

[student@localhost ~]# date
Thu Dec  1 18:48:26 PST 2016
[student@localhost ~]# env TZ=MST7MDT date
Thu Dec  1 19:48:31 MST 2016
[student@localhost ~]# echo $TZ

[student@localhost ~]#
To unset a variable when executing a command, use the --unset=VAR option (for example, env --unset=TZ date).
Initialization Files
When a user logs in to the system, a login shell is started. When a user starts a new shell after login, it is referred to as a non-login shell. In each case, initialization files are used to set up the shell environment. Which initialization files are executed depends on whether the shell is a login shell or a non-login shell.
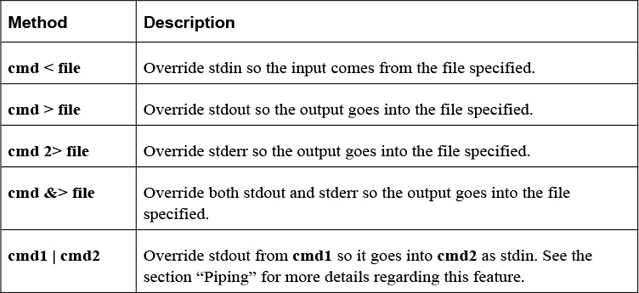
Figure 2-4 demonstrates which initialization files are executed when the user logs in to the system.

Figure 2-4 Initialization Files Executed When the User Logs In to the System
The following is an explanation of Figure 2-4:
• The first initialization file that is executed when a user logs in is the /etc/profile file. On most Linux platforms, this script includes code that executes all the initialization files in the /etc/profile.d directory that end in “.sh”. The purpose of the /etc/profile file is to serve as a place for system administrators to put code that will execute every time a BASH shell user logs in (typically login messages and environment variables definitions).
• After the /etc/profile file is executed, the login shell looks in the user’s home directory for a file named ~/.bash_profile. If it’s found, the login shell executes the code in this file. Otherwise, the login shell looks for a file named ~/.bash_login. If it’s found, the login shell executes the code in this file. Otherwise, the login shell looks for a file named ~/.profile and executes the code in this file. The purpose of these files is to serve as a place where each user can put code that will execute every time that specific user logs in (typically environment variables definitions).
• The next initialization file executed is the ~/.bashrc script. The purpose of this file is to serve as a place where each user can put code that will execute every time the user opens a new shell (typically alias definitions).
• The next initialization file executed is the /etc/bash.bashrc script. The purpose of this file is to serve as a place where system administrators can put code that will execute every time the user opens a new shell (typically alias definitions).
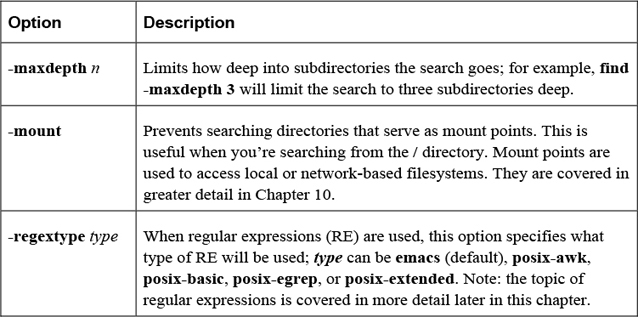
Figure 2-5 demonstrates which initialization files are executed when the user opens a new shell.
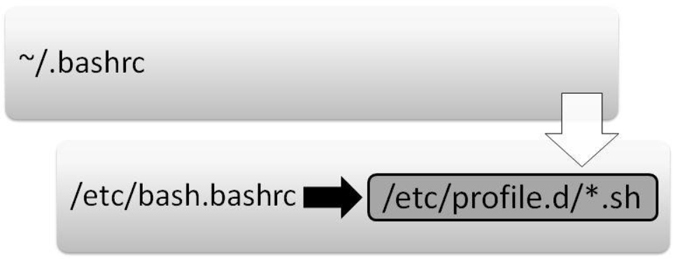
Figure 2-5 Initialization Files Executed When the User Starts a Non-Login Shell
The following is an explanation of Figure 2-5:
• The first initialization file that is executed when a user opens a non-login shell is the ~/.bashrc script. The purpose of this file is to serve as a place where each user can put code that will execute every time that user opens a new shell (typically alias definitions).
• The next initialization file executed is the /etc/bash.bashrc script. On most Linux platforms, this script includes code that executes all the initialization files in the /etc/profile.d directory that end in “.sh”. The purpose of these initialization files is to serve as a place where system administrators can put code that will execute every time the user opens a new shell (typically alias definitions).
Alias
An alias is a shell feature that allows a collection of commands to be executed by issuing a single “command.” Here’s how to create an alias:
[student @localhost ~]$ alias copy="cp"
And here’s how to use an alias:
[student @localhost ~]$ ls
file.txt
[student @localhost ~]$ copy /etc/hosts .
[student @localhost ~]$ ls
file.txt  hosts
To display all aliases, execute the alias command with no arguments. To unset an alias, use the unalias command as shown in Example 2-1.
Example 2-1 Using unalias Command to Unset an Alias
[student @localhost ~]$ alias
alias copy='cp'
alias egrep='egrep --color=auto'
alias fgrep='fgrep --color=auto'
alias grep='grep --color=auto'
alias l='ls -CF'
alias la='ls -A'
alias ll='ls -alF'
[student @localhost ~]$ unalias copy
[student @localhost ~]$ alias
alias egrep='egrep --color=auto'
alias fgrep='fgrep --color=auto'
alias grep='grep --color=auto'
alias l='ls -CF'
alias la='ls -A'
alias ll='ls -alF'
Command History
Each shell keeps a list of previously executed commands in a memory-based history list. This list can be viewed by executing the history command.
The history command displays the contents of the history list. This output can be quite large, so often a numeric value is given to limit the number of commands displayed. For example, the following history command lists the last five commands in the history list:
[student@localhost ~]$ history 5
   83  ls
   84  pwd
   85  cat /etc/passwd
   86  clear
   87  history 5
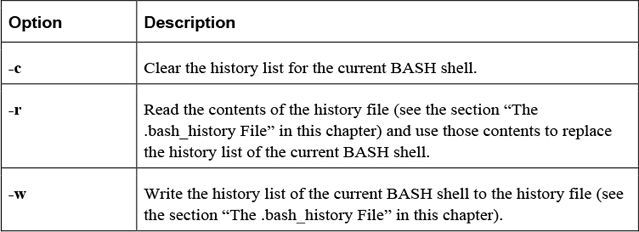
Table 2-13 shows some useful options for the history command.
Table 2-13 Options for the history Command
To execute a command in the history list, type ! followed directly by the command you want to execute. For example, to execute command number 84 (the pwd command in the previous example), enter the following:
[student@localhost ~]$ !84
pwd
/home/student
Table 2-14 provides some additional techniques for executing previous commands.
Table 2-14 Techniques for Executing Commands
Here’s an example of using ^str1^str2:
[student@localhost ~]$ ls /usr/shara/dict
ls: cannot access /usr/shara/dict: No such file or directory
[student@localhost ~]$ ^ra^re
ls /usr/share/dict
linux.words  words
History Variables
Several variables can affect how information is stored in the history list, some of which are shown in Table 2-15.
Table 2-15 Variables Affecting Storage in the History List
The .bash_history File
When a user logs off the system, the current history list is written automatically to the user’s .bash_history file. This is typically stored in the user’s home directory (~/.bash_history), but the name and location can be changed by modifying the HISTFILE variable.
How many lines are stored in the .bash_history file is determined by the value of the HISTFILESIZE variable.
Security Highlight
The history command can pose a security risk because any Linux system that is not secured with a login screen and password-protected screensaver is susceptible to anyone having the credentials used to access the system and files simply by entering the history command and reading or copying the results to a file for later use. Always use a password-protected screensaver set for a short inactivity prompt to prevent this from happening. Clearing the history or using the HISTIGNORE variable to denote login information are additional security practices to prevent the use of authentication credentials found in past commands by others.
Redirecting Input and Output
Each command is able to send two streams of output (standard output and standard error) and can accept one stream of data (standard input). In documentation, these terms can also be described as follows:
• Standard output = stdout or STDOUT
• Standard error = stderr or STDERR
• Standard input = stdin or STDIN
By default, stdout and stderr are sent to the terminal window, whereas stdin comes from keyboard input. In some cases, you want to change these locations, and this is accomplished by a process called redirection.
Table 2-16 describes the methods used to perform redirection.
Table 2-16 Methods for Redirection
In the following example, stdout of the cal program is sent to a file named month:
[student@localhost ~]$ cal > month
It is common to redirect both stdout and stderr into separate files, as demonstrated in the next example:
[student@localhost ~]$ find /etc -name "*.cfg" -exec file {} \;
> output 2> error
Redirecting stdin is fairly rare because most commands will accept a filename as a regular argument; however, the tr command, which performs character translations, requires redirecting stdin:
[student@localhost ~]$ cat /etc/hostname
localhost
[student@localhost ~]$ tr 'a-z' 'A-Z' < /etc/hostname
LOCALHOST
Piping
The process of piping (so called because the | character is referred to as a “pipe”) the output of one command to another command results in a more powerful command line. For example, the following takes the standard output of the ls command and sends it into the grep command to filter files that were changed on April 16th:
[student@localhost ~]$ ls -l /etc | grep "Apr 16"
-rw-r--r-- 1 root     321 Apr 16  2018 blkid.conf
drwxr-xr-x 2 root root    4096 Apr 16  2018 fstab.d
In Example 2-2, lines 41–50 of the copyright file are displayed.
Example 2-2 Lines 41–50 of the Copyright File
[student@localhost ~]$ head -50 copyright | tail
       b) If you have received a modified Vim that was distributed as
          mentioned under a) you are allowed to further distribute it
          unmodified, as mentioned at I). If you make additional changes
          the text under a) applies to those changes.
       c) Provide all the changes, including source code, with every
          copy of the modified Vim you distribute. This may be done in
          the form of a context diff. You can choose what license to use
          for new code you add. The changes and their license must not
          restrict others from making their own changes to the official
          version of Vim.
       d) When you have a modified Vim which includes changes as
          mentioned
You can add additional commands, as demonstrated in Example 2-3, where the output of the tail command is sent to the nl command (which numbers the lines of output).
Example 2-3 Output of tail Command Is Sent to the nl Command
[student@localhost ~]$ head -50 copyright | tail | nl
   1   b) If you have received a modified Vim that was distributed as
   2      mentioned under a) you are allowed to further distribute it
   3      unmodified, as mentioned at I). If you make additional changes
   4      the text under a) applies to those changes.
   5   c) Provide all the changes, including source code, with every
   6      copy of the modified Vim you distribute. This may be done in
   7      the form of a context diff. You can choose what license to use
   8      for new code you add. The changes and their license must not
   9      restrict others from making their own changes to the official
   10     version of Vim.
   11  d) When you have a modified Vim which includes changes as
   12     mentioned
Note that the order of execution makes a difference. In Example 2-3, the first 40 lines of the copyright file are sent to the tail command. Then the last ten lines of the first 40 lines are sent to the nl command for numbering. Notice the difference in output when the nl command is executed first, as shown in Example 2-4.
Example 2-4 Executing the nl Command First
 [student@localhost ~]$ nl copyright | head -50 | tail
   36  b) If you have received a modified Vim that was distributed as
   37     mentioned under a) you are allowed to further distribute it
   38     unmodified, as mentioned at I). If you make additional changes
   39     the text under a) applies to those changes.
   40  c) Provide all the changes, including source code, with every
   41     copy of the modified Vim you distribute. This may be done in
   42     the form of a context diff. You can choose what license to use
   43     for new code you add. The changes and their license must not
   44     restrict others from making their own changes to the official
   45     version of Vim.
   45  d) When you have a modified Vim which includes changes as
   47     mentioned
Subcommands
To take the output of one command and use it as an argument to another command, place the command within the $( ) characters. For example, the output of the date and pwd commands is sent to the echo command as arguments:
[student@localhost ~]$ echo "Today is $(date) and you are in the $(pwd) directory"
Today is Tue Jan 10 12:42:02 UTC 2018 and you are in the /home/student directory
Advanced Commands
As previously mentioned, there are thousands of Linux commands. The commands covered in this section are some of the more advanced commands you are likely to use on a regular basis.
The find Command
The find command will search the live filesystem for files and directories using different criteria. Here’s the format of the command:
find [options] starting_point criteria action
The starting_point is the directory where the search will start. The criteria is what to search for, and the action is what to do with the results.
The options shown in Table 2-17 are designed to modify how the find command behaves.
Table 2-17 Options for the find Command
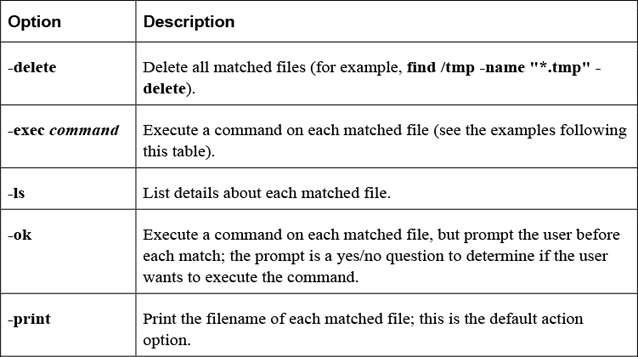
Most criteria-based options allow you to specify a numeric value as an argument. This can be preceded by a - or + character to indicate “less than” or “greater than.” For example, using +5 would mean “more than five.” Table 2-18 shows some important criteria-based options.
Table 2-18 Criteria-Based Options
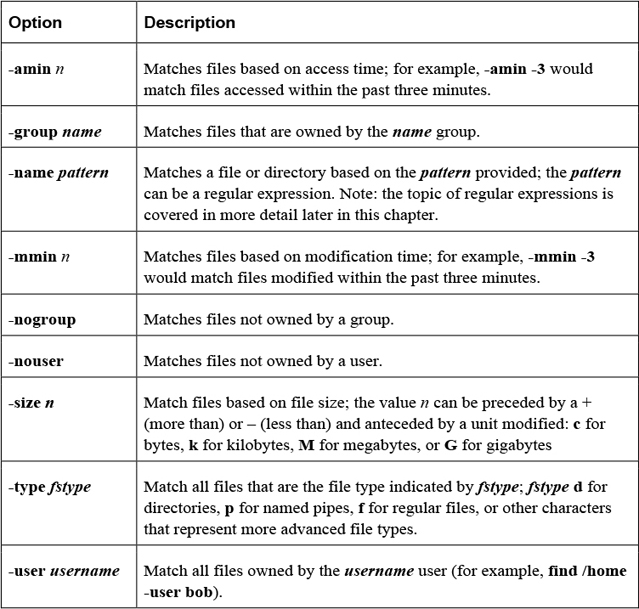
Once a file is found, an action can be taken on the file. Table 2-19 shows some important action-based options.
Table 2-19 Action-Based Options
Here’s an example of the -exec option:
[root@localhost ~]# find /etc -name "*.cfg" -exec file {} \;
/etc/grub2.cfg: symbolic link to `../boot/grub2/grub.cfg'
/etc/enscript.cfg: ASCII text
/etc/python/cert-verification.cfg: ASCII text
The \; is used to build a command line. For example, the command that was executed for the previous find example was file /etc/grub2.cfg; file /etc/enscript.cfg; file /etc/python/cert-verification.cfg. The \ before the ; is required to escape the meaning of the ; character for the BASH shell, so the ; character is passed to the find command as a regular argument.
The {} characters represent where in the command the matching filename is placed. This can be used more than once, as demonstrated in the next example, which makes a copy of each matched file:
find /etc -name "*.cfg" -exec cp {} /tmp/{}.bak \;
Security Highlight
Use of the find command aids in identification of files recently accessed or files accessed immediately before a negative network event because those files (or entered commands) are likely the cause of the negative event (such as a corrupted file, the loss or system access, or incorrect information written to a file).
Additionally, using the –nogroup or –nouser option aids in finding files that may have been installed by a hacker or that have become orphaned in updates of operating systems and applications. So these files may be investigated and removed.
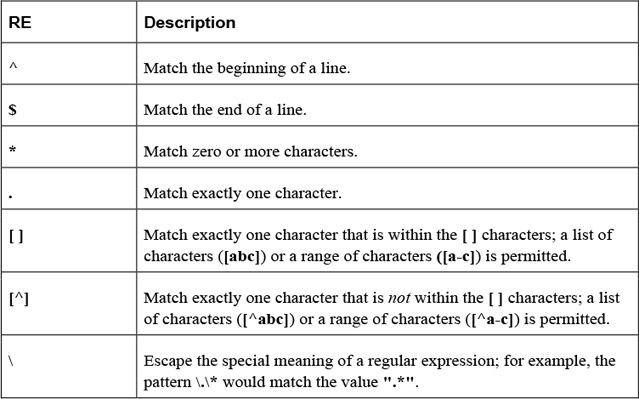
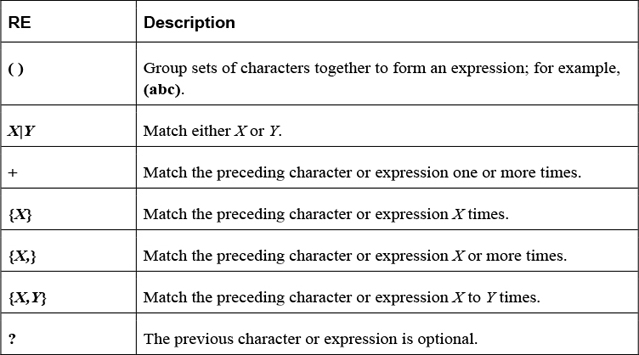
Regular Expressions
The term regex stands for regular expression (RE), which is a character or set of characters designed to match other characters. For example, in utilities that support REs, a dot (.) will match a single character of any type, whereas [a-z] would match any single lowercase character.
There are two types of REs: basic and extended. Basic REs are the “original,” and extended REs are the newer additions. Utilities that use REs normally support basic REs by default and have some option or feature to enable extended REs. Although documentation may refer to basic REs as obsolete, they are still used by most modern utilities.
Commonly used basic REs are described in Table 2-20.
Commonly used extended REs are described in Table 2-21.
The find command supports the -regexp option, which allows you to use regular expressions to perform pattern matching of the filename.
For example, the following command would search for all files that have “chpasswd” somewhere in filename and an “8” somewhere in the filename after “chpasswd”:
[student@localhost ~]$ find / -regex ".*chpasswd.*8.*" 2> /dev/null
/usr/share/man/zh_CN/man8/chpasswd.8.gz
/usr/share/man/ja/man8/chpasswd.8.gz
/usr/share/man/zh_TW/man8/chpasswd.8.gz
/usr/share/man/ru/man8/chpasswd.8.gz
/usr/share/man/de/man8/chpasswd.8.gz
/usr/share/man/fr/man8/chpasswd.8.gz
/usr/share/man/man8/chpasswd.8.gz
/usr/share/man/it/man8/chpasswd.8.gz
The grep Command
Use the grep command to search files for lines that contain a specific pattern. By default, the grep command will display the entire line when it finds a matching pattern.
Example:
[student@localhost ~]$ grep "the" /etc/rsyslog.conf
# To enable high precision timestamps, comment out the following line.
# Set the default permissions for all log files.
Note
The pattern used to perform the search uses basic regular expressions.
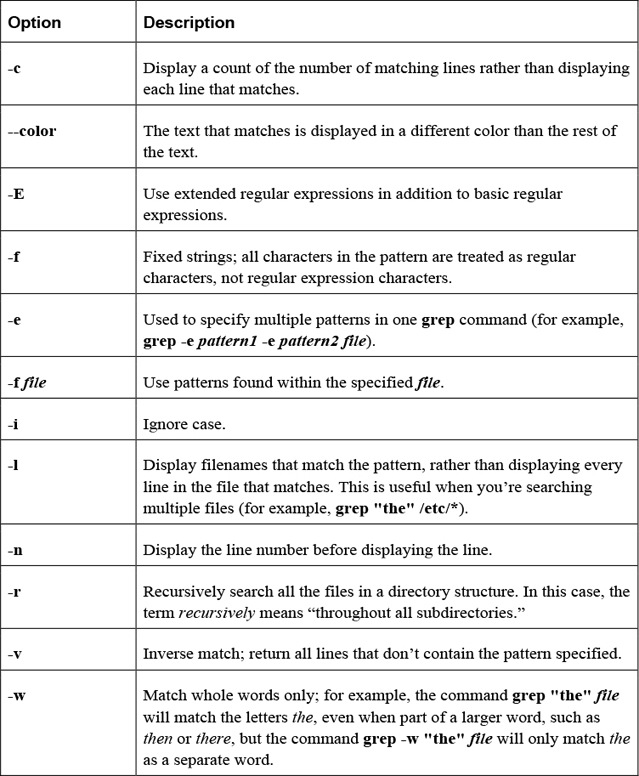
Important options for the grep command include those shown in Table 2-22.
Table 2-22 Options for the grep Command
For example, to search the filesystem based on file content, use the grep command with the -r option:
[student@localhost ~]$ grep -r ":[0-9][0-9]:games:" /etc 2> /dev/null
/etc/passwd:games:x:5:60:games:/usr/games:/usr/sbin/nologin
The sed Command
The sed command is designed to edit file data in a non-interactive method. Unlike most editors (such as the vi editor discussed in Chapter 4, “Editing Files”), which require human interaction to perform modification to files, the sed command can make changes automatically.
In the following example, the sed command will replace “localhost” with “myhost” in the /etc/hosts file:
[student@localhost ~]$ cat /etc/hosts
127.0.0.1 localhost
[student@localhost ~]$ sed 's/localhost/myhost/' /etc/hosts
127.0.0.1 myhost
Only the first occurrence on each line is replaced by default. To have all occurrences replaced, used the /g modifier, as shown in the next example:
[student@localhost ~]$ sed 's/0/X/' /etc/hosts
127.X.0.1 localhost
[student@localhost ~]$ sed 's/0/X/g' /etc/hosts
127.X.X.1 localhost
Note that a search pattern can be a regular expression (basic only; by default, use the -r option to include extended regular expressions).
The sed command does not replace the original file. Redirect output into another file, like so:
[student@localhost ~]$ sed 's/0/X/' /etc/hosts > myhosts
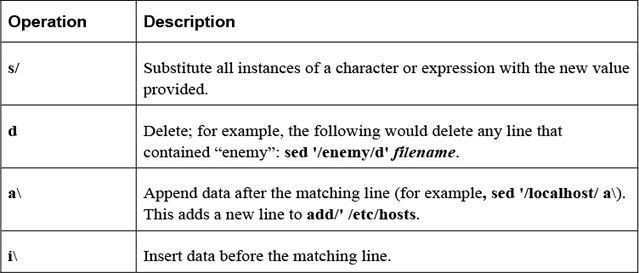
Important operations for the sed command include those shown in Table 2-23.
Table 2-23 Operations for the sed Command
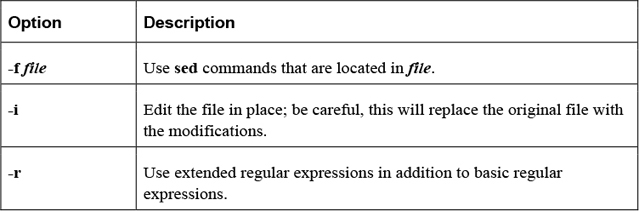
Important options for the sed command include those shown in Table 2-24.
Table 2-24 Options for the sed Command
Compression Commands
A common task on most modern operating systems is to combine and compress multiple files into a single file. This could be in order to store files on a smaller device, to make it easy to download files from a website, or to merge and compress files for email transport. This section focuses on some of the more common Linux utilities that merge and compress files.
The tar Command
The purpose of the tar command, which stands for tape archive, is to merge multiple files into a single file. To create a tar file named sample.tar, execute the following:
tar -cf sample.tar files_to_merge
To list the contents of a .tar file:
tar -tf sample.tar
To extract the contents of a .tar file:
tar -xf sample.tar
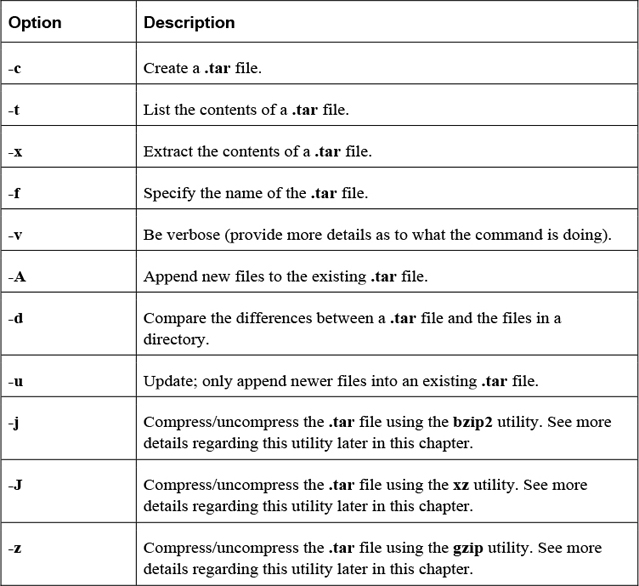
Important options include those shown in Table 2-25.
Table 2-25 Options for the tar Command
The gzip Command
Use the gzip command to compress files:
[student@localhost ~]$ ls -lh juju
-rwxr-xr-x 1 vagrant vagrant 109M Jan 10 09:20 juju
[student@localhost ~]$ gzip juju
[student@localhost ~]$ ls -lh juju.gz
-rwxr-xr-x 1 vagrant vagrant 17M Jan 10 09:20 juju.gz
Note that the gzip command replaces the original file with the smaller compressed file.
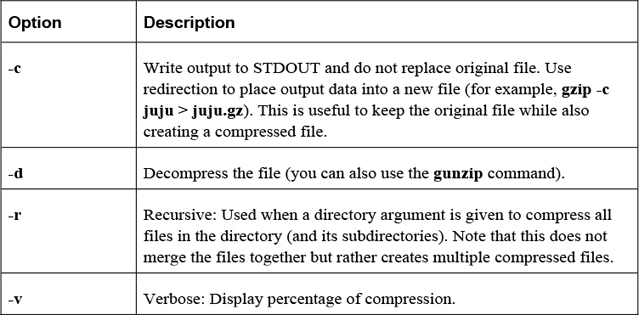
Important options include those shown in Table 2-26.
Table 2-26 Options for the gzip Command
The gunzip Command
Use the gunzip command to decompress gzipped files:
[student@localhost ~]$ ls -lh juju.gz
-rwxr-xr-x 1 vagrant vagrant 17M Jan 10 09:20 juju.gz
[student@localhost ~]$ gunzip juju
[student@localhost ~]$ ls -lh juju
-rwxr-xr-x 1 vagrant vagrant 109M Jan 10 09:20 juju
The bzip2 Command
Use the bzip2 command to compress files:
[student@localhost ~]$ ls -lh juju
-rwxr-xr-x 1 vagrant vagrant 109M Jan 10 09:20 juju
[student@localhost ~]$ bzip2 juju
[student@localhost ~]$ ls -lh juju.bz2
-rwxr-xr-x 1 vagrant vagrant 14M Jan 10 09:20 juju.bz2
Note that the bzip2 command replaces the original file with the compressed file.
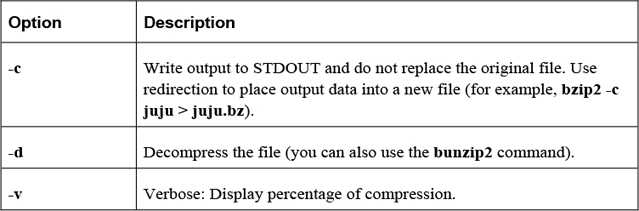
Important options include those shown in Table 2-27.
Table 2-27 Options for the bzip2 Command
The xz Command
Use the xz command to compress files:
[student@localhost ~]$ ls -lh juju
-rwxr-xr-x 1 vagrant vagrant 109M Jan 10 09:20 juju
[student@localhost ~]$ xz juju
[student@localhost ~]$ ls -lh juju.xz
-rwxr-xr-x 1 vagrant vagrant 11M Jan 10 09:20 juju.xz
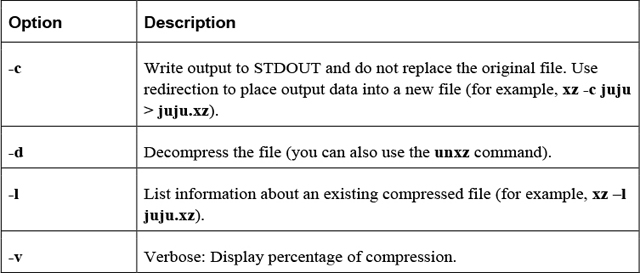
Important options include those shown in Table 2-28.
Table 2-28 Options for the xz Command
The gzip, xz, and bzip2 commands are very similar. The biggest difference is the technique used to compress files. The gzip command uses the Lempel-Ziv (LZ77) coding method, whereas the bzip2 command uses the Burrows-Wheeler (BWT) block-sorting text-compression algorithm and Huffman coding. The xz command uses the LZMA and LZMA2 compression methods.
Summary
This chapter focused on essential commands that all Linux users should know. These commands allow you to navigate the Linux operating system, manipulate files and directories, and perform advanced end-user operations. Consider these topics as “must know” in order to learn more advanced security and advanced system administration topics.
Key Terms
Review Questions
1. The _____ command can be used to delete a directory and all its contents.
2. Which of the following is a valid path type? (Choose all that apply.)
a. absolute
b. full
c. complete
d. relative
3. Which of the following represents the current directory?
a. .
b. ..
c. -
d. ~
4. The _____ option to the ls command will display a file’s permissions.
5. The _____ command will tell you what type of contents are contained in a file.