Table of Contents for
Linux Essentials for Cybersecurity, First Edition
 Linux Essentials for Cybersecurity, First Edition
Published by
Pearson IT Certification, 2018
Linux Essentials for Cybersecurity, First Edition
Published by
Pearson IT Certification, 2018
- Cover Page
- Title Page
- Copyright Page
- Contents at a Glance
- Table of Contents
- About the Author
- Dedication
- Acknowledgments
- About the Technical Reviewers
- We Want to Hear from You!
- Reader Services
- Introduction
- Part I: Introducing Linux
- Chapter 1: Distributions and Key Components
- Chapter 2: Working on the Command Line
- Chapter 3: Getting Help
- Chapter 4: Editing Files
- Chapter 5: When Things Go Wrong
- Part II: User and Group Accounts
- Chapter 6: Managing Group Accounts
- Chapter 7: Managing User Accounts
- Chapter 8: Develop an Account Security Policy
- Part III: File and Data Storage
- Chapter 9: File Permissions
- Chapter 10: Manage Local Storage: Essentials
- Chapter 11: Manage Local Storage: Advanced Features
- Chapter 12: Manage Network Storage
- Chapter 13: Develop a Storage Security Policy
- Part IV: Automation
- Chapter 14: Crontab and At
- Chapter 15: Scripting
- Chapter 16: Common Automation Tasks
- Chapter 17: Develop an Automation Security Policy
- Part V: Networking
- Chapter 18: Networking Basics
- Chapter 19: Network Configuration
- Chapter 20: Network Service Configuration: Essential Services
- Chapter 21: Network Service Configuration: Web Services
- Chapter 22: Connecting to Remote Systems
- Chapter 23: Develop a Network Security Policy
- Part VI: Process and Log Administration
- Chapter 24: Process Control
- Chapter 25: System Logging
- Part VII: Software Management
- Chapter 26: Red Hat–Based Software Management
- Chapter 27: Debian-Based Software Management
- Chapter 28: System Booting
- Chapter 29: Develop a Software Management Security Policy
- Part VIII: Security Tasks
- Chapter 30: Footprinting
- Chapter 31: Firewalls
- Chapter 32: Intrusion Detection
- Chapter 33: Additional Security Tasks
- Appendix A: Answers to Review Questions
- Appendix B: Resource Guide
- Glossary
Chapter 24 Process Control
On any operating system, it is important to have the ability to determine what programs are running and to alter the states of these programs. In Linux, this can be accomplished by a collection of commands that allow you to display running programs, pause and restart programs, stop programs, and change program CPU priority. During this chapter you explore these topics as well as how to display essential CPU and memory information.
After reading this chapter and completing the exercises, you will be able to do the following:
Describe what processes and jobs are.
Start and stop processes and jobs.
List processes and jobs that are currently running.
Change process priority.
Display CPU and RAM information.
Viewing Processes
Process is just a fancy way of saying “a program that is running on the system.” It could be a command that you executed from a BASH shell, a web browser, or some program started by the operating system.
Both regular users and system administrators should know how to start and stop processes. Typically you start a process by executing a command or clicking an icon or menu option within the GUI, but there are other techniques you can use to start a process. Some of these additional techniques can provide the process with access to more system resources.
Before discussing detailed methods of starting and stopping processes, we’ll first focus on how to view process information.
The ps Command
The ps command is used to list processes that are running on the system. With no arguments, the command will list any child process of the current shell as well as the BASH shell itself, as shown here:
[student@onecoursesource ~]$ps
  PID TTY          TIME CMD
18360 pts/0    00:00:00 bash
18691 pts/0    00:00:00 ps
Each line describes one process. By default, the ps command displays the following information:
• PID: Process ID number; each process has a unique ID that can be used to control the process.
• TTY: This is the terminal window that started the process. A terminal window is essentially a place where a user is able to issue commands from the command line. Originally this was a physical terminal (a machine that provided keyboard input to an operating system). In fact, TTY stands for Teletype, a terminal that was used to connect to some of the original Unix systems. Terminals that start with “pts” are GUI-based virtual terminals, windows in which shell programs run, or remote connections (such as an SSH connection). You may also see “tty,” which indicates a non-GUI-based virtual terminal. A “?” indicates a process that was not started from a terminal, but rather from another process (perhaps during system boot).
• TIME: CPU time; how much time the process has used to execute code on the CPU. Although this number can grow over time, it is typically a very small number (a handful of seconds or maybe a few minutes, but rarely more), unless something is wrong with the process.
• CMD: The command.
To list all processes running on the system, add the -e option, as shown next. This is useful because the process you want to view might have been started from a different shell (or by a different user), but the result of this command is dozens, perhaps even hundreds of lines of output.
[student@onecoursesource ~]$ps -e | wc -l
194
Recall that wc -l will display the number of lines of data; in the previous example, that would be the number of lines that the ps command produced. Each process is displayed on a separate line, so this system has 193 processes running (one line is the header information— PID, TTY, TIME, and so on). As a result, you likely will want to use a grep command to filter the output by command name:
[student@onecoursesource ~]$ps -e | grep xeyes
 4896 pts/2    00:00:00 xeyes
Another useful option to the ps command is the -f option, which displays “full information” about a process:
[student@onecoursesource ~]$ps -f
UID        PID  PPID  C STIME TTY          TIME CMD
student    3872  3693  0 16:41 pts/5    00:00:00 bash
student    4934  3872  0 21:05 pts/5    00:00:00 ps -f
The following new columns of data are included when you use the -f option:
• UID: User ID; the name of the user who started the process. This user “owns” the process, which is important because to control a process, you either need to be the root user or own the process.
• PPID: Parent process ID; this is the PID of the process that started the process described on this line. For example, in the previous output, the ps -f command was launched by the bash command, so the PPID of the ps -fe command matches the PID of the bash command. This can be useful to find a specific process in the event that more than one execution of a command or program is currently running.
• C: State; a value of 1 means it is currently executing code on the CPU (or has code in the CPU queue), and a value of 0 means it is currently “sleeping” (waiting for something to happen so it can perform an action).
• STIME: Start time; when the command was started. If a command has been running for more than 24 hours, this will be displayed as a date rather than as a time.
There are many more useful options to the ps command. This is one of those situations where you really want to explore the documentation and find additional options that will be useful for your daily work.
The pgrep Command
Often you will use a combination of the ps and grep commands to display specific processes:
[student@onecoursesource ~]$ps -e | grep sleep
25194 pts/0    00:00:00 sleep
The pgrep command can also provide a similar function:
[student@onecoursesource ~]$pgrep sleep
25194
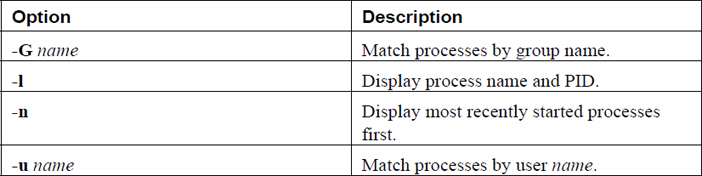
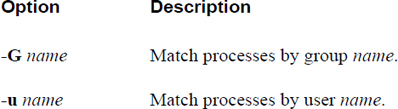
Important options to the pgrep command are shown in Table 24-1.
Table 24-1 Options for pgrep Command
The top Command
The top command displays process information that is updated on a regular basis (by default, every two seconds). The first half of the output of the top command contains overall information, whereas the second half displays a select list of processes (by default, the processes with the most CPU utilization).
See Figure 24-1 for a typical output of the top command.
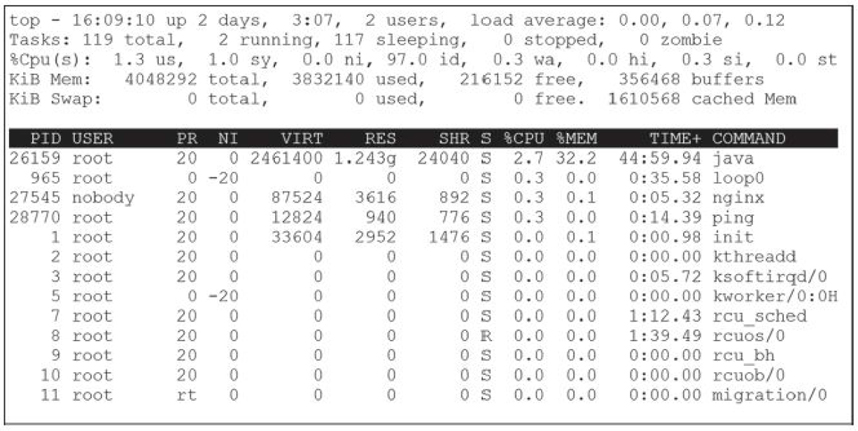
Figure 24-1 The top command
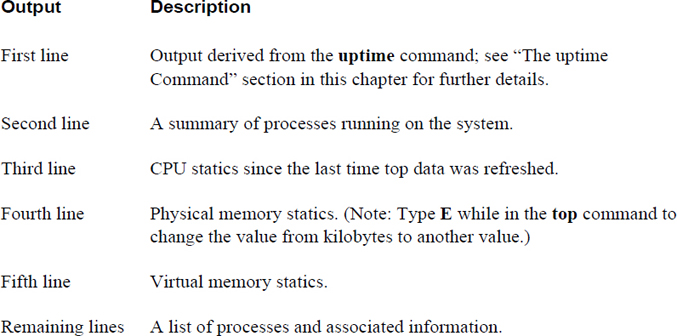
The top command provides both general system statistics as well as process information. Table 24-2 describes the output displayed in Figure 24-1.
Table 24-2 Output of the top Command
See Figure 24-2 for information about how top can be used to help solve system problems.
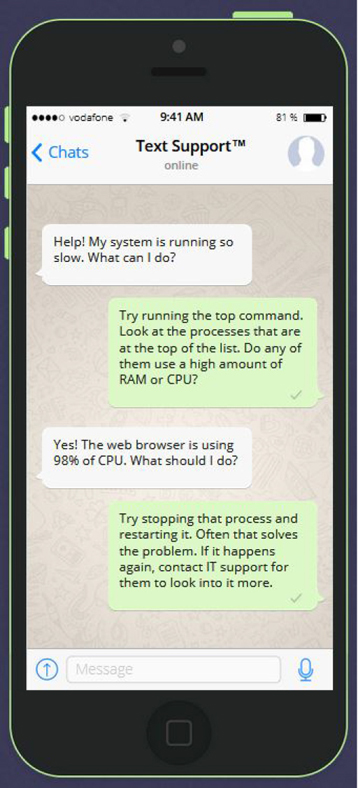
Figure 24-2 Text Support—solving issues on systems that lag
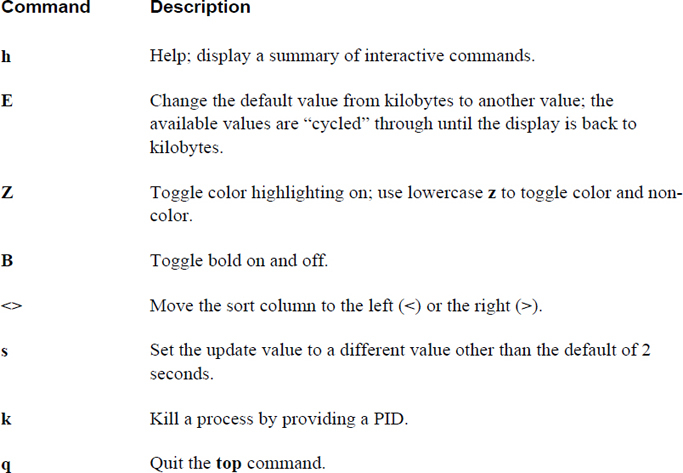
While the top command is running, you can type interactive commands to perform actions such as change display values, reorder the process list, and kill (stop) processes. These interactive commands are single characters. The more important interactive commands are provided in Table 24-3.
Table 24-3 Commands Within the Execution of the top Command
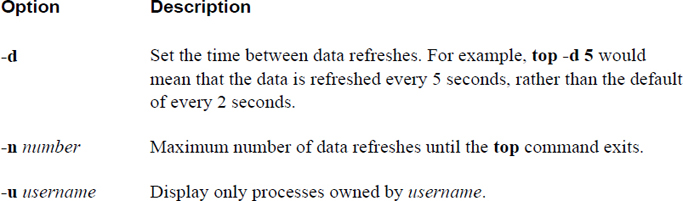
The top command also supports several command-line options. Important options are displayed in Table 24-4.
Table 24-4 Important Options to the top Command
The uptime Command
Although the uptime command doesn’t display individual process data, it does provide stats regarding overall process activity. The uptime command displays how long the system has been up for and its load average, as shown here:
[student@onecoursesource ~]$ uptime
 15:06:13 up 2 days,  9:09,  3 users,  load average: 0.01, 0.02, 0.05
The load average indicates the CPU usage over the last 1, 5, and 15 minutes (0.01, 0.02 and 0.05, for example). Load average is related to the number of CPUs, as described next:
• A load average of 1.0 on a single CPU system means 100% utilization.
• A load average of 2.0 on a single CPU system means 200% utilization (meaning that processes were often waiting for the CPU because it was busy).
• A load average of 1.0 on a system with two CPUs means 50% utilization.
• A load average of 2.0 on a system with two CPUs means 100% utilization.
The information provided by the uptime command can be useful in determining if the CPU is overloaded. Consistent utilization of the CPU over 100% indicates a problem and can cause servers to lag in response time.
Security Highlight
A high load average may indicate a hacking attempt. Even worse, it could be the result of a successful hack in which the hacker has placed intelligence-gathering scripts on the system.
The free Command
The free command displays memory statistics. Although this command does not display how much memory each individual process uses, it does provide a good overview of how much memory is available and how much is currently used. Here’s an example:
[student@onecoursesource ~]$ free
             total       used       free     shared    buffers     cached
Mem:       4048292    3891592     156700        460     370640    1617812
-/+ buffers/cache:    1903140    2145152
Swap:       400000          0          0
Values are displayed in bytes by default. The important areas to focus on are how much is the total memory and how much is the amount of free memory. The columns shared, buffers, and cache are more important for developers.
Swap refers to “swap space,” a topic that’s discussed in Chapter 10, “Manage Local Storage: Essentials,” and Chapter 11, “Manage Local Storage: Advanced Features.” Recall that swap space is hard drive storage that is temporarily used to store data from memory in the event that system RAM becomes full.
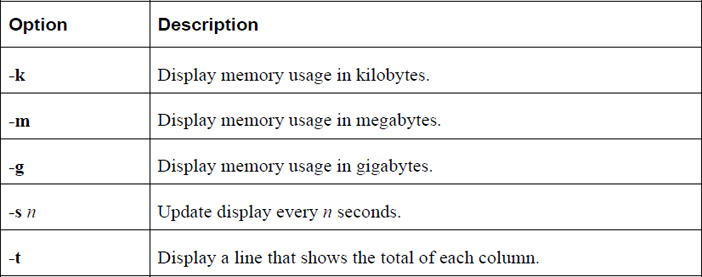
Important options to the swap command include those shown in Table 24-5.
Table 24-5 Options for the swap Command
Running Processes
Typically, processes are started as foreground jobs. When a process is in the foreground, the BASH shell from which the process was launched is not available. A process that is run in the background leaves the BASH shell available for the user to execute additional commands.
The terms job and process are essentially interchangeable. Any program running on the system is a process. A job is a process that is executed from the command line. Each BASH shell keeps track of jobs that were launched from that BASH shell.
Conversational Learning™ — Processes Versus Jobs
Gary: Hi, Julia. Can you explain something to me? I’m not really understanding the difference between a process and a job.
Julia: Hi, Gary. No problem. Let’s start by describing a process. A process is any command, program, or application that is running on the system. This includes anything that was started during the boot process, by other users or programs started by other processes.
Gary: OK, I understand that.
Julia: A job is also a process. Consider jobs to be a subset of all the processes running on the system. Not all processes are jobs. For example, any process started at boot is not considered a job.
Gary: So, which processes are considered to be jobs?
Julia: Any process that is started by a user in a shell. In other words, any command or program that you start by typing the command or program name in a shell.
Gary: Why are these processes called jobs?
Julia: Because there are some commands and features you can used on jobs that you can’t use on other processes. For example, the jobs command displays all the processes that were started in the current shell.
Gary: OK, but I could also see those “job processes” by using the ps command, right?
Julia: Yes, but the point is that often you just want to focus on the processes started by your current shell, so the jobs command often makes more sense in these cases. Also, jobs have job numbers that are unique for each shell. You can see these job numbers by using the jobs command, and you can use them with commands like the kill command.
Gary: OK, this all makes more sense now. Thank you!
Running a process in the background allows you to continue to work in the BASH shell and execute additional commands. To execute a process in the background, add an ampersand (&) character to the end of the command:
[student@onecoursesource ~]$xeyes &
Each BASH shell keeps track of the processes that are running from that BASH shell. These processes are referred to as jobs. To list the currently running jobs, execute the jobs command from the BASH shell:
[student@onecoursesource ~]$jobs
[1]-  Running                 xeyes&
[2]+  Running                 sleep 777 &
Each job is assigned a job number to control the job. Refer to this job number by the following syntax: %job_number.
Pausing and Restarting Processes
To pause a program that is running in the foreground, hold down the Ctrl key and press z. You can then see whether that job is stopped (paused) by running the jobs command.
A paused process is restarted in the background by using the bg command, like so:
[student@onecoursesource ~]$jobs
[1]+  Stopped                 sleep 999
[student@onecoursesource ~]$bg %1
[1]+ sleep 999 &
[student@onecoursesource ~]$jobs
[1]+  Running                 sleep 999 &
A paused process is restarted in the foreground by using the fg command, as shown here:
[student@onecoursesource ~]$jobs
[1]+  Stopped                 sleep 999
[student@onecoursesource ~]$fg %1
sleep 999
Killing Processes
As morbid as it sounds, the phrase “kill a process” is used to describe when you completely stop a process, not just pause it. Several methods are available to kill a process, including the following:
• The kill command
• The pkill command
• The killall command
• The xkill command
• Clicking the close box of a GUI-based program
The kill Command
The kill command can be used to change the state of a process, including to stop (kill) a process. To stop a process, first determine its process ID or job number and then provide that number as an argument to the kill command. Both the process ID and job number methods are demonstrated in Example 24-1.
Example 24-1 Stopping Jobs with the kill Command
[student@onecoursesource ~]$jobs
[1]-  Running                 sleep 999 &
[2]+  Running                 sleep 777 &
[student@onecoursesource ~]$kill %2
[student@onecoursesource ~]$jobs
[1]-  Running                 sleep 999 &
[2]+  Terminated              sleep 777
[student@onecoursesource ~]$ps -fe | grep sleep
student  17846 12540  0 14:30 pts/2    00:00:00 sleep 999
student  17853 12540  0 14:31 pts/2    00:00:00 grep --color=auto sleep
[student@onecoursesource ~]$kill 17846
[student@onecoursesource ~]$ps -fe | grep sleep
student  17856 12540  0 14:31 pts/2    00:00:00 grep --color=auto sleep
[1]+  Terminated              sleep 999
The kill command sends a signal to the process to inform the process what action to take. This signal can be specified as either a numeric argument or a keyword argument. Example 24-2 demonstrates how you can list all the possible signals that the kill command can send to a process.
Example 24-2 Listing Kill Signals
[student@onecoursesource ~]$ kill -l | head -5
 1) SIGHUP 2) SIGINT3) SIGQUIT4) SIGILL 5) SIGTRAP
 6) SIGABRT7) SIGBUS8) SIGFPE 9) SIGKILL10) SIGUSR1
11) SIGSEGV12) SIGUSR213) SIGPIPE14) SIGALRM15) SIGTERM
16) SIGSTKFLT17) SIGCHLD18) SIGCONT19) SIGSTOP20) SIGTSTP
21) SIGTTIN22) SIGTTOU23) SIGURG24) SIGXCPU25) SIGXFSZ
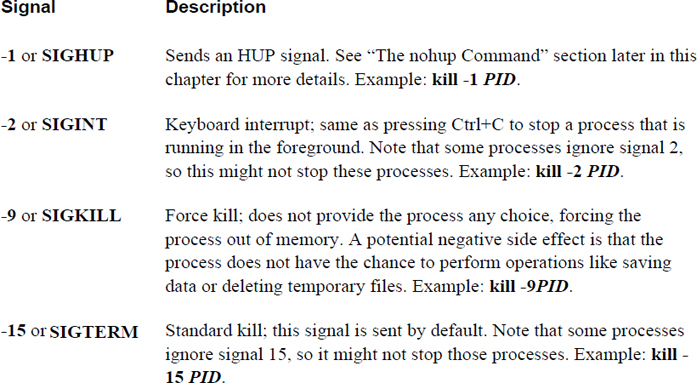
The output in Example 24-2 was truncated with the head command because the later kill signals are more esoteric and not as important as the earlier signals shown in the output. Some of the more important kill signals are described in Table 24-6.
Table 24-6 Important Kill Signals
Security Highlight
Because of potential negative side effects, avoid using signal 9 when stopping processes, at least initially. Allow processes to shut down gracefully by issuing a regular kill command, wait about 30 seconds, and then attempt the kill -9 command.
The -9 option may be necessary if the developer of the program you are trying to stop decided to ignore regular kill signals, or if a hacker has taken control or executed potentially harmful processes on the system.
The pkill Command
When sending signals to a process using the kill command, you indicate which process by providing a PID (process ID). With the pkill command, you can provide a process name, a username, or another method to indicate which process (or processes) to send a signal. For example, the following will send a kill signal to all processes owned by the user sarah:
[student@onecoursesource ~]$pkill -u sarah
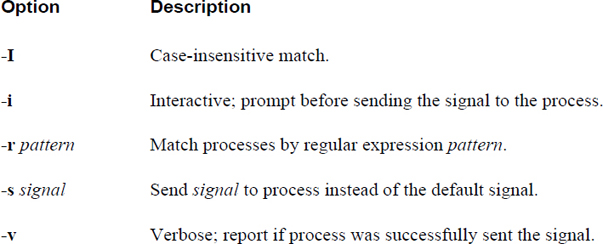
Important options include those shown in Table 24-7.
Table 24-7 Options for the pkill Command
The killall Command
The killall command is used to stop all the processes of a specific name. Here’s an example:
[student@onecoursesource ~]$killall firefox
Important options include those shown in Table 24-8.
Table 24-8 Options for the killall Command
The xkill Command
You can kill a process by running the xkill command and then just clicking the process that you want to stop. Refer to Figure 24-3 to see the first step in using the xkill command.
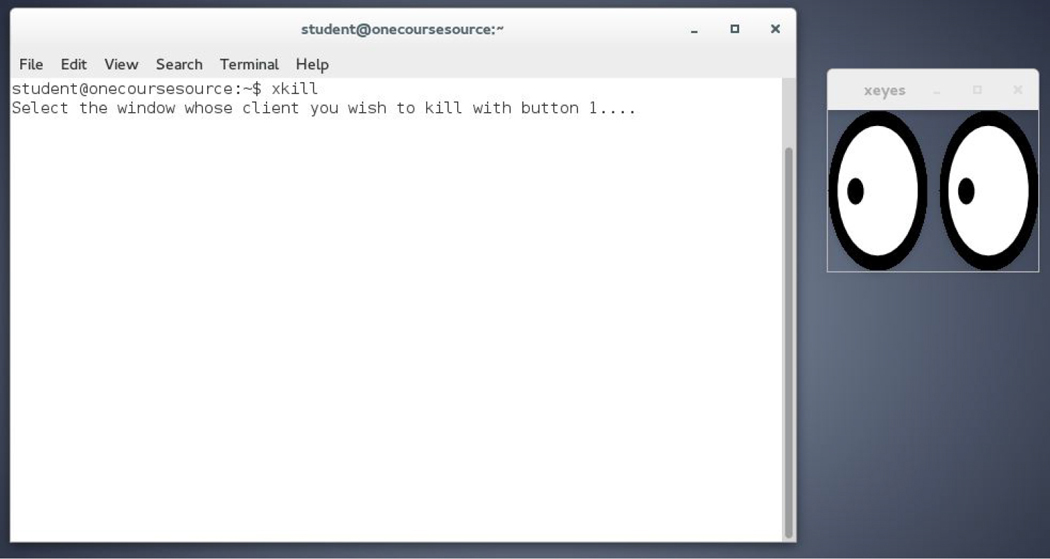
Figure 24-3 Starting the xkill command
The first step of running the xkill command is to make sure you can see the window of the program you want to stop. In this case, the xkill command will be used to stop the xeyes program (the pair of “eyes” to the right of the terminal window). Note the message that is displayed after running the xkill command and then see the result of clicking the xeyes program in Figure 24-4.
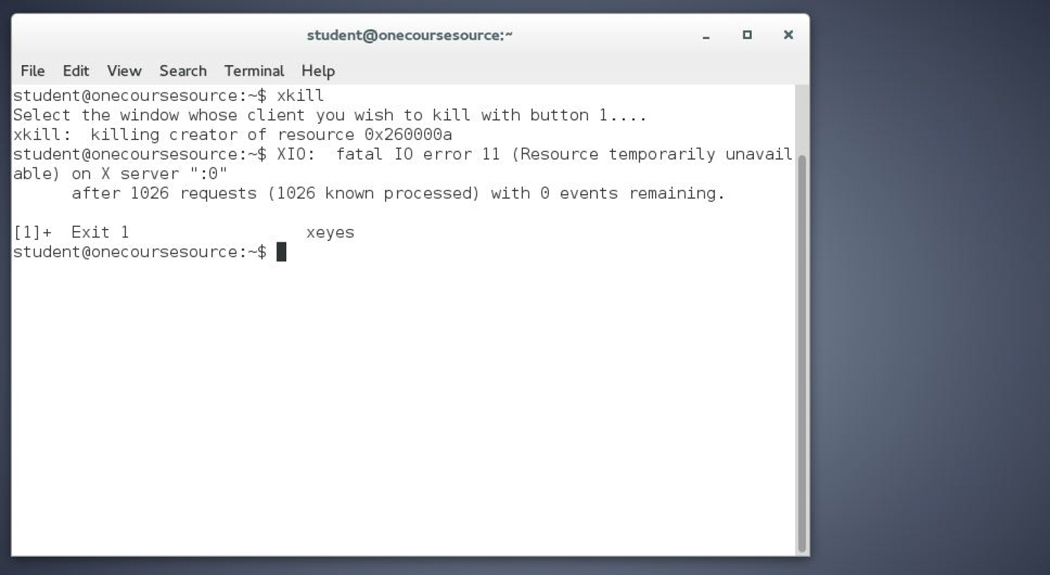
Figure 24-4 Stopping the xeyes program
The nohup Command
Each process has a parent process that started it. For example, if you execute a command in a BASH shell, then that command’s parent process is the BASH shell process.
When a parent process is stopped, an HUP signal is sent to all the child processes. This HUP signal is designed to stop the child processes. By default, a child process will stop when sent an HUP signal.
To avoid this, execute the child process with the nohup command:
[student@onecoursesource ~]$nohup some_command
This technique is typically used when you remotely log in to a system and want to have some command continue to run even if you are disconnected. When you are disconnected, all the programs you have running are sent HUP signals. Using the nohup command allows this specific process to continue running.
Process Priority
“Nice” values are used to indicate to the CPU which process has the higher priority for access to the CPU. The values range from -20 (highest priority) to 19 (lowest priority). The default priority of any job created by a user is 0. You can set the priority value of a new process by running the process with the nice command. To change the priority value of an existing process, use the renice command.
The nice Command
To specify a different “nice” value than the default, execute the job via the nice command:
[student@onecoursesource ~]$ nice -n 5 firefox
Note that regular users cannot assign a negative nice value. These values can only be used by the root user.
To view the nice value of a process, use the -o option with the ps command and include the value of “nice”:
[student@onecoursesource ~] ps -o nice,pid,cmd
 NI   PID CMD
  0 23865 -bash
  5 27967 firefox
  0 27969 ps -o nice,pid,cmd
The renice Command
Use the renice command to change the nice value of an existing job, as shown in Example 24-3.
Example 24-3 Using renice to Change the Nice Value of an Existing Job
[student@onecoursesource ~] ps -o nice,pid,cmd
 NI   PID CMD
  0 23865 -bash
 5 28235 sleep 999
  0 28261 ps -o nice,pid,cmd
[student@onecoursesource ~] renice -n 10 -p 28235
28235 (process ID) old priority 5, new priority 10
[student@onecoursesource ~] ps -o nice,pid,cmd
 NI   PID CMD
  0 23865 -bash
 10 28235 sleep 999
  0 28261 ps -o nice,pid,cmd
Note
Regular (non-root) users can only change the priority of an existing process to a lower priority. Only the root user can alter a process priority to a high priority.
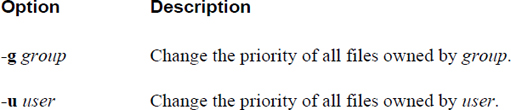
Important options for the renice command include those shown in Table 24-9.
Table 24-9 Options for the renice Command
Summary
In this chapter, you explored how to control processes, including how to start, pause, resume, and stop processes. You also learned several techniques to display process information as well as change process CPU priority.
Key Terms
Review Questions
1. The _____ command is used to display all process running on the system.
2. Which command is used to display process information on a regular basis (every 2 seconds by default)?
a. free
b. uptime
c. top
d. jobs
3. The highest CPU priority for a process is specified by the nice value of _____.
4. Which command can stop a process from executing? (Choose all that apply.)
a. stop
b. skill
c. pkill
d. xkill
5. The _____ command can be used to prevent a process from terminating if its parent process stops running.