Table of Contents for
Linux Shell Scripting Bootcamp
 Linux Shell Scripting Bootcamp
Published by
Packt Publishing, 2017
Linux Shell Scripting Bootcamp
Published by
Packt Publishing, 2017
- Cover
- Table of Contents
- Linux Shell Scripting Bootcamp
- Linux Shell Scripting Bootcamp
- Credits
- About the Author
- Acknowledgement
- About the Reviewer
- www.PacktPub.com
- Customer Feedback
- Preface
- What you need for this book
- Who this book is for
- Conventions
- Reader feedback
- Customer support
- 1. Getting Started with Shell Scripting
- Demonstrating the use of scripts
- Summary
- 2. Working with Variables
- Validating parameters using conditional statements
- Comparison operators for strings
- Environment variables
- Summary
- 3. Using Loops and the sleep Command
- Screen manipulation
- Indenting your code
- Using the for statement
- Leaving a loop early
- The sleep command
- Watching a process
- Creating numbered backup files
- Summary
- 4. Creating and Calling Subroutines
- File redirection
- Command piping
- Subroutines
- Using parameters
- Making a current backup of your work
- Summary
- 5. Creating Interactive Scripts
- Summary
- 6. Automating Tasks with Scripts
- Summary
- 7. Working with Files
- Reading files
- Reading and writing files
- Reading and writing files interactively
- File checksums
- File encryption
- Summary
- 8. Working with wget and curl
- wget and recursion
- wget options
- curl
- Summary
- 9. Debugging Scripts
- Automatic backups
- More syntax errors
- Logic errors
- Using set to debug scripts
- Summary
- 10. Scripting Best Practices
- ssh and scp
- Find and use a good text editor
- Environment variables and aliases
- ssh prompt
- Testing an archive
- Progress indicator
- Creating new commands from a template
- Alerting the user
- Summary
- Index
You can use the set commands to help with debugging your scripts. There are two common options to set, x and v. Here is a description of each.
Note that a - activates the set while a + deactivates it. If that sounds backwards to you it is because it is backwards.
Use:
set -x: to display the expanded trace before running the commandset -v: to display the input line as it is parsed
Take a look at Script 5 which shows what set -x does:
#!/bin/sh
#
# 6/7/2017
#
set -x                       # turn debugging on

echo "Chapter 9 - Script 5"

x=0
while [ $x -lt 5 ]
do
 echo "x: $x"
 let x++
done

echo "End of script5"
exit 0
And the output:
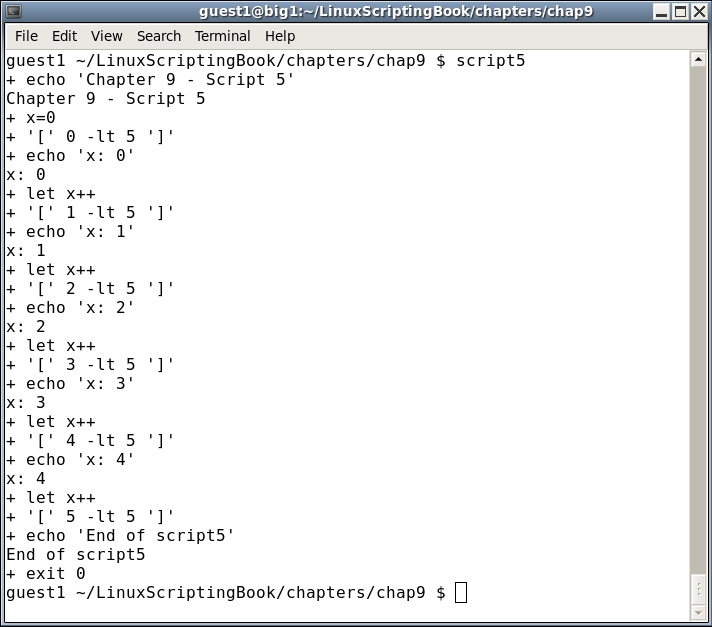
If this looks a little strange at first don't worry, it gets easier the more you look at it. In essence, the lines that start with a + are the expanded source code lines, and the lines without a + are the output of the script.
Look at the first two lines. It shows:
 + echo 'Chapter 9 - Script 5'
 Chapter 9 - Script 5
The first line shows the expanded command and the second the output.
You can also use the set -v option. Here is a screenshot of Script 6 which is just Script 5 but with set -v this time:
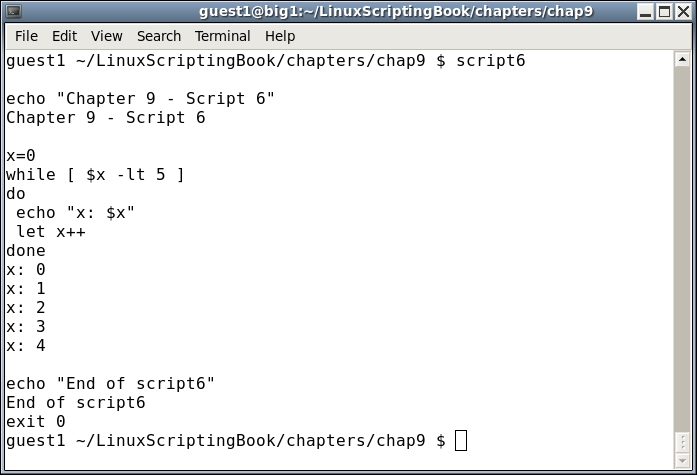
You can see the output is quite a bit different.
Note that with the set commands you can turn them on and off at any point you want in the script. This is so you can limit the output to just the areas of the code you are interested in.
Let's look at an example of this:
#!/bin/sh
#
# 6/8/2017
#
set +x                       # turn debugging off

echo "Chapter 9 - Script 7"

x=0
for fn in *.txt
do
 echo "x: $x - fn: $fn"
 array[$x]="$fn"
 let x++
done

maxx=$x
echo "Number of files: $maxx"

set -x                       # turn debugging on

x=0
while [ $x -lt $maxx ]
do
  echo "File: ${array[$x]}"
  let x++
done

set +x                       # turn debugging off

echo "End of script7"
exit 0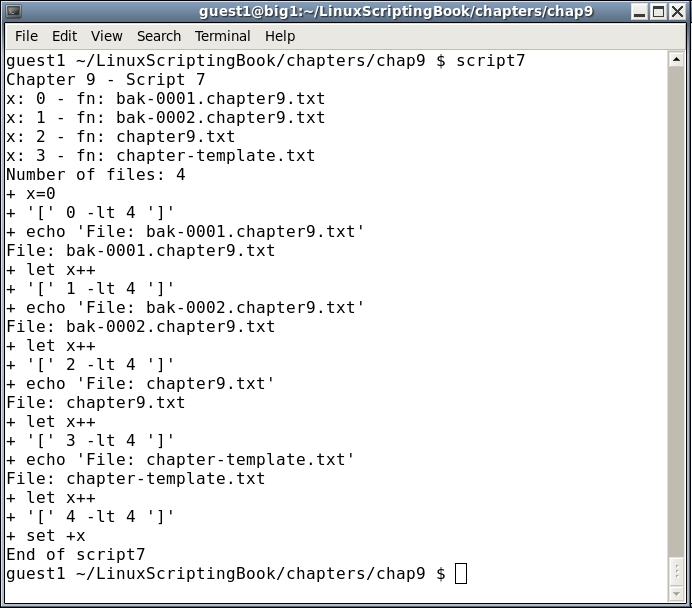
Notice how the debugging was explicitly turned off at the beginning of the script even though it is off by default. This is a good way to keep track of when it is off and when it is on. Look at the output closely and see how the debug statements don't start displaying until the second loop with the array. Then it is turned off before running the last two lines.
The output when using the set commands can be pretty hard to look at sometimes and so this is a good way to limit what you have to wade through to get to the lines of interest.
There is another debugging technique that I use quite frequently. In many cases I think it is superior to using the set commands as the display does not get quite as cluttered. You may recall in Chapter 6, Automating Tasks with Scripts, that we were able to display output to other terminals. This is a very handy feature.
The following script shows how to display output in another terminal. A subroutine is used for convenience:
#!/bin/sh
#
# 6/8/2017
#
echo "Chapter 9 - Script 8"
TTY=/dev/pts/35              # TTY of other terminal

# Subroutines
p1()                         # display to TTY
{
 rc1=0                       # default is no error
 if [ $# -ne 1 ] ; then
  rc1=2                      # missing parameter
 else
  echo "$1" > $TTY
  rc1=$?                     # set error status of echo command
 fi

 return $rc1
}

# Code
p1                           # missing parameter
echo $?

p1 Hello
echo $?

p1 "Linux Rules!"
echo $?

p1 "Programming is fun!"
echo $?

echo "End of script8"
exit 0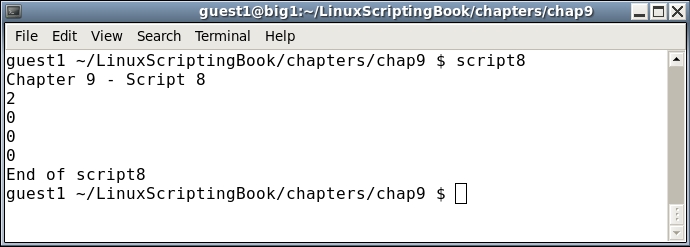
Remember to quote the parameter to p1 in case it contains blank characters.
This subroutine might be a bit of overkill to use for debugging but it captures many of the concepts previously discussed in this book. This approach can also be used in a script to display information in multiple terminals. We will go over that in the next chapter.
It probably means the terminal has not been opened yet. Also remember to put your terminal device strings into a variable because those tend to change after a reboot. Something like TTY=/dev/pts/35 is a good idea.
A great time to use this debugging technique is when writing a form script as we did in Chapter 5, Creating Interactive Scripts. So, let's take a look at that script again and put this new subroutine to use.
#!/bin/sh
# 6/8/2017
# Chapter 9 - Script 9
#
TTY=/dev/pts/35              # debug terminal

# Subroutines
cls()
{
 tput clear
}

move()                       # move cursor to row, col
{
 tput cup $1 $2
}

movestr()                    # move cursor to row, col
{
 tput cup $1 $2
 echo -n "$3"                # display string
}

checktermsize()
{
 p1 "Entering routine checktermsize."

 rc1=0                       # default is no error
 if [[ $LINES -lt $1 || $COLUMNS -lt $2 ]] ; then
  rc1=1                      # set return code
 fi
 return $rc1
}

init()                       # set up the cursor position array
{
 p1 "Entering routine init."

 srow[0]=2;  scol[0]=7       # name
 srow[1]=4;  scol[1]=12      # address 1
 srow[2]=6;  scol[2]=12      # address 2
 srow[3]=8;  scol[3]=7       # city
 srow[4]=8;  scol[4]=37      # state
 srow[5]=8;  scol[5]=52      # zip code
 srow[6]=10; scol[6]=8       # email
}

drawscreen()                 # main screen draw routine
{
 p1 "Entering routine drawscreen."

 cls                         # clear the screen
 movestr 0 25 "Chapter 9 - Script 9"
 movestr 2 1 "Name:"
 movestr 4 1 "Address 1:"
 movestr 6 1 "Address 2:"
 movestr 8 1 "City:"
 movestr 8 30 "State:"
 movestr 8 42 "Zip code:"
 movestr 10 1 "Email:"
}

getdata()
{
 p1 "Entering routine getdata."

 x=0                         # array subscript
 rc1=0                       # loop control variable
 while [ $rc1 -eq 0 ]
 do
  row=${srow[x]}; col=${scol[x]}

  p1 "row: $row  col: $col"

  move $row $col
  read array[x]
  let x++
  if [ $x -eq $sizeofarray ] ; then
   rc1=1
  fi
 done
 return 0
}

showdata()
{
 p1 "Entering routine showdata."

 fn=0
 echo ""
 read -p "Enter filename, or just Enter to skip: " filename
 if [ -n "$filename" ] ; then       # if not blank
  echo "Writing to '$filename'"
  fn=1                       # a filename was given
 fi
 echo ""                     # skip 1 line
 echo "Data array contents: "
 y=0
 while [ $y -lt $sizeofarray ]
 do
  echo "$y - ${array[$y]}"
  if [ $fn -eq 1 ] ; then
   echo "$y - ${array[$y]}" >> "$filename"
  fi
  let y++
 done
 return 0
}

p1()                         # display to TTY
{
 rc1=0                       # default is no error
 if [ $# -ne 1 ] ; then
  rc1=2                      # missing parameter
 else
  echo "$1" > $TTY
  rc1=$?                     # set error status of echo command
 fi

 return $rc1
}

# Code starts here

p1 " "                       # carriage return
p1 "Starting debug of script9"

sizeofarray=7                # number of array elements

if [ "$1" = "--help" ] ; then
 p1 "In Usage clause."

 echo "Usage: script9 --help"
 echo " This script shows how to create an interactive screen program"
 echo " and how to use another terminal for debugging."
 exit 255
fi

checktermsize 25 80
rc=$?
if [ $rc -ne 0 ] ; then
 echo "Please size the terminal to 25x80 and try again."
 exit 1
fi

init                         # initialize the screen array
drawscreen                   # draw the screen
getdata                      # cursor movement and data input routine
showdata                     # display the data

p1 "At exit."
exit 0
Here is the output from the debug terminal (dev/pts/35):
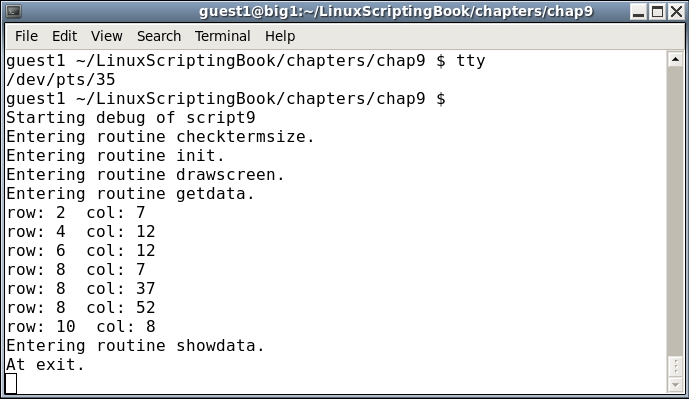
By having the debug information display in another terminal it is much easier to see what is happening in the code.
You can put the p1 routine where ever you think the problem might be. Labeling which subroutine is being used can also help locate if the problem is in a subroutine or in the main code body.
When your script is completed and ready for use, you don't have to remove the calls to the p1 routine unless you really want to. You can just code a return 0 at the top of the routine.
I use this approach when debugging shell scripts or C programs and it has always worked very well for me.