Table of Contents for
Linux Shell Scripting Bootcamp
 Linux Shell Scripting Bootcamp
Published by
Packt Publishing, 2017
Linux Shell Scripting Bootcamp
Published by
Packt Publishing, 2017
- Cover
- Table of Contents
- Linux Shell Scripting Bootcamp
- Linux Shell Scripting Bootcamp
- Credits
- About the Author
- Acknowledgement
- About the Reviewer
- www.PacktPub.com
- Customer Feedback
- Preface
- What you need for this book
- Who this book is for
- Conventions
- Reader feedback
- Customer support
- 1. Getting Started with Shell Scripting
- Demonstrating the use of scripts
- Summary
- 2. Working with Variables
- Validating parameters using conditional statements
- Comparison operators for strings
- Environment variables
- Summary
- 3. Using Loops and the sleep Command
- Screen manipulation
- Indenting your code
- Using the for statement
- Leaving a loop early
- The sleep command
- Watching a process
- Creating numbered backup files
- Summary
- 4. Creating and Calling Subroutines
- File redirection
- Command piping
- Subroutines
- Using parameters
- Making a current backup of your work
- Summary
- 5. Creating Interactive Scripts
- Summary
- 6. Automating Tasks with Scripts
- Summary
- 7. Working with Files
- Reading files
- Reading and writing files
- Reading and writing files interactively
- File checksums
- File encryption
- Summary
- 8. Working with wget and curl
- wget and recursion
- wget options
- curl
- Summary
- 9. Debugging Scripts
- Automatic backups
- More syntax errors
- Logic errors
- Using set to debug scripts
- Summary
- 10. Scripting Best Practices
- ssh and scp
- Find and use a good text editor
- Environment variables and aliases
- ssh prompt
- Testing an archive
- Progress indicator
- Creating new commands from a template
- Alerting the user
- Summary
- Index
So far we have only talked about variables that are local to a script. There are also system wide environment variables (env vars) which play a very important part of any Linux system. Here are a few, some of which the reader may already be aware of:
|
Variable |
Role |
|---|---|
|
|
user's home directory |
|
|
directories which are searched for commands |
|
|
command line prompt |
|
|
hostname of the machine |
|
|
shell that is being used |
|
|
user of this session |
|
|
text editor to use for |
|
|
number of commands that will be shown by the history command |
|
|
type of command line terminal that is being used |
Most of these are self-explanatory, however, I will mention a few.
The PS1 environment variable controls what the shell prompt displays as part of the command line. The default setting is usually something like [guest1@big1 ~]$, which is not as useful as it could be. At a minimum, a good prompt shows at least the hostname and current directory.
For example, as I work on this chapter the prompt on my system looks just like this:
big1 ~/LinuxScriptingBook/chapters/chap2 $
big1 is the hostname of my system and ~/LinuxScriptingBook/chapters/chap2 is the current directory. Recall that the tilde ~ stands for the user's home directory; so in my case this expands out to:
/home/guest1/LinuxScriptingBook/chapters/chap2
The "$" means I am running under a guest account.
To enable this, my PS1 env var is defined in /home/guest1/.bashrc as follows:
export PS1="\h \w $ "
The "\h" shows the hostname and the \w shows the current directory. This is a very useful prompt and I have been using it for many years. Here's how to show the username as well:
export PS1="\u \h \w $ "
The prompt would now look like this:
guest1 big1 ~/LinuxScriptingBook/chapters/chap2 $
If you change the PS1 variable in your .bashrc file, make certain you do it after any other lines that are already in the file.
For example, here is what my original .bashrc contains under my guest1 account:
# .bashrc

# Source global definitions
if [ -f /etc/bashrc ]; then
    . /etc/bashrc
fi

# User specific aliases and functions
Put your PS1 definition after these lines.
Note
If you log into a lot of different machines on a daily basis, there is a PS1 trick I have found that is very useful. This will be shown in a later chapter.
You may have noticed that it looks as though I did not always use a good PS1 variable for the examples in this book. It was edited out during book creation to save space.
The EDITOR variable can be very useful. This tells the system which text editor to use for things such as editing the user's crontab (crontab -e). If not set, it defaults to the vi editor. It can be changed by putting it in the user's .bashrc file. Here is what mine looks like for the root account:
export EDITOR=/lewis/bin64/kw
When I run crontab -l (or -e), my personally written text editor comes up instead of vi. Very handy!
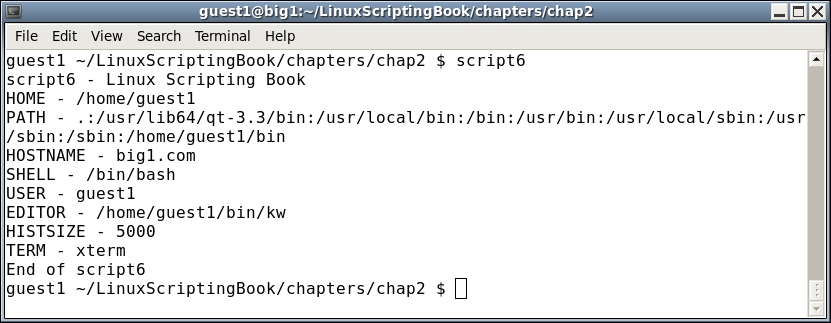
Here we'll take a look at Script 6, that shows some of the variables on my system under my guest1 account:
#!/bin/sh
#
# 5/1/2017
#
echo "script6 - Linux Scripting Book"

echo HOME - $HOME
echo PATH - $PATH
echo HOSTNAME - $HOSTNAME
echo SHELL - $SHELL
echo USER - $USER
echo EDITOR - $EDITOR
echo HISTSIZE - $HISTSIZE
echo TERM - $TERM

echo "End of script6"
Here's the output:
You can also create and use your own env vars. This is a really powerful feature of a Linux system. Here are some examples that I use in my /root/.bashrc file:
BIN=/lewis/bin64
DOWN=/home/guest1/Downloads
DESK=/home/guest1/Desktop
JAVAPATH=/usr/lib/jvm/java-1.7.0-openjdk-1.7.0.99.x86_64/include/
KW_WORKDIR=/root
L1=guest1@192.168.1.21
L4=guest1@192.168.1.2
LBCUR=/home/guest1/LinuxScriptingBook/chapters/chap2
export BIN DOWN DESK JAVAPATH KW_WORKDIR L1 L4 LBCUR
BIN: This is the directory of my executables and scripts under rootDOWN: This is the download directory for email attachments, etcDESK: This is the download directory for screenshotsJAVAPATH: This is the directory to use when I am writing Java appsKW_WORKDIR: This is where my editor puts its working filesL1andL2: This is the IP addresses to my laptopsLBCUR: This is the current directory I am working in for this book
Be sure to export your variables so that they can be accessed by other terminals. Also remember to source your .bashrc when you make a change. On my system the command would be:
guest1 $ . /home/guest1/.bashrc
I will show in a later chapter how these env vars can be paired with aliases. For example, the bin command on my system is an alias that changes the current directory to the /lewis/bin64 directory. This is one of the most powerful features in a Linux system, however, I am always surprised that I do not see it used more often.
The last type of variable we will cover in this chapter is called an array. Suppose you want to write a script that contains all of the IP addresses of the machines in your lab. You could do something like this:
L0=192.168.1.1
L1=192.168.1.10
L2=192.168.1.15
L3=192.168.1.16
L4=192.168.1.20
L5=192.168.1.26
That will work and in fact I do something similar to that in my home office/lab. However, suppose you have a whole lot of machines. Using arrays can make your life a lot simpler.
Take a look at Script 7:
#!/bin/sh
#
# 5/1/2017
#
echo "script7 - Linux Scripting Book"

array_var=(1 2 3 4 5 6)

echo ${array_var[0]}
echo ${array_var[1]}
echo ${array_var[2]}
echo ${array_var[3]}
echo ${array_var[4]}
echo ${array_var[5]}

echo "List all elements:"
echo ${array_var[*]}

echo "List all elements (alternative method):"
echo ${array_var[@]}

echo "Number of elements: ${#array_var[*]}"
labip[0]="192.168.1.1"
labip[1]="192.168.1.10"
labip[2]="192.168.1.15"
labip[3]="192.168.1.16"
labip[4]="192.168.1.20"

echo ${labip[0]}
echo ${labip[1]}
echo ${labip[2]}
echo ${labip[3]}
echo ${labip[4]}

echo "List all elements:"
echo ${labip[*]}

echo "Number of elements: ${#labip[*]}"
echo "End of script7"
And here is the output on my system:
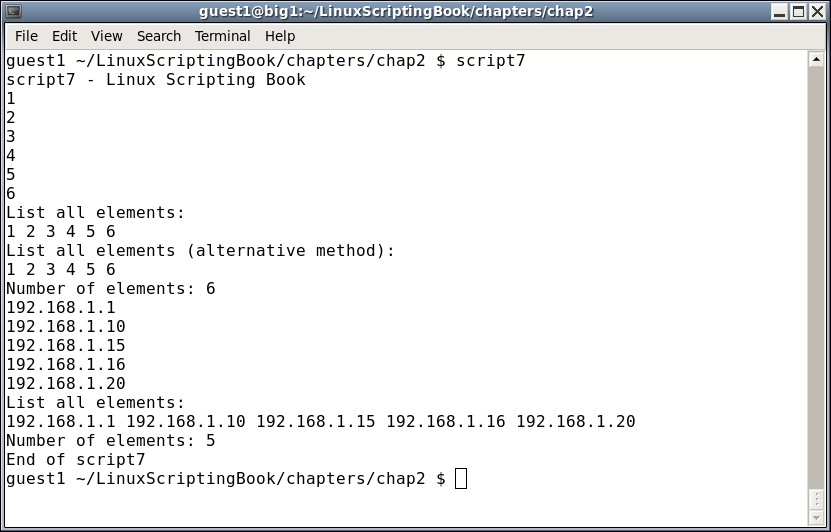
Run this script on your system and try experimenting with it. If you have never seen or used an array before, don't let them scare you; you will get familiar with them soon enough. This is another area where it's easy to forget the ${ array variable here } syntax so if the script doesn't do what you want (or generates an error) check that first.
We will talk about arrays again in much more detail when we cover loops in the next chapter.