Table of Contents for
Linux Shell Scripting Bootcamp
 Linux Shell Scripting Bootcamp
Published by
Packt Publishing, 2017
Linux Shell Scripting Bootcamp
Published by
Packt Publishing, 2017
- Cover
- Table of Contents
- Linux Shell Scripting Bootcamp
- Linux Shell Scripting Bootcamp
- Credits
- About the Author
- Acknowledgement
- About the Reviewer
- www.PacktPub.com
- Customer Feedback
- Preface
- What you need for this book
- Who this book is for
- Conventions
- Reader feedback
- Customer support
- 1. Getting Started with Shell Scripting
- Demonstrating the use of scripts
- Summary
- 2. Working with Variables
- Validating parameters using conditional statements
- Comparison operators for strings
- Environment variables
- Summary
- 3. Using Loops and the sleep Command
- Screen manipulation
- Indenting your code
- Using the for statement
- Leaving a loop early
- The sleep command
- Watching a process
- Creating numbered backup files
- Summary
- 4. Creating and Calling Subroutines
- File redirection
- Command piping
- Subroutines
- Using parameters
- Making a current backup of your work
- Summary
- 5. Creating Interactive Scripts
- Summary
- 6. Automating Tasks with Scripts
- Summary
- 7. Working with Files
- Reading files
- Reading and writing files
- Reading and writing files interactively
- File checksums
- File encryption
- Summary
- 8. Working with wget and curl
- wget and recursion
- wget options
- curl
- Summary
- 9. Debugging Scripts
- Automatic backups
- More syntax errors
- Logic errors
- Using set to debug scripts
- Summary
- 10. Scripting Best Practices
- ssh and scp
- Find and use a good text editor
- Environment variables and aliases
- ssh prompt
- Testing an archive
- Progress indicator
- Creating new commands from a template
- Alerting the user
- Summary
- Index
This chapter shows how to read the keyboard in order to create interactive scripts.
The topics covered in this chapter are:
- How to use the
readbuilt-in command to query the keyboard. - The different ways to use
read. - The use of traps (interrupts).
The reader will learn how to create interactive scripts.
The scripts we have looked at up to this point have run without much user interaction. The read command is used to create scripts that can query the keyboard. The code can then take action based on the input.
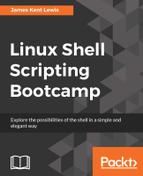
#!/bin/sh
#
# 5/16/2017
#
echo "script1 - Linux Scripting Book"

echo "Enter 'q' to quit."
rc=0
while [ $rc -eq 0 ]
do
 echo -n "Enter a string: "
 read str
 echo "str: $str"
 if [ "$str" = "q" ] ; then
  rc=1
 fi
done

echo "End of script1"
exit 0
And here is the output when run on my system:
This is a good one to run on your system. Try several different strings, numbers, and so on. Notice how the returned string contains whitespace, special characters, and so on. You don't have to quote anything, and if you do those will be returned as well.
You can also use the read command to put a simple pause into your script. This will allow you to see the output before it scrolls off the screen. It can also be used when debugging which will be shown in Chapter 9, Debugging Scripts.
The following script shows how to create a pause when the output gets to the last line of the screen:
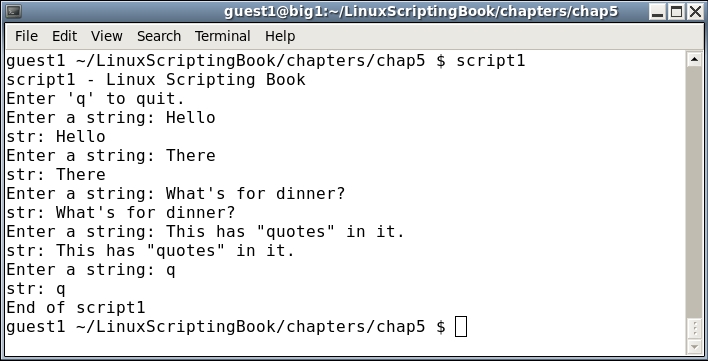
#!/bin/sh
#
# 5/16/2017
# Chapter 5 - Script 2
#
linecnt=1                    # line counter
loop=0                       # loop control var
while [ $loop -eq 0 ]
do
 echo "$linecnt  $RANDOM"    # display next random number
 let linecnt++
 if [ $linecnt -eq $LINES ] ; then
  linecnt=1
  echo -n "Press Enter to continue or q to quit: "
  read str                   # pause
  if [ "$str" = "q" ] ; then
   loop=1                    # end the loop
  fi
 fi
done

echo "End of script2"
exit 0
And here is the output when run on my system:
I pressed Enter twice, and then Q and Enter on the last one.
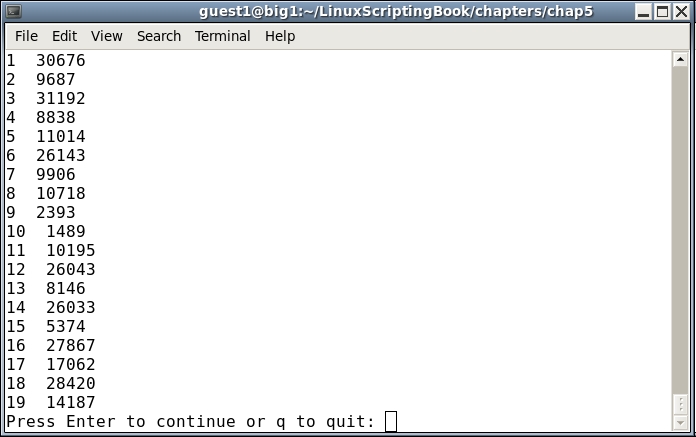
Let's try something a bit more interesting. This next script shows how to fill an array with values taken from the keyboard:
#!/bin/sh
#
# 5/16/2017
#
echo "script3 - Linux Scripting Book"

if [ "$1" = "--help" ] ; then
 echo "Usage: script3"
 echo " Queries the user for values and puts them into an array."
 echo " Entering 'q' will halt the script."
 echo " Running 'script3 --help' shows this Usage message."
 exit 255
fi

x=0                          # subscript into array
loop=0                       # loop control variable
while [ $loop -eq 0 ]
do
 echo -n "Enter a value or q to quit: "
 read value
 if [ "$value" = "q" ] ; then
  loop=1
 else
  array[$x]="$value"
  let x++
 fi
done

let size=x
x=0
while [ $x -lt $size ]
do
 echo "array $x: ${array[x]}"
 let x++
done

echo "End of script3"
exit 0
And the output:
Since this script does not require any parameters I decided to add a Usage statement. This will display if the user runs it with --help and is a common feature in many system scripts and programs.
The only thing new in this script is the read command. The loop and array variables were discussed in an earlier chapter. Note again that, with the read command what you type is what you get.
Now let's create a complete interactive script. But first we need to check the size of the current terminal. If it is too small, the output of your script may become garbled and the user may not know why or how to fix it.
The following script contains a subroutine that checks the size of the terminal:
#!/bin/sh
#
# 5/16/2017
#
echo "script4 - Linux Scripting Book"

checktermsize()
{
 rc1=0                       # default is no error
 if [[ $LINES -lt $1 || $COLUMNS -lt $2 ]] ; then
  rc1=1                      # set return code
 fi
 return $rc1
}

rc=0                         # default is no error
checktermsize 40 90          # check terminal size
rc=$?
if [ $rc -ne 0 ] ; then
 echo "Return code: $rc from checktermsize"
fi

exit $rc
Run this on your system with different-sized terminals to check the result. As you can see from the code, it's okay if the terminal is larger than needed; it just can't be too small.
Now let's look at a full interactive script:
#!/bin/sh
#
# 5/27/2017
#
echo "script5 - Linux Scripting Book"

# Subroutines
cls()
{
 tput clear
}

move()                       # move cursor to row, col
{
 tput cup $1 $2
}

movestr()                    # move cursor to row, col
{
 tput cup $1 $2
 echo -n "$3"                # display string
}

checktermsize()
{
 rc1=0                       # default is no error
 if [[ $LINES -lt $1 || $COLUMNS -lt $2 ]] ; then
  rc1=1                      # set return code
 fi
 return $rc1
}

init()                       # set up the cursor position array
{
 srow[0]=2;  scol[0]=7       # name
 srow[1]=4;  scol[1]=12      # address 1
 srow[2]=6;  scol[2]=12      # address 2
 srow[3]=8;  scol[3]=7       # city
 srow[4]=8;  scol[4]=37      # state
 srow[5]=8;  scol[5]=52      # zip code
 srow[6]=10; scol[6]=8       # email
}

drawscreen()                 # main screen draw routine
{
 cls                         # clear the screen
 movestr 0 25 "Chapter 5 - Script 5"
 movestr 2 1 "Name:"
 movestr 4 1 "Address 1:"
 movestr 6 1 "Address 2:"
 movestr 8 1 "City:"
 movestr 8 30 "State:"
 movestr 8 42 "Zip code:"
 movestr 10 1 "Email:"
}

getdata()
{
 x=0                         # array subscript
 rc1=0                       # loop control variable
 while [ $rc1 -eq 0 ]
 do
  row=${srow[x]}; col=${scol[x]}
  move $row $col
  read array[x]
  let x++
  if [ $x -eq $sizeofarray ] ; then
   rc1=1
  fi
 done
 return 0
}

showdata()
{
 fn=0
 echo ""
 read -p "Enter filename, or just Enter to skip: " filename
 if [ -n "$filename" ] ; then       # if not blank
  echo "Writing to '$filename'"
 fn=1                       # a filename was given
 fi
 echo ""                     # skip 1 line
 echo "Data array contents: "
 y=0
 while [ $y -lt $sizeofarray ]
 do
  echo "$y - ${array[$y]}"
  if [ $fn -eq 1 ] ; then
   echo "$y - ${array[$y]}">>"$filename"
  fi
  let y++
 done
 return 0
}

# Code starts here
sizeofarray=7                # number of array elements

if [ "$1" = "--help" ] ; then
 echo "Usage: script5 --help"
 echo " This script shows how to create an interactive screen program."
 exit 255
fi

checktermsize 25 80
rc=$?
if [ $rc -ne 0 ] ; then
 echo "Please size the terminal to 25x80 and try again."
 exit 1
fi

init                         # initialize the screen array
drawscreen                   # draw the screen
getdata                      # cursor movement and data input routine
showdata                     # display the data

exit 0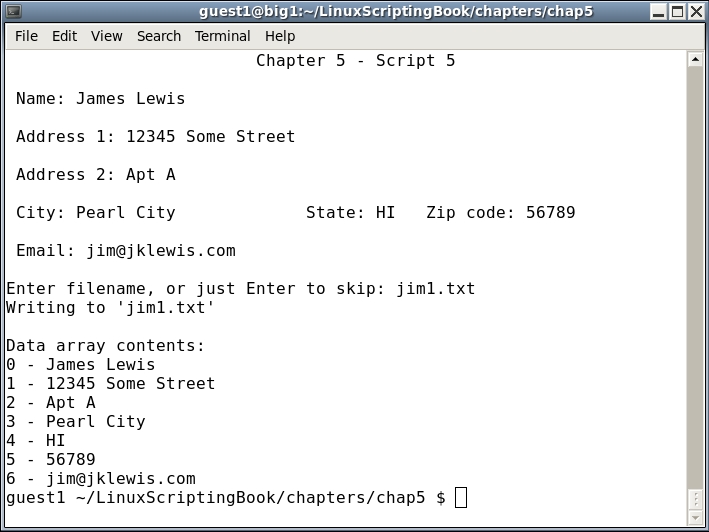
There is a lot of new information here, so let's take a look. First the subroutines are defined, and you can see we included the checktermsize subroutine from the preceding Script 4.
The init routine sets up the cursor placement array. It's good programming practice to put initial values in a subroutine, particularly if it is going to be called again.
The drawscreen routine displays the initial form. Note that I could have used the values in the srow and scol array here, however, I didn't want the script to look too cluttered.
Look very carefully at the getdata routine because this is where the fun begins:
- First the array subscript
xand control varrc1are set to0. - In the loop the cursor is placed at the first position (
Name:). - The keyboard is queried and the user's input goes into the array at sub
x. xis incremented and we go to the next field.- If
xis equal to the size of the array we leave the loop. Keep in mind that we start counting at0.
The showdata routine displays the array data and then we are done.
This is just a small example of an interactive script to show the basic concepts. In a later chapter we will go into this in more detail.
The read command can be used in a number of different ways. Here are a few examples:
read var
Wait for input of characters into the variable var.
read -p "string" var
Display contents of string, stay on the line, and wait for input.

read -p "Enter password:" -s var
Display "Enter password:", but do not echo the typing of the input. Note that a carriage return is not output after Enter is pressed.

read -n 1 var
The -n option means to wait for that number of characters and then continue, it does not wait for an Enter press.
In this example it will wait for 1 char and then go. This can be useful in utility scripts and games:
#!/bin/sh
#
# 5/27/2017
#
echo "Chapter 5 - Script 6"

rc=0                         # return code
while [ $rc -eq 0 ]
do
 read -p "Enter value or q to quit: " var
 echo "var: $var"
 if [ "$var" = "q" ] ; then
  rc=1
 fi
done

rc=0                         # return code
while [ $rc -eq 0 ]
do
 read -p "Password: " -s var
 echo ""                     # carriage return
 echo "var: $var"
if [ "$var" = "q" ] ; then
  rc=1
 fi
done

echo "Press some keys and q to quit."
rc=0                         # return code
while [ $rc -eq 0 ]
do
 read -n 1 -s var            # wait for 1 char, does not output it
 echo $var                   # output it here
 if [ "$var" = "q" ] ; then
  rc=1
 fi
done

exit $rc
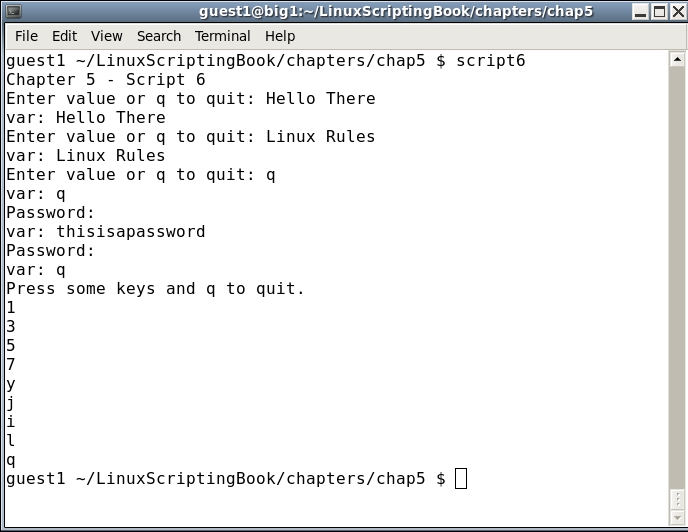
The comments in the script should make this one pretty self explanatory. The read command has a few more options, one of which will be shown in the next script.
Another way to query the keyboard is by using what is called a trap. This is a subroutine that is accessed when a special key sequence is pressed, such as Ctrl + C.
Here is an example of using a trap:
#!/bin/sh
#
# 5/16/2017
#
echo "script7 - Linux Scripting Book"

trap catchCtrlC INT          # Initialize the trap

# Subroutines
catchCtrlC()
{
 echo "Entering catchCtrlC routine."
}

# Code starts here

echo "Press Ctrl-C to trigger the trap, 'Q' to exit."

loop=0
while [ $loop -eq 0 ]
do
 read -t 1 -n 1 str          # wait 1 sec for input or for 1 char
 rc=$?

 if [ $rc -gt 128 ] ; then
  echo "Timeout exceeded."
 fi

 if [ "$str" = "Q" ] ; then
  echo "Exiting the script."
  loop=1
 fi

done

exit 0
Here is the output on my system:
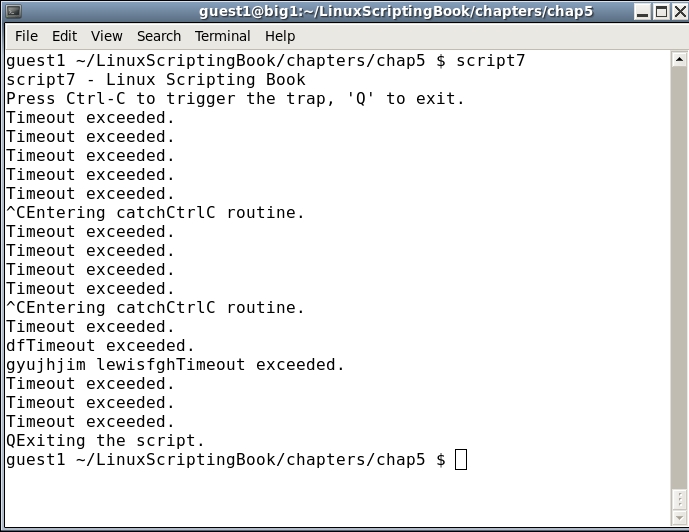
Try running this one on your system. Press some keys and see the response. Press Ctrl + C a few times as well. When done press Q.
That read statement needs some further explanation. Using read with the -t option (timeout) means to wait that many seconds for a character. If one is not input in the allotted time it will return a code with a value greater than 128. As we have seen before, the -n 1 option tells read to wait for 1 character. So this means we are waiting 1 second for 1 character. This is another way read can be used to create a game or other interactive script.
If you get yourself into a situation where you can't exit a script you can use the kill command.
For example, if I had needed to stop script7 the directions would be follows:
 guest1 $ ps auxw | grep script7
 guest1   17813  0.0  0.0 106112  1252 pts/32   S+   17:23   0:00 /bin/sh ./script7
 guest1   17900  0.0  0.0 103316   864 pts/18   S+   17:23   0:00 grep script7
 guest1   29880  0.0  0.0  10752  1148 pts/17   S+   16:47   0:00 kw script7
 guest1 $ kill -9 17813
 guest1 $
In the terminal where script7 was running you will see it has stopped with the word Killed in it.
Note, be sure to kill the right process!
In the example above, PID 29880 is my text editor session where I am writing script7. Killing that would not be a good idea :).
Now for some fun! The next script allows you to draw crude pictures on the screen:
#!/bin/sh
#
# 5/16/2017
#
echo "script8 - Linux Scripting Book"

# Subroutines
cls()
{
 tput clear
}

move()                       # move cursor to row, col
{
 tput cup $1 $2
}

movestr()                    # move cursor to row, col
{
 tput cup $1 $2
 echo -n "$3"                # display string
}

init()                       # set initial values
{
 minrow=1                    # terminal boundaries
 maxrow=24
 mincol=0
 maxcol=79
 startrow=1
 startcol=0
}

restart()                    # clears screen, sets initial cursor position
{
 cls
 movestr 0 0 "Arrow keys move cursor. 'x' to draw, 'd' to erase, '+' to restart, 'Q' to quit."
 row=$startrow
 col=$startcol

 draw=0                      # default is not drawing
 drawchar=""
}

checktermsize2()             # must be the specified size
{
 rc1=0                       # default is no error
 if [[ $LINES -ne $1 || $COLUMNS -ne $2 ]] ; then
  rc1=1                      # set return code
 fi
 return $rc1
}

# Code starts here
if [ "$1" = "--help" ] ; then
 echo "Usage: script7 --help"
 echo " This script shows the basics on how to create a game."
 echo " Use the arrow keys to move the cursor."
 echo " Press c to restart and Q to quit."
 exit 255
fi

checktermsize2 25 80         # terminal must be this size
rc=$?
if [ $rc -ne 0 ] ; then
 echo "Please size the terminal to 25x80 and try again."
 exit 1
fi

init                         # initialize values
restart                      # set starting cursor pos and clear screen

loop=1
while [ $loop -eq 1 ]
do
 move $row $col              # position the cursor here
 read -n 1 -s ch

 case "$ch" in
  A) if [ $row -gt $minrow ] ; then
      let row--
     fi
     ;;
  B) if [ $row -lt $maxrow ] ; then
      let row++
     fi
     ;;
  C) if [ $col -lt $maxcol ] ; then
      let col++
     fi
     ;;
  D) if [ $col -gt $mincol ] ; then
      let col--
     fi
     ;;
  d) echo -n ""             # delete char
     ;;
  x) if [ $col -lt $maxcol ] ; then
      echo -n "X"            # put char
      let col++
     fi
     ;;
  +) restart ;;
  Q) loop=0 ;;
 esac
done

movestr 24 0 "Script completed normally."
echo ""                      # carriage return

exit 0
This was fun to write and a bit more fun to play with than I expected it to be.
One thing we haven't covered yet is the case statement. This is similar to an if...then...else but makes the code easier to read. Basically, the value that was input to the read statement is checked for a match in each case clause. If it matches, that stanza is executed and then control goes to the line after the esac statement. It also does this if there is no match.
Try this script, and remember to make the terminal 25x80 (or 80x25 if that is how your GUI works).
Here is just one example of what can be done with this script:
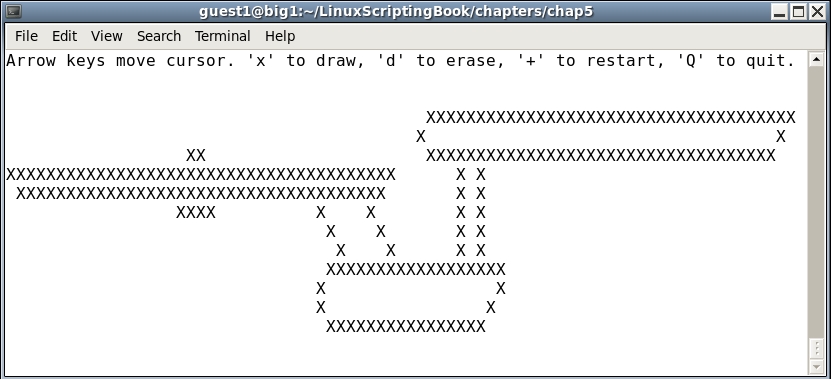
Well okay I guess this shows that I am not much of an artist. I will stick to programming and writing books.