
Copyright © 2017 Packt Publishing
All rights reserved. No part of this book may be reproduced, stored in a retrieval system, or transmitted in any form or by any means, without the prior written permission of the publisher, except in the case of brief quotations embedded in critical articles or reviews.
Every effort has been made in the preparation of this book to ensure the accuracy of the information presented. However, the information contained in this book is sold without warranty, either express or implied. Neither the author, nor Packt Publishing, and its dealers and distributors will be held liable for any damages caused or alleged to be caused directly or indirectly by this book.
Packt Publishing has endeavored to provide trademark information about all of the companies and products mentioned in this book by the appropriate use of capitals. However, Packt Publishing cannot guarantee the accuracy of this information.
First published: July 2017
Production reference: 1170717
Published by Packt Publishing Ltd.
Livery Place
35 Livery Street
Birmingham B3 2PB, UK.
ISBN 978-1-78728-110-3
Author
James Kent Lewis
Reviewer
Thushara Jayawardena
Commissioning Editor
Pratik Shah
Acquisition Editor
Namrata Patil
Content Development Editor
Amrita Noronha
Technical Editor
Jovita Alva
Copy Editor
SAFIS
Laxmi Subramanian
Project Coordinator
Shweta H Birwatkar
Proofreader
SAFIS
Laxmi Subramanian
Indexer
Pratik Shirodkar
Graphics
Tania Dutta
Production Coordinator
Arvindkumar Gupta
Cover Work
Arvindkumar Gupta
James Kent Lewis has been in the computer industry for over 35 years. He started out writing basic programs in high school and used punch cards in college for his Pascal, Fortran, COBOL, and assembly language classes. Jim taught himself the C programming language by writing various utilities, including a fully-functional text editor, which he uses everyday.
He started out using DOS and AIX, and then OS/2. Linux is now his operating system of choice.
Jim has worked in the past for several companies, including IBM, Texas Instruments, Tandem, Raytheon, Hewlett-Packard, and others. Most of these positions dealt with low-level device drivers and operating system internals. In his spare time he likes to create video games in Java.
Jim has written articles for IBM Developer Works and has one patent. He has worked on Linux Utilities Cookbook with Packt Publishing.
First, I would like to thank Red Hat and CentOS for creating a great operating system. I used CentOS 6.8 exclusively in the writing of this book and it worked flawlessly. I would also like to thank my brother, David, for letting me bounce ideas off of him. Last, but certainly not least, I would like to thank my girlfriend, Gabriele. Her patience was greatly appreciated, and she also helped by letting me log into her Fedora laptop from time to time.
Thushara Jayawardena is a very strong asset in software development as well as in the software service industry with more than 15 years of experience in systems administrating. That experience has contributed to this book. The main responsibility of the current day job is performance engineering for a leading European ERP software provider. It translates to system configuration and installations, followed by end-to-end automated performance testing. Scripting is an integral part of all these components.
His spare time is spent partly developing a user guide for tourist attractions for Android and IOS devices. The cloud backend for the solution comprises Mongo Cloud DB services and Heroku app dynos, run on Nodejs. Thushara also spends time with systems on chip devices such as Raspberry Pi and Arduino-like boards. Here, the focus is on IOT-type solutions.
Thushara is a loving father and husband who values his family very much and makes sure homebrewing doesn't come between him and family. He's been living nomadic since 2007, or rather migrated to Sweden with his family and moved around a bit in Sweden, and currently is living south of the beautiful port city of Gothenburg. He enjoys Scandinavian life, simplicity, and respect very much and is keen on improving his skiing skills during the winters up in the Swedish mountains. He has also worked on Raspberry Pi Android Projects.
Did you know that Packt offers eBook versions of every book published, with PDF and ePub files available? You can upgrade to the eBook version at www.PacktPub.com and as a print book customer, you are entitled to a discount on the eBook copy. Get in touch with us at <customercare@packtpub.com> for more details.
At www.PacktPub.com, you can also read a collection of free technical articles, sign up for a range of free newsletters and receive exclusive discounts and offers on Packt books and eBooks.
Get the most in-demand software skills with Mapt. Mapt gives you full access to all Packt books and video courses, as well as industry-leading tools to help you plan your personal development and advance your career.
Thanks for purchasing this Packt book. At Packt, quality is at the heart of our editorial process. To help us improve, please leave us an honest review on this book's Amazon page at www.amazon.com/dp/1787281108.
If you'd like to join our team of regular reviewers, you can e-mail us at customerreviews@packtpub.com. We award our regular reviewers with free eBooks and videos in exchange for their valuable feedback. Help us be relentless in improving our products!
In Linux Shell Scripting Bootcamp, you will begin by learning the essentials of script creation. You will learn how to validate parameters and also how to check for the existence of files. Moving on, you will get well-versed with how variables work on a Linux system and how they relate to scripts. You'll also learn how to create and call subroutines and create interactive scripts. Finally, you will learn how to debug scripts and scripting best practices, which will enable you to write a great code every time! By the end of the book you will be able to write shell scripts that can dig data from the Web and process it efficiently.
Chapter 1, Getting Started with Shell Scripting, begins with the basics of script design. How to make a script executable is shown as is creating an informative Usage message. The importance of return codes is also covered with the use and validation of parameters.
Chapter 2, Working with Variables, discusses how to declare and use both environment and local variables. We also speak about how math is performed and how to work with arrays.
Chapter 3, Using Loops and the sleep Command, introduces the use of loops to perform iterative operations. It also shows how to create a delay in a script. The reader will also learn how to use loops and the sleep command in a script.
Chapter 4, Creating and Calling Subroutines, starts with some very simple scripts and then proceeds to cover some simple subroutines that take parameters.
Chapter 5, Creating Interactive Scripts, explains the use of the read built-in command to query the keyboard. Further, we explore some of the different options to read and also cover the use of traps.
Chapter 6, Automating Tasks with Scripts, describes the creation of scripts to automate a task. The proper way to use cron to run a script automatically at a specific time is covered. The archive commands zip and tar are also discussed for performing compressed backups.
Chapter 7, Working with Files, introduces the use of the redirection operator for writing out a file and use of read command for reading a file. Checksums and file encryption are also discussed, and a way to convert the contents of a file into a variable is also covered.
Chapter 8, Working with wget and curl, discusses the usage of wget and curl in scripts. Along with this, return codes are also discussed with a couple of example scripts.
Chapter 9, Debugging Scripts, explains some techniques to prevent common syntax and logic errors. A way to send output from a script to another terminal using the redirection operator was also discussed.
Chapter 10, Scripting Best Practices, discusses some practices and techniques that will help the reader create good code every time.
In this book, you will find a number of text styles that distinguish between different kinds of information. Here are some examples of these styles and an explanation of their meaning.
Code words in text, database table names, folder names, filenames, file extensions, pathnames, dummy URLs, user input, and Twitter handles are shown as follows: You can see that the echo statement Start of x loop was displayed A block of code is set as follows:
echo "Start of x loop"
x=0
while [ $x -lt 5 ]
do
 echo "x: $x"
 let x++
Any command-line input or output is written as follows:
guest1 $ ps auxw | grep script7
New terms and important words are shown in bold. Words that you see on the screen, for example, in menus or dialog boxes, appear in the text like this: "Clicking the Next button moves you to the next screen."
Feedback from our readers is always welcome. Let us know what you think about this book—what you liked or disliked. Reader feedback is important for us as it helps us develop titles that you will really get the most out of.
To send us general feedback, simply e-mail <feedback@packtpub.com>, and mention the book's title in the subject of your message.
If there is a topic that you have expertise in and you are interested in either writing or contributing to a book, see our author guide at www.packtpub.com/authors.
Now that you are the proud owner of a Packt book, we have a number of things to help you to get the most from your purchase.
You can download the example code files for this book from your account at http://www.packtpub.com. If you purchased this book elsewhere, you can visit http://www.packtpub.com/support and register to have the files e-mailed directly to you.
You can download the code files by following these steps:
You can also download the code files by clicking on the Code Files button on the book's webpage at the Packt Publishing website. This page can be accessed by entering the book's name in the Search box. Please note that you need to be logged in to your Packt account.
Once the file is downloaded, please make sure that you unzip or extract the folder using the latest version of:
The code bundle for the book is also hosted on GitHub at https://github.com/PacktPublishing/Linux-Shell-Scripting-Bootcamp. We also have other code bundles from our rich catalog of books and videos available at https://github.com/PacktPublishing/. Check them out!
Although we have taken every care to ensure the accuracy of our content, mistakes do happen. If you find a mistake in one of our books—maybe a mistake in the text or the code—we would be grateful if you could report this to us. By doing so, you can save other readers from frustration and help us improve subsequent versions of this book. If you find any errata, please report them by visiting http://www.packtpub.com/submit-errata, selecting your book, clicking on the Errata Submission Form link, and entering the details of your errata. Once your errata are verified, your submission will be accepted and the errata will be uploaded to our website or added to any list of existing errata under the Errata section of that title.
To view the previously submitted errata, go to https://www.packtpub.com/books/content/support and enter the name of the book in the search field. The required information will appear under the Errata section.
Piracy of copyrighted material on the Internet is an ongoing problem across all media. At Packt, we take the protection of our copyright and licenses very seriously. If you come across any illegal copies of our works in any form on the Internet, please provide us with the location address or website name immediately so that we can pursue a remedy.
Please contact us at <copyright@packtpub.com> with a link to the suspected pirated material.
We appreciate your help in protecting our authors and our ability to bring you valuable content.
If you have a problem with any aspect of this book, you can contact us at <questions@packtpub.com>, and we will do our best to address the problem.
This chapter is a brief introduction to shell scripting. It will assume the reader is mostly familiar with script basics and will serve as a refresher.
The topics covered in this chapter are as follows:
You will always be able to create these scripts under a guest account, and most will run from there. It will be clearly stated when root access is needed to run a particular script.
The book will assume that the user has put a (.) at the beginning of the path for that account. If not, to run a script prepend ./ to the filename. For example:
$ ./runme
The scripts will be made executable using the chmod command.
It is suggested that the user create a directory under his guest account specifically for the examples in this book. For example, something like this works well:
$ /home/guest1/LinuxScriptingBook/chapters/chap1
Of course, feel free to use whatever works best for you.
Following the general format of a bash script the very first line will contain this and nothing else:
#!/bin/sh
Note that in every other case text following the # sign is treated as comments.
For example,
# This entire line is a comment
chmod 755 filename # This text after the # is a comment
Use comments however you deem appropriate. Some people comment every line, some don't comment anything. I try to strike a balance somewhere in the middle of those two extremes.
I have found that most people are comfortable using vi to create and edit text documents under a UNIX/Linux environment. This is fine as vi is a very dependable application. I would suggest not using any type of word processing program, even if it claims to have a code development option. These programs might still put invisible control characters in the file which will probably cause the script to fail. This can take hours or even days to figure out unless you are good at looking at binary files.
Also, in my opinion, if you plan to do a lot of script and/or code development I suggest looking at some other text editor other than vi. You will almost certainly become more productive.
Here is an example of a very simple script. It might not look like much but this is the basis for every script:
#!/bin/sh
#
#  03/27/2017
#
exit 0
Here is the same script with the lines numbered:
1  #!/bin/sh
2  #
3  # 03/27/2017
4  #
5  exit 0
6
Here is an explanation for each line:
/bin/sh is actually a symbolic link to the interpreter.# are comments. Also, anything after a # is also treated as a comment.Usage section (covered next).Using your favorite text editor, edit a new file named script1 and copy the preceding script without the line numbers into it. Save the file.
To make the file into an executable script run this:
$ chmod 755 script1
Now run the script:
$ script1
If you did not prepend a . to your path as mentioned in the introduction then run:
$ ./script1
Now check the return code:
$ echo $?
0
Here is a script that does something a little more useful:
#!/bin/sh
#
# 3/26/2017
#
ping -c 1 google.com        # ping google.com just 1 time
echo Return code: $?
The ping command returns a zero on success and non-zero on failure. As you can see, echoing $? shows the return value of the command preceding it. More on this later.
  1  #!/bin/sh
  2  #
  3  # 6/13/2017
  4  #
  5  if [ $# -ne 1 ] ; then
  6   echo "Usage: script3 file"
  7   echo " Will determine if the file exists."
  8   exit 255
  9  fi
 10
 11  if [ -f $1 ] ; then
 12   echo File $1 exists.
 13   exit 0
 14  else
 15   echo File $1 does not exist.
 16   exit 1
 17  fi
 18
Here is an explanation for each line:
5 checks to see if a parameter was given. If not, lines 6 through 9 are executed. Note that is it usually a good idea to include an informative Usage statement in your script. It is also good to provide a meaningful return code.11 checks to see if the file exists and if so lines 12-13 are executed. Otherwise lines 14-17 are run.1 #!/bin/sh 2 # 3 # 6/13/2017 4 # 5 if [ $# -ne 1 ] ; then 6 echo "Usage: script4 filename" 7 echo " Will show various attributes of the file given." 8 exit 255 9 fi 10 11 echo -n "$1 " # Stay on the line 12 13 if [ ! -e $1 ] ; then 14 echo does not exist. 15 exit 1 # Leave script now 16 fi 17 18 if [ -f $1 ] ; then 19 echo is a file. 20 elif [ -d $1 ] ; then 21 echo is a directory. 22 fi 23 24 if [ -x $1 ] ; then 25 echo Is executable. 26 fi 27 28 if [ -r $1 ] ; then 29 echo Is readable. 30 else 31 echo Is not readable. 32 fi 33 34 if [ -w $1 ] ; then 35 echo Is writable. 36 fi 37 38 if [ -s $1 ] ; then 39 echo Is not empty. 40 else 41 echo Is empty. 42 fi 43 44 exit 0 # No error 45
Here is an explanation for each line:
5-9: If the script is not run with a parameter display the Usage message and exit with a return code of 255.11 shows how to echo a string of text but still stay on the line (no linefeed).13 shows how to determine if the parameter given is an existing file.15 leaves the script as there is no reason to continue if the file doesn't exist.The meaning of the remaining lines can be determined by the script itself. Note that there are many other checks that can be performed on a file, these are just a few.
Here are some examples of running script4 on my system:
guest1 $ script4
Usage: script4 filename
 Will show various attributes of the file given.

guest1 $ script4 /tmp
/tmp is a directory.
Is executable.
Is readable.
Is writable.
Is not empty.

guest1 $ script4 script4.numbered
script4.numbered is a file.
Is readable.
Is not empty.

guest1 $ script4 /usr
/usr is a directory.
Is executable.
Is readable.
Is not empty.

guest1 $ script4 empty1
empty1 is a file.
Is readable.
Is writable.
Is empty.

guest1 $ script4 empty-noread
empty-noread is a file.
Is not readable.
Is empty.
This next script shows how to determine the number of parameters that were passed to it:
#!/bin/sh
#
# 3/27/2017
#
echo The number of parameters is: $#
exit 0
Let's try a few examples:
guest1 $ script5
The number of parameters is: 0

guest1 $ script5 parm1
The number of parameters is: 1

guest1 $ script5 parm1 Hello
The number of parameters is: 2

guest1 $ script5 parm1 Hello 15
The number of parameters is: 3

guest1 $ script5 parm1 Hello 15 "A string"
The number of parameters is: 4

guest1 $ script5 parm1 Hello 15 "A string" lastone
The number of parameters is: 5
This next script shows how to handle multiple parameters in more detail:
#!/bin/sh
#
# 3/27/2017
#

if [ $# -ne 3 ] ; then
 echo "Usage: script6 parm1 parm2 parm3"
 echo " Please enter 3 parameters."

 exit 255
fi

echo Parameter 1: $1
echo Parameter 2: $2
echo Parameter 3: $3

exit 0
The lines of this script were not numbered as it is rather simple. The $# contains the number of parameters that were passed to the script.
In this chapter we looked at the basics of script design. How to make a script executable was shown as was creating an informative Usage message. The importance of return codes was also covered as was the use and validation of parameters.
The next chapter will go into more detail about variables and conditional statements.
This chapter will show how variables are used in a Linux system and in scripts.
The topics covered in this chapter are:
A variable is simply a placeholder for some value. The value can change; however, the variable name will always be the same. Here is a simple example:
a=1
This assigns the value 1 to variable a. Here's another one:
b=2
To display what a variable contains use the echo statement:
echo Variable a is: $a
If at anytime, you aren't seeing the results you expect first check for the $.
Here's an example using the command line:
$ a=1
$ echo a
a
$ echo $a
1
$ b="Jim"
$ echo b
b
$ echo $b
Jim
All variables in a Bash script are considered to be strings. This is different than in a programming language such as C, where everything is strongly typed. In the preceding example, a and b are strings even though they appear to be integers.
Here's a short script to get us started:
#!/bin/sh
#
# 6/13/2017
#
echo "script1"

# Variables
a="1"
b=2
c="Jim"
d="Lewis"
e="Jim Lewis"
pi=3.141592

# Statements
echo $a
echo $b
echo $c
echo $d
echo $e
echo $pi
echo "End of script1"
And here is the output when run on my system:
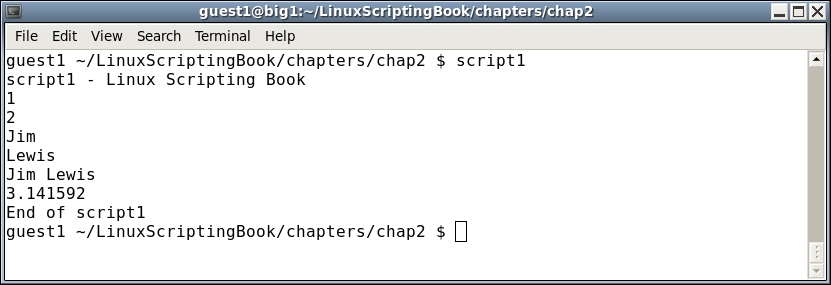
Since all of the variables are strings I could have also done this:
a="1"
b="2"
It is important to quote strings when they contain blank spaces such as variables d and e here.
Variables can be tested and compared against other variables when using a variable as a number.
Here is a list of some of the operators that can be used:
|
Operator |
Description |
|---|---|
|
|
This stands for equal to |
|
|
This stands for not equal to |
|
|
This stands for greater than |
|
|
This stands for less than |
|
|
This stands for greater than or equal to |
|
|
This stands for less than or equal to |
|
|
This stands for the negation operator |
Let's take a look at this in our next example script:
#!/bin/sh
#
# 6/13/2017
#
echo "script2"

# Numeric variables
a=100
b=100
c=200
d=300

echo a=$a b=$b c=$c d=$d     # display the values

# Conditional tests
if [ $a -eq $b ] ; then
 echo a equals b
fi

if [ $a -ne $b ] ; then
 echo a does not equal b
fi

if [ $a -gt $c ] ; then
 echo a is greater than c
fi

if [ $a -lt $c ] ; then
 echo a is less than c
fi

if [ $a -ge $d ] ; then
 echo a is greater than or equal to d
fi

if [ $a -le $d ] ; then
 echo a is less than or equal to d
fi

echo Showing the negation operator:
if [ ! $a -eq $b ] ; then
 echo Clause 1
else
 echo Clause 2
fi
echo "End of script2"
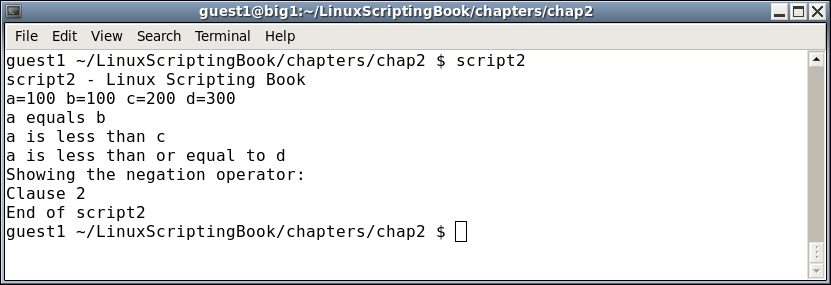
To help understand this chapter run the script on your system. Try changing the values of the variables to see how it affects the output.
We saw the negation operator in Chapter 1, Getting Started with Shell Scripting when we were looking at files. As a reminder, it negates the expression. You could also say it does the opposite of what the original statement means.
Consider the following example:
a=1
b=1
if [ $a -eq $b ] ; then
  echo Clause 1
else
  echo Clause 2
fi
When this script is run it will display Clause 1. Now consider this:
a=1
b=1
if [ ! $a -eq $b ] ; then    # negation
  echo Clause 1
else
  echo Clause 2
fi
Because of the negation operator it will now display Clause 2. Try it on your system.
The comparison for strings are different than for numbers. Here is a partial list:
|
Operator |
Explanation |
|---|---|
|
|
This stands for equal to |
|
|
This stands for not equal to |
|
|
This stands for greater than |
|
|
This stands for less than |
Now let's take a look at Script 3:
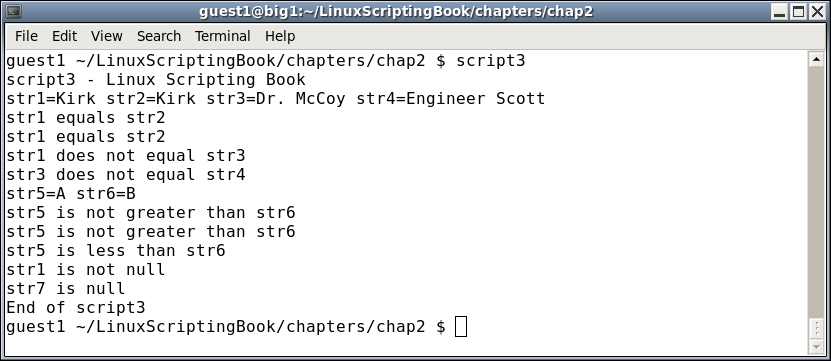
  1  #!/bin/sh
  2  #
  3  # 6/13/2017
  4  #
  5  echo "script3"
  6
  7  # String variables
  8  str1="Kirk"
  9  str2="Kirk"
 10  str3="Spock"
 11  str3="Dr. McCoy"
 12  str4="Engineer Scott"
 13  str5="A"
 14  str6="B"
 15
 16  echo str1=$str1 str2=$str2 str3=$str3 str4=$str4
 17
 18  if [ "$str1" = "$str2" ] ; then
 19   echo str1 equals str2
 20  else
 21   echo str1 does not equal str2
 22  fi
 23
 24  if [ "$str1" != "$str2" ] ; then
 25   echo str1 does not equal str2
 26  else
 27   echo str1 equals str2
 28  fi
 29
 30  if [ "$str1" = "$str3" ] ; then
 31   echo str1 equals str3
 32  else
 33   echo str1 does not equal str3
 34  fi
 35
 36  if [ "$str3" = "$str4" ] ; then
 37   echo str3 equals str4
 38  else
 39   echo str3 does not equal str4
 40  fi
 41
 42  echo str5=$str5 str6=$str6
 43
 44  if [ "$str5" \> "$str6" ] ; then        # must escape the >
 45   echo str5 is greater than str6
 46  else
 47   echo str5 is not greater than str6
 48  fi
 49
 50  if [[ "$str5" > "$str6" ]] ; then       # or use double brackets
 51   echo str5 is greater than str6
 52  else
 53   echo str5 is not greater than str6
 54  fi
 55
 56  if [[ "$str5" < "$str6" ]] ; then       # double brackets
 57   echo str5 is less than str6
 58  else
 59   echo str5 is not less than str6
 60  fi
 61
 62  if [ -n "$str1" ] ; then     # test if str1 is not null
 63   echo str1 is not null
 64  fi
 65
 66  if [ -z "$str7" ] ; then     # test if str7 is null
 67   echo str7 is null
 68  fi
 69  echo "End of script3"
 70
Here's the output from my system:
Lets go through this line by line:
7-14 set up the variables16 displays their values18 checks for equality24 uses the not equal operator50 are self-explanatory44 needs some clarification. In order to avoid a syntax error the > and < operators must be escaped\ character50 shows how double brackets can be used to handle the greater than operator. As you can see in line 58 it works for the less than operator as well. My preference will be to use double brackets when needed.62 shows how to check to see if a string is not null.66 shows how to check to see if a string is null.Take a look at this script carefully to make sure it is clear to you. Also notice that str7 is shown to be null, but we didn't actually declare a str7. That is okay to do in a script, it will not generate an error. However, as a general rule of programming it is a good idea to declare all variables before they are used. Your code will be easier to understand and debug by you and others.
A scenario that comes up often in programming is when there are multiple conditions to test. For example, if something is true and something else is true take this action. This is accomplished by using the logical operators.
Here is Script 4 to show how logical operators are used:
#!/bin/sh
#
# 5/1/2017
#
echo "script4 - Linux Scripting Book"

if [ $# -ne 4 ] ; then
 echo "Usage: script4 number1 number2 number3 number4"
 echo "       Please enter 4 numbers."

 exit 255
fi

echo Parameters: $1 $2 $3 $4

echo Showing logical AND
if [[ $1 -eq $2 && $3 -eq $4 ]] ; then      # logical AND
 echo Clause 1
else
 echo Clause 2
fi

echo Showing logical OR
if [[ $1 -eq $2 || $3 -eq $4 ]] ; then      # logical OR
 echo Clause 1
else
 echo Clause 2
fi

echo "End of script4"
exit 0
Here's the output on my system:
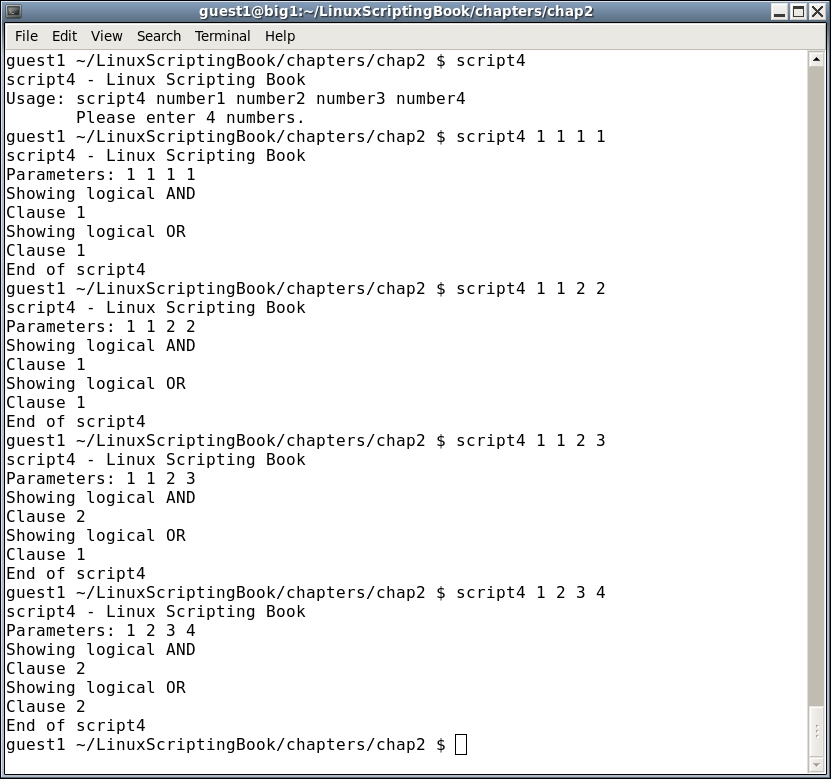
Run this script on your system using several different parameters. On each attempt, try to determine what the output will be and then run it. Do this as many times as it takes until you can get it right every time. Understanding this concept now will be very helpful as we get into more complicated scripts later.
Now let's look Script 5 to see how math can be performed:
#!/bin/sh
#
# 5/1/2017
#
echo "script5 - Linux Scripting Book"

num1=1
num2=2
num3=0
num4=0
sum=0

echo num1=$num1
echo num2=$num2

let sum=num1+num2
echo "The sum is: $sum"

let num1++
echo "num1 is now: $num1"

let num2--
echo "num2 is now: $num2"

let num3=5
echo num3=$num3

let num3=num3+10
echo "num3 is now: $num3"

let num3+=10
echo "num3 is now: $num3"

let num4=50
echo "num4=$num4"

let num4-=10
echo "num4 is now: $num4"

echo "End of script5"
And here is the output:
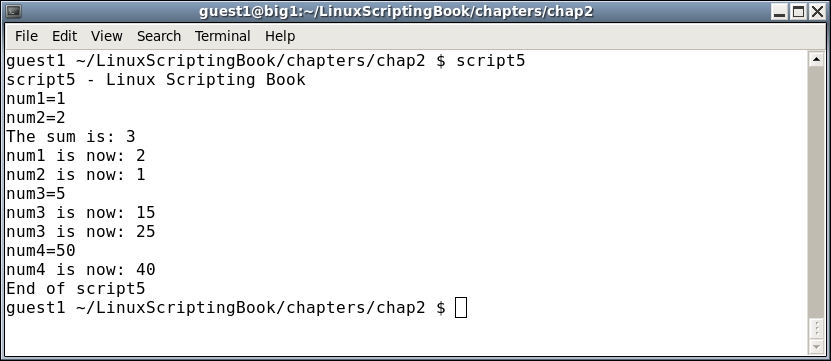
As you can see, the variables are set up as before. The let command is used to perform math. Note the $ prefix is not used:
let sum=num1+num2
Also note the shorthand way of doing some operations. For example, say you want to increment the var num1 by 1. You could do this as follows:
let num1=num1+1
Alternatively, you could use the shorthand notation:
let num1++
Run this script and change some of the values to get a feel for how the math operations work. We will go over this in much more detail in a later chapter.
So far we have only talked about variables that are local to a script. There are also system wide environment variables (env vars) which play a very important part of any Linux system. Here are a few, some of which the reader may already be aware of:
|
Variable |
Role |
|---|---|
|
|
user's home directory |
|
|
directories which are searched for commands |
|
|
command line prompt |
|
|
hostname of the machine |
|
|
shell that is being used |
|
|
user of this session |
|
|
text editor to use for |
|
|
number of commands that will be shown by the history command |
|
|
type of command line terminal that is being used |
Most of these are self-explanatory, however, I will mention a few.
The PS1 environment variable controls what the shell prompt displays as part of the command line. The default setting is usually something like [guest1@big1 ~]$, which is not as useful as it could be. At a minimum, a good prompt shows at least the hostname and current directory.
For example, as I work on this chapter the prompt on my system looks just like this:
big1 ~/LinuxScriptingBook/chapters/chap2 $
big1 is the hostname of my system and ~/LinuxScriptingBook/chapters/chap2 is the current directory. Recall that the tilde ~ stands for the user's home directory; so in my case this expands out to:
/home/guest1/LinuxScriptingBook/chapters/chap2
The "$" means I am running under a guest account.
To enable this, my PS1 env var is defined in /home/guest1/.bashrc as follows:
export PS1="\h \w $ "
The "\h" shows the hostname and the \w shows the current directory. This is a very useful prompt and I have been using it for many years. Here's how to show the username as well:
export PS1="\u \h \w $ "
The prompt would now look like this:
guest1 big1 ~/LinuxScriptingBook/chapters/chap2 $
If you change the PS1 variable in your .bashrc file, make certain you do it after any other lines that are already in the file.
For example, here is what my original .bashrc contains under my guest1 account:
# .bashrc

# Source global definitions
if [ -f /etc/bashrc ]; then
    . /etc/bashrc
fi

# User specific aliases and functions
Put your PS1 definition after these lines.
If you log into a lot of different machines on a daily basis, there is a PS1 trick I have found that is very useful. This will be shown in a later chapter.
You may have noticed that it looks as though I did not always use a good PS1 variable for the examples in this book. It was edited out during book creation to save space.
The EDITOR variable can be very useful. This tells the system which text editor to use for things such as editing the user's crontab (crontab -e). If not set, it defaults to the vi editor. It can be changed by putting it in the user's .bashrc file. Here is what mine looks like for the root account:
export EDITOR=/lewis/bin64/kw
When I run crontab -l (or -e), my personally written text editor comes up instead of vi. Very handy!
Here we'll take a look at Script 6, that shows some of the variables on my system under my guest1 account:
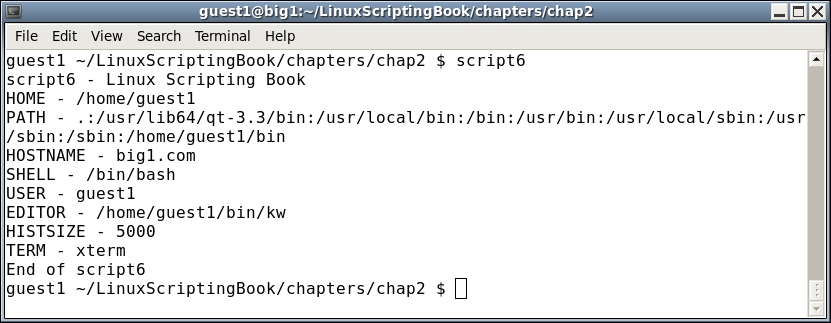
#!/bin/sh
#
# 5/1/2017
#
echo "script6 - Linux Scripting Book"

echo HOME - $HOME
echo PATH - $PATH
echo HOSTNAME - $HOSTNAME
echo SHELL - $SHELL
echo USER - $USER
echo EDITOR - $EDITOR
echo HISTSIZE - $HISTSIZE
echo TERM - $TERM

echo "End of script6"
Here's the output:
You can also create and use your own env vars. This is a really powerful feature of a Linux system. Here are some examples that I use in my /root/.bashrc file:
BIN=/lewis/bin64
DOWN=/home/guest1/Downloads
DESK=/home/guest1/Desktop
JAVAPATH=/usr/lib/jvm/java-1.7.0-openjdk-1.7.0.99.x86_64/include/
KW_WORKDIR=/root
L1=guest1@192.168.1.21
L4=guest1@192.168.1.2
LBCUR=/home/guest1/LinuxScriptingBook/chapters/chap2
export BIN DOWN DESK JAVAPATH KW_WORKDIR L1 L4 LBCUR
BIN: This is the directory of my executables and scripts under rootDOWN: This is the download directory for email attachments, etcDESK: This is the download directory for screenshotsJAVAPATH: This is the directory to use when I am writing Java appsKW_WORKDIR: This is where my editor puts its working filesL1 and L2: This is the IP addresses to my laptopsLBCUR: This is the current directory I am working in for this bookBe sure to export your variables so that they can be accessed by other terminals. Also remember to source your .bashrc when you make a change. On my system the command would be:
guest1 $ . /home/guest1/.bashrc
I will show in a later chapter how these env vars can be paired with aliases. For example, the bin command on my system is an alias that changes the current directory to the /lewis/bin64 directory. This is one of the most powerful features in a Linux system, however, I am always surprised that I do not see it used more often.
The last type of variable we will cover in this chapter is called an array. Suppose you want to write a script that contains all of the IP addresses of the machines in your lab. You could do something like this:
L0=192.168.1.1
L1=192.168.1.10
L2=192.168.1.15
L3=192.168.1.16
L4=192.168.1.20
L5=192.168.1.26
That will work and in fact I do something similar to that in my home office/lab. However, suppose you have a whole lot of machines. Using arrays can make your life a lot simpler.
Take a look at Script 7:
#!/bin/sh
#
# 5/1/2017
#
echo "script7 - Linux Scripting Book"

array_var=(1 2 3 4 5 6)

echo ${array_var[0]}
echo ${array_var[1]}
echo ${array_var[2]}
echo ${array_var[3]}
echo ${array_var[4]}
echo ${array_var[5]}

echo "List all elements:"
echo ${array_var[*]}

echo "List all elements (alternative method):"
echo ${array_var[@]}

echo "Number of elements: ${#array_var[*]}"
labip[0]="192.168.1.1"
labip[1]="192.168.1.10"
labip[2]="192.168.1.15"
labip[3]="192.168.1.16"
labip[4]="192.168.1.20"

echo ${labip[0]}
echo ${labip[1]}
echo ${labip[2]}
echo ${labip[3]}
echo ${labip[4]}

echo "List all elements:"
echo ${labip[*]}

echo "Number of elements: ${#labip[*]}"
echo "End of script7"
And here is the output on my system:
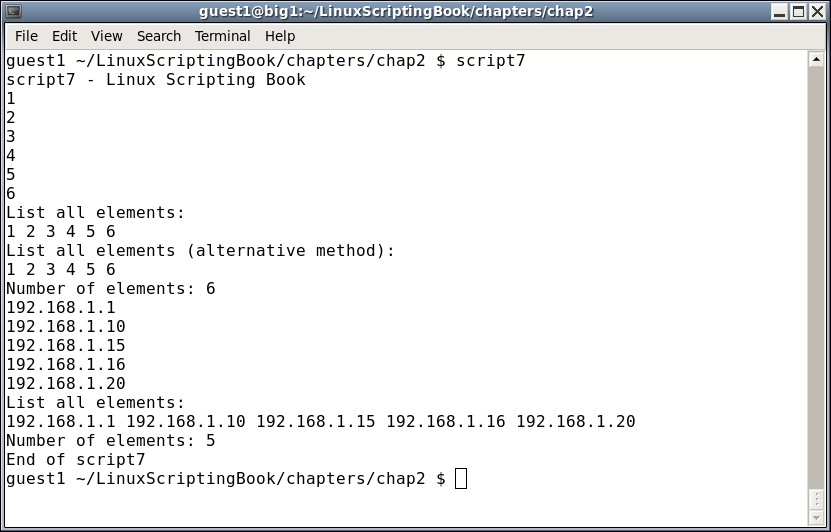
Run this script on your system and try experimenting with it. If you have never seen or used an array before, don't let them scare you; you will get familiar with them soon enough. This is another area where it's easy to forget the ${ array variable here } syntax so if the script doesn't do what you want (or generates an error) check that first.
We will talk about arrays again in much more detail when we cover loops in the next chapter.
In this chapter we covered how to declare and use both environment and local variables. We talked about how math is performed and how to work with arrays.
We also covered using variables in scripts. Script 1 showed how to assign a variable and display its value. Script 2 showed how to deal with numeric variables and Script 3 showed how to compare strings. Script 4 showed logical operators and Script 5 showed how math can be performed. Script 6 showed how environment variables are used and Script 7 showed how to use arrays.
This chapter shows how to use loops to perform iterative operations. It also shows how to create a delay in a script. The reader will learn how to use loops and the sleep command in a script.
Topics covered in this chapter are as follows:
for, while, and until loops.sleep command and how it is used to cause a delay in a script.sleep.One of the most important features of any programming language is the ability to perform a task, or tasks, a number of times and then stop when an ending condition is met. This is accomplished by using a loop.
The next section shows an example of a very simple while loop:
#!/bin/sh
#
# 5/2/2017
#
echo "script1 - Linux Scripting Book"
x=1
while [ $x -le 10 ]
do
 echo x: $x
 let x++
done

echo "End of script1"

exit 0
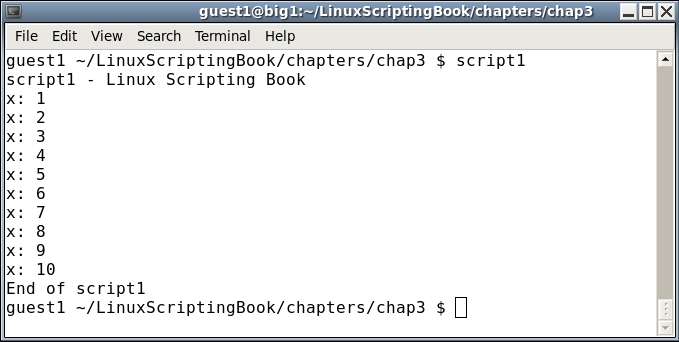
We start by setting variable x to 1. The while statement checks to see if x is less than or equal to 10 and if so, runs the commands between the do and done statements. It will continue to do this until x equals 11, in which case the lines after the done statement are then run.
Run this on your system. It is very important to understand this script so that we can move on to more advanced loops.
Let's look at another script in the next section—see if you can determine what is wrong with it.
#!/bin/sh
#
# 5/2/2017
#
echo "script2 - Linux Scripting Book"

x=1
while [ $x -ge 0 ]
do
 echo x: $x
 let x++
done

echo "End of script2"

exit 0
Feel free to skip the running of this one unless you really want to. Look carefully at the while test. It says while x is greater than or equal to 0, run the commands inside the loop. Is x ever going to not meet this condition? No, it is not, and this is what is known as an infinite loop. Don't worry; you can still end the script by pressing Ctrl + C (hold down the Ctrl key and press C). This will terminate the script.
I wanted to cover infinite loops right away as you will almost certainly do this from time to time, and I wanted you to know how to terminate the script when it happens. I certainly did this a few times when I was first starting out.
Okay let's do something more useful. Suppose you are starting a new project and need to create some directories on your system. You could do it one command at a time, or use a loop in a script.
We'll a look at this in Script 3.
#!/bin/sh
#
# 5/2/2017
#
echo "script3 - Linux Scripting Book"

x=1
while [ $x -le 10 ]
do
 echo x=$x
 mkdir chapter$x
 let x++
done
echo "End of script3"

exit 0
This simple script assumes you are starting at the base directory. When run it will create directories chapter 1 through chapter 10 and then proceed to the end.
When running scripts that make changes to your computer, it is a good idea to make sure the logic is correct before running it for real. For example, before running this I commented out the mkdir line. I then ran the script to make sure it stopped after it displayed that x was equal to 10. I then uncommented the line and ran it for real.
We'll see another script in the next section that uses a loop to put text on the screen:
#!/bin/sh
#
# 5/2/2017
#
echo "script4 - Linux Scripting Book"

if [ $# -ne 1 ] ; then
 echo "Usage: script4 string"
 echo "Will display the string on every line."
 exit 255
fi

tput clear                   # clear the screen

x=1
while [ $x -le $LINES ]
do
 echo "********** $1 **********"
 let x++
done

exit 0
Before executing this script run the following command:
echo $LINES
If the number of lines in that terminal is not displayed run the following command:
export LINES=$LINES
Then proceed to run the script. The following is the output on my system when run with script4 Linux:
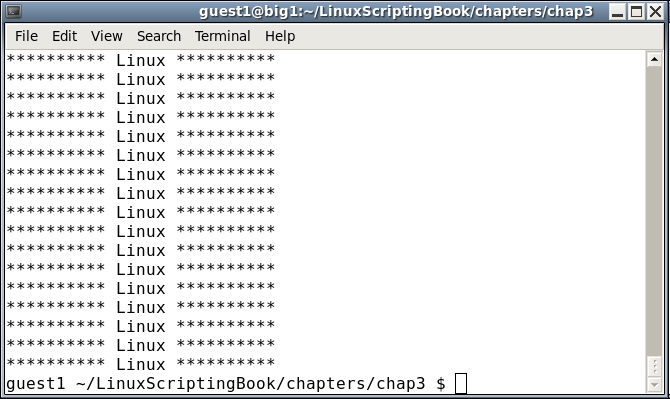
Okay, so I agree this might not be terribly useful, but it does show a few things. The LINES env var contains the current number of lines (or rows) in the current terminal. This can be useful for limiting output in more complex scripts and that will be shown in a later chapter. This example also shows how the screen can be manipulated in a script.
If you needed to export the LINES variable, you may want to put it in your .bashrc file and re-source it.
We'll take a look at another script in the next section:
#!/bin/sh
#
# 5/2/2017
#
# script5 - Linux Scripting Book

tput clear                   # clear the screen

row=1
while [ $row -le $LINES ]
do
 col=1
 while [ $col -le $COLUMNS ]
 do
  echo -n "#"
  let col++
 done
 echo ""                     # output a carriage return
 let row++
done

exit 0
This is similar to Script 4 in that it shows how to display output within the confines of the terminal. Note, you may have to export the COLUMNS env var like we did with the LINES var.
You probably noticed something a little different in this script. There is a while statement inside a while statement. This is called a nested loop and is used very frequently in programming.
We start by declaring row=1 and then begin the outer while loop. The col var is then set to 1 and then the inner loop is started. This inner loop is what displays the character on each column of the line. When the end of the line is reached, the loop ends and the echo statement outputs a carriage return. The row var is incremented, and then the process starts again. It ends after the last line.
By using the LINES and COLUMNS env vars only the actual screen is written to. You can test this by running the program and then expanding the terminal.
When using nested loops it can be easy to get mixed up about what goes where. Here is something I try to do every time. When I first realize a loop is going to be needed in a program (which can be a script, C, or Java, and so on), I code the loop body first like this:
 while [ condition ]
 do
    other statements will go here
 done
This way I don't forget the done statement and it's also lined up correctly. If I then need another loop I just do it again:
 while [ condition ]
 do
   while [ condition ]
   do
     other statements will go here
   done
 done
You can nest as many loops as you need.
This is probably a good time to talk about indenting. In the past (that is, 30+ years ago) everyone used a text editor with a mono-spaced font to write their code and so it was relatively easy to keep everything lined up with just a one space indent. Later, when people started using word processors with a variable pitched font, it became harder to see the indentation and so more spaces (or tabs) were used. My suggestion is to use what you feel most comfortable with. However, with that said you may have to learn to read and use whatever code style that is in place for your company.
So far we have only talked about the while statement. Now let's look at an until loop in the next section:
#!/bin/sh
#
# 5/3/2017
#
echo "script6 - Linux Scripting Book"

echo "This shows the while loop"

x=1
while [ $x -lt 11 ]          # perform the loop while the condition
do                           # is true
 echo "x: $x"
 let x++
done

echo "This shows the until loop"

x=1
until [ $x -gt 10 ]          # perform the loop until the condition
do                           # is true
 echo "x: $x"
 let x++
done

echo "End of script6"

exit 0
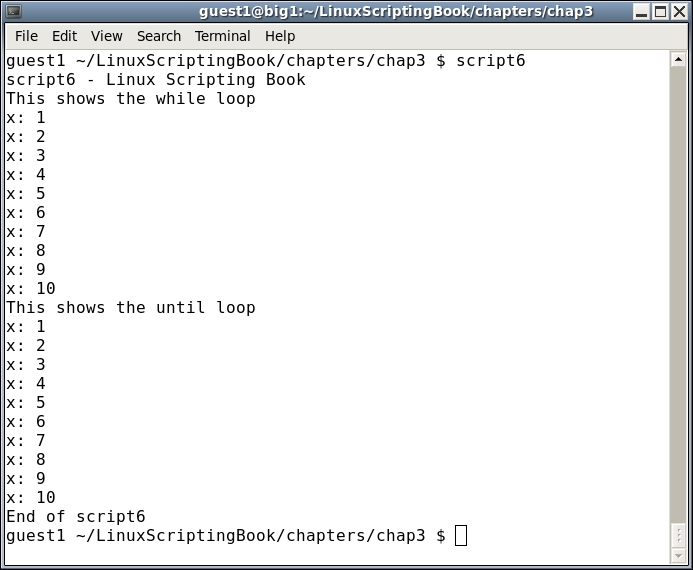
Take a look at this script. The output from both loops is the same; however, the conditions are the opposite. The first loop continues while the condition is true, the second loop continues until the condition is true. A not-so-subtle difference so be on the watch for that.
Another way to loop is to use the for statement. It is commonly used when working with files and other lists. The general syntax of a for loop is as follows:
 for variable in list
 do
     some commands
 done
The list can be a collection of strings, or a filename wildcard, and so on. We can take a look at this in the example given in the next section.
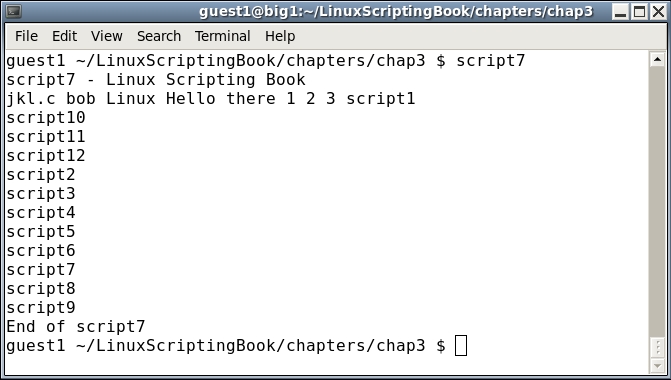
#!/bin/sh
#
# 5/4/2017
#
echo "script7 - Linux Scripting Book"

for i in jkl.c bob Linux "Hello there" 1 2 3
do
 echo -n "$i "
done

for i in script*             # returns the scripts in this directory
do
 echo $i
done

echo "End of script7"
exit 0
And the output on my system. This is my chap3 directory:
The next script shows how the for statement can be used with files:
#!/bin/sh
#
# 5/3/2017
#
echo "script8 - Linux Scripting Book"

if [ $# -eq 0 ] ; then
 echo "Please enter at least 1 parameter."
 exit 255
fi

for i in $*                  # the "$*" returns every parameter given
do                           # to the script
 echo -n "$i "
done

echo ""                      # carriage return
echo "End of script8"

exit 0

There are a few other things you can do with the for statement, consult the man page of Bash for more information.
Sometimes when you are coding a script, you encounter a situation where you would like to exit the loop early, before the ending condition is met. This can be accomplished using the break and continue commands.
Here is a script that shows these commands. I am also introducing the sleep command which will be talked about in detail in the next script.
#!/bin/sh
#
# 5/3/2017
#
echo "script9 - Linux Scripting Book"

FN1=/tmp/break.txt
FN2=/tmp/continue.txt

x=1
while [ $x -le 1000000 ]
do
 echo "x:$x"
 if [ -f $FN1 ] ; then
  echo "Running the break command"
  rm -f $FN1
  break
 fi

 if [ -f $FN2 ] ; then
  echo "Running the continue command"
  rm -f $FN2
  continue
 fi

 let x++
 sleep 1
done

echo "x:$x"

echo "End of script9"

exit 0
Here's the output from my system:
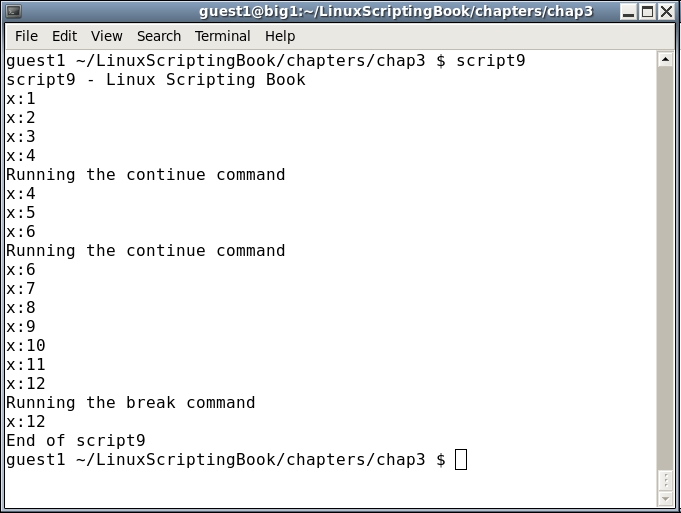
Run this on your system, and in another terminal cd to the /tmp directory. Run the command touch continue.txt and watch what happens. If you like you can do this multiple times (remember that up arrow recalls the previous command). Notice how the variable x does not get incremented when the continue command is hit. This is because the control goes immediately back to the while statement.
Now run the touch break.txt command. The script will end, and again, x has not been incremented. This is because break immediately causes the loop to end.
The break and continue commands are used quite often in scripts and so be sure to play with this one enough to really understand what is going on.
I showed the sleep command earlier, let's look at that in much more detail. In general, the sleep command is used to introduce a delay in the script. For example, in the previous script if I had not used sleep the output would have scrolled off too quickly to see what was going on.
The sleep command takes a parameter indicating how long to make the delay. For example, sleep 1 means to introduce a delay of one second. Here are a few examples:
sleep 1       # sleep 1 second (the default is seconds)
sleep 1s      # sleep 1 second
sleep 1m      # sleep 1 minute
sleep 1h      # sleep 1 hour
sleep 1d      # sleep 1 day
The sleep command actually has a bit more capability that what is shown here. For more information, please consult the man page (man sleep).
Here's a script showing in more detail how sleep works:
#!/bin/sh
#
# 5/3/2017
#
echo "script10 - Linux Scripting Book"

echo "Sleeping seconds..."
x=1
while [ $x -le 5 ]
do
 date
 let x++
 sleep 1
done

echo "Sleeping minutes..."
x=1
while [ $x -le 2 ]
do
 date
 let x++
 sleep 1m
done

echo "Sleeping hours..."
x=1
while [ $x -le 2 ]
do
 date
 let x++
 sleep 1h
done

echo "End of script10"
exit 0
And the output:
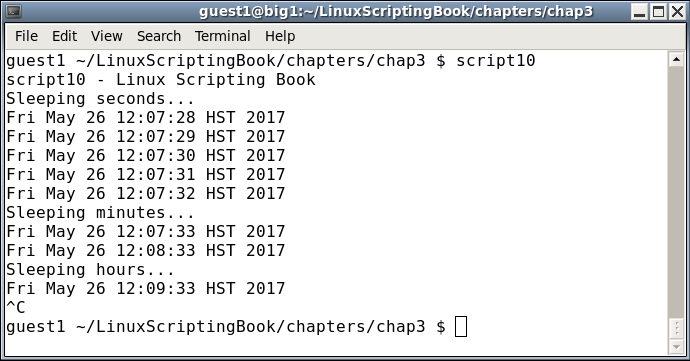
You may have noticed that I pressed Ctrl + C to terminate the script since I didn't want to wait 2 hours for it to finish. Scripts of this nature are used very extensively in a Linux system to monitor processes, watch for files, and so on.
There is a common pitfall when using the sleep command that needs to be mentioned.
We'll see an example of this in the following section:
#!/bin/sh
#
# 5/3/2017
#
echo "script11 - Linux Scripting Book"

while [ true ]
do
 date
 sleep 60                    # 60 seconds
done

echo "End of script11"

exit 0
This is the output on my system. It doesn't take all that long to eventually get out of sync:
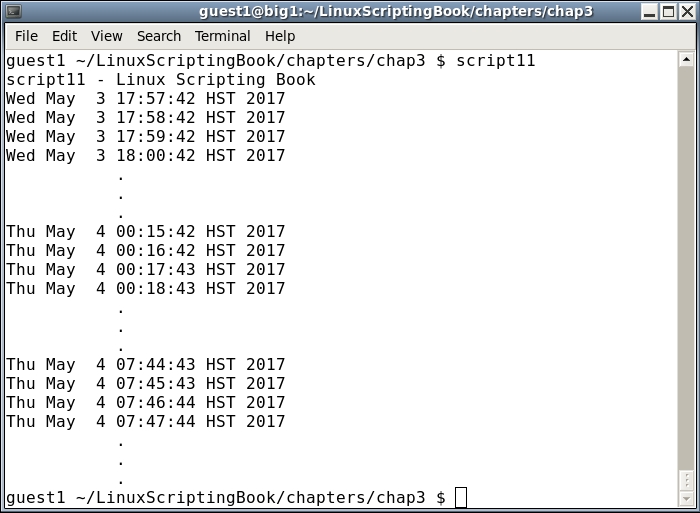
For the vast majority of scripts this is never going to be a problem. Just remember if what you are trying to accomplish is time critical, like trying to run a command at exactly 12:00 am every night, you might want to look at some other approach. Note that crontab will also not do this as there is about a 1 or 2 second delay before it runs the command.
There are a few more topics that we should look at in this chapter. Suppose you want to be alerted when a running process ends on your system.
Here's a script that notifies the user when the specified process ends. Note that there are other ways to do this task, this is just one approach.
#!/bin/sh
#
# 5/3/2017
#
echo "script12 - Linux Scripting Book"

if [ $# -ne 1 ] ; then
 echo "Usage: script12 process-directory"
 echo " For example: script12 /proc/20686"
 exit 255
fi

FN=$1                        # process directory i.e. /proc/20686
rc=1
while [ $rc -eq 1 ]
do
 if [ ! -d $FN ] ; then      # if directory is not there
  echo "Process $FN is not running or has been terminated."
  let rc=0
 else
  sleep 1
 fi
done

echo "End of script12"
exit 0
To see this script in action run the following commands:
script9ps auxw | grep script9. The output will be something like this:guest1 20686 0.0 0.0 106112 1260 pts/34 S+ 17:20 0:00 /bin/sh ./script9 guest1 23334 0.0 0.0 103316 864 pts/18 S+ 17:24 0:00 grep script9
script9 (in this case 20686) and use it as the parameter to run script12:$ script12 /proc/20686
You may let it run for a bit if you want. Eventually go back to the terminal that is running script9 and terminate it with Ctrl + C. You will see script12 output a message and then also terminate. Feel free to experiment with this one as it has a lot of important information in it.
You may notice that in this script I used a variable, rc, to determine when to end the loop. I could have used the break command as we saw earlier in this chapter. However, using a control variable (as it's often called) is considered to be a better programming style.
A script like this can be very useful when you have started a command and then it takes longer than you expected for it to finish.
For example, a while back I started a format operation on an external 1 TB USB drive using the mkfs command. It took a few days to complete and I wanted to know exactly when so that I could continue working with the drive.
Now for a bonus here is a ready-to-run script that can be used to make numbered backup files. Before I came up with this (many years ago) I would go through the ritual of making the backup by hand. My numbering scheme was not always consistent, and I quickly realized it would be easier to have a script do it. This is something computers are really good at.
I call this script cbS. I wrote this so long ago I'm not even sure what it stands for. Maybe it was Computer Backup Script or something like that.
#!/bin/sh
#
echo "cbS by Lewis 5/4/2017"
if [ $# -eq 0 ] ; then
echo "Usage: cbS filename(s) "
echo " Will make a numbered backup of the files(s) given."
echo " Files must be in the current directory."
exit 255
fi
rc=0 # return code, default is no error
for fn in $* # for each filename given on the command line
do
if [ ! -f $fn ] ; then # if not found
echo "File $fn not found."
rc=1 # one or more files were not found
else
cnt=1 # file counter
loop1=0 # loop flag
while [ $loop1 -eq 0 ]
do
tmp=bak-$cnt.$fn
if [ ! -f $tmp ] ; then
cp $fn $tmp
echo "File "$tmp" created."
loop1=1 # end the inner loop
else
let cnt++ # try the next one
fi
done
fi
done
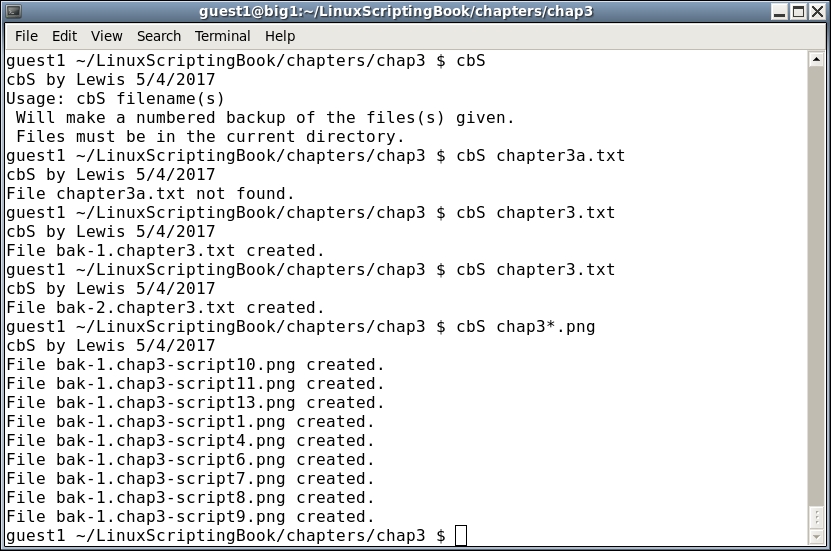
exit $rc # exit with return codeIt starts with a Usage message as it needs at least one filename to work on.
Note that this command requires the files be in the current directory, so doing something like cbS /tmp/file1.txt will generate an error.
The rc variable is initialized to 0. If a file is not found, it will be set to 1.
Now let's look at the inner loop. The logic here is a backup file will be created from the original file using the cp command. The naming scheme for the backup file is bak-(number).original-filename where number is the next one in sequence. The code determines what the next number is by going through all of the bak-#.filename files until it doesn't find one. That one then becomes the new filename.
Get this one going on your system. Feel free to name it whatever you like, but be careful to name it something other than an existing Linux command. Use the which command to check.
Here is some example output on my system:
This script could be greatly improved upon. It could be made to work with paths/files, and the cp command should be checked for errors. This level of coding will be covered in a later chapter.
In this chapter we covered the different types of loop statements and how they differ from each other. Nesting loops and the sleep command were also covered. The common pitfall when using the sleep command was also mentioned, and a backup script was introduced to show how to easily create numbered backup files.
In the next chapter we will go over the creation and calling of subroutines.
This chapter shows how to create and call subroutines in a script.
The topics covered in this chapter are as follows:
In the previous chapters we have seen mostly simple scripts that were not very complicated. Scripts can actually do a whole lot more which we are about to see.
First, let's start with a selection of simple but powerful scripts. These are mainly shown to give the reader an idea of just what can be done quickly with a script.
The tput clear terminal command can be used to clear the current command-line session. You could type tput clear all the time, but wouldn't just cls be nicer?
Here's a simple script that clears the current screen:
#!/bin/sh
#
# 5/8/2017
#
tput clear
Notice that this was so simple I didn't even bother to include a Usage message or return code. Remember, to make this a command on your system do this:
cd $HOME/binclschmod 755 clsYou can now type cls from any terminal (under that user) and your screen will clear. Try it.
At this point we need to go over file redirection. This is the ability to have the output from a command or script be copied into a file instead of going to the screen. This is done by using the redirection operator, which is really just the greater than sign.
Here is the screenshot of some commands that were run on my system:
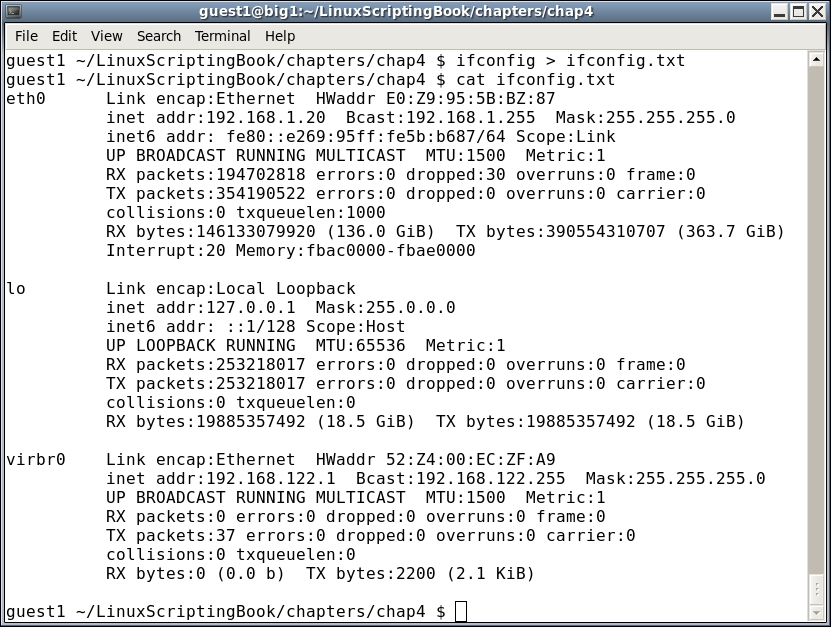
As you can see, the output from the ifconfig command was sent (or redirected) to the ifconfig.txt file.
Now let's look at command piping, which is the ability to run a command and have the output from it serve as the input to another command.
Suppose a program or script named loop1 is running on your system and you want to know the PID of it. You could run the ps auxw command to a file, and then grep the file for loop1. Alternatively, you could do it in one step by using a pipe as follows:
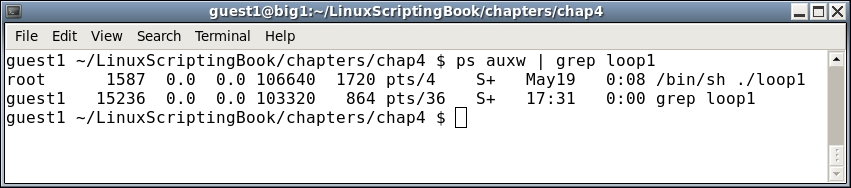
Pretty cool, right? This is a very powerful feature in a Linux system and is used extensively. We will be seeing a lot more of this soon.
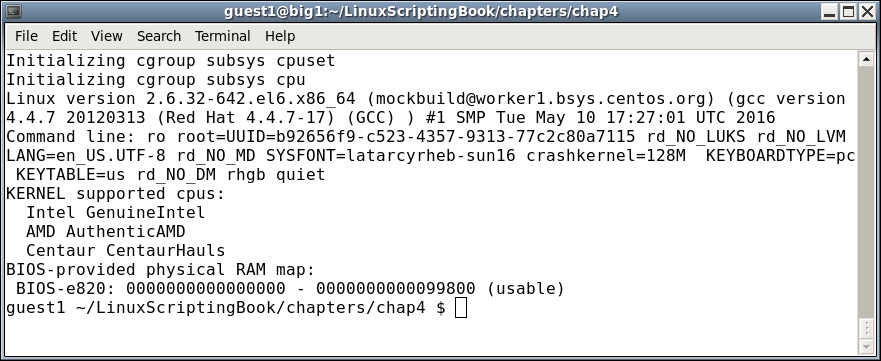
The next section shows another very short script using some command piping. This clears the screen and then shows only the first 10 lines from dmesg:
#!/bin/sh
#
# 5/8/2017
#
tput clear
dmesg | head
And here is the output:
The next section shows file redirection.
#!/bin/sh
#
# 5/8/2017
#
FN=/tmp/dmesg.txt
dmesg > $FN
echo "File $FN created."
exit 0
Try it on your system.
This shows how easy it is to create a script to perform commands that you would normally type on the command line. Also notice the use of the FN variable. If you want to use a different filename later, you only have to make the change in one place.
Now let's really get into subroutines. To do this we will use more of the tput commands:
tput cup <row><col>         # moves the cursor to row, col
tput cup 0 0                # cursor to the upper left hand side
tput cup $LINES $COLUMNS    # cursor to bottom right hand side
tput clear                  # clears the terminal screen
tput smso                   # bolds the text that follows
tput rmso                   # un-bolds the text that follows
Here is the script. This was mainly written to show the concept of a subroutine, however, it can also be used as a guide on writing interactive tools.
#!/bin/sh
# 6/13/2017
# script4

# Subroutines
cls()
{
 tput clear
 return 0
}

home()
{
 tput cup 0 0
 return 0
}

end()
{
 let x=$COLUMNS-1
 tput cup $LINES $x
 echo -n "X"                 # no newline or else will scroll
}

bold()
{
 tput smso
}

unbold()
{
 tput rmso
}

underline()
{
 tput smul
}

normalline()
{
 tput rmul
}

# Code starts here
rc=0                         # return code
if [ $# -ne 1 ] ; then
 echo "Usage: script4 parameter"
 echo "Where parameter can be: "
 echo " home      - put an X at the home position"
 echo " cls       - clear the terminal screen"
 echo " end       - put an X at the last screen position"
 echo " bold      - bold the following output"
 echo " underline - underline the following output"
 exit 255
fi

parm=$1                      # main parameter 1

if [ "$parm" = "home" ] ; then
 echo "Calling subroutine home."
 home
 echo -n "X"
elif [ "$parm" = "cls" ] ; then
 cls
elif [ "$parm" = "end" ] ; then
 echo "Calling subroutine end."
 end
elif [ "$parm" = "bold" ] ; then
 echo "Calling subroutine bold."
 bold
 echo "After calling subroutine bold."
 unbold
 echo "After calling subroutine unbold."
elif [ "$parm" = "underline" ] ; then
 echo "Calling subroutine underline."
 underline
 echo "After subroutine underline."
 normalline
 echo "After subroutine normalline."
else
 echo "Unknown parameter: $parm"
 rc=1
fi

exit $rc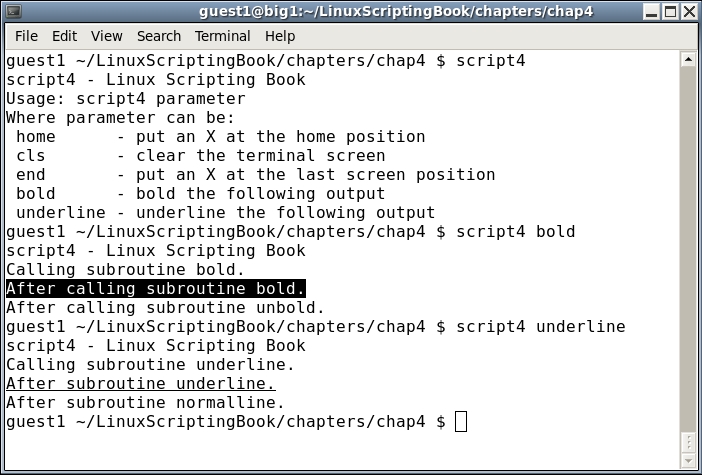
Try this on your system. If you run it with the home parameter it might look a little strange to you. The code puts a capital X at the home position (0,0) and this causes the prompt to print one character over. Nothing is wrong here, it just looks a little weird. Don't worry if this still doesn't make sense to you, just go ahead and look at Script 5.
Okay, let's add some routines to this script to show how to use parameters with a subroutine. In order to make the output look better the cls routine is called first to clear the screen:
#!/bin/sh
# 6/13/2017
# script5

# Subroutines
cls()
{
 tput clear
 return 0
}

home()
{
 tput cup 0 0
 return 0
}

end()
{
 let x=$COLUMNS-1
 tput cup $LINES $x
 echo -n "X"                 # no newline or else will scroll
}

bold()
{
 tput smso
}

unbold()
{
 tput rmso
}

underline()
{
 tput smul
}

normalline()
{
 tput rmul
}

move()                       # move cursor to row, col
{
 tput cup $1 $2
}

movestr()                    # move cursor to row, col
{
 tput cup $1 $2
 echo $3
}

# Code starts here
cls                          # clear the screen to make the output look better
rc=0                         # return code
if [ $# -ne 1 ] ; then
 echo "Usage: script5 parameter"
 echo "Where parameter can be: "
 echo " home      - put an X at the home position"
 echo " cls       - clear the terminal screen"
 echo " end       - put an X at the last screen position"
 echo " bold      - bold the following output"
 echo " underline - underline the following output"
 echo " move      - move cursor to row,col"
 echo " movestr   - move cursor to row,col and output string"
 exit 255
fi

parm=$1                      # main parameter 1

if [ "$parm" = "home" ] ; then
 home
 echo -n "X"
elif [ "$parm" = "cls" ] ; then
 cls
elif [ "$parm" = "end" ] ; then
 move 0 0
 echo "Calling subroutine end."
end
elif [ "$parm" = "bold" ] ; then
 echo "Calling subroutine bold."
 bold
 echo "After calling subroutine bold."
 unbold
 echo "After calling subroutine unbold."
elif [ "$parm" = "underline" ] ; then
 echo "Calling subroutine underline."
 underline
 echo "After subroutine underline."
 normalline
 echo "After subroutine normalline."
elif [ "$parm" = "move" ] ; then
 move 10 20
 echo "This line started at row 10 col 20"
elif [ "$parm" = "movestr" ] ; then
 movestr 15 40 "This line started at 15 40"
else
 echo "Unknown parameter: $parm"
 rc=1
fi

exit $rc
Since this script only has two extra functions you can just run them. This will be shown one command at a time as follows:
guest1 $ script5
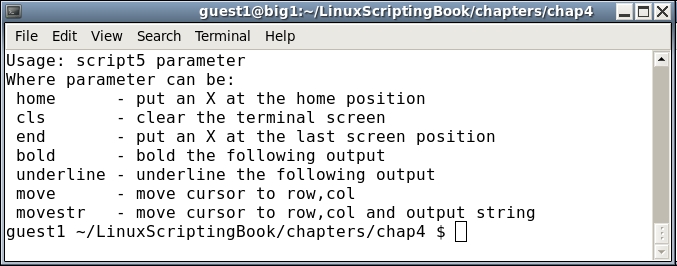
guest1 $ script5 move

guest1 $ script5 movestr
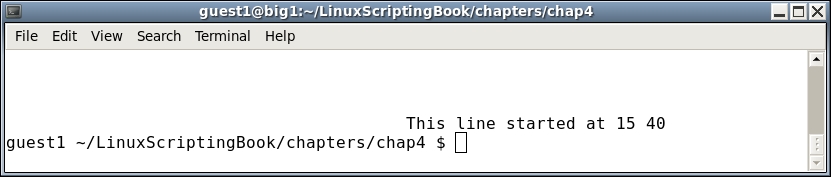
Since we are now placing the cursor at a specific location, the output should make more sense to you. Notice how the command-line prompt reappears where the last cursor position was.
You probably noticed that the parameters to a subroutine work just like with a script. Parameter 1 is $1, parameter 2 is $2, and so on. This is good and bad, good because you don't have to learn anything radically different. But bad in that it is very easy to get the $1, $2, vars mixed up if you are not careful.
A possible solution, and the one I use, is to assign the $1, $2, and so on variables in the main script to a variable with a good meaningful name.
For example, in these example scripts I set parm1 equal to $1 (parm1=$1), and so on.
Take a good look at the script in the next section:
#!/bin/sh
#
# 6/13/2017
# script6

# Subroutines
sub1()
{
 echo "Entering sub1"
 rc1=0                       # default is no error
 if [ $# -ne 1 ] ; then
  echo "sub1 requires 1 parameter"
  rc1=1                      # set error condition
 else
  echo "1st parm: $1"
 fi

 echo "Leaving sub1"
 return $rc1                 # routine return code
}

sub2()
{
 echo "Entering sub2"
 rc2=0                       # default is no error
 if [ $# -ne 2 ] ; then
  echo "sub2 requires 2 parameters"
  rc2=1                      # set error condition
 else
  echo "1st parm: $1"
  echo "2nd parm: $2"
 fi
 echo "Leaving sub2"
 return $rc2                 # routine return code
}

sub3()
{
 echo "Entering sub3"
 rc3=0                       # default is no error
 if [ $# -ne 3 ] ; then
  echo "sub3 requires 3 parameters"
  rc3=1                      # set error condition
 else
  echo "1st parm: $1"
  echo "2nd parm: $2"
  echo "3rd parm: $3"
 fi
 echo "Leaving sub3"
 return $rc3                 # routine return code
}

cls()                        # clear screen
{
 tput clear
 return $?                   # return code from tput
}

causeanerror()
{
 echo "Entering causeanerror"
 tput firephasers
 return $?                   # return code from tput
}

# Code starts here
cls                          # clear the screen
rc=$?
echo "return code from cls: $rc"
rc=0                         # reset the return code
if [ $# -ne 3 ] ; then
 echo "Usage: script6 parameter1 parameter2 parameter3"
 echo "Where all parameters are simple strings."
 exit 255
fi

parm1=$1                     # main parameter 1
parm2=$2                     # main parameter 2
parm3=$3                     # main parameter 3

# show main parameters
echo "parm1: $parm1  parm2: $parm2  parm3: $parm3"

sub1 "sub1-parm1"
echo "return code from sub1: $?"

sub2 "sub2-parm1"
echo "return code from sub2: $?"

sub3 $parm1 $parm2 $parm3
echo "return code from sub3: $?"

causeanerror
echo "return code from causeanerror: $?"

exit $rc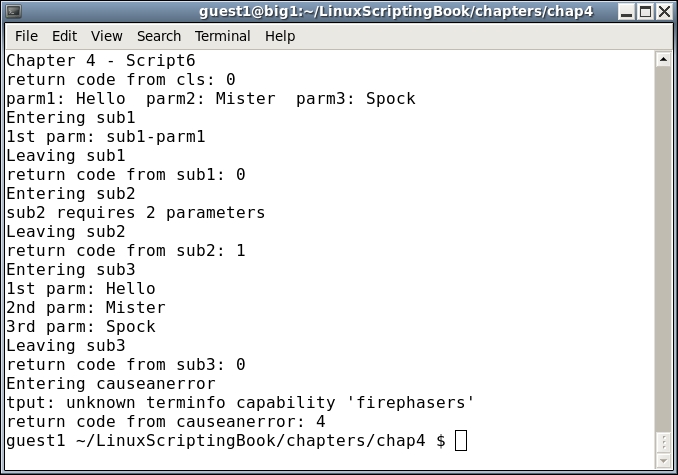
There are some new concepts here and so we will go through this one very carefully.
First, we define the subroutines. Notice that a return code has been added. A cls routine has also been included so that a return code could be shown.
We are now at the start of the code. The cls routine is called and then the return value from it is stored in the rc variable. Then the echo statement showing which script this is will be displayed.
So, why did I have to put the return code from the cls command into the rc var? Couldn't I have just displayed it after the echo of the script title? No, because the echo $? always refers to the command immediately preceding it. This is easy to forget so make sure you understand this point.
Okay, so now we reset the rc var to 0 and continue on. I could have used a different variable for this, but since the value of rc is not going to be needed again I chose to just reuse the rc variable.
Now, at the check for parameters, the Usage statement will be displayed if three parameters are not there.
After three parameters are entered we display them. This is always a good idea especially when first writing a script/program. You can always take it out later if it is not needed.
The first subroutine, sub1, is run with 1 parameter. This is checked and an error is displayed if needed.
The same thing happens with sub2, but in this case I intentionally set it to run with only one parameter so that the error message would be displayed.
For sub3, you can see that the main parameters are still accessible from a subroutine. In fact, all of the named variables are, and also the wildcard * and other file expansion tokens. Only the main script parameters cannot be accessed, which is why we put them into variables.
The final routine was created in order to show how errors can be handled. You can see that the tput command itself displayed the error, and then we also captured it in the script.
Finally, the script exits with the main rc variable.
As was mentioned earlier, this script has a lot in it so be sure to study it carefully. Note that when I wanted to show an error in tput, I just assumed that firephasers was going to be an unknown command. I would have been rather surprised if some phasers had actually shot out of (or worse, into) my computer!
And now, for another bonus the next section shows the script I used to backup my current book's chapter every 60 seconds:
#!/bin/sh
#
# Auto backs up the file given if it has changed
# Assumes the cbS command exists
# Checks that ../back exists
# Copies to specific USB directory
# Checks if filename.bak exists on startup, copy if it doesn't

echo "autobackup by Lewis 5/9/2017 A"
if [ $# -ne 3 ] ; then
 echo "Usage: autobackup filename USB-backup-dir delay"
 exit 255
fi

# Create back directory if it does not exist
if [ ! -d back ] ; then
 mkdir back
fi

FN=$1                        # filename to monitor
USBdir=$2                    # USB directory to copy to
DELAY=$3                     # how often to check

if [ ! -f $FN ] ; then       # if no filename abort
 echo "File: $FN does not exist."
 exit 5
fi

if [ ! -f $FN.bak ] ; then
 cp $FN $FN.bak
fi

filechanged=0
while [ 1 ]
do
 cmp $FN $FN.bak
 rc=$?
 if [ $rc -ne 0 ] ; then
  cp $FN back
  cp $FN $USBdir
  cd back
  cbS $FN
  cd ..
  cp $FN $FN.bak
  filechanged=1
 fi

 sleep $DELAY
done
And for the output on my system
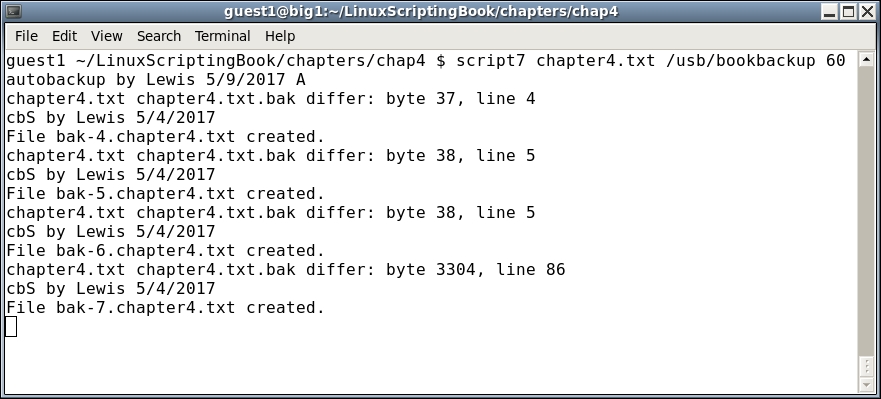
There's not much in this script that we have not already covered. The informal comments at the top are mainly for me, so that I don't forget what I wrote or why.
The parms are checked and the back subdirectory is created if it does not already exist. I never seem to be able to remember to create it, so I let the script do it.
Next, the main variables are set up and then the .bak file is created if it doesn't exist (this helps with the logic).
In the while loop, which you can see runs forever, the cmp Linux command is used to see if the original file has changed from the backup file. If so, the cmp command returns non-zero and the file is copied back to the subdir as a numbered backup using our cbS script. The file is also copied to the backup directory, which in this case is my USB drive. The loop continues until I start a new chapter, in which case I press Ctrl + C to quit.
This is a good example of script automation, which will be covered in more detail in Chapter 6, Automating Tasks with Scripts.
We started with some very simple scripts and then proceeded to show some simple subroutines.
We then showed some subroutines that take parameters. Return codes were mentioned again to show how they work in subroutines. We including several scripts to show the concepts, and also included a special bonus script at no extra charge.
In the next chapter we will go over how to create interactive scripts.
This chapter shows how to read the keyboard in order to create interactive scripts.
The topics covered in this chapter are:
read built-in command to query the keyboard.read.The reader will learn how to create interactive scripts.
The scripts we have looked at up to this point have run without much user interaction. The read command is used to create scripts that can query the keyboard. The code can then take action based on the input.
#!/bin/sh
#
# 5/16/2017
#
echo "script1 - Linux Scripting Book"

echo "Enter 'q' to quit."
rc=0
while [ $rc -eq 0 ]
do
 echo -n "Enter a string: "
 read str
 echo "str: $str"
 if [ "$str" = "q" ] ; then
  rc=1
 fi
done

echo "End of script1"
exit 0
And here is the output when run on my system:
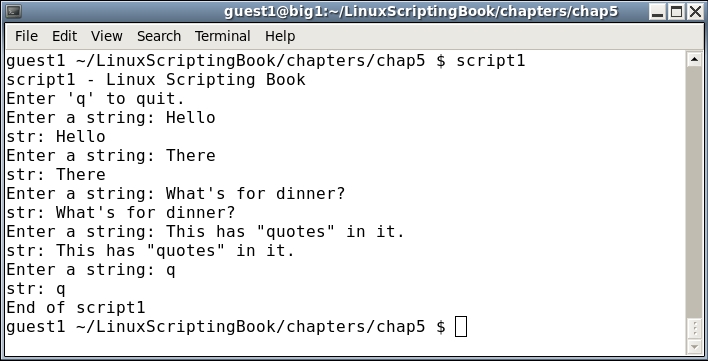
This is a good one to run on your system. Try several different strings, numbers, and so on. Notice how the returned string contains whitespace, special characters, and so on. You don't have to quote anything, and if you do those will be returned as well.
You can also use the read command to put a simple pause into your script. This will allow you to see the output before it scrolls off the screen. It can also be used when debugging which will be shown in Chapter 9, Debugging Scripts.
The following script shows how to create a pause when the output gets to the last line of the screen:
#!/bin/sh
#
# 5/16/2017
# Chapter 5 - Script 2
#
linecnt=1                    # line counter
loop=0                       # loop control var
while [ $loop -eq 0 ]
do
 echo "$linecnt  $RANDOM"    # display next random number
 let linecnt++
 if [ $linecnt -eq $LINES ] ; then
  linecnt=1
  echo -n "Press Enter to continue or q to quit: "
  read str                   # pause
  if [ "$str" = "q" ] ; then
   loop=1                    # end the loop
  fi
 fi
done

echo "End of script2"
exit 0
And here is the output when run on my system:
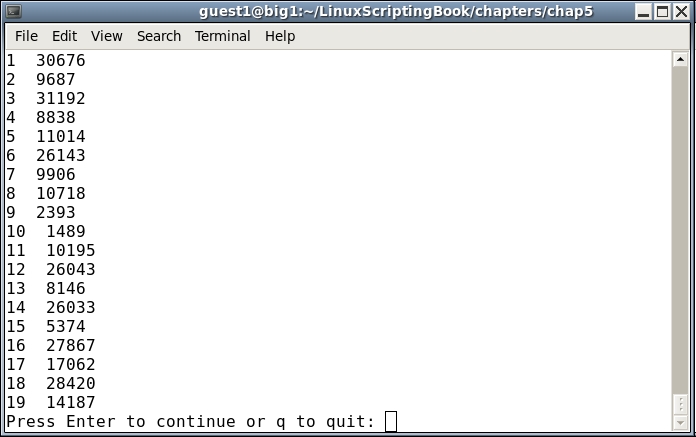
I pressed Enter twice, and then Q and Enter on the last one.
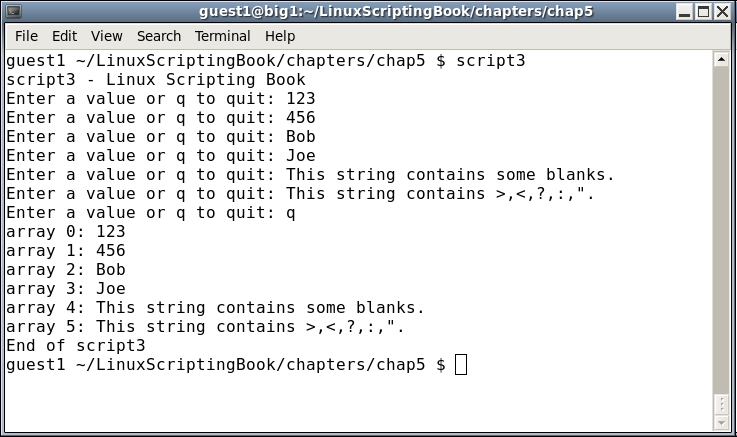
Let's try something a bit more interesting. This next script shows how to fill an array with values taken from the keyboard:
#!/bin/sh
#
# 5/16/2017
#
echo "script3 - Linux Scripting Book"

if [ "$1" = "--help" ] ; then
 echo "Usage: script3"
 echo " Queries the user for values and puts them into an array."
 echo " Entering 'q' will halt the script."
 echo " Running 'script3 --help' shows this Usage message."
 exit 255
fi

x=0                          # subscript into array
loop=0                       # loop control variable
while [ $loop -eq 0 ]
do
 echo -n "Enter a value or q to quit: "
 read value
 if [ "$value" = "q" ] ; then
  loop=1
 else
  array[$x]="$value"
  let x++
 fi
done

let size=x
x=0
while [ $x -lt $size ]
do
 echo "array $x: ${array[x]}"
 let x++
done

echo "End of script3"
exit 0
And the output:
Since this script does not require any parameters I decided to add a Usage statement. This will display if the user runs it with --help and is a common feature in many system scripts and programs.
The only thing new in this script is the read command. The loop and array variables were discussed in an earlier chapter. Note again that, with the read command what you type is what you get.
Now let's create a complete interactive script. But first we need to check the size of the current terminal. If it is too small, the output of your script may become garbled and the user may not know why or how to fix it.
The following script contains a subroutine that checks the size of the terminal:
#!/bin/sh
#
# 5/16/2017
#
echo "script4 - Linux Scripting Book"

checktermsize()
{
 rc1=0                       # default is no error
 if [[ $LINES -lt $1 || $COLUMNS -lt $2 ]] ; then
  rc1=1                      # set return code
 fi
 return $rc1
}

rc=0                         # default is no error
checktermsize 40 90          # check terminal size
rc=$?
if [ $rc -ne 0 ] ; then
 echo "Return code: $rc from checktermsize"
fi

exit $rc
Run this on your system with different-sized terminals to check the result. As you can see from the code, it's okay if the terminal is larger than needed; it just can't be too small.
Now let's look at a full interactive script:
#!/bin/sh
#
# 5/27/2017
#
echo "script5 - Linux Scripting Book"

# Subroutines
cls()
{
 tput clear
}

move()                       # move cursor to row, col
{
 tput cup $1 $2
}

movestr()                    # move cursor to row, col
{
 tput cup $1 $2
 echo -n "$3"                # display string
}

checktermsize()
{
 rc1=0                       # default is no error
 if [[ $LINES -lt $1 || $COLUMNS -lt $2 ]] ; then
  rc1=1                      # set return code
 fi
 return $rc1
}

init()                       # set up the cursor position array
{
 srow[0]=2;  scol[0]=7       # name
 srow[1]=4;  scol[1]=12      # address 1
 srow[2]=6;  scol[2]=12      # address 2
 srow[3]=8;  scol[3]=7       # city
 srow[4]=8;  scol[4]=37      # state
 srow[5]=8;  scol[5]=52      # zip code
 srow[6]=10; scol[6]=8       # email
}

drawscreen()                 # main screen draw routine
{
 cls                         # clear the screen
 movestr 0 25 "Chapter 5 - Script 5"
 movestr 2 1 "Name:"
 movestr 4 1 "Address 1:"
 movestr 6 1 "Address 2:"
 movestr 8 1 "City:"
 movestr 8 30 "State:"
 movestr 8 42 "Zip code:"
 movestr 10 1 "Email:"
}

getdata()
{
 x=0                         # array subscript
 rc1=0                       # loop control variable
 while [ $rc1 -eq 0 ]
 do
  row=${srow[x]}; col=${scol[x]}
  move $row $col
  read array[x]
  let x++
  if [ $x -eq $sizeofarray ] ; then
   rc1=1
  fi
 done
 return 0
}

showdata()
{
 fn=0
 echo ""
 read -p "Enter filename, or just Enter to skip: " filename
 if [ -n "$filename" ] ; then       # if not blank
  echo "Writing to '$filename'"
 fn=1                       # a filename was given
 fi
 echo ""                     # skip 1 line
 echo "Data array contents: "
 y=0
 while [ $y -lt $sizeofarray ]
 do
  echo "$y - ${array[$y]}"
  if [ $fn -eq 1 ] ; then
   echo "$y - ${array[$y]}">>"$filename"
  fi
  let y++
 done
 return 0
}

# Code starts here
sizeofarray=7                # number of array elements

if [ "$1" = "--help" ] ; then
 echo "Usage: script5 --help"
 echo " This script shows how to create an interactive screen program."
 exit 255
fi

checktermsize 25 80
rc=$?
if [ $rc -ne 0 ] ; then
 echo "Please size the terminal to 25x80 and try again."
 exit 1
fi

init                         # initialize the screen array
drawscreen                   # draw the screen
getdata                      # cursor movement and data input routine
showdata                     # display the data

exit 0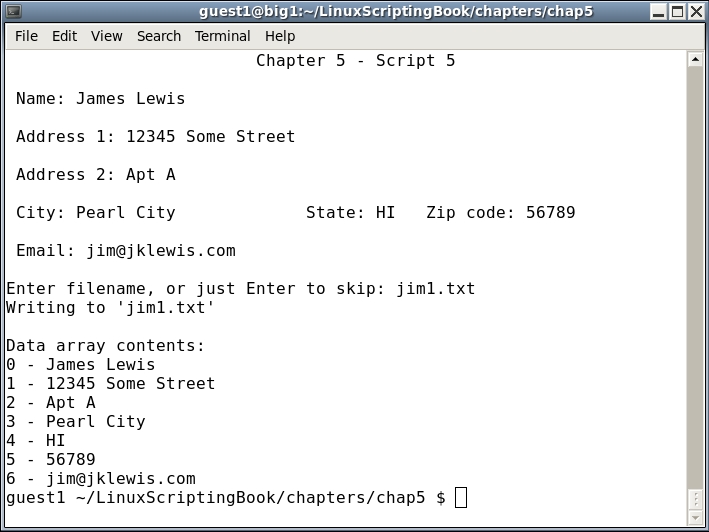
There is a lot of new information here, so let's take a look. First the subroutines are defined, and you can see we included the checktermsize subroutine from the preceding Script 4.
The init routine sets up the cursor placement array. It's good programming practice to put initial values in a subroutine, particularly if it is going to be called again.
The drawscreen routine displays the initial form. Note that I could have used the values in the srow and scol array here, however, I didn't want the script to look too cluttered.
Look very carefully at the getdata routine because this is where the fun begins:
x and control var rc1 are set to 0.Name:).x.x is incremented and we go to the next field.x is equal to the size of the array we leave the loop. Keep in mind that we start counting at 0.The showdata routine displays the array data and then we are done.
This is just a small example of an interactive script to show the basic concepts. In a later chapter we will go into this in more detail.
The read command can be used in a number of different ways. Here are a few examples:
read var
Wait for input of characters into the variable var.
read -p "string" var
Display contents of string, stay on the line, and wait for input.

read -p "Enter password:" -s var
Display "Enter password:", but do not echo the typing of the input. Note that a carriage return is not output after Enter is pressed.

read -n 1 var
The -n option means to wait for that number of characters and then continue, it does not wait for an Enter press.
In this example it will wait for 1 char and then go. This can be useful in utility scripts and games:
#!/bin/sh
#
# 5/27/2017
#
echo "Chapter 5 - Script 6"

rc=0                         # return code
while [ $rc -eq 0 ]
do
 read -p "Enter value or q to quit: " var
 echo "var: $var"
 if [ "$var" = "q" ] ; then
  rc=1
 fi
done

rc=0                         # return code
while [ $rc -eq 0 ]
do
 read -p "Password: " -s var
 echo ""                     # carriage return
 echo "var: $var"
if [ "$var" = "q" ] ; then
  rc=1
 fi
done

echo "Press some keys and q to quit."
rc=0                         # return code
while [ $rc -eq 0 ]
do
 read -n 1 -s var            # wait for 1 char, does not output it
 echo $var                   # output it here
 if [ "$var" = "q" ] ; then
  rc=1
 fi
done

exit $rc
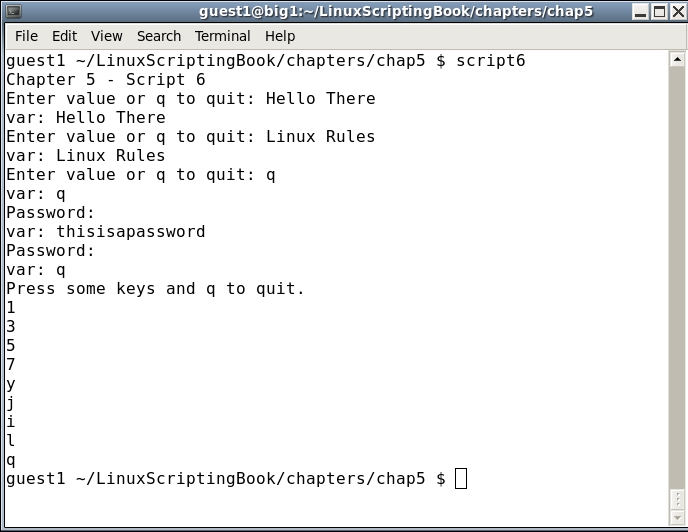
The comments in the script should make this one pretty self explanatory. The read command has a few more options, one of which will be shown in the next script.
Another way to query the keyboard is by using what is called a trap. This is a subroutine that is accessed when a special key sequence is pressed, such as Ctrl + C.
Here is an example of using a trap:
#!/bin/sh
#
# 5/16/2017
#
echo "script7 - Linux Scripting Book"

trap catchCtrlC INT          # Initialize the trap

# Subroutines
catchCtrlC()
{
 echo "Entering catchCtrlC routine."
}

# Code starts here

echo "Press Ctrl-C to trigger the trap, 'Q' to exit."

loop=0
while [ $loop -eq 0 ]
do
 read -t 1 -n 1 str          # wait 1 sec for input or for 1 char
 rc=$?

 if [ $rc -gt 128 ] ; then
  echo "Timeout exceeded."
 fi

 if [ "$str" = "Q" ] ; then
  echo "Exiting the script."
  loop=1
 fi

done

exit 0
Here is the output on my system:
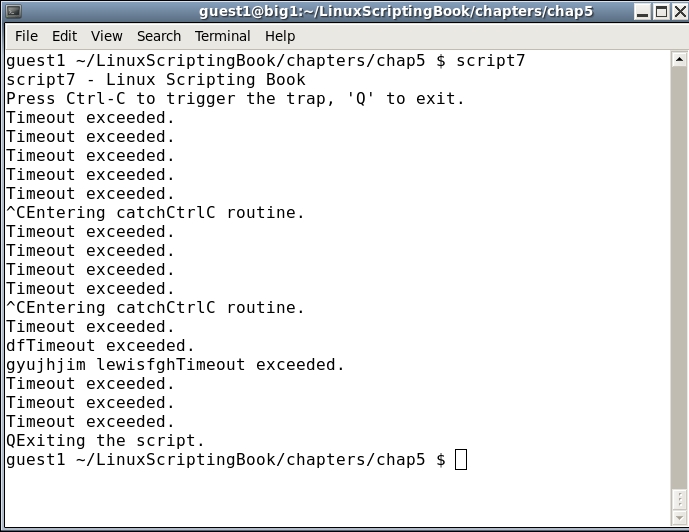
Try running this one on your system. Press some keys and see the response. Press Ctrl + C a few times as well. When done press Q.
That read statement needs some further explanation. Using read with the -t option (timeout) means to wait that many seconds for a character. If one is not input in the allotted time it will return a code with a value greater than 128. As we have seen before, the -n 1 option tells read to wait for 1 character. So this means we are waiting 1 second for 1 character. This is another way read can be used to create a game or other interactive script.
If you get yourself into a situation where you can't exit a script you can use the kill command.
For example, if I had needed to stop script7 the directions would be follows:
 guest1 $ ps auxw | grep script7
 guest1   17813  0.0  0.0 106112  1252 pts/32   S+   17:23   0:00 /bin/sh ./script7
 guest1   17900  0.0  0.0 103316   864 pts/18   S+   17:23   0:00 grep script7
 guest1   29880  0.0  0.0  10752  1148 pts/17   S+   16:47   0:00 kw script7
 guest1 $ kill -9 17813
 guest1 $
In the terminal where script7 was running you will see it has stopped with the word Killed in it.
Note, be sure to kill the right process!
In the example above, PID 29880 is my text editor session where I am writing script7. Killing that would not be a good idea :).
Now for some fun! The next script allows you to draw crude pictures on the screen:
#!/bin/sh
#
# 5/16/2017
#
echo "script8 - Linux Scripting Book"

# Subroutines
cls()
{
 tput clear
}

move()                       # move cursor to row, col
{
 tput cup $1 $2
}

movestr()                    # move cursor to row, col
{
 tput cup $1 $2
 echo -n "$3"                # display string
}

init()                       # set initial values
{
 minrow=1                    # terminal boundaries
 maxrow=24
 mincol=0
 maxcol=79
 startrow=1
 startcol=0
}

restart()                    # clears screen, sets initial cursor position
{
 cls
 movestr 0 0 "Arrow keys move cursor. 'x' to draw, 'd' to erase, '+' to restart, 'Q' to quit."
 row=$startrow
 col=$startcol

 draw=0                      # default is not drawing
 drawchar=""
}

checktermsize2()             # must be the specified size
{
 rc1=0                       # default is no error
 if [[ $LINES -ne $1 || $COLUMNS -ne $2 ]] ; then
  rc1=1                      # set return code
 fi
 return $rc1
}

# Code starts here
if [ "$1" = "--help" ] ; then
 echo "Usage: script7 --help"
 echo " This script shows the basics on how to create a game."
 echo " Use the arrow keys to move the cursor."
 echo " Press c to restart and Q to quit."
 exit 255
fi

checktermsize2 25 80         # terminal must be this size
rc=$?
if [ $rc -ne 0 ] ; then
 echo "Please size the terminal to 25x80 and try again."
 exit 1
fi

init                         # initialize values
restart                      # set starting cursor pos and clear screen

loop=1
while [ $loop -eq 1 ]
do
 move $row $col              # position the cursor here
 read -n 1 -s ch

 case "$ch" in
  A) if [ $row -gt $minrow ] ; then
      let row--
     fi
     ;;
  B) if [ $row -lt $maxrow ] ; then
      let row++
     fi
     ;;
  C) if [ $col -lt $maxcol ] ; then
      let col++
     fi
     ;;
  D) if [ $col -gt $mincol ] ; then
      let col--
     fi
     ;;
  d) echo -n ""             # delete char
     ;;
  x) if [ $col -lt $maxcol ] ; then
      echo -n "X"            # put char
      let col++
     fi
     ;;
  +) restart ;;
  Q) loop=0 ;;
 esac
done

movestr 24 0 "Script completed normally."
echo ""                      # carriage return

exit 0
This was fun to write and a bit more fun to play with than I expected it to be.
One thing we haven't covered yet is the case statement. This is similar to an if...then...else but makes the code easier to read. Basically, the value that was input to the read statement is checked for a match in each case clause. If it matches, that stanza is executed and then control goes to the line after the esac statement. It also does this if there is no match.
Try this script, and remember to make the terminal 25x80 (or 80x25 if that is how your GUI works).
Here is just one example of what can be done with this script:
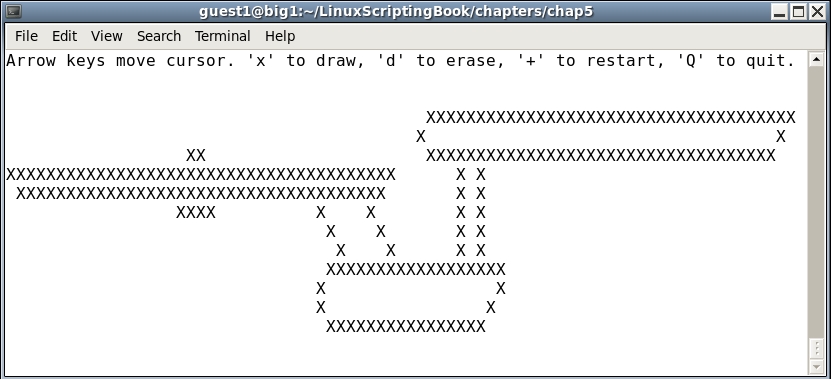
Well okay I guess this shows that I am not much of an artist. I will stick to programming and writing books.
In this chapter we showed how to use the read built-in command to query the keyboard. We explained some of the different options to read and also covered the use of traps. A simple drawing game was also included.
The next chapter will show how to automate a script so that it can run unattended. We will explain how cron can be used to run the script at a specific time. The archival programs zip and tar will also be covered as they are very useful when creating automated back up scripts.
This chapter shows how to automate various tasks using scripts.
The topics covered in this chapter are as follows:
ZIP and TAR to perform compressed backups.The reader will learn how to create automated scripts.
We talked about the sleep command in Chapter 3, Using Loops and the sleep Command. It can be used to create an automated script (that is, one that runs at a specific time with no user intervention) as long as a few guidelines are followed.
This very simple script will reinforce what we covered in Chapter 3 Using Loops and the sleep Command about using the sleep command for automation:
#!/bin/sh
#
# 5/23/2017
#
echo "script1 - Linux Scripting Book"
while [ true ]
do
  date
  sleep 1d
done
echo "End of script1"
exit 0
If you run this on your system and wait a few days you will start to see the date slip a little. This is because the sleep command inserts a delay into the script, it does not mean that it is going to run the script at the same time every day.
#!/bin/sh
#
# 5/23/2017
#
echo "script2 - Linux Scripting Book"
while [ true ]
do
 # Run at 3 am
 date | grep -q 03:00:
 rc=$?
 if [ $rc -eq 0 ] ; then
  echo "Run commands here."
  date
 fi
 sleep 60                   # sleep 60 seconds
done
echo "End of script2"
exit 0
The first thing you will notice is that this script will run until it is either manually terminated with Ctrl + C or the kill command (or when the machine goes down for whatever reason). It is common for automated scripts to just run forever.
The date command, as run without any parameters, returns something like this:
  guest1 $ date
  Fri May 19 15:11:54 HST 2017
So now all we have to do is use grep to match that time. Unfortunately, there is a very subtle problem here. It has been verified that it is possible for this to miss from time to time. For example, if the time has just changed to 3:00 am and the program is now in the sleep it might already be 3:01 when it wakes up. In my early days in computing I had seen code like this all the time in my jobs and never gave it a single thought. When some important backups were missed one day my team was asked to figure out what was going on and we discovered this issue. A quick fix for this would be to change the seconds to 59, however, a better way is to use cron which will be shown later in this chapter.
Notice the -q option to grep, this simply tells it to suppress any output. Feel free to take this out if you want, especially when first writing the script. Also notice that grep returns 0 when a match is found, non-zero otherwise.
With all this said let's look at some simple automated scripts. I have been running the following on my Linux systems since 1996:
#!/bin/sh
#
# 5/23/2017
#
echo "script3 - Linux Scripting Book"
FN=/tmp/log1.txt             # log file
while [ true ]
do
  echo Pinging $PROVIDER
  ping -c 1 $PROVIDER
  rc=$?
  if [ $rc -ne 0 ] ; then
    echo Cannot ping $PROVIDER
    date >> $FN
    echo Cannot ping $PROVIDER >> $FN
  fi
  sleep 60
done
echo "End of script3"        # 60 seconds
exit 0
And the output on my system:
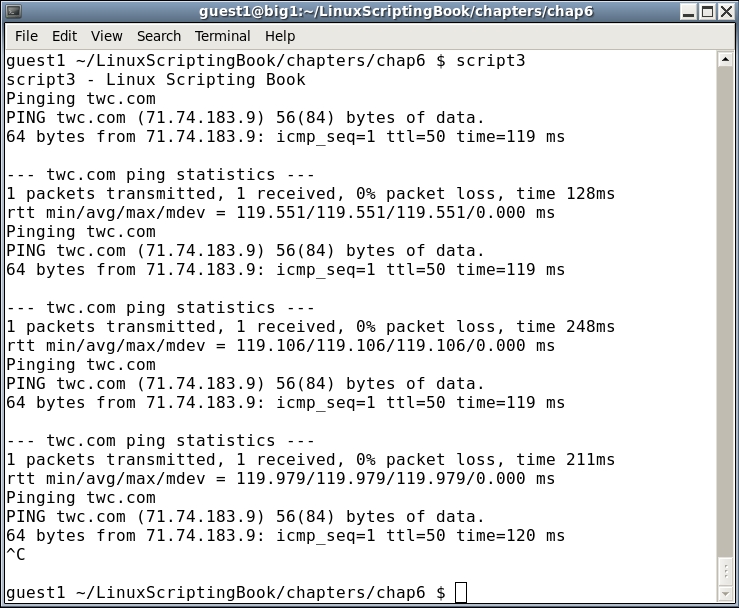
I ran it just three times, however, it would go forever. Before running this on your system let's talk about that PROVIDER environment variable. I have several scripts on my system that deal with the Internet and I found myself constantly changing providers. It didn't take too long to realize that this was a great time to use an env var, hence PROVIDER.
This is in my /root/.bashrc and /home/guest1/.bashrc files:
export PROVIDER=twc.com
Substitute yours as needed. Notice too that when a failure occurs it is being written to the screen and to a file. Since the >> append operator is being used the file might eventually get rather large so plan accordingly if your connection is not very stable.
Here is a script that detects when a user has either logged on or off your system:
#!/bin/sh
#
# 5/23/2017
#
echo "Chapter 6 - Script 4"
numusers=`who | wc -l`
while [ true ]
do
  currusers=`who | wc -l`           # get current number of users
  if [ $currusers -gt $numusers ] ; then
    echo "Someone new has logged on!!!!!!!!!!!"
    date
    who
#   beep
    numusers=$currusers
  elif [ $currusers -lt $numusers ] ; then
    echo "Someone logged off."
    date
    numusers=$currusers
  fi
  sleep 1                    # sleep 1 second
done
Here's the output (adjusted for length):
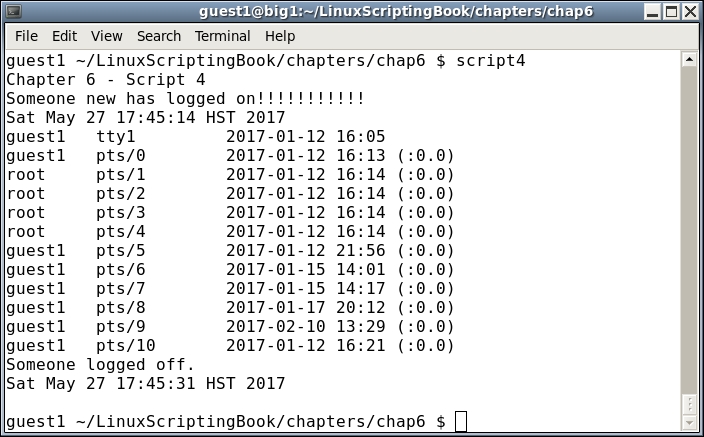
This script checks the output from the who command to see if it has changed since the last run. If so it takes the appropriate action. If you have a beep command or equivalent on your system this is a good place to use it.
Take a look at this statement:
currusers=`who | wc -l` # get current number of users
This needs some clarification as we have not covered it yet. Those back-tick characters mean to run the command(s) inside and put the result into the variable. In this case, the who command is piped into the wc -l command to count the number of lines. This value is then put into the currusers variable. If this sounds a bit complicated don't worry, it will be covered in greater detail in the next chapter.
The remainder of the script should already be clear as we have covered this before. If you decide to run something like this on your system just remember that it will trigger every time a new terminal is opened.
Okay, now for some real fun. If you have been using Linux for even just a short amount of time you are probably already aware of cron. This is a daemon, or background process, that executes commands at specific times.
Cron reads a file called crontab once a minute to determine if a command needs to be run.
For the examples in this chapter we will focus on the crontab for a guest account only (not for root).
Using my guest1 account here is what it would look like the first time it is run. It would be a good idea to follow along on your system under a guest account:
guest1 $ crontab -l
no crontab for guest1
guest1 $
That makes sense as we have not created a crontab file for guest1 yet. It is not meant to be edited directly and so the crontab -e command is used.
Run crontab -e under a guest account on your system now.
Here is a screenshot of how it appears on my system when using vi:
As you can see the crontab command creates a temporary file. It is unfortunate that this file comes up empty as they should have provided a template. Let's add one now. Copy and paste the following text into the file:
# this is the crontab file for guest1
# min   hour   day of month  month  day of week       command
# 0-59  0-23    1-31          1-12   0-6
#                                    Sun=0 Mon=1 Tue=2 Wed=3 Thu=4 Fri=5 Sat=6
Substitute guest1 for your user name. This now gives us an idea of what goes where.
To this file add the following line:
* * * * * date > /dev/pts/31
The * means to match everything in the field. So in essence this line will fire once a minute.
We are using the redirection operator to write the output from the echo command to another terminal. Substitute yours as appropriate.
Try the above on your system. Remember you must save the file first, and you should see this output:
guest1 $ crontab -e
crontab: installing new crontab
guest1 $
This means the addition was successful. Now wait for the next minute to come around. You should see the current date show up in the other terminal.
We can now see the basics of cron. Here are a few quick pointers:
0   0    *   *   *   command            # run every day at midnight
0   3    *   *   *   command            # run every day at 3 am
30  9    1   *   *   command            # run at 9:30 am on the first of the month
45  14   *   *   0   command            # run at 2:45 pm on Sundays
0   0    25  12  *   command            # run at midnight on my birthday
This is just a very small subset of how the date and times can be set in cron. For more information consult the man pages for cron and crontab.
One thing that needs to be mentioned is the PATH for a user's cron. It does not source the user's .bashrc file. You can verify this by adding the following line:
* * * * * echo $PATH > /dev/pts/31 # check the PATH
On my CentOS 6.8 system it shows:
/usr/bin:/bin
To get around this problem you can source your .bashrc file:
* * * * * source $HOME/.bashrc; echo $PATH > /dev/pts/31 # check the PATH
This should now show the real path. The EDITOR env var was mentioned in Chapter 2, Working with Variables. If you want crontab to use a different text editor you can set EDITOR to the path/name of the one you want.
For example, on my system I have this:
export EDITOR=/home/guest1/bin/kw
So when I run crontab -e I get this:
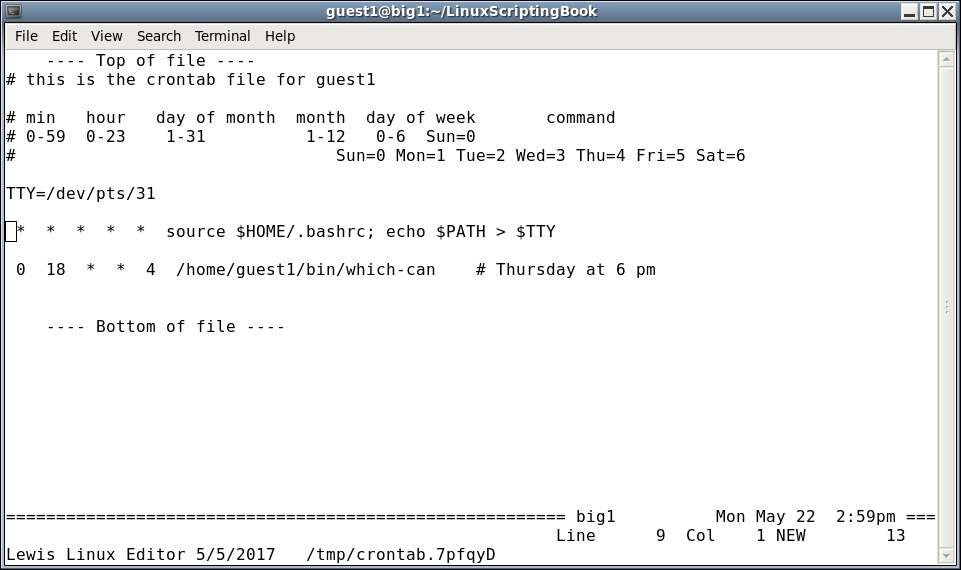
Another thing that should be mentioned is if you make a mistake when using crontab in some cases it will tell you when you attempt to save the file. But it cannot check everything so be careful. Also, if a command gets an error crontab will use the mail system to notify the user. So, with this in mind you may need to run the mail command from time to time when using cron.
Now that we have looked at the basics let's create a backup script that uses the zip command. If you are not familiar with zip don't worry, this will get you up to speed quickly. On a Linux system most people just use the tar command, however, if you know how zip works you can share files with Windows users more easily.
In a directory under a guest account run these commands on your system. As usual I used /home/guest1/LinuxScriptingBook:
Make a work directory:
guest1 ~/LinuxScriptingBook $ mkdir work
Change to it:
guest1 ~/LinuxScriptingBook $ cd work
Create some temporary files, and/or copy a few existing files to this directory:
guest1 ~/LinuxScriptingBook/work $ route > route.txt
guest1 ~/LinuxScriptingBook/work $ ifconfig > ifconfig.txt
guest1 ~/LinuxScriptingBook/work $ ls -la /usr > usr.txt
guest1 ~/LinuxScriptingBook/work $ cp /etc/motd .
Get a listing:
guest1 ~/LinuxScriptingBook/work $ ls -la
total 24
drwxrwxr-x 2 guest1 guest1 4096 May 23 09:44 .
drwxr-xr-x 8 guest1 guest1 4096 May 22 15:18 ..
-rw-rw-r-- 1 guest1 guest1 1732 May 23 09:44 ifconfig.txt
-rw-r--r-- 1 guest1 guest1 1227 May 23 09:44 motd
-rw-rw-r-- 1 guest1 guest1  335 May 23 09:44 route.txt
-rw-rw-r-- 1 guest1 guest1  724 May 23 09:44 usr.txt
Zip them up:
guest1 ~/LinuxScriptingBook/work $ zip work1.zip *
  adding: ifconfig.txt (deflated 69%)
  adding: motd (deflated 49%)
  adding: route.txt (deflated 52%)
  adding: usr.txt (deflated 66%)
guest1 ~/LinuxScriptingBook/work $ ls -la
total 28
drwxrwxr-x 2 guest1 guest1 4096 May 23 09:45 .
drwxr-xr-x 8 guest1 guest1 4096 May 22 15:18 ..
-rw-rw-r-- 1 guest1 guest1 1732 May 23 09:44 ifconfig.txt
-rw-r--r-- 1 guest1 guest1 1227 May 23 09:44 motd
-rw-rw-r-- 1 guest1 guest1  335 May 23 09:44 route.txt
-rw-rw-r-- 1 guest1 guest1  724 May 23 09:44 usr.txt
-rw-rw-r-- 1 guest1 guest1 2172 May 23 09:45 work1.zip
There is now file work1.zip in that directory. The syntax to create a zip file is:
zip [optional parameters] filename.zip list-of-files-to-include
To unzip it:
unzip filename.zip
To view (or list) the contents of a zip file without extracting it:
unzip -l filename.zip
This is also a good way to ensure that the .zip file was created properly, because unzip will report an error if it cannot read the file. Note that the zip command not only creates a .zip file but it also compresses the data. This makes for smaller backup files.
#!/bin/sh
#
# 5/23/2017
#
echo "script5 - Linux Scripting Book"
FN=work1.zip
cd /tmp
mkdir work 2> /dev/null      # suppress message if directory already exists
cd work
cp /etc/motd .
cp /etc/issue .
ls -la /tmp > tmp.txt
ls -la /usr > usr.txt
rm $FN 2> /dev/null          # remove any previous file
zip $FN *
echo File "$FN" created.
# cp to an external drive, and/or scp to another computer
echo "End of script5"
exit 0
And the output on my system:
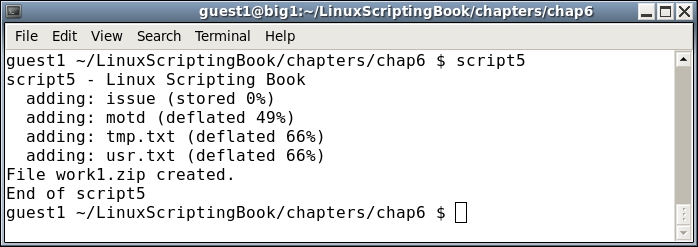
This is a really simple script, however it shows the basics of using the zip command to backup some files.
Suppose we wanted to run this every day at midnight. Assuming script5 was located under /tmp, the crontab entry would be the following:
guest1 /tmp/work $ crontab -l
# this is the crontab file for guest1

# min   hour   day of month  month  day of week       command
# 0-59  0-23    1-31          1-12   0-6  Sun=0
#                                Sun=0 Mon=1 Tue=2 Wed=3 Thu=4 Fri=5 Sat=6

0 0 * * * /tmp/script5
In this case we did not have to source the /home/guest1/.bashrc file. Also notice that any errors get sent to the User's mail account. The zip command can do a whole lot more than just this, for example it can recurse into directories. For more information consult the man pages.
Now let's talk about the Linux tar command. It is used more frequently than the zip command and is better at getting all files, even hidden ones. Referring back to the /tmp/work directory, here is how you would use tar to back it up. It is assumed the files are still there from the previous script:
guest1 /tmp $ tar cvzf work1.gz work/
work/
work/motd
work/tmp.txt
work/issue
work/work1.zip
work/usr.txt
guest1 /tmp $
There is now file work1.gz under the /tmp directory. It is a compressed archive of the contents of all the files under /tmp/work, including the .zip file we created earlier.
The syntax for tar is a little cryptic at first but you will get used to it. Some of the features available in tar are:
|
Parameter |
Feature |
|---|---|
|
|
create an archive |
|
|
extract an archive |
|
|
use the verbose option |
|
|
use gunzip style compression (.gz) |
|
|
the filename to create/extract |
Note that if you do not include the z option the file will not be compressed. By convention the file extension would then just be tar. Note that the user controls the actual name of the file, not the tar command.
Okay so now we have a compressed tar-gz file (or archive). Here is how to un-compress and extract the files. We will do this under /home/guest1:
guest1 /home/guest1 $ tar xvzf /tmp/work1.gz
work/
work/motd
work/tmp.txt
work/issue
work/work1.zip
work/usr.txt
guest1 /home/guest1 $
Using tar to backup a system is really convenient. It's also a great way to configure a new machine with your personal files. For example, I routinely back up the following directories on my primary system:
 /home/guest1
 /lewis
 /temp
 /root
These files are then auto-copied to an external USB drive. Remember that tar automatically recurses into directories and also gets every file, including hidden ones. Tar also has many other options that control how the archive is created. One of the most common options is to exclude certain directories.
For example, when backing up /home/guest1 there is really no reason to include the .cache, Cache, .thumbnails, and so on directories.
The option to exclude directories is --exclude=<directory name> and that is shown in the next script.
Here are the backup programs that I use on my primary Linux system. It is two scripts, one to schedule the backup and one to actually perform the work. I mainly did this so that I could make changes to the actual backup script without turning off the scheduler script. The first thing that needs to be set up is the crontab entry. Here is what it looks like on my system:
guest1 $ crontab -l
# this is the crontab file for guest1
# min   hour   day of month  month  day of week       command
# 0-59  0-23    1-31          1-12   0-6  Sun=0
#                                Sun=0 Mon=1 Tue=2 Wed=3 Thu=4 Fri=5 Sat=6
TTY=/dev/pts/31

 0  3   *  *  *  touch /tmp/runbackup-cron.txt
This will create the file /tmp/backup-cron.txt at approximately 3 am every day.
#!/bin/sh
#
# runbackup1 - this version watches for file from crontab
#
# 6/3/2017 - mainlogs now under /data/mainlogs
#
VER="runbackup1 6/4/2017 A"
FN=/tmp/runbackup-cron.txt
DR=/wd1                      # symbolic link to external drive

tput clear
echo $VER

# Insure backup drive is mounted
file $DR | grep broken
rc=$?
if [ $rc -eq 0  ] ; then
 echo "ERROR: USB drive $DR is not mounted!!!!!!!!!!!!!!"
 beep
 exit 255
fi

cd $LDIR/backup

while [ true ]
do
 # crontab creates the file at 3 am

 if [ -f $FN ] ; then
  rm $FN
  echo Running backup1 ...
  backup1 | tee /data/mainlogs/mainlog`date '+%Y%m%d'`.txt
  echo $VER
 fi

 sleep 60                    # check every minute
done
There's a lot of information here so we will go through it line by line:
DR variable is assigned to my USB external drive (wd1) which is a symbolic link.file command to ensure that /wd1 has been mounted. If it has not, the file command will return broken symbolic link, grep will trigger on this, and the script will abort.backup1 script (see next) is run. The output from it is sent to both the screen and the file using the tee command.'+%Y%m%d' shows the date in this format: YYYYMMDDI check the files in the /data/mainlogs directory from time to time to make sure my backups are being created correctly with no errors.
The following script is used to backup my system. The logic here is the current day backups are stored on the hard drive in the $TDIR directory. They are also copied to a numbered directory on the external drive. These go into directories numbered 1 through 7. When the last one is reached it starts back at 1 again. This way there are always 7 days of backups available on the external drive.
#!/bin/sh
#   Jim's backup program
#   Runs standalone
#   Copies to /data/backups first, then to USB backup drive
VER="File backup by Jim Lewis 5/27/2017 A"
TDIR=/data/backups
RUNDIR=$LDIR/backup
DR=/wd1
echo $VER
cd $RUNDIR
# Insure backup drive is mounted
file $DR | grep broken
a=$?
if [ "$a" != "1" ] ; then
 echo "ERROR: USB drive $DR is not mounted!!!!!!!!!!!!!!"
 beep
 exit 255
fi
date >> datelog.txt
date
echo "Removing files from $TDIR"
cd "$TDIR"
rc=$?
if [ $rc -ne 0 ] ; then
 echo "backup1: Error cannot change to $TDIR!"
 exit 250
fi
rm *.gz
echo "Backing up files to $TDIR"
X=`date '+%Y%m%d'`
cd /
tar cvzf "$TDIR/lewis$X.gz"  lewis
tar cvzf "$TDIR/temp$X.gz"   temp
tar cvzf "$TDIR/root$X.gz"   root
cd /home
tar cvzf "$TDIR/guest$X.gz" --exclude=Cache --exclude=.cache --exclude=.evolution --exclude=vmware --exclude=.thumbnails  --exclude=.gconf --exclude=.kde --exclude=.adobe  --exclude=.mozilla  --exclude=.gconf  --exclude=thunderbird  --exclude=.local --exclude=.macromedia  --exclude=.config   guest1
cd $RUNDIR
T=`cat filenum1`
BACKDIR=$DR/backups/$T
rm $BACKDIR/*.gz
cd "$TDIR"
cp *.gz $BACKDIR
echo $VER
cd $BACKDIR
pwd
ls -lah
cd $RUNDIR
let T++
if [ $T -gt 7 ] ; then
 T=1
fi
echo $T > filenum1
This is a bit more complicated than the previous scripts so let's go through it line by line:
RUNDIR variable holds the starting directory for the scripts.DR variable points to the external backup drive.datelog.txt file.TDIR variable is the target directory for the backups.cd is performed to that directory and the return code is checked. On error the script exits with a 250.It now goes back to the / directory to perform the tar backups.
Notice that several directories are excluded from the guest1 directory.
cd $RUNDIR puts it back into the starting directory.T=`filenum1` gets the value from that file and puts it into the T variable. This is a counter for which directory to use next on the external drive.BACKDIR is set to the old backups and then they are removed.pwd displays the name, and then the contents of the directory are displayed.T variable is incremented by 1. If it is greater than 7 it is set back to 1.And finally the updated T variable is written back to the filenum1 file.
This script should serve as a good starting point for whatever backup process you want to develop. Note that the scp command can be used to copy files directly to another computer without user intervention. This will be covered in Chapter 10, Scripting Best Practices.
We described how to create a script to automate a task. The proper way to use cron to run a script automatically at a specific time was covered. The archive commands zip and tar were discussed to show how to perform compressed backups. A full scheduler and backup script were also included and discussed.
In the next chapter we will show how to read and write files in a script.
This chapter will show how to read from and write to text files. It will also cover file encryption and checksums.
The topics covered in this chapter are as follows:
cat and other important commandsWe showed in some of the previous chapters how to create and write files by using the redirection operator. To recap, this command will create the file ifconfig.txt (or overwrite the file if it already exists):
ifconfig > ifconfig.txt
The following command will append to any previous file or create a new one if it does not already exist:
ifconfig >> ifconfig.txt
Some of the previous scripts used the back-tick operator to retrieve the data from a file. Let's recap by looking at Script 1:
#!/bin/sh
#
# 6/1/2017
#
echo "Chapter 7 - Script 1"
FN=file1.txt
rm $FN 2> /dev/null          # remove it silently if it exists
x=1
while [ $x -le 10 ]          # 10 lines
do
 echo "x: $x"
 echo "Line $x" >> $FN       # append to file
 let x++
done
echo "End of script1"
exit 0
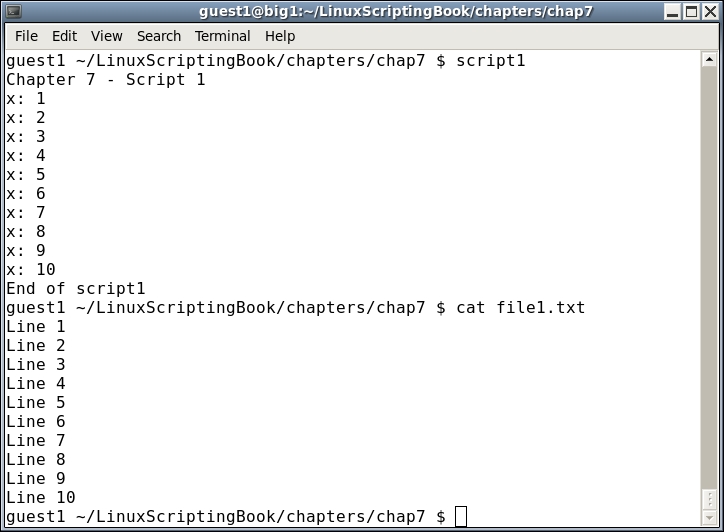
This is pretty straight forward. It removes the file (silently) if it exists, and then outputs each line to the file, incrementing x each time. When x gets to 10 the loop terminates.
Now let's look again at the method the backup scripts in the last chapter used to get the value from a file:
#!/bin/sh
#
# 6/2/2017
#
echo "Chapter 7 - Script 2"

FN=filenum1.txt              # input/output filename
MAXFILES=5                   # maximum number before going back to 1

if [ ! -f $FN ] ; then
  echo 1 > $FN               # create the file if it does not exist
fi

echo -n "Contents of $FN: "
cat $FN                      # display the contents

count=`cat $FN`              # put the output of cat into variable count
echo "Initial value of count from $FN: $count"

let count++
if [ $count -gt $MAXFILES ] ; then
 count=1
fi

echo "New value of count: $count"
echo $count > $FN

echo -n "New contents of $FN: "
cat $FN

echo "End of script2"
exit 0
Here is the screenshot for Script 2:
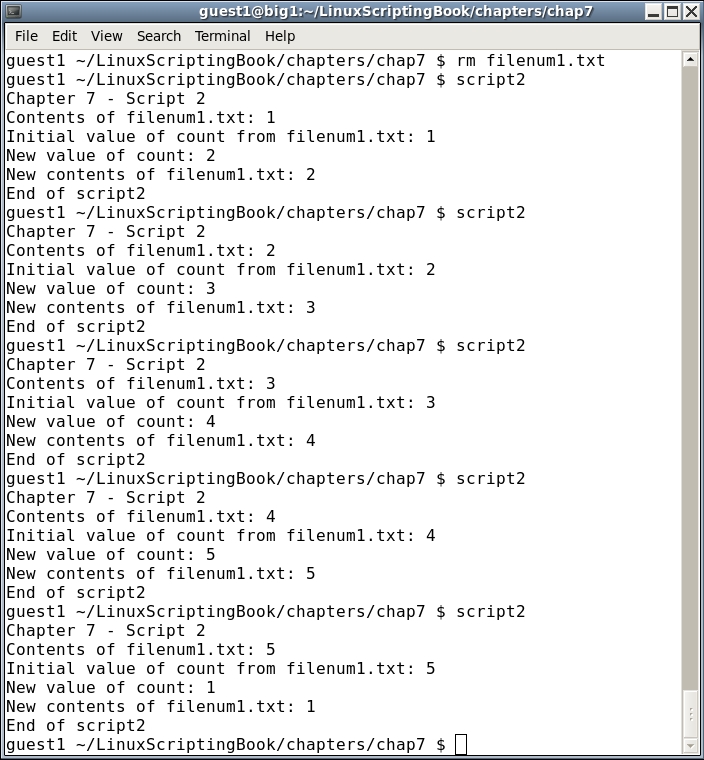
We start by setting the FN variable to the name of the file (filenum1.txt). It is displayed by the cat command and then the contents of the file are assigned to the count variable. It is displayed and then incremented by 1. The new value is written back to the file and then it is displayed again. Run this one at least 6 times to see how it wraps around.
This is just one simple way to create and read a file. Now let's look at a script that reads several lines from a file. It will use the file file1.txt that was created by the preceding Script 1.
#!/bin/sh
#
# 6/1/2017
#
echo "Chapter 7 - Script 3"
FN=file1.txt                 # filename
while IFS= read -r linevar   # use read to put line into linevar
do
  echo "$linevar"            # display contents of linevar
done < $FN                   # the file to use as input
echo "End of script3"
exit 0
And here is the output:
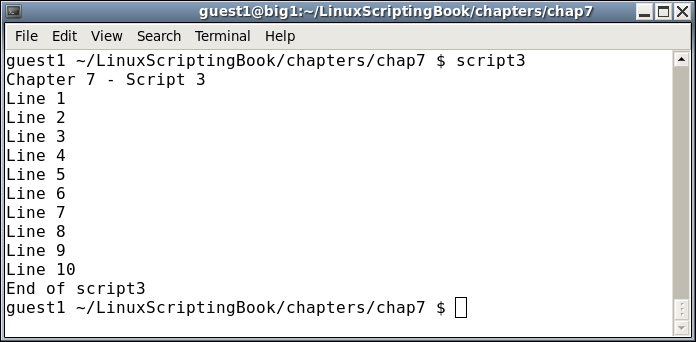
The structure here may look a little strange as it is rather different from what we have seen before. This script uses the read command to get each line of the file. In the statement:
while IFS= read -r linevar
The IFS= (Internal Field Separator) prevents read from trimming leading and trailing whitespace characters. The -r parameter to read causes backslash escape sequences to be ignored. The next line uses the redirection operator to enable file1.txt as the input for read.
done < $FN
There is a lot of new material here and so look this over carefully until you get comfortable with it.
There is a slight flaw in the above script. If the file does not exist an error will occur. Look at the following screenshot:
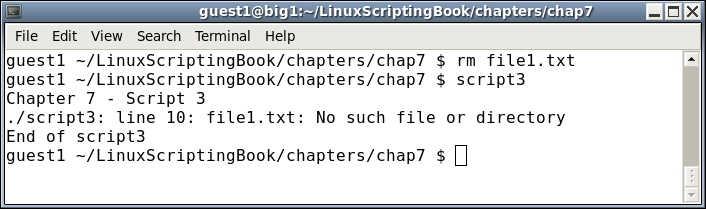
Shell scripts are interpreted, meaning each line is examined and run by the system one at a time. This is different from say a program written in the C language which is compiled. This means any syntax errors will appear during the compile stage and not when the program is run. We will discuss how to avoid most shell scripting syntax errors in Chapter 9, Debugging scripts.
Here is Script 4 with a solution to the missing file problem:
#!/bin/sh
#
# 6/1/2017
#
echo "Chapter 7 - Script 4"

FN=file1.txt                 # filename
if [ ! -f $FN ] ; then
 echo "File $FN does not exist."
 exit 100
fi

while IFS= read -r linevar   # use read to put line into linevar
do
  echo "$linevar"            # display contents of linevar
done < $FN                   # the file to use as input

echo "End of script4"
exit 0
And the following is the output:
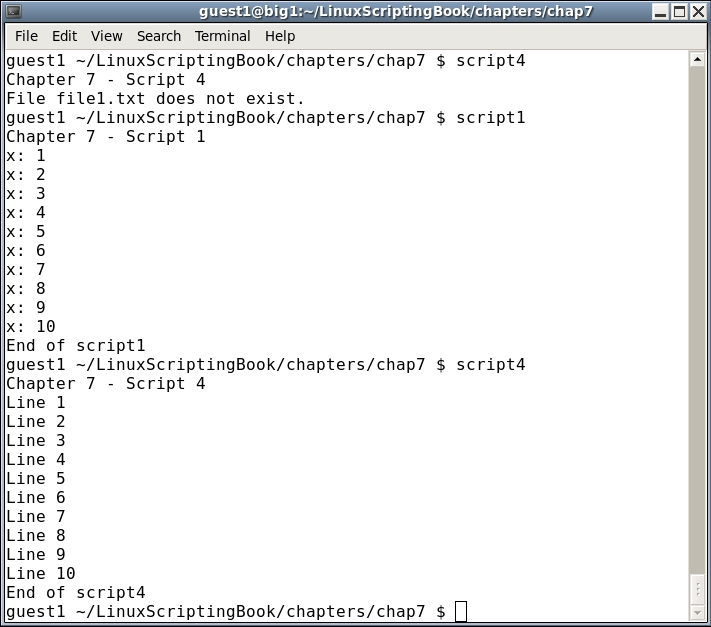
Keep this in mind when using files and always check to make sure the file exists before trying to read it.
This next script reads a text file and creates a copy of it:
#!/bin/sh
#
# 6/1/2017
#
echo "Chapter 7 - Script 5"

if [ $# -ne 2 ] ; then
 echo "Usage: script5 infile outfile"
 echo " Copies text file infile to outfile."
 exit 255
fi

INFILE=$1
OUTFILE=$2

if [ ! -f $INFILE ] ; then
 echo "Error: File $INFILE does not exist."
 exit 100
fi

if [ $INFILE = $OUTFILE ] ; then
 echo "Error: Cannot copy to same file."
 exit 101
fi

rm $OUTFILE 2> /dev/null       # remove it
echo "Reading file $INFILE ..."

x=0
while IFS= read -r linevar     # use read to put line into linevar
do
  echo "$linevar" >> $OUTFILE  # append to file
  let x++
done < $INFILE                 # the file to use as input
echo "$x lines read."

diff $INFILE $OUTFILE          # use diff to check the output
rc=$?
if [ $rc -ne 0 ] ; then
 echo "Error, files do not match."
 exit 103
else
 echo "File $OUTFILE created."
fi

sum $INFILE $OUTFILE           # show the checksums

echo "End of script5"
exit $rc
Here is the screenshot for Script 5:
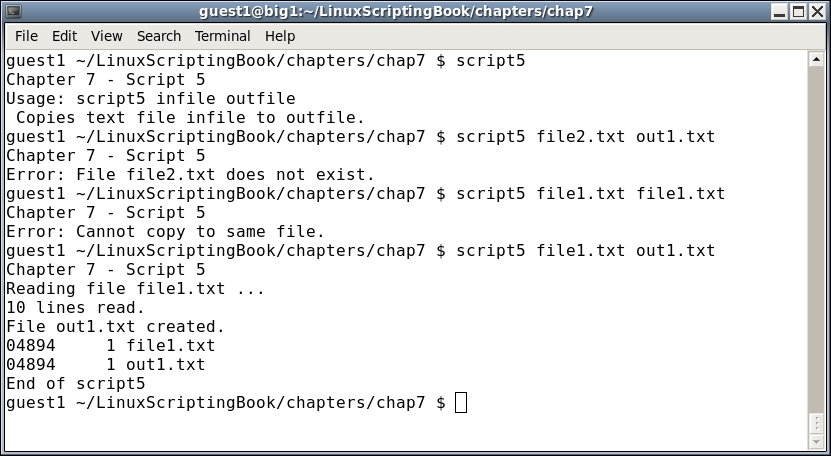
This shows how to read and write a text file in a script. The following explains each line:
Usage message is displayed.100 if it does not.while loop reads and writes the lines. A count is made of the number of lines in x.diff command is used to make sure the files are the same.sum command is run on the two files.This next script is similar to one in Chapter 5, Creating Interactive Scripts. It reads the file specified, displays a form, and allows the user to edit and then save it:
#!/bin/sh
# 6/2/2017
# Chapter 7 - Script 6

trap catchCtrlC INT          # Initialize the trap

# Subroutines
catchCtrlC()
{
 move 13 0
 savefile
 movestr 23 0 "Script terminated by user."
 echo ""                     # carriage return
 exit 0
}

cls()
{
 tput clear
}

move()                       # move cursor to row, col
{
 tput cup $1 $2
}

movestr()                    # move cursor to row, col
{
 tput cup $1 $2
 echo -n "$3"                # display string
}

checktermsize()
{
 rc1=0                       # default is no error
 if [[ $LINES -lt $1 || $COLUMNS -lt $2 ]] ; then
  rc1=1                      # set return code
 fi
 return $rc1
}

init()                       # set up the cursor position array
{
 srow[0]=2;  scol[0]=7       # name
 srow[1]=4;  scol[1]=12      # address 1
 srow[2]=6;  scol[2]=12      # address 2
 srow[3]=8;  scol[3]=7       # city
 srow[4]=8;  scol[4]=37      # state
 srow[5]=8;  scol[5]=52      # zip code
 srow[6]=10; scol[6]=8       # email
}

drawscreen()                 # main screen draw routine
{
 cls                         # clear the screen
 movestr 0 25 "Chapter 7 - Script 6"

 movestr 2 1  "Name: ${array[0]}"
 movestr 4 1  "Address 1: ${array[1]}"
 movestr 6 1  "Address 2: ${array[2]}"
 movestr 8 1  "City: ${array[3]}"
 movestr 8 30 "State: ${array[4]}"
 movestr 8 42 "Zip code: ${array[5]}"
 movestr 10 1 "Email: ${array[6]}"
}

getdata()
{
 x=0                         # start at the first field
 while [ true ]
 do
  row=${srow[x]}; col=${scol[x]}
  move $row $col
  read var
  if [ -n "$var" ] ; then    # if not blank assign to array
    array[$x]=$var
  fi
  let x++
  if [ $x -eq $sizeofarray ] ; then
   x=0                       # go back to first field
  fi
 done

 return 0
}

savefile()
{
 rm $FN 2> /dev/null         # remove any existing file
 echo "Writing file $FN ..."
 y=0
 while [ $y -lt $sizeofarray ]
 do
  echo "$y - '${array[$y]}'"            # display to screen
  echo "${array[$y]}" >> "$FN"          # write to file
  let y++
 done
 echo "File written."
 return 0
}

getfile()
{
 x=0
 if [ -n "$FN" ] ; then      # check that file exists
  while IFS= read -r linevar # use read to put line into linevar
  do
   array[$x]="$linevar"
   let x++
  done < $FN                 # the file to use as input
 fi
 return 0
}

# Code starts here
if [ $# -ne 1 ] ; then
 echo "Usage: script6 file"
 echo " Reads existing file or creates a new file"
 echo " and allows user to enter data into fields."
 echo " Press Ctrl-C to end."
 exit 255
fi

FN=$1                        # filename (input and output)
sizeofarray=7                # number of array elements
checktermsize 25 80
rc=$?
if [ $rc -ne 0 ] ; then
 echo "Please size the terminal to 25x80 and try again."
 exit 1
fi

init                         # initialize the screen array
getfile                      # read in file if it exists
drawscreen                   # draw the screen
getdata                      # read in the data and put into the fields

exit 0
Here is what this looks like on my system:
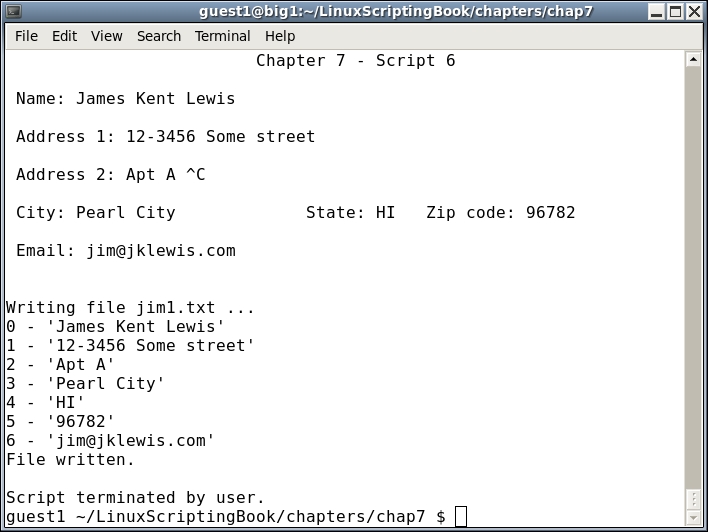
Here is a description of the code:
getdata routine is used to read the user input.savefile routine writes out the data array.getfile routine reads the file, if it exists, into the array.FN variable is set to the name of the file.sizeofarray.init routine is called which sets up the screen array.getfile and drawscreen are called.getdata routine is used to move the cursor and get the data from the fields into the proper array location.This is an example of how a simple screen input/output routine can be developed in Bash. This script could use a few refinements, here is a partial list:
grep commands.You probably noticed the use of the sum command above. It displays the checksum and block count of files which can be used to determine if two or more files are the same file (that is, have the exact same contents).
Here is a real world example:
Suppose you are writing a book, and the files are being sent from the author to the publisher for review. The publisher makes some revisions and then sends the revised file back to the author. It is sometimes easy to get out of sync, and receive a file that doesn't look any different. If you run the sum command against the two files you can easily determine if they are the same.
Take a look at the following screenshot:
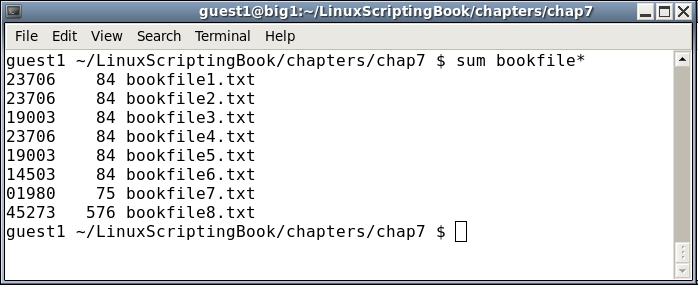
The first column is the checksum and the second column is the block count. If both of these are the same that means the contents of the files are identical. So, in this example bookfiles 1, 2, and 4 are the same. Bookfiles 3 and 5 are also the same. However, bookfiles 6, 7, and 8 don't match up with anything, and the last two don't even have the same block count.
There are times you might want to encrypt some important and/or confidential files on your system. Some people store their passwords in a file on their computers, this is probably okay but only if some type of file encryption is being used. There are many encryption programs available, here we will show OpenSSL.
The OpenSSL command line tool is very popular and is most likely already installed on your computer (it came by default on my CentOS 6.8 systems). It has several options and methods of encryption, however we will cover just the basics.
Using file1.txt again from above try the following on your system:
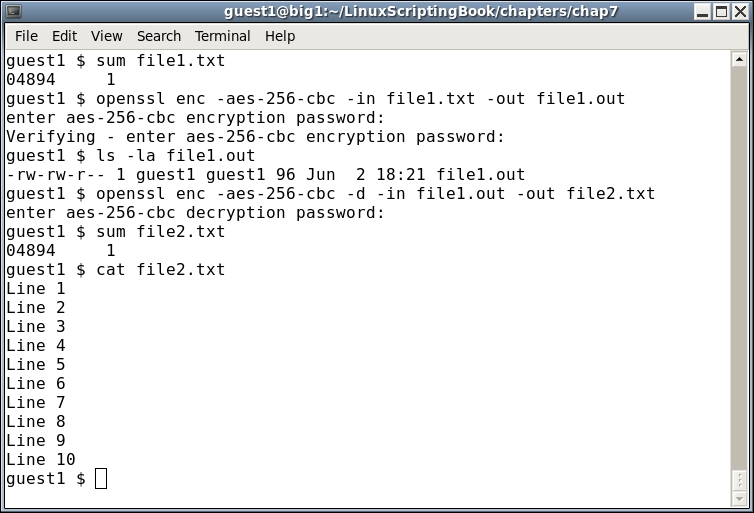
We start by performing a sum on the file1.txt file, then run openssl. Here is the syntax:
enc: specify which encoding to use, in this case it's aes-256-cbc-in: the input file-out: the output file-d: decryptAfter running the openssl command we perform an ls -la to verify that the output file was indeed created.
We then decrypt the file. Note the order of the files and the addition of the -d parameter (to decrypt). We do another sum to verify that the resulting file is the same as the original.
Since there is no way I am going to type that all the time let's write a quick script to do it:
#!/bin/sh
#
# 6/2/2017
#
echo "Chapter 7 - Script 7"

if [ $# -ne 3 ] ; then
 echo "Usage: script7 -e|-d infile outfile"
 echo " Uses openssl to encrypt files."
 echo " -e to encrypt"
 echo " -d to decrypt"
 exit 255
fi

PARM=$1
INFILE=$2
OUTFILE=$3

if [ ! -f $INFILE ] ; then
 echo "Input file $INFILE does not exist."
 exit 100
fi

if [ "$PARM" = "-e" ] ; then
 echo "Encrypting"
 openssl enc -aes-256-cbc -in $INFILE -out $OUTFILE
elif [ "$PARM" = "-d" ] ; then
 echo "Decrypting"
 openssl enc -aes-256-cbc -d -in $INFILE -out $OUTFILE
else
 echo "Please specify either -e or -d."
 exit 101
fi

ls -la $OUTFILE

echo "End of script7"
exit 0
Here is the screenshot:
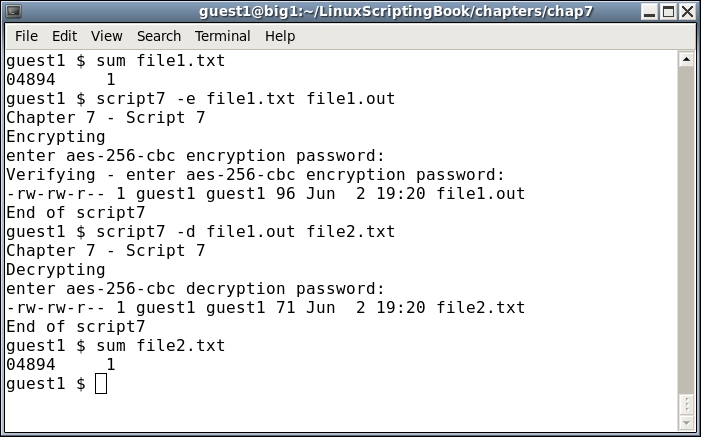
This is obviously a lot easier than typing (or trying to remember) the syntax for openssl. As you can see the resulting decrypted file (file2.txt) is the same as the file1.txt file.
In this chapter we showed how to write out a file using the redirection operator and how to read a file using the (properly formatted) read command. Converting the contents of a file into a variable was covered as was the use of checksums and file encryption.
In the next chapter we will look at some utilities that can be used to gather information from web pages on the Internet.
This chapter will show how to use wget and curl to gather information directly from the internet.
The topics covered in this chapter are:
wget.curl.Scripts that can gather data in this way can be very powerful tools to have at your disposal. As you will see from this chapter, you can get stock quotes, lake levels, just about anything automatically from web sites anywhere in the world.
You may have already heard about or even used the wget program. It is a command line utility that can be used to download files from the Internet.
Here is a screenshot showing wget in its most simplest form:
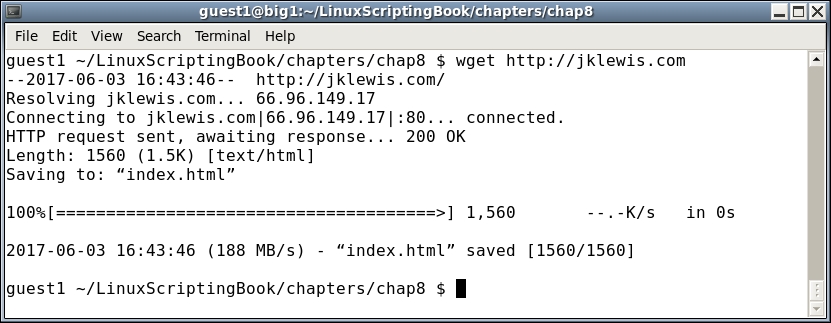
In the output you can see that wget downloaded the index.html file from my jklewis.com website.
This is the default behavior of wget. The standard usage is:
wget [options] URL
where URL stands for Uniform Resource Locator, or address of the website.
Here is just a short list of the many available options with wget:
|
Parameter |
Explanation |
|---|---|
|
|
|
|
|
same as |
|
|
output file, copy the file to this name |
|
|
turn debugging on |
|
|
quiet mode |
|
|
verbose mode |
|
|
recursive mode |
Let's try another example:
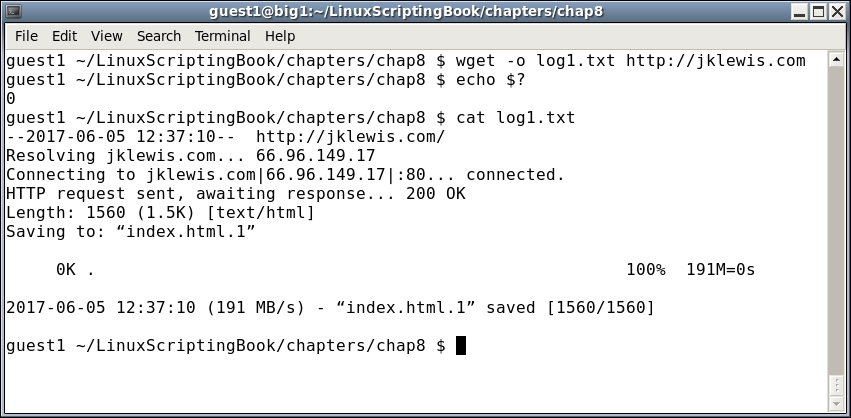
The -o option was used in this case. The return code was checked and a code of 0 means no failure. There was no output because it was directed to the log file which was displayed by the cat command.
The -o option, write output to file, was used in this case. There was no output displayed because it was directed to the log file which was then shown by the cat command. The return code from wget was checked and a code of 0 means no failure.
Notice that this time it named the downloaded file index.html.1. This is because index.html was created in the previous example. The author of this application did it this way to avoid overwriting a previously downloaded file. Very nice!
Take a look at this next example:
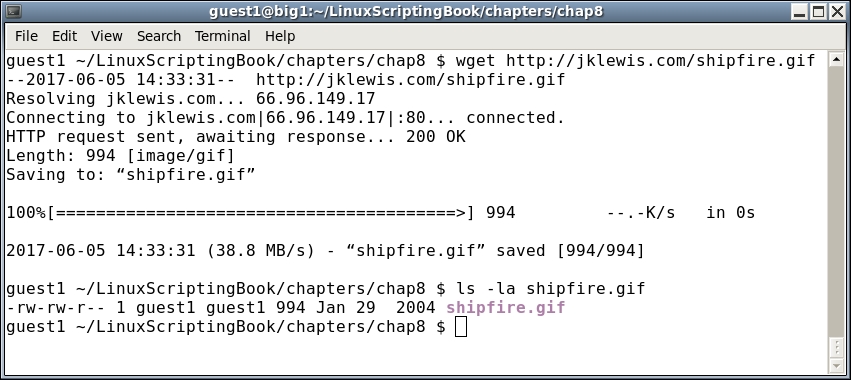
Here we are telling wget to download the file given (shipfire.gif).
In this next screenshot we show how wget will return a useful error code:
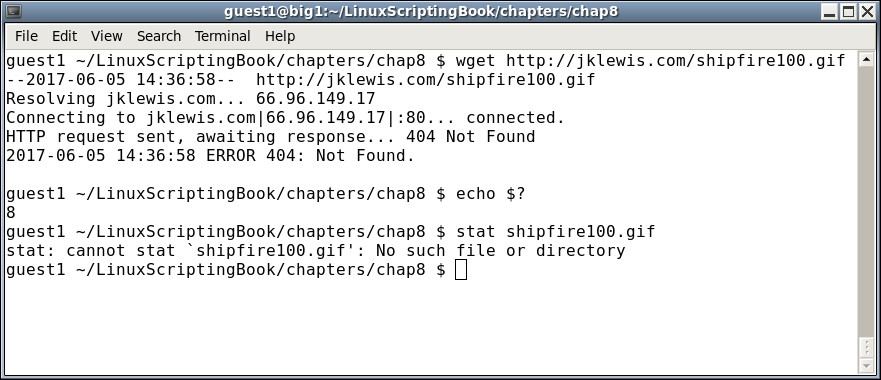
This error occurred because there is no file named shipfire100.gif in the base directory on my website. Notice how the output shows a 404 Not Found message, this is seen very often on the Web. In general, it means a requested resource was not available at that time. In this case the file isn't there and so that message appears.
Note too how wget returned an 8 error code. The man page for wget shows this for the possible exit codes from wget:
|
Error codes |
Explanation |
|---|---|
|
|
No problems occurred. |
|
|
Generic error code. |
|
|
Parse error. For instance when parsing command-line options, the |
|
|
File I/O error. |
|
|
Network failure. |
|
|
SSL verification failure. |
|
|
Username/password authentication failure. |
|
|
Protocol errors. |
|
|
Server issued an error response. |
A return of 8 makes pretty good sense. The server could not find the file and so returned a 404 error code.
Now is a good time to mention the different wget configuration files. There are two main files, /etc/wgetrc is the default location of the global wget startup file. In most cases you probably should not edit this unless you really want to make changes that affect all users. The file $HOME/.wgetrc is a better place to put any options you would like. A good way to do this is to open both /etc/wgetrc and $HOME/.wgetrc in your text editor and then copy the stanzas you want into your $HOME./wgetrc file.
For more information on the wget config files consult the man page (man wget).
Now let's see wget in action. I wrote this a while back to keep track of the water level in the lake I used to go boating in:
#!/bin/sh
# 6/5/2017
# Chapter 8 - Script 1

URL=http://www.arlut.utexas.edu/omg/weather.html
FN=weather.html
TF=temp1.txt                 # temp file
LF=logfile.txt               # log file

loop=1
while [ $loop -eq 1 ]
do
 rm $FN 2> /dev/null         # remove old file
 wget -o $LF $URL
 rc=$?
 if [ $rc -ne 0 ] ; then
  echo "wget returned code: $rc"
  echo "logfile:"
  cat $LF

  exit 200
 fi

 date
 grep "Lake Travis Level:" $FN > $TF
 cat $TF | cut  -d ' ' -f 12 --complement

 sleep 1h
done

exit 0
This output is from June 5, 2017. It's not much to look at but here it is:
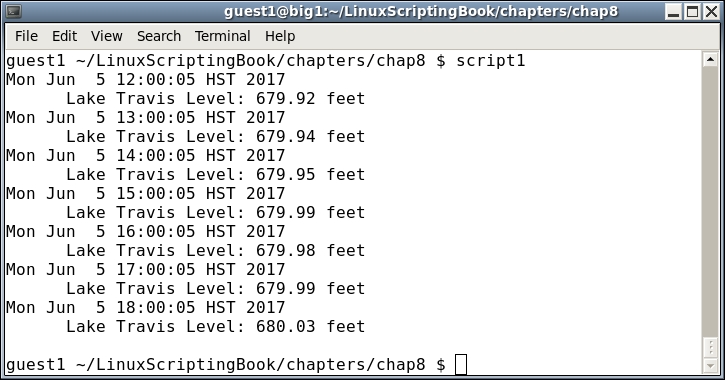
You can see from the script and the output that it runs once every hour. In case you were wondering why anyone would write something like this, I needed to know if the lake level went below 640 feet as I would have had to move my boat out of the marina. This was during a severe drought back in Texas.
There are a few things to keep in mind when writing a script like this:
wget once manually and then work with the downloaded file.wget several times in a short period of time or else you may get blocked by the site.wget again.The wget program can also be used to download the contents of an entire website by using the recursive (-r) option.
For an example look at the following screenshot:
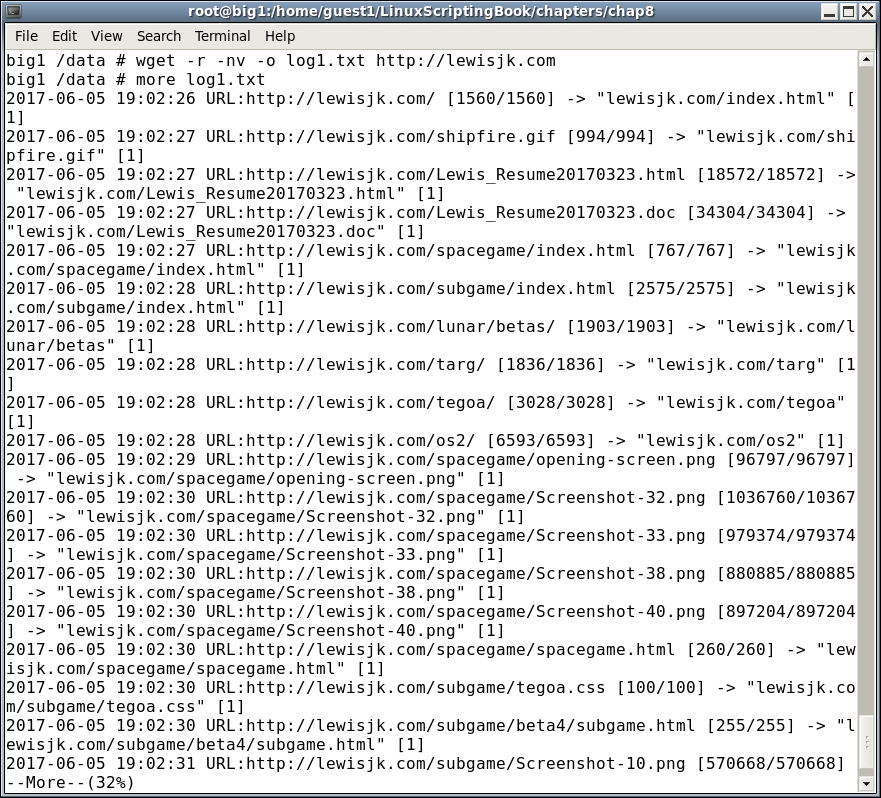
The no verbose (-nv) option was used to limit the output. After the wget command completed the more command was used to view the contents of the log. Depending on the number of files the output might be very long.
When using wget you may run into unexpected issues. It may not get any files, or it may get some but not all of them. It might even fail without any reasonable error message. If this happens check the man page (man wget) very carefully. There may be an option that can help get you through the problem. In particular look at the following.
Run wget --version on your system. It will display a detailed listing of the options and features and also how wget was compiled.
Here is an example taken from my system running CentOS 6.8 64-bit:
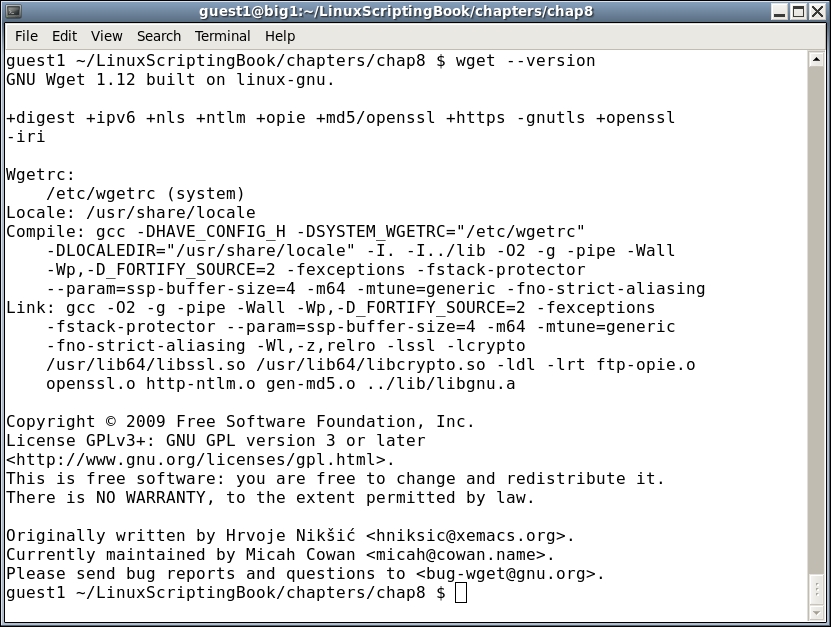
Normally the defaults used by wget are good enough for most users, however, you may need to tweak things from time to time to get it to work the way you want it to.
Here is a partial list of some of the wget options:
|
wget option |
Explanation |
|---|---|
|
|
Output messages to a |
|
|
Try number times before giving up on the connection. |
|
|
Continue to download a partially downloaded file from a previous |
|
|
Display the headers sent by the server. |
|
|
The quota, or total amount of bytes that will be downloaded. Number can be in bytes, kilobytes (k), or megabytes (m). Set to 0 or inf for no quota. |
|
|
This specifies the maximum recursion level. The default is 5. |
|
|
This is good for when trying to create a mirror of a site. It is equivalent to using the |
Another thing you may try is to turn on debugging with the -d option. Note that this will only work if your version of wget was compiled with debug support. Let's see what happens when I try it on my system:
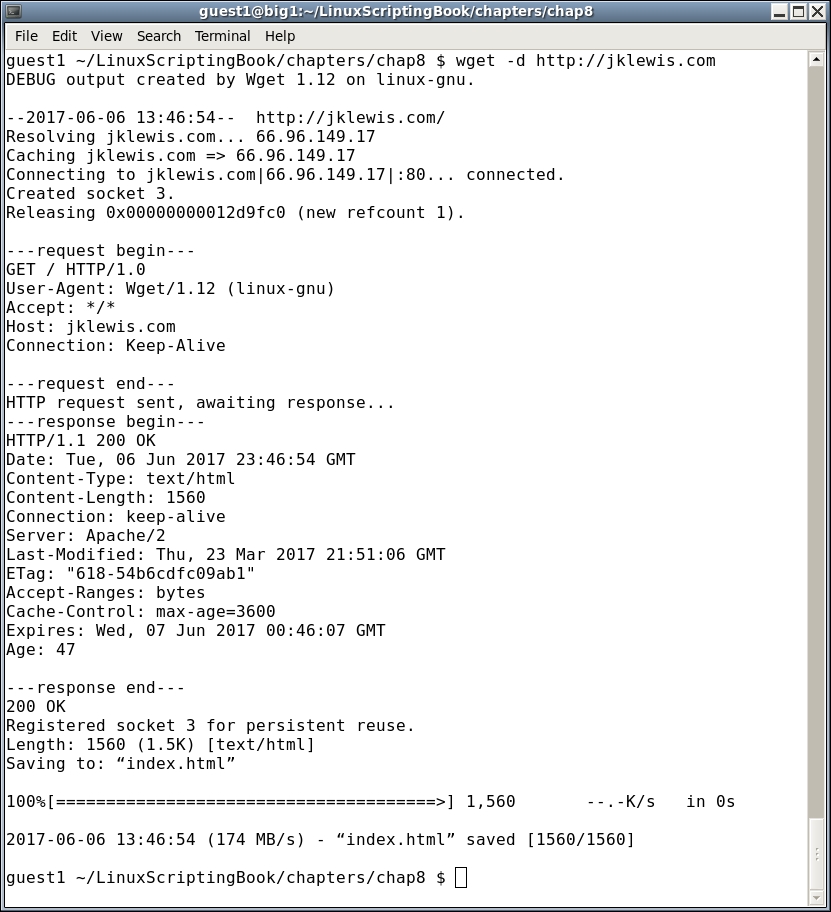
I wasn't sure if debugging was turned on or not, now I know. This output might not be very useful unless you are a developer, however, if you ever need to send in a bug report on wget they are going to ask for the debug output.
As you can see, wget is a very powerful program with several options.
Now let's look at the curl program as it is somewhat similar to wget. One of the main differences between wget and curl is how they handle the output.
The wget program by default displays some progress information on the screen and then downloads the index.html file. In contrast, curl normally displays the file itself on the screen.
Here is an example of curl running on my system using my favorite website (screenshot shortened to save space):

Another way to get the output into a file is by using redirection like this:
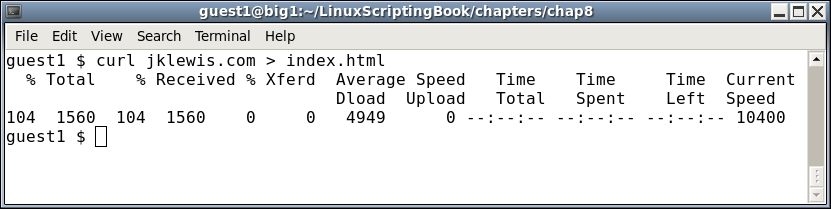
You will notice that when redirected to a file the transfer progress is displayed on the screen. Also note that any error output goes into the file if redirected and not the screen.
Here is a very brief list of the options available in curl:
|
Curl options |
Explanation |
|---|---|
|
|
Output filename |
|
|
Silent mode. Shows nothing, not even errors |
|
|
Show errors if in silent mode |
|
|
Verbose, useful for debugging |
There are many other options to curl, as well as several pages of return codes. For more information consult the curl man page.
And now here is a script showing how curl can be used to automatically get the current value of the Dow Jones Industrial Average:
#!/bin/sh
# 6/6/2017
# Chapter 8 - Script 2

URL="https://www.google.com/finance?cid=983582"
FN=outfile1.txt              # output file
TF=temp1.txt                 # temp file for grep

loop=1
while [ $loop -eq 1 ]
do
 rm $FN 2> /dev/null         # remove old file
 curl -o $FN $URL            # output to file
 rc=$?
 if [ $rc -ne 0 ] ; then
  echo "curl returned code: $rc"
  echo "outfile:"
  cat $FN

  exit 200
 fi

 echo ""                     # carriage return
 date
 grep "ref_983582_l" $FN > $TF
 echo -n "DJIA: "
 cat $TF | cut -c 25-33

 sleep 1h
done

exit 0
Here's what it looks like on my system. Normally you would probably leave the progress information out of the output by using the -s option but I thought it looked cool and so left it in:
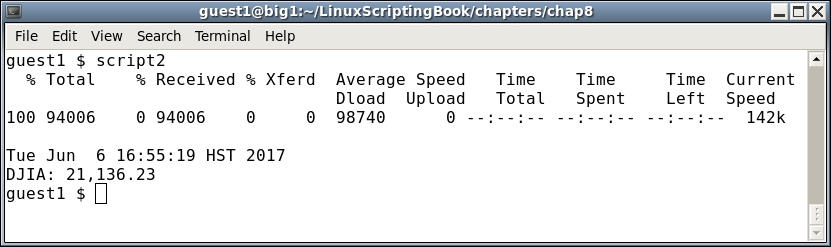
You can see that curl and wget work pretty much the same way. Remember when writing scripts such as these to keep in mind that the format of the page will almost certainly change from time to time so plan accordingly.
In this chapter we showed how to use wget and curl in scripts. The default behavior of these programs were shown as were some of the many options. Return codes were also discussed and a couple of example scripts were presented.
The following chapter will cover how to more easily debug both syntax and logic errors in your scripts.
This chapter shows how to debug Bash shell scripts.
Programming in any language, be it C, Java, FORTRAN, COBOL*, or Bash can be a lot of fun. However, what is often not fun is when something goes wrong, and when it takes an inordinate amount of time to find the problem and then solve it. This chapter will attempt to show the reader how to avoid some of the more common syntax and logic errors, and also how to find them when they occur.
*COBOL: Okay, I have to say that programming in COBOL was never fun!
The topics covered are in the chapter are:
set -x and set -v.Nothing can be so frustrating than to be on a roll when coding your script or program and then have a syntax error pop up. In some cases the solution is so easy you find and solve it right away. In other cases it can take minutes or even hours. Here are a few pointers:
When coding a loop put the whole while...do...done structure in first. It is sometimes really easy to forget the ending done statement, especially if the code spans more than a page.
Take a look at Script 1:
#!/bin/sh
#
# 6/7/2017
#
echo "Chapter 9 - Script 1"

x=0
while [ $x -lt 5 ]
do
 echo "x: $x"
 let x++

y=0
while [ $y -lt 5 ]
do
 echo "y: $y"
 let y++
done

# more code here
# more code here

echo "End of script1"
exit 0
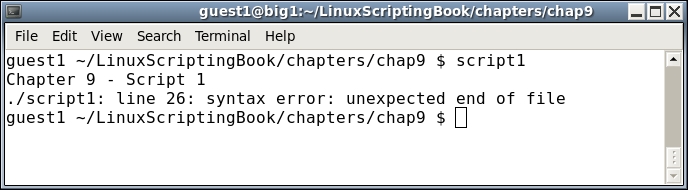
Look at this real closely, it says the error is at line 26. Wow, how can that be, when the file has only has 25 lines in it? The simple answer is that's just the way the Bash interpreter handles this type of situation. If you have not already found the bug it's actually at line 12. This is where the done statement should have been and by omitting it I intentionally caused the error. Now imagine if this had been a really long script. Depending on the circumstances it could take a long time to find the line that caused the problem.
Now take a look at Script 2, which is just Script 1 with some additional echo statements:
#!/bin/sh
#
# 6/7/2017
#
echo "Chapter 9 - Script 2"

echo "Start of x loop"
x=0
while [ $x -lt 5 ]
do
 echo "x: $x"
 let x++

echo "Start of y loop"
y=0
while [ $y -lt 5 ]
do
 echo "y: $y"
 let y++
done

# more code here
# more code here

echo "End of script2"
exit 0
Here is the output:
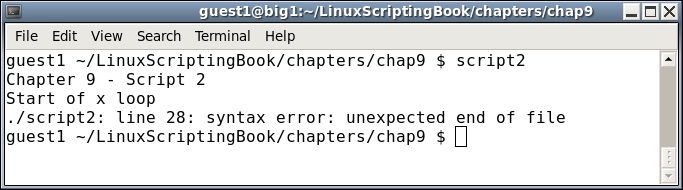
You can see that the echo statement Start of x loop was displayed. However, the second one, Start of y loop was not displayed. This gives you a good idea that the error is somewhere before the 2nd echo statement. In this case it is right before, but don't expect to be that lucky every time.
Now for a bit of free programming advice, making automatic backups of files was mentioned in Chapter 4, Creating and Calling Subroutines. I strongly suggest you use something like this when you are writing anything that is even slightly complicated. There is nothing more frustrating than to be working on your program or script and have it going pretty well, only to make a few changes and have it fail in some bizarre fashion. You had it working a few minutes ago and then wham! It has a fault and you can't figure out what change caused it. If you don't have a numbered backup you could literally spend hours (maybe days) trying to find the bug. I have seen people spend hours backing out every change until the problem was found. Yes, I have done it too.
Obviously if you have a numbered backup you can simply go back and find the latest one that doesn't have the fault. You can then diff the two versions and probably find the error really fast. Without a numbered backup, well you are on your own. Don't do what I did and wait 2 years or more before realizing all of this.
A fundamental problem with shell scripts is syntax errors don't usually show up until the line with the problem is parsed by the interpreter. Here's a common error that I still find myself doing more than I should. See if you can locate the problem by just reading the script:
#!/bin/sh
#
# 6/7/2017
#
echo "Chapter 9 - Script 3"

if [ $# -ne 1 ] ; then
 echo "Usage: script3 parameter"
 exit 255
fi

parm=$1
echo "parm: $parm"

if [ "$parm" = "home" ] ; then
 echo "parm is home."
elif if [ "$parm" = "cls" ] ; then
 echo "parm is cls."
elif [ "$parm" = "end" ] ; then
 echo "parm is end."
else
 echo "Unknown parameter: $parm"
fi

echo "End of script3"
exit 0
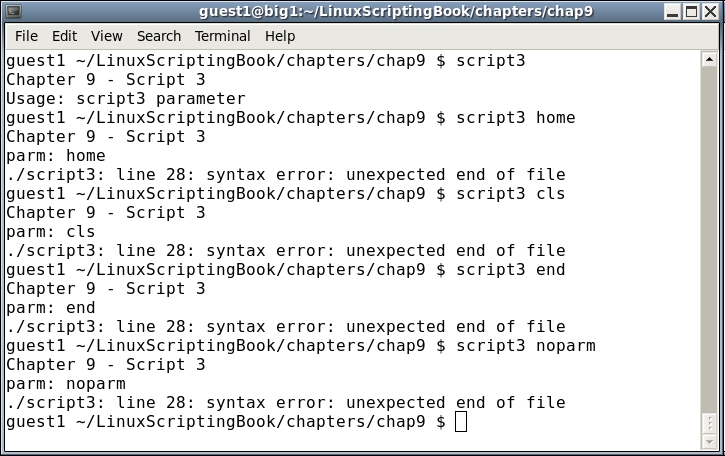
Did you find my mistake? When I code an if...elif...else statement, I tend to copy and paste the first if statement. I then prepend elif to the next statement but forget to remove the if. This gets me almost every time.
Look at how I ran this script. I started first with just the name of the script to invoke the Usage clause. You may find it interesting that the syntax error was not reported by the interpreter. That's because it never got down to that line. This can be a real problem with scripts, as it may run for days, weeks, or even years before running a part of code that has a syntax error in it and then failing. Keep this in mind when writing and testing your scripts.
Here is another quick example of a classic syntax error (classic in the sense that I just now made it again):
for i in *.txt
 echo "i: $i"
done
When run it outputs this:
./script-bad: line 8: syntax error near unexpected token `echo'
./script-bad: line 8: ` echo "i: $i"'
Can you find my mistake? If not look again. I forgot the do statement after the for statement. Bad Jim!
One of the easiest things to do wrong in a script is to forget the $ in front of a variable. This is particularly so if you code in other languages such as C or Java, because you don't prepend a $ to variables in those languages. The only real advice I can give here is if your script just doesn't seem to be doing anything right check all of your variables for the $. But be careful you don't go too far and start adding them where they don't belong!
Now let's talk about logic errors. These can be very hard to diagnose, and unfortunately I don't have any magical ways to avoid those. There are some things that can be pointed out however to help track them down.
A common problem with coding is what is called off by 1 errors. This was caused when computer language designers in the sixties decided to number things starting at 0 instead of 1. Computers will happily start counting anywhere you want them to and never complain at all, but most humans tend to do better when they start counting at 1. Most of my peers would probably disagree with this, but since I was the one who always had to fix their off by 1 defects I stand by my comments.
Let's look at the following very simple script:
#!/bin/sh
#
# 6/7/2017
#
echo "Chapter 9 - Script 4"

x=0
while [ $x -lt 5 ]
do
 echo "x: $x"
 let x++
done

echo "x after loop: $x"
let maxx=x

y=1
while [ $y -le 5 ]
do
 echo "y: $y"
 let y++
done

echo "y after loop: $y"
let maxy=y-1                 # must subtract 1

echo "Max. number of x: $maxx"
echo "Max. number of y: $maxy"

echo "End of script4"
exit 0
And the output:
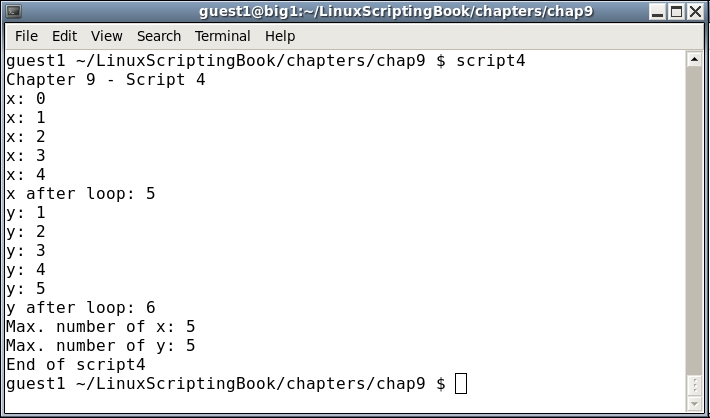
Look at the subtle differences between the two loops:
x loop the counting was started at 0.x was incremented while it was less than 5.x after the loop was 5.maxx, which is supposed to equal the number of iterations, is set to x.1.y was incremented while it was less than or equal to 5.y after the loop was 6.maxy, which is supposed to equal the number of iterations, is set to y-1.If you already understand the above perfectly you will probably never have a problem with 1 off errors and that's great.
For the rest of us I suggest looking over this very carefully until you get it just right.
You can use the set commands to help with debugging your scripts. There are two common options to set, x and v. Here is a description of each.
Note that a - activates the set while a + deactivates it. If that sounds backwards to you it is because it is backwards.
Use:
set -x: to display the expanded trace before running the commandset -v: to display the input line as it is parsedTake a look at Script 5 which shows what set -x does:
#!/bin/sh
#
# 6/7/2017
#
set -x                       # turn debugging on

echo "Chapter 9 - Script 5"

x=0
while [ $x -lt 5 ]
do
 echo "x: $x"
 let x++
done

echo "End of script5"
exit 0
And the output:
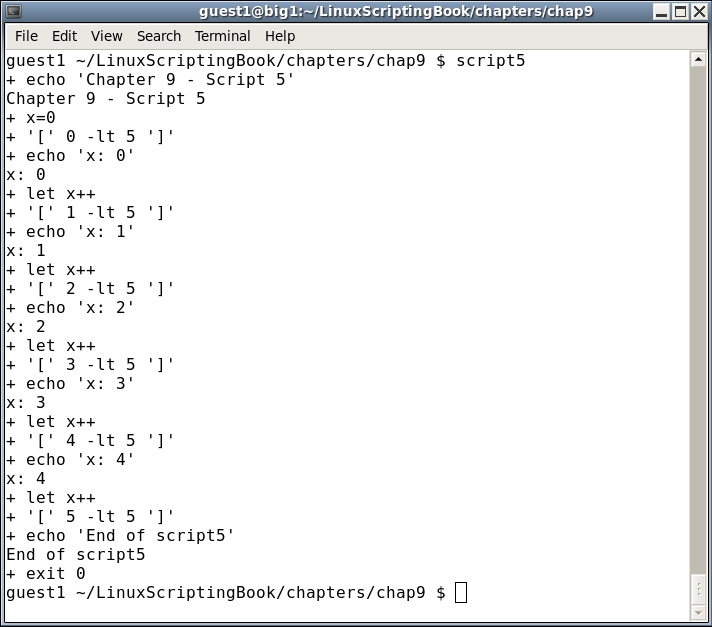
If this looks a little strange at first don't worry, it gets easier the more you look at it. In essence, the lines that start with a + are the expanded source code lines, and the lines without a + are the output of the script.
Look at the first two lines. It shows:
 + echo 'Chapter 9 - Script 5'
 Chapter 9 - Script 5
The first line shows the expanded command and the second the output.
You can also use the set -v option. Here is a screenshot of Script 6 which is just Script 5 but with set -v this time:
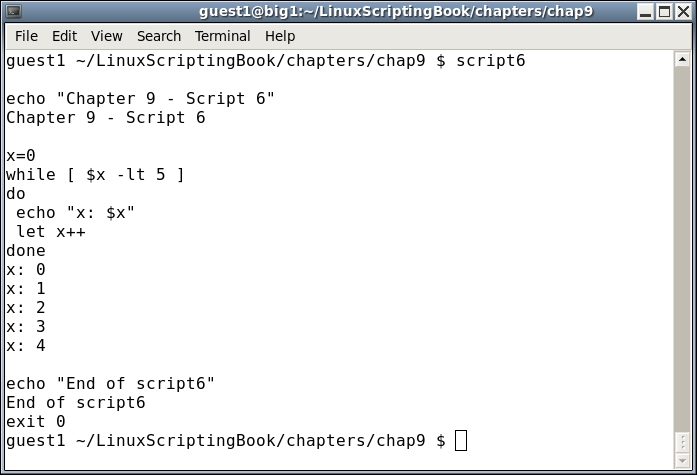
You can see the output is quite a bit different.
Note that with the set commands you can turn them on and off at any point you want in the script. This is so you can limit the output to just the areas of the code you are interested in.
Let's look at an example of this:
#!/bin/sh
#
# 6/8/2017
#
set +x                       # turn debugging off

echo "Chapter 9 - Script 7"

x=0
for fn in *.txt
do
 echo "x: $x - fn: $fn"
 array[$x]="$fn"
 let x++
done

maxx=$x
echo "Number of files: $maxx"

set -x                       # turn debugging on

x=0
while [ $x -lt $maxx ]
do
  echo "File: ${array[$x]}"
  let x++
done

set +x                       # turn debugging off

echo "End of script7"
exit 0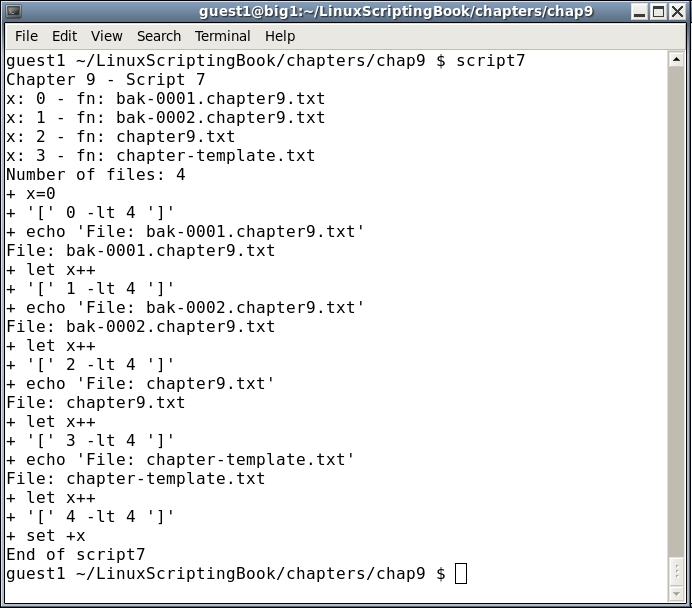
Notice how the debugging was explicitly turned off at the beginning of the script even though it is off by default. This is a good way to keep track of when it is off and when it is on. Look at the output closely and see how the debug statements don't start displaying until the second loop with the array. Then it is turned off before running the last two lines.
The output when using the set commands can be pretty hard to look at sometimes and so this is a good way to limit what you have to wade through to get to the lines of interest.
There is another debugging technique that I use quite frequently. In many cases I think it is superior to using the set commands as the display does not get quite as cluttered. You may recall in Chapter 6, Automating Tasks with Scripts, that we were able to display output to other terminals. This is a very handy feature.
The following script shows how to display output in another terminal. A subroutine is used for convenience:
#!/bin/sh
#
# 6/8/2017
#
echo "Chapter 9 - Script 8"
TTY=/dev/pts/35              # TTY of other terminal

# Subroutines
p1()                         # display to TTY
{
 rc1=0                       # default is no error
 if [ $# -ne 1 ] ; then
  rc1=2                      # missing parameter
 else
  echo "$1" > $TTY
  rc1=$?                     # set error status of echo command
 fi

 return $rc1
}

# Code
p1                           # missing parameter
echo $?

p1 Hello
echo $?

p1 "Linux Rules!"
echo $?

p1 "Programming is fun!"
echo $?

echo "End of script8"
exit 0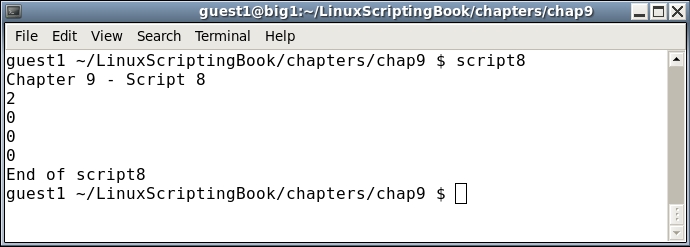
Remember to quote the parameter to p1 in case it contains blank characters.
This subroutine might be a bit of overkill to use for debugging but it captures many of the concepts previously discussed in this book. This approach can also be used in a script to display information in multiple terminals. We will go over that in the next chapter.
It probably means the terminal has not been opened yet. Also remember to put your terminal device strings into a variable because those tend to change after a reboot. Something like TTY=/dev/pts/35 is a good idea.
A great time to use this debugging technique is when writing a form script as we did in Chapter 5, Creating Interactive Scripts. So, let's take a look at that script again and put this new subroutine to use.
#!/bin/sh
# 6/8/2017
# Chapter 9 - Script 9
#
TTY=/dev/pts/35              # debug terminal

# Subroutines
cls()
{
 tput clear
}

move()                       # move cursor to row, col
{
 tput cup $1 $2
}

movestr()                    # move cursor to row, col
{
 tput cup $1 $2
 echo -n "$3"                # display string
}

checktermsize()
{
 p1 "Entering routine checktermsize."

 rc1=0                       # default is no error
 if [[ $LINES -lt $1 || $COLUMNS -lt $2 ]] ; then
  rc1=1                      # set return code
 fi
 return $rc1
}

init()                       # set up the cursor position array
{
 p1 "Entering routine init."

 srow[0]=2;  scol[0]=7       # name
 srow[1]=4;  scol[1]=12      # address 1
 srow[2]=6;  scol[2]=12      # address 2
 srow[3]=8;  scol[3]=7       # city
 srow[4]=8;  scol[4]=37      # state
 srow[5]=8;  scol[5]=52      # zip code
 srow[6]=10; scol[6]=8       # email
}

drawscreen()                 # main screen draw routine
{
 p1 "Entering routine drawscreen."

 cls                         # clear the screen
 movestr 0 25 "Chapter 9 - Script 9"
 movestr 2 1 "Name:"
 movestr 4 1 "Address 1:"
 movestr 6 1 "Address 2:"
 movestr 8 1 "City:"
 movestr 8 30 "State:"
 movestr 8 42 "Zip code:"
 movestr 10 1 "Email:"
}

getdata()
{
 p1 "Entering routine getdata."

 x=0                         # array subscript
 rc1=0                       # loop control variable
 while [ $rc1 -eq 0 ]
 do
  row=${srow[x]}; col=${scol[x]}

  p1 "row: $row  col: $col"

  move $row $col
  read array[x]
  let x++
  if [ $x -eq $sizeofarray ] ; then
   rc1=1
  fi
 done
 return 0
}

showdata()
{
 p1 "Entering routine showdata."

 fn=0
 echo ""
 read -p "Enter filename, or just Enter to skip: " filename
 if [ -n "$filename" ] ; then       # if not blank
  echo "Writing to '$filename'"
  fn=1                       # a filename was given
 fi
 echo ""                     # skip 1 line
 echo "Data array contents: "
 y=0
 while [ $y -lt $sizeofarray ]
 do
  echo "$y - ${array[$y]}"
  if [ $fn -eq 1 ] ; then
   echo "$y - ${array[$y]}" >> "$filename"
  fi
  let y++
 done
 return 0
}

p1()                         # display to TTY
{
 rc1=0                       # default is no error
 if [ $# -ne 1 ] ; then
  rc1=2                      # missing parameter
 else
  echo "$1" > $TTY
  rc1=$?                     # set error status of echo command
 fi

 return $rc1
}

# Code starts here

p1 " "                       # carriage return
p1 "Starting debug of script9"

sizeofarray=7                # number of array elements

if [ "$1" = "--help" ] ; then
 p1 "In Usage clause."

 echo "Usage: script9 --help"
 echo " This script shows how to create an interactive screen program"
 echo " and how to use another terminal for debugging."
 exit 255
fi

checktermsize 25 80
rc=$?
if [ $rc -ne 0 ] ; then
 echo "Please size the terminal to 25x80 and try again."
 exit 1
fi

init                         # initialize the screen array
drawscreen                   # draw the screen
getdata                      # cursor movement and data input routine
showdata                     # display the data

p1 "At exit."
exit 0
Here is the output from the debug terminal (dev/pts/35):
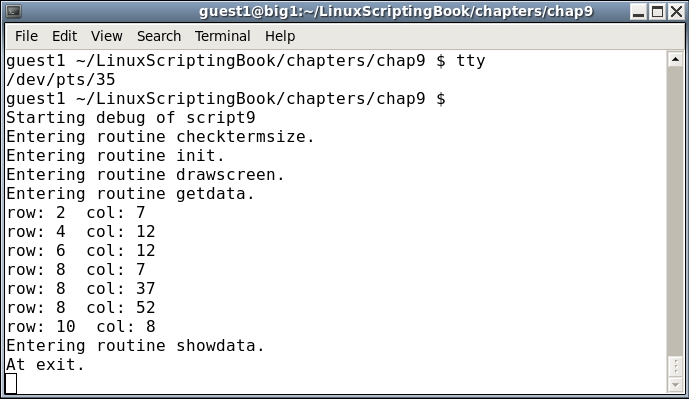
By having the debug information display in another terminal it is much easier to see what is happening in the code.
You can put the p1 routine where ever you think the problem might be. Labeling which subroutine is being used can also help locate if the problem is in a subroutine or in the main code body.
When your script is completed and ready for use, you don't have to remove the calls to the p1 routine unless you really want to. You can just code a return 0 at the top of the routine.
I use this approach when debugging shell scripts or C programs and it has always worked very well for me.
In this chapter we explained how to prevent some common syntax and logic errors. The shell debugging commands set -x and set -v were also described. Using redirection to send the output from a script to another terminal was also shown as a way to debug in real time.
In the next chapter we will talk about scripting best practices. This includes making careful backups of your work and selecting a good text editor. A way to help you be more productive using the command line by using environment variables and aliases will also be discussed.
This chapter explains some practices and techniques that will help the reader become a better and more efficient programmer.
In this chapter we will talk about what I consider to be scripting (or programming) best practices. Having programmed computers since 1977 I have attained quite a bit of experience in this field. I take great pleasure in teaching people about computers and hopefully my ideas will be of some benefit.
The topics covered are as follows:
I have already spoken about backups at least twice in this book and this will be the last time I promise. Create your backup scripts and make sure they run when they are supposed to. But one thing I have not talked about yet is verification of the backups. You might have 10 teraquads of backups lying around somewhere, but do they actually work? When was the last time you checked?
When using the tar command it will report at the end of the run if it encountered any issues making the archive. In general if it doesn't show anything amiss the backup is probably good. Using tar with the -t (tell) option, or actually extracting it on the local or remote machine, is also a good way to determine if the archive was made successfully.
Here is a rather obvious example:
guest1 /home # tar cvzf guest1.gz guest1/ | tee /home/guest1/temp/mainlogs`date '+%Y%m%d'`.gz
The tar command might not consider this an error but will usually report it so be sure to check for this.
Another common backup mistake is to not copy the file to another computer or external device. If you are good at making backups but they are all on the same machine eventually the hard drive and/or controller is going to fail. You may be able to recover the data but why take the risk? Copy your files to at least one external drive and/or computer and be safe.
There is one last thing about backups I will mention. Make sure you have a backup sent to an off-site location, preferably in another city, state, continent, or planet. You really can't be too careful with your valuable data.
Using scp to a remote computer is a really good idea too and my backup program does that every night as well. Here is how to set up unattended ssh/scp. In this case, the root account on machine 1 (M1) will be able to scp files to the guest1 account on machine 2 (M2). I do it this way because I always disable root access of ssh/scp for security reasons on all my machines.
ssh has been run at least once on each machine. This will set up some needed directories and files.root, run the ssh-keygen -t rsa command. This will create the file id_rsa.pub in the /root/.ssh directory.scp to copy that file to M2 to the /tmp directory (or some other suitable location).home/guest1/.ssh directory.authorized_keys file edit it, otherwise create it./tmp/id_rsa.pub file into the authorized_keys file and save it.Test this by using scp to copy a file from M1 to M2. It should work without prompting for a password. If there are any problems remember that this has to be set up for each user that wants to perform unattended ssh/scp.
If you have an Internet service provider (ISP) that provides SSH with your account this method should work on there as well. I use it all the time and it is really convenient. Using this approach you can have a script generate an HTML file and then copy it right to your website. Dynamic generation of HTML pages is something programs are really good at.
If you only occasionally write scripts or programs then vi is probably good enough for you. However, if you get into some real in depth programming, be it in Bash, C, Java, or some other language you should very definitely check out some of the other text editors that are available on Linux. You will almost certainly become more productive.
As I mentioned before, I have been working with computers for a really long time. I started out using an editor on DOS called Edlin and it was pretty weak (but still better than punch cards). I eventually moved on and started using vi on AIX (IBM's version of UNIX). I got pretty good at using vi since we didn't have any other options yet. As time went on other choices became available and I started using the IBM Personal Editors. These were really easy to use, more efficient than vi, and had many more features. As I did more and more programming, I found that none of these editors could do everything I wanted and so I wrote my own in the C programming language. This was a long time ago under DOS, however, my editor has now been modified to run on Xenix, OS/2, AIX, Solaris, UNIX, FreeBSD, NetBSD, and of course Linux. It also works well on Windows under the Cygwin environment.
Any text editor should have the standard features such as copy, paste, move, insert, delete, split, join, find/replace, and so on. These should be easy to use and require not more than two keystrokes. The save command should only need one keystroke.
In addition, a good editor will also have one, more, or all of the following:
Well, maybe I haven't quite figured out that last one yet. There are of course many, many more features that could be listed but I feel those are some of the most important.
Here's a screenshot of my editor showing an example of how the ring command might look:

Many more features could be shown but that should be enough to get the point across. I will mention that vi is a fine editor and is used with success by probably the majority of UNIX/Linux people. However, in my experience if a lot of programming is being done the use of a different editor with more features will save you a lot of time. It's also quite a bit easier, and that makes the process even more fun.
Environment variables were covered in Chapter2, Working with Variables. Here is a cool trick that I learned years ago that can really help when using the command line. Most Linux systems generally have several standard directories under $HOME such as Desktop, Downloads, Music, Pictures, and so on. I personally do not like typing the same things over and over again and so do this to help use the system more efficiently. Here are some of the lines that I have added to my /home/guest1/.bashrc file:
export BIN=$HOME/bin
alias bin="cd $BIN"

export DOWN=$HOME/Downloads
alias down="cd $DOWN"

export DESK=$HOME/Desktop
alias desk="cd $DESK"

export MUSIC=$HOME/Music
alias music="cd $MUSIC"

export PICTURES=$HOME/Pictures
alias pictures="cd $PICTURES"

export BOOKMARKS=$HOME/Bookmarks
alias bookmarks="cd $BOOKMARKS"

# Packt- Linux Scripting Bootcamp
export LB=$HOME/LinuxScriptingBook
alias lb="cd $LB"

# Source lbcur
. $LB/source.lbcur.txt
Using this approach you can cd to any of the above directories by just typing the lowercase alias. What's even better is you can also copy or move files to or from the directory by using the uppercase exported environment variable. Check out the following screenshot:
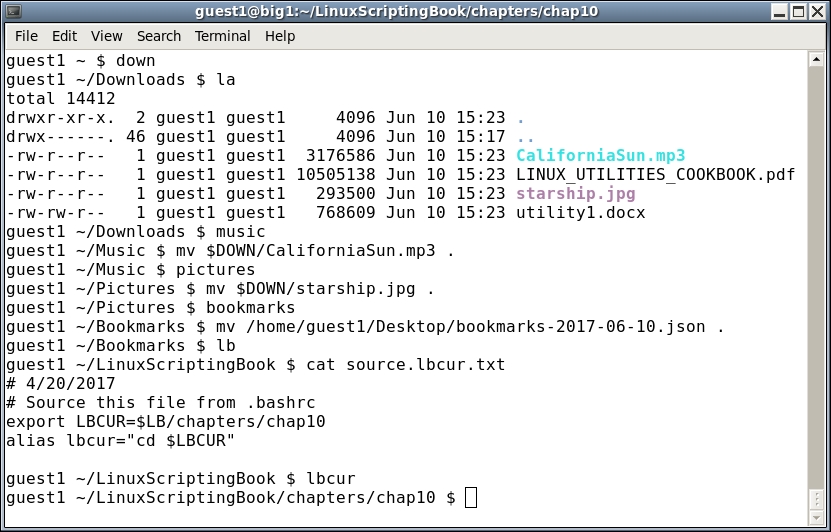
It took me several years to start doing this and I am still kicking myself for not discovering it sooner. Remember to make the alias lowercase and the env var uppercase and you should be good to go.
Notice the command I ran in the Bookmarks directory. I actually typed mv $DESK/ and then hit the Tab key. This caused the line to auto-complete and then I added the dot . character and pressed Enter.
Remember to use command auto-completion any time you can, it's a great time saver.
The line . $LB/source.lbcur.txt needs to be explained. You can see I have an lbcur alias which puts me into the directory where I am currently working on this book. Since I use both my root and guest1 accounts to write a book, I can change the chapter number in just the source.lbcur.txt file. I then source the .bashrc files for root and guest1 and I'm done. Otherwise, I would have to make the change in each .bashrc file. With just two files maybe it wouldn't be that bad, but suppose you had several users? I use this technique quite a bit on my systems as I am a very lazy typist.
Remember: When using aliases and environment variables you need to source the users's .bashrc file before any changes will be picked up in the terminal.
When I run a Linux system I tend to have at least 30 terminal windows open. Some of these are logged into the other machines in my house. As of this writing I am logged into laptop1, laptop4, and gabi1 (my girlfriend's laptop running Fedora 20). I found a while back that if the prompt were different on these terminals it was harder for me to get mixed up and type the right command but on the wrong computer. Needless to say that could be a disaster. For a while I would change the prompt manually but that got old very quickly. One day I found almost by accident a really cool solution to this problem. I have used this technique on Red Hat Enterprise Linux, Fedora, and CentOS and so it should work on your system as well (with maybe a little bit of tweaking).
These lines are in the $HOME/.bashrc file on all my systems:
# Modified 1/17/2014
set | grep XAUTHORITY
rc=$?
if [ $rc -eq 0 ] ; then
 PS1="\h \w # "
else
 PS1="\h \h \h \h \w # "
fi
So what this does is use the set command to grep for the string XAUTHORITY. That string is only in the environment on the local machine. So when you open a terminal locally on big1 it uses the normal prompt. However, if you ssh to another system the string is not there and so it uses the long expanded prompt.
Here is a screenshot of my system showing how this looks:
Here is something that I ran into on several of my computer jobs. I would be asked by my manager to take over a project from a fellow worker. He would zip or tar up the files and then give me the archive. I would uncompress it on my system and try to begin the work. But there was always a file missing. It would often take two, three, or more attempts before I would finally have every file needed to compile the project. So, the moral to this story is when making an archive to give to someone else make absolutely sure to copy it to another machine and test it there. Only then can you be reasonably sure that you have included every file.
Here is another cursor movement script that also calculates the low and high of the $RANDOM Bash variable. It might not look all that cool to everyone but it does show some more of the concepts we have covered in this book. I was also somewhat curious as to what the range of that random number generator was.
#!/bin/sh
#
# 6/11/2017
# Chapter 10 - Script 1
#

# Subroutines
trap catchCtrlC INT          # Initialize the trap

# Subroutines
catchCtrlC()
{
 loop=0                      # end the loop
}

cls()
{
 tput clear
}

movestr()                    # move cursor to row, col, display string
{
 tput cup $1 $2
 echo -n "$3"
}

# Code
if [ "$1" = "--help" ] ; then
 echo "Usage: script1 or script1 --help "
 echo " Shows the low and high count of the Bash RANDOM variable."
 echo " Press Ctrl-C to end."
 exit 255
fi

sym[0]='|'
sym[1]='/'
sym[2]='-'
sym[3]='\'

low=99999999
high=-1

cls
echo "Chapter 10 - Script 1"
echo "Calculating RANDOM low and high ..."
loop=1
count=0
x=0
while [ $loop -eq 1 ]
do
 r=$RANDOM
 if [ $r -lt $low ] ; then
  low=$r
 elif [ $r -gt $high ] ; then
  high=$r
 fi

# Activity indicator
 movestr 2 1 "${sym[x]}"     # row 2 col 1
 let x++
 if [ $x -gt 3 ] ; then
  x=0
 fi

 let count++
done

echo " "                     # carriage return
echo "Number of loops: $count"
echo "low: $low  high: $high"

echo "End of script1"
exit 0
Since you are reading this book it can be assumed that you are going to be writing a good number of scripts. Here is another handy trick I learned over the years. When I need to create a new script, instead of doing it from scratch I use this simple command:
#!/bin/sh
#
# 1/26/2014
#
# create a command script

if [ $# -eq 0 ] ; then
 echo "Usage: mkcmd command"
 echo " Copies mkcmd.template to command and edits it with kw"
 exit 255
fi

if [ -f $1 ] ; then
  echo File already exists!
  exit 2
fi

cp $BIN/mkcmd.template $1
kw $1
exit 0


And here is the contents of the $BIN/mkcmd.template file:
#!/bin/sh
#
# Date
#
if [ $# -eq 0 ] ; then
 echo "Usage:                "
 echo "                      "
 exit 255
fi
Be sure that after you create the mkcmd.template file that you run chmod 755 on it. That way you do not have to remember to do it every time on your new commands. In fact, that was the main reason I wrote this script.
Feel free to modify this however you want, and of course change kw to vi or whatever editor you are using.
It's nice to have your computer beep when an important task has completed and you want to know about it right away. Here's a script I use to beep the internal speaker on my computer:
#!/bin/sh
#
# 5/3/2017
#
# beep the PC speaker

lsmod | grep pcspkr > /dev/null
rc=$?
if [ $rc -ne 0 ] ; then
 echo "Please modprobe pcspkr and try again."
 exit 255
fi

echo -e '\a' > /dev/console
This command will beep the PC speaker if it has one and if the driver has been loaded. Note that this command will probably only work on your system when run as the root user.
In this last chapter, I showed some of the programming best practices I have learned. The features of a good text editor were talked about, and a $RANDOM testing script was included. I also presented some of the scripts I have written over the years to make my systems more efficient and easier to use.
Copyright © 2017 Packt Publishing
All rights reserved. No part of this book may be reproduced, stored in a retrieval system, or transmitted in any form or by any means, without the prior written permission of the publisher, except in the case of brief quotations embedded in critical articles or reviews.
Every effort has been made in the preparation of this book to ensure the accuracy of the information presented. However, the information contained in this book is sold without warranty, either express or implied. Neither the author, nor Packt Publishing, and its dealers and distributors will be held liable for any damages caused or alleged to be caused directly or indirectly by this book.
Packt Publishing has endeavored to provide trademark information about all of the companies and products mentioned in this book by the appropriate use of capitals. However, Packt Publishing cannot guarantee the accuracy of this information.
First published: July 2017
Production reference: 1170717
Published by Packt Publishing Ltd.
Livery Place
35 Livery Street
Birmingham B3 2PB, UK.
ISBN 978-1-78728-110-3
Author
James Kent Lewis
Reviewer
Thushara Jayawardena
Commissioning Editor
Pratik Shah
Acquisition Editor
Namrata Patil
Content Development Editor
Amrita Noronha
Technical Editor
Jovita Alva
Copy Editor
SAFIS
Laxmi Subramanian
Project Coordinator
Shweta H Birwatkar
Proofreader
SAFIS
Laxmi Subramanian
Indexer
Pratik Shirodkar
Graphics
Tania Dutta
Production Coordinator
Arvindkumar Gupta
Cover Work
Arvindkumar Gupta
James Kent Lewis has been in the computer industry for over 35 years. He started out writing basic programs in high school and used punch cards in college for his Pascal, Fortran, COBOL, and assembly language classes. Jim taught himself the C programming language by writing various utilities, including a fully-functional text editor, which he uses everyday.
He started out using DOS and AIX, and then OS/2. Linux is now his operating system of choice.
Jim has worked in the past for several companies, including IBM, Texas Instruments, Tandem, Raytheon, Hewlett-Packard, and others. Most of these positions dealt with low-level device drivers and operating system internals. In his spare time he likes to create video games in Java.
Jim has written articles for IBM Developer Works and has one patent. He has worked on Linux Utilities Cookbook with Packt Publishing.
First, I would like to thank Red Hat and CentOS for creating a great operating system. I used CentOS 6.8 exclusively in the writing of this book and it worked flawlessly. I would also like to thank my brother, David, for letting me bounce ideas off of him. Last, but certainly not least, I would like to thank my girlfriend, Gabriele. Her patience was greatly appreciated, and she also helped by letting me log into her Fedora laptop from time to time.
Thushara Jayawardena is a very strong asset in software development as well as in the software service industry with more than 15 years of experience in systems administrating. That experience has contributed to this book. The main responsibility of the current day job is performance engineering for a leading European ERP software provider. It translates to system configuration and installations, followed by end-to-end automated performance testing. Scripting is an integral part of all these components.
His spare time is spent partly developing a user guide for tourist attractions for Android and IOS devices. The cloud backend for the solution comprises Mongo Cloud DB services and Heroku app dynos, run on Nodejs. Thushara also spends time with systems on chip devices such as Raspberry Pi and Arduino-like boards. Here, the focus is on IOT-type solutions.
Thushara is a loving father and husband who values his family very much and makes sure homebrewing doesn't come between him and family. He's been living nomadic since 2007, or rather migrated to Sweden with his family and moved around a bit in Sweden, and currently is living south of the beautiful port city of Gothenburg. He enjoys Scandinavian life, simplicity, and respect very much and is keen on improving his skiing skills during the winters up in the Swedish mountains. He has also worked on Raspberry Pi Android Projects.
Did you know that Packt offers eBook versions of every book published, with PDF and ePub files available? You can upgrade to the eBook version at www.PacktPub.com and as a print book customer, you are entitled to a discount on the eBook copy. Get in touch with us at <customercare@packtpub.com> for more details.
At www.PacktPub.com, you can also read a collection of free technical articles, sign up for a range of free newsletters and receive exclusive discounts and offers on Packt books and eBooks.
Get the most in-demand software skills with Mapt. Mapt gives you full access to all Packt books and video courses, as well as industry-leading tools to help you plan your personal development and advance your career.
Thanks for purchasing this Packt book. At Packt, quality is at the heart of our editorial process. To help us improve, please leave us an honest review on this book's Amazon page at www.amazon.com/dp/1787281108.
If you'd like to join our team of regular reviewers, you can e-mail us at customerreviews@packtpub.com. We award our regular reviewers with free eBooks and videos in exchange for their valuable feedback. Help us be relentless in improving our products!
In Linux Shell Scripting Bootcamp, you will begin by learning the essentials of script creation. You will learn how to validate parameters and also how to check for the existence of files. Moving on, you will get well-versed with how variables work on a Linux system and how they relate to scripts. You'll also learn how to create and call subroutines and create interactive scripts. Finally, you will learn how to debug scripts and scripting best practices, which will enable you to write a great code every time! By the end of the book you will be able to write shell scripts that can dig data from the Web and process it efficiently.
Chapter 1, Getting Started with Shell Scripting, begins with the basics of script design. How to make a script executable is shown as is creating an informative Usage message. The importance of return codes is also covered with the use and validation of parameters.
Chapter 2, Working with Variables, discusses how to declare and use both environment and local variables. We also speak about how math is performed and how to work with arrays.
Chapter 3, Using Loops and the sleep Command, introduces the use of loops to perform iterative operations. It also shows how to create a delay in a script. The reader will also learn how to use loops and the sleep command in a script.
Chapter 4, Creating and Calling Subroutines, starts with some very simple scripts and then proceeds to cover some simple subroutines that take parameters.
Chapter 5, Creating Interactive Scripts, explains the use of the read built-in command to query the keyboard. Further, we explore some of the different options to read and also cover the use of traps.
Chapter 6, Automating Tasks with Scripts, describes the creation of scripts to automate a task. The proper way to use cron to run a script automatically at a specific time is covered. The archive commands zip and tar are also discussed for performing compressed backups.
Chapter 7, Working with Files, introduces the use of the redirection operator for writing out a file and use of read command for reading a file. Checksums and file encryption are also discussed, and a way to convert the contents of a file into a variable is also covered.
Chapter 8, Working with wget and curl, discusses the usage of wget and curl in scripts. Along with this, return codes are also discussed with a couple of example scripts.
Chapter 9, Debugging Scripts, explains some techniques to prevent common syntax and logic errors. A way to send output from a script to another terminal using the redirection operator was also discussed.
Chapter 10, Scripting Best Practices, discusses some practices and techniques that will help the reader create good code every time.
In this book, you will find a number of text styles that distinguish between different kinds of information. Here are some examples of these styles and an explanation of their meaning.
Code words in text, database table names, folder names, filenames, file extensions, pathnames, dummy URLs, user input, and Twitter handles are shown as follows: You can see that the echo statement Start of x loop was displayed A block of code is set as follows:
echo "Start of x loop"
x=0
while [ $x -lt 5 ]
do
 echo "x: $x"
 let x++
Any command-line input or output is written as follows:
guest1 $ ps auxw | grep script7
New terms and important words are shown in bold. Words that you see on the screen, for example, in menus or dialog boxes, appear in the text like this: "Clicking the Next button moves you to the next screen."
Feedback from our readers is always welcome. Let us know what you think about this book—what you liked or disliked. Reader feedback is important for us as it helps us develop titles that you will really get the most out of.
To send us general feedback, simply e-mail <feedback@packtpub.com>, and mention the book's title in the subject of your message.
If there is a topic that you have expertise in and you are interested in either writing or contributing to a book, see our author guide at www.packtpub.com/authors.
Now that you are the proud owner of a Packt book, we have a number of things to help you to get the most from your purchase.
You can download the example code files for this book from your account at http://www.packtpub.com. If you purchased this book elsewhere, you can visit http://www.packtpub.com/support and register to have the files e-mailed directly to you.
You can download the code files by following these steps:
You can also download the code files by clicking on the Code Files button on the book's webpage at the Packt Publishing website. This page can be accessed by entering the book's name in the Search box. Please note that you need to be logged in to your Packt account.
Once the file is downloaded, please make sure that you unzip or extract the folder using the latest version of:
The code bundle for the book is also hosted on GitHub at https://github.com/PacktPublishing/Linux-Shell-Scripting-Bootcamp. We also have other code bundles from our rich catalog of books and videos available at https://github.com/PacktPublishing/. Check them out!
Although we have taken every care to ensure the accuracy of our content, mistakes do happen. If you find a mistake in one of our books—maybe a mistake in the text or the code—we would be grateful if you could report this to us. By doing so, you can save other readers from frustration and help us improve subsequent versions of this book. If you find any errata, please report them by visiting http://www.packtpub.com/submit-errata, selecting your book, clicking on the Errata Submission Form link, and entering the details of your errata. Once your errata are verified, your submission will be accepted and the errata will be uploaded to our website or added to any list of existing errata under the Errata section of that title.
To view the previously submitted errata, go to https://www.packtpub.com/books/content/support and enter the name of the book in the search field. The required information will appear under the Errata section.
Piracy of copyrighted material on the Internet is an ongoing problem across all media. At Packt, we take the protection of our copyright and licenses very seriously. If you come across any illegal copies of our works in any form on the Internet, please provide us with the location address or website name immediately so that we can pursue a remedy.
Please contact us at <copyright@packtpub.com> with a link to the suspected pirated material.
We appreciate your help in protecting our authors and our ability to bring you valuable content.
If you have a problem with any aspect of this book, you can contact us at <questions@packtpub.com>, and we will do our best to address the problem.
This chapter is a brief introduction to shell scripting. It will assume the reader is mostly familiar with script basics and will serve as a refresher.
The topics covered in this chapter are as follows:
You will always be able to create these scripts under a guest account, and most will run from there. It will be clearly stated when root access is needed to run a particular script.
The book will assume that the user has put a (.) at the beginning of the path for that account. If not, to run a script prepend ./ to the filename. For example:
$ ./runme
The scripts will be made executable using the chmod command.
It is suggested that the user create a directory under his guest account specifically for the examples in this book. For example, something like this works well:
$ /home/guest1/LinuxScriptingBook/chapters/chap1
Of course, feel free to use whatever works best for you.
Following the general format of a bash script the very first line will contain this and nothing else:
#!/bin/sh
Note that in every other case text following the # sign is treated as comments.
For example,
# This entire line is a comment
chmod 755 filename # This text after the # is a comment
Use comments however you deem appropriate. Some people comment every line, some don't comment anything. I try to strike a balance somewhere in the middle of those two extremes.
I have found that most people are comfortable using vi to create and edit text documents under a UNIX/Linux environment. This is fine as vi is a very dependable application. I would suggest not using any type of word processing program, even if it claims to have a code development option. These programs might still put invisible control characters in the file which will probably cause the script to fail. This can take hours or even days to figure out unless you are good at looking at binary files.
Also, in my opinion, if you plan to do a lot of script and/or code development I suggest looking at some other text editor other than vi. You will almost certainly become more productive.
Here is an example of a very simple script. It might not look like much but this is the basis for every script:
#!/bin/sh
#
#  03/27/2017
#
exit 0
Here is the same script with the lines numbered:
1  #!/bin/sh
2  #
3  # 03/27/2017
4  #
5  exit 0
6
Here is an explanation for each line:
/bin/sh is actually a symbolic link to the interpreter.# are comments. Also, anything after a # is also treated as a comment.Usage section (covered next).Using your favorite text editor, edit a new file named script1 and copy the preceding script without the line numbers into it. Save the file.
To make the file into an executable script run this:
$ chmod 755 script1
Now run the script:
$ script1
If you did not prepend a . to your path as mentioned in the introduction then run:
$ ./script1
Now check the return code:
$ echo $?
0
Here is a script that does something a little more useful:
#!/bin/sh
#
# 3/26/2017
#
ping -c 1 google.com        # ping google.com just 1 time
echo Return code: $?
The ping command returns a zero on success and non-zero on failure. As you can see, echoing $? shows the return value of the command preceding it. More on this later.
  1  #!/bin/sh
  2  #
  3  # 6/13/2017
  4  #
  5  if [ $# -ne 1 ] ; then
  6   echo "Usage: script3 file"
  7   echo " Will determine if the file exists."
  8   exit 255
  9  fi
 10
 11  if [ -f $1 ] ; then
 12   echo File $1 exists.
 13   exit 0
 14  else
 15   echo File $1 does not exist.
 16   exit 1
 17  fi
 18
Here is an explanation for each line:
5 checks to see if a parameter was given. If not, lines 6 through 9 are executed. Note that is it usually a good idea to include an informative Usage statement in your script. It is also good to provide a meaningful return code.11 checks to see if the file exists and if so lines 12-13 are executed. Otherwise lines 14-17 are run.1 #!/bin/sh 2 # 3 # 6/13/2017 4 # 5 if [ $# -ne 1 ] ; then 6 echo "Usage: script4 filename" 7 echo " Will show various attributes of the file given." 8 exit 255 9 fi 10 11 echo -n "$1 " # Stay on the line 12 13 if [ ! -e $1 ] ; then 14 echo does not exist. 15 exit 1 # Leave script now 16 fi 17 18 if [ -f $1 ] ; then 19 echo is a file. 20 elif [ -d $1 ] ; then 21 echo is a directory. 22 fi 23 24 if [ -x $1 ] ; then 25 echo Is executable. 26 fi 27 28 if [ -r $1 ] ; then 29 echo Is readable. 30 else 31 echo Is not readable. 32 fi 33 34 if [ -w $1 ] ; then 35 echo Is writable. 36 fi 37 38 if [ -s $1 ] ; then 39 echo Is not empty. 40 else 41 echo Is empty. 42 fi 43 44 exit 0 # No error 45
Here is an explanation for each line:
5-9: If the script is not run with a parameter display the Usage message and exit with a return code of 255.11 shows how to echo a string of text but still stay on the line (no linefeed).13 shows how to determine if the parameter given is an existing file.15 leaves the script as there is no reason to continue if the file doesn't exist.The meaning of the remaining lines can be determined by the script itself. Note that there are many other checks that can be performed on a file, these are just a few.
Here are some examples of running script4 on my system:
guest1 $ script4
Usage: script4 filename
 Will show various attributes of the file given.

guest1 $ script4 /tmp
/tmp is a directory.
Is executable.
Is readable.
Is writable.
Is not empty.

guest1 $ script4 script4.numbered
script4.numbered is a file.
Is readable.
Is not empty.

guest1 $ script4 /usr
/usr is a directory.
Is executable.
Is readable.
Is not empty.

guest1 $ script4 empty1
empty1 is a file.
Is readable.
Is writable.
Is empty.

guest1 $ script4 empty-noread
empty-noread is a file.
Is not readable.
Is empty.
This next script shows how to determine the number of parameters that were passed to it:
#!/bin/sh
#
# 3/27/2017
#
echo The number of parameters is: $#
exit 0
Let's try a few examples:
guest1 $ script5
The number of parameters is: 0

guest1 $ script5 parm1
The number of parameters is: 1

guest1 $ script5 parm1 Hello
The number of parameters is: 2

guest1 $ script5 parm1 Hello 15
The number of parameters is: 3

guest1 $ script5 parm1 Hello 15 "A string"
The number of parameters is: 4

guest1 $ script5 parm1 Hello 15 "A string" lastone
The number of parameters is: 5
This next script shows how to handle multiple parameters in more detail:
#!/bin/sh
#
# 3/27/2017
#

if [ $# -ne 3 ] ; then
 echo "Usage: script6 parm1 parm2 parm3"
 echo " Please enter 3 parameters."

 exit 255
fi

echo Parameter 1: $1
echo Parameter 2: $2
echo Parameter 3: $3

exit 0
The lines of this script were not numbered as it is rather simple. The $# contains the number of parameters that were passed to the script.
In this chapter we looked at the basics of script design. How to make a script executable was shown as was creating an informative Usage message. The importance of return codes was also covered as was the use and validation of parameters.
The next chapter will go into more detail about variables and conditional statements.
This chapter will show how variables are used in a Linux system and in scripts.
The topics covered in this chapter are:
A variable is simply a placeholder for some value. The value can change; however, the variable name will always be the same. Here is a simple example:
a=1
This assigns the value 1 to variable a. Here's another one:
b=2
To display what a variable contains use the echo statement:
echo Variable a is: $a
If at anytime, you aren't seeing the results you expect first check for the $.
Here's an example using the command line:
$ a=1
$ echo a
a
$ echo $a
1
$ b="Jim"
$ echo b
b
$ echo $b
Jim
All variables in a Bash script are considered to be strings. This is different than in a programming language such as C, where everything is strongly typed. In the preceding example, a and b are strings even though they appear to be integers.
Here's a short script to get us started:
#!/bin/sh
#
# 6/13/2017
#
echo "script1"

# Variables
a="1"
b=2
c="Jim"
d="Lewis"
e="Jim Lewis"
pi=3.141592

# Statements
echo $a
echo $b
echo $c
echo $d
echo $e
echo $pi
echo "End of script1"
And here is the output when run on my system:
Since all of the variables are strings I could have also done this:
a="1"
b="2"
It is important to quote strings when they contain blank spaces such as variables d and e here.
Variables can be tested and compared against other variables when using a variable as a number.
Here is a list of some of the operators that can be used:
|
Operator |
Description |
|---|---|
|
|
This stands for equal to |
|
|
This stands for not equal to |
|
|
This stands for greater than |
|
|
This stands for less than |
|
|
This stands for greater than or equal to |
|
|
This stands for less than or equal to |
|
|
This stands for the negation operator |
Let's take a look at this in our next example script:
#!/bin/sh
#
# 6/13/2017
#
echo "script2"

# Numeric variables
a=100
b=100
c=200
d=300

echo a=$a b=$b c=$c d=$d     # display the values

# Conditional tests
if [ $a -eq $b ] ; then
 echo a equals b
fi

if [ $a -ne $b ] ; then
 echo a does not equal b
fi

if [ $a -gt $c ] ; then
 echo a is greater than c
fi

if [ $a -lt $c ] ; then
 echo a is less than c
fi

if [ $a -ge $d ] ; then
 echo a is greater than or equal to d
fi

if [ $a -le $d ] ; then
 echo a is less than or equal to d
fi

echo Showing the negation operator:
if [ ! $a -eq $b ] ; then
 echo Clause 1
else
 echo Clause 2
fi
echo "End of script2"
To help understand this chapter run the script on your system. Try changing the values of the variables to see how it affects the output.
We saw the negation operator in Chapter 1, Getting Started with Shell Scripting when we were looking at files. As a reminder, it negates the expression. You could also say it does the opposite of what the original statement means.
Consider the following example:
a=1
b=1
if [ $a -eq $b ] ; then
  echo Clause 1
else
  echo Clause 2
fi
When this script is run it will display Clause 1. Now consider this:
a=1
b=1
if [ ! $a -eq $b ] ; then    # negation
  echo Clause 1
else
  echo Clause 2
fi
Because of the negation operator it will now display Clause 2. Try it on your system.
The comparison for strings are different than for numbers. Here is a partial list:
|
Operator |
Explanation |
|---|---|
|
|
This stands for equal to |
|
|
This stands for not equal to |
|
|
This stands for greater than |
|
|
This stands for less than |
Now let's take a look at Script 3:
  1  #!/bin/sh
  2  #
  3  # 6/13/2017
  4  #
  5  echo "script3"
  6
  7  # String variables
  8  str1="Kirk"
  9  str2="Kirk"
 10  str3="Spock"
 11  str3="Dr. McCoy"
 12  str4="Engineer Scott"
 13  str5="A"
 14  str6="B"
 15
 16  echo str1=$str1 str2=$str2 str3=$str3 str4=$str4
 17
 18  if [ "$str1" = "$str2" ] ; then
 19   echo str1 equals str2
 20  else
 21   echo str1 does not equal str2
 22  fi
 23
 24  if [ "$str1" != "$str2" ] ; then
 25   echo str1 does not equal str2
 26  else
 27   echo str1 equals str2
 28  fi
 29
 30  if [ "$str1" = "$str3" ] ; then
 31   echo str1 equals str3
 32  else
 33   echo str1 does not equal str3
 34  fi
 35
 36  if [ "$str3" = "$str4" ] ; then
 37   echo str3 equals str4
 38  else
 39   echo str3 does not equal str4
 40  fi
 41
 42  echo str5=$str5 str6=$str6
 43
 44  if [ "$str5" \> "$str6" ] ; then        # must escape the >
 45   echo str5 is greater than str6
 46  else
 47   echo str5 is not greater than str6
 48  fi
 49
 50  if [[ "$str5" > "$str6" ]] ; then       # or use double brackets
 51   echo str5 is greater than str6
 52  else
 53   echo str5 is not greater than str6
 54  fi
 55
 56  if [[ "$str5" < "$str6" ]] ; then       # double brackets
 57   echo str5 is less than str6
 58  else
 59   echo str5 is not less than str6
 60  fi
 61
 62  if [ -n "$str1" ] ; then     # test if str1 is not null
 63   echo str1 is not null
 64  fi
 65
 66  if [ -z "$str7" ] ; then     # test if str7 is null
 67   echo str7 is null
 68  fi
 69  echo "End of script3"
 70
Here's the output from my system:
Lets go through this line by line:
7-14 set up the variables16 displays their values18 checks for equality24 uses the not equal operator50 are self-explanatory44 needs some clarification. In order to avoid a syntax error the > and < operators must be escaped\ character50 shows how double brackets can be used to handle the greater than operator. As you can see in line 58 it works for the less than operator as well. My preference will be to use double brackets when needed.62 shows how to check to see if a string is not null.66 shows how to check to see if a string is null.Take a look at this script carefully to make sure it is clear to you. Also notice that str7 is shown to be null, but we didn't actually declare a str7. That is okay to do in a script, it will not generate an error. However, as a general rule of programming it is a good idea to declare all variables before they are used. Your code will be easier to understand and debug by you and others.
A scenario that comes up often in programming is when there are multiple conditions to test. For example, if something is true and something else is true take this action. This is accomplished by using the logical operators.
Here is Script 4 to show how logical operators are used:
#!/bin/sh
#
# 5/1/2017
#
echo "script4 - Linux Scripting Book"

if [ $# -ne 4 ] ; then
 echo "Usage: script4 number1 number2 number3 number4"
 echo "       Please enter 4 numbers."

 exit 255
fi

echo Parameters: $1 $2 $3 $4

echo Showing logical AND
if [[ $1 -eq $2 && $3 -eq $4 ]] ; then      # logical AND
 echo Clause 1
else
 echo Clause 2
fi

echo Showing logical OR
if [[ $1 -eq $2 || $3 -eq $4 ]] ; then      # logical OR
 echo Clause 1
else
 echo Clause 2
fi

echo "End of script4"
exit 0
Here's the output on my system:
Run this script on your system using several different parameters. On each attempt, try to determine what the output will be and then run it. Do this as many times as it takes until you can get it right every time. Understanding this concept now will be very helpful as we get into more complicated scripts later.
Now let's look Script 5 to see how math can be performed:
#!/bin/sh
#
# 5/1/2017
#
echo "script5 - Linux Scripting Book"

num1=1
num2=2
num3=0
num4=0
sum=0

echo num1=$num1
echo num2=$num2

let sum=num1+num2
echo "The sum is: $sum"

let num1++
echo "num1 is now: $num1"

let num2--
echo "num2 is now: $num2"

let num3=5
echo num3=$num3

let num3=num3+10
echo "num3 is now: $num3"

let num3+=10
echo "num3 is now: $num3"

let num4=50
echo "num4=$num4"

let num4-=10
echo "num4 is now: $num4"

echo "End of script5"
And here is the output:
As you can see, the variables are set up as before. The let command is used to perform math. Note the $ prefix is not used:
let sum=num1+num2
Also note the shorthand way of doing some operations. For example, say you want to increment the var num1 by 1. You could do this as follows:
let num1=num1+1
Alternatively, you could use the shorthand notation:
let num1++
Run this script and change some of the values to get a feel for how the math operations work. We will go over this in much more detail in a later chapter.
So far we have only talked about variables that are local to a script. There are also system wide environment variables (env vars) which play a very important part of any Linux system. Here are a few, some of which the reader may already be aware of:
|
Variable |
Role |
|---|---|
|
|
user's home directory |
|
|
directories which are searched for commands |
|
|
command line prompt |
|
|
hostname of the machine |
|
|
shell that is being used |
|
|
user of this session |
|
|
text editor to use for |
|
|
number of commands that will be shown by the history command |
|
|
type of command line terminal that is being used |
Most of these are self-explanatory, however, I will mention a few.
The PS1 environment variable controls what the shell prompt displays as part of the command line. The default setting is usually something like [guest1@big1 ~]$, which is not as useful as it could be. At a minimum, a good prompt shows at least the hostname and current directory.
For example, as I work on this chapter the prompt on my system looks just like this:
big1 ~/LinuxScriptingBook/chapters/chap2 $
big1 is the hostname of my system and ~/LinuxScriptingBook/chapters/chap2 is the current directory. Recall that the tilde ~ stands for the user's home directory; so in my case this expands out to:
/home/guest1/LinuxScriptingBook/chapters/chap2
The "$" means I am running under a guest account.
To enable this, my PS1 env var is defined in /home/guest1/.bashrc as follows:
export PS1="\h \w $ "
The "\h" shows the hostname and the \w shows the current directory. This is a very useful prompt and I have been using it for many years. Here's how to show the username as well:
export PS1="\u \h \w $ "
The prompt would now look like this:
guest1 big1 ~/LinuxScriptingBook/chapters/chap2 $
If you change the PS1 variable in your .bashrc file, make certain you do it after any other lines that are already in the file.
For example, here is what my original .bashrc contains under my guest1 account:
# .bashrc

# Source global definitions
if [ -f /etc/bashrc ]; then
    . /etc/bashrc
fi

# User specific aliases and functions
Put your PS1 definition after these lines.
If you log into a lot of different machines on a daily basis, there is a PS1 trick I have found that is very useful. This will be shown in a later chapter.
You may have noticed that it looks as though I did not always use a good PS1 variable for the examples in this book. It was edited out during book creation to save space.
The EDITOR variable can be very useful. This tells the system which text editor to use for things such as editing the user's crontab (crontab -e). If not set, it defaults to the vi editor. It can be changed by putting it in the user's .bashrc file. Here is what mine looks like for the root account:
export EDITOR=/lewis/bin64/kw
When I run crontab -l (or -e), my personally written text editor comes up instead of vi. Very handy!
Here we'll take a look at Script 6, that shows some of the variables on my system under my guest1 account:
#!/bin/sh
#
# 5/1/2017
#
echo "script6 - Linux Scripting Book"

echo HOME - $HOME
echo PATH - $PATH
echo HOSTNAME - $HOSTNAME
echo SHELL - $SHELL
echo USER - $USER
echo EDITOR - $EDITOR
echo HISTSIZE - $HISTSIZE
echo TERM - $TERM

echo "End of script6"
Here's the output:
You can also create and use your own env vars. This is a really powerful feature of a Linux system. Here are some examples that I use in my /root/.bashrc file:
BIN=/lewis/bin64
DOWN=/home/guest1/Downloads
DESK=/home/guest1/Desktop
JAVAPATH=/usr/lib/jvm/java-1.7.0-openjdk-1.7.0.99.x86_64/include/
KW_WORKDIR=/root
L1=guest1@192.168.1.21
L4=guest1@192.168.1.2
LBCUR=/home/guest1/LinuxScriptingBook/chapters/chap2
export BIN DOWN DESK JAVAPATH KW_WORKDIR L1 L4 LBCUR
BIN: This is the directory of my executables and scripts under rootDOWN: This is the download directory for email attachments, etcDESK: This is the download directory for screenshotsJAVAPATH: This is the directory to use when I am writing Java appsKW_WORKDIR: This is where my editor puts its working filesL1 and L2: This is the IP addresses to my laptopsLBCUR: This is the current directory I am working in for this bookBe sure to export your variables so that they can be accessed by other terminals. Also remember to source your .bashrc when you make a change. On my system the command would be:
guest1 $ . /home/guest1/.bashrc
I will show in a later chapter how these env vars can be paired with aliases. For example, the bin command on my system is an alias that changes the current directory to the /lewis/bin64 directory. This is one of the most powerful features in a Linux system, however, I am always surprised that I do not see it used more often.
The last type of variable we will cover in this chapter is called an array. Suppose you want to write a script that contains all of the IP addresses of the machines in your lab. You could do something like this:
L0=192.168.1.1
L1=192.168.1.10
L2=192.168.1.15
L3=192.168.1.16
L4=192.168.1.20
L5=192.168.1.26
That will work and in fact I do something similar to that in my home office/lab. However, suppose you have a whole lot of machines. Using arrays can make your life a lot simpler.
Take a look at Script 7:
#!/bin/sh
#
# 5/1/2017
#
echo "script7 - Linux Scripting Book"

array_var=(1 2 3 4 5 6)

echo ${array_var[0]}
echo ${array_var[1]}
echo ${array_var[2]}
echo ${array_var[3]}
echo ${array_var[4]}
echo ${array_var[5]}

echo "List all elements:"
echo ${array_var[*]}

echo "List all elements (alternative method):"
echo ${array_var[@]}

echo "Number of elements: ${#array_var[*]}"
labip[0]="192.168.1.1"
labip[1]="192.168.1.10"
labip[2]="192.168.1.15"
labip[3]="192.168.1.16"
labip[4]="192.168.1.20"

echo ${labip[0]}
echo ${labip[1]}
echo ${labip[2]}
echo ${labip[3]}
echo ${labip[4]}

echo "List all elements:"
echo ${labip[*]}

echo "Number of elements: ${#labip[*]}"
echo "End of script7"
And here is the output on my system:
Run this script on your system and try experimenting with it. If you have never seen or used an array before, don't let them scare you; you will get familiar with them soon enough. This is another area where it's easy to forget the ${ array variable here } syntax so if the script doesn't do what you want (or generates an error) check that first.
We will talk about arrays again in much more detail when we cover loops in the next chapter.
In this chapter we covered how to declare and use both environment and local variables. We talked about how math is performed and how to work with arrays.
We also covered using variables in scripts. Script 1 showed how to assign a variable and display its value. Script 2 showed how to deal with numeric variables and Script 3 showed how to compare strings. Script 4 showed logical operators and Script 5 showed how math can be performed. Script 6 showed how environment variables are used and Script 7 showed how to use arrays.
This chapter shows how to use loops to perform iterative operations. It also shows how to create a delay in a script. The reader will learn how to use loops and the sleep command in a script.
Topics covered in this chapter are as follows:
for, while, and until loops.sleep command and how it is used to cause a delay in a script.sleep.One of the most important features of any programming language is the ability to perform a task, or tasks, a number of times and then stop when an ending condition is met. This is accomplished by using a loop.
The next section shows an example of a very simple while loop:
#!/bin/sh
#
# 5/2/2017
#
echo "script1 - Linux Scripting Book"
x=1
while [ $x -le 10 ]
do
 echo x: $x
 let x++
done

echo "End of script1"

exit 0
We start by setting variable x to 1. The while statement checks to see if x is less than or equal to 10 and if so, runs the commands between the do and done statements. It will continue to do this until x equals 11, in which case the lines after the done statement are then run.
Run this on your system. It is very important to understand this script so that we can move on to more advanced loops.
Let's look at another script in the next section—see if you can determine what is wrong with it.
#!/bin/sh
#
# 5/2/2017
#
echo "script2 - Linux Scripting Book"

x=1
while [ $x -ge 0 ]
do
 echo x: $x
 let x++
done

echo "End of script2"

exit 0
Feel free to skip the running of this one unless you really want to. Look carefully at the while test. It says while x is greater than or equal to 0, run the commands inside the loop. Is x ever going to not meet this condition? No, it is not, and this is what is known as an infinite loop. Don't worry; you can still end the script by pressing Ctrl + C (hold down the Ctrl key and press C). This will terminate the script.
I wanted to cover infinite loops right away as you will almost certainly do this from time to time, and I wanted you to know how to terminate the script when it happens. I certainly did this a few times when I was first starting out.
Okay let's do something more useful. Suppose you are starting a new project and need to create some directories on your system. You could do it one command at a time, or use a loop in a script.
We'll a look at this in Script 3.
#!/bin/sh
#
# 5/2/2017
#
echo "script3 - Linux Scripting Book"

x=1
while [ $x -le 10 ]
do
 echo x=$x
 mkdir chapter$x
 let x++
done
echo "End of script3"

exit 0
This simple script assumes you are starting at the base directory. When run it will create directories chapter 1 through chapter 10 and then proceed to the end.
When running scripts that make changes to your computer, it is a good idea to make sure the logic is correct before running it for real. For example, before running this I commented out the mkdir line. I then ran the script to make sure it stopped after it displayed that x was equal to 10. I then uncommented the line and ran it for real.
We'll see another script in the next section that uses a loop to put text on the screen:
#!/bin/sh
#
# 5/2/2017
#
echo "script4 - Linux Scripting Book"

if [ $# -ne 1 ] ; then
 echo "Usage: script4 string"
 echo "Will display the string on every line."
 exit 255
fi

tput clear                   # clear the screen

x=1
while [ $x -le $LINES ]
do
 echo "********** $1 **********"
 let x++
done

exit 0
Before executing this script run the following command:
echo $LINES
If the number of lines in that terminal is not displayed run the following command:
export LINES=$LINES
Then proceed to run the script. The following is the output on my system when run with script4 Linux:
Okay, so I agree this might not be terribly useful, but it does show a few things. The LINES env var contains the current number of lines (or rows) in the current terminal. This can be useful for limiting output in more complex scripts and that will be shown in a later chapter. This example also shows how the screen can be manipulated in a script.
If you needed to export the LINES variable, you may want to put it in your .bashrc file and re-source it.
We'll take a look at another script in the next section:
#!/bin/sh
#
# 5/2/2017
#
# script5 - Linux Scripting Book

tput clear                   # clear the screen

row=1
while [ $row -le $LINES ]
do
 col=1
 while [ $col -le $COLUMNS ]
 do
  echo -n "#"
  let col++
 done
 echo ""                     # output a carriage return
 let row++
done

exit 0
This is similar to Script 4 in that it shows how to display output within the confines of the terminal. Note, you may have to export the COLUMNS env var like we did with the LINES var.
You probably noticed something a little different in this script. There is a while statement inside a while statement. This is called a nested loop and is used very frequently in programming.
We start by declaring row=1 and then begin the outer while loop. The col var is then set to 1 and then the inner loop is started. This inner loop is what displays the character on each column of the line. When the end of the line is reached, the loop ends and the echo statement outputs a carriage return. The row var is incremented, and then the process starts again. It ends after the last line.
By using the LINES and COLUMNS env vars only the actual screen is written to. You can test this by running the program and then expanding the terminal.
When using nested loops it can be easy to get mixed up about what goes where. Here is something I try to do every time. When I first realize a loop is going to be needed in a program (which can be a script, C, or Java, and so on), I code the loop body first like this:
 while [ condition ]
 do
    other statements will go here
 done
This way I don't forget the done statement and it's also lined up correctly. If I then need another loop I just do it again:
 while [ condition ]
 do
   while [ condition ]
   do
     other statements will go here
   done
 done
You can nest as many loops as you need.
This is probably a good time to talk about indenting. In the past (that is, 30+ years ago) everyone used a text editor with a mono-spaced font to write their code and so it was relatively easy to keep everything lined up with just a one space indent. Later, when people started using word processors with a variable pitched font, it became harder to see the indentation and so more spaces (or tabs) were used. My suggestion is to use what you feel most comfortable with. However, with that said you may have to learn to read and use whatever code style that is in place for your company.
So far we have only talked about the while statement. Now let's look at an until loop in the next section:
#!/bin/sh
#
# 5/3/2017
#
echo "script6 - Linux Scripting Book"

echo "This shows the while loop"

x=1
while [ $x -lt 11 ]          # perform the loop while the condition
do                           # is true
 echo "x: $x"
 let x++
done

echo "This shows the until loop"

x=1
until [ $x -gt 10 ]          # perform the loop until the condition
do                           # is true
 echo "x: $x"
 let x++
done

echo "End of script6"

exit 0
Take a look at this script. The output from both loops is the same; however, the conditions are the opposite. The first loop continues while the condition is true, the second loop continues until the condition is true. A not-so-subtle difference so be on the watch for that.
Another way to loop is to use the for statement. It is commonly used when working with files and other lists. The general syntax of a for loop is as follows:
 for variable in list
 do
     some commands
 done
The list can be a collection of strings, or a filename wildcard, and so on. We can take a look at this in the example given in the next section.
#!/bin/sh
#
# 5/4/2017
#
echo "script7 - Linux Scripting Book"

for i in jkl.c bob Linux "Hello there" 1 2 3
do
 echo -n "$i "
done

for i in script*             # returns the scripts in this directory
do
 echo $i
done

echo "End of script7"
exit 0
And the output on my system. This is my chap3 directory:
The next script shows how the for statement can be used with files:
#!/bin/sh
#
# 5/3/2017
#
echo "script8 - Linux Scripting Book"

if [ $# -eq 0 ] ; then
 echo "Please enter at least 1 parameter."
 exit 255
fi

for i in $*                  # the "$*" returns every parameter given
do                           # to the script
 echo -n "$i "
done

echo ""                      # carriage return
echo "End of script8"

exit 0
There are a few other things you can do with the for statement, consult the man page of Bash for more information.
Sometimes when you are coding a script, you encounter a situation where you would like to exit the loop early, before the ending condition is met. This can be accomplished using the break and continue commands.
Here is a script that shows these commands. I am also introducing the sleep command which will be talked about in detail in the next script.
#!/bin/sh
#
# 5/3/2017
#
echo "script9 - Linux Scripting Book"

FN1=/tmp/break.txt
FN2=/tmp/continue.txt

x=1
while [ $x -le 1000000 ]
do
 echo "x:$x"
 if [ -f $FN1 ] ; then
  echo "Running the break command"
  rm -f $FN1
  break
 fi

 if [ -f $FN2 ] ; then
  echo "Running the continue command"
  rm -f $FN2
  continue
 fi

 let x++
 sleep 1
done

echo "x:$x"

echo "End of script9"

exit 0
Here's the output from my system:
Run this on your system, and in another terminal cd to the /tmp directory. Run the command touch continue.txt and watch what happens. If you like you can do this multiple times (remember that up arrow recalls the previous command). Notice how the variable x does not get incremented when the continue command is hit. This is because the control goes immediately back to the while statement.
Now run the touch break.txt command. The script will end, and again, x has not been incremented. This is because break immediately causes the loop to end.
The break and continue commands are used quite often in scripts and so be sure to play with this one enough to really understand what is going on.
I showed the sleep command earlier, let's look at that in much more detail. In general, the sleep command is used to introduce a delay in the script. For example, in the previous script if I had not used sleep the output would have scrolled off too quickly to see what was going on.
The sleep command takes a parameter indicating how long to make the delay. For example, sleep 1 means to introduce a delay of one second. Here are a few examples:
sleep 1       # sleep 1 second (the default is seconds)
sleep 1s      # sleep 1 second
sleep 1m      # sleep 1 minute
sleep 1h      # sleep 1 hour
sleep 1d      # sleep 1 day
The sleep command actually has a bit more capability that what is shown here. For more information, please consult the man page (man sleep).
Here's a script showing in more detail how sleep works:
#!/bin/sh
#
# 5/3/2017
#
echo "script10 - Linux Scripting Book"

echo "Sleeping seconds..."
x=1
while [ $x -le 5 ]
do
 date
 let x++
 sleep 1
done

echo "Sleeping minutes..."
x=1
while [ $x -le 2 ]
do
 date
 let x++
 sleep 1m
done

echo "Sleeping hours..."
x=1
while [ $x -le 2 ]
do
 date
 let x++
 sleep 1h
done

echo "End of script10"
exit 0
And the output:
You may have noticed that I pressed Ctrl + C to terminate the script since I didn't want to wait 2 hours for it to finish. Scripts of this nature are used very extensively in a Linux system to monitor processes, watch for files, and so on.
There is a common pitfall when using the sleep command that needs to be mentioned.
We'll see an example of this in the following section:
#!/bin/sh
#
# 5/3/2017
#
echo "script11 - Linux Scripting Book"

while [ true ]
do
 date
 sleep 60                    # 60 seconds
done

echo "End of script11"

exit 0
This is the output on my system. It doesn't take all that long to eventually get out of sync:
For the vast majority of scripts this is never going to be a problem. Just remember if what you are trying to accomplish is time critical, like trying to run a command at exactly 12:00 am every night, you might want to look at some other approach. Note that crontab will also not do this as there is about a 1 or 2 second delay before it runs the command.
There are a few more topics that we should look at in this chapter. Suppose you want to be alerted when a running process ends on your system.
Here's a script that notifies the user when the specified process ends. Note that there are other ways to do this task, this is just one approach.
#!/bin/sh
#
# 5/3/2017
#
echo "script12 - Linux Scripting Book"

if [ $# -ne 1 ] ; then
 echo "Usage: script12 process-directory"
 echo " For example: script12 /proc/20686"
 exit 255
fi

FN=$1                        # process directory i.e. /proc/20686
rc=1
while [ $rc -eq 1 ]
do
 if [ ! -d $FN ] ; then      # if directory is not there
  echo "Process $FN is not running or has been terminated."
  let rc=0
 else
  sleep 1
 fi
done

echo "End of script12"
exit 0
To see this script in action run the following commands:
script9ps auxw | grep script9. The output will be something like this:guest1 20686 0.0 0.0 106112 1260 pts/34 S+ 17:20 0:00 /bin/sh ./script9 guest1 23334 0.0 0.0 103316 864 pts/18 S+ 17:24 0:00 grep script9
script9 (in this case 20686) and use it as the parameter to run script12:$ script12 /proc/20686
You may let it run for a bit if you want. Eventually go back to the terminal that is running script9 and terminate it with Ctrl + C. You will see script12 output a message and then also terminate. Feel free to experiment with this one as it has a lot of important information in it.
You may notice that in this script I used a variable, rc, to determine when to end the loop. I could have used the break command as we saw earlier in this chapter. However, using a control variable (as it's often called) is considered to be a better programming style.
A script like this can be very useful when you have started a command and then it takes longer than you expected for it to finish.
For example, a while back I started a format operation on an external 1 TB USB drive using the mkfs command. It took a few days to complete and I wanted to know exactly when so that I could continue working with the drive.
Now for a bonus here is a ready-to-run script that can be used to make numbered backup files. Before I came up with this (many years ago) I would go through the ritual of making the backup by hand. My numbering scheme was not always consistent, and I quickly realized it would be easier to have a script do it. This is something computers are really good at.
I call this script cbS. I wrote this so long ago I'm not even sure what it stands for. Maybe it was Computer Backup Script or something like that.
#!/bin/sh
#
echo "cbS by Lewis 5/4/2017"

if [ $# -eq 0 ] ; then
 echo "Usage: cbS filename(s) "
 echo " Will make a numbered backup of the files(s) given."
 echo " Files must be in the current directory."
 exit 255
fi

rc=0                         # return code, default is no error
for fn in $*                 # for each filename given on the command line
do
 if [ ! -f $fn ] ; then      # if not found
  echo "File $fn not found."
  rc=1                       # one or more files were not found
 else
  cnt=1                      # file counter
  loop1=0                    # loop flag
  while [ $loop1 -eq 0 ]
  do
   tmp=bak-$cnt.$fn
   if [ ! -f $tmp ] ; then
     cp $fn $tmp
     echo "File "$tmp" created."
     loop1=1                 # end the inner loop
   else
     let cnt++               # try the next one
   fi
  done
 fi
done

exit $rc                     # exit with return code
It starts with a Usage message as it needs at least one filename to work on.
Note that this command requires the files be in the current directory, so doing something like cbS /tmp/file1.txt will generate an error.
The rc variable is initialized to 0. If a file is not found, it will be set to 1.
Now let's look at the inner loop. The logic here is a backup file will be created from the original file using the cp command. The naming scheme for the backup file is bak-(number).original-filename where number is the next one in sequence. The code determines what the next number is by going through all of the bak-#.filename files until it doesn't find one. That one then becomes the new filename.
Get this one going on your system. Feel free to name it whatever you like, but be careful to name it something other than an existing Linux command. Use the which command to check.
Here is some example output on my system:
This script could be greatly improved upon. It could be made to work with paths/files, and the cp command should be checked for errors. This level of coding will be covered in a later chapter.
In this chapter we covered the different types of loop statements and how they differ from each other. Nesting loops and the sleep command were also covered. The common pitfall when using the sleep command was also mentioned, and a backup script was introduced to show how to easily create numbered backup files.
In the next chapter we will go over the creation and calling of subroutines.
This chapter shows how to create and call subroutines in a script.
The topics covered in this chapter are as follows:
In the previous chapters we have seen mostly simple scripts that were not very complicated. Scripts can actually do a whole lot more which we are about to see.
First, let's start with a selection of simple but powerful scripts. These are mainly shown to give the reader an idea of just what can be done quickly with a script.
The tput clear terminal command can be used to clear the current command-line session. You could type tput clear all the time, but wouldn't just cls be nicer?
Here's a simple script that clears the current screen:
#!/bin/sh
#
# 5/8/2017
#
tput clear
Notice that this was so simple I didn't even bother to include a Usage message or return code. Remember, to make this a command on your system do this:
cd $HOME/binclschmod 755 clsYou can now type cls from any terminal (under that user) and your screen will clear. Try it.
At this point we need to go over file redirection. This is the ability to have the output from a command or script be copied into a file instead of going to the screen. This is done by using the redirection operator, which is really just the greater than sign.
Here is the screenshot of some commands that were run on my system:
As you can see, the output from the ifconfig command was sent (or redirected) to the ifconfig.txt file.
Now let's look at command piping, which is the ability to run a command and have the output from it serve as the input to another command.
Suppose a program or script named loop1 is running on your system and you want to know the PID of it. You could run the ps auxw command to a file, and then grep the file for loop1. Alternatively, you could do it in one step by using a pipe as follows:
Pretty cool, right? This is a very powerful feature in a Linux system and is used extensively. We will be seeing a lot more of this soon.
The next section shows another very short script using some command piping. This clears the screen and then shows only the first 10 lines from dmesg:
#!/bin/sh
#
# 5/8/2017
#
tput clear
dmesg | head
And here is the output:
The next section shows file redirection.
#!/bin/sh
#
# 5/8/2017
#
FN=/tmp/dmesg.txt
dmesg > $FN
echo "File $FN created."
exit 0
Try it on your system.
This shows how easy it is to create a script to perform commands that you would normally type on the command line. Also notice the use of the FN variable. If you want to use a different filename later, you only have to make the change in one place.
Now let's really get into subroutines. To do this we will use more of the tput commands:
tput cup <row><col>         # moves the cursor to row, col
tput cup 0 0                # cursor to the upper left hand side
tput cup $LINES $COLUMNS    # cursor to bottom right hand side
tput clear                  # clears the terminal screen
tput smso                   # bolds the text that follows
tput rmso                   # un-bolds the text that follows
Here is the script. This was mainly written to show the concept of a subroutine, however, it can also be used as a guide on writing interactive tools.
#!/bin/sh
# 6/13/2017
# script4

# Subroutines
cls()
{
 tput clear
 return 0
}

home()
{
 tput cup 0 0
 return 0
}

end()
{
 let x=$COLUMNS-1
 tput cup $LINES $x
 echo -n "X"                 # no newline or else will scroll
}

bold()
{
 tput smso
}

unbold()
{
 tput rmso
}

underline()
{
 tput smul
}

normalline()
{
 tput rmul
}

# Code starts here
rc=0                         # return code
if [ $# -ne 1 ] ; then
 echo "Usage: script4 parameter"
 echo "Where parameter can be: "
 echo " home      - put an X at the home position"
 echo " cls       - clear the terminal screen"
 echo " end       - put an X at the last screen position"
 echo " bold      - bold the following output"
 echo " underline - underline the following output"
 exit 255
fi

parm=$1                      # main parameter 1

if [ "$parm" = "home" ] ; then
 echo "Calling subroutine home."
 home
 echo -n "X"
elif [ "$parm" = "cls" ] ; then
 cls
elif [ "$parm" = "end" ] ; then
 echo "Calling subroutine end."
 end
elif [ "$parm" = "bold" ] ; then
 echo "Calling subroutine bold."
 bold
 echo "After calling subroutine bold."
 unbold
 echo "After calling subroutine unbold."
elif [ "$parm" = "underline" ] ; then
 echo "Calling subroutine underline."
 underline
 echo "After subroutine underline."
 normalline
 echo "After subroutine normalline."
else
 echo "Unknown parameter: $parm"
 rc=1
fi

exit $rcTry this on your system. If you run it with the home parameter it might look a little strange to you. The code puts a capital X at the home position (0,0) and this causes the prompt to print one character over. Nothing is wrong here, it just looks a little weird. Don't worry if this still doesn't make sense to you, just go ahead and look at Script 5.
Okay, let's add some routines to this script to show how to use parameters with a subroutine. In order to make the output look better the cls routine is called first to clear the screen:
#!/bin/sh
# 6/13/2017
# script5

# Subroutines
cls()
{
 tput clear
 return 0
}

home()
{
 tput cup 0 0
 return 0
}

end()
{
 let x=$COLUMNS-1
 tput cup $LINES $x
 echo -n "X"                 # no newline or else will scroll
}

bold()
{
 tput smso
}

unbold()
{
 tput rmso
}

underline()
{
 tput smul
}

normalline()
{
 tput rmul
}

move()                       # move cursor to row, col
{
 tput cup $1 $2
}

movestr()                    # move cursor to row, col
{
 tput cup $1 $2
 echo $3
}

# Code starts here
cls                          # clear the screen to make the output look better
rc=0                         # return code
if [ $# -ne 1 ] ; then
 echo "Usage: script5 parameter"
 echo "Where parameter can be: "
 echo " home      - put an X at the home position"
 echo " cls       - clear the terminal screen"
 echo " end       - put an X at the last screen position"
 echo " bold      - bold the following output"
 echo " underline - underline the following output"
 echo " move      - move cursor to row,col"
 echo " movestr   - move cursor to row,col and output string"
 exit 255
fi

parm=$1                      # main parameter 1

if [ "$parm" = "home" ] ; then
 home
 echo -n "X"
elif [ "$parm" = "cls" ] ; then
 cls
elif [ "$parm" = "end" ] ; then
 move 0 0
 echo "Calling subroutine end."
end
elif [ "$parm" = "bold" ] ; then
 echo "Calling subroutine bold."
 bold
 echo "After calling subroutine bold."
 unbold
 echo "After calling subroutine unbold."
elif [ "$parm" = "underline" ] ; then
 echo "Calling subroutine underline."
 underline
 echo "After subroutine underline."
 normalline
 echo "After subroutine normalline."
elif [ "$parm" = "move" ] ; then
 move 10 20
 echo "This line started at row 10 col 20"
elif [ "$parm" = "movestr" ] ; then
 movestr 15 40 "This line started at 15 40"
else
 echo "Unknown parameter: $parm"
 rc=1
fi

exit $rc
Since this script only has two extra functions you can just run them. This will be shown one command at a time as follows:
guest1 $ script5
guest1 $ script5 move
guest1 $ script5 movestr
Since we are now placing the cursor at a specific location, the output should make more sense to you. Notice how the command-line prompt reappears where the last cursor position was.
You probably noticed that the parameters to a subroutine work just like with a script. Parameter 1 is $1, parameter 2 is $2, and so on. This is good and bad, good because you don't have to learn anything radically different. But bad in that it is very easy to get the $1, $2, vars mixed up if you are not careful.
A possible solution, and the one I use, is to assign the $1, $2, and so on variables in the main script to a variable with a good meaningful name.
For example, in these example scripts I set parm1 equal to $1 (parm1=$1), and so on.
Take a good look at the script in the next section:
#!/bin/sh
#
# 6/13/2017
# script6

# Subroutines
sub1()
{
 echo "Entering sub1"
 rc1=0                       # default is no error
 if [ $# -ne 1 ] ; then
  echo "sub1 requires 1 parameter"
  rc1=1                      # set error condition
 else
  echo "1st parm: $1"
 fi

 echo "Leaving sub1"
 return $rc1                 # routine return code
}

sub2()
{
 echo "Entering sub2"
 rc2=0                       # default is no error
 if [ $# -ne 2 ] ; then
  echo "sub2 requires 2 parameters"
  rc2=1                      # set error condition
 else
  echo "1st parm: $1"
  echo "2nd parm: $2"
 fi
 echo "Leaving sub2"
 return $rc2                 # routine return code
}

sub3()
{
 echo "Entering sub3"
 rc3=0                       # default is no error
 if [ $# -ne 3 ] ; then
  echo "sub3 requires 3 parameters"
  rc3=1                      # set error condition
 else
  echo "1st parm: $1"
  echo "2nd parm: $2"
  echo "3rd parm: $3"
 fi
 echo "Leaving sub3"
 return $rc3                 # routine return code
}

cls()                        # clear screen
{
 tput clear
 return $?                   # return code from tput
}

causeanerror()
{
 echo "Entering causeanerror"
 tput firephasers
 return $?                   # return code from tput
}

# Code starts here
cls                          # clear the screen
rc=$?
echo "return code from cls: $rc"
rc=0                         # reset the return code
if [ $# -ne 3 ] ; then
 echo "Usage: script6 parameter1 parameter2 parameter3"
 echo "Where all parameters are simple strings."
 exit 255
fi

parm1=$1                     # main parameter 1
parm2=$2                     # main parameter 2
parm3=$3                     # main parameter 3

# show main parameters
echo "parm1: $parm1  parm2: $parm2  parm3: $parm3"

sub1 "sub1-parm1"
echo "return code from sub1: $?"

sub2 "sub2-parm1"
echo "return code from sub2: $?"

sub3 $parm1 $parm2 $parm3
echo "return code from sub3: $?"

causeanerror
echo "return code from causeanerror: $?"

exit $rcThere are some new concepts here and so we will go through this one very carefully.
First, we define the subroutines. Notice that a return code has been added. A cls routine has also been included so that a return code could be shown.
We are now at the start of the code. The cls routine is called and then the return value from it is stored in the rc variable. Then the echo statement showing which script this is will be displayed.
So, why did I have to put the return code from the cls command into the rc var? Couldn't I have just displayed it after the echo of the script title? No, because the echo $? always refers to the command immediately preceding it. This is easy to forget so make sure you understand this point.
Okay, so now we reset the rc var to 0 and continue on. I could have used a different variable for this, but since the value of rc is not going to be needed again I chose to just reuse the rc variable.
Now, at the check for parameters, the Usage statement will be displayed if three parameters are not there.
After three parameters are entered we display them. This is always a good idea especially when first writing a script/program. You can always take it out later if it is not needed.
The first subroutine, sub1, is run with 1 parameter. This is checked and an error is displayed if needed.
The same thing happens with sub2, but in this case I intentionally set it to run with only one parameter so that the error message would be displayed.
For sub3, you can see that the main parameters are still accessible from a subroutine. In fact, all of the named variables are, and also the wildcard * and other file expansion tokens. Only the main script parameters cannot be accessed, which is why we put them into variables.
The final routine was created in order to show how errors can be handled. You can see that the tput command itself displayed the error, and then we also captured it in the script.
Finally, the script exits with the main rc variable.
As was mentioned earlier, this script has a lot in it so be sure to study it carefully. Note that when I wanted to show an error in tput, I just assumed that firephasers was going to be an unknown command. I would have been rather surprised if some phasers had actually shot out of (or worse, into) my computer!
And now, for another bonus the next section shows the script I used to backup my current book's chapter every 60 seconds:
#!/bin/sh
#
# Auto backs up the file given if it has changed
# Assumes the cbS command exists
# Checks that ../back exists
# Copies to specific USB directory
# Checks if filename.bak exists on startup, copy if it doesn't

echo "autobackup by Lewis 5/9/2017 A"
if [ $# -ne 3 ] ; then
 echo "Usage: autobackup filename USB-backup-dir delay"
 exit 255
fi

# Create back directory if it does not exist
if [ ! -d back ] ; then
 mkdir back
fi

FN=$1                        # filename to monitor
USBdir=$2                    # USB directory to copy to
DELAY=$3                     # how often to check

if [ ! -f $FN ] ; then       # if no filename abort
 echo "File: $FN does not exist."
 exit 5
fi

if [ ! -f $FN.bak ] ; then
 cp $FN $FN.bak
fi

filechanged=0
while [ 1 ]
do
 cmp $FN $FN.bak
 rc=$?
 if [ $rc -ne 0 ] ; then
  cp $FN back
  cp $FN $USBdir
  cd back
  cbS $FN
  cd ..
  cp $FN $FN.bak
  filechanged=1
 fi

 sleep $DELAY
done
And for the output on my system
There's not much in this script that we have not already covered. The informal comments at the top are mainly for me, so that I don't forget what I wrote or why.
The parms are checked and the back subdirectory is created if it does not already exist. I never seem to be able to remember to create it, so I let the script do it.
Next, the main variables are set up and then the .bak file is created if it doesn't exist (this helps with the logic).
In the while loop, which you can see runs forever, the cmp Linux command is used to see if the original file has changed from the backup file. If so, the cmp command returns non-zero and the file is copied back to the subdir as a numbered backup using our cbS script. The file is also copied to the backup directory, which in this case is my USB drive. The loop continues until I start a new chapter, in which case I press Ctrl + C to quit.
This is a good example of script automation, which will be covered in more detail in Chapter 6, Automating Tasks with Scripts.
We started with some very simple scripts and then proceeded to show some simple subroutines.
We then showed some subroutines that take parameters. Return codes were mentioned again to show how they work in subroutines. We including several scripts to show the concepts, and also included a special bonus script at no extra charge.
In the next chapter we will go over how to create interactive scripts.
This chapter shows how to read the keyboard in order to create interactive scripts.
The topics covered in this chapter are:
read built-in command to query the keyboard.read.The reader will learn how to create interactive scripts.
The scripts we have looked at up to this point have run without much user interaction. The read command is used to create scripts that can query the keyboard. The code can then take action based on the input.
#!/bin/sh
#
# 5/16/2017
#
echo "script1 - Linux Scripting Book"

echo "Enter 'q' to quit."
rc=0
while [ $rc -eq 0 ]
do
 echo -n "Enter a string: "
 read str
 echo "str: $str"
 if [ "$str" = "q" ] ; then
  rc=1
 fi
done

echo "End of script1"
exit 0
And here is the output when run on my system:
This is a good one to run on your system. Try several different strings, numbers, and so on. Notice how the returned string contains whitespace, special characters, and so on. You don't have to quote anything, and if you do those will be returned as well.
You can also use the read command to put a simple pause into your script. This will allow you to see the output before it scrolls off the screen. It can also be used when debugging which will be shown in Chapter 9, Debugging Scripts.
The following script shows how to create a pause when the output gets to the last line of the screen:
#!/bin/sh
#
# 5/16/2017
# Chapter 5 - Script 2
#
linecnt=1                    # line counter
loop=0                       # loop control var
while [ $loop -eq 0 ]
do
 echo "$linecnt  $RANDOM"    # display next random number
 let linecnt++
 if [ $linecnt -eq $LINES ] ; then
  linecnt=1
  echo -n "Press Enter to continue or q to quit: "
  read str                   # pause
  if [ "$str" = "q" ] ; then
   loop=1                    # end the loop
  fi
 fi
done

echo "End of script2"
exit 0
And here is the output when run on my system:
I pressed Enter twice, and then Q and Enter on the last one.
Let's try something a bit more interesting. This next script shows how to fill an array with values taken from the keyboard:
#!/bin/sh
#
# 5/16/2017
#
echo "script3 - Linux Scripting Book"

if [ "$1" = "--help" ] ; then
 echo "Usage: script3"
 echo " Queries the user for values and puts them into an array."
 echo " Entering 'q' will halt the script."
 echo " Running 'script3 --help' shows this Usage message."
 exit 255
fi

x=0                          # subscript into array
loop=0                       # loop control variable
while [ $loop -eq 0 ]
do
 echo -n "Enter a value or q to quit: "
 read value
 if [ "$value" = "q" ] ; then
  loop=1
 else
  array[$x]="$value"
  let x++
 fi
done

let size=x
x=0
while [ $x -lt $size ]
do
 echo "array $x: ${array[x]}"
 let x++
done

echo "End of script3"
exit 0
And the output:
Since this script does not require any parameters I decided to add a Usage statement. This will display if the user runs it with --help and is a common feature in many system scripts and programs.
The only thing new in this script is the read command. The loop and array variables were discussed in an earlier chapter. Note again that, with the read command what you type is what you get.
Now let's create a complete interactive script. But first we need to check the size of the current terminal. If it is too small, the output of your script may become garbled and the user may not know why or how to fix it.
The following script contains a subroutine that checks the size of the terminal:
#!/bin/sh
#
# 5/16/2017
#
echo "script4 - Linux Scripting Book"

checktermsize()
{
 rc1=0                       # default is no error
 if [[ $LINES -lt $1 || $COLUMNS -lt $2 ]] ; then
  rc1=1                      # set return code
 fi
 return $rc1
}

rc=0                         # default is no error
checktermsize 40 90          # check terminal size
rc=$?
if [ $rc -ne 0 ] ; then
 echo "Return code: $rc from checktermsize"
fi

exit $rc
Run this on your system with different-sized terminals to check the result. As you can see from the code, it's okay if the terminal is larger than needed; it just can't be too small.
Now let's look at a full interactive script:
#!/bin/sh
#
# 5/27/2017
#
echo "script5 - Linux Scripting Book"

# Subroutines
cls()
{
 tput clear
}

move()                       # move cursor to row, col
{
 tput cup $1 $2
}

movestr()                    # move cursor to row, col
{
 tput cup $1 $2
 echo -n "$3"                # display string
}

checktermsize()
{
 rc1=0                       # default is no error
 if [[ $LINES -lt $1 || $COLUMNS -lt $2 ]] ; then
  rc1=1                      # set return code
 fi
 return $rc1
}

init()                       # set up the cursor position array
{
 srow[0]=2;  scol[0]=7       # name
 srow[1]=4;  scol[1]=12      # address 1
 srow[2]=6;  scol[2]=12      # address 2
 srow[3]=8;  scol[3]=7       # city
 srow[4]=8;  scol[4]=37      # state
 srow[5]=8;  scol[5]=52      # zip code
 srow[6]=10; scol[6]=8       # email
}

drawscreen()                 # main screen draw routine
{
 cls                         # clear the screen
 movestr 0 25 "Chapter 5 - Script 5"
 movestr 2 1 "Name:"
 movestr 4 1 "Address 1:"
 movestr 6 1 "Address 2:"
 movestr 8 1 "City:"
 movestr 8 30 "State:"
 movestr 8 42 "Zip code:"
 movestr 10 1 "Email:"
}

getdata()
{
 x=0                         # array subscript
 rc1=0                       # loop control variable
 while [ $rc1 -eq 0 ]
 do
  row=${srow[x]}; col=${scol[x]}
  move $row $col
  read array[x]
  let x++
  if [ $x -eq $sizeofarray ] ; then
   rc1=1
  fi
 done
 return 0
}

showdata()
{
 fn=0
 echo ""
 read -p "Enter filename, or just Enter to skip: " filename
 if [ -n "$filename" ] ; then       # if not blank
  echo "Writing to '$filename'"
 fn=1                       # a filename was given
 fi
 echo ""                     # skip 1 line
 echo "Data array contents: "
 y=0
 while [ $y -lt $sizeofarray ]
 do
  echo "$y - ${array[$y]}"
  if [ $fn -eq 1 ] ; then
   echo "$y - ${array[$y]}">>"$filename"
  fi
  let y++
 done
 return 0
}

# Code starts here
sizeofarray=7                # number of array elements

if [ "$1" = "--help" ] ; then
 echo "Usage: script5 --help"
 echo " This script shows how to create an interactive screen program."
 exit 255
fi

checktermsize 25 80
rc=$?
if [ $rc -ne 0 ] ; then
 echo "Please size the terminal to 25x80 and try again."
 exit 1
fi

init                         # initialize the screen array
drawscreen                   # draw the screen
getdata                      # cursor movement and data input routine
showdata                     # display the data

exit 0There is a lot of new information here, so let's take a look. First the subroutines are defined, and you can see we included the checktermsize subroutine from the preceding Script 4.
The init routine sets up the cursor placement array. It's good programming practice to put initial values in a subroutine, particularly if it is going to be called again.
The drawscreen routine displays the initial form. Note that I could have used the values in the srow and scol array here, however, I didn't want the script to look too cluttered.
Look very carefully at the getdata routine because this is where the fun begins:
x and control var rc1 are set to 0.Name:).x.x is incremented and we go to the next field.x is equal to the size of the array we leave the loop. Keep in mind that we start counting at 0.The showdata routine displays the array data and then we are done.
This is just a small example of an interactive script to show the basic concepts. In a later chapter we will go into this in more detail.
The read command can be used in a number of different ways. Here are a few examples:
read var
Wait for input of characters into the variable var.
read -p "string" var
Display contents of string, stay on the line, and wait for input.

read -p "Enter password:" -s var
Display "Enter password:", but do not echo the typing of the input. Note that a carriage return is not output after Enter is pressed.

read -n 1 var
The -n option means to wait for that number of characters and then continue, it does not wait for an Enter press.
In this example it will wait for 1 char and then go. This can be useful in utility scripts and games:
#!/bin/sh
#
# 5/27/2017
#
echo "Chapter 5 - Script 6"

rc=0                         # return code
while [ $rc -eq 0 ]
do
 read -p "Enter value or q to quit: " var
 echo "var: $var"
 if [ "$var" = "q" ] ; then
  rc=1
 fi
done

rc=0                         # return code
while [ $rc -eq 0 ]
do
 read -p "Password: " -s var
 echo ""                     # carriage return
 echo "var: $var"
if [ "$var" = "q" ] ; then
  rc=1
 fi
done

echo "Press some keys and q to quit."
rc=0                         # return code
while [ $rc -eq 0 ]
do
 read -n 1 -s var            # wait for 1 char, does not output it
 echo $var                   # output it here
 if [ "$var" = "q" ] ; then
  rc=1
 fi
done

exit $rc
The comments in the script should make this one pretty self explanatory. The read command has a few more options, one of which will be shown in the next script.
Another way to query the keyboard is by using what is called a trap. This is a subroutine that is accessed when a special key sequence is pressed, such as Ctrl + C.
Here is an example of using a trap:
#!/bin/sh
#
# 5/16/2017
#
echo "script7 - Linux Scripting Book"

trap catchCtrlC INT          # Initialize the trap

# Subroutines
catchCtrlC()
{
 echo "Entering catchCtrlC routine."
}

# Code starts here

echo "Press Ctrl-C to trigger the trap, 'Q' to exit."

loop=0
while [ $loop -eq 0 ]
do
 read -t 1 -n 1 str          # wait 1 sec for input or for 1 char
 rc=$?

 if [ $rc -gt 128 ] ; then
  echo "Timeout exceeded."
 fi

 if [ "$str" = "Q" ] ; then
  echo "Exiting the script."
  loop=1
 fi

done

exit 0
Here is the output on my system:
Try running this one on your system. Press some keys and see the response. Press Ctrl + C a few times as well. When done press Q.
That read statement needs some further explanation. Using read with the -t option (timeout) means to wait that many seconds for a character. If one is not input in the allotted time it will return a code with a value greater than 128. As we have seen before, the -n 1 option tells read to wait for 1 character. So this means we are waiting 1 second for 1 character. This is another way read can be used to create a game or other interactive script.
If you get yourself into a situation where you can't exit a script you can use the kill command.
For example, if I had needed to stop script7 the directions would be follows:
 guest1 $ ps auxw | grep script7
 guest1   17813  0.0  0.0 106112  1252 pts/32   S+   17:23   0:00 /bin/sh ./script7
 guest1   17900  0.0  0.0 103316   864 pts/18   S+   17:23   0:00 grep script7
 guest1   29880  0.0  0.0  10752  1148 pts/17   S+   16:47   0:00 kw script7
 guest1 $ kill -9 17813
 guest1 $
In the terminal where script7 was running you will see it has stopped with the word Killed in it.
Note, be sure to kill the right process!
In the example above, PID 29880 is my text editor session where I am writing script7. Killing that would not be a good idea :).
Now for some fun! The next script allows you to draw crude pictures on the screen:
#!/bin/sh
#
# 5/16/2017
#
echo "script8 - Linux Scripting Book"

# Subroutines
cls()
{
 tput clear
}

move()                       # move cursor to row, col
{
 tput cup $1 $2
}

movestr()                    # move cursor to row, col
{
 tput cup $1 $2
 echo -n "$3"                # display string
}

init()                       # set initial values
{
 minrow=1                    # terminal boundaries
 maxrow=24
 mincol=0
 maxcol=79
 startrow=1
 startcol=0
}

restart()                    # clears screen, sets initial cursor position
{
 cls
 movestr 0 0 "Arrow keys move cursor. 'x' to draw, 'd' to erase, '+' to restart, 'Q' to quit."
 row=$startrow
 col=$startcol

 draw=0                      # default is not drawing
 drawchar=""
}

checktermsize2()             # must be the specified size
{
 rc1=0                       # default is no error
 if [[ $LINES -ne $1 || $COLUMNS -ne $2 ]] ; then
  rc1=1                      # set return code
 fi
 return $rc1
}

# Code starts here
if [ "$1" = "--help" ] ; then
 echo "Usage: script7 --help"
 echo " This script shows the basics on how to create a game."
 echo " Use the arrow keys to move the cursor."
 echo " Press c to restart and Q to quit."
 exit 255
fi

checktermsize2 25 80         # terminal must be this size
rc=$?
if [ $rc -ne 0 ] ; then
 echo "Please size the terminal to 25x80 and try again."
 exit 1
fi

init                         # initialize values
restart                      # set starting cursor pos and clear screen

loop=1
while [ $loop -eq 1 ]
do
 move $row $col              # position the cursor here
 read -n 1 -s ch

 case "$ch" in
  A) if [ $row -gt $minrow ] ; then
      let row--
     fi
     ;;
  B) if [ $row -lt $maxrow ] ; then
      let row++
     fi
     ;;
  C) if [ $col -lt $maxcol ] ; then
      let col++
     fi
     ;;
  D) if [ $col -gt $mincol ] ; then
      let col--
     fi
     ;;
  d) echo -n ""             # delete char
     ;;
  x) if [ $col -lt $maxcol ] ; then
      echo -n "X"            # put char
      let col++
     fi
     ;;
  +) restart ;;
  Q) loop=0 ;;
 esac
done

movestr 24 0 "Script completed normally."
echo ""                      # carriage return

exit 0
This was fun to write and a bit more fun to play with than I expected it to be.
One thing we haven't covered yet is the case statement. This is similar to an if...then...else but makes the code easier to read. Basically, the value that was input to the read statement is checked for a match in each case clause. If it matches, that stanza is executed and then control goes to the line after the esac statement. It also does this if there is no match.
Try this script, and remember to make the terminal 25x80 (or 80x25 if that is how your GUI works).
Here is just one example of what can be done with this script:
Well okay I guess this shows that I am not much of an artist. I will stick to programming and writing books.
In this chapter we showed how to use the read built-in command to query the keyboard. We explained some of the different options to read and also covered the use of traps. A simple drawing game was also included.
The next chapter will show how to automate a script so that it can run unattended. We will explain how cron can be used to run the script at a specific time. The archival programs zip and tar will also be covered as they are very useful when creating automated back up scripts.
This chapter shows how to automate various tasks using scripts.
The topics covered in this chapter are as follows:
ZIP and TAR to perform compressed backups.The reader will learn how to create automated scripts.
We talked about the sleep command in Chapter 3, Using Loops and the sleep Command. It can be used to create an automated script (that is, one that runs at a specific time with no user intervention) as long as a few guidelines are followed.
This very simple script will reinforce what we covered in Chapter 3 Using Loops and the sleep Command about using the sleep command for automation:
#!/bin/sh
#
# 5/23/2017
#
echo "script1 - Linux Scripting Book"
while [ true ]
do
  date
  sleep 1d
done
echo "End of script1"
exit 0
If you run this on your system and wait a few days you will start to see the date slip a little. This is because the sleep command inserts a delay into the script, it does not mean that it is going to run the script at the same time every day.
#!/bin/sh
#
# 5/23/2017
#
echo "script2 - Linux Scripting Book"
while [ true ]
do
 # Run at 3 am
 date | grep -q 03:00:
 rc=$?
 if [ $rc -eq 0 ] ; then
  echo "Run commands here."
  date
 fi
 sleep 60                   # sleep 60 seconds
done
echo "End of script2"
exit 0
The first thing you will notice is that this script will run until it is either manually terminated with Ctrl + C or the kill command (or when the machine goes down for whatever reason). It is common for automated scripts to just run forever.
The date command, as run without any parameters, returns something like this:
  guest1 $ date
  Fri May 19 15:11:54 HST 2017
So now all we have to do is use grep to match that time. Unfortunately, there is a very subtle problem here. It has been verified that it is possible for this to miss from time to time. For example, if the time has just changed to 3:00 am and the program is now in the sleep it might already be 3:01 when it wakes up. In my early days in computing I had seen code like this all the time in my jobs and never gave it a single thought. When some important backups were missed one day my team was asked to figure out what was going on and we discovered this issue. A quick fix for this would be to change the seconds to 59, however, a better way is to use cron which will be shown later in this chapter.
Notice the -q option to grep, this simply tells it to suppress any output. Feel free to take this out if you want, especially when first writing the script. Also notice that grep returns 0 when a match is found, non-zero otherwise.
With all this said let's look at some simple automated scripts. I have been running the following on my Linux systems since 1996:
#!/bin/sh
#
# 5/23/2017
#
echo "script3 - Linux Scripting Book"
FN=/tmp/log1.txt             # log file
while [ true ]
do
  echo Pinging $PROVIDER
  ping -c 1 $PROVIDER
  rc=$?
  if [ $rc -ne 0 ] ; then
    echo Cannot ping $PROVIDER
    date >> $FN
    echo Cannot ping $PROVIDER >> $FN
  fi
  sleep 60
done
echo "End of script3"        # 60 seconds
exit 0
And the output on my system:
I ran it just three times, however, it would go forever. Before running this on your system let's talk about that PROVIDER environment variable. I have several scripts on my system that deal with the Internet and I found myself constantly changing providers. It didn't take too long to realize that this was a great time to use an env var, hence PROVIDER.
This is in my /root/.bashrc and /home/guest1/.bashrc files:
export PROVIDER=twc.com
Substitute yours as needed. Notice too that when a failure occurs it is being written to the screen and to a file. Since the >> append operator is being used the file might eventually get rather large so plan accordingly if your connection is not very stable.
Here is a script that detects when a user has either logged on or off your system:
#!/bin/sh
#
# 5/23/2017
#
echo "Chapter 6 - Script 4"
numusers=`who | wc -l`
while [ true ]
do
  currusers=`who | wc -l`           # get current number of users
  if [ $currusers -gt $numusers ] ; then
    echo "Someone new has logged on!!!!!!!!!!!"
    date
    who
#   beep
    numusers=$currusers
  elif [ $currusers -lt $numusers ] ; then
    echo "Someone logged off."
    date
    numusers=$currusers
  fi
  sleep 1                    # sleep 1 second
done
Here's the output (adjusted for length):
This script checks the output from the who command to see if it has changed since the last run. If so it takes the appropriate action. If you have a beep command or equivalent on your system this is a good place to use it.
Take a look at this statement:
currusers=`who | wc -l` # get current number of users
This needs some clarification as we have not covered it yet. Those back-tick characters mean to run the command(s) inside and put the result into the variable. In this case, the who command is piped into the wc -l command to count the number of lines. This value is then put into the currusers variable. If this sounds a bit complicated don't worry, it will be covered in greater detail in the next chapter.
The remainder of the script should already be clear as we have covered this before. If you decide to run something like this on your system just remember that it will trigger every time a new terminal is opened.
Okay, now for some real fun. If you have been using Linux for even just a short amount of time you are probably already aware of cron. This is a daemon, or background process, that executes commands at specific times.
Cron reads a file called crontab once a minute to determine if a command needs to be run.
For the examples in this chapter we will focus on the crontab for a guest account only (not for root).
Using my guest1 account here is what it would look like the first time it is run. It would be a good idea to follow along on your system under a guest account:
guest1 $ crontab -l
no crontab for guest1
guest1 $
That makes sense as we have not created a crontab file for guest1 yet. It is not meant to be edited directly and so the crontab -e command is used.
Run crontab -e under a guest account on your system now.
Here is a screenshot of how it appears on my system when using vi:
As you can see the crontab command creates a temporary file. It is unfortunate that this file comes up empty as they should have provided a template. Let's add one now. Copy and paste the following text into the file:
# this is the crontab file for guest1
# min   hour   day of month  month  day of week       command
# 0-59  0-23    1-31          1-12   0-6
#                                    Sun=0 Mon=1 Tue=2 Wed=3 Thu=4 Fri=5 Sat=6
Substitute guest1 for your user name. This now gives us an idea of what goes where.
To this file add the following line:
* * * * * date > /dev/pts/31
The * means to match everything in the field. So in essence this line will fire once a minute.
We are using the redirection operator to write the output from the echo command to another terminal. Substitute yours as appropriate.
Try the above on your system. Remember you must save the file first, and you should see this output:
guest1 $ crontab -e
crontab: installing new crontab
guest1 $
This means the addition was successful. Now wait for the next minute to come around. You should see the current date show up in the other terminal.
We can now see the basics of cron. Here are a few quick pointers:
0   0    *   *   *   command            # run every day at midnight
0   3    *   *   *   command            # run every day at 3 am
30  9    1   *   *   command            # run at 9:30 am on the first of the month
45  14   *   *   0   command            # run at 2:45 pm on Sundays
0   0    25  12  *   command            # run at midnight on my birthday
This is just a very small subset of how the date and times can be set in cron. For more information consult the man pages for cron and crontab.
One thing that needs to be mentioned is the PATH for a user's cron. It does not source the user's .bashrc file. You can verify this by adding the following line:
* * * * * echo $PATH > /dev/pts/31 # check the PATH
On my CentOS 6.8 system it shows:
/usr/bin:/bin
To get around this problem you can source your .bashrc file:
* * * * * source $HOME/.bashrc; echo $PATH > /dev/pts/31 # check the PATH
This should now show the real path. The EDITOR env var was mentioned in Chapter 2, Working with Variables. If you want crontab to use a different text editor you can set EDITOR to the path/name of the one you want.
For example, on my system I have this:
export EDITOR=/home/guest1/bin/kw
So when I run crontab -e I get this:
Another thing that should be mentioned is if you make a mistake when using crontab in some cases it will tell you when you attempt to save the file. But it cannot check everything so be careful. Also, if a command gets an error crontab will use the mail system to notify the user. So, with this in mind you may need to run the mail command from time to time when using cron.
Now that we have looked at the basics let's create a backup script that uses the zip command. If you are not familiar with zip don't worry, this will get you up to speed quickly. On a Linux system most people just use the tar command, however, if you know how zip works you can share files with Windows users more easily.
In a directory under a guest account run these commands on your system. As usual I used /home/guest1/LinuxScriptingBook:
Make a work directory:
guest1 ~/LinuxScriptingBook $ mkdir work
Change to it:
guest1 ~/LinuxScriptingBook $ cd work
Create some temporary files, and/or copy a few existing files to this directory:
guest1 ~/LinuxScriptingBook/work $ route > route.txt
guest1 ~/LinuxScriptingBook/work $ ifconfig > ifconfig.txt
guest1 ~/LinuxScriptingBook/work $ ls -la /usr > usr.txt
guest1 ~/LinuxScriptingBook/work $ cp /etc/motd .
Get a listing:
guest1 ~/LinuxScriptingBook/work $ ls -la
total 24
drwxrwxr-x 2 guest1 guest1 4096 May 23 09:44 .
drwxr-xr-x 8 guest1 guest1 4096 May 22 15:18 ..
-rw-rw-r-- 1 guest1 guest1 1732 May 23 09:44 ifconfig.txt
-rw-r--r-- 1 guest1 guest1 1227 May 23 09:44 motd
-rw-rw-r-- 1 guest1 guest1  335 May 23 09:44 route.txt
-rw-rw-r-- 1 guest1 guest1  724 May 23 09:44 usr.txt
Zip them up:
guest1 ~/LinuxScriptingBook/work $ zip work1.zip *
  adding: ifconfig.txt (deflated 69%)
  adding: motd (deflated 49%)
  adding: route.txt (deflated 52%)
  adding: usr.txt (deflated 66%)
guest1 ~/LinuxScriptingBook/work $ ls -la
total 28
drwxrwxr-x 2 guest1 guest1 4096 May 23 09:45 .
drwxr-xr-x 8 guest1 guest1 4096 May 22 15:18 ..
-rw-rw-r-- 1 guest1 guest1 1732 May 23 09:44 ifconfig.txt
-rw-r--r-- 1 guest1 guest1 1227 May 23 09:44 motd
-rw-rw-r-- 1 guest1 guest1  335 May 23 09:44 route.txt
-rw-rw-r-- 1 guest1 guest1  724 May 23 09:44 usr.txt
-rw-rw-r-- 1 guest1 guest1 2172 May 23 09:45 work1.zip
There is now file work1.zip in that directory. The syntax to create a zip file is:
zip [optional parameters] filename.zip list-of-files-to-include
To unzip it:
unzip filename.zip
To view (or list) the contents of a zip file without extracting it:
unzip -l filename.zip
This is also a good way to ensure that the .zip file was created properly, because unzip will report an error if it cannot read the file. Note that the zip command not only creates a .zip file but it also compresses the data. This makes for smaller backup files.
#!/bin/sh
#
# 5/23/2017
#
echo "script5 - Linux Scripting Book"
FN=work1.zip
cd /tmp
mkdir work 2> /dev/null      # suppress message if directory already exists
cd work
cp /etc/motd .
cp /etc/issue .
ls -la /tmp > tmp.txt
ls -la /usr > usr.txt
rm $FN 2> /dev/null          # remove any previous file
zip $FN *
echo File "$FN" created.
# cp to an external drive, and/or scp to another computer
echo "End of script5"
exit 0
And the output on my system:
This is a really simple script, however it shows the basics of using the zip command to backup some files.
Suppose we wanted to run this every day at midnight. Assuming script5 was located under /tmp, the crontab entry would be the following:
guest1 /tmp/work $ crontab -l
# this is the crontab file for guest1

# min   hour   day of month  month  day of week       command
# 0-59  0-23    1-31          1-12   0-6  Sun=0
#                                Sun=0 Mon=1 Tue=2 Wed=3 Thu=4 Fri=5 Sat=6

0 0 * * * /tmp/script5
In this case we did not have to source the /home/guest1/.bashrc file. Also notice that any errors get sent to the User's mail account. The zip command can do a whole lot more than just this, for example it can recurse into directories. For more information consult the man pages.
Now let's talk about the Linux tar command. It is used more frequently than the zip command and is better at getting all files, even hidden ones. Referring back to the /tmp/work directory, here is how you would use tar to back it up. It is assumed the files are still there from the previous script:
guest1 /tmp $ tar cvzf work1.gz work/
work/
work/motd
work/tmp.txt
work/issue
work/work1.zip
work/usr.txt
guest1 /tmp $
There is now file work1.gz under the /tmp directory. It is a compressed archive of the contents of all the files under /tmp/work, including the .zip file we created earlier.
The syntax for tar is a little cryptic at first but you will get used to it. Some of the features available in tar are:
|
Parameter |
Feature |
|---|---|
|
|
create an archive |
|
|
extract an archive |
|
|
use the verbose option |
|
|
use gunzip style compression (.gz) |
|
|
the filename to create/extract |
Note that if you do not include the z option the file will not be compressed. By convention the file extension would then just be tar. Note that the user controls the actual name of the file, not the tar command.
Okay so now we have a compressed tar-gz file (or archive). Here is how to un-compress and extract the files. We will do this under /home/guest1:
guest1 /home/guest1 $ tar xvzf /tmp/work1.gz
work/
work/motd
work/tmp.txt
work/issue
work/work1.zip
work/usr.txt
guest1 /home/guest1 $
Using tar to backup a system is really convenient. It's also a great way to configure a new machine with your personal files. For example, I routinely back up the following directories on my primary system:
 /home/guest1
 /lewis
 /temp
 /root
These files are then auto-copied to an external USB drive. Remember that tar automatically recurses into directories and also gets every file, including hidden ones. Tar also has many other options that control how the archive is created. One of the most common options is to exclude certain directories.
For example, when backing up /home/guest1 there is really no reason to include the .cache, Cache, .thumbnails, and so on directories.
The option to exclude directories is --exclude=<directory name> and that is shown in the next script.
Here are the backup programs that I use on my primary Linux system. It is two scripts, one to schedule the backup and one to actually perform the work. I mainly did this so that I could make changes to the actual backup script without turning off the scheduler script. The first thing that needs to be set up is the crontab entry. Here is what it looks like on my system:
guest1 $ crontab -l
# this is the crontab file for guest1
# min   hour   day of month  month  day of week       command
# 0-59  0-23    1-31          1-12   0-6  Sun=0
#                                Sun=0 Mon=1 Tue=2 Wed=3 Thu=4 Fri=5 Sat=6
TTY=/dev/pts/31

 0  3   *  *  *  touch /tmp/runbackup-cron.txt
This will create the file /tmp/backup-cron.txt at approximately 3 am every day.
#!/bin/sh
#
# runbackup1 - this version watches for file from crontab
#
# 6/3/2017 - mainlogs now under /data/mainlogs
#
VER="runbackup1 6/4/2017 A"
FN=/tmp/runbackup-cron.txt
DR=/wd1                      # symbolic link to external drive

tput clear
echo $VER

# Insure backup drive is mounted
file $DR | grep broken
rc=$?
if [ $rc -eq 0  ] ; then
 echo "ERROR: USB drive $DR is not mounted!!!!!!!!!!!!!!"
 beep
 exit 255
fi

cd $LDIR/backup

while [ true ]
do
 # crontab creates the file at 3 am

 if [ -f $FN ] ; then
  rm $FN
  echo Running backup1 ...
  backup1 | tee /data/mainlogs/mainlog`date '+%Y%m%d'`.txt
  echo $VER
 fi

 sleep 60                    # check every minute
done
There's a lot of information here so we will go through it line by line:
DR variable is assigned to my USB external drive (wd1) which is a symbolic link.file command to ensure that /wd1 has been mounted. If it has not, the file command will return broken symbolic link, grep will trigger on this, and the script will abort.backup1 script (see next) is run. The output from it is sent to both the screen and the file using the tee command.'+%Y%m%d' shows the date in this format: YYYYMMDDI check the files in the /data/mainlogs directory from time to time to make sure my backups are being created correctly with no errors.
The following script is used to backup my system. The logic here is the current day backups are stored on the hard drive in the $TDIR directory. They are also copied to a numbered directory on the external drive. These go into directories numbered 1 through 7. When the last one is reached it starts back at 1 again. This way there are always 7 days of backups available on the external drive.
#!/bin/sh
#   Jim's backup program
#   Runs standalone
#   Copies to /data/backups first, then to USB backup drive
VER="File backup by Jim Lewis 5/27/2017 A"
TDIR=/data/backups
RUNDIR=$LDIR/backup
DR=/wd1
echo $VER
cd $RUNDIR
# Insure backup drive is mounted
file $DR | grep broken
a=$?
if [ "$a" != "1" ] ; then
 echo "ERROR: USB drive $DR is not mounted!!!!!!!!!!!!!!"
 beep
 exit 255
fi
date >> datelog.txt
date
echo "Removing files from $TDIR"
cd "$TDIR"
rc=$?
if [ $rc -ne 0 ] ; then
 echo "backup1: Error cannot change to $TDIR!"
 exit 250
fi
rm *.gz
echo "Backing up files to $TDIR"
X=`date '+%Y%m%d'`
cd /
tar cvzf "$TDIR/lewis$X.gz"  lewis
tar cvzf "$TDIR/temp$X.gz"   temp
tar cvzf "$TDIR/root$X.gz"   root
cd /home
tar cvzf "$TDIR/guest$X.gz" --exclude=Cache --exclude=.cache --exclude=.evolution --exclude=vmware --exclude=.thumbnails  --exclude=.gconf --exclude=.kde --exclude=.adobe  --exclude=.mozilla  --exclude=.gconf  --exclude=thunderbird  --exclude=.local --exclude=.macromedia  --exclude=.config   guest1
cd $RUNDIR
T=`cat filenum1`
BACKDIR=$DR/backups/$T
rm $BACKDIR/*.gz
cd "$TDIR"
cp *.gz $BACKDIR
echo $VER
cd $BACKDIR
pwd
ls -lah
cd $RUNDIR
let T++
if [ $T -gt 7 ] ; then
 T=1
fi
echo $T > filenum1
This is a bit more complicated than the previous scripts so let's go through it line by line:
RUNDIR variable holds the starting directory for the scripts.DR variable points to the external backup drive.datelog.txt file.TDIR variable is the target directory for the backups.cd is performed to that directory and the return code is checked. On error the script exits with a 250.It now goes back to the / directory to perform the tar backups.
Notice that several directories are excluded from the guest1 directory.
cd $RUNDIR puts it back into the starting directory.T=`filenum1` gets the value from that file and puts it into the T variable. This is a counter for which directory to use next on the external drive.BACKDIR is set to the old backups and then they are removed.pwd displays the name, and then the contents of the directory are displayed.T variable is incremented by 1. If it is greater than 7 it is set back to 1.And finally the updated T variable is written back to the filenum1 file.
This script should serve as a good starting point for whatever backup process you want to develop. Note that the scp command can be used to copy files directly to another computer without user intervention. This will be covered in Chapter 10, Scripting Best Practices.
We described how to create a script to automate a task. The proper way to use cron to run a script automatically at a specific time was covered. The archive commands zip and tar were discussed to show how to perform compressed backups. A full scheduler and backup script were also included and discussed.
In the next chapter we will show how to read and write files in a script.
This chapter will show how to read from and write to text files. It will also cover file encryption and checksums.
The topics covered in this chapter are as follows:
cat and other important commandsWe showed in some of the previous chapters how to create and write files by using the redirection operator. To recap, this command will create the file ifconfig.txt (or overwrite the file if it already exists):
ifconfig > ifconfig.txt
The following command will append to any previous file or create a new one if it does not already exist:
ifconfig >> ifconfig.txt
Some of the previous scripts used the back-tick operator to retrieve the data from a file. Let's recap by looking at Script 1:
#!/bin/sh
#
# 6/1/2017
#
echo "Chapter 7 - Script 1"
FN=file1.txt
rm $FN 2> /dev/null          # remove it silently if it exists
x=1
while [ $x -le 10 ]          # 10 lines
do
 echo "x: $x"
 echo "Line $x" >> $FN       # append to file
 let x++
done
echo "End of script1"
exit 0
This is pretty straight forward. It removes the file (silently) if it exists, and then outputs each line to the file, incrementing x each time. When x gets to 10 the loop terminates.
Now let's look again at the method the backup scripts in the last chapter used to get the value from a file:
#!/bin/sh
#
# 6/2/2017
#
echo "Chapter 7 - Script 2"

FN=filenum1.txt              # input/output filename
MAXFILES=5                   # maximum number before going back to 1

if [ ! -f $FN ] ; then
  echo 1 > $FN               # create the file if it does not exist
fi

echo -n "Contents of $FN: "
cat $FN                      # display the contents

count=`cat $FN`              # put the output of cat into variable count
echo "Initial value of count from $FN: $count"

let count++
if [ $count -gt $MAXFILES ] ; then
 count=1
fi

echo "New value of count: $count"
echo $count > $FN

echo -n "New contents of $FN: "
cat $FN

echo "End of script2"
exit 0
Here is the screenshot for Script 2:
We start by setting the FN variable to the name of the file (filenum1.txt). It is displayed by the cat command and then the contents of the file are assigned to the count variable. It is displayed and then incremented by 1. The new value is written back to the file and then it is displayed again. Run this one at least 6 times to see how it wraps around.
This is just one simple way to create and read a file. Now let's look at a script that reads several lines from a file. It will use the file file1.txt that was created by the preceding Script 1.
#!/bin/sh
#
# 6/1/2017
#
echo "Chapter 7 - Script 3"
FN=file1.txt                 # filename
while IFS= read -r linevar   # use read to put line into linevar
do
  echo "$linevar"            # display contents of linevar
done < $FN                   # the file to use as input
echo "End of script3"
exit 0
And here is the output:
The structure here may look a little strange as it is rather different from what we have seen before. This script uses the read command to get each line of the file. In the statement:
while IFS= read -r linevar
The IFS= (Internal Field Separator) prevents read from trimming leading and trailing whitespace characters. The -r parameter to read causes backslash escape sequences to be ignored. The next line uses the redirection operator to enable file1.txt as the input for read.
done < $FN
There is a lot of new material here and so look this over carefully until you get comfortable with it.
There is a slight flaw in the above script. If the file does not exist an error will occur. Look at the following screenshot:
Shell scripts are interpreted, meaning each line is examined and run by the system one at a time. This is different from say a program written in the C language which is compiled. This means any syntax errors will appear during the compile stage and not when the program is run. We will discuss how to avoid most shell scripting syntax errors in Chapter 9, Debugging scripts.
Here is Script 4 with a solution to the missing file problem:
#!/bin/sh
#
# 6/1/2017
#
echo "Chapter 7 - Script 4"

FN=file1.txt                 # filename
if [ ! -f $FN ] ; then
 echo "File $FN does not exist."
 exit 100
fi

while IFS= read -r linevar   # use read to put line into linevar
do
  echo "$linevar"            # display contents of linevar
done < $FN                   # the file to use as input

echo "End of script4"
exit 0
And the following is the output:
Keep this in mind when using files and always check to make sure the file exists before trying to read it.
This next script reads a text file and creates a copy of it:
#!/bin/sh
#
# 6/1/2017
#
echo "Chapter 7 - Script 5"

if [ $# -ne 2 ] ; then
 echo "Usage: script5 infile outfile"
 echo " Copies text file infile to outfile."
 exit 255
fi

INFILE=$1
OUTFILE=$2

if [ ! -f $INFILE ] ; then
 echo "Error: File $INFILE does not exist."
 exit 100
fi

if [ $INFILE = $OUTFILE ] ; then
 echo "Error: Cannot copy to same file."
 exit 101
fi

rm $OUTFILE 2> /dev/null       # remove it
echo "Reading file $INFILE ..."

x=0
while IFS= read -r linevar     # use read to put line into linevar
do
  echo "$linevar" >> $OUTFILE  # append to file
  let x++
done < $INFILE                 # the file to use as input
echo "$x lines read."

diff $INFILE $OUTFILE          # use diff to check the output
rc=$?
if [ $rc -ne 0 ] ; then
 echo "Error, files do not match."
 exit 103
else
 echo "File $OUTFILE created."
fi

sum $INFILE $OUTFILE           # show the checksums

echo "End of script5"
exit $rc
Here is the screenshot for Script 5:
This shows how to read and write a text file in a script. The following explains each line:
Usage message is displayed.100 if it does not.while loop reads and writes the lines. A count is made of the number of lines in x.diff command is used to make sure the files are the same.sum command is run on the two files.This next script is similar to one in Chapter 5, Creating Interactive Scripts. It reads the file specified, displays a form, and allows the user to edit and then save it:
#!/bin/sh
# 6/2/2017
# Chapter 7 - Script 6

trap catchCtrlC INT          # Initialize the trap

# Subroutines
catchCtrlC()
{
 move 13 0
 savefile
 movestr 23 0 "Script terminated by user."
 echo ""                     # carriage return
 exit 0
}

cls()
{
 tput clear
}

move()                       # move cursor to row, col
{
 tput cup $1 $2
}

movestr()                    # move cursor to row, col
{
 tput cup $1 $2
 echo -n "$3"                # display string
}

checktermsize()
{
 rc1=0                       # default is no error
 if [[ $LINES -lt $1 || $COLUMNS -lt $2 ]] ; then
  rc1=1                      # set return code
 fi
 return $rc1
}

init()                       # set up the cursor position array
{
 srow[0]=2;  scol[0]=7       # name
 srow[1]=4;  scol[1]=12      # address 1
 srow[2]=6;  scol[2]=12      # address 2
 srow[3]=8;  scol[3]=7       # city
 srow[4]=8;  scol[4]=37      # state
 srow[5]=8;  scol[5]=52      # zip code
 srow[6]=10; scol[6]=8       # email
}

drawscreen()                 # main screen draw routine
{
 cls                         # clear the screen
 movestr 0 25 "Chapter 7 - Script 6"

 movestr 2 1  "Name: ${array[0]}"
 movestr 4 1  "Address 1: ${array[1]}"
 movestr 6 1  "Address 2: ${array[2]}"
 movestr 8 1  "City: ${array[3]}"
 movestr 8 30 "State: ${array[4]}"
 movestr 8 42 "Zip code: ${array[5]}"
 movestr 10 1 "Email: ${array[6]}"
}

getdata()
{
 x=0                         # start at the first field
 while [ true ]
 do
  row=${srow[x]}; col=${scol[x]}
  move $row $col
  read var
  if [ -n "$var" ] ; then    # if not blank assign to array
    array[$x]=$var
  fi
  let x++
  if [ $x -eq $sizeofarray ] ; then
   x=0                       # go back to first field
  fi
 done

 return 0
}

savefile()
{
 rm $FN 2> /dev/null         # remove any existing file
 echo "Writing file $FN ..."
 y=0
 while [ $y -lt $sizeofarray ]
 do
  echo "$y - '${array[$y]}'"            # display to screen
  echo "${array[$y]}" >> "$FN"          # write to file
  let y++
 done
 echo "File written."
 return 0
}

getfile()
{
 x=0
 if [ -n "$FN" ] ; then      # check that file exists
  while IFS= read -r linevar # use read to put line into linevar
  do
   array[$x]="$linevar"
   let x++
  done < $FN                 # the file to use as input
 fi
 return 0
}

# Code starts here
if [ $# -ne 1 ] ; then
 echo "Usage: script6 file"
 echo " Reads existing file or creates a new file"
 echo " and allows user to enter data into fields."
 echo " Press Ctrl-C to end."
 exit 255
fi

FN=$1                        # filename (input and output)
sizeofarray=7                # number of array elements
checktermsize 25 80
rc=$?
if [ $rc -ne 0 ] ; then
 echo "Please size the terminal to 25x80 and try again."
 exit 1
fi

init                         # initialize the screen array
getfile                      # read in file if it exists
drawscreen                   # draw the screen
getdata                      # read in the data and put into the fields

exit 0
Here is what this looks like on my system:
Here is a description of the code:
getdata routine is used to read the user input.savefile routine writes out the data array.getfile routine reads the file, if it exists, into the array.FN variable is set to the name of the file.sizeofarray.init routine is called which sets up the screen array.getfile and drawscreen are called.getdata routine is used to move the cursor and get the data from the fields into the proper array location.This is an example of how a simple screen input/output routine can be developed in Bash. This script could use a few refinements, here is a partial list:
grep commands.You probably noticed the use of the sum command above. It displays the checksum and block count of files which can be used to determine if two or more files are the same file (that is, have the exact same contents).
Here is a real world example:
Suppose you are writing a book, and the files are being sent from the author to the publisher for review. The publisher makes some revisions and then sends the revised file back to the author. It is sometimes easy to get out of sync, and receive a file that doesn't look any different. If you run the sum command against the two files you can easily determine if they are the same.
Take a look at the following screenshot:
The first column is the checksum and the second column is the block count. If both of these are the same that means the contents of the files are identical. So, in this example bookfiles 1, 2, and 4 are the same. Bookfiles 3 and 5 are also the same. However, bookfiles 6, 7, and 8 don't match up with anything, and the last two don't even have the same block count.
There are times you might want to encrypt some important and/or confidential files on your system. Some people store their passwords in a file on their computers, this is probably okay but only if some type of file encryption is being used. There are many encryption programs available, here we will show OpenSSL.
The OpenSSL command line tool is very popular and is most likely already installed on your computer (it came by default on my CentOS 6.8 systems). It has several options and methods of encryption, however we will cover just the basics.
Using file1.txt again from above try the following on your system:
We start by performing a sum on the file1.txt file, then run openssl. Here is the syntax:
enc: specify which encoding to use, in this case it's aes-256-cbc-in: the input file-out: the output file-d: decryptAfter running the openssl command we perform an ls -la to verify that the output file was indeed created.
We then decrypt the file. Note the order of the files and the addition of the -d parameter (to decrypt). We do another sum to verify that the resulting file is the same as the original.
Since there is no way I am going to type that all the time let's write a quick script to do it:
#!/bin/sh
#
# 6/2/2017
#
echo "Chapter 7 - Script 7"

if [ $# -ne 3 ] ; then
 echo "Usage: script7 -e|-d infile outfile"
 echo " Uses openssl to encrypt files."
 echo " -e to encrypt"
 echo " -d to decrypt"
 exit 255
fi

PARM=$1
INFILE=$2
OUTFILE=$3

if [ ! -f $INFILE ] ; then
 echo "Input file $INFILE does not exist."
 exit 100
fi

if [ "$PARM" = "-e" ] ; then
 echo "Encrypting"
 openssl enc -aes-256-cbc -in $INFILE -out $OUTFILE
elif [ "$PARM" = "-d" ] ; then
 echo "Decrypting"
 openssl enc -aes-256-cbc -d -in $INFILE -out $OUTFILE
else
 echo "Please specify either -e or -d."
 exit 101
fi

ls -la $OUTFILE

echo "End of script7"
exit 0
Here is the screenshot:
This is obviously a lot easier than typing (or trying to remember) the syntax for openssl. As you can see the resulting decrypted file (file2.txt) is the same as the file1.txt file.
In this chapter we showed how to write out a file using the redirection operator and how to read a file using the (properly formatted) read command. Converting the contents of a file into a variable was covered as was the use of checksums and file encryption.
In the next chapter we will look at some utilities that can be used to gather information from web pages on the Internet.
This chapter will show how to use wget and curl to gather information directly from the internet.
The topics covered in this chapter are:
wget.curl.Scripts that can gather data in this way can be very powerful tools to have at your disposal. As you will see from this chapter, you can get stock quotes, lake levels, just about anything automatically from web sites anywhere in the world.
You may have already heard about or even used the wget program. It is a command line utility that can be used to download files from the Internet.
Here is a screenshot showing wget in its most simplest form:
In the output you can see that wget downloaded the index.html file from my jklewis.com website.
This is the default behavior of wget. The standard usage is:
wget [options] URL
where URL stands for Uniform Resource Locator, or address of the website.
Here is just a short list of the many available options with wget:
|
Parameter |
Explanation |
|---|---|
|
|
|
|
|
same as |
|
|
output file, copy the file to this name |
|
|
turn debugging on |
|
|
quiet mode |
|
|
verbose mode |
|
|
recursive mode |
Let's try another example:
The -o option was used in this case. The return code was checked and a code of 0 means no failure. There was no output because it was directed to the log file which was displayed by the cat command.
The -o option, write output to file, was used in this case. There was no output displayed because it was directed to the log file which was then shown by the cat command. The return code from wget was checked and a code of 0 means no failure.
Notice that this time it named the downloaded file index.html.1. This is because index.html was created in the previous example. The author of this application did it this way to avoid overwriting a previously downloaded file. Very nice!
Take a look at this next example:
Here we are telling wget to download the file given (shipfire.gif).
In this next screenshot we show how wget will return a useful error code:
This error occurred because there is no file named shipfire100.gif in the base directory on my website. Notice how the output shows a 404 Not Found message, this is seen very often on the Web. In general, it means a requested resource was not available at that time. In this case the file isn't there and so that message appears.
Note too how wget returned an 8 error code. The man page for wget shows this for the possible exit codes from wget:
|
Error codes |
Explanation |
|---|---|
|
|
No problems occurred. |
|
|
Generic error code. |
|
|
Parse error. For instance when parsing command-line options, the |
|
|
File I/O error. |
|
|
Network failure. |
|
|
SSL verification failure. |
|
|
Username/password authentication failure. |
|
|
Protocol errors. |
|
|
Server issued an error response. |
A return of 8 makes pretty good sense. The server could not find the file and so returned a 404 error code.
Now is a good time to mention the different wget configuration files. There are two main files, /etc/wgetrc is the default location of the global wget startup file. In most cases you probably should not edit this unless you really want to make changes that affect all users. The file $HOME/.wgetrc is a better place to put any options you would like. A good way to do this is to open both /etc/wgetrc and $HOME/.wgetrc in your text editor and then copy the stanzas you want into your $HOME./wgetrc file.
For more information on the wget config files consult the man page (man wget).
Now let's see wget in action. I wrote this a while back to keep track of the water level in the lake I used to go boating in:
#!/bin/sh
# 6/5/2017
# Chapter 8 - Script 1

URL=http://www.arlut.utexas.edu/omg/weather.html
FN=weather.html
TF=temp1.txt                 # temp file
LF=logfile.txt               # log file

loop=1
while [ $loop -eq 1 ]
do
 rm $FN 2> /dev/null         # remove old file
 wget -o $LF $URL
 rc=$?
 if [ $rc -ne 0 ] ; then
  echo "wget returned code: $rc"
  echo "logfile:"
  cat $LF

  exit 200
 fi

 date
 grep "Lake Travis Level:" $FN > $TF
 cat $TF | cut  -d ' ' -f 12 --complement

 sleep 1h
done

exit 0
This output is from June 5, 2017. It's not much to look at but here it is:
You can see from the script and the output that it runs once every hour. In case you were wondering why anyone would write something like this, I needed to know if the lake level went below 640 feet as I would have had to move my boat out of the marina. This was during a severe drought back in Texas.
There are a few things to keep in mind when writing a script like this:
wget once manually and then work with the downloaded file.wget several times in a short period of time or else you may get blocked by the site.wget again.The wget program can also be used to download the contents of an entire website by using the recursive (-r) option.
For an example look at the following screenshot:
The no verbose (-nv) option was used to limit the output. After the wget command completed the more command was used to view the contents of the log. Depending on the number of files the output might be very long.
When using wget you may run into unexpected issues. It may not get any files, or it may get some but not all of them. It might even fail without any reasonable error message. If this happens check the man page (man wget) very carefully. There may be an option that can help get you through the problem. In particular look at the following.
Run wget --version on your system. It will display a detailed listing of the options and features and also how wget was compiled.
Here is an example taken from my system running CentOS 6.8 64-bit:
Normally the defaults used by wget are good enough for most users, however, you may need to tweak things from time to time to get it to work the way you want it to.
Here is a partial list of some of the wget options:
|
wget option |
Explanation |
|---|---|
|
|
Output messages to a |
|
|
Try number times before giving up on the connection. |
|
|
Continue to download a partially downloaded file from a previous |
|
|
Display the headers sent by the server. |
|
|
The quota, or total amount of bytes that will be downloaded. Number can be in bytes, kilobytes (k), or megabytes (m). Set to 0 or inf for no quota. |
|
|
This specifies the maximum recursion level. The default is 5. |
|
|
This is good for when trying to create a mirror of a site. It is equivalent to using the |
Another thing you may try is to turn on debugging with the -d option. Note that this will only work if your version of wget was compiled with debug support. Let's see what happens when I try it on my system:
I wasn't sure if debugging was turned on or not, now I know. This output might not be very useful unless you are a developer, however, if you ever need to send in a bug report on wget they are going to ask for the debug output.
As you can see, wget is a very powerful program with several options.
Now let's look at the curl program as it is somewhat similar to wget. One of the main differences between wget and curl is how they handle the output.
The wget program by default displays some progress information on the screen and then downloads the index.html file. In contrast, curl normally displays the file itself on the screen.
Here is an example of curl running on my system using my favorite website (screenshot shortened to save space):
Another way to get the output into a file is by using redirection like this:
You will notice that when redirected to a file the transfer progress is displayed on the screen. Also note that any error output goes into the file if redirected and not the screen.
Here is a very brief list of the options available in curl:
|
Curl options |
Explanation |
|---|---|
|
|
Output filename |
|
|
Silent mode. Shows nothing, not even errors |
|
|
Show errors if in silent mode |
|
|
Verbose, useful for debugging |
There are many other options to curl, as well as several pages of return codes. For more information consult the curl man page.
And now here is a script showing how curl can be used to automatically get the current value of the Dow Jones Industrial Average:
#!/bin/sh
# 6/6/2017
# Chapter 8 - Script 2

URL="https://www.google.com/finance?cid=983582"
FN=outfile1.txt              # output file
TF=temp1.txt                 # temp file for grep

loop=1
while [ $loop -eq 1 ]
do
 rm $FN 2> /dev/null         # remove old file
 curl -o $FN $URL            # output to file
 rc=$?
 if [ $rc -ne 0 ] ; then
  echo "curl returned code: $rc"
  echo "outfile:"
  cat $FN

  exit 200
 fi

 echo ""                     # carriage return
 date
 grep "ref_983582_l" $FN > $TF
 echo -n "DJIA: "
 cat $TF | cut -c 25-33

 sleep 1h
done

exit 0
Here's what it looks like on my system. Normally you would probably leave the progress information out of the output by using the -s option but I thought it looked cool and so left it in:
You can see that curl and wget work pretty much the same way. Remember when writing scripts such as these to keep in mind that the format of the page will almost certainly change from time to time so plan accordingly.
In this chapter we showed how to use wget and curl in scripts. The default behavior of these programs were shown as were some of the many options. Return codes were also discussed and a couple of example scripts were presented.
The following chapter will cover how to more easily debug both syntax and logic errors in your scripts.
This chapter shows how to debug Bash shell scripts.
Programming in any language, be it C, Java, FORTRAN, COBOL*, or Bash can be a lot of fun. However, what is often not fun is when something goes wrong, and when it takes an inordinate amount of time to find the problem and then solve it. This chapter will attempt to show the reader how to avoid some of the more common syntax and logic errors, and also how to find them when they occur.
*COBOL: Okay, I have to say that programming in COBOL was never fun!
The topics covered are in the chapter are:
set -x and set -v.Nothing can be so frustrating than to be on a roll when coding your script or program and then have a syntax error pop up. In some cases the solution is so easy you find and solve it right away. In other cases it can take minutes or even hours. Here are a few pointers:
When coding a loop put the whole while...do...done structure in first. It is sometimes really easy to forget the ending done statement, especially if the code spans more than a page.
Take a look at Script 1:
#!/bin/sh
#
# 6/7/2017
#
echo "Chapter 9 - Script 1"

x=0
while [ $x -lt 5 ]
do
 echo "x: $x"
 let x++

y=0
while [ $y -lt 5 ]
do
 echo "y: $y"
 let y++
done

# more code here
# more code here

echo "End of script1"
exit 0
Look at this real closely, it says the error is at line 26. Wow, how can that be, when the file has only has 25 lines in it? The simple answer is that's just the way the Bash interpreter handles this type of situation. If you have not already found the bug it's actually at line 12. This is where the done statement should have been and by omitting it I intentionally caused the error. Now imagine if this had been a really long script. Depending on the circumstances it could take a long time to find the line that caused the problem.
Now take a look at Script 2, which is just Script 1 with some additional echo statements:
#!/bin/sh
#
# 6/7/2017
#
echo "Chapter 9 - Script 2"

echo "Start of x loop"
x=0
while [ $x -lt 5 ]
do
 echo "x: $x"
 let x++

echo "Start of y loop"
y=0
while [ $y -lt 5 ]
do
 echo "y: $y"
 let y++
done

# more code here
# more code here

echo "End of script2"
exit 0
Here is the output:
You can see that the echo statement Start of x loop was displayed. However, the second one, Start of y loop was not displayed. This gives you a good idea that the error is somewhere before the 2nd echo statement. In this case it is right before, but don't expect to be that lucky every time.
Now for a bit of free programming advice, making automatic backups of files was mentioned in Chapter 4, Creating and Calling Subroutines. I strongly suggest you use something like this when you are writing anything that is even slightly complicated. There is nothing more frustrating than to be working on your program or script and have it going pretty well, only to make a few changes and have it fail in some bizarre fashion. You had it working a few minutes ago and then wham! It has a fault and you can't figure out what change caused it. If you don't have a numbered backup you could literally spend hours (maybe days) trying to find the bug. I have seen people spend hours backing out every change until the problem was found. Yes, I have done it too.
Obviously if you have a numbered backup you can simply go back and find the latest one that doesn't have the fault. You can then diff the two versions and probably find the error really fast. Without a numbered backup, well you are on your own. Don't do what I did and wait 2 years or more before realizing all of this.
A fundamental problem with shell scripts is syntax errors don't usually show up until the line with the problem is parsed by the interpreter. Here's a common error that I still find myself doing more than I should. See if you can locate the problem by just reading the script:
#!/bin/sh # # 6/7/2017 # echo "Chapter 9 - Script 3" if [ $# -ne 1 ] ; then echo "Usage: script3 parameter" exit 255 fi parm=$1 echo "parm: $parm" if [ "$parm" = "home" ] ; then echo "parm is home." elif if [ "$parm" = "cls" ] ; then echo "parm is cls." elif [ "$parm" = "end" ] ; then echo "parm is end." else echo "Unknown parameter: $parm" fi echo "End of script3" exit 0
Did you find my mistake? When I code an if...elif...else statement, I tend to copy and paste the first if statement. I then prepend elif to the next statement but forget to remove the if. This gets me almost every time.
Look at how I ran this script. I started first with just the name of the script to invoke the Usage clause. You may find it interesting that the syntax error was not reported by the interpreter. That's because it never got down to that line. This can be a real problem with scripts, as it may run for days, weeks, or even years before running a part of code that has a syntax error in it and then failing. Keep this in mind when writing and testing your scripts.
Here is another quick example of a classic syntax error (classic in the sense that I just now made it again):
for i in *.txt echo "i: $i" done
When run it outputs this:
./script-bad: line 8: syntax error near unexpected token `echo' ./script-bad: line 8: ` echo "i: $i"'
Can you find my mistake? If not look again. I forgot the do statement after the for statement. Bad Jim!
One of the easiest things to do wrong in a script is to forget the $ in front of a variable. This is particularly so if you code in other languages such as C or Java, because you don't prepend a $ to variables in those languages. The only real advice I can give here is if your script just doesn't seem to be doing anything right check all of your variables for the $. But be careful you don't go too far and start adding them where they don't belong!
Now let's talk about logic errors. These can be very hard to diagnose, and unfortunately I don't have any magical ways to avoid those. There are some things that can be pointed out however to help track them down.
A common problem with coding is what is called off by 1 errors. This was caused when computer language designers in the sixties decided to number things starting at 0 instead of 1. Computers will happily start counting anywhere you want them to and never complain at all, but most humans tend to do better when they start counting at 1. Most of my peers would probably disagree with this, but since I was the one who always had to fix their off by 1 defects I stand by my comments.
Let's look at the following very simple script:
#!/bin/sh # # 6/7/2017 # echo "Chapter 9 - Script 4" x=0 while [ $x -lt 5 ] do echo "x: $x" let x++ done echo "x after loop: $x" let maxx=x y=1 while [ $y -le 5 ] do echo "y: $y" let y++ done echo "y after loop: $y" let maxy=y-1 # must subtract 1 echo "Max. number of x: $maxx" echo "Max. number of y: $maxy" echo "End of script4" exit 0
And the output:
Look at the subtle differences between the two loops:
x loop the counting was started at 0.x was incremented while it was less than 5.x after the loop was 5.maxx, which is supposed to equal the number of iterations, is set to x.1.y was incremented while it was less than or equal to 5.y after the loop was 6.maxy, which is supposed to equal the number of iterations, is set to y-1.If you already understand the above perfectly you will probably never have a problem with 1 off errors and that's great.
For the rest of us I suggest looking over this very carefully until you get it just right.
You can use the set commands to help with debugging your scripts. There are two common options to set, x and v. Here is a description of each.
Note that a - activates the set while a + deactivates it. If that sounds backwards to you it is because it is backwards.
Use:
set -x: to display the expanded trace before running the commandset -v: to display the input line as it is parsedTake a look at Script 5 which shows what set -x does:
#!/bin/sh # # 6/7/2017 # set -x # turn debugging on echo "Chapter 9 - Script 5" x=0 while [ $x -lt 5 ] do echo "x: $x" let x++ done echo "End of script5" exit 0
And the output:
If this looks a little strange at first don't worry, it gets easier the more you look at it. In essence, the lines that start with a + are the expanded source code lines, and the lines without a + are the output of the script.
Look at the first two lines. It shows:
+ echo 'Chapter 9 - Script 5' Chapter 9 - Script 5
The first line shows the expanded command and the second the output.
You can also use the set -v option. Here is a screenshot of Script 6 which is just Script 5 but with set -v this time:
You can see the output is quite a bit different.
Note that with the set commands you can turn them on and off at any point you want in the script. This is so you can limit the output to just the areas of the code you are interested in.
Let's look at an example of this:
#!/bin/sh
#
# 6/8/2017
#
set +x # turn debugging off
echo "Chapter 9 - Script 7"
x=0
for fn in *.txt
do
echo "x: $x - fn: $fn"
array[$x]="$fn"
let x++
done
maxx=$x
echo "Number of files: $maxx"
set -x # turn debugging on
x=0
while [ $x -lt $maxx ]
do
echo "File: ${array[$x]}"
let x++
done
set +x # turn debugging off
echo "End of script7"
exit 0Notice how the debugging was explicitly turned off at the beginning of the script even though it is off by default. This is a good way to keep track of when it is off and when it is on. Look at the output closely and see how the debug statements don't start displaying until the second loop with the array. Then it is turned off before running the last two lines.
The output when using the set commands can be pretty hard to look at sometimes and so this is a good way to limit what you have to wade through to get to the lines of interest.
There is another debugging technique that I use quite frequently. In many cases I think it is superior to using the set commands as the display does not get quite as cluttered. You may recall in Chapter 6, Automating Tasks with Scripts, that we were able to display output to other terminals. This is a very handy feature.
The following script shows how to display output in another terminal. A subroutine is used for convenience:
#!/bin/sh
#
# 6/8/2017
#
echo "Chapter 9 - Script 8"
TTY=/dev/pts/35 # TTY of other terminal
# Subroutines
p1() # display to TTY
{
rc1=0 # default is no error
if [ $# -ne 1 ] ; then
rc1=2 # missing parameter
else
echo "$1" > $TTY
rc1=$? # set error status of echo command
fi
return $rc1
}
# Code
p1 # missing parameter
echo $?
p1 Hello
echo $?
p1 "Linux Rules!"
echo $?
p1 "Programming is fun!"
echo $?
echo "End of script8"
exit 0Remember to quote the parameter to p1 in case it contains blank characters.
This subroutine might be a bit of overkill to use for debugging but it captures many of the concepts previously discussed in this book. This approach can also be used in a script to display information in multiple terminals. We will go over that in the next chapter.
It probably means the terminal has not been opened yet. Also remember to put your terminal device strings into a variable because those tend to change after a reboot. Something like TTY=/dev/pts/35 is a good idea.
A great time to use this debugging technique is when writing a form script as we did in Chapter 5, Creating Interactive Scripts. So, let's take a look at that script again and put this new subroutine to use.
#!/bin/sh
# 6/8/2017
# Chapter 9 - Script 9
#
TTY=/dev/pts/35 # debug terminal
# Subroutines
cls()
{
tput clear
}
move() # move cursor to row, col
{
tput cup $1 $2
}
movestr() # move cursor to row, col
{
tput cup $1 $2
echo -n "$3" # display string
}
checktermsize()
{
p1 "Entering routine checktermsize."
rc1=0 # default is no error
if [[ $LINES -lt $1 || $COLUMNS -lt $2 ]] ; then
rc1=1 # set return code
fi
return $rc1
}
init() # set up the cursor position array
{
p1 "Entering routine init."
srow[0]=2; scol[0]=7 # name
srow[1]=4; scol[1]=12 # address 1
srow[2]=6; scol[2]=12 # address 2
srow[3]=8; scol[3]=7 # city
srow[4]=8; scol[4]=37 # state
srow[5]=8; scol[5]=52 # zip code
srow[6]=10; scol[6]=8 # email
}
drawscreen() # main screen draw routine
{
p1 "Entering routine drawscreen."
cls # clear the screen
movestr 0 25 "Chapter 9 - Script 9"
movestr 2 1 "Name:"
movestr 4 1 "Address 1:"
movestr 6 1 "Address 2:"
movestr 8 1 "City:"
movestr 8 30 "State:"
movestr 8 42 "Zip code:"
movestr 10 1 "Email:"
}
getdata()
{
p1 "Entering routine getdata."
x=0 # array subscript
rc1=0 # loop control variable
while [ $rc1 -eq 0 ]
do
row=${srow[x]}; col=${scol[x]}
p1 "row: $row col: $col"
move $row $col
read array[x]
let x++
if [ $x -eq $sizeofarray ] ; then
rc1=1
fi
done
return 0
}
showdata()
{
p1 "Entering routine showdata."
fn=0
echo ""
read -p "Enter filename, or just Enter to skip: " filename
if [ -n "$filename" ] ; then # if not blank
echo "Writing to '$filename'"
fn=1 # a filename was given
fi
echo "" # skip 1 line
echo "Data array contents: "
y=0
while [ $y -lt $sizeofarray ]
do
echo "$y - ${array[$y]}"
if [ $fn -eq 1 ] ; then
echo "$y - ${array[$y]}" >> "$filename"
fi
let y++
done
return 0
}
p1() # display to TTY
{
rc1=0 # default is no error
if [ $# -ne 1 ] ; then
rc1=2 # missing parameter
else
echo "$1" > $TTY
rc1=$? # set error status of echo command
fi
return $rc1
}
# Code starts here
p1 " " # carriage return
p1 "Starting debug of script9"
sizeofarray=7 # number of array elements
if [ "$1" = "--help" ] ; then
p1 "In Usage clause."
echo "Usage: script9 --help"
echo " This script shows how to create an interactive screen program"
echo " and how to use another terminal for debugging."
exit 255
fi
checktermsize 25 80
rc=$?
if [ $rc -ne 0 ] ; then
echo "Please size the terminal to 25x80 and try again."
exit 1
fi
init # initialize the screen array
drawscreen # draw the screen
getdata # cursor movement and data input routine
showdata # display the data
p1 "At exit."
exit 0Here is the output from the debug terminal (dev/pts/35):
By having the debug information display in another terminal it is much easier to see what is happening in the code.
You can put the p1 routine where ever you think the problem might be. Labeling which subroutine is being used can also help locate if the problem is in a subroutine or in the main code body.
When your script is completed and ready for use, you don't have to remove the calls to the p1 routine unless you really want to. You can just code a return 0 at the top of the routine.
I use this approach when debugging shell scripts or C programs and it has always worked very well for me.
In this chapter we explained how to prevent some common syntax and logic errors. The shell debugging commands set -x and set -v were also described. Using redirection to send the output from a script to another terminal was also shown as a way to debug in real time.
In the next chapter we will talk about scripting best practices. This includes making careful backups of your work and selecting a good text editor. A way to help you be more productive using the command line by using environment variables and aliases will also be discussed.
This chapter explains some practices and techniques that will help the reader become a better and more efficient programmer.
In this chapter we will talk about what I consider to be scripting (or programming) best practices. Having programmed computers since 1977 I have attained quite a bit of experience in this field. I take great pleasure in teaching people about computers and hopefully my ideas will be of some benefit.
The topics covered are as follows:
I have already spoken about backups at least twice in this book and this will be the last time I promise. Create your backup scripts and make sure they run when they are supposed to. But one thing I have not talked about yet is verification of the backups. You might have 10 teraquads of backups lying around somewhere, but do they actually work? When was the last time you checked?
When using the tar command it will report at the end of the run if it encountered any issues making the archive. In general if it doesn't show anything amiss the backup is probably good. Using tar with the -t (tell) option, or actually extracting it on the local or remote machine, is also a good way to determine if the archive was made successfully.
Here is a rather obvious example:
guest1 /home # tar cvzf guest1.gz guest1/ | tee /home/guest1/temp/mainlogs`date '+%Y%m%d'`.gz
The tar command might not consider this an error but will usually report it so be sure to check for this.
Another common backup mistake is to not copy the file to another computer or external device. If you are good at making backups but they are all on the same machine eventually the hard drive and/or controller is going to fail. You may be able to recover the data but why take the risk? Copy your files to at least one external drive and/or computer and be safe.
There is one last thing about backups I will mention. Make sure you have a backup sent to an off-site location, preferably in another city, state, continent, or planet. You really can't be too careful with your valuable data.
Using scp to a remote computer is a really good idea too and my backup program does that every night as well. Here is how to set up unattended ssh/scp. In this case, the root account on machine 1 (M1) will be able to scp files to the guest1 account on machine 2 (M2). I do it this way because I always disable root access of ssh/scp for security reasons on all my machines.
ssh has been run at least once on each machine. This will set up some needed directories and files.root, run the ssh-keygen -t rsa command. This will create the file id_rsa.pub in the /root/.ssh directory.scp to copy that file to M2 to the /tmp directory (or some other suitable location).home/guest1/.ssh directory.authorized_keys file edit it, otherwise create it./tmp/id_rsa.pub file into the authorized_keys file and save it.Test this by using scp to copy a file from M1 to M2. It should work without prompting for a password. If there are any problems remember that this has to be set up for each user that wants to perform unattended ssh/scp.
If you have an Internet service provider (ISP) that provides SSH with your account this method should work on there as well. I use it all the time and it is really convenient. Using this approach you can have a script generate an HTML file and then copy it right to your website. Dynamic generation of HTML pages is something programs are really good at.
If you only occasionally write scripts or programs then vi is probably good enough for you. However, if you get into some real in depth programming, be it in Bash, C, Java, or some other language you should very definitely check out some of the other text editors that are available on Linux. You will almost certainly become more productive.
As I mentioned before, I have been working with computers for a really long time. I started out using an editor on DOS called Edlin and it was pretty weak (but still better than punch cards). I eventually moved on and started using vi on AIX (IBM's version of UNIX). I got pretty good at using vi since we didn't have any other options yet. As time went on other choices became available and I started using the IBM Personal Editors. These were really easy to use, more efficient than vi, and had many more features. As I did more and more programming, I found that none of these editors could do everything I wanted and so I wrote my own in the C programming language. This was a long time ago under DOS, however, my editor has now been modified to run on Xenix, OS/2, AIX, Solaris, UNIX, FreeBSD, NetBSD, and of course Linux. It also works well on Windows under the Cygwin environment.
Any text editor should have the standard features such as copy, paste, move, insert, delete, split, join, find/replace, and so on. These should be easy to use and require not more than two keystrokes. The save command should only need one keystroke.
In addition, a good editor will also have one, more, or all of the following:
Well, maybe I haven't quite figured out that last one yet. There are of course many, many more features that could be listed but I feel those are some of the most important.
Here's a screenshot of my editor showing an example of how the ring command might look:
Many more features could be shown but that should be enough to get the point across. I will mention that vi is a fine editor and is used with success by probably the majority of UNIX/Linux people. However, in my experience if a lot of programming is being done the use of a different editor with more features will save you a lot of time. It's also quite a bit easier, and that makes the process even more fun.
Environment variables were covered in Chapter2, Working with Variables. Here is a cool trick that I learned years ago that can really help when using the command line. Most Linux systems generally have several standard directories under $HOME such as Desktop, Downloads, Music, Pictures, and so on. I personally do not like typing the same things over and over again and so do this to help use the system more efficiently. Here are some of the lines that I have added to my /home/guest1/.bashrc file:
export BIN=$HOME/bin alias bin="cd $BIN" export DOWN=$HOME/Downloads alias down="cd $DOWN" export DESK=$HOME/Desktop alias desk="cd $DESK" export MUSIC=$HOME/Music alias music="cd $MUSIC" export PICTURES=$HOME/Pictures alias pictures="cd $PICTURES" export BOOKMARKS=$HOME/Bookmarks alias bookmarks="cd $BOOKMARKS" # Packt- Linux Scripting Bootcamp export LB=$HOME/LinuxScriptingBook alias lb="cd $LB" # Source lbcur . $LB/source.lbcur.txt
Using this approach you can cd to any of the above directories by just typing the lowercase alias. What's even better is you can also copy or move files to or from the directory by using the uppercase exported environment variable. Check out the following screenshot:
It took me several years to start doing this and I am still kicking myself for not discovering it sooner. Remember to make the alias lowercase and the env var uppercase and you should be good to go.
Notice the command I ran in the Bookmarks directory. I actually typed mv $DESK/ and then hit the Tab key. This caused the line to auto-complete and then I added the dot . character and pressed Enter.
Remember to use command auto-completion any time you can, it's a great time saver.
The line . $LB/source.lbcur.txt needs to be explained. You can see I have an lbcur alias which puts me into the directory where I am currently working on this book. Since I use both my root and guest1 accounts to write a book, I can change the chapter number in just the source.lbcur.txt file. I then source the .bashrc files for root and guest1 and I'm done. Otherwise, I would have to make the change in each .bashrc file. With just two files maybe it wouldn't be that bad, but suppose you had several users? I use this technique quite a bit on my systems as I am a very lazy typist.
Remember: When using aliases and environment variables you need to source the users's .bashrc file before any changes will be picked up in the terminal.
When I run a Linux system I tend to have at least 30 terminal windows open. Some of these are logged into the other machines in my house. As of this writing I am logged into laptop1, laptop4, and gabi1 (my girlfriend's laptop running Fedora 20). I found a while back that if the prompt were different on these terminals it was harder for me to get mixed up and type the right command but on the wrong computer. Needless to say that could be a disaster. For a while I would change the prompt manually but that got old very quickly. One day I found almost by accident a really cool solution to this problem. I have used this technique on Red Hat Enterprise Linux, Fedora, and CentOS and so it should work on your system as well (with maybe a little bit of tweaking).
These lines are in the $HOME/.bashrc file on all my systems:
# Modified 1/17/2014 set | grep XAUTHORITY rc=$? if [ $rc -eq 0 ] ; then PS1="\h \w # " else PS1="\h \h \h \h \w # " fi
So what this does is use the set command to grep for the string XAUTHORITY. That string is only in the environment on the local machine. So when you open a terminal locally on big1 it uses the normal prompt. However, if you ssh to another system the string is not there and so it uses the long expanded prompt.
Here is a screenshot of my system showing how this looks:
Here is something that I ran into on several of my computer jobs. I would be asked by my manager to take over a project from a fellow worker. He would zip or tar up the files and then give me the archive. I would uncompress it on my system and try to begin the work. But there was always a file missing. It would often take two, three, or more attempts before I would finally have every file needed to compile the project. So, the moral to this story is when making an archive to give to someone else make absolutely sure to copy it to another machine and test it there. Only then can you be reasonably sure that you have included every file.
Here is another cursor movement script that also calculates the low and high of the $RANDOM Bash variable. It might not look all that cool to everyone but it does show some more of the concepts we have covered in this book. I was also somewhat curious as to what the range of that random number generator was.
#!/bin/sh
#
# 6/11/2017
# Chapter 10 - Script 1
#
# Subroutines
trap catchCtrlC INT # Initialize the trap
# Subroutines
catchCtrlC()
{
loop=0 # end the loop
}
cls()
{
tput clear
}
movestr() # move cursor to row, col, display string
{
tput cup $1 $2
echo -n "$3"
}
# Code
if [ "$1" = "--help" ] ; then
echo "Usage: script1 or script1 --help "
echo " Shows the low and high count of the Bash RANDOM variable."
echo " Press Ctrl-C to end."
exit 255
fi
sym[0]='|'
sym[1]='/'
sym[2]='-'
sym[3]='\'
low=99999999
high=-1
cls
echo "Chapter 10 - Script 1"
echo "Calculating RANDOM low and high ..."
loop=1
count=0
x=0
while [ $loop -eq 1 ]
do
r=$RANDOM
if [ $r -lt $low ] ; then
low=$r
elif [ $r -gt $high ] ; then
high=$r
fi
# Activity indicator
movestr 2 1 "${sym[x]}" # row 2 col 1
let x++
if [ $x -gt 3 ] ; then
x=0
fi
let count++
done
echo " " # carriage return
echo "Number of loops: $count"
echo "low: $low high: $high"
echo "End of script1"
exit 0Since you are reading this book it can be assumed that you are going to be writing a good number of scripts. Here is another handy trick I learned over the years. When I need to create a new script, instead of doing it from scratch I use this simple command:
#!/bin/sh
#
# 1/26/2014
#
# create a command script
if [ $# -eq 0 ] ; then
echo "Usage: mkcmd command"
echo " Copies mkcmd.template to command and edits it with kw"
exit 255
fi
if [ -f $1 ] ; then
echo File already exists!
exit 2
fi
cp $BIN/mkcmd.template $1
kw $1
exit 0
And here is the contents of the $BIN/mkcmd.template file:
#!/bin/sh
#
# Date
#
if [ $# -eq 0 ] ; then
echo "Usage: "
echo " "
exit 255
fiBe sure that after you create the mkcmd.template file that you run chmod 755 on it. That way you do not have to remember to do it every time on your new commands. In fact, that was the main reason I wrote this script.
Feel free to modify this however you want, and of course change kw to vi or whatever editor you are using.
It's nice to have your computer beep when an important task has completed and you want to know about it right away. Here's a script I use to beep the internal speaker on my computer:
#!/bin/sh # # 5/3/2017 # # beep the PC speaker lsmod | grep pcspkr > /dev/null rc=$? if [ $rc -ne 0 ] ; then echo "Please modprobe pcspkr and try again." exit 255 fi echo -e '\a' > /dev/console
This command will beep the PC speaker if it has one and if the driver has been loaded. Note that this command will probably only work on your system when run as the root user.
In this last chapter, I showed some of the programming best practices I have learned. The features of a good text editor were talked about, and a $RANDOM testing script was included. I also presented some of the scripts I have written over the years to make my systems more efficient and easier to use.