Table of Contents for
Linux Shell Scripting Bootcamp
 Linux Shell Scripting Bootcamp
Published by
Packt Publishing, 2017
Linux Shell Scripting Bootcamp
Published by
Packt Publishing, 2017
- Cover
- Table of Contents
- Linux Shell Scripting Bootcamp
- Linux Shell Scripting Bootcamp
- Credits
- About the Author
- Acknowledgement
- About the Reviewer
- www.PacktPub.com
- Customer Feedback
- Preface
- What you need for this book
- Who this book is for
- Conventions
- Reader feedback
- Customer support
- 1. Getting Started with Shell Scripting
- Demonstrating the use of scripts
- Summary
- 2. Working with Variables
- Validating parameters using conditional statements
- Comparison operators for strings
- Environment variables
- Summary
- 3. Using Loops and the sleep Command
- Screen manipulation
- Indenting your code
- Using the for statement
- Leaving a loop early
- The sleep command
- Watching a process
- Creating numbered backup files
- Summary
- 4. Creating and Calling Subroutines
- File redirection
- Command piping
- Subroutines
- Using parameters
- Making a current backup of your work
- Summary
- 5. Creating Interactive Scripts
- Summary
- 6. Automating Tasks with Scripts
- Summary
- 7. Working with Files
- Reading files
- Reading and writing files
- Reading and writing files interactively
- File checksums
- File encryption
- Summary
- 8. Working with wget and curl
- wget and recursion
- wget options
- curl
- Summary
- 9. Debugging Scripts
- Automatic backups
- More syntax errors
- Logic errors
- Using set to debug scripts
- Summary
- 10. Scripting Best Practices
- ssh and scp
- Find and use a good text editor
- Environment variables and aliases
- ssh prompt
- Testing an archive
- Progress indicator
- Creating new commands from a template
- Alerting the user
- Summary
- Index
This chapter shows how to automate various tasks using scripts.
The topics covered in this chapter are as follows:
- How to create a script to automate a task.
- The proper way to use cron to run the script automatically at specific times.
- How to use
ZIPandTARto perform compressed backups. - Source code examples.
The reader will learn how to create automated scripts.
We talked about the sleep command in Chapter 3, Using Loops and the sleep Command. It can be used to create an automated script (that is, one that runs at a specific time with no user intervention) as long as a few guidelines are followed.
This very simple script will reinforce what we covered in Chapter 3 Using Loops and the sleep Command about using the sleep command for automation:
#!/bin/sh
#
# 5/23/2017
#
echo "script1 - Linux Scripting Book"
while [ true ]
do
  date
  sleep 1d
done
echo "End of script1"
exit 0
If you run this on your system and wait a few days you will start to see the date slip a little. This is because the sleep command inserts a delay into the script, it does not mean that it is going to run the script at the same time every day.
#!/bin/sh
#
# 5/23/2017
#
echo "script2 - Linux Scripting Book"
while [ true ]
do
 # Run at 3 am
 date | grep -q 03:00:
 rc=$?
 if [ $rc -eq 0 ] ; then
  echo "Run commands here."
  date
 fi
 sleep 60                   # sleep 60 seconds
done
echo "End of script2"
exit 0
The first thing you will notice is that this script will run until it is either manually terminated with Ctrl + C or the kill command (or when the machine goes down for whatever reason). It is common for automated scripts to just run forever.
The date command, as run without any parameters, returns something like this:
  guest1 $ date
  Fri May 19 15:11:54 HST 2017
So now all we have to do is use grep to match that time. Unfortunately, there is a very subtle problem here. It has been verified that it is possible for this to miss from time to time. For example, if the time has just changed to 3:00 am and the program is now in the sleep it might already be 3:01 when it wakes up. In my early days in computing I had seen code like this all the time in my jobs and never gave it a single thought. When some important backups were missed one day my team was asked to figure out what was going on and we discovered this issue. A quick fix for this would be to change the seconds to 59, however, a better way is to use cron which will be shown later in this chapter.
Notice the -q option to grep, this simply tells it to suppress any output. Feel free to take this out if you want, especially when first writing the script. Also notice that grep returns 0 when a match is found, non-zero otherwise.
With all this said let's look at some simple automated scripts. I have been running the following on my Linux systems since 1996:
#!/bin/sh
#
# 5/23/2017
#
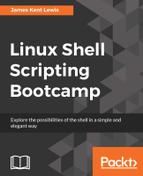
echo "script3 - Linux Scripting Book"
FN=/tmp/log1.txt # log file
while [ true ]
do
echo Pinging $PROVIDER
ping -c 1 $PROVIDER
rc=$?
if [ $rc -ne 0 ] ; then
echo Cannot ping $PROVIDER
date >> $FN
echo Cannot ping $PROVIDER >> $FN
fi
sleep 60
done
echo "End of script3" # 60 seconds
exit 0And the output on my system:
I ran it just three times, however, it would go forever. Before running this on your system let's talk about that PROVIDER environment variable. I have several scripts on my system that deal with the Internet and I found myself constantly changing providers. It didn't take too long to realize that this was a great time to use an env var, hence PROVIDER.
This is in my /root/.bashrc and /home/guest1/.bashrc files:
export PROVIDER=twc.com
Substitute yours as needed. Notice too that when a failure occurs it is being written to the screen and to a file. Since the >> append operator is being used the file might eventually get rather large so plan accordingly if your connection is not very stable.
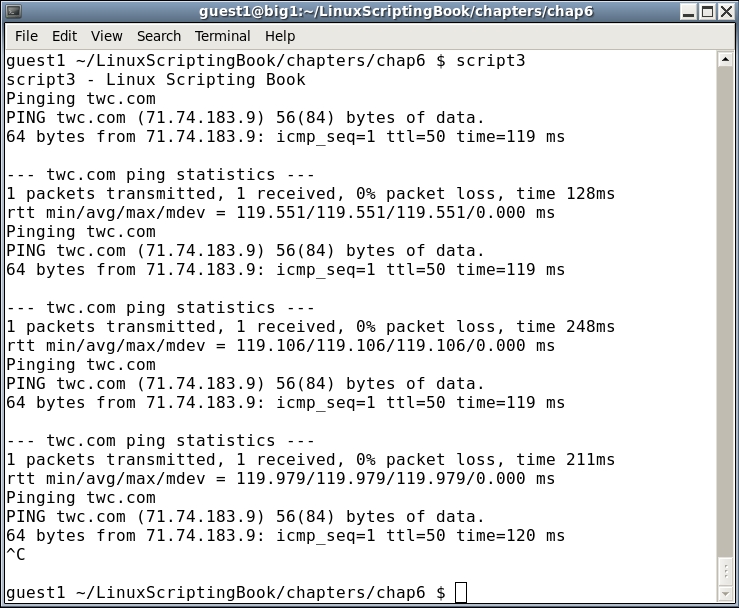
Here is a script that detects when a user has either logged on or off your system:
#!/bin/sh
#
# 5/23/2017
#
echo "Chapter 6 - Script 4"
numusers=`who | wc -l`
while [ true ]
do
  currusers=`who | wc -l`           # get current number of users
  if [ $currusers -gt $numusers ] ; then
    echo "Someone new has logged on!!!!!!!!!!!"
    date
    who
#   beep
    numusers=$currusers
  elif [ $currusers -lt $numusers ] ; then
    echo "Someone logged off."
    date
    numusers=$currusers
  fi
  sleep 1                    # sleep 1 second
done
Here's the output (adjusted for length):
This script checks the output from the who command to see if it has changed since the last run. If so it takes the appropriate action. If you have a beep command or equivalent on your system this is a good place to use it.
Take a look at this statement:
currusers=`who | wc -l` # get current number of users
This needs some clarification as we have not covered it yet. Those back-tick characters mean to run the command(s) inside and put the result into the variable. In this case, the who command is piped into the wc -l command to count the number of lines. This value is then put into the currusers variable. If this sounds a bit complicated don't worry, it will be covered in greater detail in the next chapter.
The remainder of the script should already be clear as we have covered this before. If you decide to run something like this on your system just remember that it will trigger every time a new terminal is opened.
Okay, now for some real fun. If you have been using Linux for even just a short amount of time you are probably already aware of cron. This is a daemon, or background process, that executes commands at specific times.
Cron reads a file called crontab once a minute to determine if a command needs to be run.
For the examples in this chapter we will focus on the crontab for a guest account only (not for root).
Using my guest1 account here is what it would look like the first time it is run. It would be a good idea to follow along on your system under a guest account:
guest1 $ crontab -l
no crontab for guest1
guest1 $
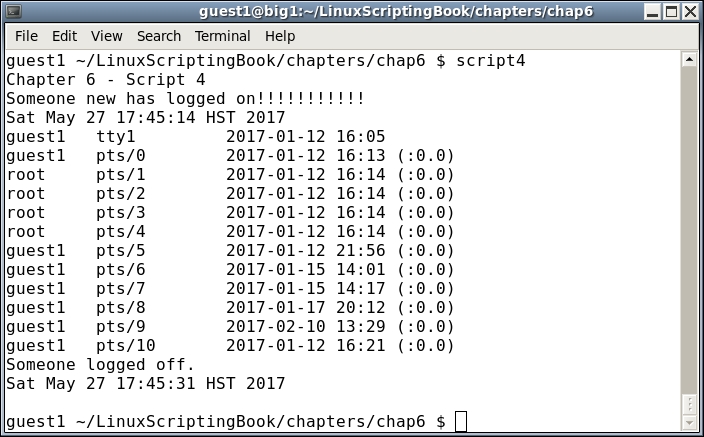
That makes sense as we have not created a crontab file for guest1 yet. It is not meant to be edited directly and so the crontab -e command is used.
Run crontab -e under a guest account on your system now.
Here is a screenshot of how it appears on my system when using vi:
As you can see the crontab command creates a temporary file. It is unfortunate that this file comes up empty as they should have provided a template. Let's add one now. Copy and paste the following text into the file:
# this is the crontab file for guest1
# min   hour   day of month  month  day of week       command
# 0-59  0-23    1-31          1-12   0-6
#                                    Sun=0 Mon=1 Tue=2 Wed=3 Thu=4 Fri=5 Sat=6
Substitute guest1 for your user name. This now gives us an idea of what goes where.
To this file add the following line:
* * * * * date > /dev/pts/31
The * means to match everything in the field. So in essence this line will fire once a minute.
We are using the redirection operator to write the output from the echo command to another terminal. Substitute yours as appropriate.
Try the above on your system. Remember you must save the file first, and you should see this output:
guest1 $ crontab -e
crontab: installing new crontab
guest1 $
This means the addition was successful. Now wait for the next minute to come around. You should see the current date show up in the other terminal.
We can now see the basics of cron. Here are a few quick pointers:
0   0    *   *   *   command            # run every day at midnight
0   3    *   *   *   command            # run every day at 3 am
30  9    1   *   *   command            # run at 9:30 am on the first of the month
45  14   *   *   0   command            # run at 2:45 pm on Sundays
0   0    25  12  *   command            # run at midnight on my birthday
This is just a very small subset of how the date and times can be set in cron. For more information consult the man pages for cron and crontab.
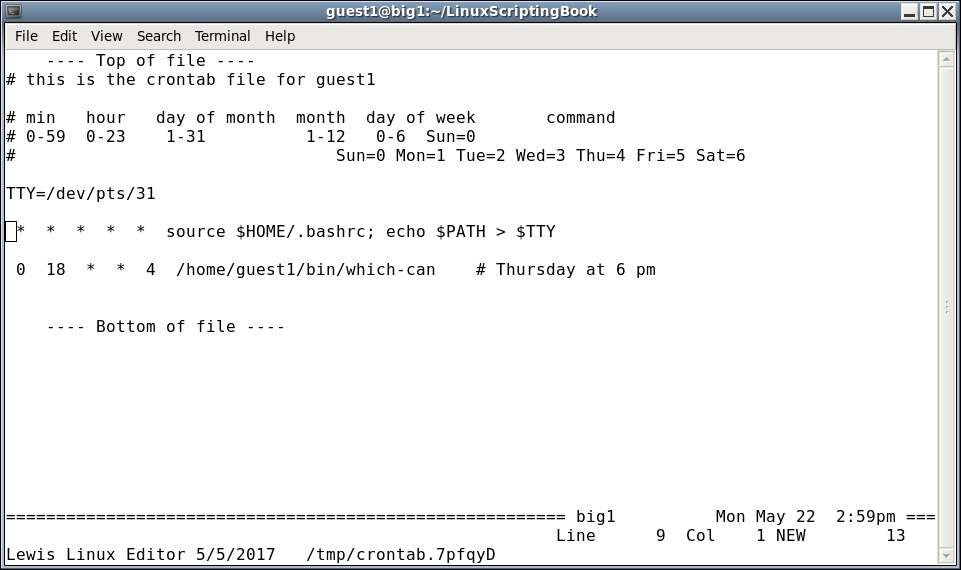
One thing that needs to be mentioned is the PATH for a user's cron. It does not source the user's .bashrc file. You can verify this by adding the following line:
* * * * * echo $PATH > /dev/pts/31 # check the PATH
On my CentOS 6.8 system it shows:
/usr/bin:/bin
To get around this problem you can source your .bashrc file:
* * * * * source $HOME/.bashrc; echo $PATH > /dev/pts/31 # check the PATH
This should now show the real path. The EDITOR env var was mentioned in Chapter 2, Working with Variables. If you want crontab to use a different text editor you can set EDITOR to the path/name of the one you want.
For example, on my system I have this:
export EDITOR=/home/guest1/bin/kw
So when I run crontab -e I get this:
Another thing that should be mentioned is if you make a mistake when using crontab in some cases it will tell you when you attempt to save the file. But it cannot check everything so be careful. Also, if a command gets an error crontab will use the mail system to notify the user. So, with this in mind you may need to run the mail command from time to time when using cron.
Now that we have looked at the basics let's create a backup script that uses the zip command. If you are not familiar with zip don't worry, this will get you up to speed quickly. On a Linux system most people just use the tar command, however, if you know how zip works you can share files with Windows users more easily.
In a directory under a guest account run these commands on your system. As usual I used /home/guest1/LinuxScriptingBook:
Make a work directory:
guest1 ~/LinuxScriptingBook $ mkdir work
Change to it:
guest1 ~/LinuxScriptingBook $ cd work
Create some temporary files, and/or copy a few existing files to this directory:
guest1 ~/LinuxScriptingBook/work $ route > route.txt
guest1 ~/LinuxScriptingBook/work $ ifconfig > ifconfig.txt
guest1 ~/LinuxScriptingBook/work $ ls -la /usr > usr.txt
guest1 ~/LinuxScriptingBook/work $ cp /etc/motd .
Get a listing:
guest1 ~/LinuxScriptingBook/work $ ls -la
total 24
drwxrwxr-x 2 guest1 guest1 4096 May 23 09:44 .
drwxr-xr-x 8 guest1 guest1 4096 May 22 15:18 ..
-rw-rw-r-- 1 guest1 guest1 1732 May 23 09:44 ifconfig.txt
-rw-r--r-- 1 guest1 guest1 1227 May 23 09:44 motd
-rw-rw-r-- 1 guest1 guest1  335 May 23 09:44 route.txt
-rw-rw-r-- 1 guest1 guest1  724 May 23 09:44 usr.txt
Zip them up:
guest1 ~/LinuxScriptingBook/work $ zip work1.zip *
  adding: ifconfig.txt (deflated 69%)
  adding: motd (deflated 49%)
  adding: route.txt (deflated 52%)
  adding: usr.txt (deflated 66%)
guest1 ~/LinuxScriptingBook/work $ ls -la
total 28
drwxrwxr-x 2 guest1 guest1 4096 May 23 09:45 .
drwxr-xr-x 8 guest1 guest1 4096 May 22 15:18 ..
-rw-rw-r-- 1 guest1 guest1 1732 May 23 09:44 ifconfig.txt
-rw-r--r-- 1 guest1 guest1 1227 May 23 09:44 motd
-rw-rw-r-- 1 guest1 guest1  335 May 23 09:44 route.txt
-rw-rw-r-- 1 guest1 guest1  724 May 23 09:44 usr.txt
-rw-rw-r-- 1 guest1 guest1 2172 May 23 09:45 work1.zip
There is now file work1.zip in that directory. The syntax to create a zip file is:
zip [optional parameters] filename.zip list-of-files-to-include
To unzip it:
unzip filename.zip
To view (or list) the contents of a zip file without extracting it:
unzip -l filename.zip
This is also a good way to ensure that the .zip file was created properly, because unzip will report an error if it cannot read the file. Note that the zip command not only creates a .zip file but it also compresses the data. This makes for smaller backup files.
#!/bin/sh
#
# 5/23/2017
#
echo "script5 - Linux Scripting Book"
FN=work1.zip
cd /tmp
mkdir work 2> /dev/null      # suppress message if directory already exists
cd work
cp /etc/motd .
cp /etc/issue .
ls -la /tmp > tmp.txt
ls -la /usr > usr.txt
rm $FN 2> /dev/null          # remove any previous file
zip $FN *
echo File "$FN" created.
# cp to an external drive, and/or scp to another computer
echo "End of script5"
exit 0
And the output on my system:
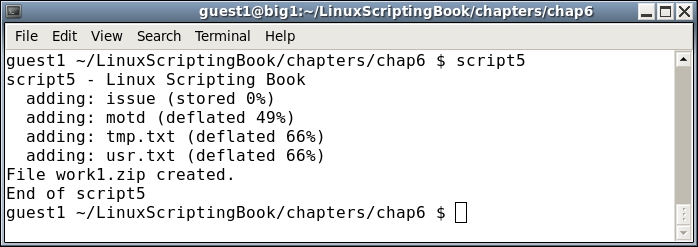
This is a really simple script, however it shows the basics of using the zip command to backup some files.
Suppose we wanted to run this every day at midnight. Assuming script5 was located under /tmp, the crontab entry would be the following:
guest1 /tmp/work $ crontab -l
# this is the crontab file for guest1

# min   hour   day of month  month  day of week       command
# 0-59  0-23    1-31          1-12   0-6  Sun=0
#                                Sun=0 Mon=1 Tue=2 Wed=3 Thu=4 Fri=5 Sat=6

0 0 * * * /tmp/script5
In this case we did not have to source the /home/guest1/.bashrc file. Also notice that any errors get sent to the User's mail account. The zip command can do a whole lot more than just this, for example it can recurse into directories. For more information consult the man pages.
Now let's talk about the Linux tar command. It is used more frequently than the zip command and is better at getting all files, even hidden ones. Referring back to the /tmp/work directory, here is how you would use tar to back it up. It is assumed the files are still there from the previous script:
guest1 /tmp $ tar cvzf work1.gz work/
work/
work/motd
work/tmp.txt
work/issue
work/work1.zip
work/usr.txt
guest1 /tmp $
There is now file work1.gz under the /tmp directory. It is a compressed archive of the contents of all the files under /tmp/work, including the .zip file we created earlier.
The syntax for tar is a little cryptic at first but you will get used to it. Some of the features available in tar are:
|
Parameter |
Feature |
|---|---|
|
|
create an archive |
|
|
extract an archive |
|
|
use the verbose option |
|
|
use gunzip style compression (.gz) |
|
|
the filename to create/extract |
Note that if you do not include the z option the file will not be compressed. By convention the file extension would then just be tar. Note that the user controls the actual name of the file, not the tar command.
Okay so now we have a compressed tar-gz file (or archive). Here is how to un-compress and extract the files. We will do this under /home/guest1:
guest1 /home/guest1 $ tar xvzf /tmp/work1.gz
work/
work/motd
work/tmp.txt
work/issue
work/work1.zip
work/usr.txt
guest1 /home/guest1 $
Using tar to backup a system is really convenient. It's also a great way to configure a new machine with your personal files. For example, I routinely back up the following directories on my primary system:
 /home/guest1
 /lewis
 /temp
 /root
These files are then auto-copied to an external USB drive. Remember that tar automatically recurses into directories and also gets every file, including hidden ones. Tar also has many other options that control how the archive is created. One of the most common options is to exclude certain directories.
For example, when backing up /home/guest1 there is really no reason to include the .cache, Cache, .thumbnails, and so on directories.
The option to exclude directories is --exclude=<directory name> and that is shown in the next script.
Here are the backup programs that I use on my primary Linux system. It is two scripts, one to schedule the backup and one to actually perform the work. I mainly did this so that I could make changes to the actual backup script without turning off the scheduler script. The first thing that needs to be set up is the crontab entry. Here is what it looks like on my system:
guest1 $ crontab -l
# this is the crontab file for guest1
# min   hour   day of month  month  day of week       command
# 0-59  0-23    1-31          1-12   0-6  Sun=0
#                                Sun=0 Mon=1 Tue=2 Wed=3 Thu=4 Fri=5 Sat=6
TTY=/dev/pts/31

 0  3   *  *  *  touch /tmp/runbackup-cron.txt
This will create the file /tmp/backup-cron.txt at approximately 3 am every day.
#!/bin/sh
#
# runbackup1 - this version watches for file from crontab
#
# 6/3/2017 - mainlogs now under /data/mainlogs
#
VER="runbackup1 6/4/2017 A"
FN=/tmp/runbackup-cron.txt
DR=/wd1                      # symbolic link to external drive

tput clear
echo $VER

# Insure backup drive is mounted
file $DR | grep broken
rc=$?
if [ $rc -eq 0  ] ; then
 echo "ERROR: USB drive $DR is not mounted!!!!!!!!!!!!!!"
 beep
 exit 255
fi

cd $LDIR/backup

while [ true ]
do
 # crontab creates the file at 3 am

 if [ -f $FN ] ; then
  rm $FN
  echo Running backup1 ...
  backup1 | tee /data/mainlogs/mainlog`date '+%Y%m%d'`.txt
  echo $VER
 fi

 sleep 60                    # check every minute
done
There's a lot of information here so we will go through it line by line:
- The script first sets up the variables, clears the screen, and displays the name of the script.
- The
DRvariable is assigned to my USB external drive (wd1) which is a symbolic link. - A check is then performed using the
filecommand to ensure that/wd1has been mounted. If it has not, thefilecommand will return broken symbolic link,grepwill trigger on this, and the script will abort. - If the drive is mounted then the loop is entered. The existence of the file is checked every minute to see if it is time to begin the backup.
- When the file is found the
backup1script (see next) is run. The output from it is sent to both the screen and the file using theteecommand. - The date format specifier
'+%Y%m%d'shows the date in this format: YYYYMMDD
I check the files in the /data/mainlogs directory from time to time to make sure my backups are being created correctly with no errors.
The following script is used to backup my system. The logic here is the current day backups are stored on the hard drive in the $TDIR directory. They are also copied to a numbered directory on the external drive. These go into directories numbered 1 through 7. When the last one is reached it starts back at 1 again. This way there are always 7 days of backups available on the external drive.
#!/bin/sh
#   Jim's backup program
#   Runs standalone
#   Copies to /data/backups first, then to USB backup drive
VER="File backup by Jim Lewis 5/27/2017 A"
TDIR=/data/backups
RUNDIR=$LDIR/backup
DR=/wd1
echo $VER
cd $RUNDIR
# Insure backup drive is mounted
file $DR | grep broken
a=$?
if [ "$a" != "1" ] ; then
 echo "ERROR: USB drive $DR is not mounted!!!!!!!!!!!!!!"
 beep
 exit 255
fi
date >> datelog.txt
date
echo "Removing files from $TDIR"
cd "$TDIR"
rc=$?
if [ $rc -ne 0 ] ; then
 echo "backup1: Error cannot change to $TDIR!"
 exit 250
fi
rm *.gz
echo "Backing up files to $TDIR"
X=`date '+%Y%m%d'`
cd /
tar cvzf "$TDIR/lewis$X.gz"  lewis
tar cvzf "$TDIR/temp$X.gz"   temp
tar cvzf "$TDIR/root$X.gz"   root
cd /home
tar cvzf "$TDIR/guest$X.gz" --exclude=Cache --exclude=.cache --exclude=.evolution --exclude=vmware --exclude=.thumbnails  --exclude=.gconf --exclude=.kde --exclude=.adobe  --exclude=.mozilla  --exclude=.gconf  --exclude=thunderbird  --exclude=.local --exclude=.macromedia  --exclude=.config   guest1
cd $RUNDIR
T=`cat filenum1`
BACKDIR=$DR/backups/$T
rm $BACKDIR/*.gz
cd "$TDIR"
cp *.gz $BACKDIR
echo $VER
cd $BACKDIR
pwd
ls -lah
cd $RUNDIR
let T++
if [ $T -gt 7 ] ; then
 T=1
fi
echo $T > filenum1
This is a bit more complicated than the previous scripts so let's go through it line by line:
- The
RUNDIRvariable holds the starting directory for the scripts. - The
DRvariable points to the external backup drive. - The drive is checked to insure it is mounted.
- The current date is appended to the
datelog.txtfile. - The
TDIRvariable is the target directory for the backups. - A
cdis performed to that directory and the return code is checked. On error the script exits with a250. - The backups from the previous day are deleted.
It now goes back to the / directory to perform the tar backups.
Notice that several directories are excluded from the guest1 directory.
- The
cd $RUNDIRputs it back into the starting directory. - The
T=`filenum1`gets the value from that file and puts it into theTvariable. This is a counter for which directory to use next on the external drive. BACKDIRis set to the old backups and then they are removed.- Control returns again to the starting directory, and the current backups are copied to the appropriate directory on the external drive.
- The version of the program is displayed again so that it can be easily found on a cluttered screen.
- Control goes to the backup directory, the
pwddisplays the name, and then the contents of the directory are displayed. - The
Tvariable is incremented by 1. If it is greater than 7 it is set back to 1.
And finally the updated T variable is written back to the filenum1 file.
This script should serve as a good starting point for whatever backup process you want to develop. Note that the scp command can be used to copy files directly to another computer without user intervention. This will be covered in Chapter 10, Scripting Best Practices.