Table of Contents for
System Forensics, Investigation, and Response, 3rd Edition
 System Forensics, Investigation, and Response, 3rd Edition
Published by
Jones & Bartlett Learning, 2017
System Forensics, Investigation, and Response, 3rd Edition
Published by
Jones & Bartlett Learning, 2017
- Cover Page
- Contents
- System Forensics, Investigation, and Response
- Title Page
- Copyright Page
- Content
- Preface
- About the Author
- PART I Introduction to Forensics
- CHAPTER 1 Introduction to Forensics
- What Is Computer Forensics?
- Understanding the Field of Digital Forensics
- Knowledge Needed for Computer Forensics Analysis
- The Daubert Standard
- U.S. Laws Affecting Digital Forensics
- Federal Guidelines
- CHAPTER SUMMARY
- KEY CONCEPTS AND TERMS
- CHAPTER 1 ASSESSMENT
- CHAPTER 2 Overview of Computer Crime
- How Computer Crime Affects Forensics
- Identity Theft
- Hacking
- Cyberstalking and Harassment
- Fraud
- Non-Access Computer Crimes
- Cyberterrorism
- CHAPTER SUMMARY
- KEY CONCEPTS AND TERMS
- CHAPTER 2 ASSESSMENT
- CHAPTER 3 Forensic Methods and Labs
- Forensic Methodologies
- Formal Forensic Approaches
- Documentation of Methodologies and Findings
- Evidence-Handling Tasks
- How to Set Up a Forensic Lab
- Common Forensic Software Programs
- Forensic Certifications
- CHAPTER SUMMARY
- KEY CONCEPTS AND TERMS
- CHAPTER 3 ASSESSMENT
- PART II Technical Overview: SystemForensics Tools, Techniques, and Methods
- CHAPTER 4 Collecting, Seizing, and Protecting Evidence
- Proper Procedure
- Handling Evidence
- Storage Formats
- Forensic Imaging
- RAID Acquisitions
- CHAPTER SUMMARY
- KEY CONCEPTS AND TERMS
- CHAPTER 4 ASSESSMENT
- CHAPTER LAB
- CHAPTER 5 Understanding Techniques for Hiding and Scrambling Information
- Steganography
- Encryption
- CHAPTER SUMMARY
- KEY CONCEPTS AND TERMS
- CHAPTER 5 ASSESSMENT
- CHAPTER 6 Recovering Data
- Undeleting Data
- Recovering Information from Damaged Media
- File Carving
- CHAPTER SUMMARY
- KEY CONCEPTS AND TERMS
- CHAPTER 6 ASSESSMENT
- CHAPTER 7 Email Forensics
- How Email Works
- Email Protocols
- Email Headers
- Tracing Email
- Email Server Forensics
- Email and the Law
- CHAPTER SUMMARY
- KEY CONCEPTS AND TERMS
- CHAPTER 7 ASSESSMENT
- CHAPTER 8 Windows Forensics
- Windows Details
- Volatile Data
- Windows Swap File
- Windows Logs
- Windows Directories
- Index.dat
- Windows Files and Permissions
- The Registry
- Volume Shadow Copy
- Memory Forensics
- CHAPTER SUMMARY
- KEY CONCEPTS AND TERMS
- CHAPTER 8 ASSESSMENT
- CHAPTER 9 Linux Forensics
- Linux and Forensics
- Linux Basics
- Linux File Systems
- Linux Logs
- Linux Directories
- Shell Commands for Forensics
- Kali Linux Forensics
- Forensics Tools for Linux
- CHAPTER SUMMARY
- KEY CONCEPTS AND TERMS
- CHAPTER 9 ASSESSMENT
- CHAPTER 10 Macintosh Forensics
- Mac Basics
- Macintosh Logs
- Directories
- Macintosh Forensic Techniques
- How to Examine a Mac
- Can You Undelete in Mac?
- CHAPTER SUMMARY
- KEY CONCEPTS AND TERMS
- CHAPTER 10 ASSESSMENT
- CHAPTER 11 Mobile Forensics
- Cellular Device Concepts
- What Evidence You Can Get from a Cell Phone
- Seizing Evidence from a Mobile Device
- JTAG
- CHAPTER SUMMARY
- KEY CONCEPTS AND TERMS
- CHAPTER 11 ASSESSMENT
- CHAPTER 12 Performing Network Analysis
- Network Packet Analysis
- Network Traffic Analysis
- Router Forensics
- Firewall Forensics
- CHAPTER SUMMARY
- KEY CONCEPTS AND TERMS
- CHAPTER 12 ASSESSMENT
- PART III Incident Response and Resources
- CHAPTER 13 Incident and Intrusion Response
- Disaster Recovery
- Preserving Evidence
- Adding Forensics to Incident Response
- CHAPTER SUMMARY
- KEY CONCEPTS AND TERMS
- CHAPTER 13 ASSESSMENT
- CHAPTER 14 Trends and Future Directions
- Technical Trends
- Legal and Procedural Trends
- CHAPTER SUMMARY
- KEY CONCEPTS AND TERMS
- CHAPTER 14 ASSESSMENT
- CHAPTER 15 System Forensics Resources
- Tools to Use
- Resources
- Laws
- CHAPTER SUMMARY
- KEY CONCEPTS AND TERMS
- CHAPTER 15 ASSESSMENT
- APPENDIX A Answer Key
- APPENDIX B Standard Acronyms
- Glossary of Key Terms
- References
- Index
Seizing Evidence from a Mobile Device
Once you are ready to seize evidence from the mobile device, remember the following rules:
If you are going to plug the phone into a computer, make sure the phone does not synchronize with the computer. This is particularly important with the iPhone, which routinely auto-syncs.
Follow the same advice you follow for PCs. Make sure you touch the evidence as little as possible, and document what you do to the device.
One of the most important things to do is to make sure you don’t accidentally write data to the mobile device. For example, if you plug an iPhone into your forensic workstation, you want to make sure you don’t accidentally write information from your workstation to the iPhone.
If the forensic workstation is a Windows machine, you can use the Windows Registry to prevent the workstation from writing to the mobile device. Before connecting to a Windows machine, find the Registry key HKEY_LOCAL_MACHINE\System\Current Controlset\StorageDevicePolicies, set the value to 0x00000001, and restart the computer. This prevents that computer from writing to mobile devices that are connected to it.
Although Forensic Toolkit and EnCase can both image a phone for you, there are other products made specifically for phone forensics:
Oxygen Forensics—This is a full forensic tool capable of imaging and examining iPhones and Android phones. It provides a number of user-friendly tools for extracting specific data such as contacts, social media data, and the like.
Cellabrite—This is probably the most widely known phone forensics tool. It is used heavily by federal law enforcement. It is a very robust and effective tool. The only downside to Cellabrite, that I am aware of, is the high cost. It is the most expensive phone forensics tool on the market.
MobileEdit—There are several variations of this product. MobileEdit Lite is the most forensically advanced version of MobileEdit. This is a very easy-to-use tool that can aid a forensic examiner in extracting data from cell phones.
Data Doctor—This product recovers all Inbox and Outbox data and all contact data, and it has an easy-to-use interface. Most important, it has a free trial version, but there is a cost for the full version. It is available from http://www.simrestore.com.
Sim Card Data Retrieval Utility—This product is available from http://shareme.com/details/sim-card-data-retrieval-utility.html. It retrieves Inbox and sent message data as well as contact data. It runs on various Windows versions. There is a license fee associated with this product.
Device Seizure—This is available from Paraben Software at http://www.paraben.com. There is a license fee associated with this product. Paraben makes a number of forensic products.
Forensic SIM Cloner—This tool is used to clone SIM cards, allowing you to perform forensic analysis of the SIM card. http://forensic-sim-cloner.software.informer.com/1.2/
Forensics for a Windows 8 or 10 phone is done in much the same way as forensics for a Windows 8 or 10 PC or laptop. The only issue is to make certain the phone does not synchronize with the forensic workstation. A similar issue arises with the Android. Because it is based on Linux, many of the same forensic techniques can be applied. Keep in mind that a handheld portable device probably will not have all the same logs that a PC or server has, but if the operating system is the same, then the forensics will be largely the same.
Regardless of the tool you choose, you should ensure that it is adequate for your forensic needs. The NIST sponsors the Computer Forensics Tool Testing (CFTT) Project (http://www.cftt.nist.gov), which provides a measure of assurance that the tools used in the investigations of computer-related crimes produce valid results. Testing includes a set of core requirements as well as optional requirements. It is a good idea to refer to these standards when selecting a tool.
The NIST also provides general guidelines on how to write a report for a mobile device forensic report. The guidelines say you should include the following:
A descriptive list of items submitted for examination, including serial number, make, and model
The identity and signature of the examiner
The equipment and setup used in the examination
A brief description of the steps taken during the examination, such as string searches, graphics image searches, and recovering erased files
Supporting materials such as printouts of particular items of evidence, digital copies of evidence, and chain of custody documentation
Details of findings:
Specific files related to the request
Other files, including deleted files, that support the findings
String searches, keyword searches, and text string searches
Internet-related evidence, such as website traffic analysis, chat logs, cache files, email, and newsgroup activity
Graphic image analysis
Indicators of ownership, which could include program registration data
Data analysis
Description of relevant programs on the examined items
Techniques used to hide or mask data, such as encryption, steganography, hidden attributes, hidden partitions, and file name anomalies
Report conclusions
The iPhone
There are automated processes for breaking an iPhone passcode. XRY is one such tool, which can be found at http://news.cnet.com/8301-1023_3-57405580-93/iphone-passcode-cracking-is-easier-than-you-think/. Keep in mind that the iPhone has only a four-digit pin, which means there are 10,000 possible combinations of the digits 0–9.
If you are using a forensic workstation with iTunes, you can simply plug the iPhone (or iPad/iPod) into the workstation and use iTunes to extract a great deal of information about the phone. This is shown in FIGURE 11-1.
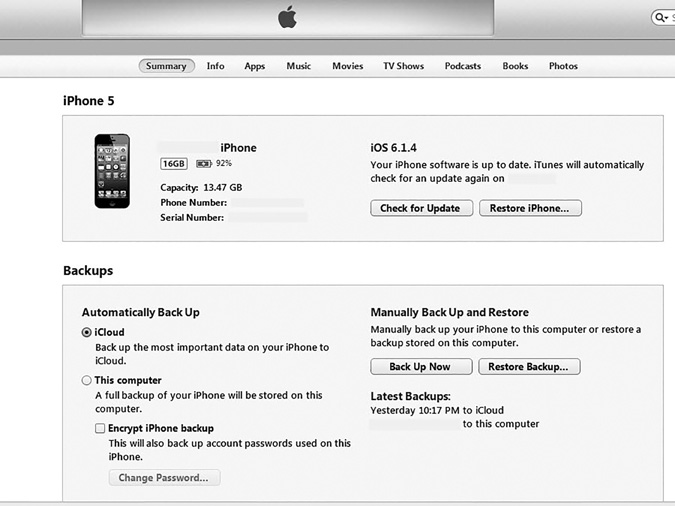
FIGURE 11-1
Apple iPhone iTunes display.
Screenshot reprinted with permission from Apple Inc.
You can immediately notice three important items to document:
The iOS version number
The phone number
The serial number
Notice you can also see where the phone is backed up. That can indicate yet another place you should search during your forensic investigation. Some information in Figure 11-1 has been redacted because this image was taken from an actual phone.
If you have imaged the phone and you then search for information, you may have to look more closely to find some data.
For example, Library_CallHistory_call_history.db has the entire call history. If you cannot view that directly on the phone itself, the database file has all call information. Cookies can be found in the file Library_Cookies_Cookies.plist. This can give you a history of the phone user’s Internet activities. These, and other files, are actually copied to a PC during synchronization. Here are a few of those files:
Library_Preferences_com.apple.mobileipod.plist
Library_Preferences_com.apple.mobileemail.plist
Library_Preferences_com.apple.mobilevpn.plist
The mobileemail.plist file has obvious forensic evidence. It will give you information about email sent and received from the phone. The mobilevpn.plist file can also be interesting. If the user has utilized the phone to communicate over a VPN, this file will have information about that.
Deleted Files
When a file is deleted on the iPhone, iPad, or iPod, it is actually moved to the .Trashes\501 folder. Essentially, the data is still there until it is overwritten, so recently deleted files can be retrieved.
Tools
There are tools specifically for iOS devices. These can be a useful addition to your forensic toolset. Here are few widely used tools:
Pwnage—This utility allows you to unlock a locked iPod Touch. It is available from http://wikee.iphwn.org.
Recover My iPod—This utility allows you to recover files deleted from an iPod. It is available from http://www.recovermyipod.com.
BlackBerry
First, you should download and install BlackBerry Desktop Manager. Use the following link to select and download the install file that fits your system or version: https://www.blackberry.com/Downloads/entry.do?code=A8BAA56554F96369AB93E4F3BB068C22. Then, you install the Desktop Manager. Once that is done, the steps for imaging the device are rather easy:
Open BlackBerry’s Desktop Manager. Click Options, and then Connection Settings.
If the Desktop Manager hasn’t already done so, select USB-PIN: Device # for connection type. Click OK.
Select Backup and Restore.
Click the Back Up button for a full backup of the device or use the Advanced section for specific data.
Select your destination and save the .ipd file.
This creates a complete backup image of the BlackBerry phone. Once you have that backup on your workstation, you can examine the data and perform a forensic analysis.