Table of Contents for
System Forensics, Investigation, and Response, 3rd Edition
 System Forensics, Investigation, and Response, 3rd Edition
Published by
Jones & Bartlett Learning, 2017
System Forensics, Investigation, and Response, 3rd Edition
Published by
Jones & Bartlett Learning, 2017
- Cover Page
- Contents
- System Forensics, Investigation, and Response
- Title Page
- Copyright Page
- Content
- Preface
- About the Author
- PART I Introduction to Forensics
- CHAPTER 1 Introduction to Forensics
- What Is Computer Forensics?
- Understanding the Field of Digital Forensics
- Knowledge Needed for Computer Forensics Analysis
- The Daubert Standard
- U.S. Laws Affecting Digital Forensics
- Federal Guidelines
- CHAPTER SUMMARY
- KEY CONCEPTS AND TERMS
- CHAPTER 1 ASSESSMENT
- CHAPTER 2 Overview of Computer Crime
- How Computer Crime Affects Forensics
- Identity Theft
- Hacking
- Cyberstalking and Harassment
- Fraud
- Non-Access Computer Crimes
- Cyberterrorism
- CHAPTER SUMMARY
- KEY CONCEPTS AND TERMS
- CHAPTER 2 ASSESSMENT
- CHAPTER 3 Forensic Methods and Labs
- Forensic Methodologies
- Formal Forensic Approaches
- Documentation of Methodologies and Findings
- Evidence-Handling Tasks
- How to Set Up a Forensic Lab
- Common Forensic Software Programs
- Forensic Certifications
- CHAPTER SUMMARY
- KEY CONCEPTS AND TERMS
- CHAPTER 3 ASSESSMENT
- PART II Technical Overview: SystemForensics Tools, Techniques, and Methods
- CHAPTER 4 Collecting, Seizing, and Protecting Evidence
- Proper Procedure
- Handling Evidence
- Storage Formats
- Forensic Imaging
- RAID Acquisitions
- CHAPTER SUMMARY
- KEY CONCEPTS AND TERMS
- CHAPTER 4 ASSESSMENT
- CHAPTER LAB
- CHAPTER 5 Understanding Techniques for Hiding and Scrambling Information
- Steganography
- Encryption
- CHAPTER SUMMARY
- KEY CONCEPTS AND TERMS
- CHAPTER 5 ASSESSMENT
- CHAPTER 6 Recovering Data
- Undeleting Data
- Recovering Information from Damaged Media
- File Carving
- CHAPTER SUMMARY
- KEY CONCEPTS AND TERMS
- CHAPTER 6 ASSESSMENT
- CHAPTER 7 Email Forensics
- How Email Works
- Email Protocols
- Email Headers
- Tracing Email
- Email Server Forensics
- Email and the Law
- CHAPTER SUMMARY
- KEY CONCEPTS AND TERMS
- CHAPTER 7 ASSESSMENT
- CHAPTER 8 Windows Forensics
- Windows Details
- Volatile Data
- Windows Swap File
- Windows Logs
- Windows Directories
- Index.dat
- Windows Files and Permissions
- The Registry
- Volume Shadow Copy
- Memory Forensics
- CHAPTER SUMMARY
- KEY CONCEPTS AND TERMS
- CHAPTER 8 ASSESSMENT
- CHAPTER 9 Linux Forensics
- Linux and Forensics
- Linux Basics
- Linux File Systems
- Linux Logs
- Linux Directories
- Shell Commands for Forensics
- Kali Linux Forensics
- Forensics Tools for Linux
- CHAPTER SUMMARY
- KEY CONCEPTS AND TERMS
- CHAPTER 9 ASSESSMENT
- CHAPTER 10 Macintosh Forensics
- Mac Basics
- Macintosh Logs
- Directories
- Macintosh Forensic Techniques
- How to Examine a Mac
- Can You Undelete in Mac?
- CHAPTER SUMMARY
- KEY CONCEPTS AND TERMS
- CHAPTER 10 ASSESSMENT
- CHAPTER 11 Mobile Forensics
- Cellular Device Concepts
- What Evidence You Can Get from a Cell Phone
- Seizing Evidence from a Mobile Device
- JTAG
- CHAPTER SUMMARY
- KEY CONCEPTS AND TERMS
- CHAPTER 11 ASSESSMENT
- CHAPTER 12 Performing Network Analysis
- Network Packet Analysis
- Network Traffic Analysis
- Router Forensics
- Firewall Forensics
- CHAPTER SUMMARY
- KEY CONCEPTS AND TERMS
- CHAPTER 12 ASSESSMENT
- PART III Incident Response and Resources
- CHAPTER 13 Incident and Intrusion Response
- Disaster Recovery
- Preserving Evidence
- Adding Forensics to Incident Response
- CHAPTER SUMMARY
- KEY CONCEPTS AND TERMS
- CHAPTER 13 ASSESSMENT
- CHAPTER 14 Trends and Future Directions
- Technical Trends
- Legal and Procedural Trends
- CHAPTER SUMMARY
- KEY CONCEPTS AND TERMS
- CHAPTER 14 ASSESSMENT
- CHAPTER 15 System Forensics Resources
- Tools to Use
- Resources
- Laws
- CHAPTER SUMMARY
- KEY CONCEPTS AND TERMS
- CHAPTER 15 ASSESSMENT
- APPENDIX A Answer Key
- APPENDIX B Standard Acronyms
- Glossary of Key Terms
- References
- Index
Forensic Imaging
Once you have acquired a physical storage medium of some type, you need to image it. You always work with an image whenever possible. Even if the medium is an optical storage device like a Blu-ray disc, you should make a forensic image of the drive and work with the image. It is possible to create a forensic image utilizing open-source tools, specifically Linux commands. This section explains all the details behind each step.
First, you must forensically wipe the target drive (which is the drive to which you will copy the suspect drive contents) to ensure there is no residual data left from a previous case. You can do this with the Linux dd command:
dd if=/dev/zero of=/dev/hdb1 bs=2048This command is literally using /dev/zero as an input file and writing its contents out to the partition hdb1 as the output file. If you are not familiar with Linux, /dev/zero is a special file on UNIX-like systems that reads out as many nulls as are required. So this command is overwriting everything on the target drive with null values.
If your partition is different, you can use fdisk −l to list the partitions on your system.
The primary propose of dd, a common UNIX program, is the low-level copying and conversion of raw data. Low-level copying means at the bit level. If you do your copy through the file system/ operating system, then you can see only the data that the operating system sees. You won’t get deleted files or slack space. That is why a basic file system copy is inadequate for forensic analysis. You must get a bit-level copy, and the dd utility is perfect for that.
You also need to use netcat to set up the forensic server to listen, so you have a Kali Linux CD boot up the suspect drive to copy it to the forensic server. At this point, both the suspect drive and the target forensic server have been booted into Linux using Kali Linux.
The netcat command reads and writes bits over a network connection. The command to run on the forensic server is as follows:
# nc −l −p 8888 > evidence.ddThis sets up the listen process on the forensic server prior to sending the data from the subject’s computer. The process listens (the −l flag) on port 8888 (the −p 8888 command) and takes all input and writes to a file called evidence.dd. You can always use another port or another filename if necessary. You must ensure the target drive is at least as big as the suspect drive.
On the suspect computer, use the dd command to read the first partition:
# dd if=/dev/hda1 | nc 192.168.0.2 8888 —w 3You then pipe the output of the dd command to netcat, which sends the bits over the network to the specified network address and port on the listening forensic computer. The argument −w 3 indicates that netcat should wait 3 seconds before closing the connection upon finding no more data. This assumes that the suspect partition is hda1, but it might be a different partition.
This process can be accomplished with most major forensic tools, including EnCase from Guidance Software and Forensic Toolkit from AccessData.
Imaging with EnCase
EnCase is a forensic tool that is widely used by law enforcement. Once you have the suspect’s hard drive disconnected from the suspect machine, you can connect that drive to the forensic computer. In some cases, you first connect to a device that prevents writing to the suspect device. FastBlock and Tableau are two such devices that are widely used in forensics.
At the top of the EnCase window, click New on the toolbar to start the new case you will be working. The Case Options dialog box opens, as shown in FIGURE 4-8.
This dialog box allows you to type in the case name and the examiner’s name. Tracking evidence by case and examiner is one convenient feature of EnCase that helps make it popular with law enforcement agencies. The text boxes are filled in automatically, but you have to click on the button on the right side next to each of the lower text boxes to select the paths. After selecting the paths, click the Finish button.
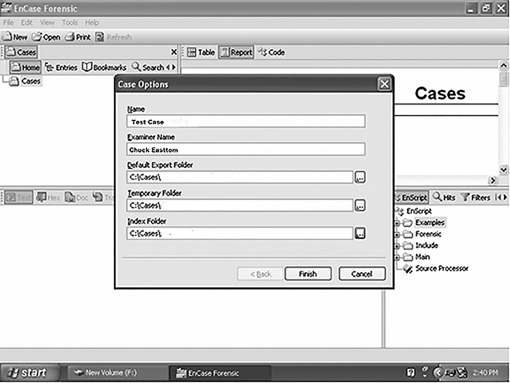
FIGURE 4-8
EnCase Case Options dialog box.
Courtesy of Guidance Software, Inc.
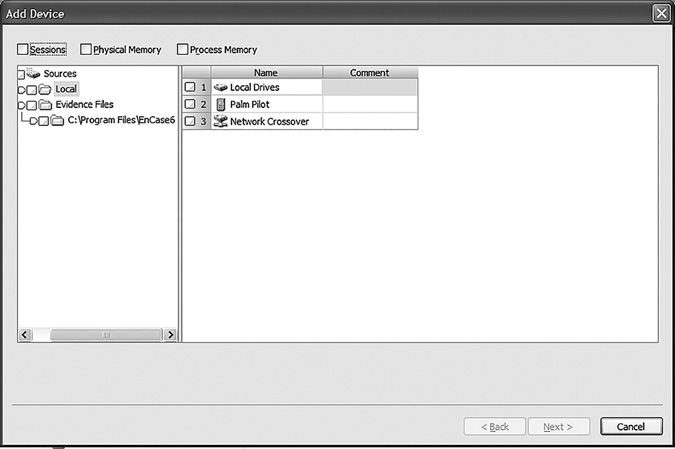
FIGURE 4-9
EnCase Add Device window.
Courtesy of Guidance Software, Inc.
Now that you have created the case, you need to save it by clicking the Save icon on the EnCase toolbar. Select a path for the save location when prompted. Now, you are ready to acquire evidence. On the EnCase toolbar, click the Add Device button. The Add Device window appears in EnCase, asking which device to add, as shown in FIGURE 4-9.
The left pane lists devices with subfolders, Local and Evidence Files. The right pane lists Local Drives, Palm Pilot, Parallel Port, and Network Crossover. (Note these options may differ on different systems.) In this procedure, you check the Local Drives in the right pane. After EnCase reads the local drives, another window appears. Once you have added the device, it shows in the case, as shown in FIGURE 4-10.
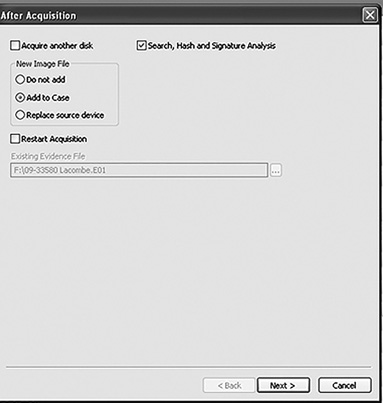
FIGURE 4-10
EnCase After Acquisition dialog box.
Courtesy of Guidance Software, Inc.
One of the first things you should note is that you can add multiple devices to a single case. This makes sense because many cases will have more than one device that is seized and requires examination.
Imaging with the Forensic Toolkit
The Forensic Toolkit (FTK) from AccessData is another popular forensic tool that is widely used by law enforcement. Once you have connected the suspect drive to the forensic machine, you simply have to add evidence, as shown in FIGURE 4-11.
You now have to select specifically what you want to image. As you can see in FIGURE 4-12, FTK offers a number of choices. The most common choice is a physical drive, but you can also add folders, logical drives, and even drive images, such as those made with the dd and netcat commands discussed earlier in this chapter. Select one of the Source Evidence Type options and then click the Next button.
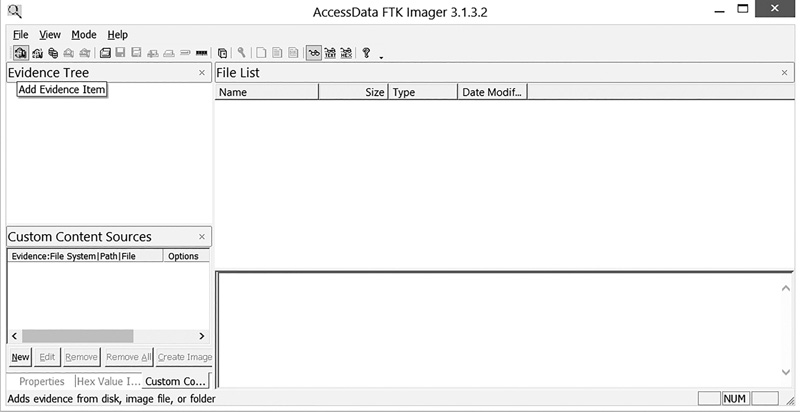
FIGURE 4-11
FTK: adding evidence.
Courtesy of AccessDataGroup, Inc.
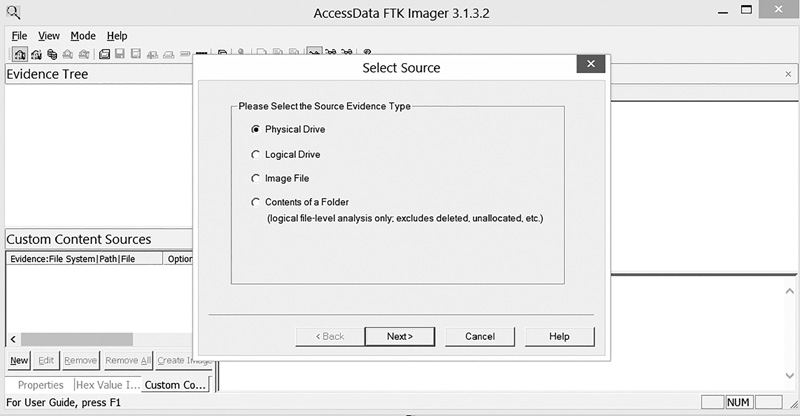
FIGURE 4-12
FTK Select Source dialog box.
Courtesy of AccessDataGroup, Inc.
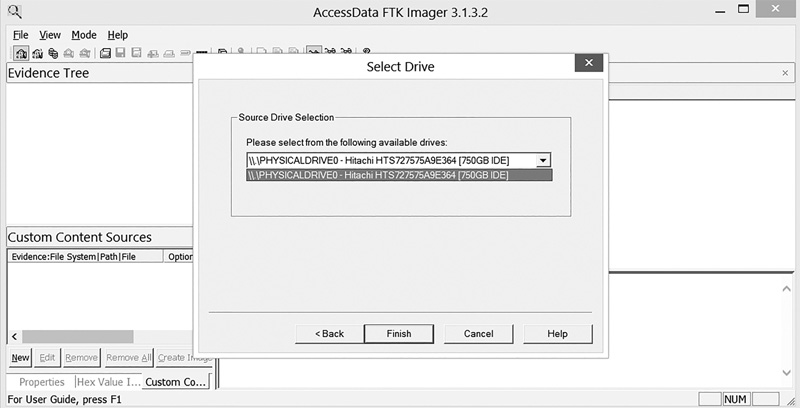
FIGURE 4-13
Evidence acquired.
Courtesy of AccessDataGroup, Inc.
Next, from the Select Drive drop-down, choose the specific drive you want to acquire and then click Finish. FTK mounts the drive; you can then see it in the evidence tree, as shown in FIGURE 4-13.
Imaging with OSForensics
OSForensics allows you to mount images created with other tools, but also allows you to create an image. The first step is to select Drive Imaging from the menu on the left, as shown in FIGURE 4-14. Then you will select the source drive you wish to image, and the target where you want to put the image. Notice that Verify Image is checked by default. (See FIGURE 4-15.) You should not uncheck this.

FIGURE 4-14
OSForensics drive imaging, step 1.
Courtesy of PassMark Software.
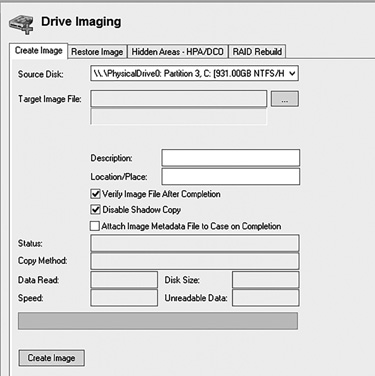
FIGURE 4-15
OSForensics drive imaging, step 2.
Courtesy of PassMark Software.
You now just start the process, and an image of the source drive will be created and verified for you.