Table of Contents for
System Forensics, Investigation, and Response, 3rd Edition
 System Forensics, Investigation, and Response, 3rd Edition
Published by
Jones & Bartlett Learning, 2017
System Forensics, Investigation, and Response, 3rd Edition
Published by
Jones & Bartlett Learning, 2017
- Cover Page
- Contents
- System Forensics, Investigation, and Response
- Title Page
- Copyright Page
- Content
- Preface
- About the Author
- PART I Introduction to Forensics
- CHAPTER 1 Introduction to Forensics
- What Is Computer Forensics?
- Understanding the Field of Digital Forensics
- Knowledge Needed for Computer Forensics Analysis
- The Daubert Standard
- U.S. Laws Affecting Digital Forensics
- Federal Guidelines
- CHAPTER SUMMARY
- KEY CONCEPTS AND TERMS
- CHAPTER 1 ASSESSMENT
- CHAPTER 2 Overview of Computer Crime
- How Computer Crime Affects Forensics
- Identity Theft
- Hacking
- Cyberstalking and Harassment
- Fraud
- Non-Access Computer Crimes
- Cyberterrorism
- CHAPTER SUMMARY
- KEY CONCEPTS AND TERMS
- CHAPTER 2 ASSESSMENT
- CHAPTER 3 Forensic Methods and Labs
- Forensic Methodologies
- Formal Forensic Approaches
- Documentation of Methodologies and Findings
- Evidence-Handling Tasks
- How to Set Up a Forensic Lab
- Common Forensic Software Programs
- Forensic Certifications
- CHAPTER SUMMARY
- KEY CONCEPTS AND TERMS
- CHAPTER 3 ASSESSMENT
- PART II Technical Overview: SystemForensics Tools, Techniques, and Methods
- CHAPTER 4 Collecting, Seizing, and Protecting Evidence
- Proper Procedure
- Handling Evidence
- Storage Formats
- Forensic Imaging
- RAID Acquisitions
- CHAPTER SUMMARY
- KEY CONCEPTS AND TERMS
- CHAPTER 4 ASSESSMENT
- CHAPTER LAB
- CHAPTER 5 Understanding Techniques for Hiding and Scrambling Information
- Steganography
- Encryption
- CHAPTER SUMMARY
- KEY CONCEPTS AND TERMS
- CHAPTER 5 ASSESSMENT
- CHAPTER 6 Recovering Data
- Undeleting Data
- Recovering Information from Damaged Media
- File Carving
- CHAPTER SUMMARY
- KEY CONCEPTS AND TERMS
- CHAPTER 6 ASSESSMENT
- CHAPTER 7 Email Forensics
- How Email Works
- Email Protocols
- Email Headers
- Tracing Email
- Email Server Forensics
- Email and the Law
- CHAPTER SUMMARY
- KEY CONCEPTS AND TERMS
- CHAPTER 7 ASSESSMENT
- CHAPTER 8 Windows Forensics
- Windows Details
- Volatile Data
- Windows Swap File
- Windows Logs
- Windows Directories
- Index.dat
- Windows Files and Permissions
- The Registry
- Volume Shadow Copy
- Memory Forensics
- CHAPTER SUMMARY
- KEY CONCEPTS AND TERMS
- CHAPTER 8 ASSESSMENT
- CHAPTER 9 Linux Forensics
- Linux and Forensics
- Linux Basics
- Linux File Systems
- Linux Logs
- Linux Directories
- Shell Commands for Forensics
- Kali Linux Forensics
- Forensics Tools for Linux
- CHAPTER SUMMARY
- KEY CONCEPTS AND TERMS
- CHAPTER 9 ASSESSMENT
- CHAPTER 10 Macintosh Forensics
- Mac Basics
- Macintosh Logs
- Directories
- Macintosh Forensic Techniques
- How to Examine a Mac
- Can You Undelete in Mac?
- CHAPTER SUMMARY
- KEY CONCEPTS AND TERMS
- CHAPTER 10 ASSESSMENT
- CHAPTER 11 Mobile Forensics
- Cellular Device Concepts
- What Evidence You Can Get from a Cell Phone
- Seizing Evidence from a Mobile Device
- JTAG
- CHAPTER SUMMARY
- KEY CONCEPTS AND TERMS
- CHAPTER 11 ASSESSMENT
- CHAPTER 12 Performing Network Analysis
- Network Packet Analysis
- Network Traffic Analysis
- Router Forensics
- Firewall Forensics
- CHAPTER SUMMARY
- KEY CONCEPTS AND TERMS
- CHAPTER 12 ASSESSMENT
- PART III Incident Response and Resources
- CHAPTER 13 Incident and Intrusion Response
- Disaster Recovery
- Preserving Evidence
- Adding Forensics to Incident Response
- CHAPTER SUMMARY
- KEY CONCEPTS AND TERMS
- CHAPTER 13 ASSESSMENT
- CHAPTER 14 Trends and Future Directions
- Technical Trends
- Legal and Procedural Trends
- CHAPTER SUMMARY
- KEY CONCEPTS AND TERMS
- CHAPTER 14 ASSESSMENT
- CHAPTER 15 System Forensics Resources
- Tools to Use
- Resources
- Laws
- CHAPTER SUMMARY
- KEY CONCEPTS AND TERMS
- CHAPTER 15 ASSESSMENT
- APPENDIX A Answer Key
- APPENDIX B Standard Acronyms
- Glossary of Key Terms
- References
- Index
Shell Commands for Forensics
There are hundreds of shell commands, and earlier in this chapter you were given a few links to some shell tutorials. Many of those commands are basic file/directory navigation, network administration, and general commands. In this section, you are introduced to a few Linux shell commands that can be very useful in your forensic investigations.
The dmesg Command
When your system boots up, you see a lot of information telling you what processes are starting, what processes failed, what hardware is being initialized, and more. This can be invaluable information to a forensic investigation. You can use the dmesg command to view all the messages that were displayed during the boot process.
The command dmesg displays the messages for you; however, it does tend to fill up multiple screens. It is recommended that you simply pipe the output to some file (for example, dmesg>myfile.txt) and then search that file. You can see some sample output of dmesg in FIGURE 9-5.
The fsck Command
Hard drives eventually age and begin to encounter problems. It is also possible that a suspect hard drive may have some issues preventing a full forensic analysis. You can use fsck (file system check) to help with that. There are several related commands, such as e2fsck.
Be aware, however, that you should try all other forensic methods before using any file system utility. It is possible that a file system utility will erase some data and lose some evidence—particularly evidence hidden in slack space.
The grep Command
This is the single most popular search command for Linux. It allows you to search for a wide range of parameters. For example, you might use dmesg>myfile.txt, then grep myfile.txt for specific data. Here are some specific examples of using grep:
Find all instances of the word corrupt in a file named somefile:
grep "corrupt" somefileLook for the same data in the same file, but ignore case:
grep −i "corrupt" somefileLook for words beginning with c and ending with e in file somefile:
grep "c..e" somefileCount the number of accounts that have /bin/false as the shell:
grep -c false /etc/passwd
As you can see, this can be very useful in searching both files and directories. As you gain more experience with Linux, you will most likely find yourself using grep very regularly. There are some great tutorials on the web to help you learn about grep and about variants of grep, such as those in the following list:
http://beginnerlinuxtutorial.com/help-tutorial/basic-linux-commands/linux-grep-command/
http://www.cyberciti.biz/faq/howto-use-grep-command-in-linux-unix/
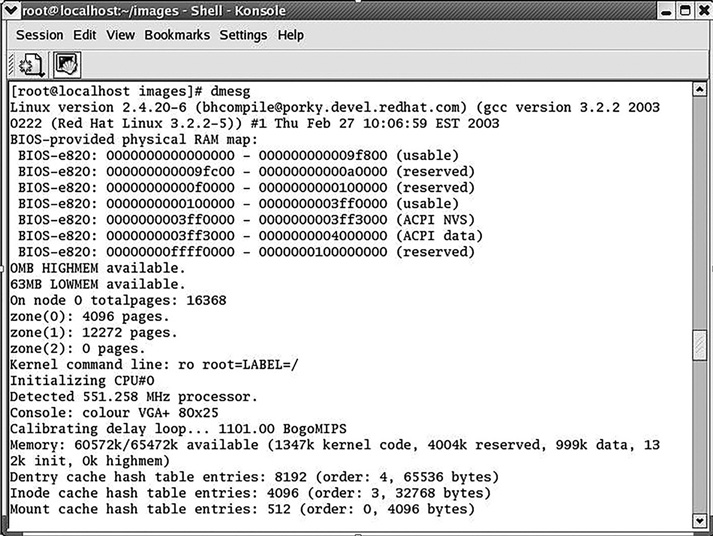
FIGURE 9-5
The dmesg command.
The first tutorial in the preceding list is ideal for people who are new to Linux. You can also find tutorials about other Linux commands on that site.
The history Command
The history command allows you to see the commands that have previously been entered. By default, this command returns the last 500 shell commands. This command can be very useful on a live system. When you first locate a Linux machine that is suspect, this is one of the commands you might want to run and record the results of before powering down the system. This can provide a wealth of forensic information. For example, if the command touch was run, that would be worth noting because that command can alter the date/time stamps of files.
The mount Command
The mount command is used to mount a new file system. When you add drives, they must be mounted. You will use this command frequently, specifically when you have a suspect drive you want to mount on your forensic workstation. Most of the commercial forensic tools like Forensic Toolkit (FTK) and EnCase can mount drives for you; however, many forensic analysts work completely with open source tools. In that case, you will need to mount the drives yourself.
The ps Command
The ps command shows the currently running processes for the current user. By default, ps selects all processes with the same user ID as the current user and associated with the same terminal as the invoker. It displays the process ID (PID), the terminal associated with the process (TTY), the cumulated CPU time in dd-hh:mm:ss format, and the executable name. There are flags you can add to this command to get more details about processes. Here are a few examples:
ps −auxUse the following to display more information:
ps −efThis is another command you will want to run on the live suspect system, before powering it down.
The pstree Command
The pstree command is very similar to the ps command, except it shows all the processes in the form of a tree structure. The tree format gives more information particular to a given forensic investigation. Not only will you know which processes are running, but also which process initiated those processes. You can see an example of pstree in FIGURE 9-6.
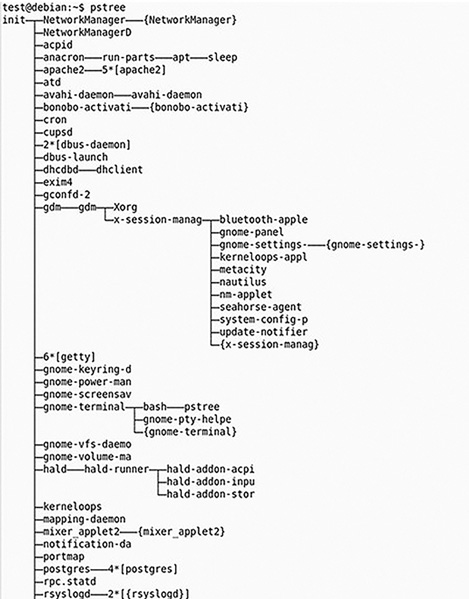
FIGURE 9-6
The pstree command.
The pgrep Command
The pgrep command takes the name you provide it and returns the ID for that process. It can even work with partial names. This is useful because many other commands require the process ID, so pgrep can help you retrieve that if you know the name of a process.
The top Command
The top command is similar to the ps command, except it lists the processes in the order of how much CPU time the process is utilizing. When examining a drive for the presence of malware, this can be a useful command. A virus or worm may be using up an excessive amount of CPU time, thus slowing down the infected machine.
The kill Command
The kill command is perhaps the simplest command of all. You simply type in the word kill followed by the process ID (PID) to halt a running process. An example is as follows:
kill 1045The file Command
The file command can tell you exactly what a file is regardless of whether it has been renamed or had its extension changed. This can be very important in a forensic investigation. The criminal may have changed the file extension to make the file appear to be something other than what it is. The file command will help you with this. An example of the file command is shown in FIGURE 9-7.
The su Command
At times, you may be at a Linux machine where someone has logged in, and you need to perform some task that requires the privileges of the root user. Logging out, and then logging back in as the root can be tedious. Fortunately, you don’t have to do that. You can simply invoke the super user mode. If you type in su at the shell, you are asked for the root password. If you can successfully supply it, you will then have root privileges.

FIGURE 9-7
The file command.
The who Command
The who command tells you all the users currently logged in to the system. This is useful only if you run it on the live suspect machine prior to shutting it down.
The finger Command
The finger command is used to get back information regarding a specific user. This is often useful for a system administrator. For example, if you run top, and see that one specific user is spawning several processes on your server, and those processes are consuming resources, then you may want to find out about that user. This is great to use along with who. After you know who is on your system, you can find out specific information about that user.
The dd Command
The dd command can be used to make a forensic copy of a suspect drive. But that is not all dd can do for you. You can use dd to make a physical image of what is live in memory. Linux physical memory is accessible via two files, the /dev/mem file and the /proc/kcore file. The following command is one example of making an image of memory:
dd if=/dev/mem of=/evidence/image.memory1This command takes whatever is in /dev/mem and sends it to the evidence partition, creating an image of it.
The ls Command
ls is a simple file management command. It lists the contents of the current directory, but ls can also be used to quickly catalog a suspect drive. For example, if you want to create a text file that has a listing of all directories and subdirectories, then try this command:
ls −R > directories.txtThe -R flag causes a recursive listing of all subdirectories. The > directories.txt writes the output of ls to the directories.txt file.
Can You Undelete in Linux?
This section expands on the details of Linux files and discusses a method for recovering deleted files.
Whenever you refer to a file by name, the operating system uses the filename to look up the corresponding inode, which then enables the system to obtain the information it needs about the file to perform further operations. An inode is a data structure in the file system that stores all the information about a file except its name and its actual data. Inodes can refer to either files or directories.
From the operating system’s perspective, a filename is really just an entry in a table with inode numbers. The name is not directly associated with the file. The name is just a human-readable method of locating the inode number.
The inode is really a link to the file. The operating system keeps a count of references to this link. When the reference count reaches zero, the file is deleted. This is why deleted files can sometimes be recovered.
Manual Method
In Linux, a file is deleted when its internal inode link count reaches zero. Just follow these steps to retrieve the deleted file:
1. Move the system to single-user mode. The init command can be used for this purpose.
2. Once you have moved to single-user mode, there are several methods you might use. The following is a rather traditional UNIX/Linux method using the grep command. Use the following grep syntax:
grep -b 'search-text' /dev/partition > file.txtor
grep -a -B[size before] -A[size after] 'text'
/dev/[your_partition] > file.txt
The flags used are defined as follows:
-i—Ignore case distinctions in both the PATTERN and the input files; that is, match both uppercase and lowercase characters.-a—Process a binary file as if it were text.-B—Print number lines/size of leading context before matching lines.-A—Print number lines/size of trailing context after matching lines.For example, to recover a text file starting with “criminalevidence” on /dev/sda1, you can try the following command:
# grep -i -a -B10 -A100 'criminalevidence' /dev/sda1 > file.txt
3. Next use any command-line text editor you like to see file.txt. You can then save that file.
This is only one of many methods for recovering deleted files in Linux.