Table of Contents for
System Forensics, Investigation, and Response, 3rd Edition
 System Forensics, Investigation, and Response, 3rd Edition
Published by
Jones & Bartlett Learning, 2017
System Forensics, Investigation, and Response, 3rd Edition
Published by
Jones & Bartlett Learning, 2017
- Cover Page
- Contents
- System Forensics, Investigation, and Response
- Title Page
- Copyright Page
- Content
- Preface
- About the Author
- PART I Introduction to Forensics
- CHAPTER 1 Introduction to Forensics
- What Is Computer Forensics?
- Understanding the Field of Digital Forensics
- Knowledge Needed for Computer Forensics Analysis
- The Daubert Standard
- U.S. Laws Affecting Digital Forensics
- Federal Guidelines
- CHAPTER SUMMARY
- KEY CONCEPTS AND TERMS
- CHAPTER 1 ASSESSMENT
- CHAPTER 2 Overview of Computer Crime
- How Computer Crime Affects Forensics
- Identity Theft
- Hacking
- Cyberstalking and Harassment
- Fraud
- Non-Access Computer Crimes
- Cyberterrorism
- CHAPTER SUMMARY
- KEY CONCEPTS AND TERMS
- CHAPTER 2 ASSESSMENT
- CHAPTER 3 Forensic Methods and Labs
- Forensic Methodologies
- Formal Forensic Approaches
- Documentation of Methodologies and Findings
- Evidence-Handling Tasks
- How to Set Up a Forensic Lab
- Common Forensic Software Programs
- Forensic Certifications
- CHAPTER SUMMARY
- KEY CONCEPTS AND TERMS
- CHAPTER 3 ASSESSMENT
- PART II Technical Overview: SystemForensics Tools, Techniques, and Methods
- CHAPTER 4 Collecting, Seizing, and Protecting Evidence
- Proper Procedure
- Handling Evidence
- Storage Formats
- Forensic Imaging
- RAID Acquisitions
- CHAPTER SUMMARY
- KEY CONCEPTS AND TERMS
- CHAPTER 4 ASSESSMENT
- CHAPTER LAB
- CHAPTER 5 Understanding Techniques for Hiding and Scrambling Information
- Steganography
- Encryption
- CHAPTER SUMMARY
- KEY CONCEPTS AND TERMS
- CHAPTER 5 ASSESSMENT
- CHAPTER 6 Recovering Data
- Undeleting Data
- Recovering Information from Damaged Media
- File Carving
- CHAPTER SUMMARY
- KEY CONCEPTS AND TERMS
- CHAPTER 6 ASSESSMENT
- CHAPTER 7 Email Forensics
- How Email Works
- Email Protocols
- Email Headers
- Tracing Email
- Email Server Forensics
- Email and the Law
- CHAPTER SUMMARY
- KEY CONCEPTS AND TERMS
- CHAPTER 7 ASSESSMENT
- CHAPTER 8 Windows Forensics
- Windows Details
- Volatile Data
- Windows Swap File
- Windows Logs
- Windows Directories
- Index.dat
- Windows Files and Permissions
- The Registry
- Volume Shadow Copy
- Memory Forensics
- CHAPTER SUMMARY
- KEY CONCEPTS AND TERMS
- CHAPTER 8 ASSESSMENT
- CHAPTER 9 Linux Forensics
- Linux and Forensics
- Linux Basics
- Linux File Systems
- Linux Logs
- Linux Directories
- Shell Commands for Forensics
- Kali Linux Forensics
- Forensics Tools for Linux
- CHAPTER SUMMARY
- KEY CONCEPTS AND TERMS
- CHAPTER 9 ASSESSMENT
- CHAPTER 10 Macintosh Forensics
- Mac Basics
- Macintosh Logs
- Directories
- Macintosh Forensic Techniques
- How to Examine a Mac
- Can You Undelete in Mac?
- CHAPTER SUMMARY
- KEY CONCEPTS AND TERMS
- CHAPTER 10 ASSESSMENT
- CHAPTER 11 Mobile Forensics
- Cellular Device Concepts
- What Evidence You Can Get from a Cell Phone
- Seizing Evidence from a Mobile Device
- JTAG
- CHAPTER SUMMARY
- KEY CONCEPTS AND TERMS
- CHAPTER 11 ASSESSMENT
- CHAPTER 12 Performing Network Analysis
- Network Packet Analysis
- Network Traffic Analysis
- Router Forensics
- Firewall Forensics
- CHAPTER SUMMARY
- KEY CONCEPTS AND TERMS
- CHAPTER 12 ASSESSMENT
- PART III Incident Response and Resources
- CHAPTER 13 Incident and Intrusion Response
- Disaster Recovery
- Preserving Evidence
- Adding Forensics to Incident Response
- CHAPTER SUMMARY
- KEY CONCEPTS AND TERMS
- CHAPTER 13 ASSESSMENT
- CHAPTER 14 Trends and Future Directions
- Technical Trends
- Legal and Procedural Trends
- CHAPTER SUMMARY
- KEY CONCEPTS AND TERMS
- CHAPTER 14 ASSESSMENT
- CHAPTER 15 System Forensics Resources
- Tools to Use
- Resources
- Laws
- CHAPTER SUMMARY
- KEY CONCEPTS AND TERMS
- CHAPTER 15 ASSESSMENT
- APPENDIX A Answer Key
- APPENDIX B Standard Acronyms
- Glossary of Key Terms
- References
- Index
Macintosh Forensic Techniques
This section covers some general forensic techniques to use on Macintosh systems. In the preceding sections, you learned about the Macintosh operating system, and you learned where to look for important logs, which is a valuable step in any forensic investigation. Now, you will learn a variety of forensic techniques.
Target Disk Mode
One of the most fundamental steps in forensics is to create a bit-level copy of the suspect drive. If the suspect drive is a Macintosh, all the techniques you know from Linux or Windows can still be used. You can utilize the dd command along with netcat to make a forensic copy. You can also use the imaging tools within EnCase or Forensic Toolkit. However, Macintosh provides another way to make a forensically sound copy of a drive. You begin by placing the suspect computer into Target Disk Mode. When you put the computer in that mode, it cannot be written to, so there is no chance of altering the source disk. Then simply connect to the suspect computer with universal serial bus (USB) or FireWire and image the disk.
Also, Target Disk Mode allows you to preview the computer on-site. This allows investigators to do a quick inspection before disconnecting and transporting the computer to a forensic lab. This is important because, just like with Windows or Linux, you will want to check running systems’ processes before shutting the machine down. You simply have to reboot the machine in Target Disk Mode, as shown in FIGURE 10-2.
Searching Virtual Memory
Checking virtual memory is just as important with a Macintosh as it is with a Windows or Linux computer. With Macintosh OS X, the swap file/virtual memory is located in the folder /var/vm/. You can check it with simple Linux commands like ls (for listing files). A good option is ls —al, which gives you a listing of all the files in virtual memory, as well as of who launched the program and when. The best news is that you can use the grep search tool to search in the virtual memory folder.
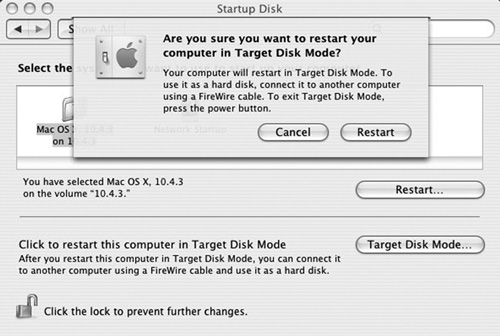
FIGURE 10-2
Target Disk Mode.
Screenshot reprinted with permission from Apple Inc.
Shell Commands
Because Mac OS X is based on FreeBSD, you can use shell commands to extract information. A number of commands can be quite useful in your forensic examination. Some additional commands are available that are specific to Macintosh.
The date Command
The date command returns the current date and time zone. It is good for documenting when exactly you begin your forensic examination. If you need the date in Coordinated Universal Time (UTC), then use the date −u version of the command.
The ls /dev/disk? Command
This command lists the current device files that are in use. You should document this information before shutting the system down for transport to the forensic lab.
The /hdiutil partition /dev/disk0 Command
This command lists the partition table for the boot drive. Clearly, it is important to know the partitions the machine recognizes upon boot-up.
The system_profiler SPHardwareDataType Command
This command returns the hardware information for the host system. This provides information useful for the basic documentation of the system prior to beginning your forensic examination. There are related commands, such as system_profiler SPSerialATA-DataType. This command gives information on all the attached Serial Advanced Technology Attachment (SATA) devices.
The system_profiler SPSoftwareDataType Command
Related to system_profiler SPHardwareDataType, this command returns information about the operating system. This is also important for documenting the system prior to starting the forensic examination.