Table of Contents for
Mastering phpMyAdmin 3.4 for Effective MySQL Management
 Mastering phpMyAdmin 3.4 for Effective MySQL Management
Published by
Packt Publishing, 2012
Mastering phpMyAdmin 3.4 for Effective MySQL Management
Published by
Packt Publishing, 2012
- Cover
- Mastering phpMyAdmin 3.4 for Effective MySQL Management
- Mastering phpMyAdmin 3.4 for Effective MySQL Management
- Credits
- About the Author
- About the Reviewers
- www.PacktPub.com
- Preface
- What you need for this book
- Who this book is for
- Conventions
- Reader feedback
- Customer support
- 1. Getting Started with phpMyAdmin
- What is phpMyAdmin?
- Installing phpMyAdmin
- Configuring phpMyAdmin
- Installing phpMyAdmin configuration storage
- Upgrading phpMyAdmin
- Summary
- 2. Configuring Authentication and Security
- Securing phpMyAdmin
- Summary
- 3. Over Viewing the Interface
- Customizing general settings
- Character sets and collations
- Navigation panel
- Main panel
- User preferences
- Query window
- Summary
- 4. Creating and Browsing Tables
- Creating our first table
- Inserting data manually
- Browse mode
- Profiling queries
- Creating an additional table
- Summary
- 5. Changing Data and Structure
- Changing table structure
- Summary
- 6. Exporting Structure and Data (Backup)
- Exporting a database
- Exporting a table
- Exporting selectively
- Exporting multiple databases
- Saving the export file on the server
- Memory limits
- Summary
- 7. Importing Structure and Data
- Importing SQL files
- Importing CSV files
- Importing other formats
- Reading files from a web server upload directory
- Displaying an upload progress bar
- Summary
- 8. Searching Data
- Performing a complete database search
- Stopping an errant query
- Summary
- 9. Performing Table and Database Operations
- Changing table attributes
- Emptying or deleting a table
- Renaming, moving, and copying tables
- Performing other table operations
- Multi-table operations
- Database operations
- Summary
- 10. Benefiting from the Relational System
- Defining relations with the relation view
- Defining relations with the Designer
- Benefiting from the defined relations
- Column commenting
- Summary
- 11. Entering SQL Statements
- The Query window
- Multi-statement queries
- Pretty printing (syntax highlighting)
- The SQL Validator
- Summary
- 12. Generating Multi-table Queries
- Exploring column criteria
- Generating automatic joins (internal relations)
- Executing the query
- The visual builder
- Summary
- 13. Synchronizing Data and Supporting Replication
- Supporting MySQL replication
- Summary
- 14. Using Query Bookmarks
- Creating bookmarks
- Recalling bookmarks from the bookmarks list
- Passing a parameter to a bookmark
- Summary
- 15. Documenting the System
- Generating relational schemas
- Summary
- 16. Transforming Data using MIME
- Enabling transformations
- Examples of transformations
- Summary
- 17. Supporting Features Added in MySQL 5
- Supporting routines—stored procedures and functions
- Executing code with triggers
- Using information_schema
- Partitioning
- Exploring the event scheduler
- Summary
- 18. Tracking Changes
- Prerequisites
- Principles
- Initiating tracking for one table
- Testing the tracking mechanism
- Determining tracking status
- Structure snapshot
- Exporting a version
- Creating a new version
- Deleting tracking information
- Summary
- 19. Administrating the MySQL Server
- Database information
- Server information
- Summary
- A. Troubleshooting and Support
- Seeking support
- Contributing to the project
This chapter discusses how a system administrator can use the phpMyAdmin server-management features for day-to-day user account maintenance, server verification, and server protection. The subject of how non-administrators can obtain server information from phpMyAdmin is also covered.
Server administration is mostly done via the Server view, which is accessed via the menu tabs available on phpMyAdmin's home page.
The Privileges page (visible only if we are logged in as a privileged user) contains dialogs to manage MySQL user accounts. It also contains dialogs to manage privileges on global, database, and table levels. This page is hierarchical. When editing a user's privileges, we can see the global privileges as well as the database-specific privileges. Then, when viewing database-specific privileges for a user, we can view and edit this user's privileges for any table within this database.
The first page displayed when we enter the Privileges page is called User overview. This shows all user accounts and a summary of their global privileges, as shown in the following screenshot:
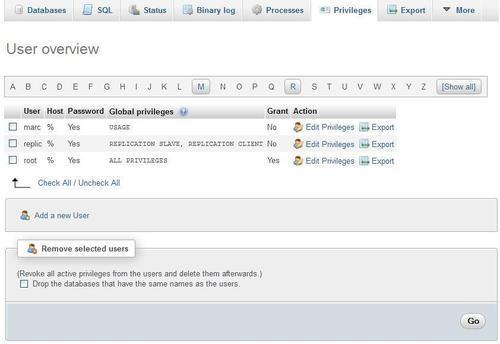
- Edit a user's privileges, via the Edit Privileges link for this user
- Export a user's privileges definition, via the Export link for this user
- Use the checkboxes to remove users, via the Remove selected users dialog
- Access the page where the Add a new User dialog is available
The displayed users' list has columns with the following characteristics:
|
Column |
Characteristic |
|---|---|
|
User |
The user account we are defining. |
|
Host |
The machine name or IP address, from which this user account will be connecting to the MySQL server. A % value here indicates all hosts. |
|
Password |
Contains Yes if a password is defined and No if it isn't. The password itself cannot be seen from phpMyAdmin's interface or by directly looking at the |
|
Global privileges |
A list of the user's global privileges. |
|
Grant |
Contains Yes if the user can grant his/her privileges to others. |
|
Action |
Contains a link to edit this user's privileges or export them. |
This feature can be useful when we need to create a user with the same password and privileges on another MySQL server. Clicking on Export for user marc produces the following panel:
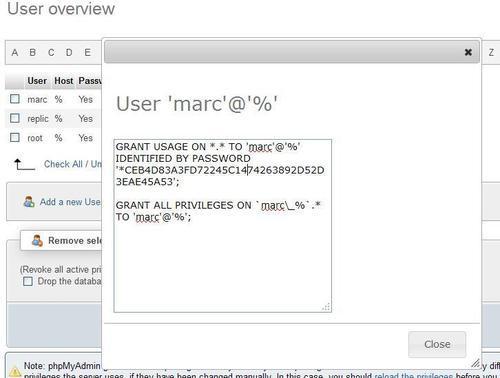
Then it's only a matter of selecting these GRANT statements and pasting them in the SQL box of another phpMyAdmin window, where we have logged in on another MySQL server.
At the bottom of User overview page, this message is displayed:
Note: phpMyAdmin gets the users' privileges directly from MySQL's privilege tables. The content of these tables may differ from the privileges the server uses, if they have been changed manually. In this case, you should reload the privileges before you continue.
Here, the text reload the privileges is clickable. The effective privileges (the ones against which the server bases its access decisions) are the privileges that are located in the server's memory. Privilege modifications that are made from the User overview page are made both in memory and on disk in the mysql database. Modifications made directly to the mysql database do not have immediate effect. The reload the privileges operation reads the privileges from the database and makes them effective in memory.
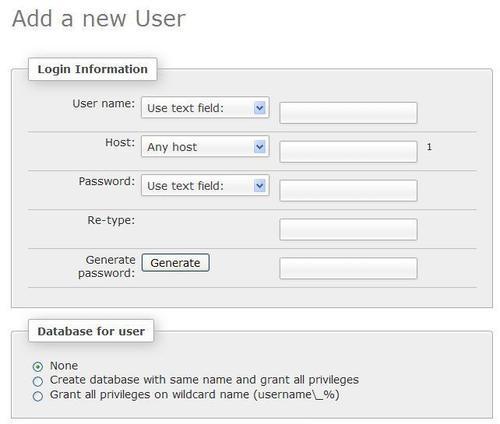
The Add a new User link opens a dialog for user account creation. First, we see the panel where we will describe the account itself, as shown in the following screenshot:
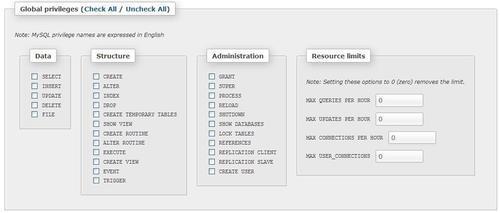
The second part of the Add a new User dialog is where we will specify the user's global privileges, which apply to the server as a whole (see the Assigning global privileges section of this chapter), as shown in the following screenshot:
The User name menu offers two choices. We can choose Use text field: and enter a username in the box, or we can choose Any user to create an anonymous user (the blank user). More details about the anonymous user are available at http://dev.mysql.com/doc/refman/5.5/en/connection-access.html. Let us choose Use text field: and enter bill.
By default, this menu is set to Any host, with % as the host value. The Local choice means localhost. The Use host table choice (which creates a blank value in the host field) means to look in the mysql.host table for database-specific privileges. Choosing Use text field: allows us to enter the exact host value we want. Let us choose Local.
Even though it's possible to create a user without a password (by selecting the No password option), it's best to have a password. We have to enter it twice (as we cannot see what is entered) to confirm the intended password. A secure password should have more than eight characters, and should contain a mixture of uppercase and lowercase characters, digits, and special characters. Therefore, it's recommended to have phpMyAdmin generate a password—this is possible in JavaScript-enabled browsers. In the Generate password dialog, clicking on Generate button enters a random password (in clear text) on the screen and fills the Password and Re-type input fields with the generated password. At this point, we should note the password so that we can pass it on to the user.
A frequent convention is to assign a user the rights to a database having the same name as this user. To accomplish this, the Database for user section offers the Create database with same name and grant all privileges radio button. Selecting this checkbox automates the process by creating both the database (if it does not already exist) and assigning the corresponding rights. Please note that, with this method, each user would be limited to one database (user bill, database bill).
Another possibility is to allow users to create databases that have the same prefix as their usernames. Therefore, the other choice Grant all privileges on wildcard name (username\_%) performs this function by assigning a wildcard privilege. With this in place, user bill could create the databases bill_test, bill_2, bill_payroll, and so on; phpMyAdmin does not pre-create the databases in this case.
Global privileges determine the user's access to all databases. Hence, these are sometimes known as superuser privileges. A normal user should not have any of these privileges unless there is a good reason for this. Moreover, should a user account that has global privileges become compromised, the damage could be far greater.
If we are really creating a superuser, we will select every global privilege that he or she needs. These privileges are further divided into Data, Structure, and Administration groups.
In our example, bill will not have any global privileges.
We can limit the resources used by this user on this server (for example, the maximum queries per hour). Zero means no limit. We will not impose any resources limits on bill.
The following screenshot shows the status of the screen just before hitting Create user to create this user's definition (with the remaining fields being set to default):

The page used to edit a user's profile appears whenever we click on Edit Privileges for a user in the User overview page. Let us try it for our newly created user bill. There are four sections on this page, each with its own Go button. Hence, each section is operated independently and has a distinct purpose.
The section for editing the user's privileges has the same look as the Add a new User dialog, and is used to view and to change global privileges.
In this section, we define the databases to which our user has access, and his or her exact privileges on these databases.
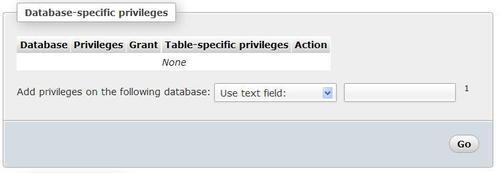
As shown in the previous screenshot, we see None because we haven't defined any privileges yet. There are two ways of defining database privileges. First, we can choose one of the existing databases from the drop-down menu as shown in the following screenshot:
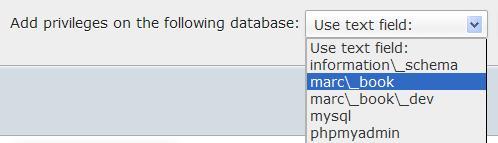
This assigns privileges only for the chosen database. Secondly, we can also choose Use text field: and enter a database name. We could enter a non-existent database name, so that the user can create it later (provided we give him/her the CREATE privilege in the next panel). We can also use special characters, such as the underscore and the percent sign, for wildcards.
For example, entering bill here would enable him to create a bill database, and entering bill% would enable him to create a database with any name that starts with bill. For our example, we will enter bill and click on Go.
The next screen is used to set bill's privileges on the bill database, and create table-specific privileges.
To learn more about the meaning of a specific privilege, we can hover the mouse over a privilege name (which is always in English), and an explanation about this privilege appears in the current language. We give SELECT, INSERT, UPDATE, DELETE, CREATE, ALTER, INDEX, and DROP privileges to bill on this database. We then click on Go.
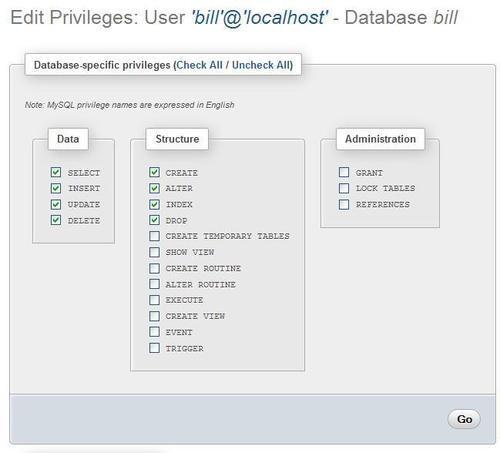
After the privileges have been assigned, the interface stays at the same place, so that we can refine these privileges further. We cannot assign table-specific privileges for the moment, as the database does not yet exist.
To go back to the general privileges page of bill, click on the'bill'@'localhost' title.
This brings us back to the following, familiar page except for a change in one section:
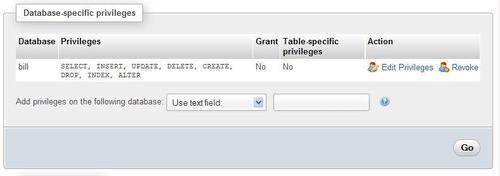
We see the existing privileges (we could click on Edit Privileges link to edit or on Revoke link to revoke them) on the bill database for user bill, and we can add privileges for bill on another database. We can also see that bill has no table-specific privilege on the bill database.
The Change password dialog is part of the Edit user page, and we can use it either to change bill's password or to remove it. Removing the password will enable bill to log in without a password. The dialog offers a choice of password hashing options, and it's recommended to keep the default of MySQL 4.1+ hashing. For more details about hashing, please visit http://dev.mysql.com/doc/refman/5.1/en/password-hashing.html.
This dialog can be used to change the user's login information, or to copy his or her login information to a new user. For example, suppose that Bill calls and tells us that he prefers the login name billy instead of bill. We just have to add a y to the username, and then select delete the old one from the user tables radio button, as shown in the following screenshot:
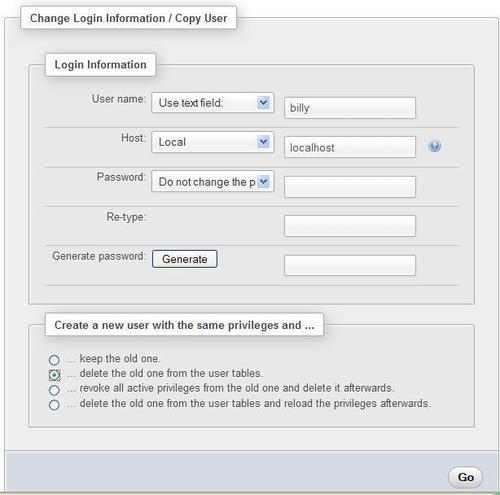
After clicking on Go, bill no longer exists in the mysql database. Also, all of his privileges, including the privileges on the bill database, will have been transferred to the new user—billy. However, the user definition of bill will still exist in memory, and hence it's still effective. If we had chosen the delete the old one from the user tables and reload the privileges afterwards option instead, the user definition of bill would immediately have ceased to be valid.
Alternatively, we could have created another user based on bill, by making use of the keep the old one choice. We can transfer the password to the new user by choosing Do not change the password option, or change it by entering a new password twice. The revoke all active privileges… option immediately terminates the effective current privileges for this user, even if he or she is currently logged in.
Removing a user is done from the User overview section of the Privileges page. We select the user to be removed. Then (in Remove selected users) we can select the Drop the databases that have the same names as the users option to remove any databases that are named after the users we are deleting. A click on Go effectively removes the selected users.