Table of Contents for
Mastering phpMyAdmin 3.4 for Effective MySQL Management
 Mastering phpMyAdmin 3.4 for Effective MySQL Management
Published by
Packt Publishing, 2012
Mastering phpMyAdmin 3.4 for Effective MySQL Management
Published by
Packt Publishing, 2012
- Cover
- Mastering phpMyAdmin 3.4 for Effective MySQL Management
- Mastering phpMyAdmin 3.4 for Effective MySQL Management
- Credits
- About the Author
- About the Reviewers
- www.PacktPub.com
- Preface
- What you need for this book
- Who this book is for
- Conventions
- Reader feedback
- Customer support
- 1. Getting Started with phpMyAdmin
- What is phpMyAdmin?
- Installing phpMyAdmin
- Configuring phpMyAdmin
- Installing phpMyAdmin configuration storage
- Upgrading phpMyAdmin
- Summary
- 2. Configuring Authentication and Security
- Securing phpMyAdmin
- Summary
- 3. Over Viewing the Interface
- Customizing general settings
- Character sets and collations
- Navigation panel
- Main panel
- User preferences
- Query window
- Summary
- 4. Creating and Browsing Tables
- Creating our first table
- Inserting data manually
- Browse mode
- Profiling queries
- Creating an additional table
- Summary
- 5. Changing Data and Structure
- Changing table structure
- Summary
- 6. Exporting Structure and Data (Backup)
- Exporting a database
- Exporting a table
- Exporting selectively
- Exporting multiple databases
- Saving the export file on the server
- Memory limits
- Summary
- 7. Importing Structure and Data
- Importing SQL files
- Importing CSV files
- Importing other formats
- Reading files from a web server upload directory
- Displaying an upload progress bar
- Summary
- 8. Searching Data
- Performing a complete database search
- Stopping an errant query
- Summary
- 9. Performing Table and Database Operations
- Changing table attributes
- Emptying or deleting a table
- Renaming, moving, and copying tables
- Performing other table operations
- Multi-table operations
- Database operations
- Summary
- 10. Benefiting from the Relational System
- Defining relations with the relation view
- Defining relations with the Designer
- Benefiting from the defined relations
- Column commenting
- Summary
- 11. Entering SQL Statements
- The Query window
- Multi-statement queries
- Pretty printing (syntax highlighting)
- The SQL Validator
- Summary
- 12. Generating Multi-table Queries
- Exploring column criteria
- Generating automatic joins (internal relations)
- Executing the query
- The visual builder
- Summary
- 13. Synchronizing Data and Supporting Replication
- Supporting MySQL replication
- Summary
- 14. Using Query Bookmarks
- Creating bookmarks
- Recalling bookmarks from the bookmarks list
- Passing a parameter to a bookmark
- Summary
- 15. Documenting the System
- Generating relational schemas
- Summary
- 16. Transforming Data using MIME
- Enabling transformations
- Examples of transformations
- Summary
- 17. Supporting Features Added in MySQL 5
- Supporting routines—stored procedures and functions
- Executing code with triggers
- Using information_schema
- Partitioning
- Exploring the event scheduler
- Summary
- 18. Tracking Changes
- Prerequisites
- Principles
- Initiating tracking for one table
- Testing the tracking mechanism
- Determining tracking status
- Structure snapshot
- Exporting a version
- Creating a new version
- Deleting tracking information
- Summary
- 19. Administrating the MySQL Server
- Database information
- Server information
- Summary
- A. Troubleshooting and Support
- Seeking support
- Contributing to the project
Instead of transmitting the export file over the network with HTTP, it is possible to save it directly on the file system of the web server. This could be quicker and less sensitive to execution time limits as the entire transfer from the server to the client browser is bypassed. Eventually, a file transfer protocol such as FTP or SFTP can be used to retrieve the file, as leaving it on the same machine would not provide good backup protection.
A special directory has to be created on the web server before saving an export file on it. Usually, this is a sub-directory of the main phpMyAdmin directory. We will use save_dir as an example. This directory must have the correct permissions. First, the web server must have write permissions for this directory. Also, if the web server's PHP component is running on safe mode, the owner of the phpMyAdmin scripts must be the same as that of save_dir.
On a Linux system, assuming that the web server is running as group apache, the following commands would do the trick:
# mkdir save_dir
# chgrp apache save_dir
# chmod g=rwx save_dir
Note
The proper ownership and permissions depends highly on the chosen web server and the SAPI (Server Application Programming Interface) (refer to http://en.wikipedia.org/wiki/Server_Application_Programming_Interface) used, which influences how directories and files are created and accessed. PHP could be using the scripts' owner as the accessing user, or the web server's user/group itself.
We also have to define the'./save_dir' directory name in $cfg['SaveDir'].We are using a path relative to the phpMyAdmin directory here, but an absolute path would work just as well.
The Output section will appear with a new Save on server... section:
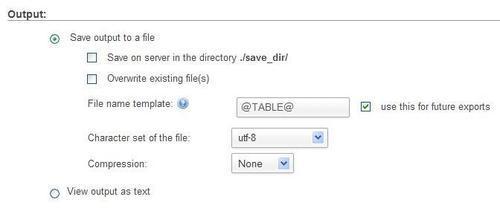
After clicking on Go, we will get a confirmation message or an error message (if the web server does not have the required permissions to save the file).
We can use the special string, %u, in the $cfg['SaveDir'] parameter. This string will be replaced by the logged-in username. For example, as shown in the following line of code:
$cfg['SaveDir'] = './save_dir/%u';
This would give us an on-screen choice, Save on server in the directory ./save_dir/marc/. These directories (one per potential user) must exist and must bear the proper permissions, as already seen in the previous section.