Table of Contents for
Mastering phpMyAdmin 3.4 for Effective MySQL Management
 Mastering phpMyAdmin 3.4 for Effective MySQL Management
Published by
Packt Publishing, 2012
Mastering phpMyAdmin 3.4 for Effective MySQL Management
Published by
Packt Publishing, 2012
- Cover
- Mastering phpMyAdmin 3.4 for Effective MySQL Management
- Mastering phpMyAdmin 3.4 for Effective MySQL Management
- Credits
- About the Author
- About the Reviewers
- www.PacktPub.com
- Preface
- What you need for this book
- Who this book is for
- Conventions
- Reader feedback
- Customer support
- 1. Getting Started with phpMyAdmin
- What is phpMyAdmin?
- Installing phpMyAdmin
- Configuring phpMyAdmin
- Installing phpMyAdmin configuration storage
- Upgrading phpMyAdmin
- Summary
- 2. Configuring Authentication and Security
- Securing phpMyAdmin
- Summary
- 3. Over Viewing the Interface
- Customizing general settings
- Character sets and collations
- Navigation panel
- Main panel
- User preferences
- Query window
- Summary
- 4. Creating and Browsing Tables
- Creating our first table
- Inserting data manually
- Browse mode
- Profiling queries
- Creating an additional table
- Summary
- 5. Changing Data and Structure
- Changing table structure
- Summary
- 6. Exporting Structure and Data (Backup)
- Exporting a database
- Exporting a table
- Exporting selectively
- Exporting multiple databases
- Saving the export file on the server
- Memory limits
- Summary
- 7. Importing Structure and Data
- Importing SQL files
- Importing CSV files
- Importing other formats
- Reading files from a web server upload directory
- Displaying an upload progress bar
- Summary
- 8. Searching Data
- Performing a complete database search
- Stopping an errant query
- Summary
- 9. Performing Table and Database Operations
- Changing table attributes
- Emptying or deleting a table
- Renaming, moving, and copying tables
- Performing other table operations
- Multi-table operations
- Database operations
- Summary
- 10. Benefiting from the Relational System
- Defining relations with the relation view
- Defining relations with the Designer
- Benefiting from the defined relations
- Column commenting
- Summary
- 11. Entering SQL Statements
- The Query window
- Multi-statement queries
- Pretty printing (syntax highlighting)
- The SQL Validator
- Summary
- 12. Generating Multi-table Queries
- Exploring column criteria
- Generating automatic joins (internal relations)
- Executing the query
- The visual builder
- Summary
- 13. Synchronizing Data and Supporting Replication
- Supporting MySQL replication
- Summary
- 14. Using Query Bookmarks
- Creating bookmarks
- Recalling bookmarks from the bookmarks list
- Passing a parameter to a bookmark
- Summary
- 15. Documenting the System
- Generating relational schemas
- Summary
- 16. Transforming Data using MIME
- Enabling transformations
- Examples of transformations
- Summary
- 17. Supporting Features Added in MySQL 5
- Supporting routines—stored procedures and functions
- Executing code with triggers
- Using information_schema
- Partitioning
- Exploring the event scheduler
- Summary
- 18. Tracking Changes
- Prerequisites
- Principles
- Initiating tracking for one table
- Testing the tracking mechanism
- Determining tracking status
- Structure snapshot
- Exporting a version
- Creating a new version
- Deleting tracking information
- Summary
- 19. Administrating the MySQL Server
- Database information
- Server information
- Summary
- A. Troubleshooting and Support
- Seeking support
- Contributing to the project
This section describes settings that have an impact on many panels. These settings modify the appearance of titles in windows, of information icons, and how the list of tables is sorted. The whole visual style of all pages is controlled by the theme system, which is covered in this section as well. This section also deals with how to restrict the list of databases seen by users.
When the navigation and main panels are displayed, the window's title changes to reflect which MySQL server, database, and table are active. These directives control the following amount of information to be displayed: $cfg['TitleDefault'], $cfg['TitleServer'], $cfg['TitleDatabase'], and $cfg['TitleTable'].
If no server is selected, $cfg['TitleDefault'] controls the title. When a server is selected (but no database), $cfg['TitleServer'] controls what is displayed in the title bar. Then if a database is selected, $cfg['TitleDatabase'] enters into play. Finally, $cfg['TitleTable'] is effective if a table is selected.
These directives contain format strings that control which piece of information is shown. For example, here is the default value of one of these directives:
$cfg['TitleTable'] = '@HTTP_HOST@ / @VSERVER@ / @DATABASE@ / @TABLE@ | @PHPMYADMIN@';
The possible format strings and their meaning are described in Documentation.html, FAQ 6.27.
Usually, computers sort items in lexical order, which gives the following results for a list of tables:
table1
table10
table2
table3
phpMyAdmin implements natural sort order by default, as specified by $cfg['NaturalOrder'] being TRUE. Thus the database and table lists in navigation and main panels are sorted as:
table1
table2
table3
table10
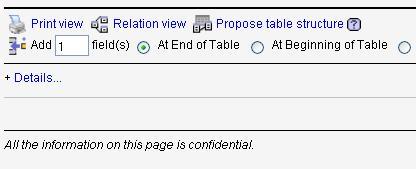
Some users may want to display a company logo, a link to their company's helpdesk, or other information on the phpMyAdmin interface. In the main phpMyAdmin directory, for this purpose, we can create two scripts—config.header.inc.php and config.footer.inc.php. We can put our own PHP or XHTML code in these scripts, and it will appear either at the beginning (for header) or at the end (for footer) of the cookie login and the main panel pages.
For example, creating a config.footer.inc.php containing these lines:
<hr />
<em>All the information on this page is confidential.</em>
Using such a sentence in the footer would produce the intended message on all pages as shown in the following screenshot:
A theme system is available in phpMyAdmin. The color parameters and the various icons are located in a directory structure under the themes sub-directory. For each available theme, there is a sub-directory named after the theme. It contains:
layout.inc.phpfor the theme parameterscssdirectory with the various CSS scriptsimgdirectory containing any icons or other imagery (for example, logos)screen.png, a screenshot of this theme
The downloaded kit contains two themes but there are more available at http://phpmyadmin.net/home_page/themes.php. Installing a new theme is just a matter of downloading the corresponding .zip file and extracting it into the themes sub-directory.
Note
In case someone would like to build a custom theme that contains JavaScript code, please note that all phpMyAdmin 3.4 pages include the jQuery library.
In config.inc.php, the $cfg['ThemePath'] parameter contains'./themes' by default, indicating which sub-directory the required structure is located in. This could be changed to point to another directory where your company's specific phpMyAdmin themes are located.
The default chosen theme is specified in $cfg['ThemeDefault'], and is set to'pmahomme'. If no theme selection is available for users, this theme will be used.
On the home page, we can offer a theme selector to users. Setting $cfg['ThemeManager'] to TRUE (the default) shows the selector as shown in the following screenshot:
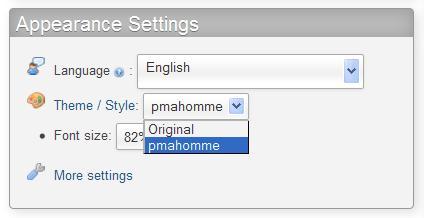
To help choose a suitable theme, the Theme / Style link displays a panel containing screenshots of the available themes and a Get more themes link. We can then click on take it under the theme we want. A reference to the chosen theme is stored in a cookie and, by default, is applied to all servers we connect to.
To make phpMyAdmin remember one theme per MySQL server, we set $cfg['ThemePerServer'] to TRUE.
A Language selector appears on the login panel (if any) and on the home page. The default behavior of phpMyAdmin is to use the language defined in our browser's preferences, if there is a corresponding language file for this version.
The default language used, in case the program cannot detect one, is defined in config.inc.php in the $cfg['DefaultLang'] parameter with'en' (English). This value can be changed. The possible values for language names are defined in the libraries/select_lang.lib.php script in the PMA_langDetails() function.
Even if the default language is defined, each user (especially on a multi-user installation) can choose his/her preferred language from the selector. The user's choice will be remembered in a cookie whenever possible.
We can also force a single language by setting the $cfg['Lang'] parameter with a value, such as'fr' (French). Another parameter, $cfg['FilterLanguages'], is available. Suppose we want to shorten the list of available languages to English and Français—French, as those are the ones used exclusively by the users of this phpMyAdmin's instance. This is accomplished by building a regular expression indicating which languages we want to display based on the ISO 639 codes of these languages. To continue with our example, we would use:
$cfg['FilterLanguages'] = '^(fr|en)';
In this expression, the caret (^) means "starting with" and the (|) means "or". The expression indicates that we are restricting the list to languages whose corresponding ISO codes start with fr or en.
By default, this parameter is empty, meaning that no filter is applied to the list of available languages.
On some pages, you will see a small plus sign followed by a controlling label—either Options or Details. A click on the label opens a slider to reveal a section of the interface, which is believed to be less often used in day-to-day work. As few people prefer to immediately see the whole interface at the expense of screen space, there is a configuration parameter that controls how the sliders are initially set:
$cfg['InitialSlidersState'] = 'closed';
The default value of closed means that sliders must be opened by a click on the label; you might have guessed that the reverse value is open. A third value, disabled, can be used by slider-allergic users.
Sometimes it is useful to avoid showing in the navigation panel, all the databases a user has access to. phpMyAdmin offers two ways of restriction—only_db
and hide_db.
To specify the list of what can be seen, the only_db parameter is used. It may contain a database name or a list of database names. Only these databases will be seen in the navigation panel:
$cfg['Servers'][$i]['only_db'] = 'payroll';
$cfg['Servers'][$i]['only_db'] = array('payroll', 'hr);
The database names can contain MySQL wildcard characters such as _ and %. These wildcard characters are described at http://dev.mysql.com/doc/refman/5.1/en/account-names.html. If an array is used to specify many databases, they will be displayed on the interface in the same order they are listed in the array.
Another feature of only_db is that you can use it not to restrict the list, but instead to put emphasis on certain names that will be displayed on top of the list. Here, the myspecial database name will appear first, followed by all other names:
$cfg['Servers'][$i]['only_db'] = array('myspecial', '*');
We can also indicate which database names must be hidden with the hide_db parameter. It contains a regular expression ( http://en.wikipedia.org/wiki/Regular_expression) representing what to exclude. If we do not want users to see any database whose name begins with'secret', we would use:
$cfg['Servers'][$i]['hide_db'] = '^secret';
These parameters apply to all users for this server-specific configuration.
Certain pages are using Asynchronous JavaScript to improve user experience. We can deactivate this behavior by setting $cfg['AjaxEnable'] to false; in this case, the pages for which a non-Ajax behavior has been programmed, will cease using Ajax, performing a full refresh instead. This may be perceived by the user as less fluid.