Table of Contents for
Mastering phpMyAdmin 3.4 for Effective MySQL Management
 Mastering phpMyAdmin 3.4 for Effective MySQL Management
Published by
Packt Publishing, 2012
Mastering phpMyAdmin 3.4 for Effective MySQL Management
Published by
Packt Publishing, 2012
- Cover
- Mastering phpMyAdmin 3.4 for Effective MySQL Management
- Mastering phpMyAdmin 3.4 for Effective MySQL Management
- Credits
- About the Author
- About the Reviewers
- www.PacktPub.com
- Preface
- What you need for this book
- Who this book is for
- Conventions
- Reader feedback
- Customer support
- 1. Getting Started with phpMyAdmin
- What is phpMyAdmin?
- Installing phpMyAdmin
- Configuring phpMyAdmin
- Installing phpMyAdmin configuration storage
- Upgrading phpMyAdmin
- Summary
- 2. Configuring Authentication and Security
- Securing phpMyAdmin
- Summary
- 3. Over Viewing the Interface
- Customizing general settings
- Character sets and collations
- Navigation panel
- Main panel
- User preferences
- Query window
- Summary
- 4. Creating and Browsing Tables
- Creating our first table
- Inserting data manually
- Browse mode
- Profiling queries
- Creating an additional table
- Summary
- 5. Changing Data and Structure
- Changing table structure
- Summary
- 6. Exporting Structure and Data (Backup)
- Exporting a database
- Exporting a table
- Exporting selectively
- Exporting multiple databases
- Saving the export file on the server
- Memory limits
- Summary
- 7. Importing Structure and Data
- Importing SQL files
- Importing CSV files
- Importing other formats
- Reading files from a web server upload directory
- Displaying an upload progress bar
- Summary
- 8. Searching Data
- Performing a complete database search
- Stopping an errant query
- Summary
- 9. Performing Table and Database Operations
- Changing table attributes
- Emptying or deleting a table
- Renaming, moving, and copying tables
- Performing other table operations
- Multi-table operations
- Database operations
- Summary
- 10. Benefiting from the Relational System
- Defining relations with the relation view
- Defining relations with the Designer
- Benefiting from the defined relations
- Column commenting
- Summary
- 11. Entering SQL Statements
- The Query window
- Multi-statement queries
- Pretty printing (syntax highlighting)
- The SQL Validator
- Summary
- 12. Generating Multi-table Queries
- Exploring column criteria
- Generating automatic joins (internal relations)
- Executing the query
- The visual builder
- Summary
- 13. Synchronizing Data and Supporting Replication
- Supporting MySQL replication
- Summary
- 14. Using Query Bookmarks
- Creating bookmarks
- Recalling bookmarks from the bookmarks list
- Passing a parameter to a bookmark
- Summary
- 15. Documenting the System
- Generating relational schemas
- Summary
- 16. Transforming Data using MIME
- Enabling transformations
- Examples of transformations
- Summary
- 17. Supporting Features Added in MySQL 5
- Supporting routines—stored procedures and functions
- Executing code with triggers
- Using information_schema
- Partitioning
- Exploring the event scheduler
- Summary
- 18. Tracking Changes
- Prerequisites
- Principles
- Initiating tracking for one table
- Testing the tracking mechanism
- Determining tracking status
- Structure snapshot
- Exporting a version
- Creating a new version
- Deleting tracking information
- Summary
- 19. Administrating the MySQL Server
- Database information
- Server information
- Summary
- A. Troubleshooting and Support
- Seeking support
- Contributing to the project
This chapter explains how we can enter our own SQL statements (queries) into phpMyAdmin, and how we can keep a history of those queries. Traditionally, one would interact with a MySQL server via the "mysql" command-line client by entering SQL statements and watching the server's response. Official MySQL training still involves directly typing statements to such a client.
phpMyAdmin allows us to accomplish many database operations via its graphical interface. However, there will be times when we have to rely on SQL query input to achieve operations that are not directly supported by the interface. Following are two examples of such queries:
SELECT department, AVG(salary) FROM employees GROUP BY department HAVING years_experience > 10;
SELECT FROM_DAYS(TO_DAYS(CURDATE()) +30);
To enter such queries, the SQL query box is available from a number of places within phpMyAdmin.
We encounter our first SQL query box when going to the SQL menu available in the Database view.
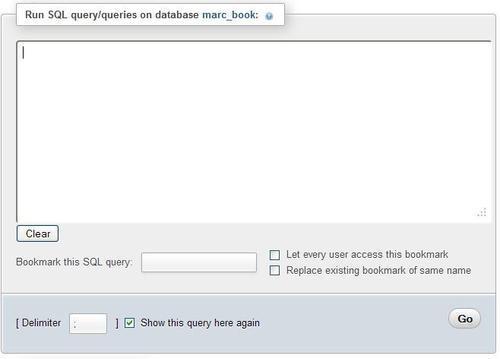
This box is simple—we type in some valid (hopefully) MySQL statement and click on Go. Under the query text area, there are bookmark-related choices (explained later in Chapter 14). Usually, we don't have to change the standard SQL delimiter, which is a semicolon. However, there is a Delimiter dialog in case we need it (refer to Chapter 17).
For a default query to appear in this box, we can set it with the $cfg['DefaultQueryDatabase'] configuration directive, which is empty by default. We could put a query such as SHOW TABLES FROM @DATABASE@ in this directive. The @DATABASE@ placeholder in this query would be replaced by the current database name, resulting in SHOW TABLES FROM `marc_book` in the query box.
A slightly different box is available in the Table view of the book table from the SQL menu.
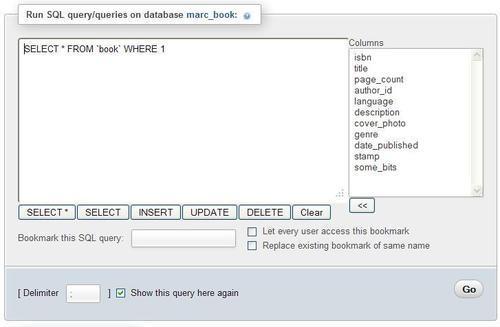
The box already has a default query as seen in the previous screenshot. This default query is generated from the $cfg['DefaultQueryTable'] configuration directive, which contains SELECT * FROM @TABLE@ WHERE 1. Here, the @TABLE@ is replaced by the current table name. Another placeholder available in $cfg['DefaultQueryTable'] is @FIELDS@. This placeholder would be replaced by the complete column's list of this table, thus producing the following query:
SELECT `isbn`, `title`, `page_count`, `author_id`, `language`, `description`, `cover_photo`, `genre`, `date_published`, `stamp`, `some_bits` FROM `book` WHERE 1.
WHERE 1 is a condition that is always true. Therefore, the query can be executed as it is. We can replace 1 with the condition we want, or we can type a completely different query.
Because this SQL box appears in the Table view, the table name is known; therefore, phpMyAdmin shows buttons below the query box, which permit to quickly create common SQL queries which contain this table name. Most of the queries generated by these buttons contain the full column list.
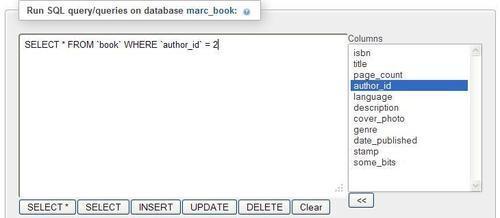
The Columns selector is a way to speed up query generation. By choosing a column and clicking on the arrows<<, this column name is copied at the current cursor position in the query box. Here, we select the author_id column, remove the digit 1, and click on<<. Then we add the condition = 2 as shown in the following screenshot:
The Show this query here again option (checked by default) ensures that the query stays in the box after its execution if we are still on the same page. This can be seen more easily for a query like an UPDATE or DELETE, which affects a table, but does not produce a separate results page.
We might want to change the behavior of a click inside the query box with the $cfg['TextareaAutoSelect'] configuration directive. Its default value is FALSE, which means that no automatic selection of the contents is done upon a click. Should you change this directive to TRUE, the first click inside this box will select all its contents. (This is a way to quickly copy the contents elsewhere or delete them from the box.) The next click would put the cursor at the click position.