Table of Contents for
Mastering phpMyAdmin 3.4 for Effective MySQL Management
 Mastering phpMyAdmin 3.4 for Effective MySQL Management
Published by
Packt Publishing, 2012
Mastering phpMyAdmin 3.4 for Effective MySQL Management
Published by
Packt Publishing, 2012
- Cover
- Mastering phpMyAdmin 3.4 for Effective MySQL Management
- Mastering phpMyAdmin 3.4 for Effective MySQL Management
- Credits
- About the Author
- About the Reviewers
- www.PacktPub.com
- Preface
- What you need for this book
- Who this book is for
- Conventions
- Reader feedback
- Customer support
- 1. Getting Started with phpMyAdmin
- What is phpMyAdmin?
- Installing phpMyAdmin
- Configuring phpMyAdmin
- Installing phpMyAdmin configuration storage
- Upgrading phpMyAdmin
- Summary
- 2. Configuring Authentication and Security
- Securing phpMyAdmin
- Summary
- 3. Over Viewing the Interface
- Customizing general settings
- Character sets and collations
- Navigation panel
- Main panel
- User preferences
- Query window
- Summary
- 4. Creating and Browsing Tables
- Creating our first table
- Inserting data manually
- Browse mode
- Profiling queries
- Creating an additional table
- Summary
- 5. Changing Data and Structure
- Changing table structure
- Summary
- 6. Exporting Structure and Data (Backup)
- Exporting a database
- Exporting a table
- Exporting selectively
- Exporting multiple databases
- Saving the export file on the server
- Memory limits
- Summary
- 7. Importing Structure and Data
- Importing SQL files
- Importing CSV files
- Importing other formats
- Reading files from a web server upload directory
- Displaying an upload progress bar
- Summary
- 8. Searching Data
- Performing a complete database search
- Stopping an errant query
- Summary
- 9. Performing Table and Database Operations
- Changing table attributes
- Emptying or deleting a table
- Renaming, moving, and copying tables
- Performing other table operations
- Multi-table operations
- Database operations
- Summary
- 10. Benefiting from the Relational System
- Defining relations with the relation view
- Defining relations with the Designer
- Benefiting from the defined relations
- Column commenting
- Summary
- 11. Entering SQL Statements
- The Query window
- Multi-statement queries
- Pretty printing (syntax highlighting)
- The SQL Validator
- Summary
- 12. Generating Multi-table Queries
- Exploring column criteria
- Generating automatic joins (internal relations)
- Executing the query
- The visual builder
- Summary
- 13. Synchronizing Data and Supporting Replication
- Supporting MySQL replication
- Summary
- 14. Using Query Bookmarks
- Creating bookmarks
- Recalling bookmarks from the bookmarks list
- Passing a parameter to a bookmark
- Summary
- 15. Documenting the System
- Generating relational schemas
- Summary
- 16. Transforming Data using MIME
- Enabling transformations
- Examples of transformations
- Summary
- 17. Supporting Features Added in MySQL 5
- Supporting routines—stored procedures and functions
- Executing code with triggers
- Using information_schema
- Partitioning
- Exploring the event scheduler
- Summary
- 18. Tracking Changes
- Prerequisites
- Principles
- Initiating tracking for one table
- Testing the tracking mechanism
- Determining tracking status
- Structure snapshot
- Exporting a version
- Creating a new version
- Deleting tracking information
- Summary
- 19. Administrating the MySQL Server
- Database information
- Server information
- Summary
- A. Troubleshooting and Support
- Seeking support
- Contributing to the project
Having seen the overall layout of phpMyAdmin, we are ready to create a database, create our first table, insert some data into it, and browse it. These first steps are intentionally simple, but they will give you the foundation on which more complex operations will be achieved later. At the end of the chapter, we will have at our disposal the two basic tables on which the remaining exercises are based.
Before creating a table, we must ensure that we have a database for which the MySQL server's administrator has given us the CREATE privilege. The following possibilities exist:
- The administrator has already created a database for us, and we see its name in the navigation panel; we don't have the right to create an additional database.
- We have the right to create databases from phpMyAdmin.
- We are on a shared host, and the host provider has installed a general web interface (for example, cPanel) to create MySQL databases and accounts; in this case, we should visit this web interface now and ensure we have created at least one database and one MySQL account.
The Databases panel in Server view is the place to go to find the database creation dialog. Note that a configuration parameter, $cfg['ShowCreateDb'], controls the display of the Create new database dialog. By default, it is set to true, which shows the dialog.
If you do not have the privilege to create a database, the panel displays a No privileges message under the Create new database label. This means that you must work with the databases already created for you, or ask the MySQL server's administrator to give you the necessary CREATE privilege.
Note
If you are the MySQL server's administrator, refer to Chapter 19.
If phpMyAdmin detects that we have the right to create a database, the dialog appears as shown in the following screenshot:
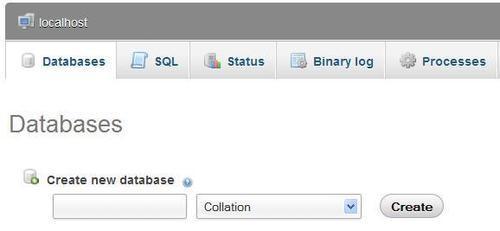
In the input field, a suggested database name appears if the $cfg['SuggestDBName'] parameter is set to TRUE, which is the default setting. The suggested database name is built according to the privileges we possess.
If we are restricted to the use of a prefix, the prefix might be suggested in the input field. (A popular choice for this prefix is the username, which might or might not be followed by an underscore character.) Note that, in this case, the prefix is followed by an ellipsis mark, added by phpMyAdmin. We should remove this ellipsis mark and complete the input field with an appropriate name.

The Collation choice can be left unchanged for now. With this dialog, we could pick a default character set and collation for this database. This setting can be changed later (refer to Chapter 9 for more information on this).
We will assume here that we have the right to create a database named marc_book. We enter marc_book in the input field and click on Create. Once the database has been created, we will see the following screen:
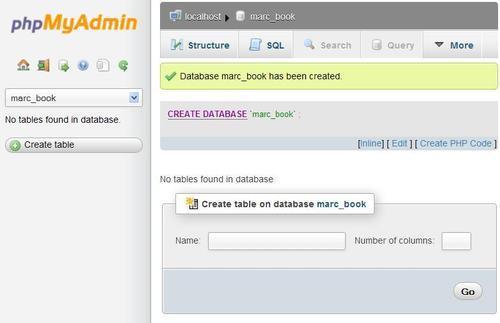
Notice the following:
- The title of the main panel has changed to reflect the fact that we are now located in this database
- A confirmation message regarding the creation is displayed
- The navigation panel has been updated; we see marc_book
- By default, the SQL query sent to the server by phpMyAdmin to create the database is displayed in color
Note
phpMyAdmin displays the query it generated, because $cfg['ShowSQL'] is set to TRUE. Looking at the generated queries can be a good way of learning SQL.
As the generated queries could be large and take much of the on-screen room, the $cfg['MaxCharactersInDisplayedSQL'] acts as a limit. Its default value of 1000 should be a good balance between seeing too few and seeing too many of the queries, especially when doing large imports.
It is important to examine the phpMyAdmin feedback to ascertain the validity of the operations we make through the interface. This way, we can detect errors like typos in the names, or creation of a table in the wrong database. phpMyAdmin retrieves error messages from the MySQL server and displays them on the interface.