Table of Contents for
Mastering phpMyAdmin 3.4 for Effective MySQL Management
 Mastering phpMyAdmin 3.4 for Effective MySQL Management
Published by
Packt Publishing, 2012
Mastering phpMyAdmin 3.4 for Effective MySQL Management
Published by
Packt Publishing, 2012
- Cover
- Mastering phpMyAdmin 3.4 for Effective MySQL Management
- Mastering phpMyAdmin 3.4 for Effective MySQL Management
- Credits
- About the Author
- About the Reviewers
- www.PacktPub.com
- Preface
- What you need for this book
- Who this book is for
- Conventions
- Reader feedback
- Customer support
- 1. Getting Started with phpMyAdmin
- What is phpMyAdmin?
- Installing phpMyAdmin
- Configuring phpMyAdmin
- Installing phpMyAdmin configuration storage
- Upgrading phpMyAdmin
- Summary
- 2. Configuring Authentication and Security
- Securing phpMyAdmin
- Summary
- 3. Over Viewing the Interface
- Customizing general settings
- Character sets and collations
- Navigation panel
- Main panel
- User preferences
- Query window
- Summary
- 4. Creating and Browsing Tables
- Creating our first table
- Inserting data manually
- Browse mode
- Profiling queries
- Creating an additional table
- Summary
- 5. Changing Data and Structure
- Changing table structure
- Summary
- 6. Exporting Structure and Data (Backup)
- Exporting a database
- Exporting a table
- Exporting selectively
- Exporting multiple databases
- Saving the export file on the server
- Memory limits
- Summary
- 7. Importing Structure and Data
- Importing SQL files
- Importing CSV files
- Importing other formats
- Reading files from a web server upload directory
- Displaying an upload progress bar
- Summary
- 8. Searching Data
- Performing a complete database search
- Stopping an errant query
- Summary
- 9. Performing Table and Database Operations
- Changing table attributes
- Emptying or deleting a table
- Renaming, moving, and copying tables
- Performing other table operations
- Multi-table operations
- Database operations
- Summary
- 10. Benefiting from the Relational System
- Defining relations with the relation view
- Defining relations with the Designer
- Benefiting from the defined relations
- Column commenting
- Summary
- 11. Entering SQL Statements
- The Query window
- Multi-statement queries
- Pretty printing (syntax highlighting)
- The SQL Validator
- Summary
- 12. Generating Multi-table Queries
- Exploring column criteria
- Generating automatic joins (internal relations)
- Executing the query
- The visual builder
- Summary
- 13. Synchronizing Data and Supporting Replication
- Supporting MySQL replication
- Summary
- 14. Using Query Bookmarks
- Creating bookmarks
- Recalling bookmarks from the bookmarks list
- Passing a parameter to a bookmark
- Summary
- 15. Documenting the System
- Generating relational schemas
- Summary
- 16. Transforming Data using MIME
- Enabling transformations
- Examples of transformations
- Summary
- 17. Supporting Features Added in MySQL 5
- Supporting routines—stored procedures and functions
- Executing code with triggers
- Using information_schema
- Partitioning
- Exploring the event scheduler
- Summary
- 18. Tracking Changes
- Prerequisites
- Principles
- Initiating tracking for one table
- Testing the tracking mechanism
- Determining tracking status
- Structure snapshot
- Exporting a version
- Creating a new version
- Deleting tracking information
- Summary
- 19. Administrating the MySQL Server
- Database information
- Server information
- Summary
- A. Troubleshooting and Support
- Seeking support
- Contributing to the project
We will now discuss a few transformation examples. Typical option values are shown, and it's recommended to tweak them until we have achieved the desired results. Depending on the phpMyAdmin version, more transformations may be available.
We will start by changing our cover_photo column type from BLOB to LONGBLOB to ensure that we can upload photographs bigger than 65 KiB in size. We then enter the attributes shown in the following screenshot:
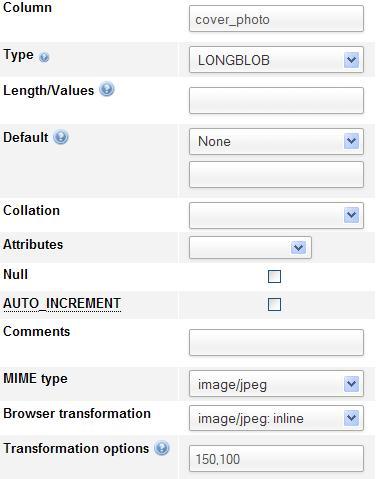
Here, the options are presented in the form of width and height. If we omit the options, the default values are 100 and 100. The thumbnail generation code preserves the original aspect ratio of the image. Therefore, the values entered are the maximum width and height of the generated image. We then upload a .jpeg file in a cell (using instructions from Chapter 5). As a result, we get the following screen in Browse mode for this table:
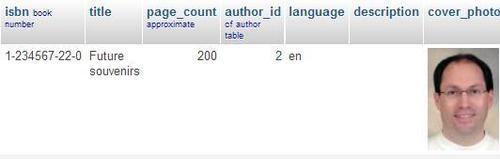
This thumbnail can be clicked to reveal a full-size photograph.
Note
The thumbnail is not stored anywhere, but generated each time we go into Browse mode for this set of rows. On a double Xeon 3.2 GHz server, we commonly experience a generation rate of six JPEG images per second. No caching of these thumbnails is offered by phpMyAdmin.
For a .png file, we have to use image/png in the MIME type dialog, and image/png: inline in the Browse transformation dialog.
To provide a link without the thumbnail, we use the image/jpeg: link transformation. There are no transformation options. This link can be used to view the photograph (by left-clicking on the link) and then possibly download it (by right-clicking on the photograph itself).

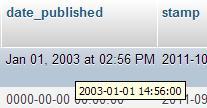
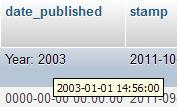
We have a column named date_published in our book table; let us change its type to DATETIME. Then, we set its MIME type to text/plain and the browser transformation to text/plain: dateformat. The next step is to edit the row for the "Future souvenirs" book, and enter 2003-01-01 14:56:00 in the date_published column. When we browse the table, we now see that the column has been formatted. Hovering the mouse over it reveals the unformatted original contents, as shown in the following screenshot:
This transformation accepts two options. The first is the number of hours (zero by default) that will be added to the original value. Adding number of hours can be useful if we store all time values based on Coordinated Universal Time (UTC) , but want to display them for a specific zone (for example, UTC+5). The second option is the time format we want to use, specified using any PHP strftime parameters (more details at http://php.net/strftime). So, if we put'0','Year: %Y' in the Transformation options, we will get the following output:
Suppose that we have put a complete URL —http://domain.com/abc.pdf
—in the description column in our book table. The text of the link will be displayed while browsing the table, but we would not be able to click it. We will now see the use of the text/plain MIME type in such a situation.
If we use a text/plain MIME type and a text/plain: link browser transformation in the scenario just mentioned, we will still see the text for the link, and it will be clickable.

If all the documents that we want to point to are located at a common URL prefix, we can put this prefix (for example,http://domain.com/) in the first transformation option, within the enclosing quotes. Then, we would only need to put the last part of the URL (abc.pdf) in each cell.
A second transformation option is available for setting a title. This would be displayed in the Browse mode instead of the URL contents, but a click would nonetheless bring us to the intended URL.
If we use only the second transformation option, we have to use quotes as the value of the first option. It could be done as'','this is the title'.
text/plain: imagelink transformation is similar to the previous one, except that in the cell, we place a URL that points to an image. This image will be fetched and displayed in the cell along with the link text. The image could be anywhere on the web, including our local server.
Here, we have the following three options available:
- The common URL prefix (such as the one for
text/plain: link) - The width of the image in pixels (default: 100)
- The height (default: 50)
For our test URL, you should enter the following options:
'','100','123'
If the text for the link is too long, the transformation does not occur. By default, the Partial texts display option is selected.

In this case, we can switch to Full texts to reveal the complete link. We can then see the complete image.

Other transformations, such as image/jpeg: inline and image/png: inline, specify the exact MIME type of the image. In these cases, phpMyAdmin uses GD2 library functions for the thumbnail generation. However, the link contained in a text/plain: imagelink transformation may refer to any browser-supported image type. Therefore, phpMyAdmin just displays a resized image with an HTML img tag, and width and height attributes set according to the size options defined in the transformation. To see the original image, we can click on either the link or the thumbnail.
Normally, when displaying text, phpMyAdmin escapes special characters. For example, if we entered This book is <b>good</b> in the description column for one book, we would normally see This book is <b>good</b> when browsing the table. However, if we used the transformation text/plain: formatted for this column, we would get the following output while browsing:

In this example, the results are correct. However, other HTML tags entered in the column could produce surprising results (including invalid HTML pages). For example, as phpMyAdmin presents results using HTML tables, a non-escaped</table> tag in the column would ruin the output.
The text/plain: substr transformation is available for displaying only a portion of the text. The following are the options:
- Where to start in the text (default: 0)
- How many characters (default: all of the remaining text)
- What to display as a suffix to show that truncation has occurred; the default is to display ellipses (...)
Remember that $cfg['LimitChars'] is doing a character truncation for every non-numeric column. Hence, text/plain: substr is a mechanism for fine-tuning this column by column.
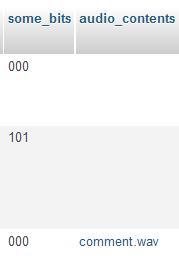
Let us say we want to store a small audio comment about each book inside MySQL. We add a new column to the book table, with the name audio_contents, and type MEDIUMBLOB. We set its MIME type to application/octetstream and choose the application/octetstream: download transformation. In the Transformation options, we insert'comment.wav'.
This MIME type and extension will inform our browser about the incoming data, and the browser should open the appropriate player. To insert a comment, we first record it in a .wav format, and then upload the contents of the file into the audio_contents column for one of the books. When browsing our table, we can see a link comment.wav for our audio comment:
Characters are stored in MySQL (and in computers in general) as numeric data, and converted into something meaningful for the screen or printer. Users sometimes cut and paste data from another application to phpMyAdmin, leading to unexpected results if the characters are not directly supported by MySQL. A case that was reported in phpMyAdmin's help forum involved special quotation marks entered in a Microsoft Word document and pasted to phpMyAdmin. It helps to be able to see the exact hexadecimal codes, and this can be done by using the application/octetstream: hex transformation.
In the following example, this transformation will be applied to the title column of our book table. When browsing the row containing the Future souvenirs title, we can see the following screen:

As we know which character set this column is encoded with, we can compare its contents with a chart describing each character. For instance, http://en.wikipedia.org/wiki/Latin1 describes the Latin1 character set.
The term pretty printing (http://en.wikipedia.org/wiki/Pretty_printing) refers to a way of "beautifying" source code (in our case, SQL statements). In the phpMyAdmin configuration storage, the pma_bookmark.query and pma_history.sqlquery columns contain SQL statements. With the text/plain: sql transformation defined for these columns, these SQL statements will be displayed in color with syntax highlighting when the table is browsed.
An IP (v4) address can be encoded into a long integer (for example, via the PHP iptolong() function), and stored into a MySQL UNSIGNED INT column. To convert it back to the familiar dotted string (for example, 127.0.0.1), you can use the text/plain: longToIpv4 transformation.
The transformations that have been described previously are implemented directly from within phpMyAdmin. However, some transformations are better executed via existing external applications.
The text/plain: external transformation enables us to send a cell's data to another application that will be started on the web server, capture this application's output, and display this output in the cell's position.
Note
This feature is supported only on a Linux or UNIX server (under Microsoft Windows, output and error redirection cannot be easily captured by the PHP process). Furthermore, PHP should not be running in safe mode. Hence, the feature may not be available on hosted servers.
For security reasons, the exact path and name of the application cannot be set from within phpMyAdmin as a transformation option. The application names are set directly inside one of the phpMyAdmin scripts.
First, in the phpMyAdmin installation directory, we edit the text_plain__external.inc.php file in libraries/transformations/, and find the following section:
$allowed_programs = array();
//$allowed_programs[0] = '/usr/local/bin/tidy';
//$allowed_programs[1] = '/usr/local/bin/validate';
No external application is configured by default, and we have to explicitly add our own.
Note
The names of the transformation scripts are constructed using the following format—the MIME type, a double underscore, and then a part indicating which transformation should take place.
Every program that is allowed, along with its complete path, must be described here with an index number starting from 0. Then we save the modifications to this script and put it back on the server if needed. The remaining setup is completed from the panel where we choose the options for the other browser transformations.
Of course, we will now choose text/plain: external in the transformations menu.
As the first option, we place the application number (for example, 0 would be for the tidy application). The second option holds the parameters we need to pass to this application. If we want phpMyAdmin to apply the htmlspecialchars() function to the results, we put 1 as the third parameter—this is the default. We could put a 0 there to avoid protecting the output with htmlspecialchars().
If we want to avoid reformatting the cell's lines, we put 1 as the fourth parameter. This will use the NOWRAP modifier, and is done by default.
This example shows how to sort the text contents of a single cell. We start by modifying the text_plain__external.inc.php script, as mentioned in the previous section, to add the sort program:
$allowed_programs[0] = '/bin/sort';
Note that our new program bears the index number 0.
We then add a TEXT column whose name is keywords to our book table. Finally, we fill in the MIME-related information, entering'0','-r' as the transformation options, as shown in the following screenshot:
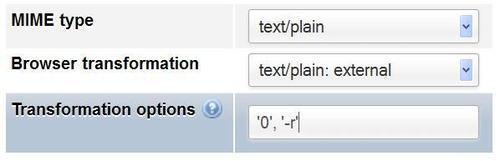
The'0' here refers to the index number for sort, and the'-r' is a parameter for sort, which makes the program sort in the reverse order.
Next, we edit the row for the book "A hundred years of cinema (volume 1)", entering some keywords in no particular order (as seen in the following screenshot) and hitting Go in order to save the changes:

To test the effects of the external program, we browse our table and see the sorted in-cell keywords:
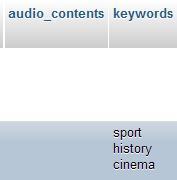
Notice that the keywords are displayed in reverse sorted order.