Table of Contents for
Mastering phpMyAdmin 3.4 for Effective MySQL Management
 Mastering phpMyAdmin 3.4 for Effective MySQL Management
Published by
Packt Publishing, 2012
Mastering phpMyAdmin 3.4 for Effective MySQL Management
Published by
Packt Publishing, 2012
- Cover
- Mastering phpMyAdmin 3.4 for Effective MySQL Management
- Mastering phpMyAdmin 3.4 for Effective MySQL Management
- Credits
- About the Author
- About the Reviewers
- www.PacktPub.com
- Preface
- What you need for this book
- Who this book is for
- Conventions
- Reader feedback
- Customer support
- 1. Getting Started with phpMyAdmin
- What is phpMyAdmin?
- Installing phpMyAdmin
- Configuring phpMyAdmin
- Installing phpMyAdmin configuration storage
- Upgrading phpMyAdmin
- Summary
- 2. Configuring Authentication and Security
- Securing phpMyAdmin
- Summary
- 3. Over Viewing the Interface
- Customizing general settings
- Character sets and collations
- Navigation panel
- Main panel
- User preferences
- Query window
- Summary
- 4. Creating and Browsing Tables
- Creating our first table
- Inserting data manually
- Browse mode
- Profiling queries
- Creating an additional table
- Summary
- 5. Changing Data and Structure
- Changing table structure
- Summary
- 6. Exporting Structure and Data (Backup)
- Exporting a database
- Exporting a table
- Exporting selectively
- Exporting multiple databases
- Saving the export file on the server
- Memory limits
- Summary
- 7. Importing Structure and Data
- Importing SQL files
- Importing CSV files
- Importing other formats
- Reading files from a web server upload directory
- Displaying an upload progress bar
- Summary
- 8. Searching Data
- Performing a complete database search
- Stopping an errant query
- Summary
- 9. Performing Table and Database Operations
- Changing table attributes
- Emptying or deleting a table
- Renaming, moving, and copying tables
- Performing other table operations
- Multi-table operations
- Database operations
- Summary
- 10. Benefiting from the Relational System
- Defining relations with the relation view
- Defining relations with the Designer
- Benefiting from the defined relations
- Column commenting
- Summary
- 11. Entering SQL Statements
- The Query window
- Multi-statement queries
- Pretty printing (syntax highlighting)
- The SQL Validator
- Summary
- 12. Generating Multi-table Queries
- Exploring column criteria
- Generating automatic joins (internal relations)
- Executing the query
- The visual builder
- Summary
- 13. Synchronizing Data and Supporting Replication
- Supporting MySQL replication
- Summary
- 14. Using Query Bookmarks
- Creating bookmarks
- Recalling bookmarks from the bookmarks list
- Passing a parameter to a bookmark
- Summary
- 15. Documenting the System
- Generating relational schemas
- Summary
- 16. Transforming Data using MIME
- Enabling transformations
- Examples of transformations
- Summary
- 17. Supporting Features Added in MySQL 5
- Supporting routines—stored procedures and functions
- Executing code with triggers
- Using information_schema
- Partitioning
- Exploring the event scheduler
- Summary
- 18. Tracking Changes
- Prerequisites
- Principles
- Initiating tracking for one table
- Testing the tracking mechanism
- Determining tracking status
- Structure snapshot
- Exporting a version
- Creating a new version
- Deleting tracking information
- Summary
- 19. Administrating the MySQL Server
- Database information
- Server information
- Summary
- A. Troubleshooting and Support
- Seeking support
- Contributing to the project
In the Preparing for replication section, we saw an overview of MySQL replication. In this section, we cover the following topics:
- How we can use phpMyAdmin to configure replication
- How to prepare a test environment containing one master server and two slave servers
- How to send commands to control the servers
- How to obtain information on replication for servers, databases, and tables
phpMyAdmin's interface offers a Replication page; however, other pages contain either information about replication or links to control replication actions. We will point to each appropriate location when covering the related subject.
How to use this section depends on how many servers we have at our disposal. If we have at least two servers and want to configure them via phpMyAdmin in a master/slave relationship, we can follow the Configuring replication section. If instead we only have one server to play with, then we should take advice from the Setting up a test environment section to install many instances of the MySQL server on the same machine.
In Server view, the Replication menu is only shown to privileged users, such as the MySQL root user. When a server is already configured as a master server or a slave server (or both), the Replication page is used to display status information and provide links that send commands.
For this exercise, we assume that the server does not currently occupy the role of master or slave server. phpMyAdmin cannot directly configure all aspects of MySQL replication. The reason is that, contrary to manipulating database structure and data by sending queries to the MySQL server, replication configuration consists (in part) of command lines stored in a MySQL configuration file, often named my.cnf. phpMyAdmin, being a web application, does not have access to this file. This is how the MySQL server's developers intended the configuration to be—at a configuration file level.
The best that phpMyAdmin can do in this situation is to guide us by generating (on screen) the proper command lines in reaction to our preferences, then it's up to us to copy these lines where they need to go and to restart the server(s). phpMyAdmin cannot even read the current replication configuration lines; it can only deduce server status via some SHOW commands.
Let us enter the Replication menu and see what happens:
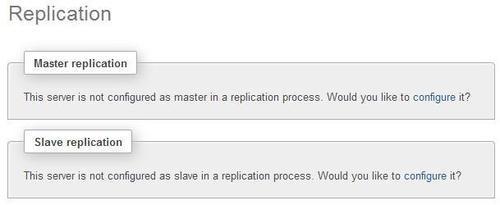
Now we choose to configure the server as a master by clicking on the appropriate configure link. The panel that appears gives us a thorough advice:
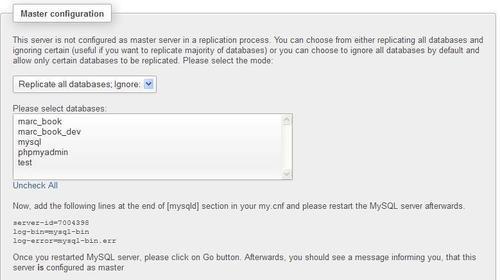
The first paragraph confirms that this server is not configured as a master in a replication process. We want to achieve this configuration, but first we need to think about the kind of replication we want. Should all databases be replicated, except for some of them? Or do we want the opposite? A convenient drop-down list offers us these choices:
- Replicate all databases; Ignore:
- Ignore all databases; Replicate:
The first choice (which is the default) implies that, in general, all databases are replicated; we don't even have to enumerate them in the configuration file. In this case, the databases selector is used to specify which database we want to exclude from the replication process. Let us pick up the mysql database and see what happens in our JavaScript-enabled browser:
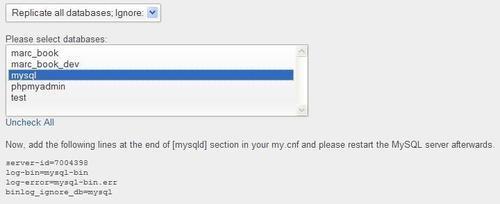
We notice that a line appeared, stating binlog_ignore_db=mysql. This is a MySQL server instruction (not a SQL statement) that tells the server to ignore sending transactions about this database to the binary log. Let us examine the meaning of the other lines. The server-id is a unique ID generated by phpMyAdmin; each server that participates in replication must have a unique server ID. Therefore, we either track the server IDs by hand, ensuring their uniqueness, or we simply use the number randomly generated by phpMyAdmin. We also see the log-bin and log-error instructions; in fact, binary logging is mandatory in order for any replication to occur.
We could add other database names to the list by using Ctrl + Click or Command + Click, depending on our workstation's OS. However, all that phpMyAdmin does is to generate correct lines; to make them operational, we still need to follow the given advice and paste these lines at the end of the [mysqld] section of our MySQL configuration file. We should then restart the MySQL server process—the way to do this depends on our environment.
After our server has been restarted, we go back to the Replication menu; at this point, we see a different panel regarding the master:
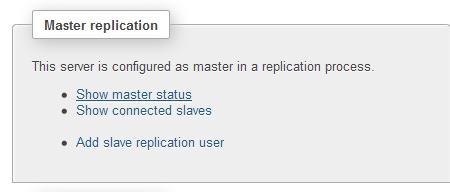
We can use the Show master status link to get some information about the master, including the current binary log name and position, and information on which databases to replicate or to ignore, as specified previously.
The Show connected slaves link would report nothing currently, as no slave is yet connected to this master.
Now would be the time to use the Add slave replication user link, because this master needs to have a separate account dedicated to replication. The slaves will use this account created on the master to connect to it. Clicking on this link displays the following panel, in which a user account, replic, is being created with a password of our choosing:
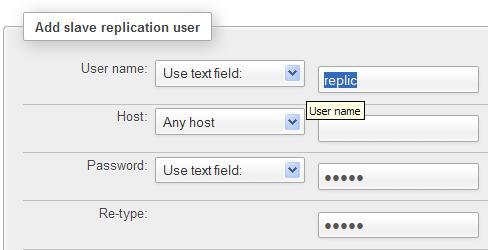
After clicking on Go, phpMyAdmin takes care of creating this user with the correct permissions set.
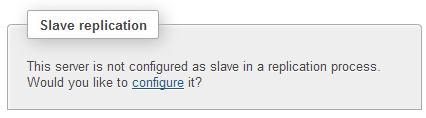
Now, on the machine that will act as a slave server in the replication process, we start phpMyAdmin. In the Replication menu, we click on configure in the following dialog:
The slave server configuration panel appears, as shown in the following screenshot:
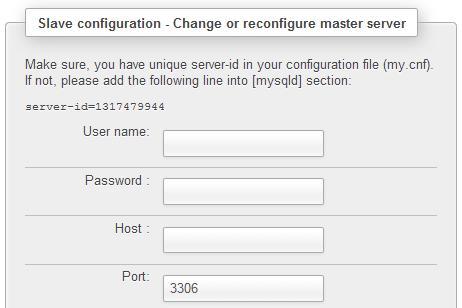
As with the master configuration, we get a suggestion about having a unique server ID in the configuration file for the slave, and we should follow this advice.
In this panel, we enter the username and password of the dedicated replication account we created on the master. We also have to indicate the hostname and port number corresponding to the master server. After filling this panel and clicking on Go, phpMyAdmin sends the appropriate CHANGE MASTER command to the slave, which puts this server in slave mode.
The replication process occurs between at least two instances of the MySQL server. In production, this normally implies a minimum of two physical servers to procure these benefits:
- Better performance
- Increased redundancy
However, due to MySQL's configurable port number (the default being 3306), data directory, and socket, it's possible to have more than one MySQL instance on the same server. This setup can be configured manually, or via an installation system such as the MySQL Sandbox. This is an open source project located at http://mysqlsandbox.net. With this tool, we can set up one or many MySQL servers very quickly. By using the powerful make_replication_sandbox Linux shell command, we can install an environment that consists of one master server and two slave servers. Each server can be started or stopped individually.
The following exercises assume that the MySQL Sandbox has been installed on your server and that phpMyAdmin's config.inc.php contains a reference to these Sandbox servers, as shown in the following code block (please adjust the socket names to your own environment):
$i++;
$cfg['Servers'][$i]['auth_type'] = 'cookie';
$cfg['Servers'][$i]['host'] = 'localhost';
$cfg['Servers'][$i]['socket'] = '/tmp/mysql_sandbox25562.sock';
$cfg['Servers'][$i]['verbose'] = 'master';
$i++;
$cfg['Servers'][$i]['auth_type'] = 'cookie';
$cfg['Servers'][$i]['host'] = 'localhost';
$cfg['Servers'][$i]['socket'] = '/tmp/mysql_sandbox25563.sock';
$cfg['Servers'][$i]['verbose'] = 'slave1';
$i++;
$cfg['Servers'][$i]['auth_type'] = 'cookie';
$cfg['Servers'][$i]['host'] = 'localhost';
$cfg['Servers'][$i]['socket'] = '/tmp/mysql_sandbox25564.sock';
$cfg['Servers'][$i]['verbose'] = 'slave2';
Here, we use the $cfg['Servers'][$i]['verbose'] directive to give a unique name to each instance, as the real server name is localhost for all of these instances. Each Sandbox server initially contains two databases: mysql and test.
Here we will assume that the Sandbox testing environment has been set. However, the explanations are useful for all situations in which we have a slave server. After connecting to a slave and once again opening the Replication menu, we see:
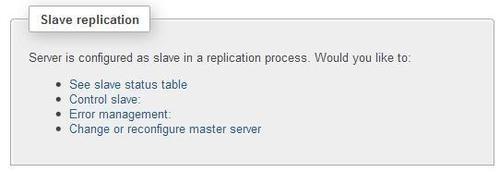
The following options are available:
- The See slave status table link permits us to receive information about all the system variables related to replication for this slave server.
- The Control slave: link reveals more options; some of them can toggle between the stop and start condition:
- The Full stop option is used to stop both the IO thread (the part of the MySQL server responsible for receiving updates from the master and writing them to the slave's relay log) and the SQL thread (which reads the updates from the relay log and executes them)
- The Reset slave option stops the slave, sends a
RESET SLAVEcommand that causes it to forget its replication position in the master's binary log, and then restarts the slave - The SQL Thread Stop only option and IO Thread Stop only option are used to stop just the respective thread
- The Error management: link permits to tell the slave server to skip some of the events (updates) sent from the master. For more details, please refer to http://dev.mysql.com/doc/refman/5.1/en/set-global-sql-slave-skip-counter.html.
- The Change or reconfigure master server link could be used to specify that this slave server should now receive updates from a different master.
Apart from the Replication menu, other screens in phpMyAdmin inform us about replication-related items. These screens are not found with the other replication dialogs; rather they are scattered on various pages, where they display replication information in the context of the respective pages.
By entering the Status panel in Server view, we first get a brief message, for example:
"This MySQL server works as master in replication process. For further information about replication status on the server, please visit the replication section."
There are a few Replication links on this page that show us the status variables of either the master or slave servers, and some links to get information about how many slave hosts are connected and the status of replication in general.
On the master server, having a look at the Databases menu in Server view shows us that some databases can potentially be replicated, with a green checkmark in the Master replication column:
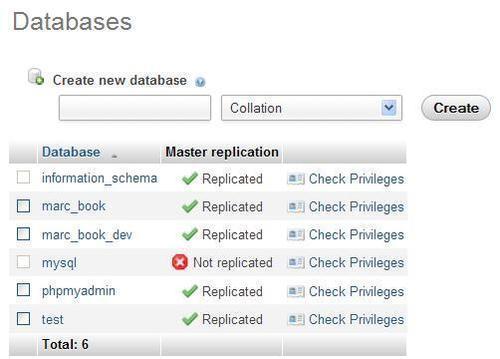
This is because this server is configured with a binary log and these databases are not excluded from replication.
As we have the following line of code in the [mysqld] section within the master's configuration file, we can exclude from the binary log all transactions that affect the mysql database:
binlog_ignore_db=mysql
Therefore, the output of the Databases page shows a red icon next to the mysql database.
If this is a slave server, a Server replication column is shown.
Let us suppose that on the master server, we create a table named employee in the test database. At this point, replication does its magic and we can have a look at the test database on a slave server:
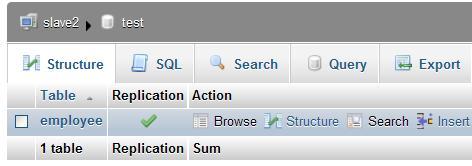
Here, the Replication column is shown as a reminder. We should not modify this table on the slave server directly, because its existence is for replication purpose only. If we decide to alter it directly, our changes will be done only in this table, introducing inconsistencies between the master and this slave, which is not a good idea.