Table of Contents for
Mastering phpMyAdmin 3.4 for Effective MySQL Management
 Mastering phpMyAdmin 3.4 for Effective MySQL Management
Published by
Packt Publishing, 2012
Mastering phpMyAdmin 3.4 for Effective MySQL Management
Published by
Packt Publishing, 2012
- Cover
- Mastering phpMyAdmin 3.4 for Effective MySQL Management
- Mastering phpMyAdmin 3.4 for Effective MySQL Management
- Credits
- About the Author
- About the Reviewers
- www.PacktPub.com
- Preface
- What you need for this book
- Who this book is for
- Conventions
- Reader feedback
- Customer support
- 1. Getting Started with phpMyAdmin
- What is phpMyAdmin?
- Installing phpMyAdmin
- Configuring phpMyAdmin
- Installing phpMyAdmin configuration storage
- Upgrading phpMyAdmin
- Summary
- 2. Configuring Authentication and Security
- Securing phpMyAdmin
- Summary
- 3. Over Viewing the Interface
- Customizing general settings
- Character sets and collations
- Navigation panel
- Main panel
- User preferences
- Query window
- Summary
- 4. Creating and Browsing Tables
- Creating our first table
- Inserting data manually
- Browse mode
- Profiling queries
- Creating an additional table
- Summary
- 5. Changing Data and Structure
- Changing table structure
- Summary
- 6. Exporting Structure and Data (Backup)
- Exporting a database
- Exporting a table
- Exporting selectively
- Exporting multiple databases
- Saving the export file on the server
- Memory limits
- Summary
- 7. Importing Structure and Data
- Importing SQL files
- Importing CSV files
- Importing other formats
- Reading files from a web server upload directory
- Displaying an upload progress bar
- Summary
- 8. Searching Data
- Performing a complete database search
- Stopping an errant query
- Summary
- 9. Performing Table and Database Operations
- Changing table attributes
- Emptying or deleting a table
- Renaming, moving, and copying tables
- Performing other table operations
- Multi-table operations
- Database operations
- Summary
- 10. Benefiting from the Relational System
- Defining relations with the relation view
- Defining relations with the Designer
- Benefiting from the defined relations
- Column commenting
- Summary
- 11. Entering SQL Statements
- The Query window
- Multi-statement queries
- Pretty printing (syntax highlighting)
- The SQL Validator
- Summary
- 12. Generating Multi-table Queries
- Exploring column criteria
- Generating automatic joins (internal relations)
- Executing the query
- The visual builder
- Summary
- 13. Synchronizing Data and Supporting Replication
- Supporting MySQL replication
- Summary
- 14. Using Query Bookmarks
- Creating bookmarks
- Recalling bookmarks from the bookmarks list
- Passing a parameter to a bookmark
- Summary
- 15. Documenting the System
- Generating relational schemas
- Summary
- 16. Transforming Data using MIME
- Enabling transformations
- Examples of transformations
- Summary
- 17. Supporting Features Added in MySQL 5
- Supporting routines—stored procedures and functions
- Executing code with triggers
- Using information_schema
- Partitioning
- Exploring the event scheduler
- Summary
- 18. Tracking Changes
- Prerequisites
- Principles
- Initiating tracking for one table
- Testing the tracking mechanism
- Determining tracking status
- Structure snapshot
- Exporting a version
- Creating a new version
- Deleting tracking information
- Summary
- 19. Administrating the MySQL Server
- Database information
- Server information
- Summary
- A. Troubleshooting and Support
- Seeking support
- Contributing to the project
The Ajax-based Designer offers a visually-driven way of managing relations (both internal and foreign key-based), and defining the display column for each table. It can also act as:
- A menu to access the structure of existing tables and to access the table creation page
- A PDF schema manager, if we want a PDF schema encompassing all our tables
On the Designer workspace, we can work on the relations for all tables on the same panel. On the other hand, the Relation view shows the relations for only a single table at a time.
We access this feature from the Database view by clicking on the Designer menu tab.
Note
If this menu tab does not appear, it's because we are yet to install the phpMyAdmin configuration storage as described in Chapter 1.
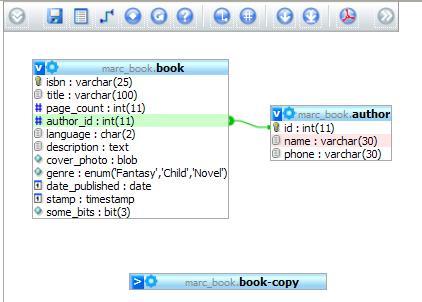
The Designer page contains the main workspace where the tables can be seen. This workspace will dynamically grow and shrink, depending on the position of our tables. The following screenshot demonstrates the Designer interface containing our three tables and the relations between them:
A top menu contains icons whose description is revealed by hovering the mouse over them. The following table gives a summary of the goals for the top menu's icons:
|
Icon |
Description |
|---|---|
|
Show/Hide left menu |
To display or hide the left hand menu. |
|
Save position |
Saves the current state of the workspace. |
|
Create table |
Quits the Designer and enters a dialog to create a table; we should take care of saving the position of tables before clicking on this. |
|
Create relation |
Puts the Designer in a relation-creating mode. |
|
Choose column to display |
Specifies which column represents a table. |
|
Reload |
Refreshes the table's information in case their structure has changed outside of the Designer. |
|
Help |
Displays an explanation about selecting the relations. |
|
Angular links/Direct links |
Specifies the shape of relation links. |
|
Snap to grid |
Influences the behavior of table movements, relative to an imaginary grid. |
|
Small/Big All |
Hides or displays the list of columns for every table. |
|
Toggle small/big |
Reverses the display mode of columns for every table, as this mode can be chosen for each table with its corner icon V or>. |
|
Import/Export |
Displays a dialog to import from an existing PDF schema definition or to export to it. |
|
Move Menu |
The top menu can move to right and back again. |
A side menu appears when clicking on the Show/Hide left menu icon. Its purpose is to present the complete list of tables, so that you can decide which table appears on the workspace, and to enable access to the Structure page of a specific table. In this example, we choose to remove the book-copy table from the workspace as shown in the following screenshot:

If we want to remove it permanently, we click on the Save position top icon. This icon also saves the current position of our tables on the workspace.
Tables can be moved on the workspace by dragging their title bars, and the list of columns for a table can be made visible/invisible with the help of upper-left icon of each table. In this list of columns, small icons show us the data type (numeric, text, and date), and also tell us whether this column is a primary key.
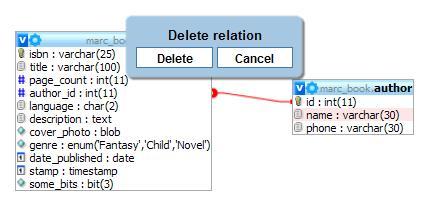
As we have already defined a relation with the Relation view, we will first see how to remove it. The Designer does not permit a change in a relation. However, the Designer allows the relation to be removed and defined.
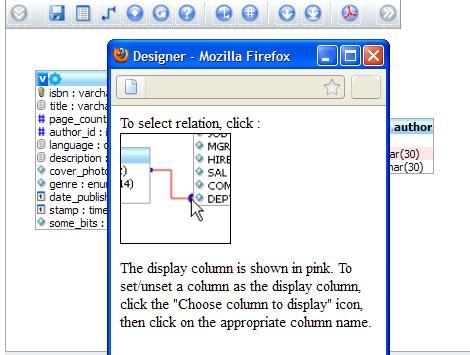
The question mark icon displays a panel that explains where to click, in order to select a relation for subsequent deletion.
Let us click on the relation line to select it. We get a confirmation panel on which we click on Delete.
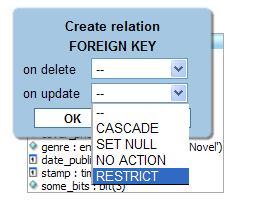
We can then proceed to recreate it. To do this, we start by clicking on the Create relation icon:

The cursor then takes the form of a short message saying Select referenced key. In our case, the referenced key is the id column of the author table; so we bring the cursor on this column and click on it. A validation is done, ensuring that we chose a primary or unique key.
Next, having changed the cursor to Select foreign key, we bring it to the author_id column of the book table and click on it again. This confirms the creation of the relation. Currently, the interface does not permit the creation of compound keys (having more than one column).
On the workspace, the name column in author table has a special background color. This indicates that this column serves as the display column. We can simply click on the Choose column to display icon, and drag the short message Choose column to display onto another column—for example, the phone column. This changes the display column to this column. If we were to drag the message to an existing display column, we would have removed the definition of this column as the display column for the table.