Table of Contents for
Mastering phpMyAdmin 3.4 for Effective MySQL Management
 Mastering phpMyAdmin 3.4 for Effective MySQL Management
Published by
Packt Publishing, 2012
Mastering phpMyAdmin 3.4 for Effective MySQL Management
Published by
Packt Publishing, 2012
- Cover
- Mastering phpMyAdmin 3.4 for Effective MySQL Management
- Mastering phpMyAdmin 3.4 for Effective MySQL Management
- Credits
- About the Author
- About the Reviewers
- www.PacktPub.com
- Preface
- What you need for this book
- Who this book is for
- Conventions
- Reader feedback
- Customer support
- 1. Getting Started with phpMyAdmin
- What is phpMyAdmin?
- Installing phpMyAdmin
- Configuring phpMyAdmin
- Installing phpMyAdmin configuration storage
- Upgrading phpMyAdmin
- Summary
- 2. Configuring Authentication and Security
- Securing phpMyAdmin
- Summary
- 3. Over Viewing the Interface
- Customizing general settings
- Character sets and collations
- Navigation panel
- Main panel
- User preferences
- Query window
- Summary
- 4. Creating and Browsing Tables
- Creating our first table
- Inserting data manually
- Browse mode
- Profiling queries
- Creating an additional table
- Summary
- 5. Changing Data and Structure
- Changing table structure
- Summary
- 6. Exporting Structure and Data (Backup)
- Exporting a database
- Exporting a table
- Exporting selectively
- Exporting multiple databases
- Saving the export file on the server
- Memory limits
- Summary
- 7. Importing Structure and Data
- Importing SQL files
- Importing CSV files
- Importing other formats
- Reading files from a web server upload directory
- Displaying an upload progress bar
- Summary
- 8. Searching Data
- Performing a complete database search
- Stopping an errant query
- Summary
- 9. Performing Table and Database Operations
- Changing table attributes
- Emptying or deleting a table
- Renaming, moving, and copying tables
- Performing other table operations
- Multi-table operations
- Database operations
- Summary
- 10. Benefiting from the Relational System
- Defining relations with the relation view
- Defining relations with the Designer
- Benefiting from the defined relations
- Column commenting
- Summary
- 11. Entering SQL Statements
- The Query window
- Multi-statement queries
- Pretty printing (syntax highlighting)
- The SQL Validator
- Summary
- 12. Generating Multi-table Queries
- Exploring column criteria
- Generating automatic joins (internal relations)
- Executing the query
- The visual builder
- Summary
- 13. Synchronizing Data and Supporting Replication
- Supporting MySQL replication
- Summary
- 14. Using Query Bookmarks
- Creating bookmarks
- Recalling bookmarks from the bookmarks list
- Passing a parameter to a bookmark
- Summary
- 15. Documenting the System
- Generating relational schemas
- Summary
- 16. Transforming Data using MIME
- Enabling transformations
- Examples of transformations
- Summary
- 17. Supporting Features Added in MySQL 5
- Supporting routines—stored procedures and functions
- Executing code with triggers
- Using information_schema
- Partitioning
- Exploring the event scheduler
- Summary
- 18. Tracking Changes
- Prerequisites
- Principles
- Initiating tracking for one table
- Testing the tracking mechanism
- Determining tracking status
- Structure snapshot
- Exporting a version
- Creating a new version
- Deleting tracking information
- Summary
- 19. Administrating the MySQL Server
- Database information
- Server information
- Summary
- A. Troubleshooting and Support
- Seeking support
- Contributing to the project
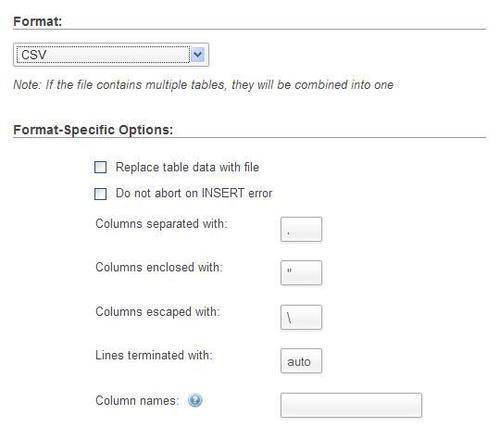
In this section, we will examine how to import CSV files. There are two possible methods—CSV and CSV using LOAD DATA. The first method is implemented internally by phpMyAdmin and is the recommended one for its simplicity. With the second method, phpMyAdmin receives the file to be loaded, and passes it to MySQL. In theory, this method should be faster. However, it has more requirements due to MySQL itself (refer to the Requirements sub-section of the CSV using LOAD DATA section).
Usually, the SQL format contains both structure and data. The CSV file format contains data only, so if we import in Table view, we must already have an existing table in place. This table does not need to have the same structure as the original table (from which the data comes); the Column names dialog enables us to choose which columns are affected in the target table.
Since version 3.4, we can also import a CSV file in Database view. In this case, phpMyAdmin examines the CSV data and generates a table structure to hold this data (with generic column names such as COL 1, COL 2 and a table name such as TABLE 24).
Before trying an import, let us generate an author.csv export file from the author table. We use the default values in the CSV export options. We can then use the Empty option to empty the author table—we should avoid dropping this table as we still need the table structure. The procedure to empty a table is covered in Chapter 5, in the Deleting all of the rows in a table section.
From the author table menu, we select Import and then CSV.
We can influence the behavior of the import in a number of ways. By default, importing does not modify existing data (based on primary or unique keys). However, the Replace table data with file option instructs phpMyAdmin to use REPLACE statements instead of INSERT statements, so that existing rows are replaced with the imported data.
Using Do not abort on INSERT error, INSERT IGNORE statements are generated. These cause MySQL to ignore any duplicate key problems during insertion. A duplicate key from the import file does not replace existing data, and the procedure continues for the next line of CSV data.
We can then specify the character that terminates each column, the character that encloses data, and the character that escapes the enclosing character. Usually this is \.
For Lines terminated with option, the auto choice should be tried first as it detects the end-of-line character automatically. We can also specify manually which characters terminate the lines. The usual choice is \n for UNIX-based systems, \r\n for DOS or Windows systems, and \r for Mac-based systems (up to Mac OS 9). If in doubt, we can use a hexadecimal file editor on our client computer (not part of phpMyAdmin) to examine the exact codes.
By default, phpMyAdmin expects a CSV file with the same number of columns and the same column order as the target table. This can be changed by entering a comma-separated list of column names in Column names, respecting the source file format. For example, let us say our source file contains only the author ID and the author name information:
"1","John Smith"
"2","Maria Sunshine"
We would have to put id, name in Column names to match the source file.
When we click on Go, the import is executed and we get a confirmation. We might also see the actual INSERT queries generated if the total size of the file is not too big.
Import has been successfully finished, 2 queries executed.
INSERT INTO `author` VALUES ('1', 'John Smith', '+01 445 789-1234'
)# 1 row(s) affected.
INSERT INTO `author` VALUES ('2', 'Maria Sunshine', '333-3333'
)# 1 row(s) affected.
With this method (only available in the Table view), phpMyAdmin relies on the server's LOAD DATA INFILE or LOAD DATA LOCAL INFILE mechanisms to do the actual import, instead of processing the data internally. These statements are the fastest way for importing text in MySQL. They cause MySQL to start a read operation either from a file located on the MySQL server (LOAD DATA INFILE) or from another place (LOAD DATA LOCAL INFILE), which in this context, is always the web server's file system. If the MySQL server is located on a computer other than the web server, we won't be able to use the LOAD DATA INFILE mechanism.
Relying on the MySQL server has some consequences. Using LOAD DATA INFILE requires that the logged-in user possess a global FILE privilege. Also, the file itself must be readable by the MySQL server's process.
Note
Chapter 19 explains phpMyAdmin's interface, which can be used by system administrators to manage privileges.
Usage of the LOCAL modifier in LOAD DATA LOCAL INFILE must be allowed by the MySQL server and MySQL's client library used by PHP.
Both the LOAD methods are available from the phpMyAdmin LOAD interface, which tries to choose the best possible default option.
We select Import from the author table menu. Choosing CSV using LOAD DATA option brings up the following dialog:
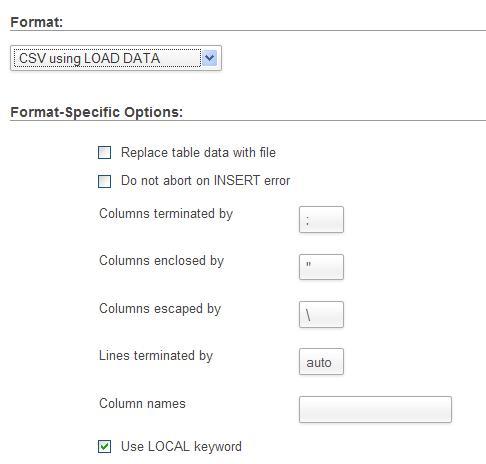
In the File to import section, we choose our author.csv file.
Finally, we can choose the LOAD method, as discussed earlier, by selecting the Use LOCAL keyword option. We then click on Go.
If all goes well, we can see the confirmation screen as shown in the following screenshot:
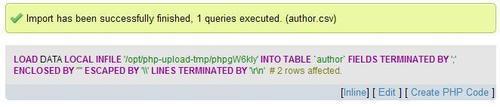
This screen shows the exact LOAD DATA LOCAL INFILE statement used. Here is what has happened:
- We chose author.csv.
- The contents of this file were transferred over HTTP and received by the web server.
- The PHP component inside the web server saved this file in a work directory (here
/opt/php-upload-tmp/)and gave it a temporary name. - phpMyAdmin, informed of the location of this working file, built a
LOAD DATA LOCAL INFILEcommand, and sent it to MySQL. Note that just one query was executed, which loaded many rows. - The MySQL server read and loaded the contents of the file into our target table. It then returned the number of affected rows (2), which phpMyAdmin displayed on the results page.