Table of Contents for
Mastering phpMyAdmin 3.4 for Effective MySQL Management
 Mastering phpMyAdmin 3.4 for Effective MySQL Management
Published by
Packt Publishing, 2012
Mastering phpMyAdmin 3.4 for Effective MySQL Management
Published by
Packt Publishing, 2012
- Cover
- Mastering phpMyAdmin 3.4 for Effective MySQL Management
- Mastering phpMyAdmin 3.4 for Effective MySQL Management
- Credits
- About the Author
- About the Reviewers
- www.PacktPub.com
- Preface
- What you need for this book
- Who this book is for
- Conventions
- Reader feedback
- Customer support
- 1. Getting Started with phpMyAdmin
- What is phpMyAdmin?
- Installing phpMyAdmin
- Configuring phpMyAdmin
- Installing phpMyAdmin configuration storage
- Upgrading phpMyAdmin
- Summary
- 2. Configuring Authentication and Security
- Securing phpMyAdmin
- Summary
- 3. Over Viewing the Interface
- Customizing general settings
- Character sets and collations
- Navigation panel
- Main panel
- User preferences
- Query window
- Summary
- 4. Creating and Browsing Tables
- Creating our first table
- Inserting data manually
- Browse mode
- Profiling queries
- Creating an additional table
- Summary
- 5. Changing Data and Structure
- Changing table structure
- Summary
- 6. Exporting Structure and Data (Backup)
- Exporting a database
- Exporting a table
- Exporting selectively
- Exporting multiple databases
- Saving the export file on the server
- Memory limits
- Summary
- 7. Importing Structure and Data
- Importing SQL files
- Importing CSV files
- Importing other formats
- Reading files from a web server upload directory
- Displaying an upload progress bar
- Summary
- 8. Searching Data
- Performing a complete database search
- Stopping an errant query
- Summary
- 9. Performing Table and Database Operations
- Changing table attributes
- Emptying or deleting a table
- Renaming, moving, and copying tables
- Performing other table operations
- Multi-table operations
- Database operations
- Summary
- 10. Benefiting from the Relational System
- Defining relations with the relation view
- Defining relations with the Designer
- Benefiting from the defined relations
- Column commenting
- Summary
- 11. Entering SQL Statements
- The Query window
- Multi-statement queries
- Pretty printing (syntax highlighting)
- The SQL Validator
- Summary
- 12. Generating Multi-table Queries
- Exploring column criteria
- Generating automatic joins (internal relations)
- Executing the query
- The visual builder
- Summary
- 13. Synchronizing Data and Supporting Replication
- Supporting MySQL replication
- Summary
- 14. Using Query Bookmarks
- Creating bookmarks
- Recalling bookmarks from the bookmarks list
- Passing a parameter to a bookmark
- Summary
- 15. Documenting the System
- Generating relational schemas
- Summary
- 16. Transforming Data using MIME
- Enabling transformations
- Examples of transformations
- Summary
- 17. Supporting Features Added in MySQL 5
- Supporting routines—stored procedures and functions
- Executing code with triggers
- Using information_schema
- Partitioning
- Exploring the event scheduler
- Summary
- 18. Tracking Changes
- Prerequisites
- Principles
- Initiating tracking for one table
- Testing the tracking mechanism
- Determining tracking status
- Structure snapshot
- Exporting a version
- Creating a new version
- Deleting tracking information
- Summary
- 19. Administrating the MySQL Server
- Database information
- Server information
- Summary
- A. Troubleshooting and Support
- Seeking support
- Contributing to the project
There are two instances when it is possible to create a bookmark—after a query is executed (in which case we don't need to plan ahead for its creation), and before sending the query to the MySQL server for execution. Both of these options are explored in the following sections.
Initial bookmark creation is made possible by the Bookmark this SQL query button. This button appears only after executing a query that generates a result (when at least one row is found); so this method for creating bookmarks only stores SELECT statements. For example, a complex query produced by the multi-table query generator (as seen in Chapter 12) could be stored as a bookmark in this way, provided that it finds some results.
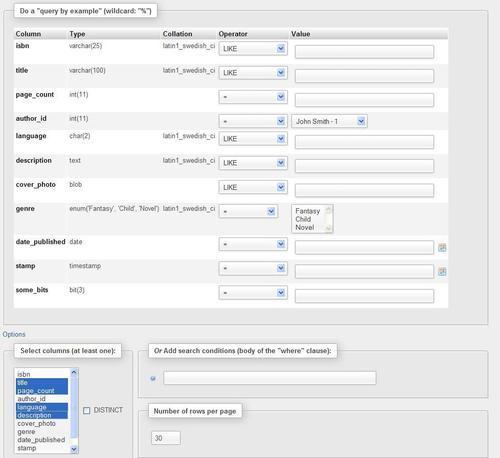
Let us see an example. In the Search page for the book table, we select the columns that we want in the results, and enter the search values as shown in the following screenshot:
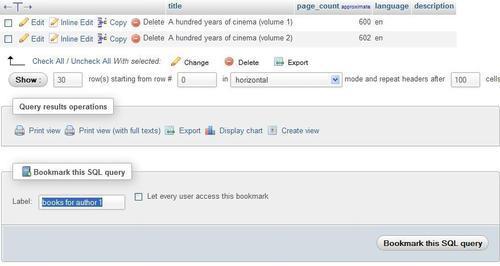
After clicking on Go, we see that the results page shows a bookmark dialog. We enter only a label, books for author 1, for this bookmark, and then click on Bookmark this SQL query to save this query as a bookmark. Bookmarks are saved in the table defined by $cfg['Servers'][$i]['bookmarktable'].
This bookmark dialog can be seen on any page that contains results. As a test, we could just click on Browse for a table to get results, and then store this query as a bookmark. However, it does not make much sense to store (in a bookmark) a query that can easily be made with one click.
We have seen that it's easy to create a bookmark after the execution of a SELECT statement that generates results. Sometimes, we may want to store a bookmark even if a query does not find any results. This may be the case if the data to which the query refers is not yet present, or if the query is a statement other than SELECT. To achieve this, we have the Bookmark this SQL query dialog available in the SQL tab of the Database view, Table view, and the Query window.
We now go to the SQL page of the book table, enter a query to retrieve French books, and directly put the books in French bookmark label in the Bookmark this SQL query dialog. If this bookmark label has been used previously, a new bookmark with the same name will be created, unless we check the Replace existing bookmark of same name checkbox. Bookmarks carry an internal identifying number, as well as a label chosen by the user.

On clicking on Go, the query is executed and stored as a bookmark. It does not matter if the query does not find anything. This is how we can generate bookmarks for non-SELECT queries such as UPDATE, DELETE, CREATE TABLE, and so on.
All bookmarks we create are private by default. When a bookmark is created, the username, which we are logged in as, is stored with the bookmark. Let us suppose that we check the Let every user access this bookmark checkbox as shown in the following screenshot:

This would have the following effect:
- All users having access to the same database (the current one) will have access to the bookmark.
- A user's ability to see meaningful results from the bookmark depends on the privileges they have on the tables referenced in the bookmark.
- Any user will be able to delete the bookmark.
- Users will be permitted to change the bookmark's query, by storing this bookmark before sending a query and using the Replace existing bookmark of same name option.
Public bookmarks are shown with a (shared) suffix when recalled.
In the previous examples, we chose bookmark labels according to our preferences. However, by convention, if a private bookmark has the same name as a table, it will be executed when Browse is clicked for this table. Thus, instead of seeing the normal Browse results of this table, we will see the bookmark's results.
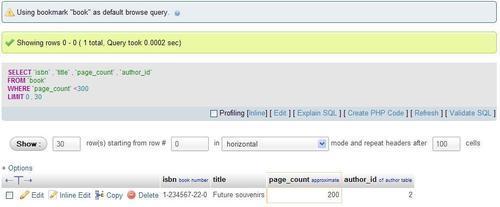
Suppose that we are interested in viewing (by default, in the Browse mode) all books with a page count lower than 300. We first generate the appropriate query, which can be done easily from the Search page, and then we use book as a bookmark label on the results page.
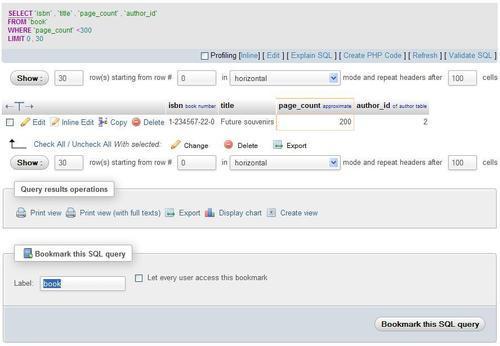
Following this action, every time the user, who created this bookmark, browses the book table, he sees the following screenshot:
A single bookmark can also store more than one query (separated by a semicolon). This is mostly useful for non-SELECT
queries. As an example, let us assume that we need to clean data about authors by removing an invalid area code from the phone numbers on a regular basis. This operation would always be followed by a display of the author table.
To accomplish this goal, we store a bookmark (before sending it for execution) that contains these queries:
update author set phone = replace(phone,'(123)', '(456)');
select * from author;
In the bookmark, we could put many data modification statements such as INSERT, UPDATE, or DELETE, followed optionally by one SELECT statement. Stacking a lot of SELECT statements would not yield the intended result because we would only see the data fetched by the last SELECT statement.