The underlying query language used in Neo4j is called Cypher. It comes with an intuitive set of pattern-matching tools to allow you to model and query nodes and relationships. The top section, located above the play start section in the previous screenshot, is a command panel that accepts Cypher queries.
Let's click the command panel and create a new node:
CREATE (:Message { title:"Welcome",text:"Hello world!" });
With the preceding command, I have created a new node of the Message type. The Message node has two properties, title and text. The title property has the value of Welcome, and the text property has the value of Hello world!.
In the following screenshot, in the left-hand portion of Neo4j Browser, I can see that I now have a node label named Message. Click the Message label:

Once you do that, Neo4j Browser sends the server process a Cypher query of its own:
MATCH (n:Message) RETURN n LIMIT 25;
The results of this query appear in a new pane, and the default view is one that shows a graphical representation of your node, which right now is only a blue Message node, as shown in the previous screenshot. If you hover over the Welcome message node, you should see its properties displayed at the bottom of the pane:
<id>: 0 text: Hello world! Title: Welcome
Of course, this lone node doesn't really help us do very much. So let's create a new node representing the new query language that we're learning, Cypher:
CREATE (:Language { name:"Cypher",version:"Cypher w/ Neo4j 3.2.2" });
Now, our node labels section contains types for both Message and Language. Feel free to click around for the different node types. But this still doesn't give us much that we can be productive with.
Next, we'll create a relationship or edge. Edges can be one-way or two-way, but we'll just create a one-way edge (from Message to Language) for now:
MATCH (m:Message),(c:Language)
WHERE m.title = 'Welcome' AND c.name = 'Cypher'
CREATE (m)-[:ACCESSED_FROM]->(c);
We now have an entry in the left-hand navigation menu under Relationships Types, as shown in the following screenshot. Click the ACCESSED_FROM relationship to see a graphical view of the Welcome message and the Cypher language connected by the new edge:

Next, we will load a file of NASA astronaut data[6] into our local Neo4j instance. Download the following files (or clone the repository) from https://github.com/aploetz/packt/:
- astronaut_data.neo
- neoCmdFile.py
If it is not present, install the Neo4j Python driver:
pip install neo4j-driver
The neoCmdFile.py is a Python script designed to load files that consist of Cypher commands. The astronaut_data.neo file is a Cypher command file that will build a series of nodes and edges for the following examples. Run the neoCmdFile.py script to load the astronaut_data.neo file:
python neoCmdFile.py 192.168.0.100 neo4j flynnLives astronaut_data.neo
Data from astronaut_data.neo loaded!
Note that if you get a TransientError exception informing you that your JVM stack size is too small, try increasing it to 2 MBs (or more) by adding the following line to the end of your neo4j.conf file (and bouncing your Neo4j server):
dbms.jvm.additional=-Xss2M
With the astronaut data now loaded, we can return to Neo4j Browser and run Cypher queries against it. Run this query for NASA astronauts who were recruited in group 1:
MATCH p=()-[r:RECRUITED_IN_CLASS]->(g {group:"1"}) RETURN p;
The output for the preceding query would look like this:

This particular query, in the preceding screenshot, returns data for the famous Mercury Seven astronauts.
In addition to querying astronauts by group, we can also query by other things, such as a specific mission. If we wanted data for the astronauts who flew on the successful failure of Apollo 13, the query would look like this:
MATCH (a:Astronaut)-[:FLEW_ON]->(m:Mission {name:'Apollo 13'})
RETURN a, m;
If we view astronaut as the criterion, we can easily modify the query to return data for other entities based on relationships. Here, we can prepend an edge of EDUCATED_AT to the School node on the previous query:
MATCH (s:School)<-[:EDUCATED_AT]-
(a:Astronaut)-[:FLEW_ON]->(m:Mission {name:'Apollo 13'})
RETURN a, m, s;
The output for the preceding query would look like this:
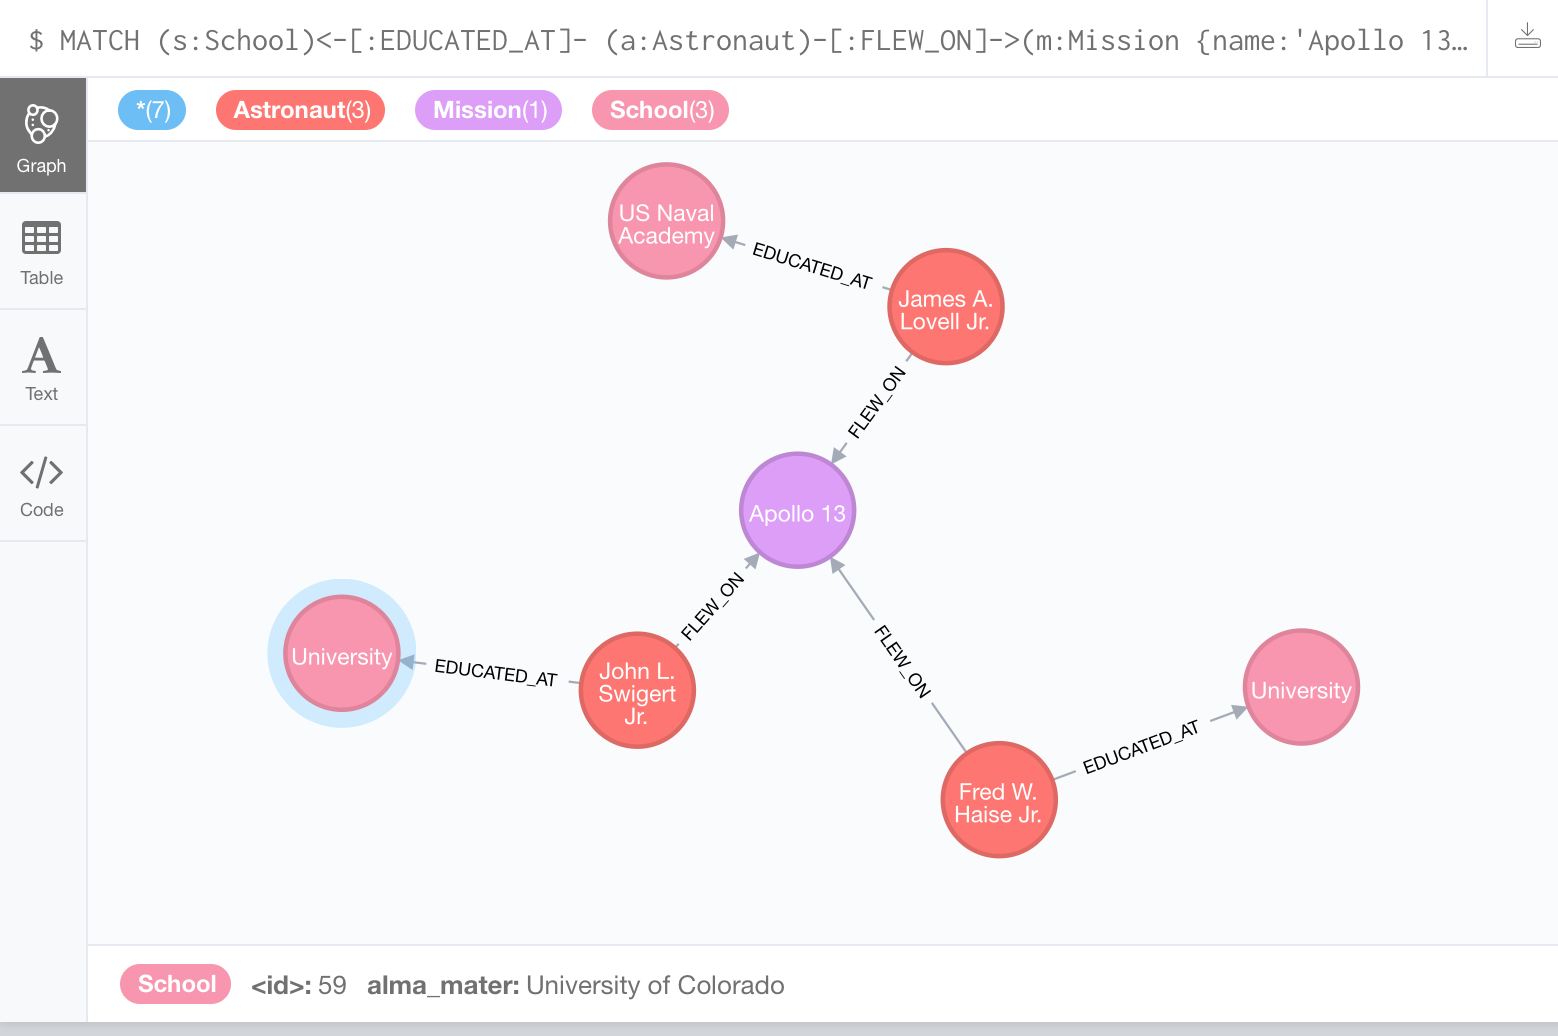
In addition to the entities for the Apollo 13 mission and the three astronauts, we can also see where each of the astronauts received their education. Feel free to further explore and experiment with the astronaut data. In doing so, we will begin to realize the potential of graph database modeling and the problems that it can help us to solve.