Table of Contents for
Responsive Web Design with HTML5 and CSS3 - Second Edition
 Responsive Web Design with HTML5 and CSS3 - Second Edition
Published by
Packt Publishing, 2015
Responsive Web Design with HTML5 and CSS3 - Second Edition
Published by
Packt Publishing, 2015
- Cover
- Table of Contents
- Responsive Web Design with HTML5 and CSS3 Second Edition
- Responsive Web Design with HTML5 and CSS3 Second Edition
- Credits
- About the Author
- About the Reviewers
- www.PacktPub.com
- Preface
- What you need for this book
- Who this book is for
- Conventions
- Reader feedback
- Customer support
- 1. The Essentials of Responsive Web Design
- Defining responsive web design
- Setting browser support levels
- Our first responsive example
- The shortcomings of our example
- Summary
- 2. Media Queries – Supporting Differing Viewports
- Media query syntax
- Combining media queries
- Using media queries to alter a design
- Considerations for organizing and authoring media queries
- Combine media queries or write them where it suits?
- The viewport meta tag
- Media Queries Level 4
- Summary
- 3. Fluid Layouts and Responsive Images
- Introducing Flexbox
- Getting Flexy
- Responsive images
- Summary
- 4. HTML5 for Responsive Web Designs
- Starting an HTML5 page the right way
- Easy-going HTML5
- New semantic elements in HTML5
- HTML5 text-level semantics
- Obsolete HTML features
- Putting HTML5 elements to use
- WCAG and WAI-ARIA for more accessible web applications
- Embedding media in HTML5
- Responsive HTML5 video and iFrames
- A note about 'offline first'
- Summary
- 5. CSS3 – Selectors, Typography, Color Modes, and New Features
- Anatomy of a CSS rule
- Quick and useful CSS tricks
- Word wrapping
- Facilitating feature forks in CSS
- New CSS3 selectors and how to use them
- CSS3 structural pseudo-classes
- CSS custom properties and variables
- CSS calc
- CSS Level 4 selectors
- Web typography
- New CSS3 color formats and alpha transparency
- Summary
- 6. Stunning Aesthetics with CSS3
- Box shadows
- Background gradients
- Repeating gradients
- Background gradient patterns
- Multiple background images
- High-resolution background images
- CSS filters
- A warning on CSS performance
- Summary
- 7. Using SVGs for Resolution Independence
- The graphic that is a document
- Creating SVGs with popular image editing packages and services
- Inserting SVGs into your web pages
- Inserting an SVG inline
- What you can do with each SVG insertion method (inline, object, background-image, and img)
- Extra SVG capabilities and oddities
- Animating SVG with JavaScript
- Optimising SVGs
- Using SVGs as filters
- A note on media queries inside SVGs
- Summary
- 8. Transitions, Transformations, and Animations
- CSS3 2D transforms
- CSS3 3D transformations
- Animating with CSS3
- Summary
- 9. Conquer Forms with HTML5 and CSS3
- Understanding the component parts of HTML5 forms
- HTML5 input types
- How to polyfill non-supporting browsers
- Styling HTML5 forms with CSS3
- Summary
- 10. Approaching a Responsive Web Design
- View and use the design on real devices
- Embracing progressive enhancement
- Defining a browser support matrix
- Tiering the user experience
- Linking CSS breakpoints to JavaScript
- Avoid CSS frameworks in production
- Coding pragmatic solutions
- Use the simplest code possible
- Hiding, showing, and loading content across viewports
- Validators and linting tools
- Performance
- The next big things
- Summary
- Index
As SVG is merely an XML document, you can insert it directly into the HTML. For example:
<div>
    <h3>Inserted 'inline':</h3>
    <span class="inlineSVG">
        <svg id="svgInline" width="198" height="188" viewBox="0 0 198 188" xmlns="http://www.w3.org/2000/svg" xmlns:xlink="http://www.w3.org/1999/xlink">
        <title>Star 1</title>
            <g class="star_Wrapper" fill="none" fill-rule="evenodd">
                <path id="star_Path" stroke="#979797" stroke-width="3" fill="#F8E81C" d="M99 154l-58.78 30.902 11.227-65.45L3.894 73.097l65.717-9.55L99 4l29.39 59.55 65.716 9.548-47.553 46.353 11.226 65.452z" />
            </g>
        </svg>
    </span>
</div>
There is no special wrapping element needed, you literally just insert the SVG markup inside the HTML markup. It's also worth knowing that if you remove any width and height attributes on the svg element, the SVG will scale fluidly to fit the containing element.
Inserting SVGs into your documents is probably the most versatile in terms of SVG features.
Earlier in the chapter I mentioned that I had picked and downloaded some icons from IcoMoon (http://icomoon.io). They were icons depicting touch gesture: swipe, pinch, drag, and so on. Suppose in a website you are building you need to make use of them multiple times. Remember I mentioned that there was a version of those icons as SVG symbol definitions? That's what we will make use of now.
In example_07-09 we will insert the various symbol definitions inside the defs element of an SVG in the page. You'll notice that on the SVG element, an inline style is used: display:none and the height and width attributes have both been set to zero (those styles could be set in CSS if you would rather). This is so that this SVG takes up no space. We are only using this SVG to house symbols of the graphical objects we want to use elsewhere.
So, our markup starts like this:
<body>
    <svg display="none" width="0" height="0" version="1.1" xmlns="http://www.w3.org/2000/svg" xmlns:xlink="http://www.w3.org/1999/xlink">
    <defs>
    <symbol id="icon-drag-left-right" viewBox="0 0 1344 1024">
        <title>drag-left-right</title>
        <path class="path1" d="M256 192v-160l-224 224 224 224v-160h256v-128z"></path>
Notice the symbol element inside the defs element? This is the element to use when we want to define a shape for later reuse.
After the SVG defining all necessary symbols for our work, we have all our 'normal' HTML markup. Then, when we want to make use of one of those symbols, we can do this:
<svg class="icon-drag-left-right">
  <use xlink:href="#icon-drag-left-right"></use>
</svg>
That will display the drag left and right icon:
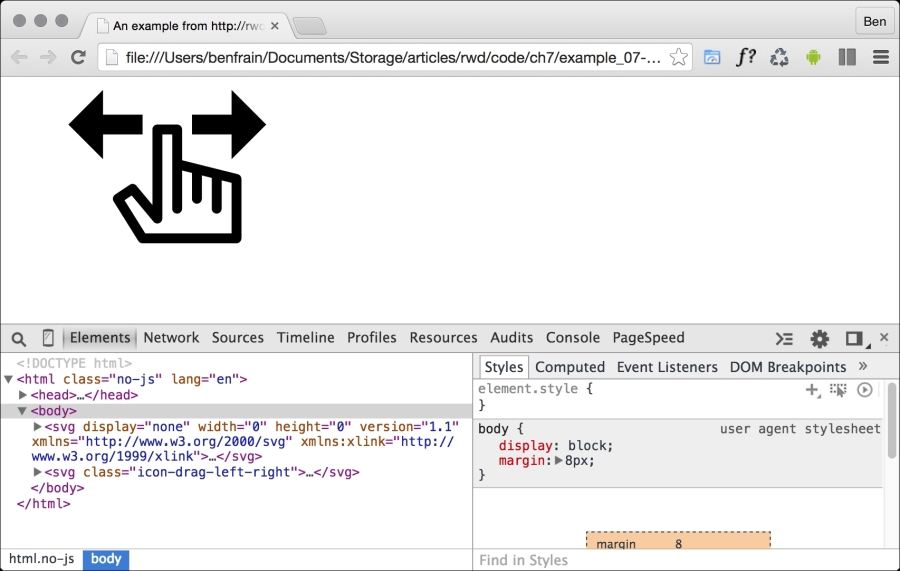
The magic here is the use element. As you might have guessed from the name, it's used to make use of existing graphical objects that have already been defined elsewhere. The mechanism for choosing what to reference is the xlink attribute that in this case is referencing the symbol ID of the 'drag left and right' icon (#icon-drag-left-right) we have inline at the beginning of the markup.
When you re-use a symbol, unless you explicitly set a size (either with attributes on the element itself or with CSS) the use will be set to width and height 100%. So, to re-size our icon we could do this:
.icon-drag-left-right {
    width: 2.5rem;
    height: 2.5rem;
}
The use element can be used to re-use all sorts of SVG content: gradients, shapes, symbols, and more.
With inline SVGs you can also do useful things like change colors based on context, and that's great when you need multiple versions of the same icon in different colors:
.icon-drag-left-right {
    fill: #f90;
}

.different-context .icon-drag-left-right {
    fill: #ddd;
}With inline SVGs you can also have some fun and create a two-tone effects from a single color icon (as long as the SVG is made up of more than one path) with the use of currentColor, the oldest CSS variable. To do this, inside the SVG symbol, set the fill of the path you want to be one color as currentColor. Then use the color value in your CSS to color the element. For the paths in the SVG symbol without the fill, set as currentColor, they will receive the fill value. To exemplify:
.icon-drag-left-right {
    width: 2.5rem;
    height: 2.5rem;
    fill: #f90;
    color: #ccc; /* this gets applied to the path that has it's fill attribute set to currentColor in the symbol */
}
Here's that same symbol re-used three times, each with different colors and sizes:

Remember you can dig around the code in example_07-09. It's also worth knowing that the color doesn't have to be set on that element itself, it can be on any parent element; the currentColor will inherit a value from up the DOM tree to the nearest parent with a color value set.
There are a lot of positives to using SVG in this way. The only downside being that it's necessary to include the same SVG data on every page you want to use the icons. Sadly, this is bad for performance, as the assets (the SVG data) isn't going to be cached easily. However, there is another option (if you are happy to add a script to support Internet Explorer).
Rather than paste in an enormous set of SVG symbols in each page, while still using the use element, it's possible to link out to external SVG files and grab the portion of the document you want to use. Take a look at example-07-10 and the same three icons as we had in example_07-09 are put on the page in this manner:
<svg class="icon-drag-left-right">
    <use xlink:href="defs.svg#icon-drag-left-right"></use>
</svg>
The important part to understand is the href. We are linking to an external SVG file (the defs.svg part) and then specifying the ID of the symbol within that file we want to use (the #icon-drag-left-right part).
The benefits of this approach are that the asset is cached by the browser (just like any other external image would/could be) and it saves littering our markup with an SVG full of symbol definitions. The downside is that, unlike when the defs are placed inline, any dynamic changes made to the defs.svg (for example, if a path was being manipulated by JavaScript) won't be updated in the use tags.
Sadly, Internet Explorer does not allow referencing symbols from external assets. However, there's a polyfill script for IE9-11, called SVG For Everybody that allows us to use this technique regardless. Head over to https://github.com/jonathantneal/svg4everybody for more information.
When using that piece of JavaScript, you can happily reference external assets and the polyfill will insert the SVG data directly into the body of the document for Internet Explorer.