
In this chapter, you look at how to export your image files (JPEG, PNG, GIF, SVG) and your animations (GIF, HTML5 Canvas, OAM), and video (MOV). You also discover some other related formats used for web design. The MOV file will be imported into Media Encoder CC in Part 5; you look at the web setting formats for this file then.
Note
This chapter does not have any actual projects; however, you can use the files in the Chapter 22 folder to practice opening and viewing for this lesson. They are at https://github.com/Apress/graphics-multimedia-web-adobe-creative-cloud .
Saving or Exporting Your Files for the Web
As you can see, there are many steps to creating an animation. There are some tools or properties that you might use more frequently than others depending upon your level of skill or the animation you are trying to accomplish. While it would be impossible to go through all possible animation options, I hope that the overview so far has given you some idea of how the basic tools and panels function. Now let’s move on to exporting our finished graphics for the web.
Possible Export Settings for Animate Files
File Format | Option 1: File ➤ Export ➤Export Image | Option 2: File ➤ Export ➤Export Image(Legacy) | Option 3: File ➤ Export ➤ Export Movie | Option 4: File ➤ Export ➤ Export Video | Option 5: File ➤ Export ➤ Export Animated GIF | Option 6: File ➤ Publish Settings HTML5 Canvas |
|---|---|---|---|---|---|---|
JPEG (.jpg, .jpeg, .jpe) | ✔ | ✔ | ✔ (sequence) | ✔ | ||
PNG (8 and 24 .png) | ✔ | ✔ | ✔ (sequence) | ✔* only via ActionScript 3.0 FLA file | ||
GIF (static and animated) (.gif) | ✔(static only) | ✔(static only) | ✔(sequence)(static only) | ✔ (animated) | ✔* only via ActionScript 3.0 FLA file | |
SVG (.svg) | ✔ | ✔ | ||||
OAM package | ✔ | |||||
SWF movie (.swf) | ✔ | ✔ | ✔* only via ActionScript 3.0 FLA file | |||
MOV (.mov) | ✔ |
The main menu allows you to export or publish your web files
If you reviewed Parts 2 and 3, many of these formats should be familiar to you; however, if you are not sure, review Chapter 4 and Chapter 12 for clarification on file formats and import settings.
Note
In recent versions, Animate CC has removed the ability to export a bitmap file; you can only import. Also, you cannot create a PDF directly from Animate. If creating a PDF document is important for your project, I recommend saving the frames you want as graphics or as image sequence JPEG files, and then placing them on pages in Adobe InDesign CC, and then Exporting from Adobe InDesign CC as a PDF. This is a bit more work but at least the layout looks professional.
As you move through each of the following options for export, I introduce some file formats that I have not discussed, such as OAM package, SWF movie, and the transition video file—the MOV.
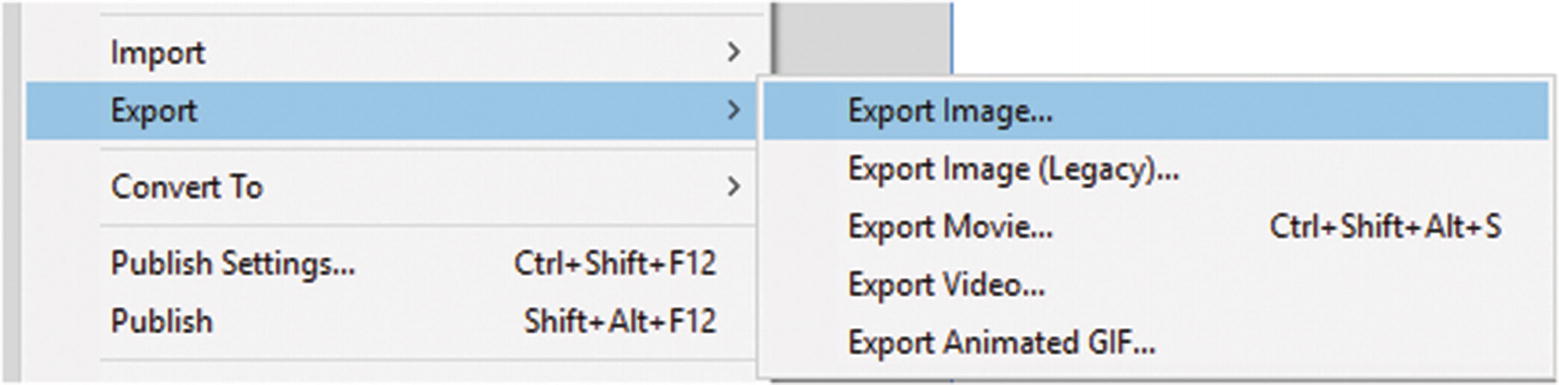
Option 1: File ➤ Export ➤ Export Image
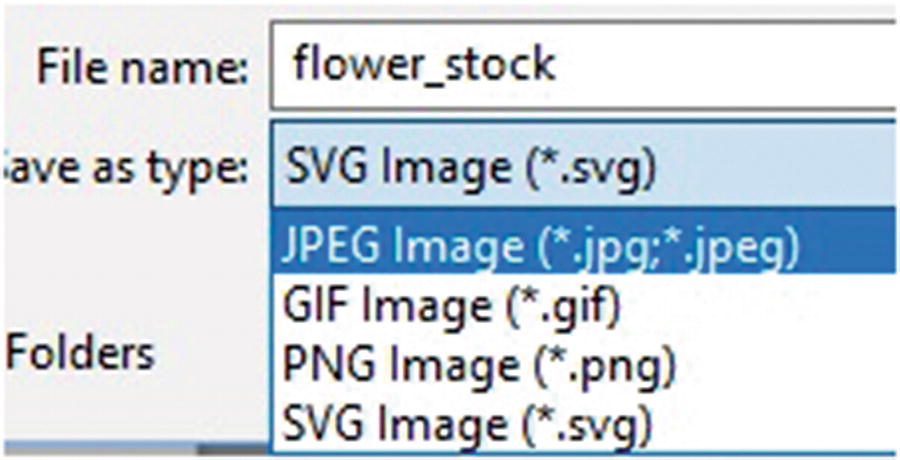
Use the flower_stock.fla file for this example.
Animate’s Export Image dialog box is similar to Illustrator’s and Photoshop’s Save for Web dialog box
The layout is very similar in that you have the ability to compare up to two images during preview and save the final preset; however, notice that on the upper left there are only four tools: Hand tool (H), Zoom tool (Z), Eyedropper tool (I) and Eyedropper Color tool. The Slice tools are missing because the purpose of program is to create single animation frames and not slices for a webpage, so there are no slicing options. Compare to Illustrator Option 4 in Chapter 12.
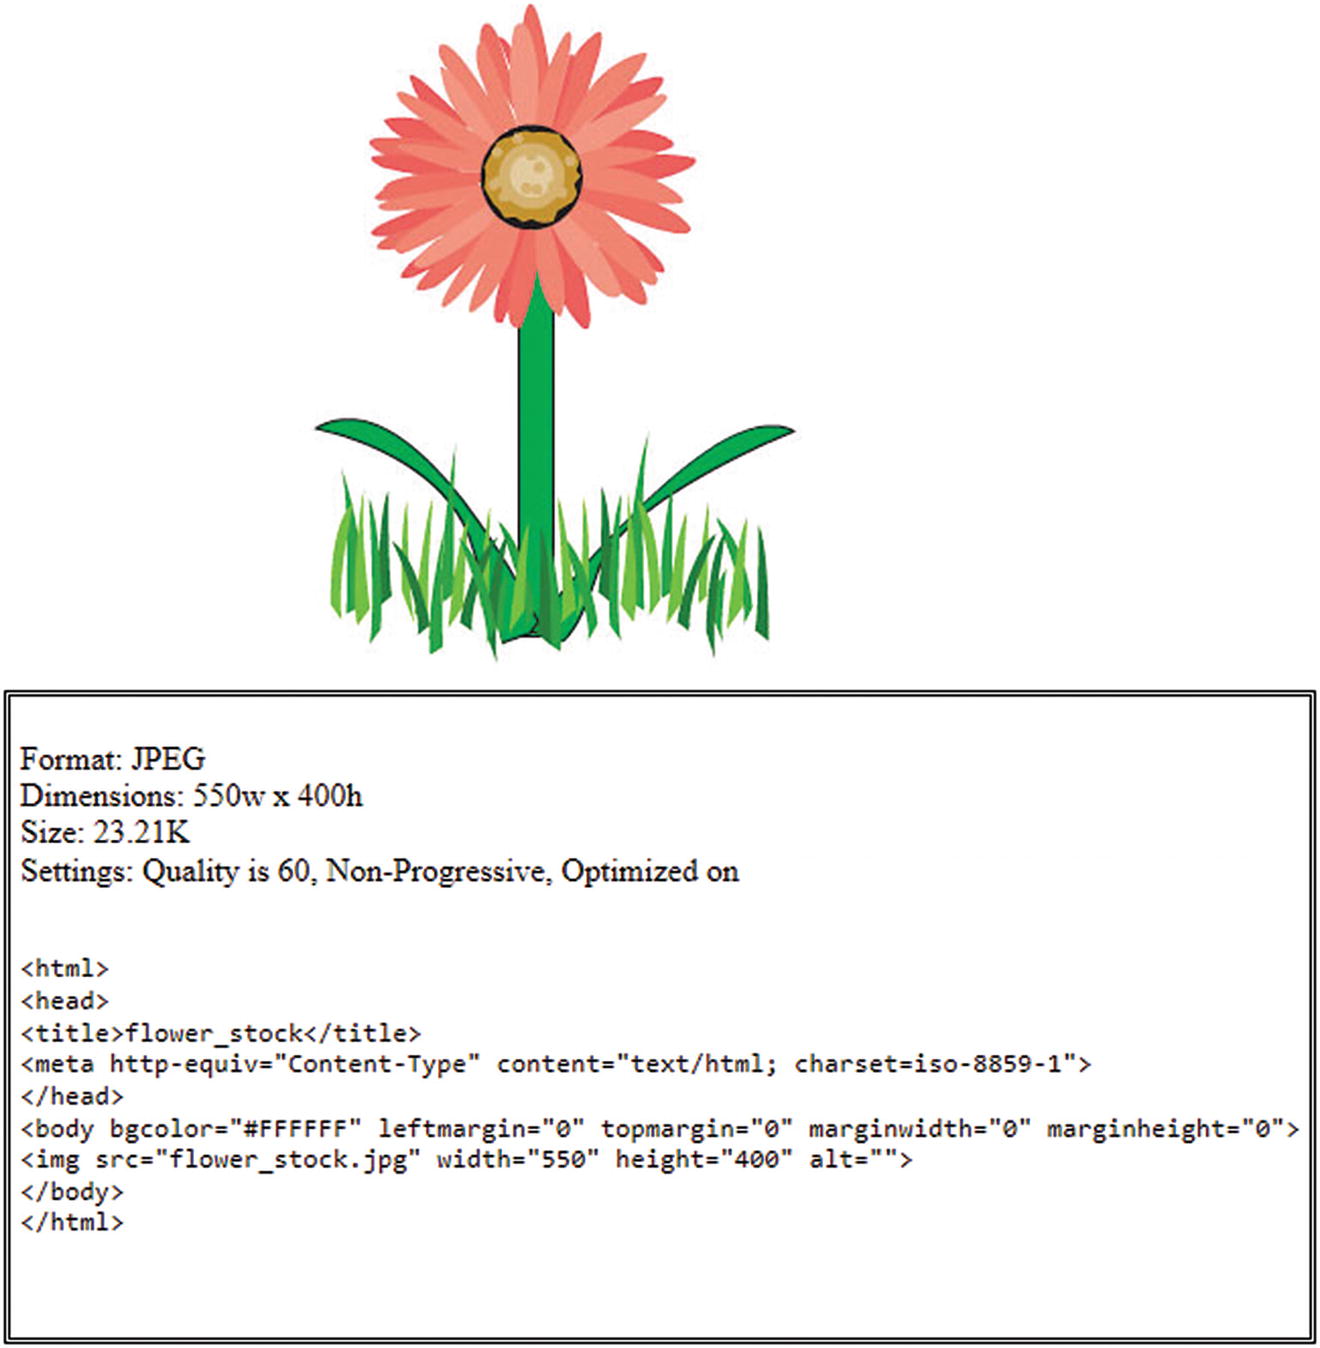
Animate generates some HTML that you can use for an exported image on your website
If extracting HTML information for your work is important, later in this chapter (see Option 6) there is a much better way to generate animated images for the canvas and HTML pages using the Publish Settings dialog box.
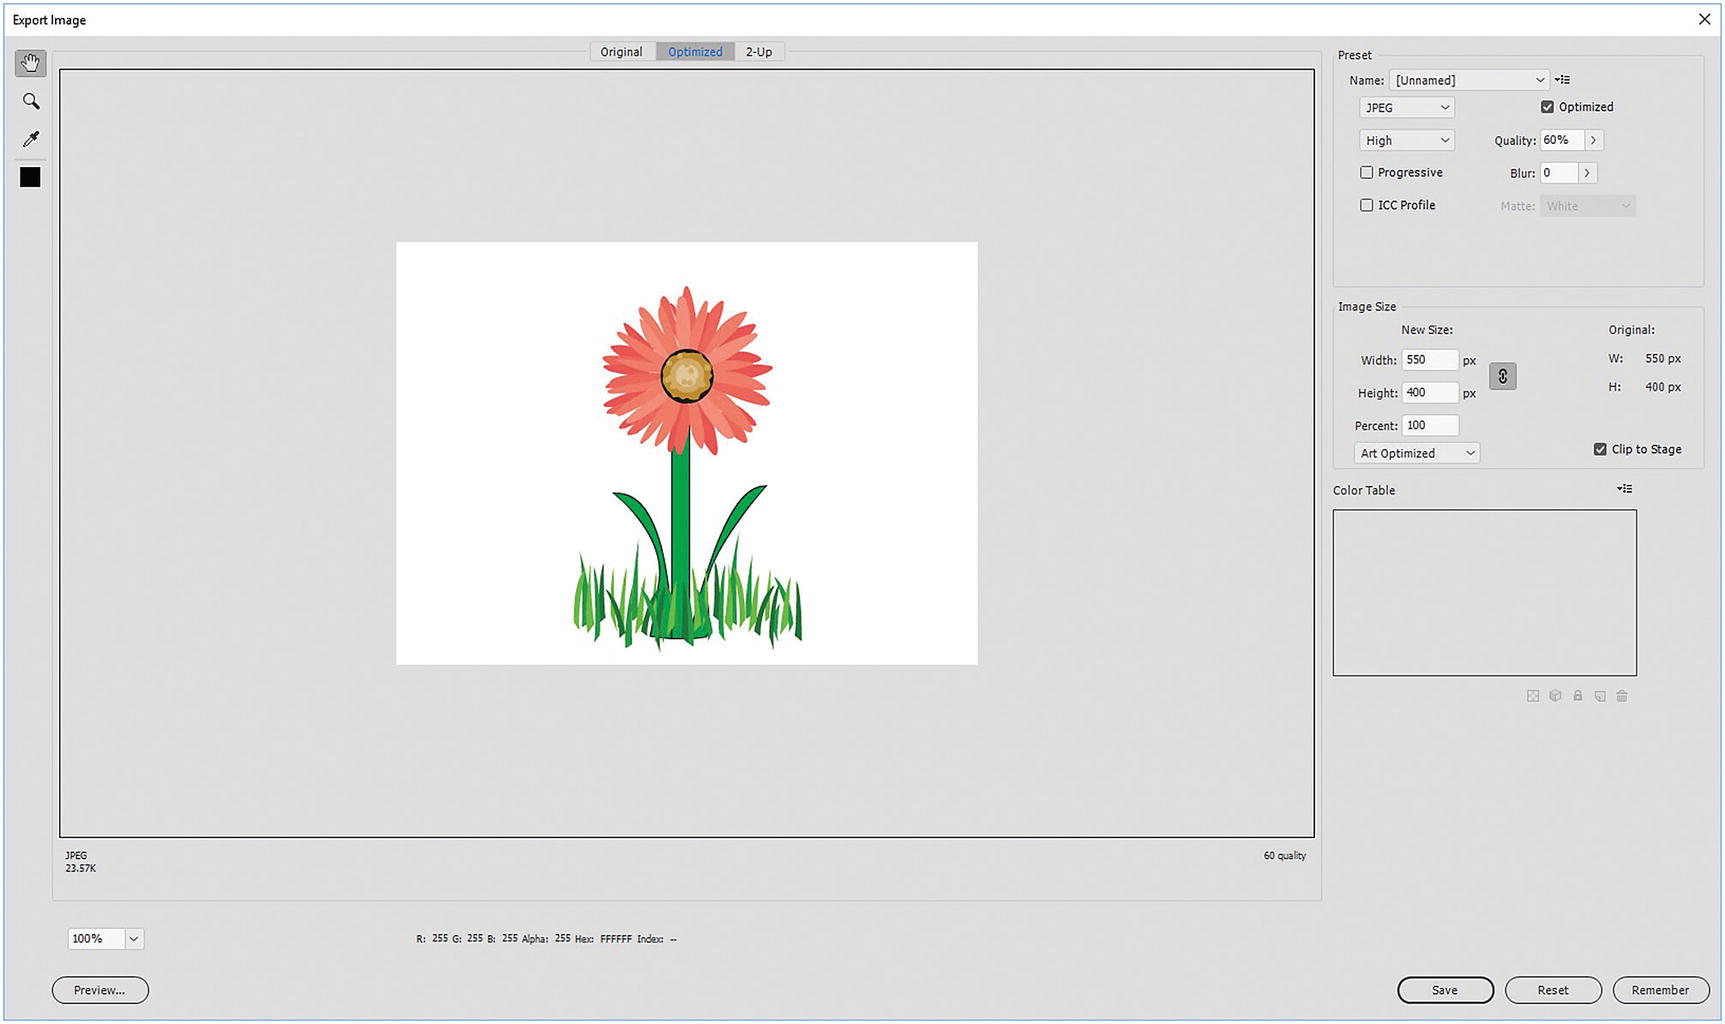
Coming back to the Export Image dialog box, whatever file format you choose (GIF, JPEG, or PNG), this option only lets you export the current image in the frame, not a sequence.
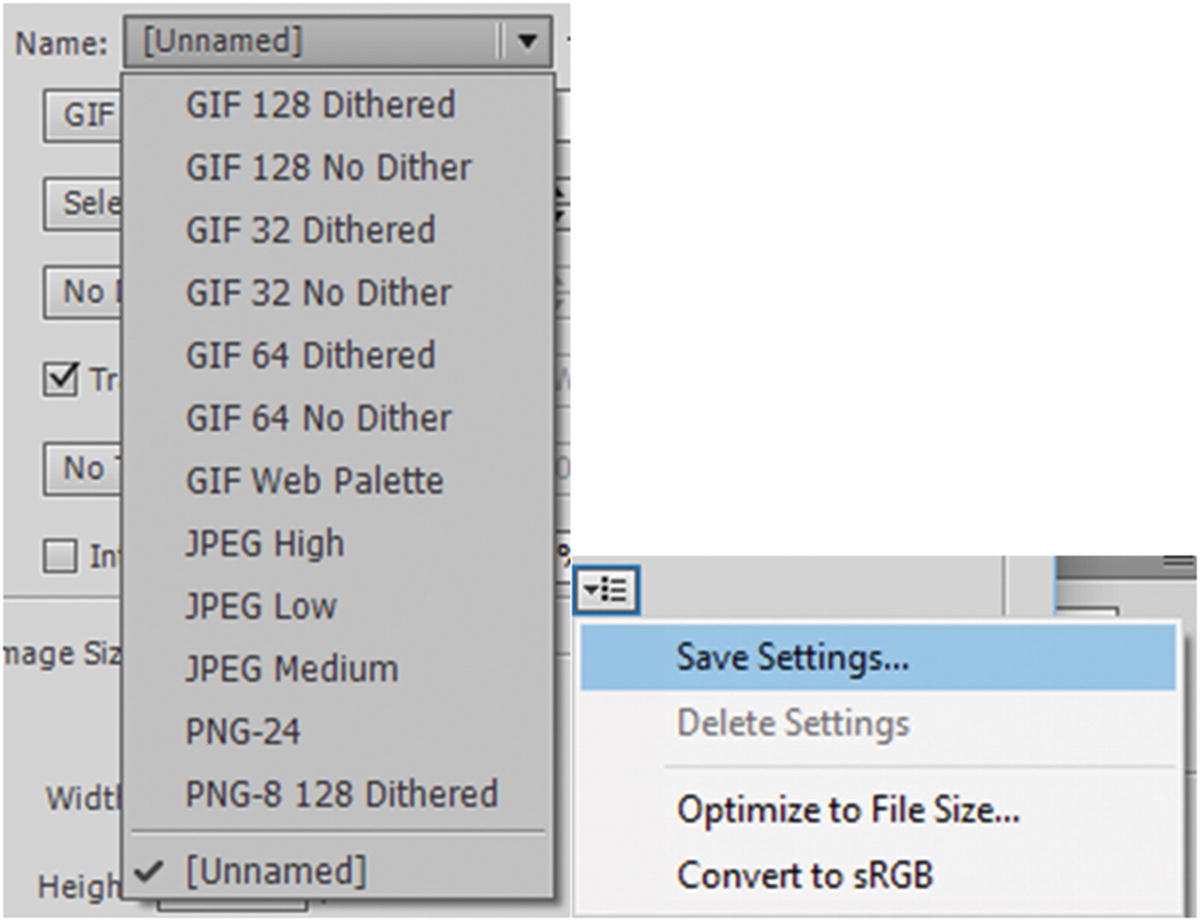
Presets found in the Export Image dialog box
You can save these settings and optimize your file size for raster images; however, if you want to save vector files, such as SVG, you need to look at either Option 2: Export Image (Legacy) or Option 6: Publish Settings for HTML5 Canvas. In Figure 22-4, Convert To sRGB ensures that all the colors are the correct web RGB format.
GIF
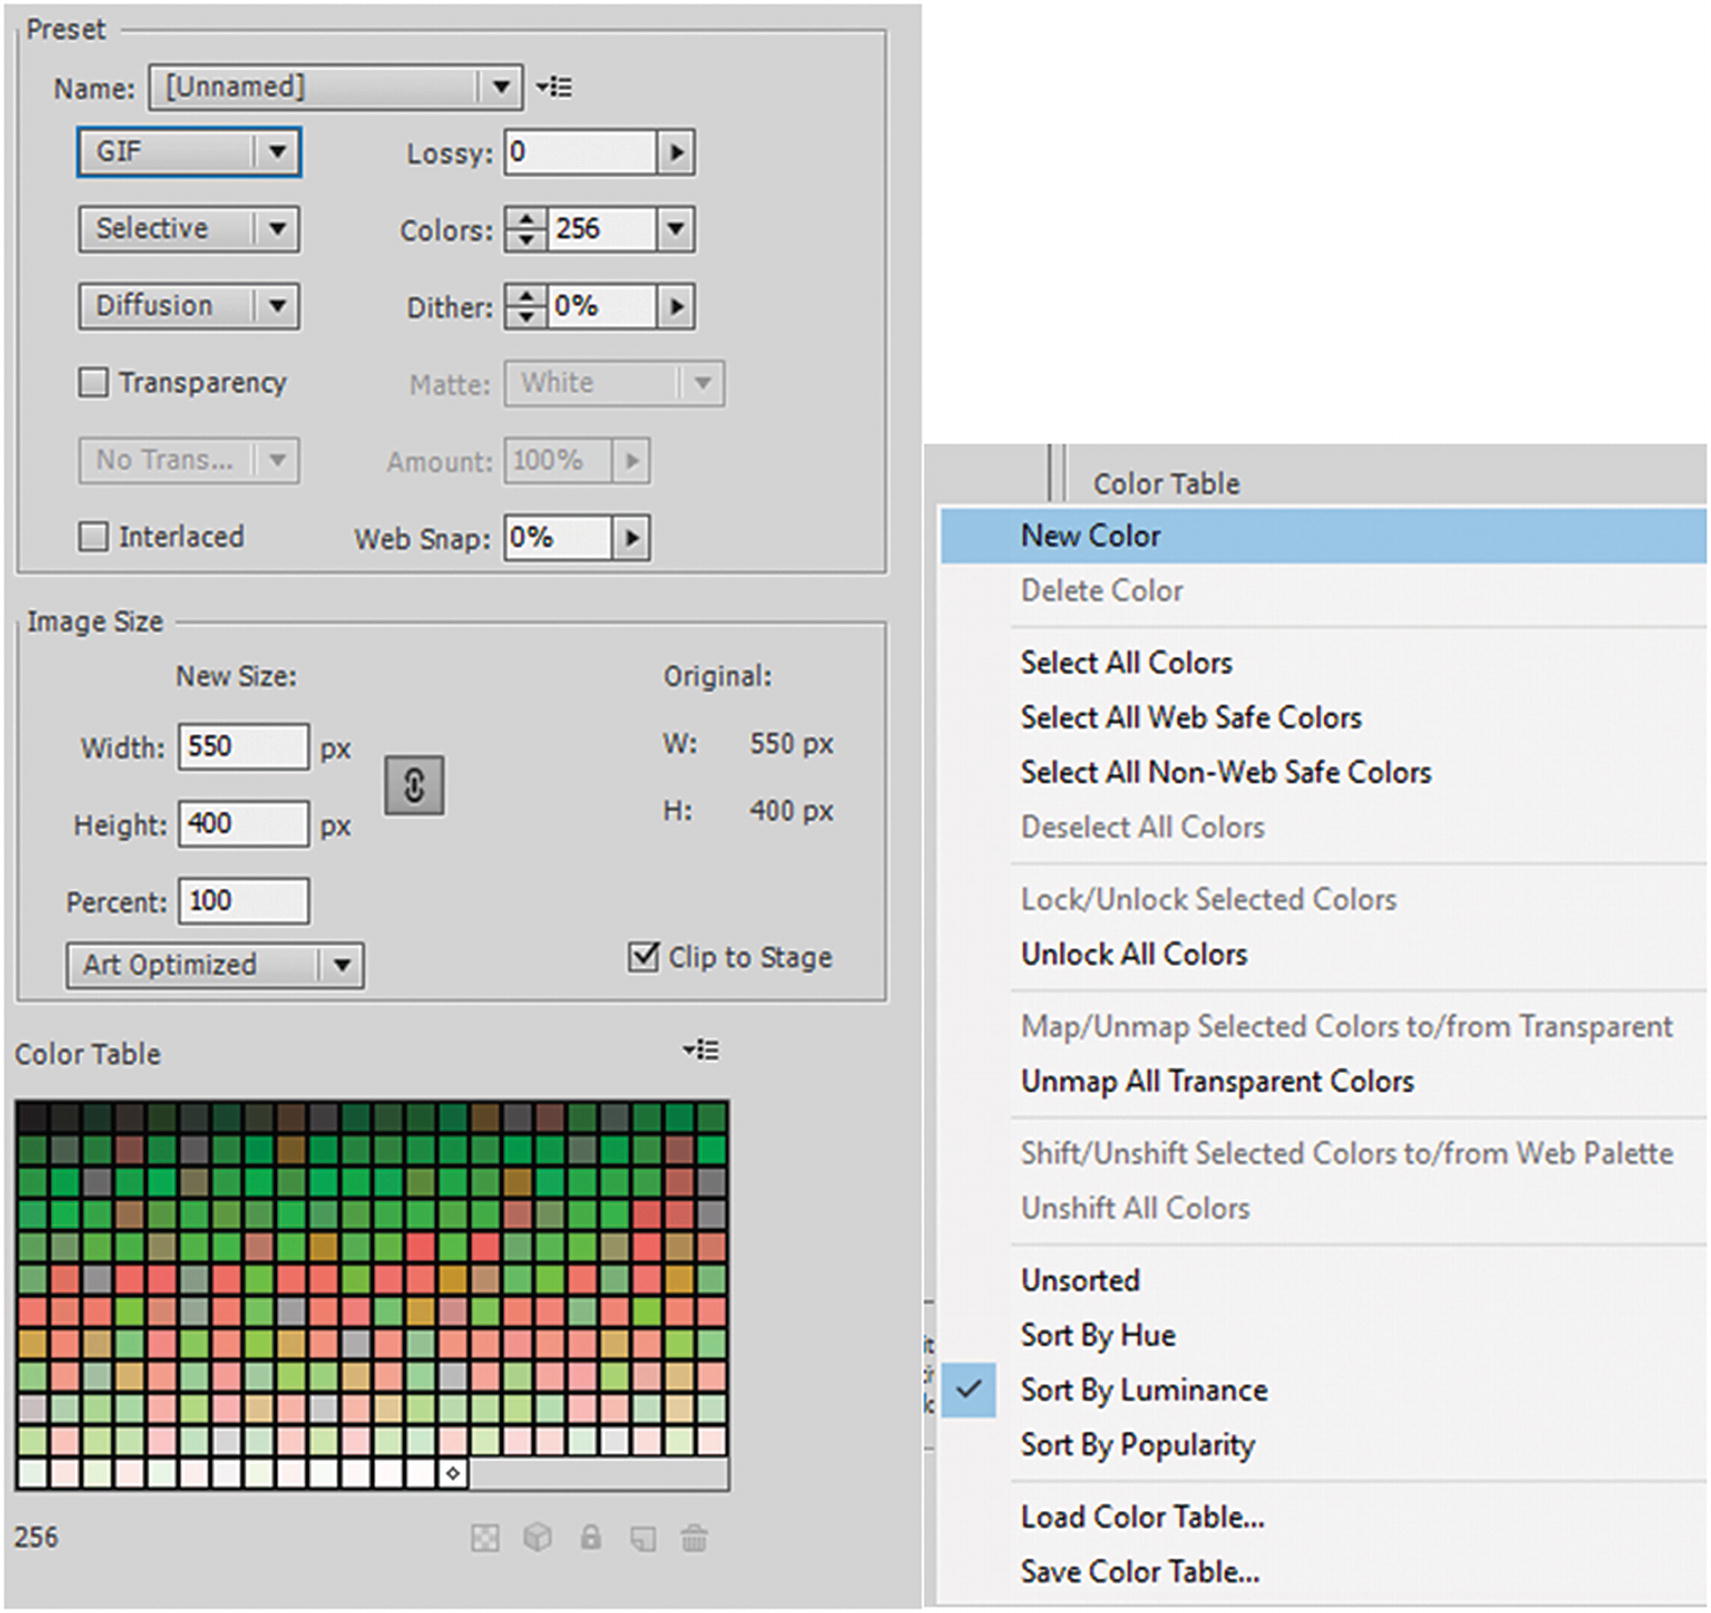
Settings for a static GIF image in the current frame
Most settings in the Preset area are the same as Photoshop CC and Illustrator CC’s Save for Web (Legacy), so refer to Chapters 4 and 12 for a more detailed explanation of items such as lossy and dither. You can set image size and anti-aliasing to None, Art Optimized, or Text Optimized.
Clip To Stage sets the clipping boundary to the stage rather than the smallest enclosing box or clipping box.
Color Table for GIF has the same settings as the dialog box in Photoshop CC; however, in this section there is no option for animation, which you can only acquire if you export as an animated GIF. The color table menu has options for how to add, delete, and sort the colors. You can also save or load color tables from here.
JPEG
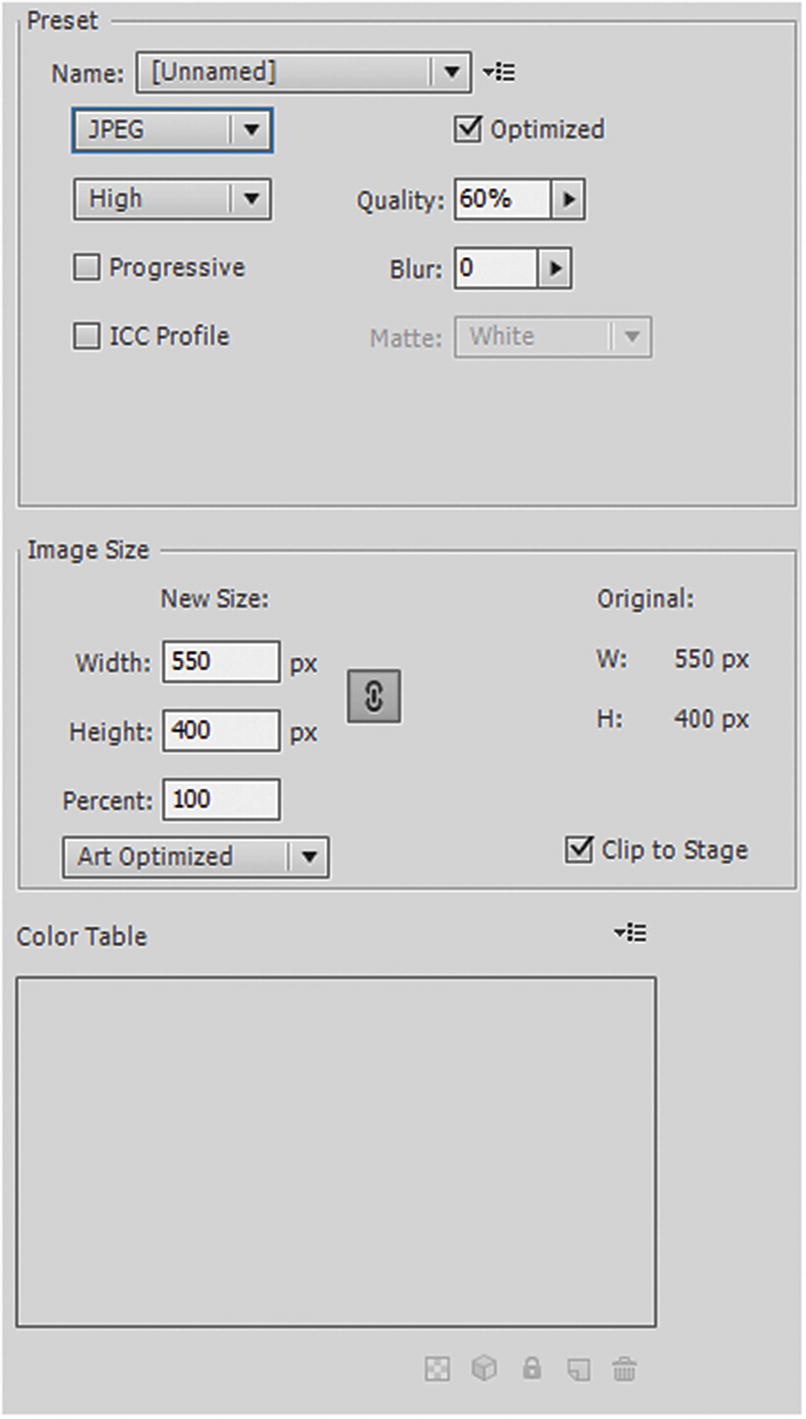
Settings for a JPEG image in the current frame
PNG-8 and PNG-24
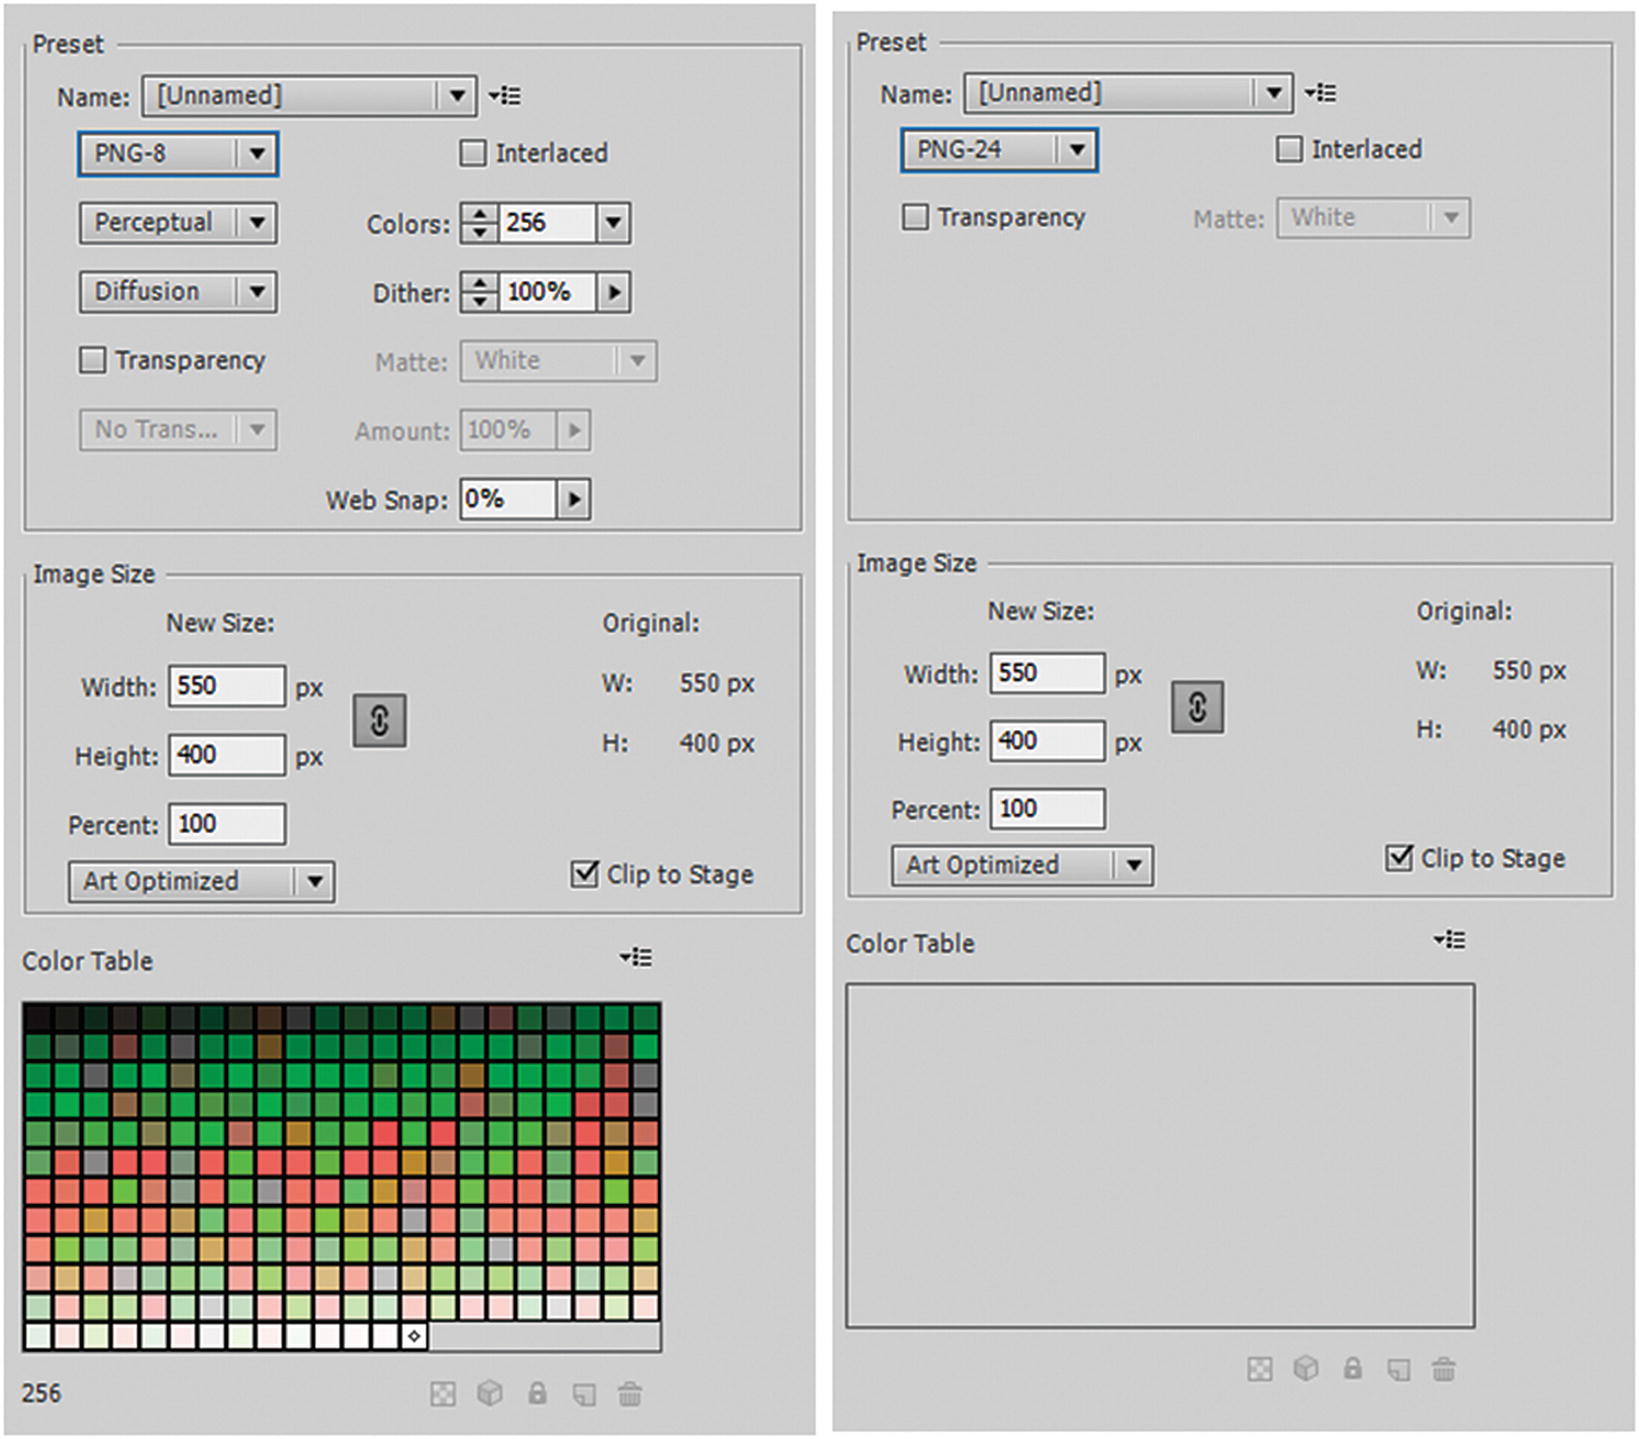
PNG-8 and PNG-24 settings for the image in the current frame

When you have chosen your setting for the current image, save your image
Option 2: File ➤ Export ➤ Export Image (Legacy)
Animate CC’s version of Export Image (Legacy) is a bit different from what you find in Photoshop CC or Illustrator CC, so for a beginner who is trying to navigate to the correct export options, this can be a bit confusing.
Export Image (Legacy) is similar to File ➤ Save as in Photoshop
SWF Movie (removed in CC 2019)
When Animate CC was called Flash, it was popular to create SWF movies; however, gradually the Internet has moved away from this option. SWF animations are processor intensive on some deceives, making SWF less popular, so it has been slowly falling out of favor. This option has been removed in the CC 2019 version, I do not recommend this option for your website because some browsers have stopped this file format from being viewed on the web.
JPEG
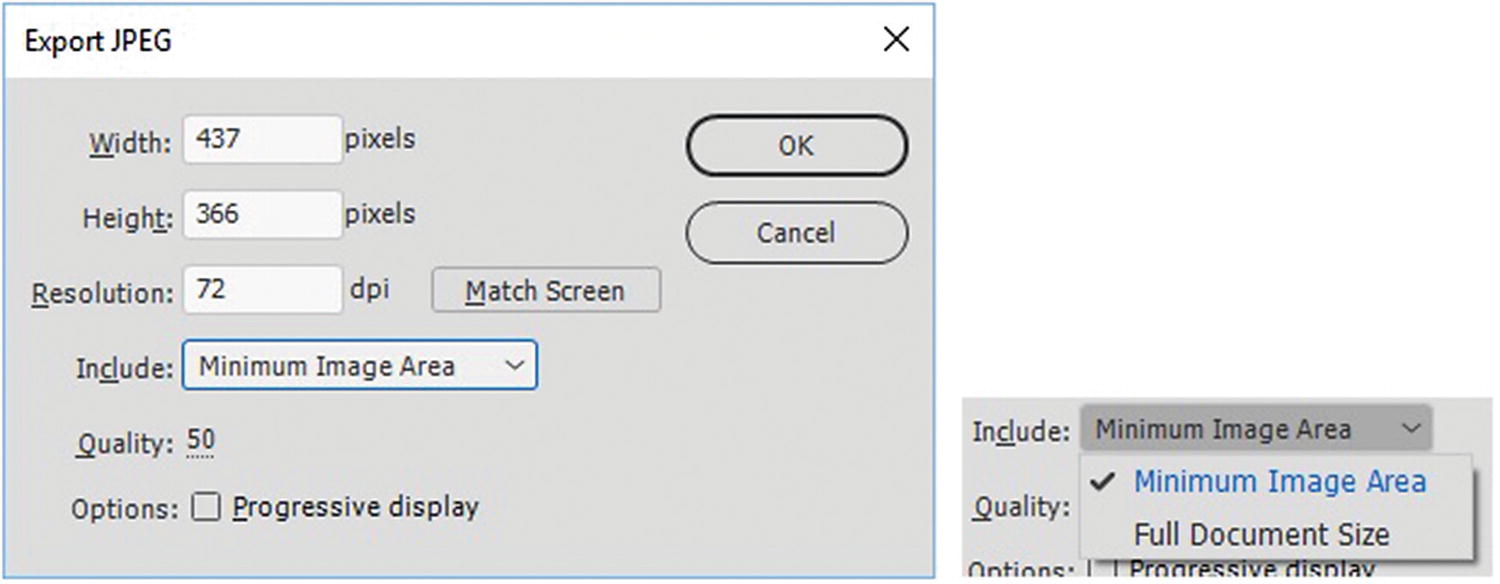
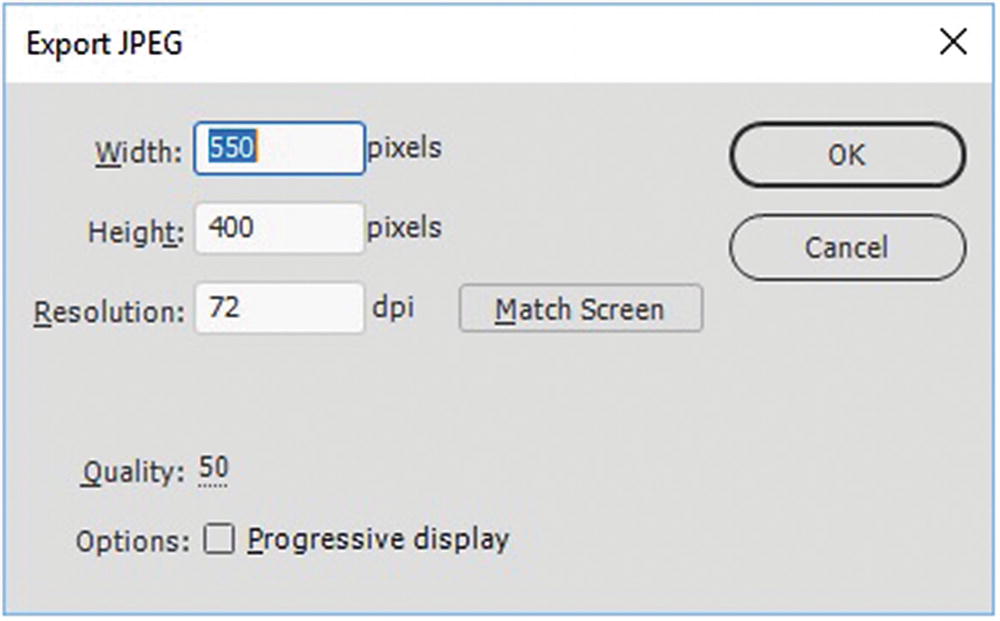
Export JPEG dialog box
If you need a resolution to be slightly higher for printed or PDF material in InDesign CC, you can adjust the resolution. For print work, 300 dpi is a good quality setting, although the file size is larger; however, in most cases for the Internet, you leave this at the default of 72 dpi. Doing so adjusts the width and the height as well. To reset, click Match Screen, which returns it to the default size.
In the Include drop-down menu, you can set the dimensions of the file to the minimum image area to decrease the size of the file or set to full document size. You can also adjust the quality from 0 to 100 and choose if you want a progressive display of the image as it loads. The default is to leave it unchecked.
GIF
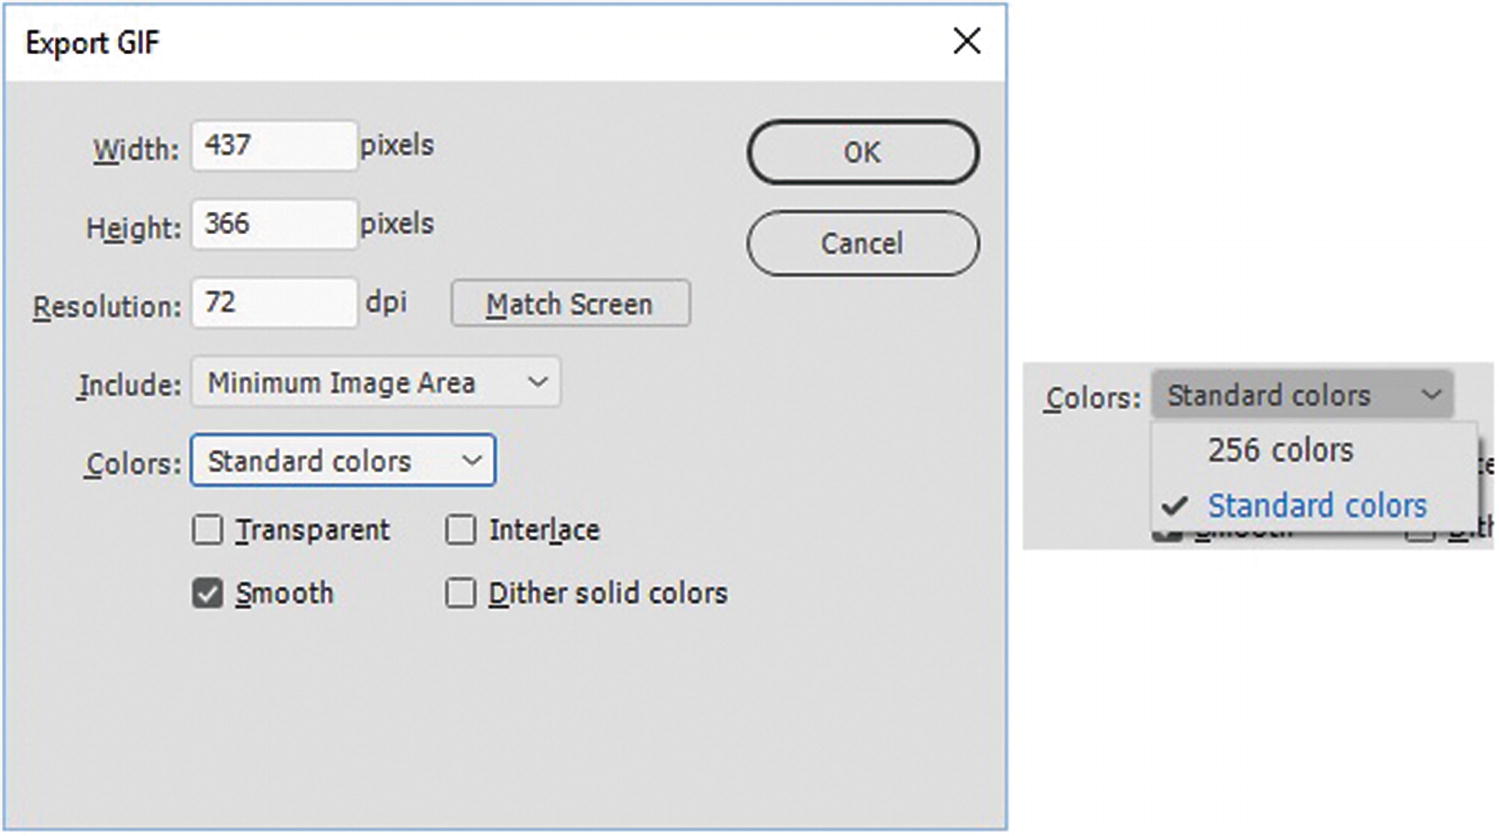
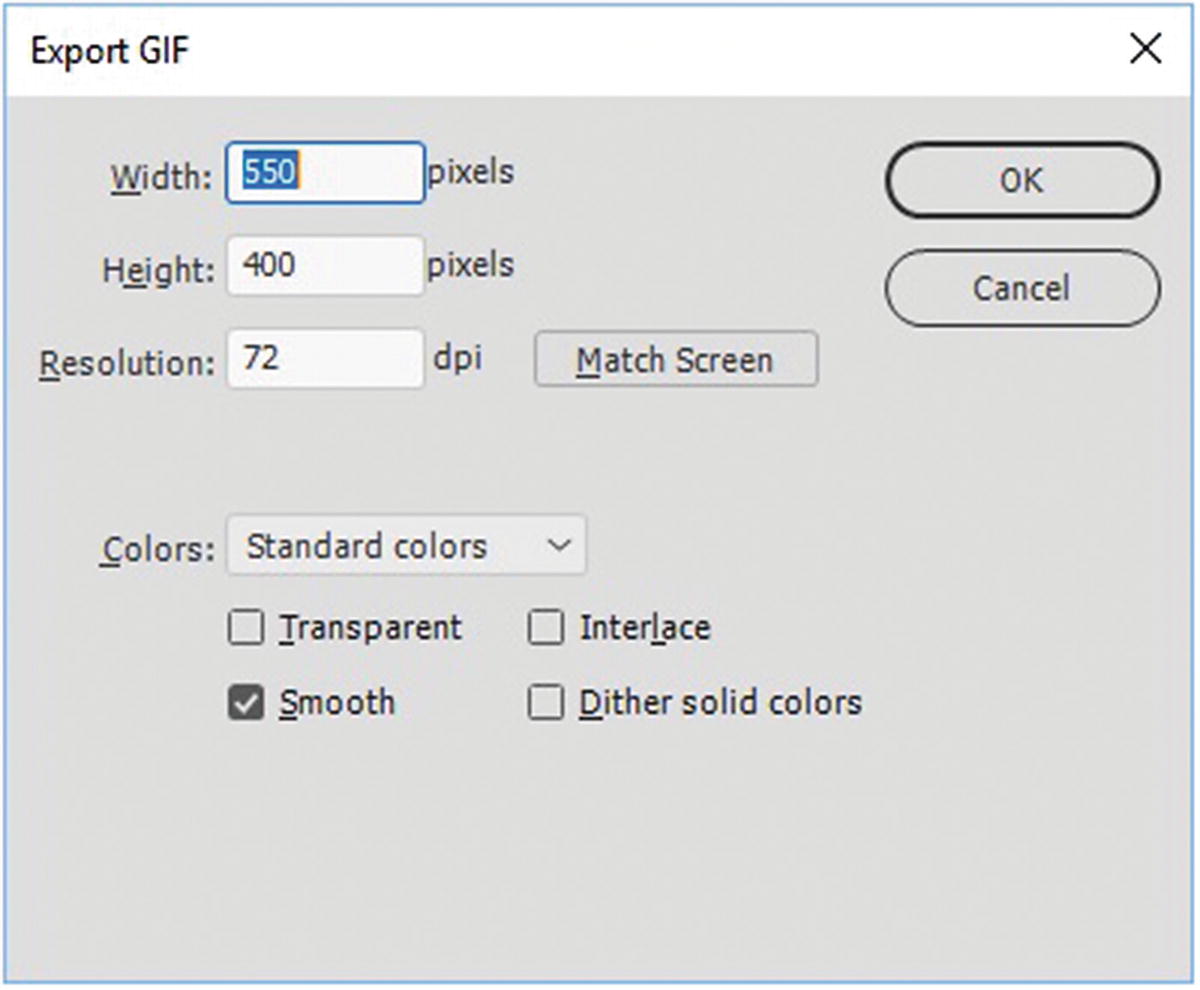
Export GIF dialog box
If you need a resolution to be slightly higher for some printed or PDF material in InDesign CC, you can adjust the resolution; this adjusts the width and the height as well. In most cases, however, a JPEG file is a better export option for print work. To reset the size, click Match Screen, which returns it to the default size. In the Include drop-down menu, you can set the dimensions of the file to either the minimum image area to decrease the size of the file or set to full document size. You can also adjust the colors to be standard or 256. Note in the Option 1 Export Image dialog box that you have greater control over the colors using the color table; however, you can still decide whether the background is transparent, interlace, or smooth, and whether to dither the solid colors in the image.
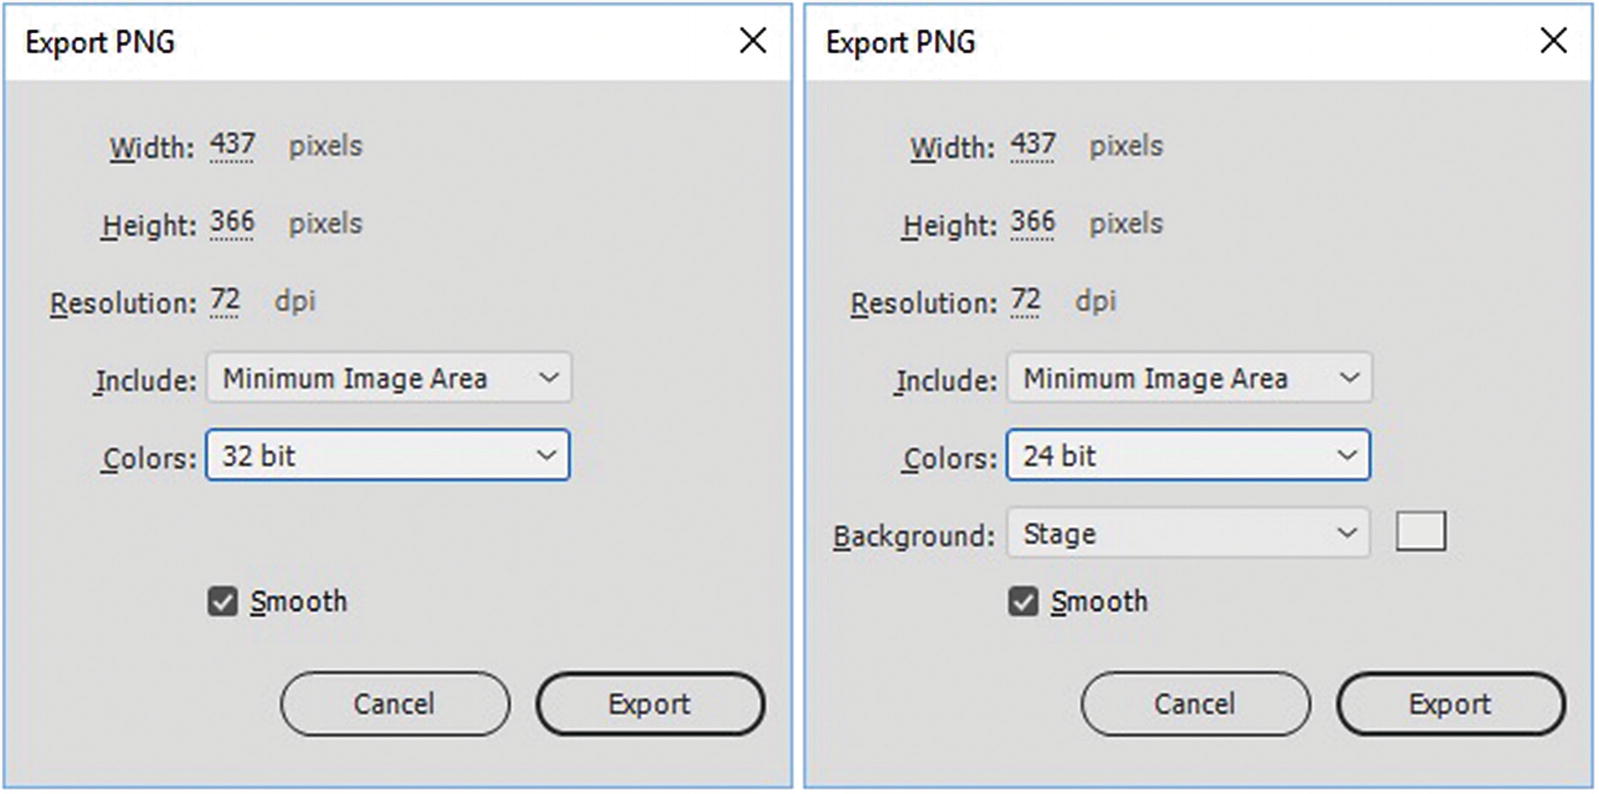
PNG
Export PNG dialog box for 8, 24, and 32 bit
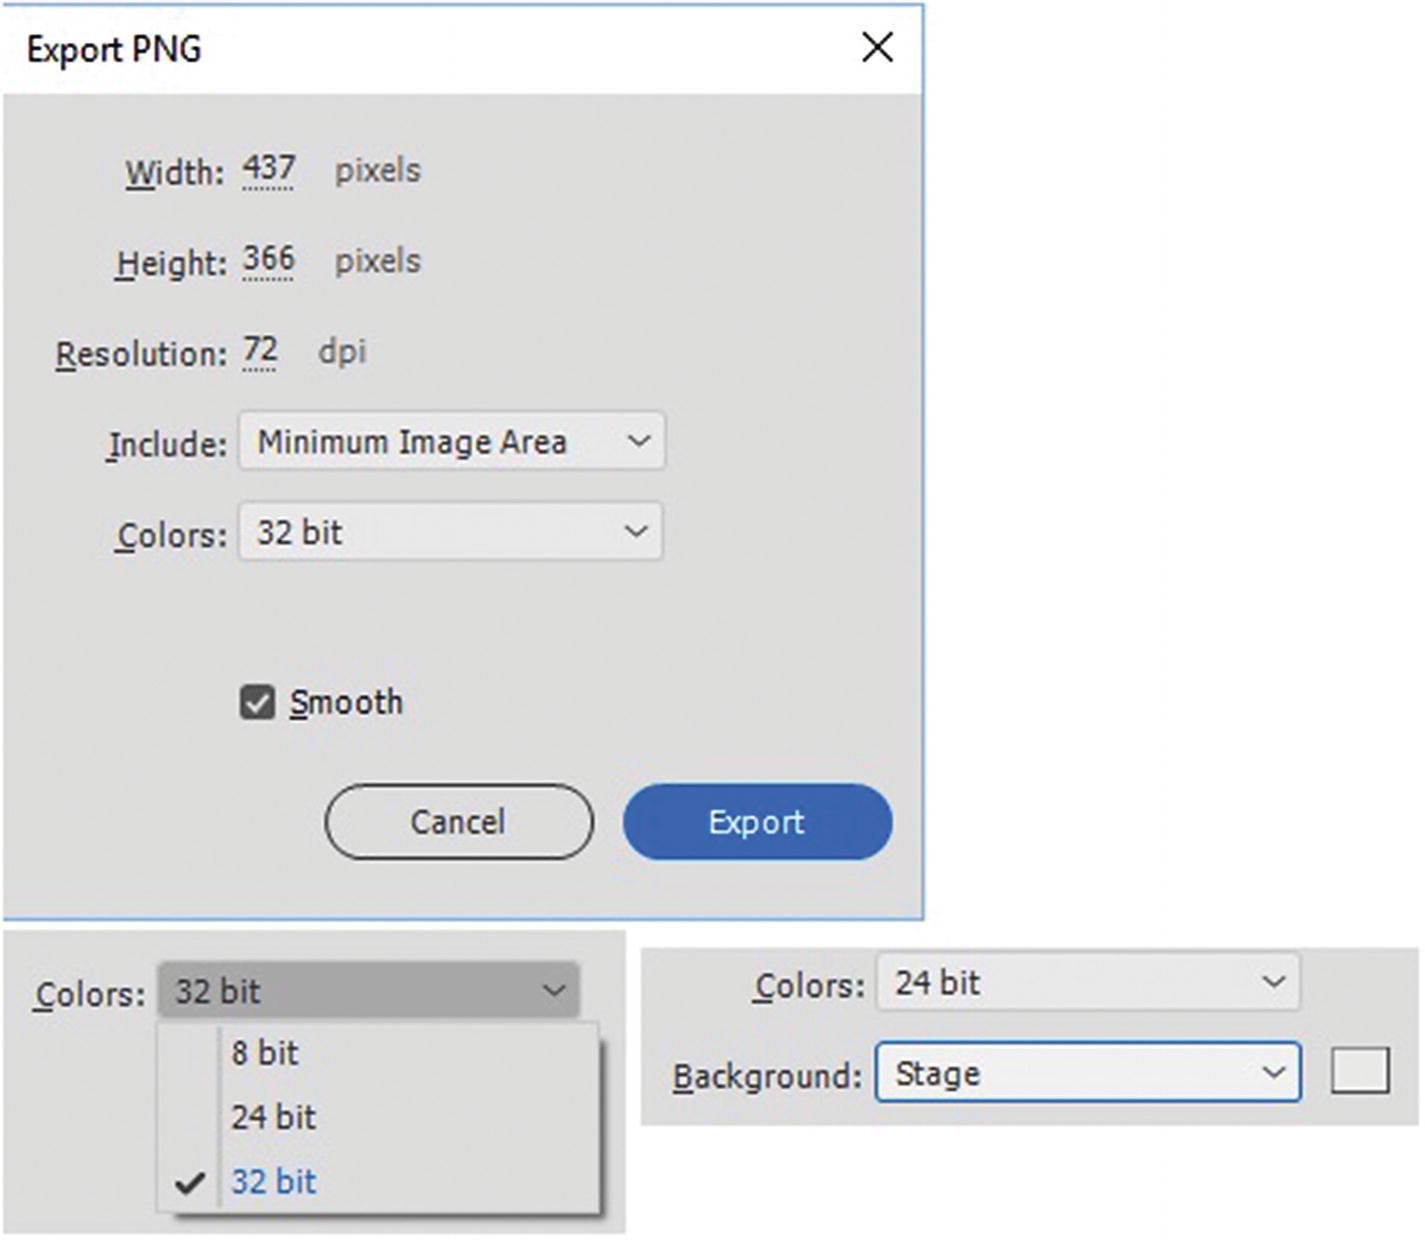
If you need a resolution to be slightly higher for some printed or PDF material in InDesign CC, you can adjust the resolution; this adjusts the width and the height as well. JPEG is usually the best file format for print material, but you can achieve some good results with PNG as well. In the Include drop-down menu, you can set the dimensions of the file to either the minimum image area to decrease the size of the file or set to full document size. You can also adjust the colors to be 8, 24, or 32 bit. You can set the background to stage or opaque (a color chosen from the color picker) for 8 and 24 bits.
In Option 1: Export Image dialog box, you have greater control over the colors using the color table; however, you can still decide whether to smooth the graphics or not.
SVG
Export SVG dialog box
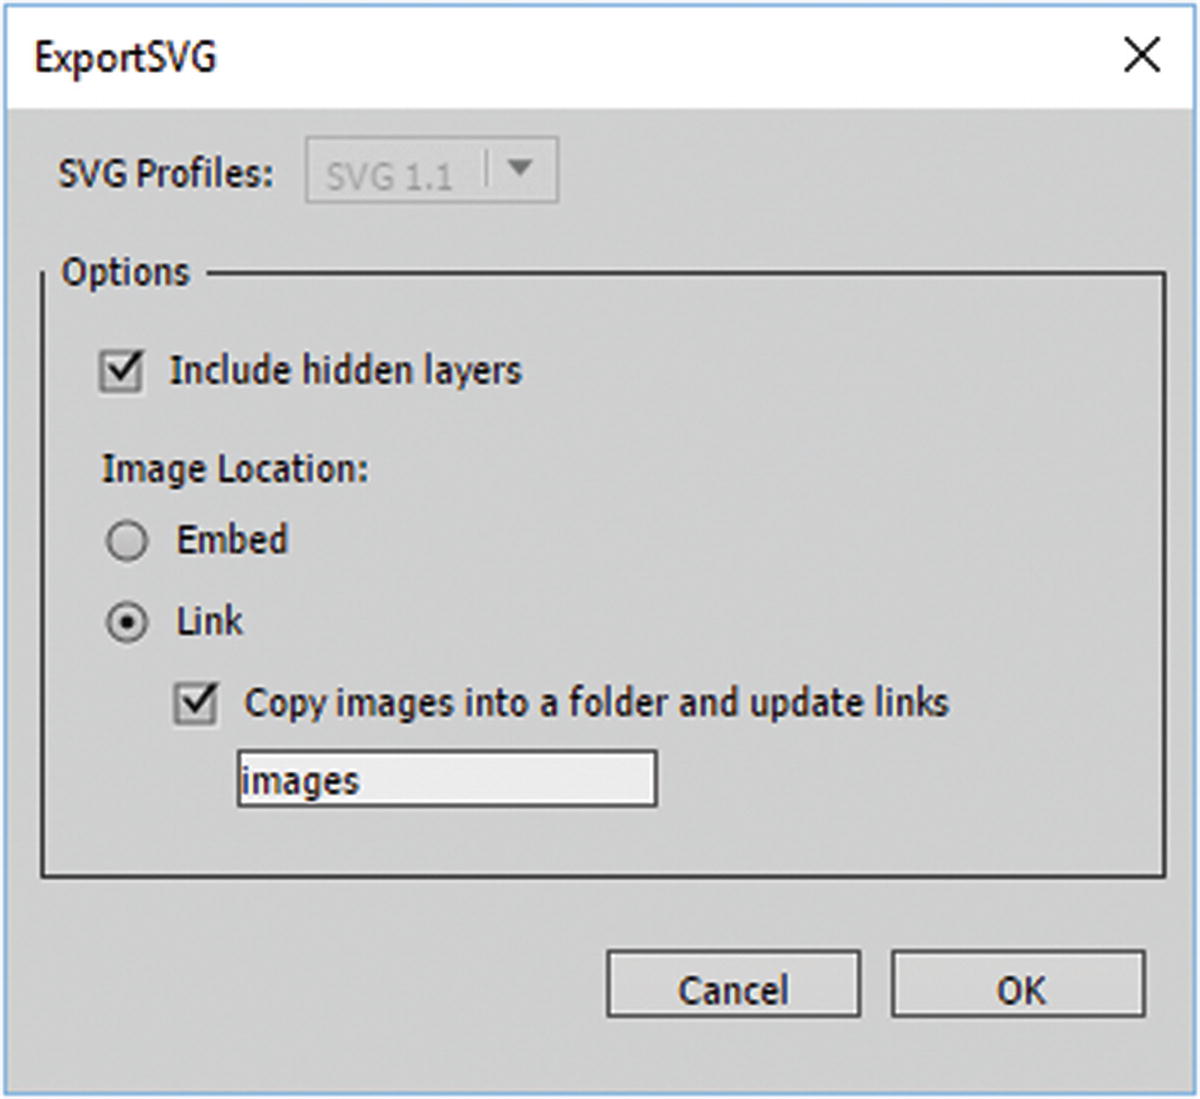
In Figure 22-13, you see that when you export an SVG. You can include or exclude hidden or turned off layers from your FLA file. The image location (non-SVG graphics within the file) can either be embedded or linked and placed into an image folder, or whatever name you choose for your project.
2D graphics uses X and Y coordinates
Can use JavaScript event handlers
Shapes (objects) can be changed and re-rendered
Not resolution dependent (scale and zoom in)
Best suited to large rendering areas like Google Maps; however, the rendering is slow if a complex DOM (Document Object Model)
Not for game applications, but can be used for some basic animations
Can use CSS3, XML, and JavaScript to animate an SVG
Like CSS3 animation transitions that use the <div> tag rather than <svg>, be aware that they may not always run in older browsers, so test first
For more information, visit https://en.wikipedia.org/wiki/SVG_animation and www.w3schools.com/graphics/svg_examples.asp .
Note
In the main menu of Animate CC, there are some commands that allow you to copy, export, or import the motion as an XML. If you plan to use this option for export, you need to select the first frame that has content. Refer to Figure 22-14.
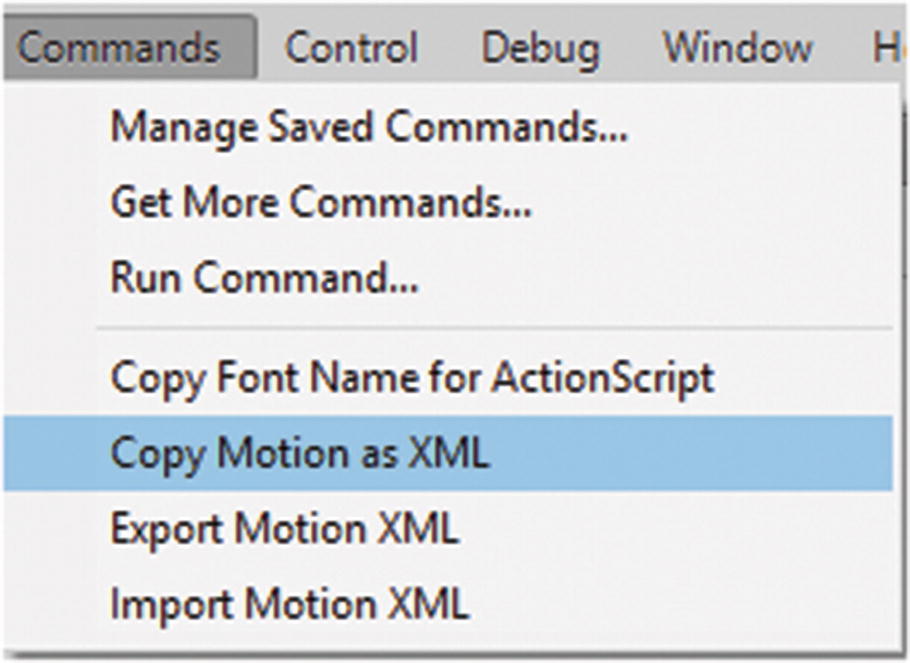
There are a few commands in the main menu that allow you to work with XML
This allows you to save that information as an XML file, which may be useful for SVG animations. You see what commands are in Chapter 23.
Option 3: File ➤ Export ➤ Export Movie
If you are working with frames that you plan to use to create a sequence in Photoshop or Premiere Pro for a movie, you can use this option to Export your files: File ➤ Export ➤ Export Movie.
File options for exporting image sequences for a movie
Note
There is no SVG sequence option.
SWF Movie
You can export a SWF movie if you plan to use it for a personal project on your computer; however, because some browsers no longer accept this format, I do not recommend using it for your website project.
JPEG
Export JPEG options for a sequence
When you click OK, it creates a sequence of images based on the number of frames in your animation; for example, 20 frames is 20 images. So, if you have a lot of frames, consider whether you want to use this option because there is not a range option here. Files export with the name and then a sequence, such as 001.jpg, 002.jpg, and so forth.
GIF
Export GIF options for a sequence
As with JPEG, clicking OK creates a sequence of images based on the number of frames in your animation. There is no setting for the range of the sequence; keep this in mind if you have many frames. Files export with the name and then a sequence such as 001.gif, 002.gif, and so forth. This is not the same as a GIF animation, as you see in Option 5.
PNG
Export PNG options for a sequence as 8, 24 or 32 bit
Clicking Export creates a sequence of images based on the number of frames in your animation. As with GIF and JPEG, there is no option to set the frame range. Files export with the name and then a sequence such as 001.png, 002.png, and so forth.
Option 4: File ➤ Export ➤ Export Video
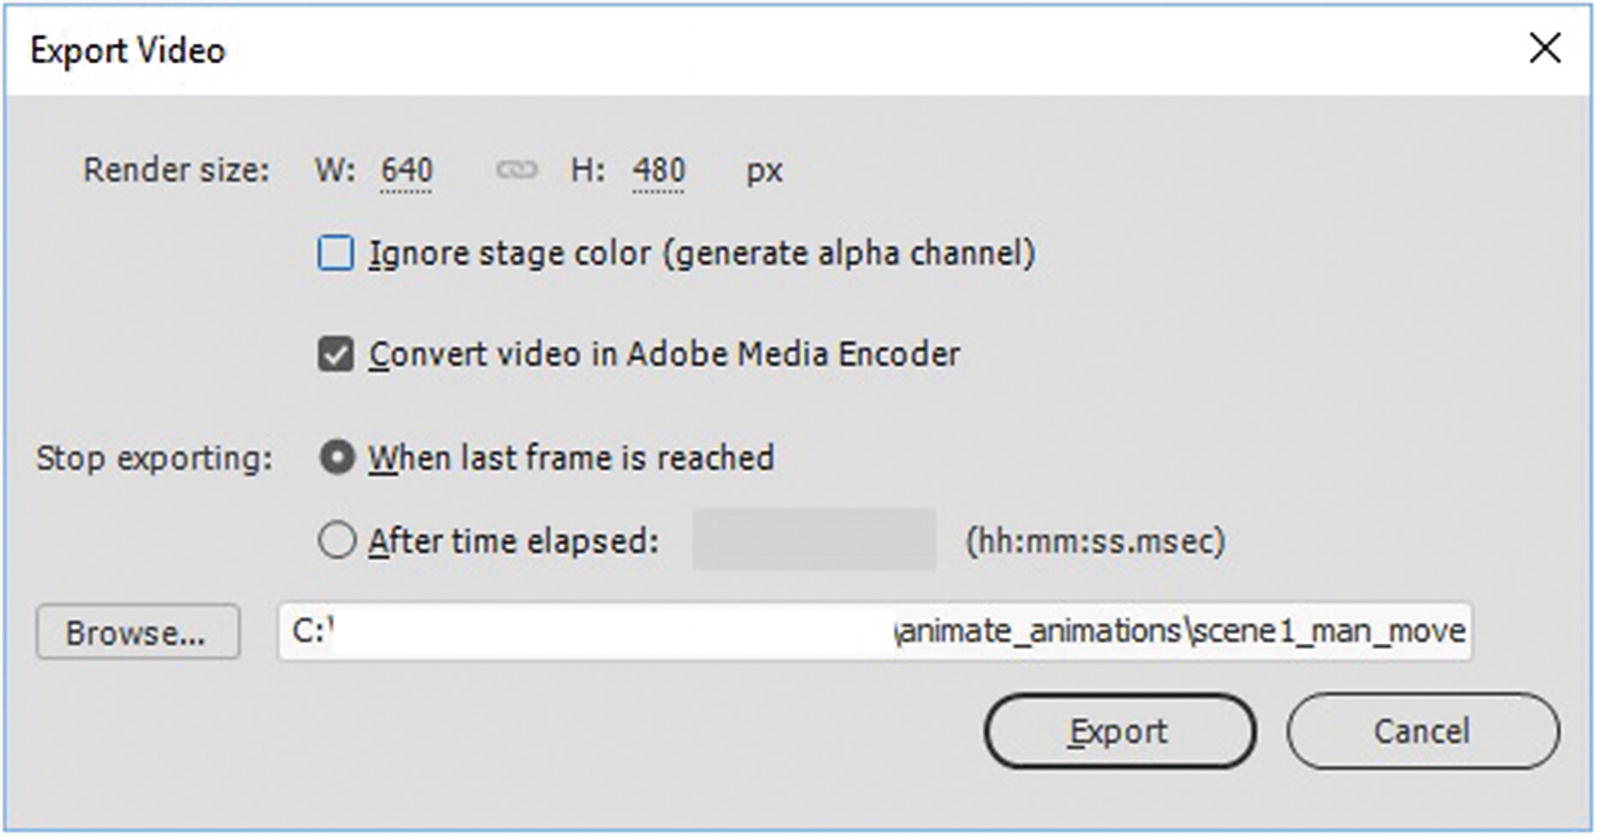
Export Video dialog box
This is great for Mac users who have the QuickTime viewer on their machines; however, if you’re a Windows PC user, you might not have this program. If you want to preview the video after export, don’t worry, Animate has a solution.
When you render a video for the web, you need to make sure that your video is a standard file size that is viewed in an HTML5 <video> tag. Secondly, when you begin creating your file, make sure that it is the correct frame rate—about 30 fps if it is later combined with footage of a similar frame rate. Your own projects may use a different frame rate, but remember consistency is important when combining files. In my project, I matched the frame rate of the FLA to what my other video camera files were. Remember, you don’t want to be adjusting frame rates after you create the animation since it is a headache to adjust frames afterward.
Upon export, you can choose to ignore stage color if you are using alpha channel. An alpha channel (like a green or blue screen) is important if you plan to export the video into Photoshop or Premiere Pro so that part of the video is transparent with a different background scenery added later; however, in most cases, you may want the background of your animation’s stage, so leave it unchecked. Make sure that Convert video in Adobe Media Encoder is checked.
This setting crucial if you are a Windows PC user. This automatically opens Media Encoder CC, which you look at in Part 5. Then you can convert your file to an MP4, which is what you want for your website and for your Photoshop Video Timeline, as seen in Chapters 7 and 9. While you can show MOV files on the web, it requires extra plug-ins. HTML5 video is a good option with modern browsers, so a video that is converted to MP4 is the clear choice. If the video is long and you only want to convert a section, you can set the Stop Export option to either when the last frame is reached (default) or after the time has elapsed.
Note
This option might be better for getting a range of frames in a sequence than Option 3. You can then bring the movie into a program like Photoshop and choose Flatten Frames to clips in the Timeline Video panel, then select the layers you need for your project. Refer to Chapter 7 to review this option.
Finally, locate the folder you want to save the file in and click Export. Give Adobe Media Encoder CC time to open and do the rendering, and then you can adjust your final MP4 settings there. You look at this software in Part 5.
Tips for Controlling the Audio in Video When Exporting to MOV
Be aware that during export, if your animation contains audio, there may be times when the sound is not in sync. When creating a video animation in Animate or Premiere Pro, if you only have background music, you can set the sound to stream on the first frame. Do not use Event on the first frame because the sound may not copy.
In adding speech, you may need to set the sound as Event either on the second frame or a few frames into the video; otherwise, the sounds may not sync with the mouth movements. Creating an animated video takes practice. A good rule to remember is to always render then test your video a few times before you upload to your site.
While short animations of a few seconds are rather small when they render as MOV files, if your animation has a lot of filters or bitmap graphics, it might be best to render your files on an external drive. Please refer to Chapters 7 and 9 if you need to know how to accomplish this.
Option 5: File ➤ Export ➤ Export Animated GIF
Refer to the flower_stock2.fla file.
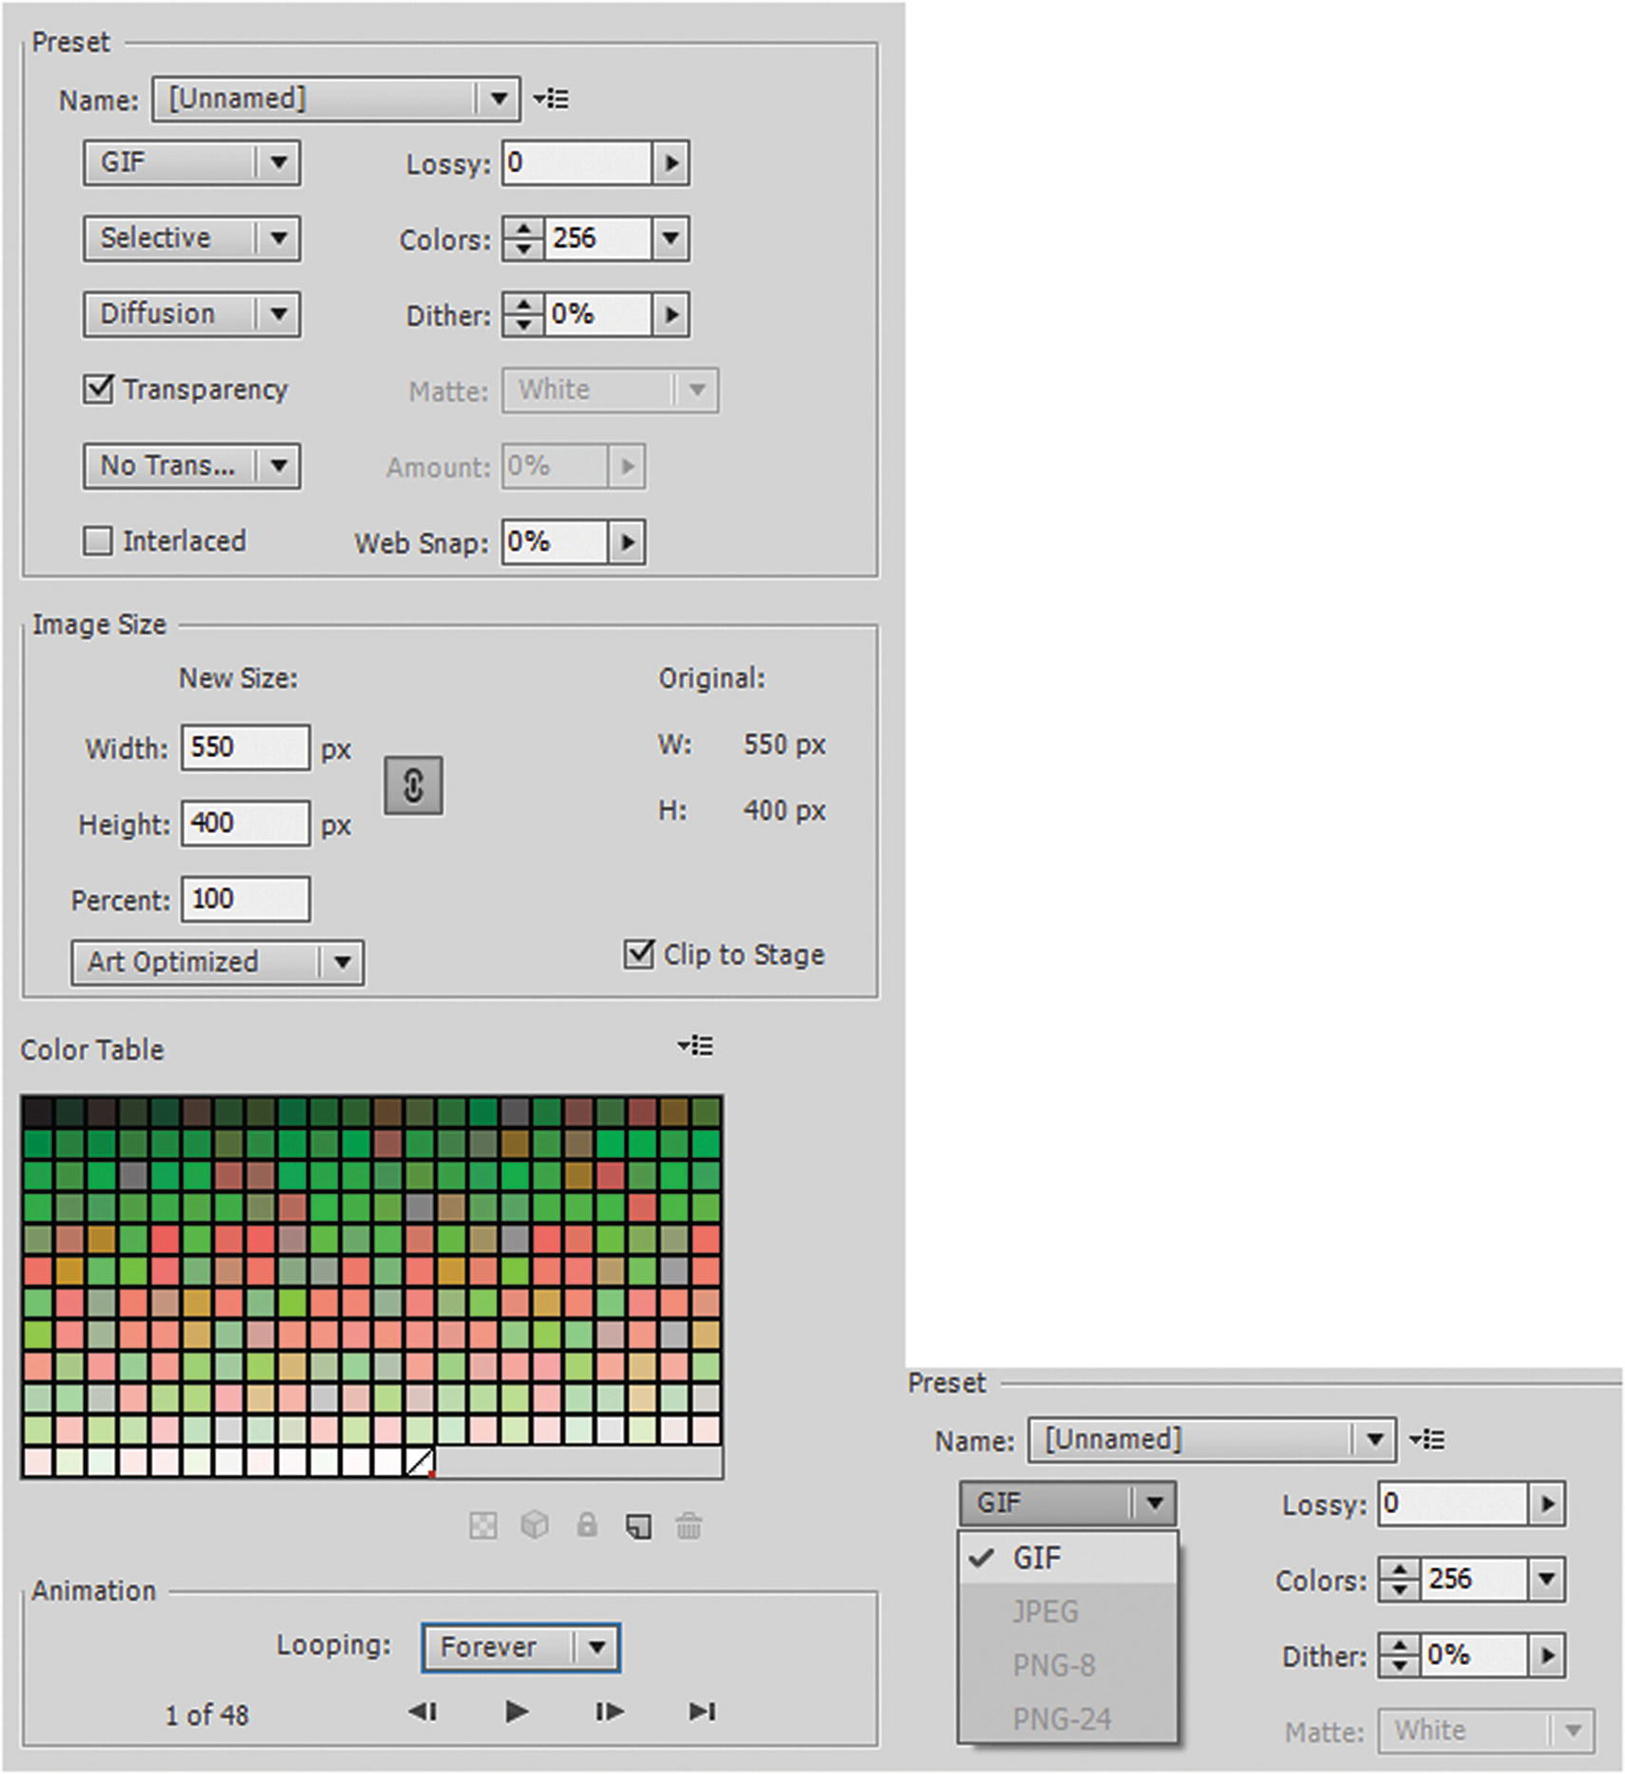
When creating a GIF animation, you have the option of controlling the looping of the animation
The Animation settings allow use to preview the animation before export using the previous frame, play/stop, next, and last frame controls. You can then set the looping to once or forever, and click Save to export your file.
Note
You cannot set the loop to a certain number of times, as you can in Photoshop CC. If this is a concern, a work-around is to convert a copy of the FLA file to an ActionScript 3.0 and use the File ➤ Publish Settings to choose GIF Image from the list of possible published files, as you will see in Option 6.

Graphic animation of moving stem; note how the nested stem animation on the left does not animate in the GIF however when the animation is placed on the main stage on the right then it animates
Personally, I would work with Options 4 or 6 for a nested animation, so as to not destroy the original work; but it’s good to know there is a work-around for GIF animations.
Regardless of which options you choose, an animated GIF does not contain audio, so any audio that your file contains does not copy over during the export. If you want to retain your audio, it is better to export your file as a MOV video that becomes an MP4 video file, or save your file as an HTML5 Canvas, which you look at next.
Option 6: File ➤ Publish Settings HTML5 Canvas
The final option that you look at is how to Publish an HTML5 Canvas. If you are working with an ActionScript 3.0 FLA file that you intend to make into a movie, then use Option 4.
Animate CC is about animation. It can save you the time and labor of plotting out the movements of each object. As a web designer and JavaScript programmer, while I like the analytical side of my work, I really like the design part more. I would rather use my imagination creating action and adventures for my characters than plotting out each point mathematically. So, if you like Animate, hopefully you feel the same way I do about design.
To create, work, and access the Publish Settings of an HTML5 Canvas file, you need to convert the ActionScript 3.0 FLA to an HTML5 Canvas FLA using File ➤ Convert to, or in File ➤ New choose an HTML5 Canvas FLA. Remember HTML5 Canvas does not have all the options as an ActionScript 3.0 FLA, because JavaScript has not caught up to all animation blending and sound options. Nevertheless, it can be a very powerful tool on the web for creating an intro page for your website with sound and interactivity that you can continue to edit in Dreamweaver CC.
In Chapter 17, you learned a bit about HTML5 Canvas; refer to that chapter if you need to review this information. You don’t need to use Animate CC to create a canvas or a canvas animation; much of it you can do by hand if you have the skills in Dreamweaver. I show you how to create a basic static canvas in Part 6.
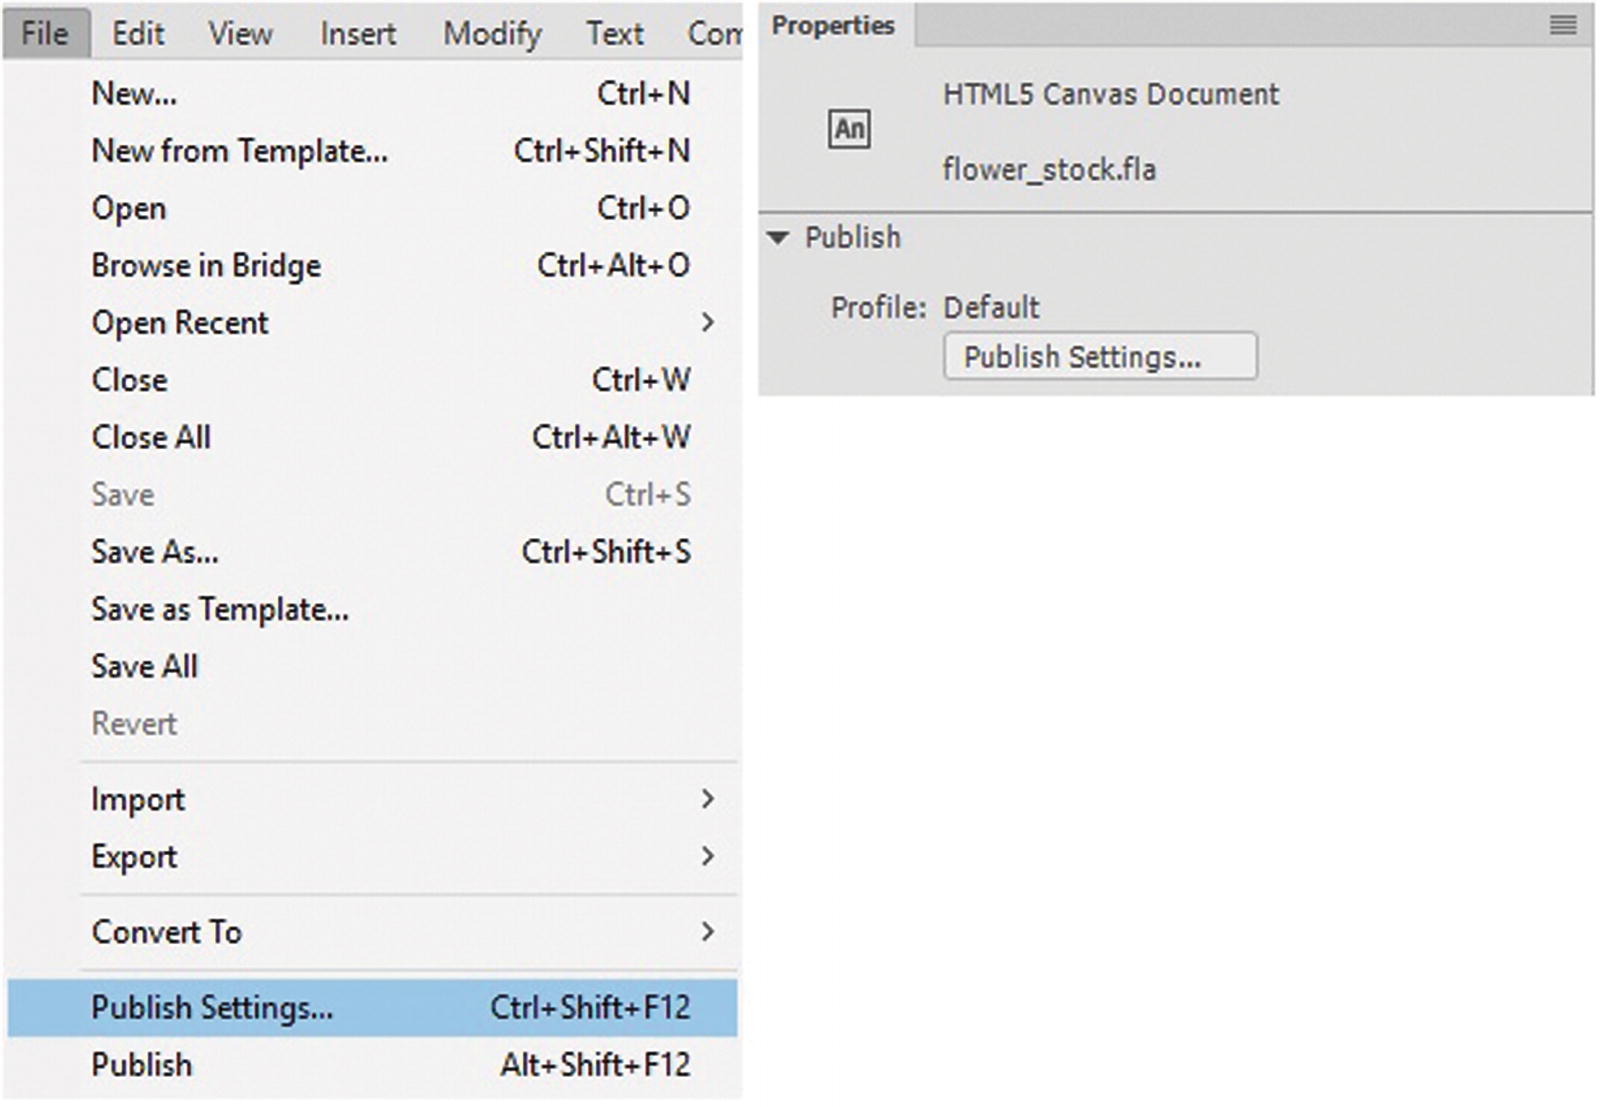
Choose Publish Settings either from the File menu or the Properties panel
Publish Settings
In the Publish Settings dialog box, you find several tabs in which you can adjust your settings before publishing the canvas.
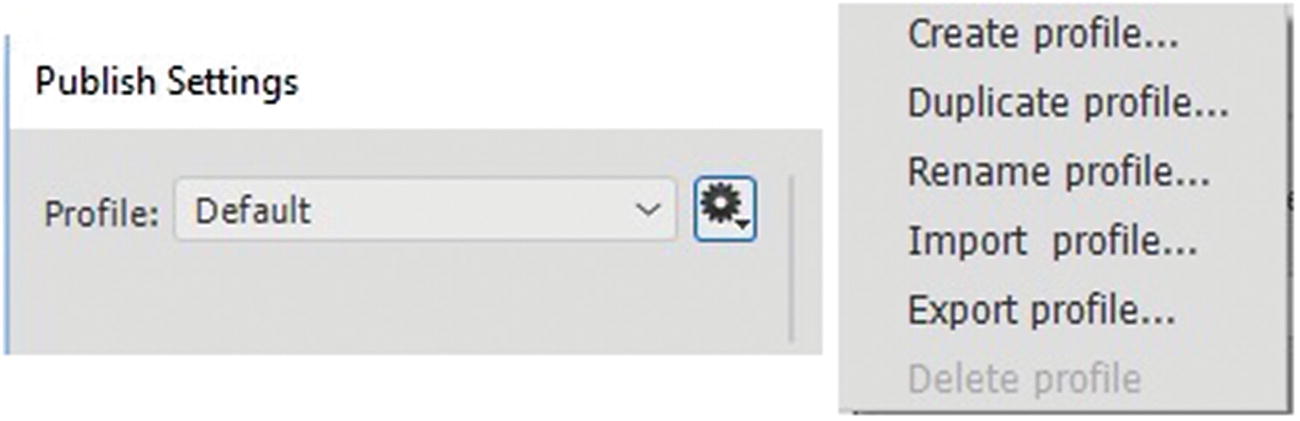
Create your own custom profile settings
In the JavaScript/HTML section, there are four tabs (Basic, HTML/JS, Image Settings, and Web Fonts). There are also three other additional tabs or other formats (JPEG image, OAM package, and SVG Image). Let’s look at each of these in order. The following items only publish if their respective check box is enabled.
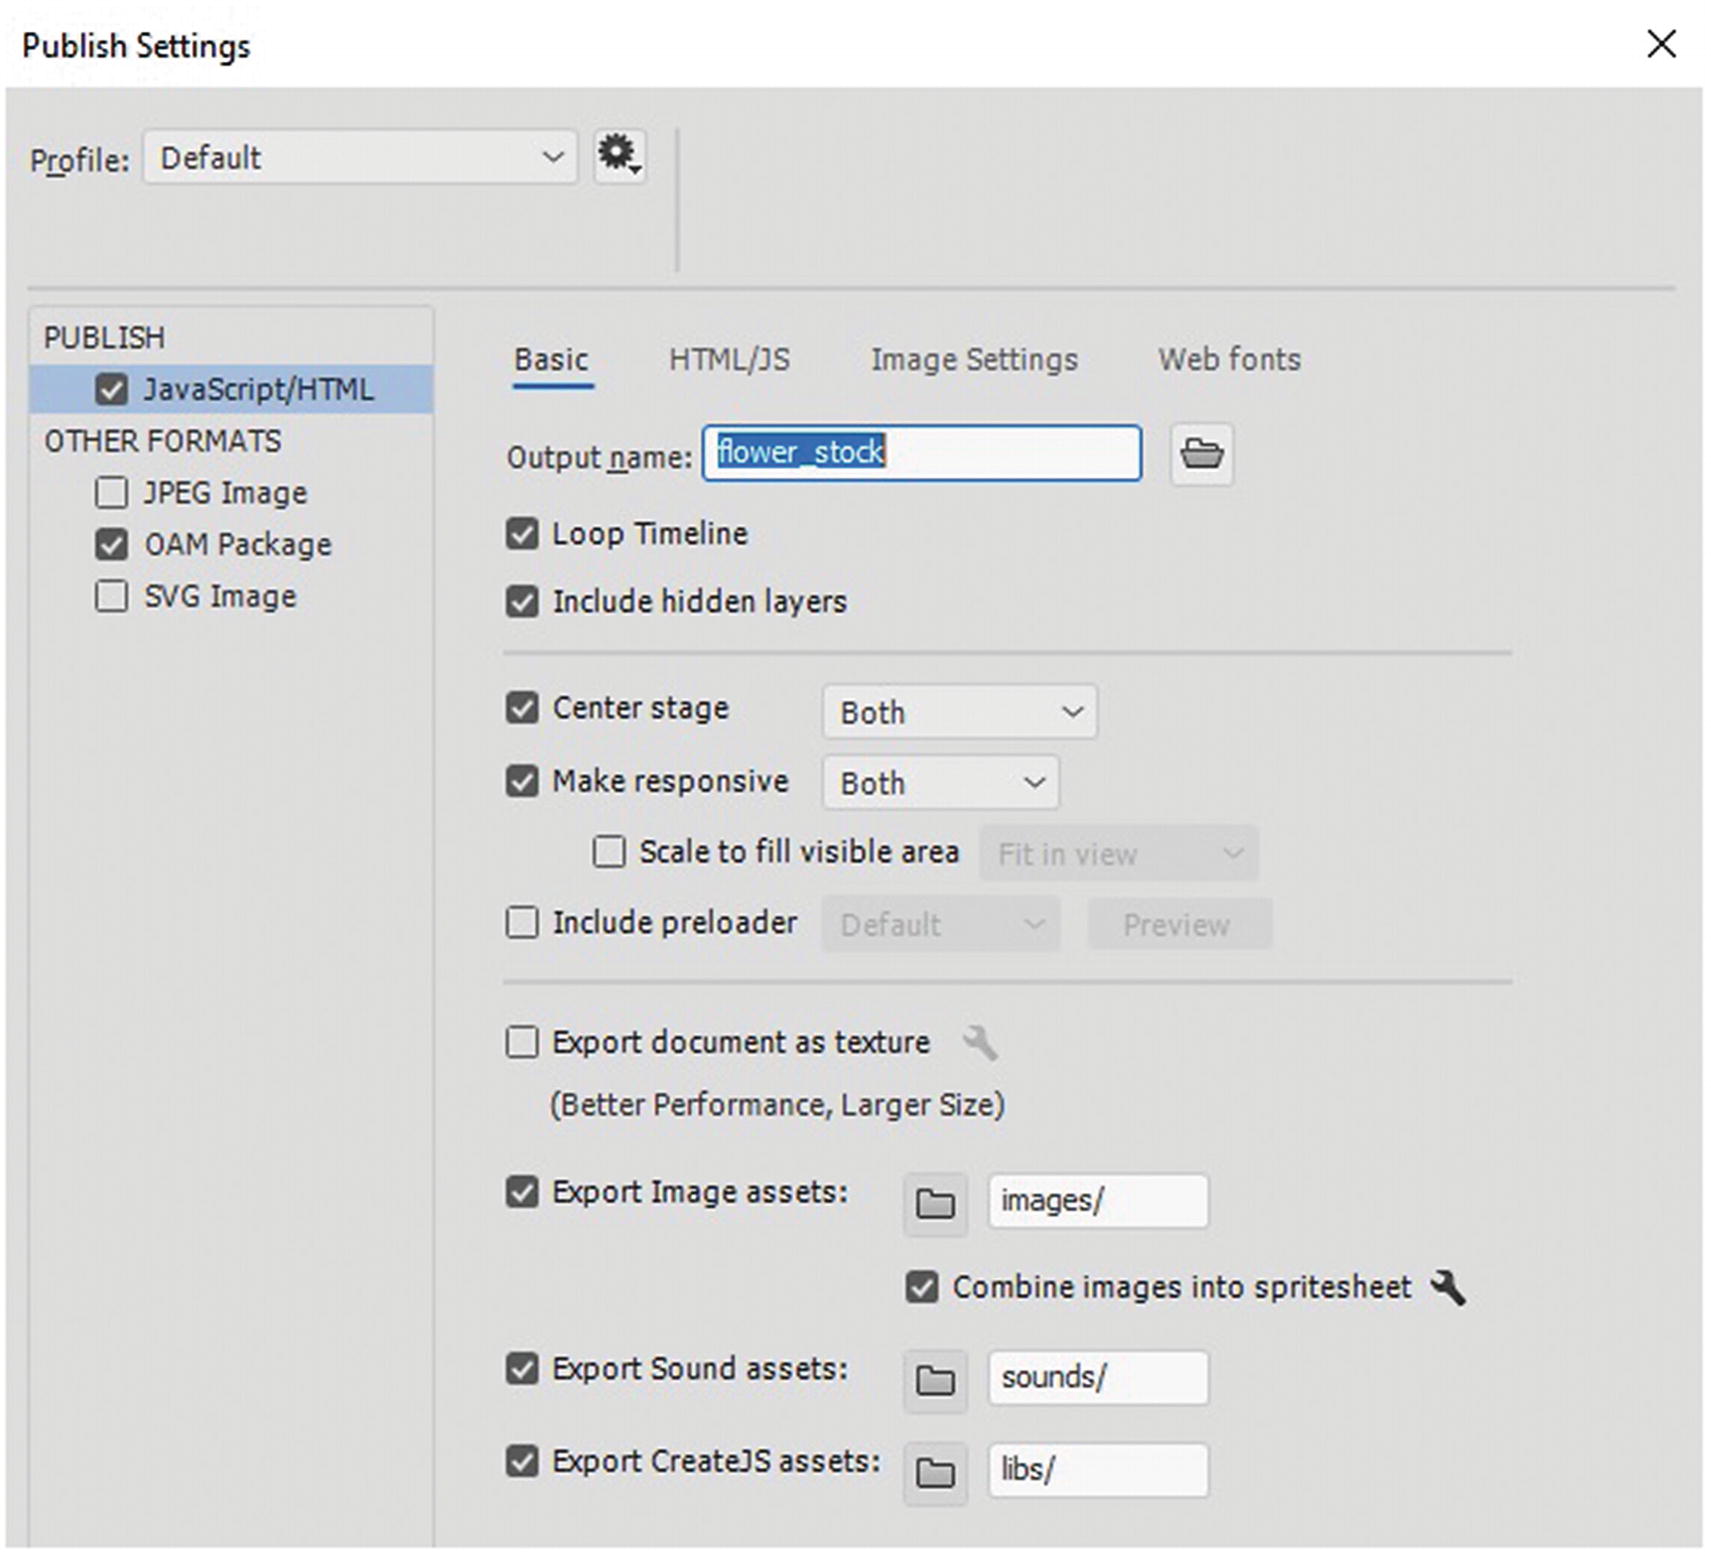
JavaScript/HTML Basic Tab
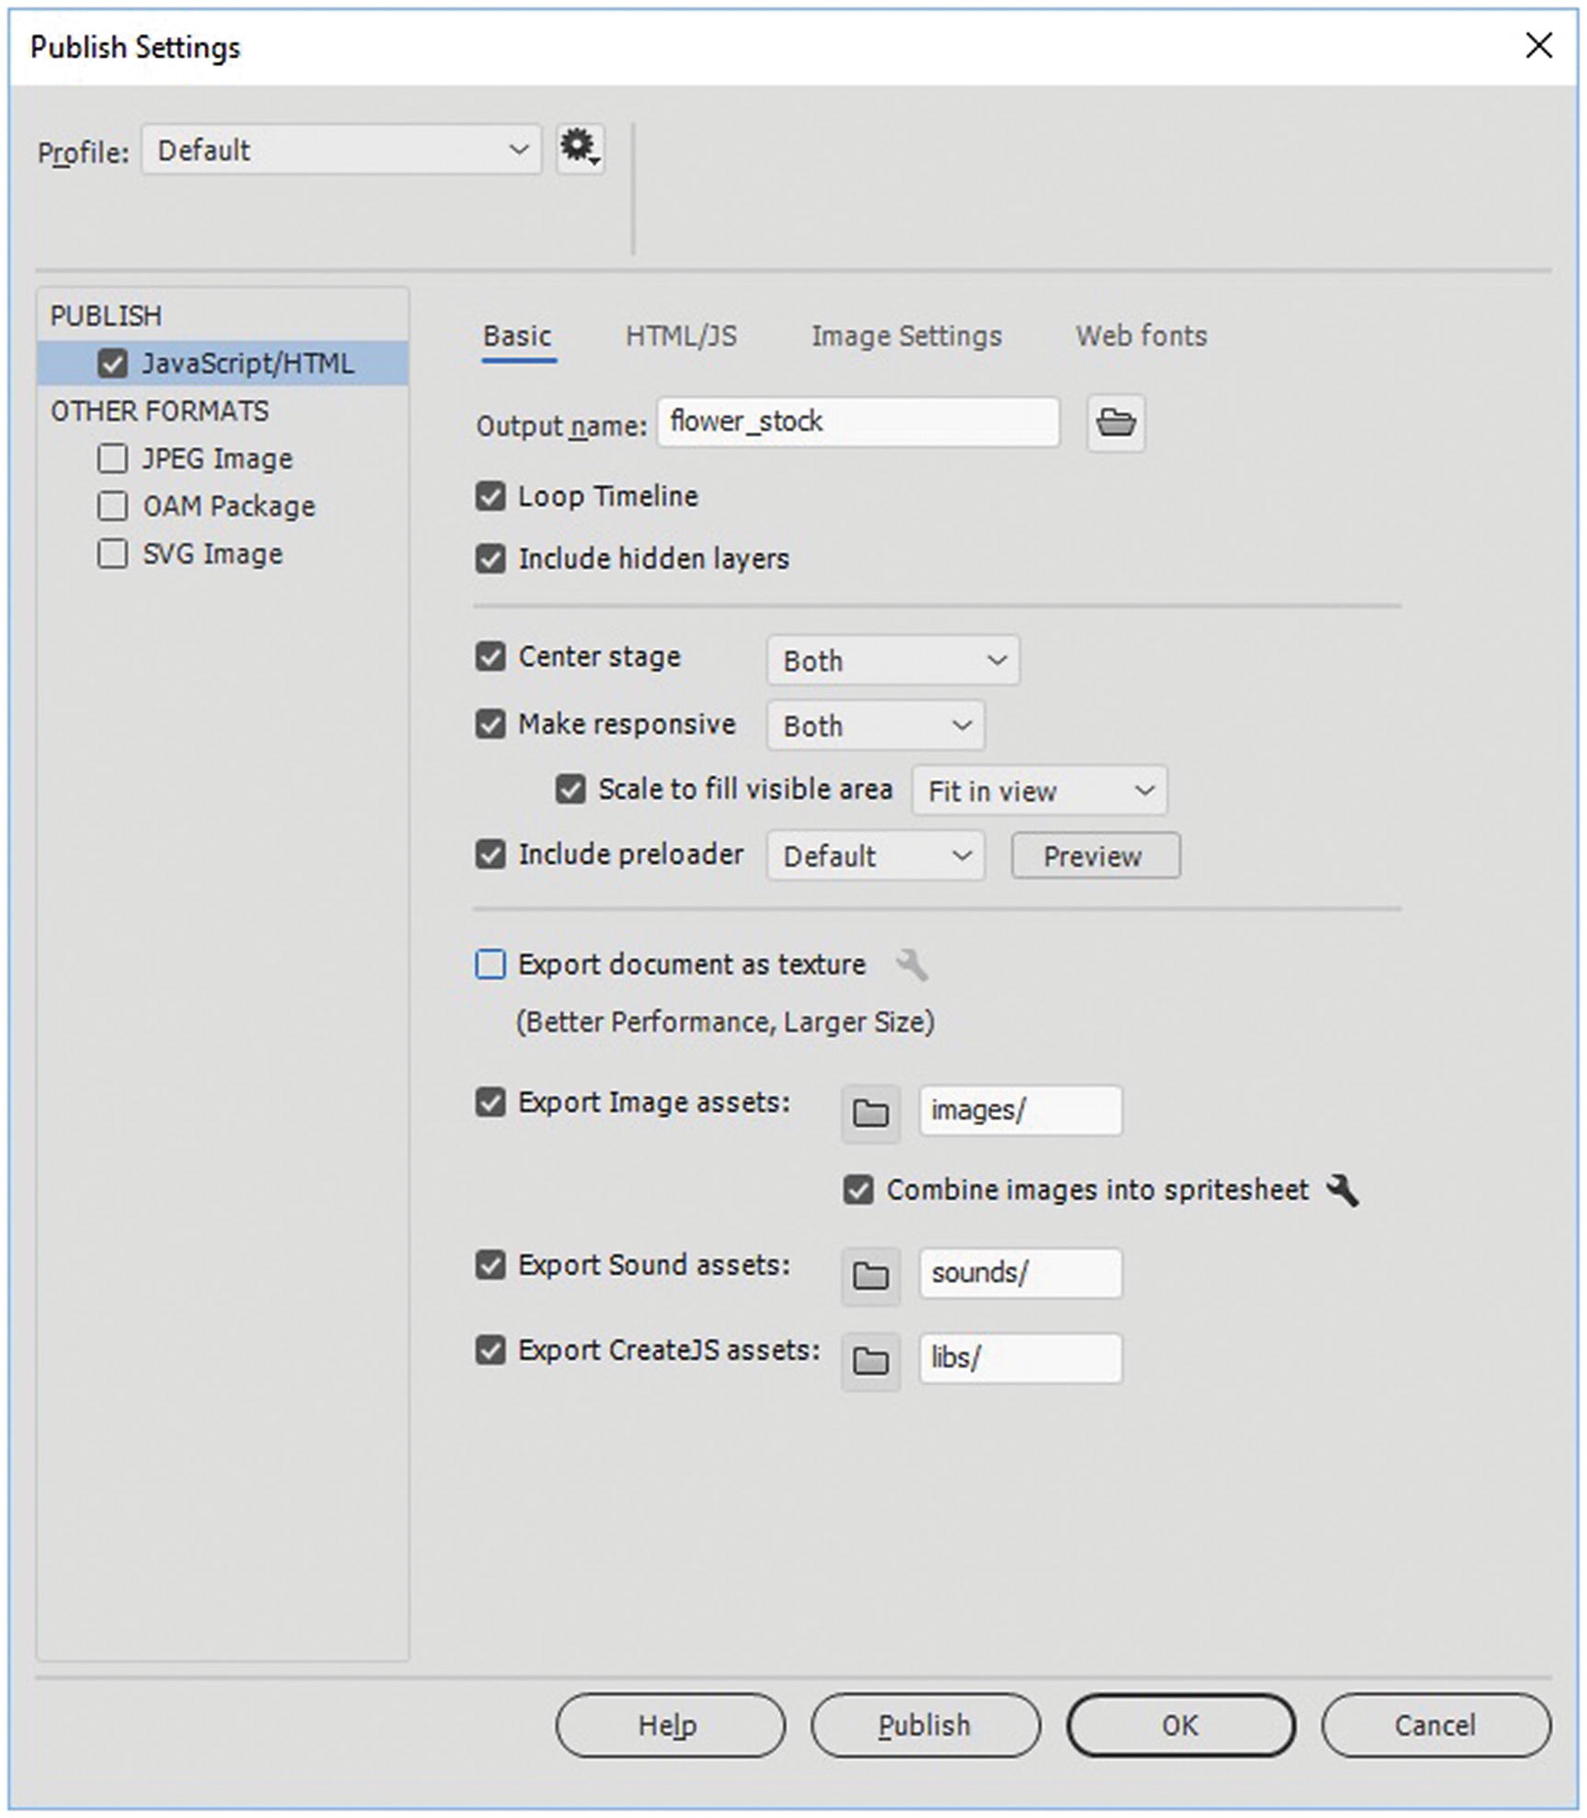
Basic tab settings in the Publish Settings dialog box
Loop Timeline: If you don’t want the timeline to loop and only play once, disable this checkbox; otherwise, leave it checked.
Include hidden layers: If there are layers in your timeline that have the Eye icon turned off and are hidden because you don’t want them published, then disable the check box. Doing this may reduce file size; otherwise, leave it checked.
Center Stage: Position the animation in the center of the browser or the viewing area. Animation can be centered by height, width, or both. Publish Settings uses a combination of CSS and HTML to center your <canvas> </canvas> tag on the HTML page in the browser. In Dreamweaver CC, you can adjust these settings to suit your design, as I show when you look at dissecting the published file.
Make Responsive: Set the animation to scale to change the dimensions of the browser or the viewing area. Animations can respond to change in width, height, or both.
Scale To Fit Visible Area: Scale the animation to fill the entire available viewing area. The aspect ratio is maintained always. Choose Fit In View or Stretch To Fit from the drop-down menu.
Note
This is important if you are building a responsive website and plan to package as an OAM in Dreamweaver. Without this setting, the OAM’s inner <canvas> will not become responsive, even if you use CSS to control the width of the <object> tag. For example, the following is in CSS Dreamweaver.
This is discussed further in Part 6.
Include Preloader: Sometimes before a file loads, if it is very large, you may want to include a preloader animation; for example, showing a bar growing or circle spinning. You can use the default of the program or create your own GIF animation and then link it to the file when you choose to browse from the drop-down menu. Clicking Preview allows you to see what this preloader look like.
Export Document as Texture: When checked this will export all symbols in the animation as one raster image or texture. If your file has a a lot of gradients as mine does you might want to leave unchecked as the quality might degrade and only use for animations with solid colors.
Export Image Assets: When you combine your image assets, this allows Animate to put any files that it regards as bitmap or too large into a folder called images, or whatever name you choose. The <canvas> tag later references this folder when it needs to work with the JavaScript code inside the HTML (.html) and external JavaScript (.js) files that are published later. You can also combine small images in the library into what is known as sprite sheets.
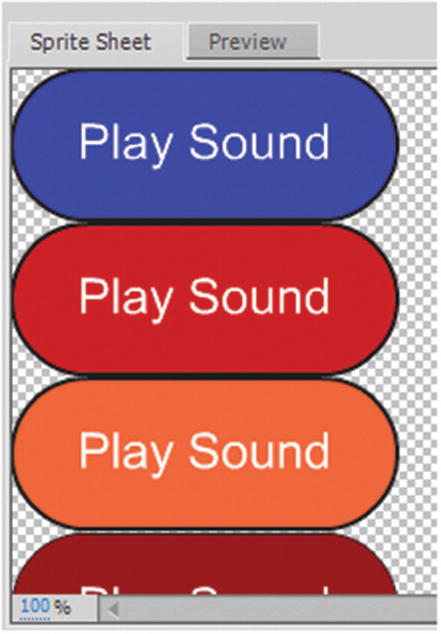
Sprite sheet for a button rollover symbol
Export Sound Assets: If your file contains sounds or audio (.wav, mp3), they are stored in the sounds folder. Note that with HTML5 Canvas, you could not import an Ogg Vorbis file. Once the file is published, you can always go inside the file and alter this link on your own project in Dreamweaver CC and change the audio type or swap the audio file.
Export CreateJS Assets: Exports a library of JavaScript code that comes from a company called CreateJS. you need this library for your animation to function You see how this library is connected when you open the file.
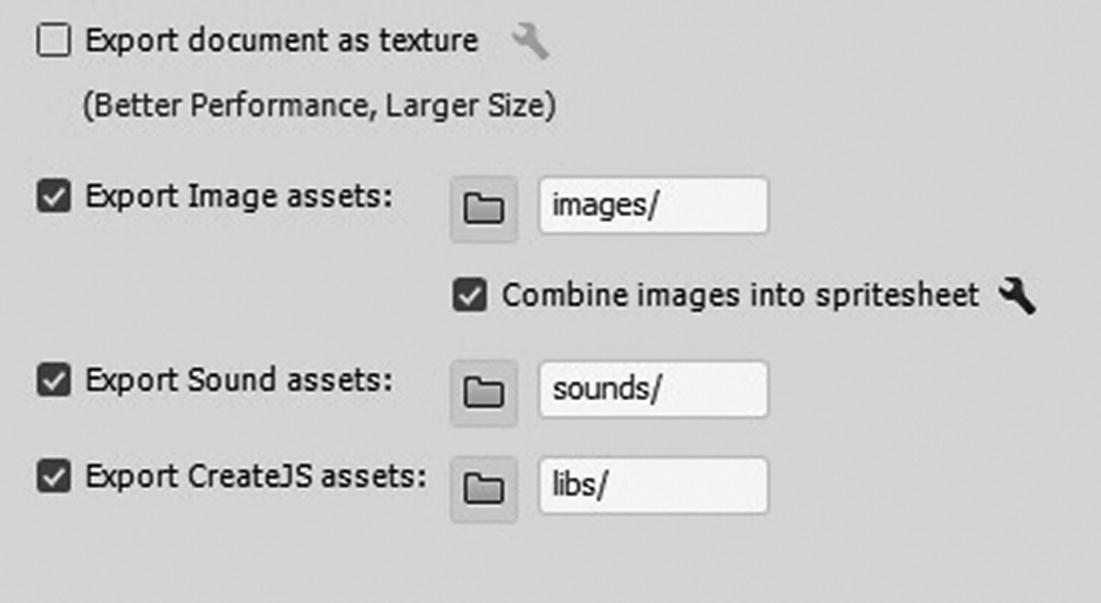
Settings for the folders that your images, sounds, and CreateJS assets are added to
Note
In a linked video, there is no folder option, so there is no new folder created to store your video other than what you created when you linked the component earlier. If you do not like this final link location, you need to edit the code in a text editor like Dreamweaver CC after it is published.
JavaScript/HTML HTML/JS Settings Tab

The HTML/JS tab in the Publish Settings dialog box
Overwrite HTML File On Publish
This overwrites the current HTML file, if you published an earlier one. To avoid this, either uncheck this setting or make sure that you give the next file you publish a different name: file_rev2 and so on. By default, this is checked so that you don’t have multiple files made every time you publish.
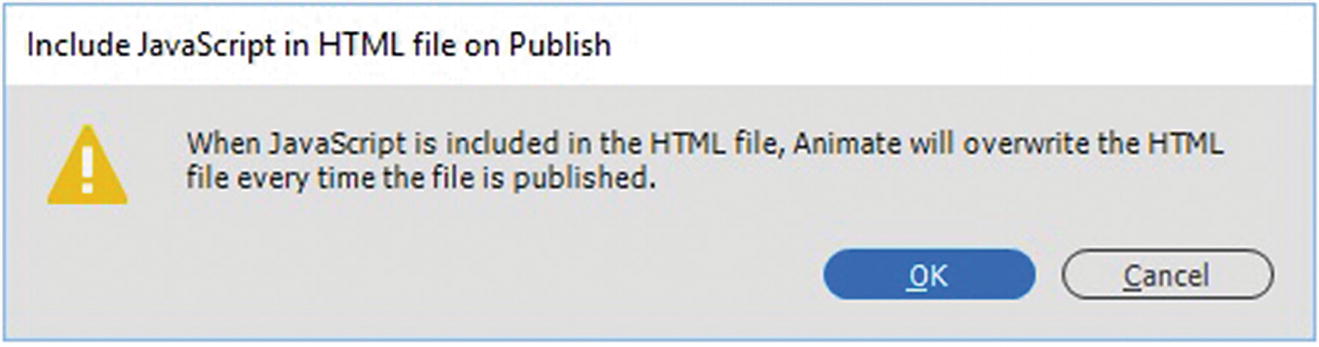
An alert regarding how the HTML and JavaScript is handled
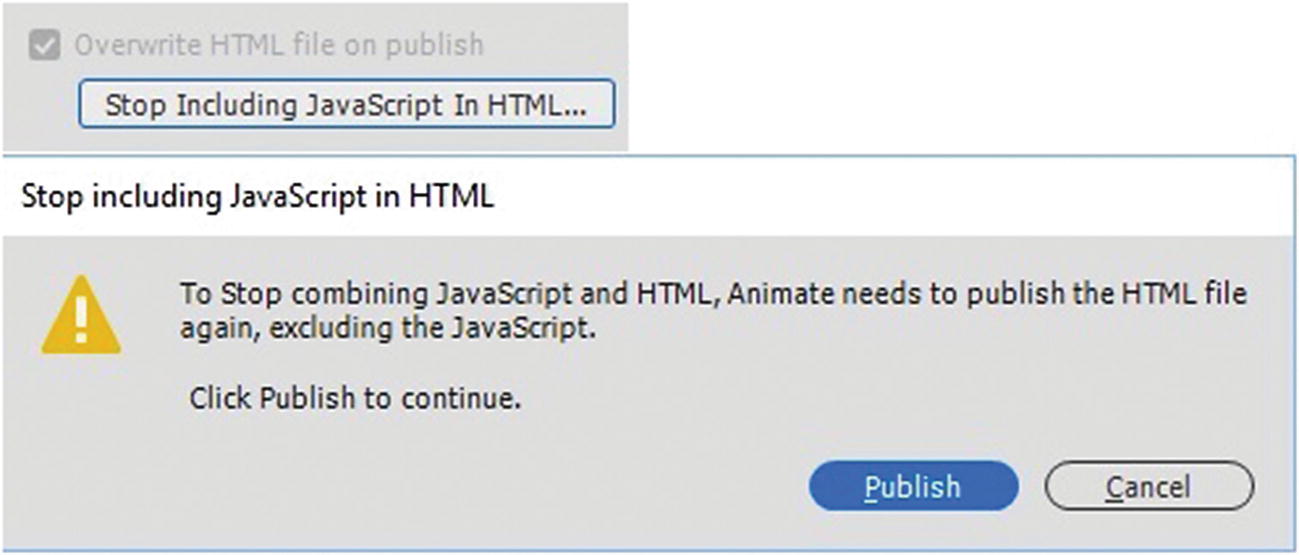
An alert regarding how the HTML and JavaScript is handled if you click the button again to reset
If you do not want this setting, click Cancel and exit the Publish Settings dialog box so that you do not save the changes.
Advanced JavaScript Options
Hosted Libraries: When checked, uses copies of the libraries hosted on the CreateJS CND at code.createjs.com. It allows libraries to be cached and then shared between various sites.
Compact Shapes: When checked, vector instructions are output in a compact form, and when deselected, the instructions are readable and verbose; this is useful if you need to debug or learn how the code operates.
Multiframe bounds: When checked, the timeline symbols include a frameBounds property containing an array or rectangles corresponding to the bounds of each frame in the timeline. A multiframe bound significantly increases the publish time, so by default, it is unchecked.
- JavaScript Name Spaces: These are the namespaces used in JavaScript to identify items.
Symbols: lib
Images: images
CreateJS: createJS
If you are an advanced user, you can alter these name spaces; however for now, leave as is.
JavaScript/HTML Image Settings Tab
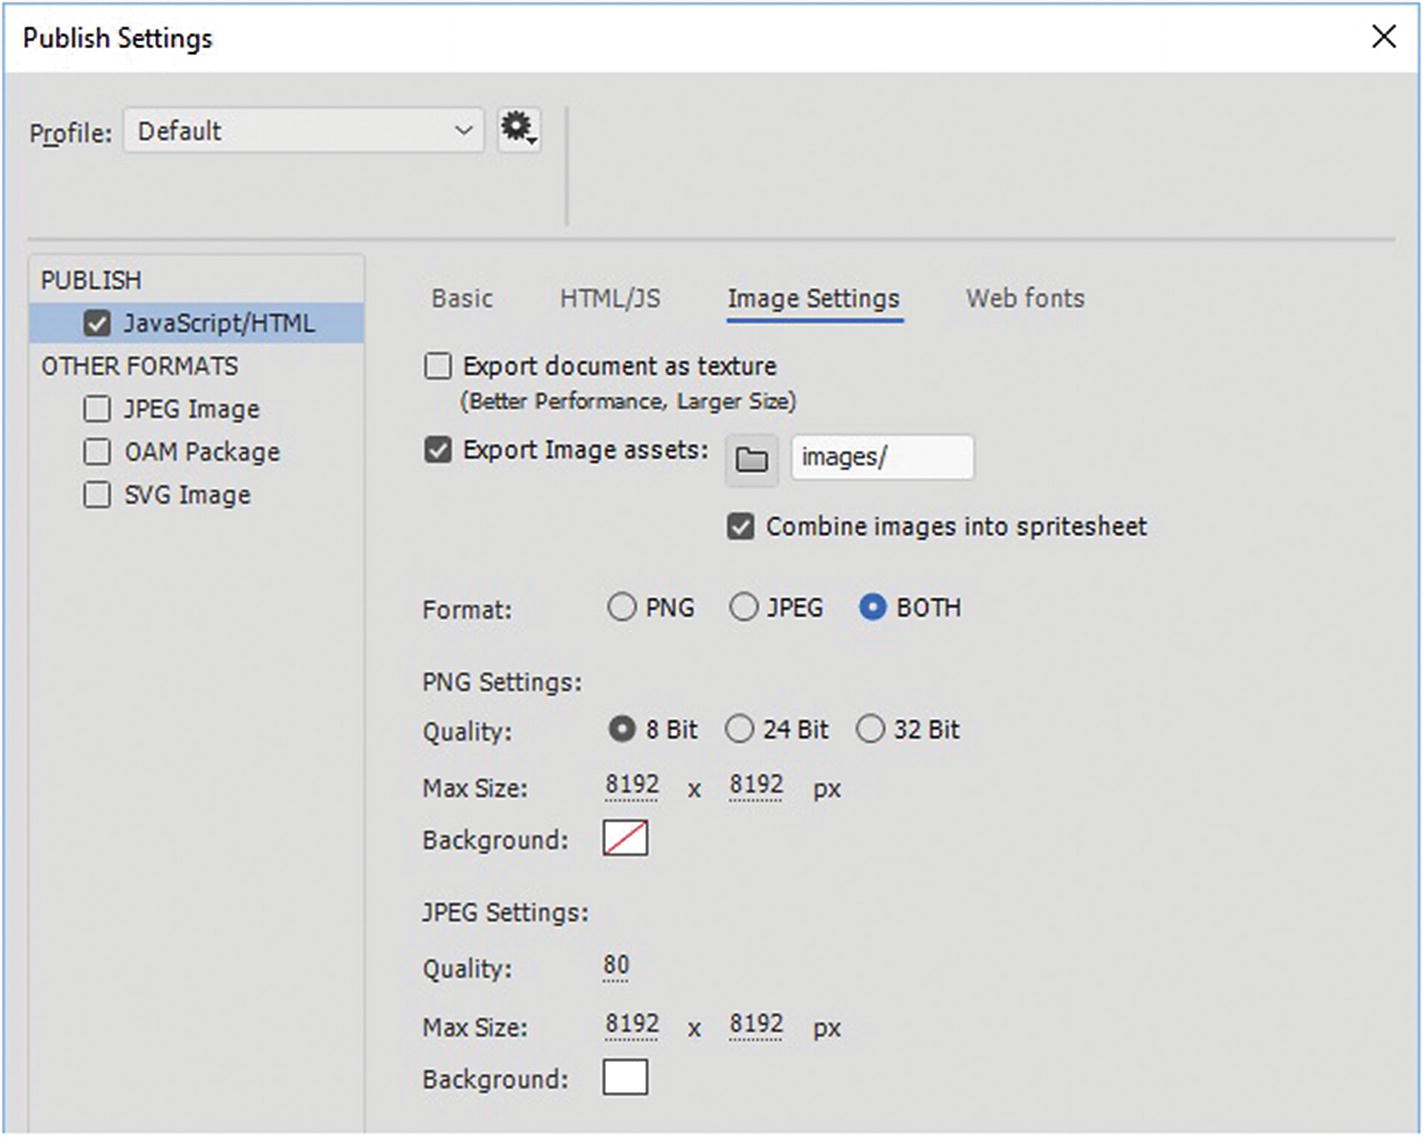
Spritesheet tab settings in the Publish Settings dialog box
By default, PNG is chosen since it can have transparency; however, if this is not an issue, you can use JPEG and give it a matte background. As you saw with other export options, you can adjust the quality and size of the image, or in this case, the sprite sheet file. Also, as you saw in the Basic tab section of this chapter, the spritesheet combines all the frames of a button symbol or bitmap graphics onto a one-page image. This improves the speed and performance of the canvas animation.
JavaScript/HTML Web Fonts Tab
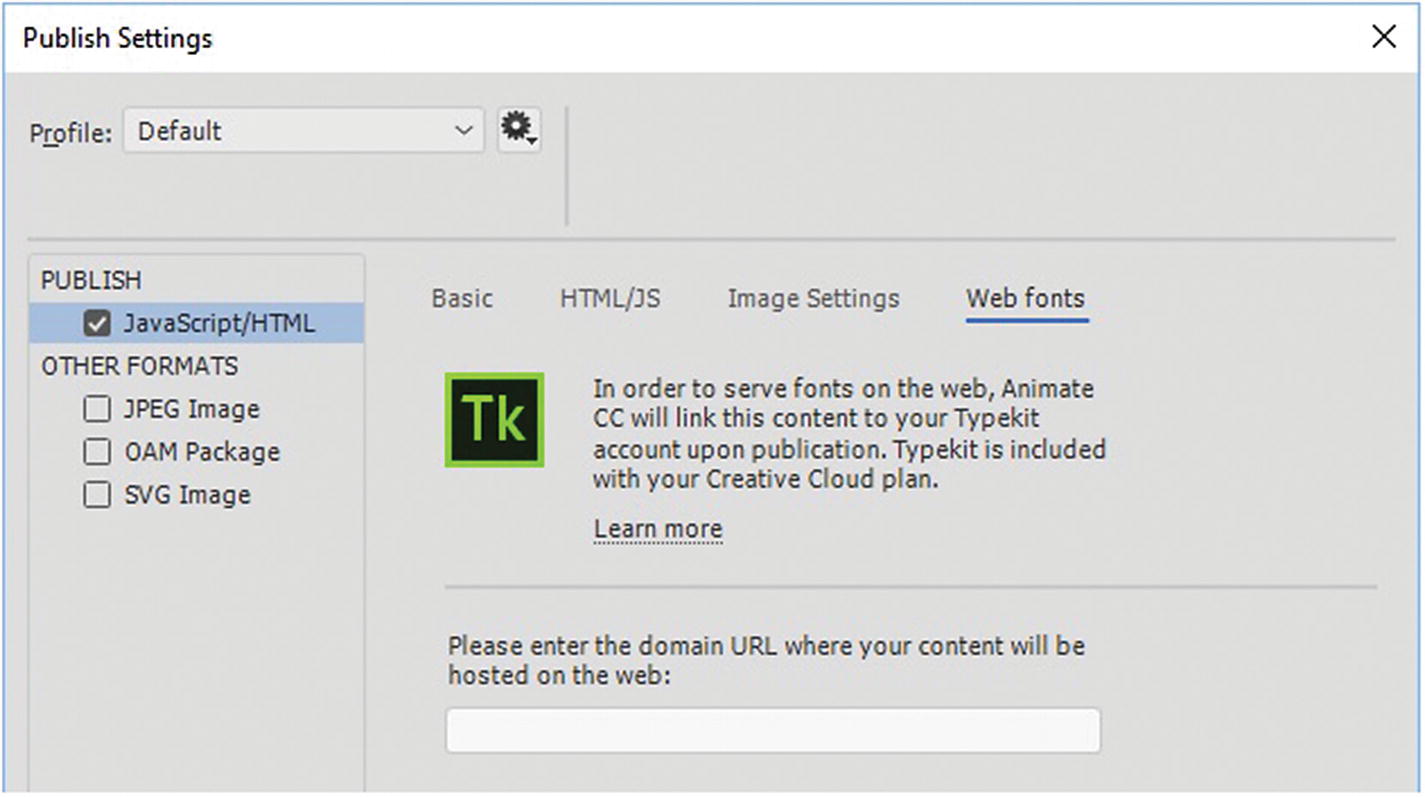
Web Fonts tab settings in the Publish Settings dialog box
Note
You can leave this area blank, if you are using your own web fonts rather than ones found Typekit, the computer’s default font using the static text or dynamic text (accessed via the Text tool(T) and Properties panel), or have no fonts in the file. Only a setting of dynamic text on a font allows you to access the Typekit (Adobe Fonts) and Google web fonts, as you see in Chapter 23.

Click Publish when you have completed adjusting your settings for the HTML5 Canvas
However, before you do that, let’s look at a few more settings in case you want to output other formats at the same time.
Other Formats
On the left side of the Publish setting you can also choose to publish when checked other formats at the same time as the HTML5 Canvas. The following text explains those choices.
JPEG Image
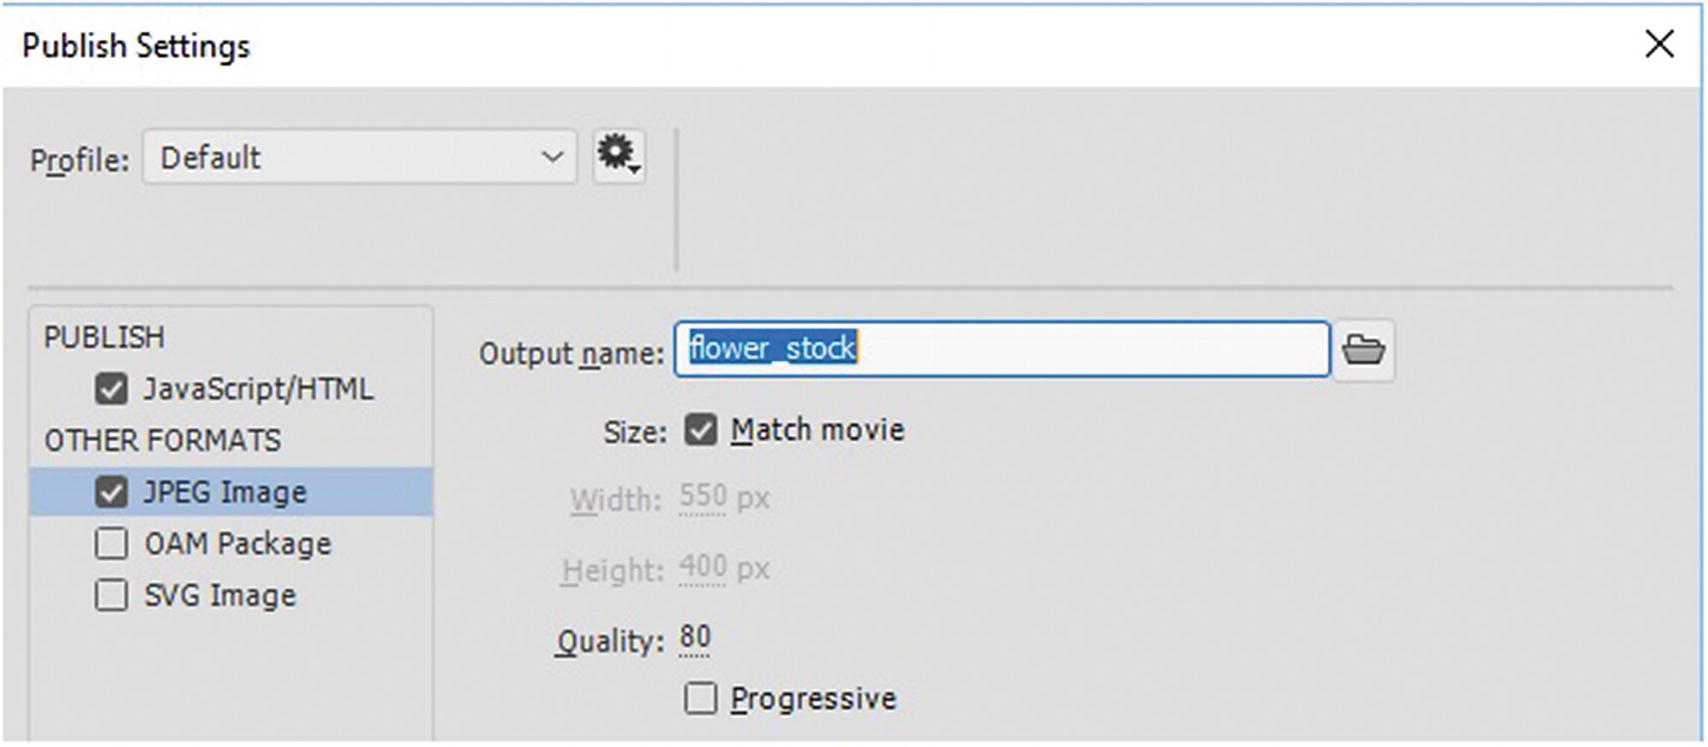
Settings for JPEG image in the Publish Settings dialog box
You can adjust the size or match to movie’s width, height, and quality, and choose to load as progressive.
OAM Package
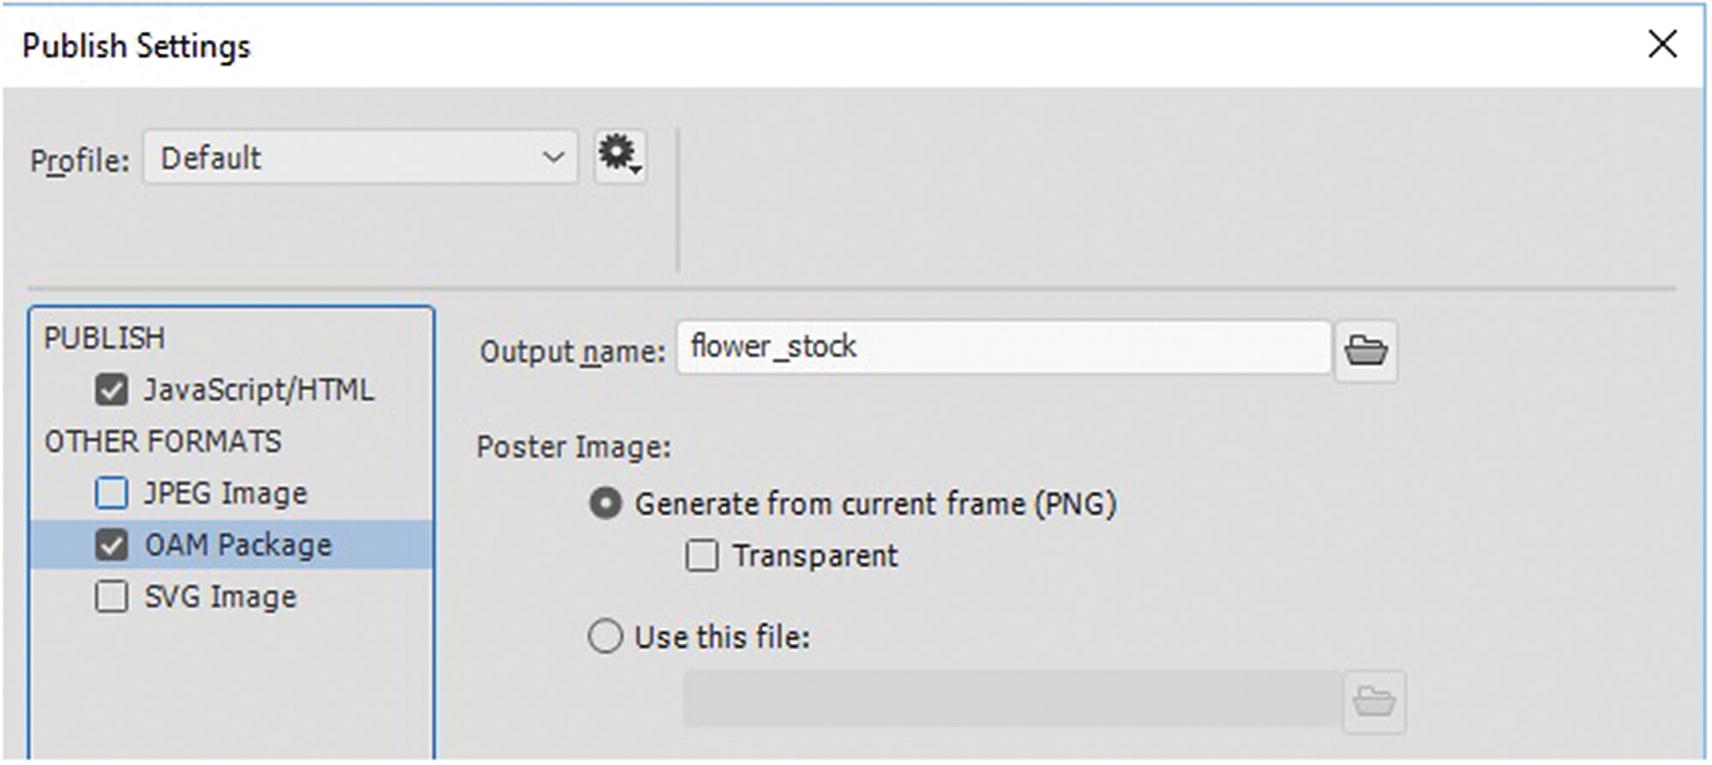
Generate an OAM package in the Publish Settings dialog box
The OAM (.oam) files generated in Animate CC can be placed in other Adobe applications, such as Dreamweaver CC, Muse CC, and InDesign CC. An OAM package is an animated widget file, or OpenAjax Metadata.
An OAM file is like a ZIP file that packs all the necessary assets into an Assets folder and includes some configuration information in an XML document.
To look inside, you can try replacing the .oam extension to .zip, and review the content inside of it. It is sometimes called an Animate Deployment Package file.
The <object> tag has an ID of EdgeID, which is a throwback to before Adobe Edge Animate merged with Flash to become Animate. Like the <canvas> tag, the <object> tag becomes a window into what is going on inside the flower_stock.html file, which contains various JavaScript links controlling the movements within the <object> tag.
With the OAM Package selected, make sure to check responsive in the Basic tab
Note
You can also publish an OAM file from an ActionScript 3.0 FLA file, but this relates to SWF files, which are not part of this chapter.
SVG Image
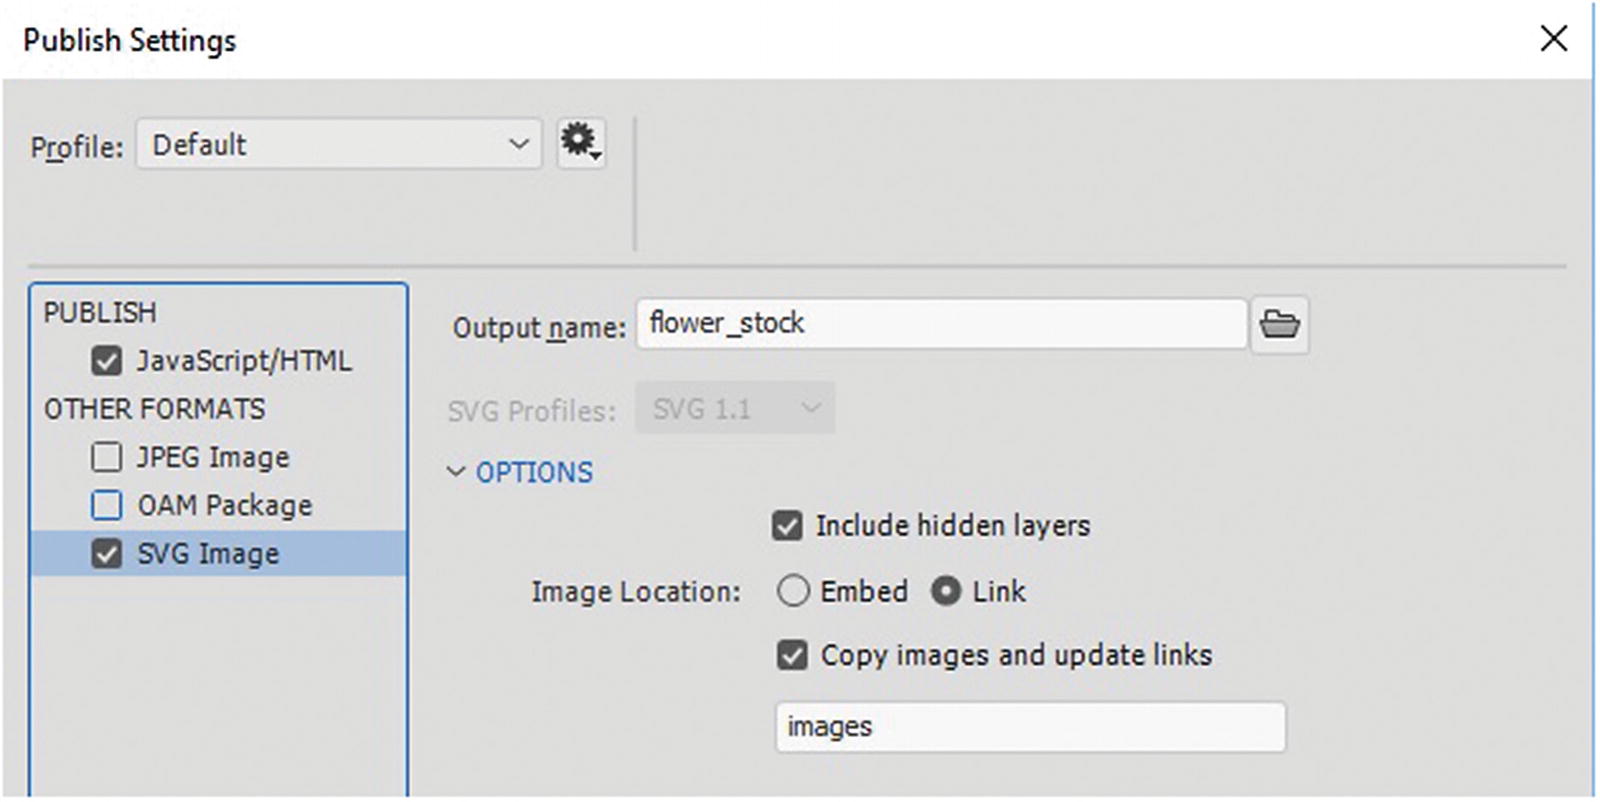
Publish and SVG image using the Publish Settings dialog box
Other Image Format Alternatives with ActionScript 3.0 FLA Files
While the HTML5 Canvas gives you quite a few format options that you can publish, there may be situations where where you need a few additional formats. The following formats are listed here.
PNG Image

Options for publishing a single PNG file from an ActionScript 3.0 FLA file in the Publish Settings dialog box
GIF Image
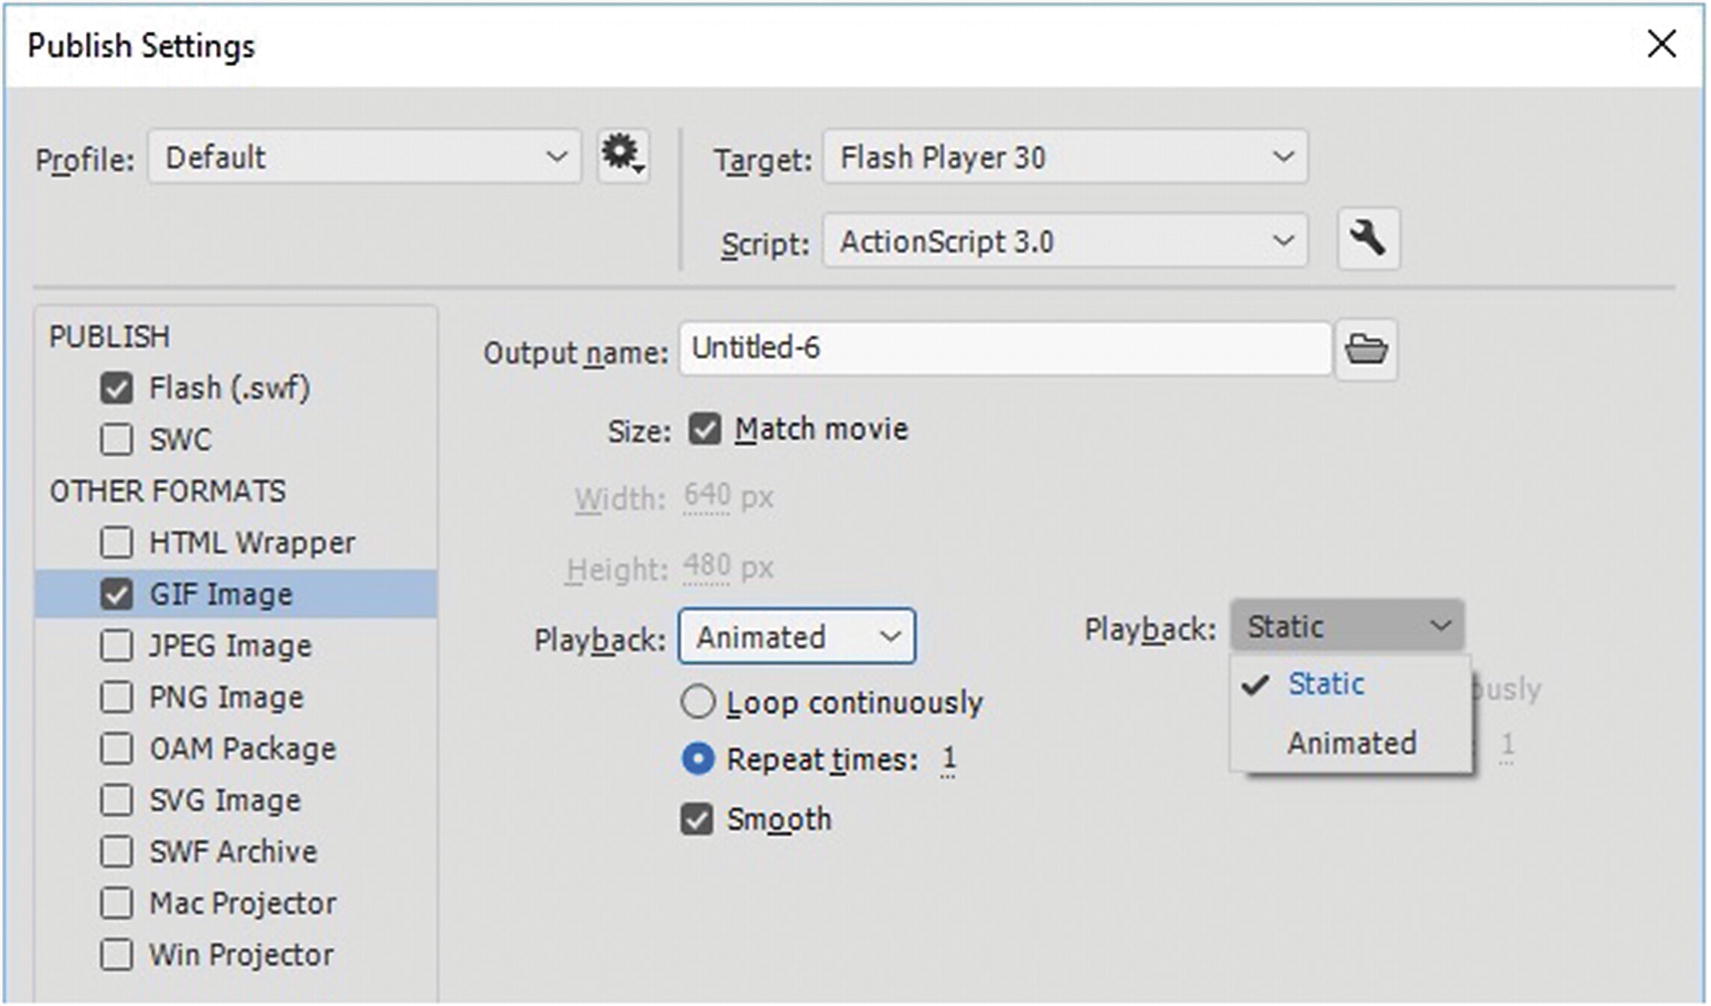
Options for publishing a single static GIF file or animated file from an ActionScript 3.0 FLA file in the Publish Settings dialog box
Note
Unlike in Option 5, you can set the repeat times to a specific number, as you would in Photoshop CC.
For more advanced information on publishing HTML5 Canvas, visit https://helpx.adobe.com/animate/using/creating-publishing-html5-canvas-document.html .
Let’s return to the newly HTML5 Canvas file and look at what it is made up of when the files are published.
Dissecting the Canvas HTML5 File
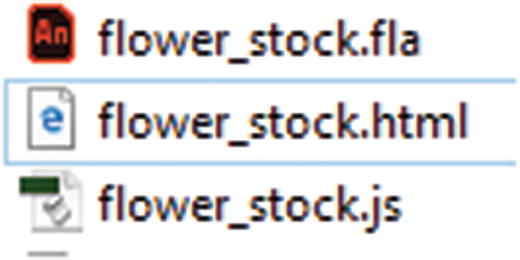
The files that are published from the flower stock example
Unlike the OAM file that was created as a package, HTML5 Canvas files remain separated (.js and .html) within the folder you published them to. Also, unlike the OAM there may not be an XML file in all cases. In both cases, the folders that are created are image and sound folders if there are images and sounds that required in the animation. And if there was a video file and linked components then these would be included in the OAM package as well.
You can copy the created code in the <head> and <body> sections into your own HTML page, and then add CSS to style it to match the theme of your site. Alternatively, you can use OAM package, which you may find easier to handle when you add it to a webpage. You look at that in more detail in Part 6.
Always make sure to test your new file and adjust the links (JavaScript, audio, and video) if they are in distinct folder locations on your own site. You look at this in more detail in Part 6. Personally, I find the HTML5 Canvas animation to be as great as the index or intro page on a site to welcome visitors and encourage them to visit other pages within the website. You create one in Chapter 24.
Other Export Options from the Symbols in the Library Panel
While working on your animation, you may not want to export the entire animation; just select items as images from the Library panel.
When you right-click an object in the Library panel, you can chose one of the following options.
Export PNG Sequence
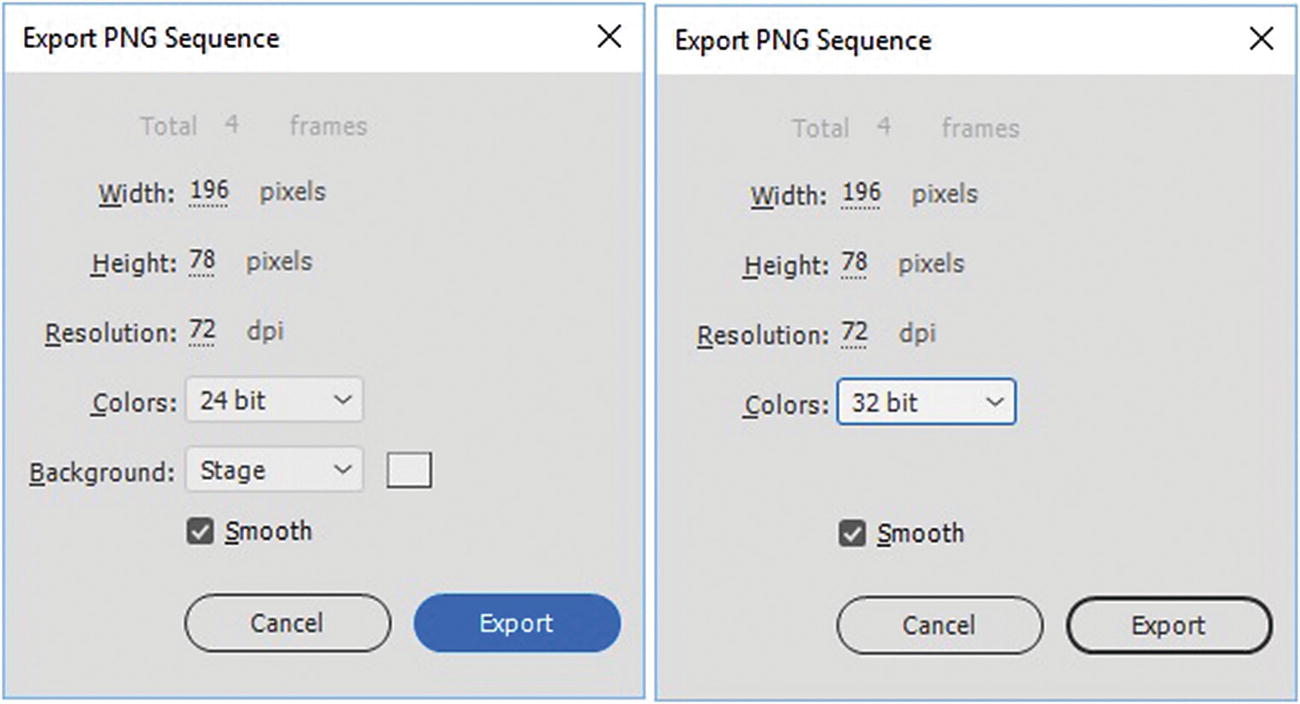
Export a PNG sequence for a symbol only
Generate Sprite Sheet
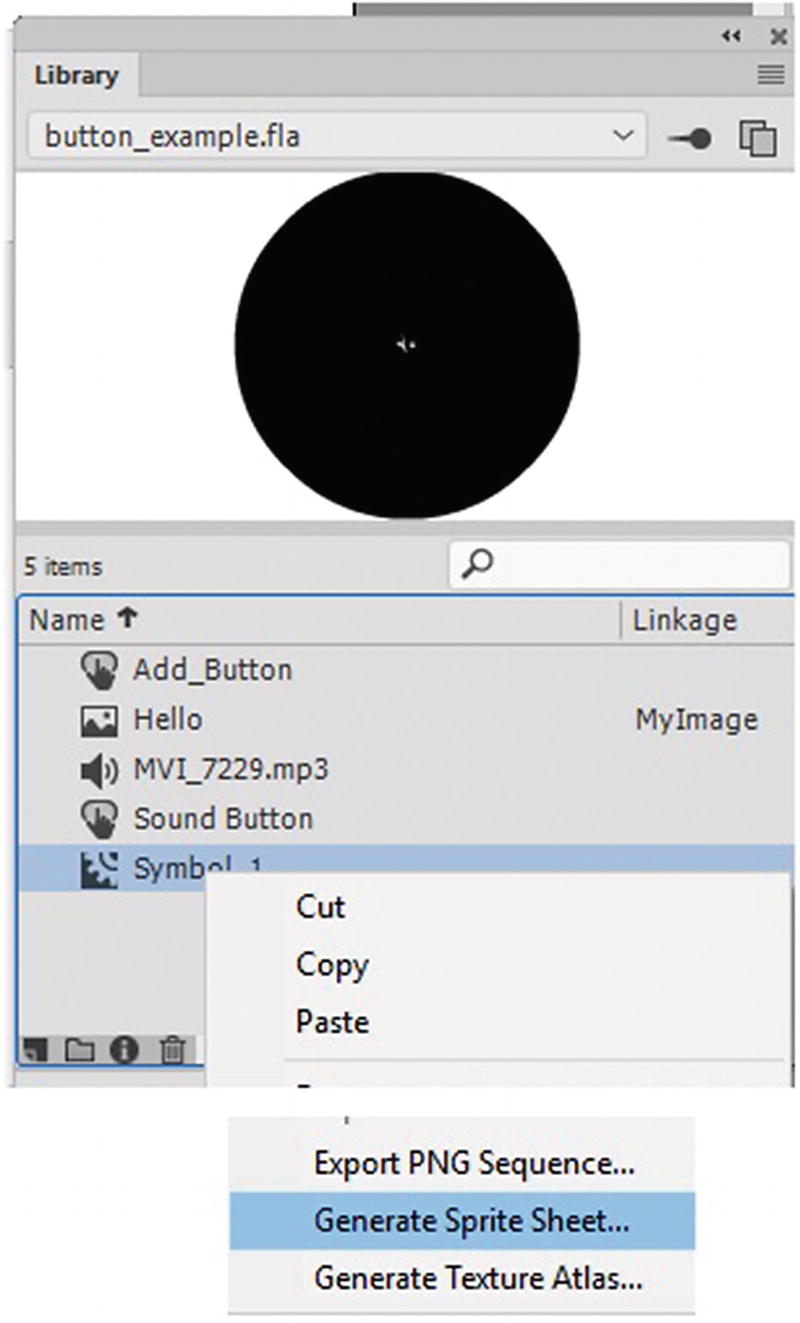
While selecting one or more symbols choose generate Sprite Sheet
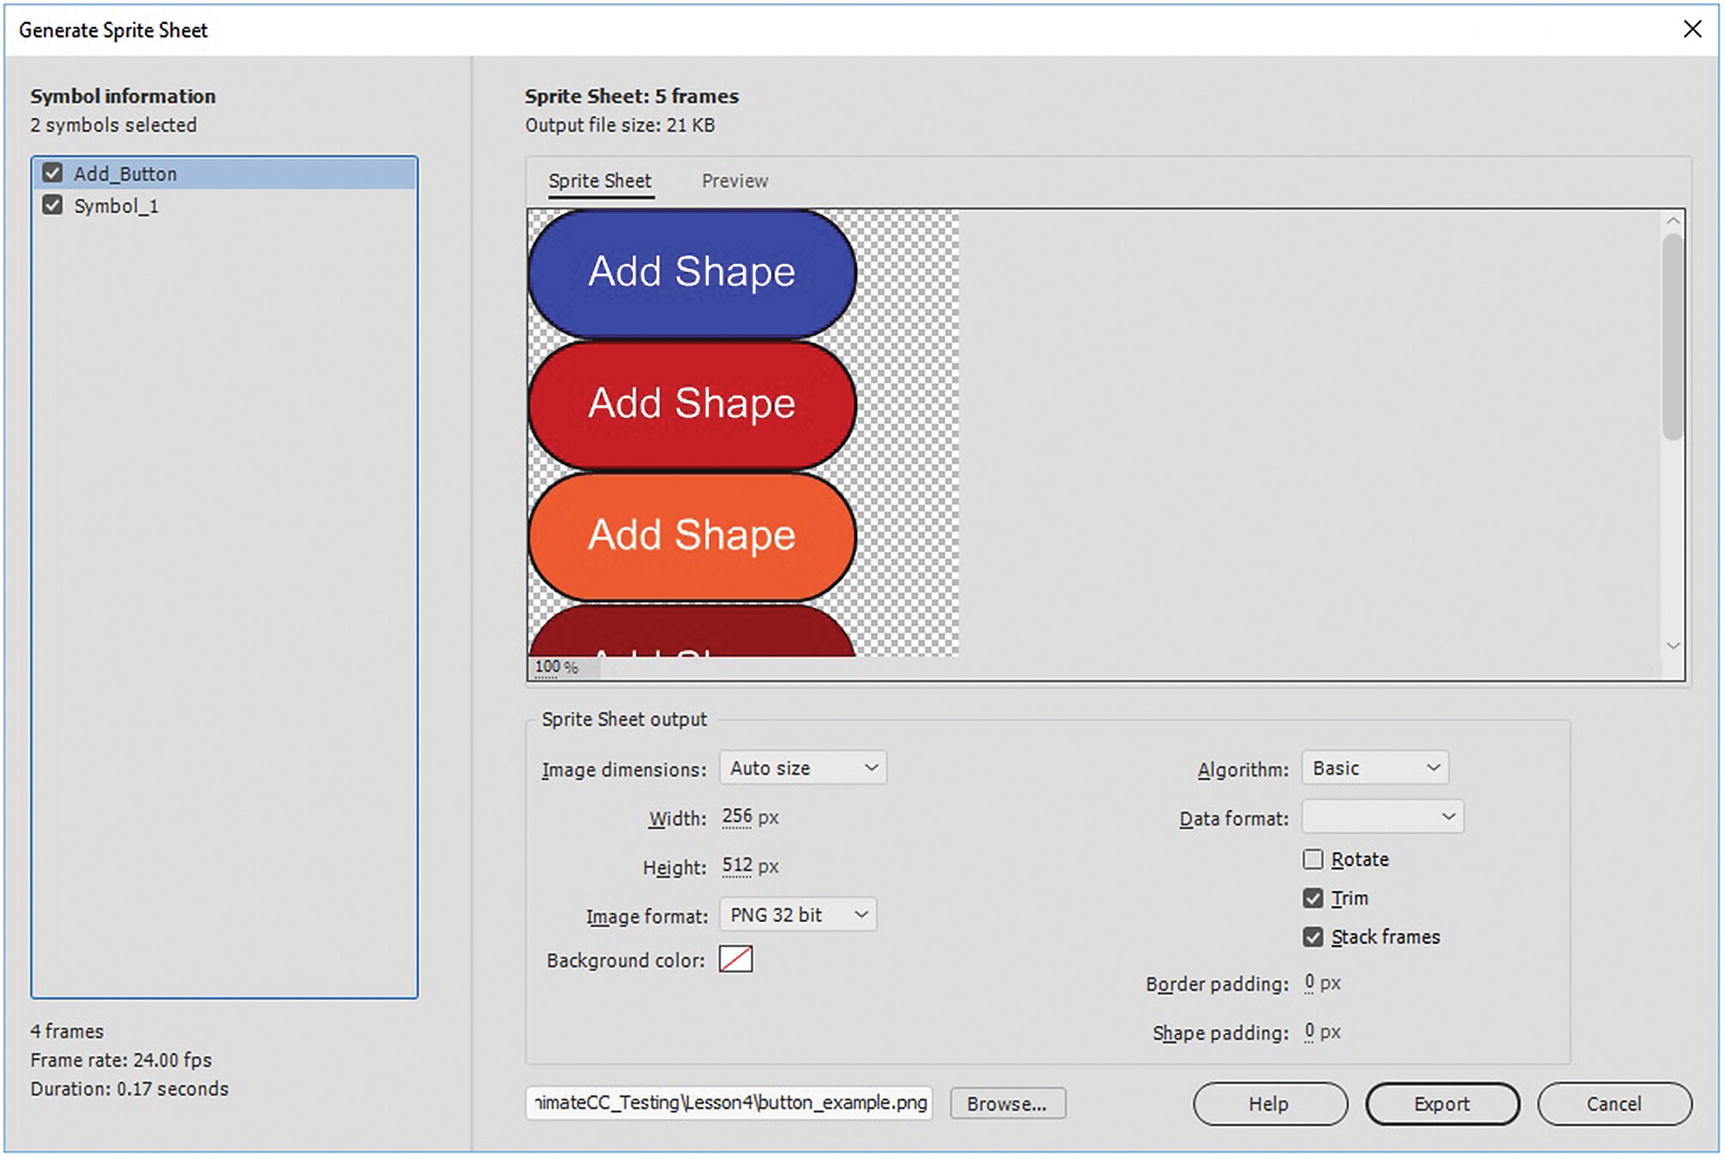
A generated sprite sheet in the dialog box
The Preview tab shows how the final sprite sheet appears before export.
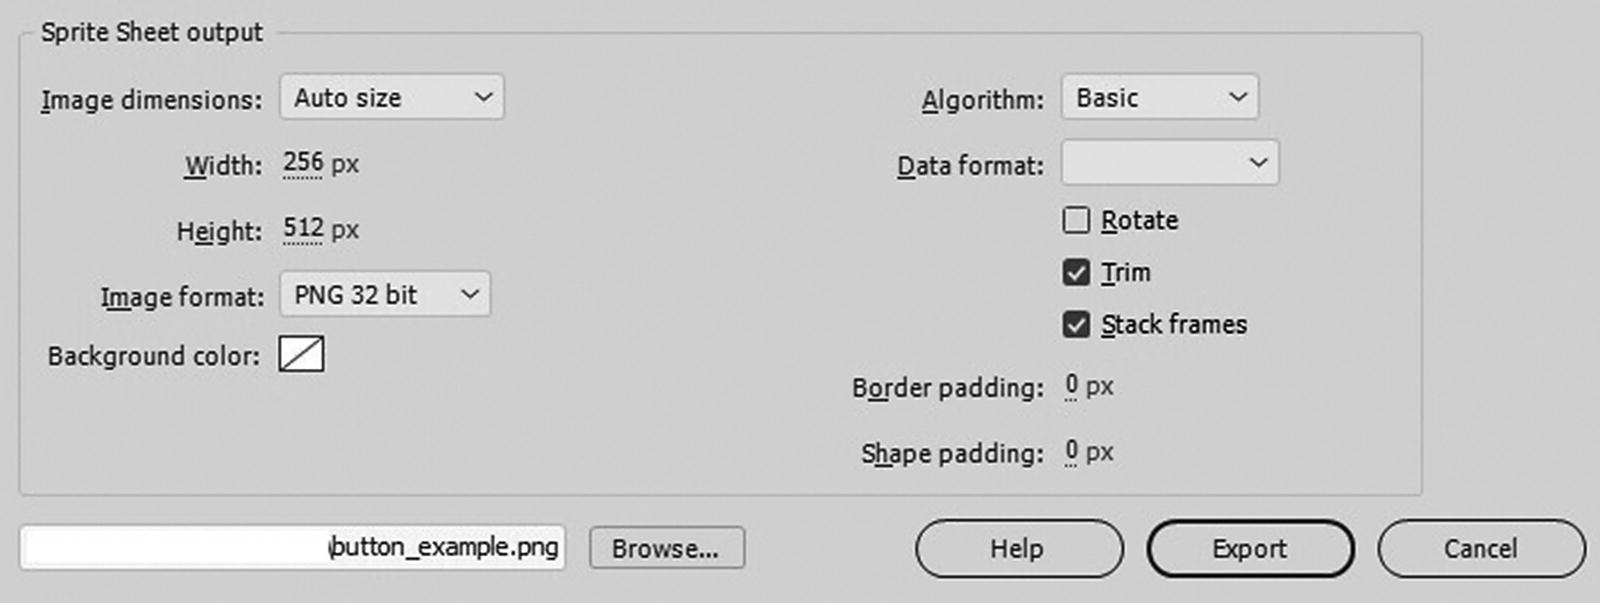
Sprite sheet output options
Algorithm: How the packing is applied to the frames, Basic (default), or Max Rects; this alters which symbols appear and in what order.
Data format: This outputs the internal format used for image data; if you’re not sure what setting to use, leave this area blank. Refer to Figure 22-44.

Data format options
Rotate: Rotates the sprites 90°. This option is only available for some data formats.
Trim: Saves space on the sprite sheet by trimming unused pixels from each symbol frame added to the sheet.
Stack frames: Prevents duplicate frames within the selected symbols from being duplicated in the resulting sprite sheet.
Border and shape padding: Adds extra padding around the sprites.
Then you can choose where the sprite sheet is saved by selecting browse in the lower left and choosing a location and clicking export to export the sprite sheet.
Generate Texture Atlas
The texture atlas is not for web design, but more for gaming and app development using an extra plug-in known as Unity, which binds objects together for the animation.
Since the topic of this book is about building animations and video for the web, I am not going into any detail on this feature; however, if you would like to learn more, check out https://helpx.adobe.com/animate/using/create-sprite-sheet.html .
Other Web Export Options
So far, you have looked at the export options that are for images (GIF, JPEG, PNG, and SVG), video (MOV)formats, and two types of animation files (Animated GIF and HTML5 Canvas) and the Canvas’ its related packaging OpenAjax Metadata (OAM).
In addition, there are a few other alternatives for various projects other than SWF files that you can use for various mobile and website projects. I list them briefly here.
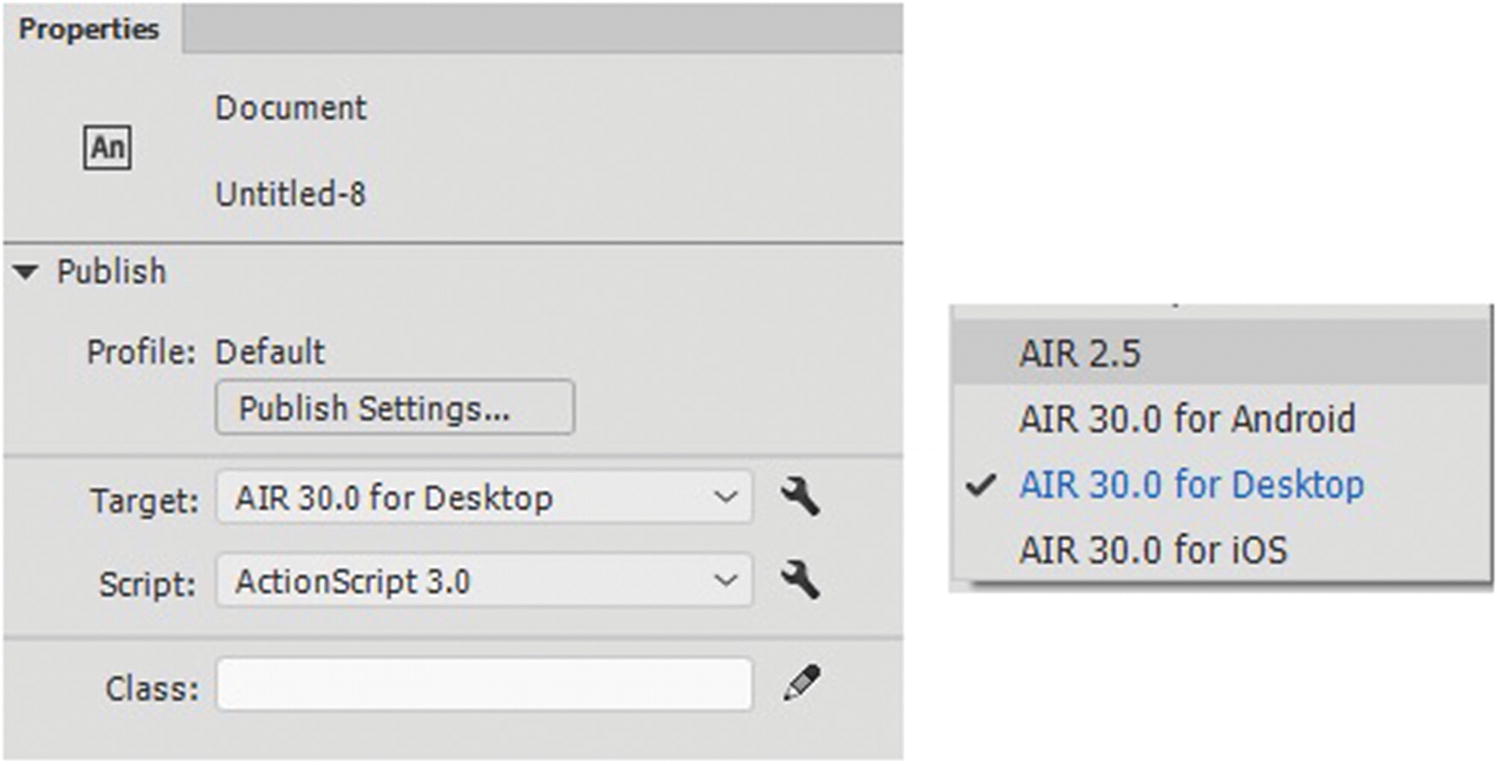
AIR Options
Options for AIR in the New Document dialog box
Air for Desktop (.air)
Air for Android (.apk)
Air for iOS (.ipa)
AIR Option settings
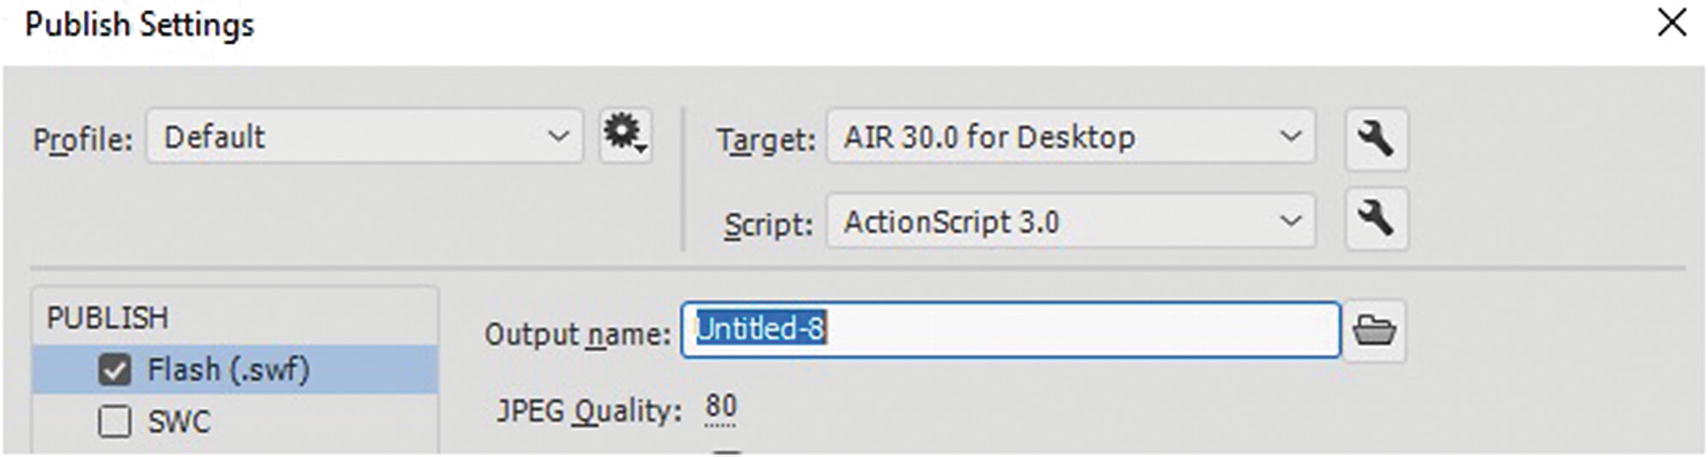
Target Publish Settings for AIR package
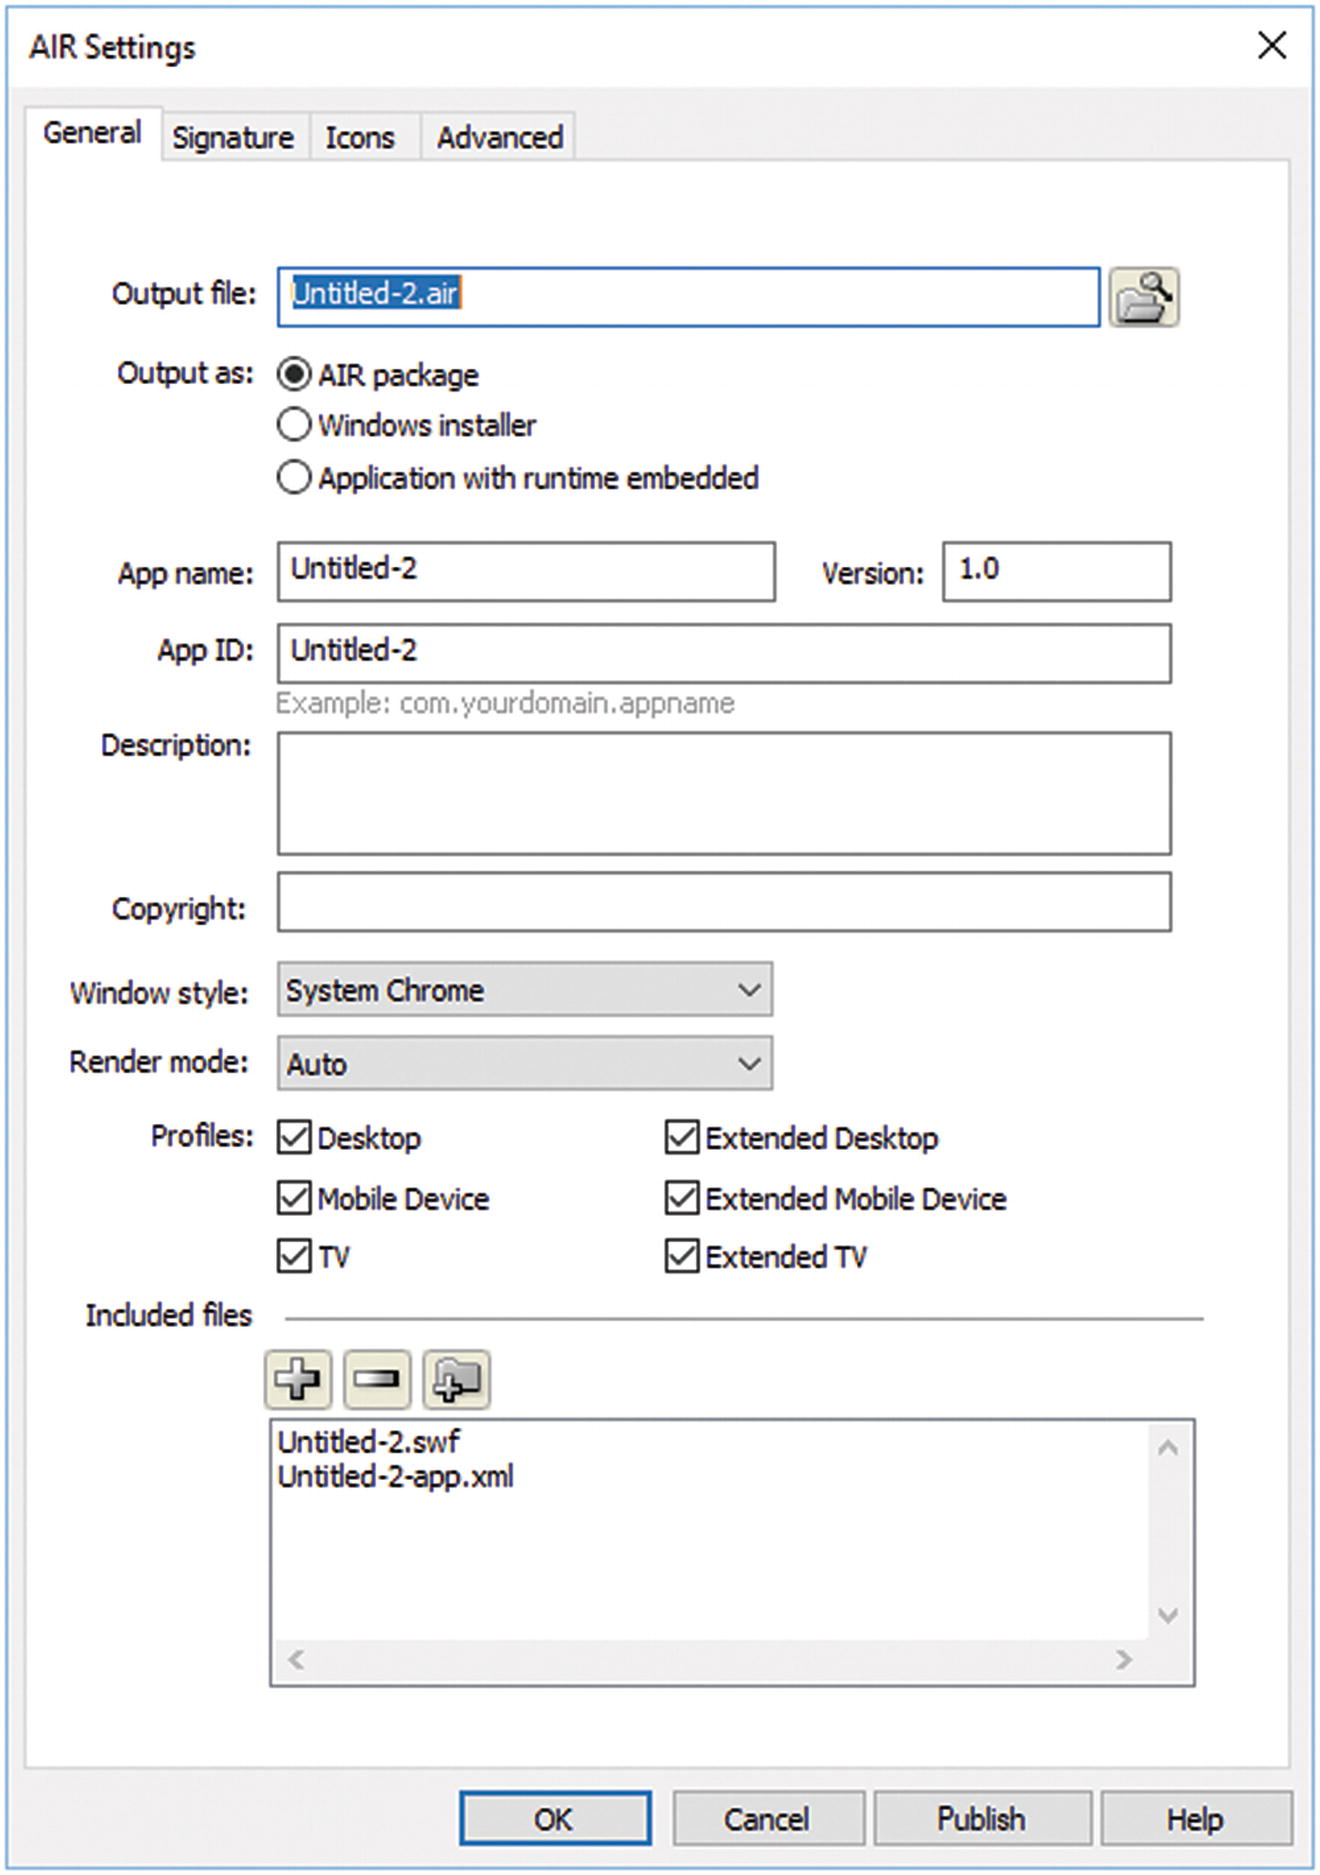
AIR Settings dialog box

When you target Flash Player, the AIR setting the upper wrench disappears
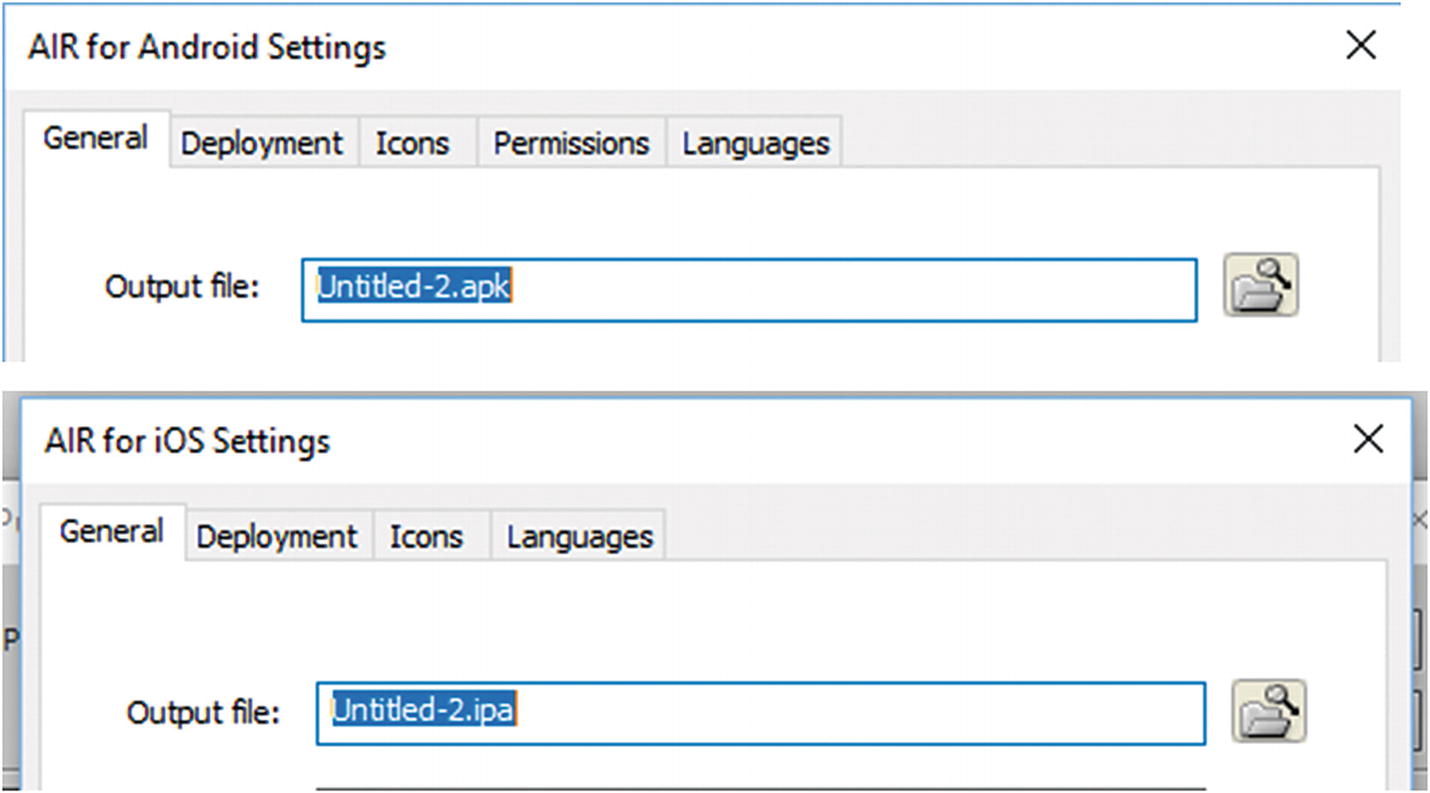
AIR settings for Android and iOS
Projector
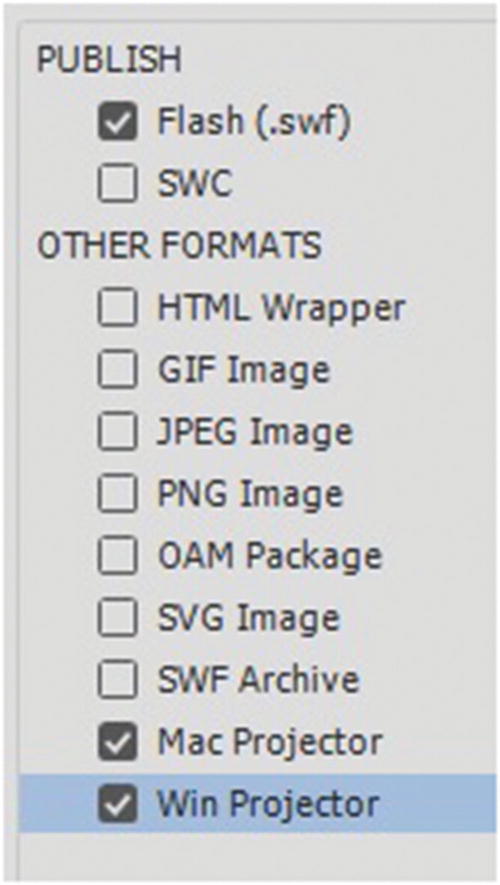
Mac and Win Projector options in the publish setting of an ActionScript 3.0 FLA file
A projector is a self-contained file that includes the Flash player runtime if your audience doesn’t have a Flash player installed. These files play like an application, but don’t require a web browser. It begins to run once you double-click the icon; however, unlike AIR, you don’t have the same range of publishing options and settings.
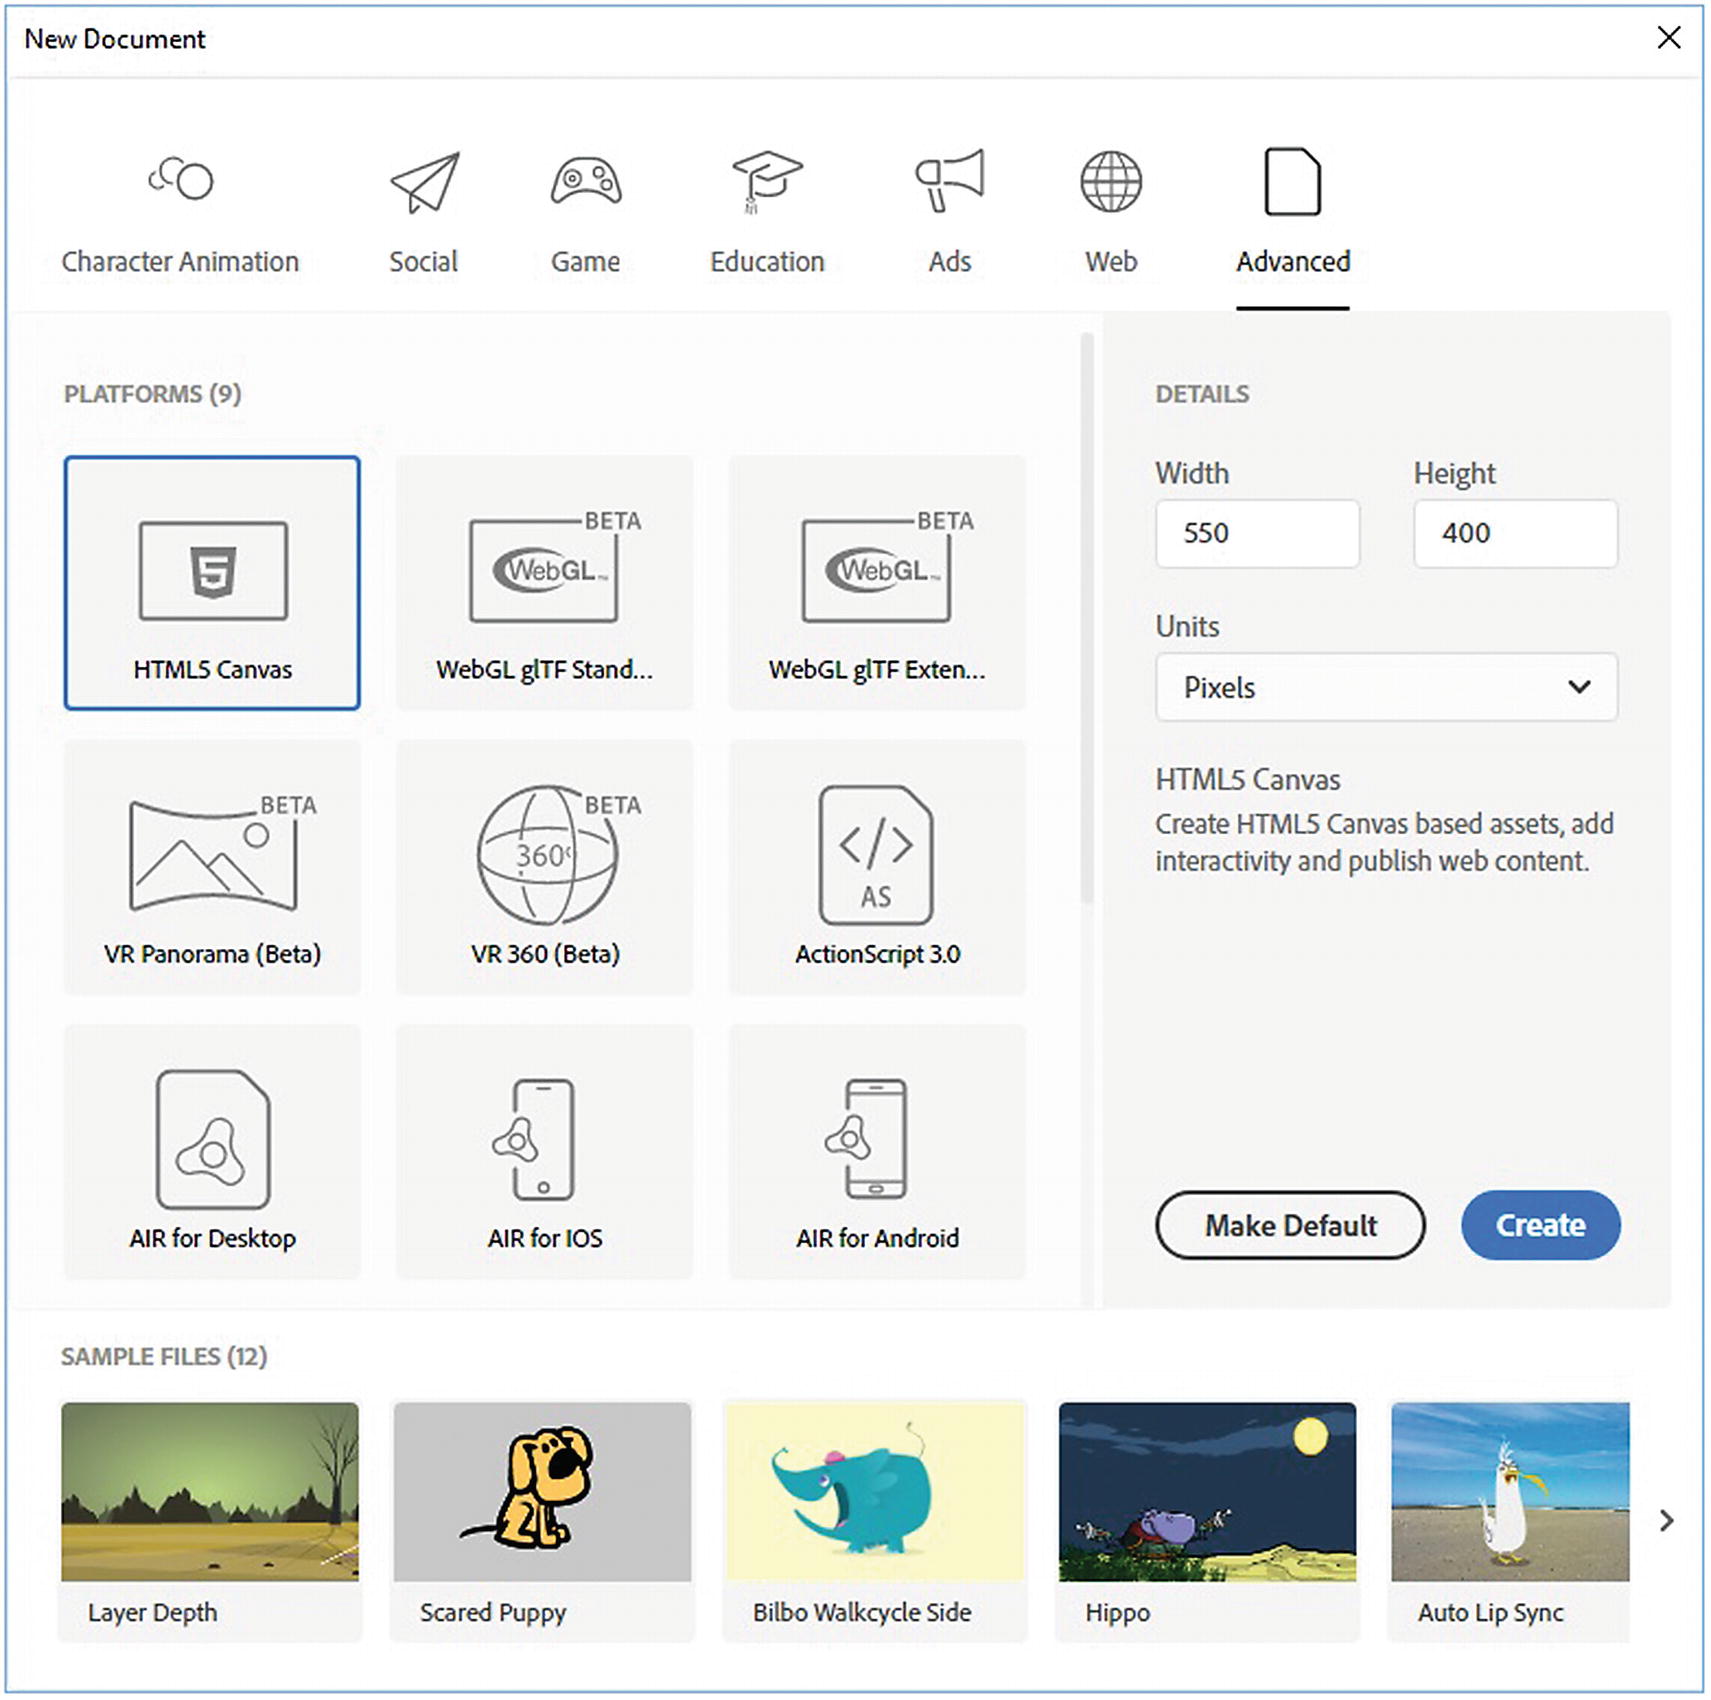
WebGL
Found under File ➤ New under the Advanced Tab now has 4 WebGL options: gltf Standard, gltf Extended, VR 360, and VR Panorama. All are in Beta version. 360 and Panorama animations can be used for virtual reality and game environments. This Web Graphics Library is a JavaScript API for rendering 2D and 3D graphics within any compatible web browser without the use of plug-ins. Besides JavaScript, it uses JSON files (JavaScript Object Notation), which is like XML; both are for storing data to render complex graphics. For more information, visit https://en.wikipedia.org/wiki/WebGL .
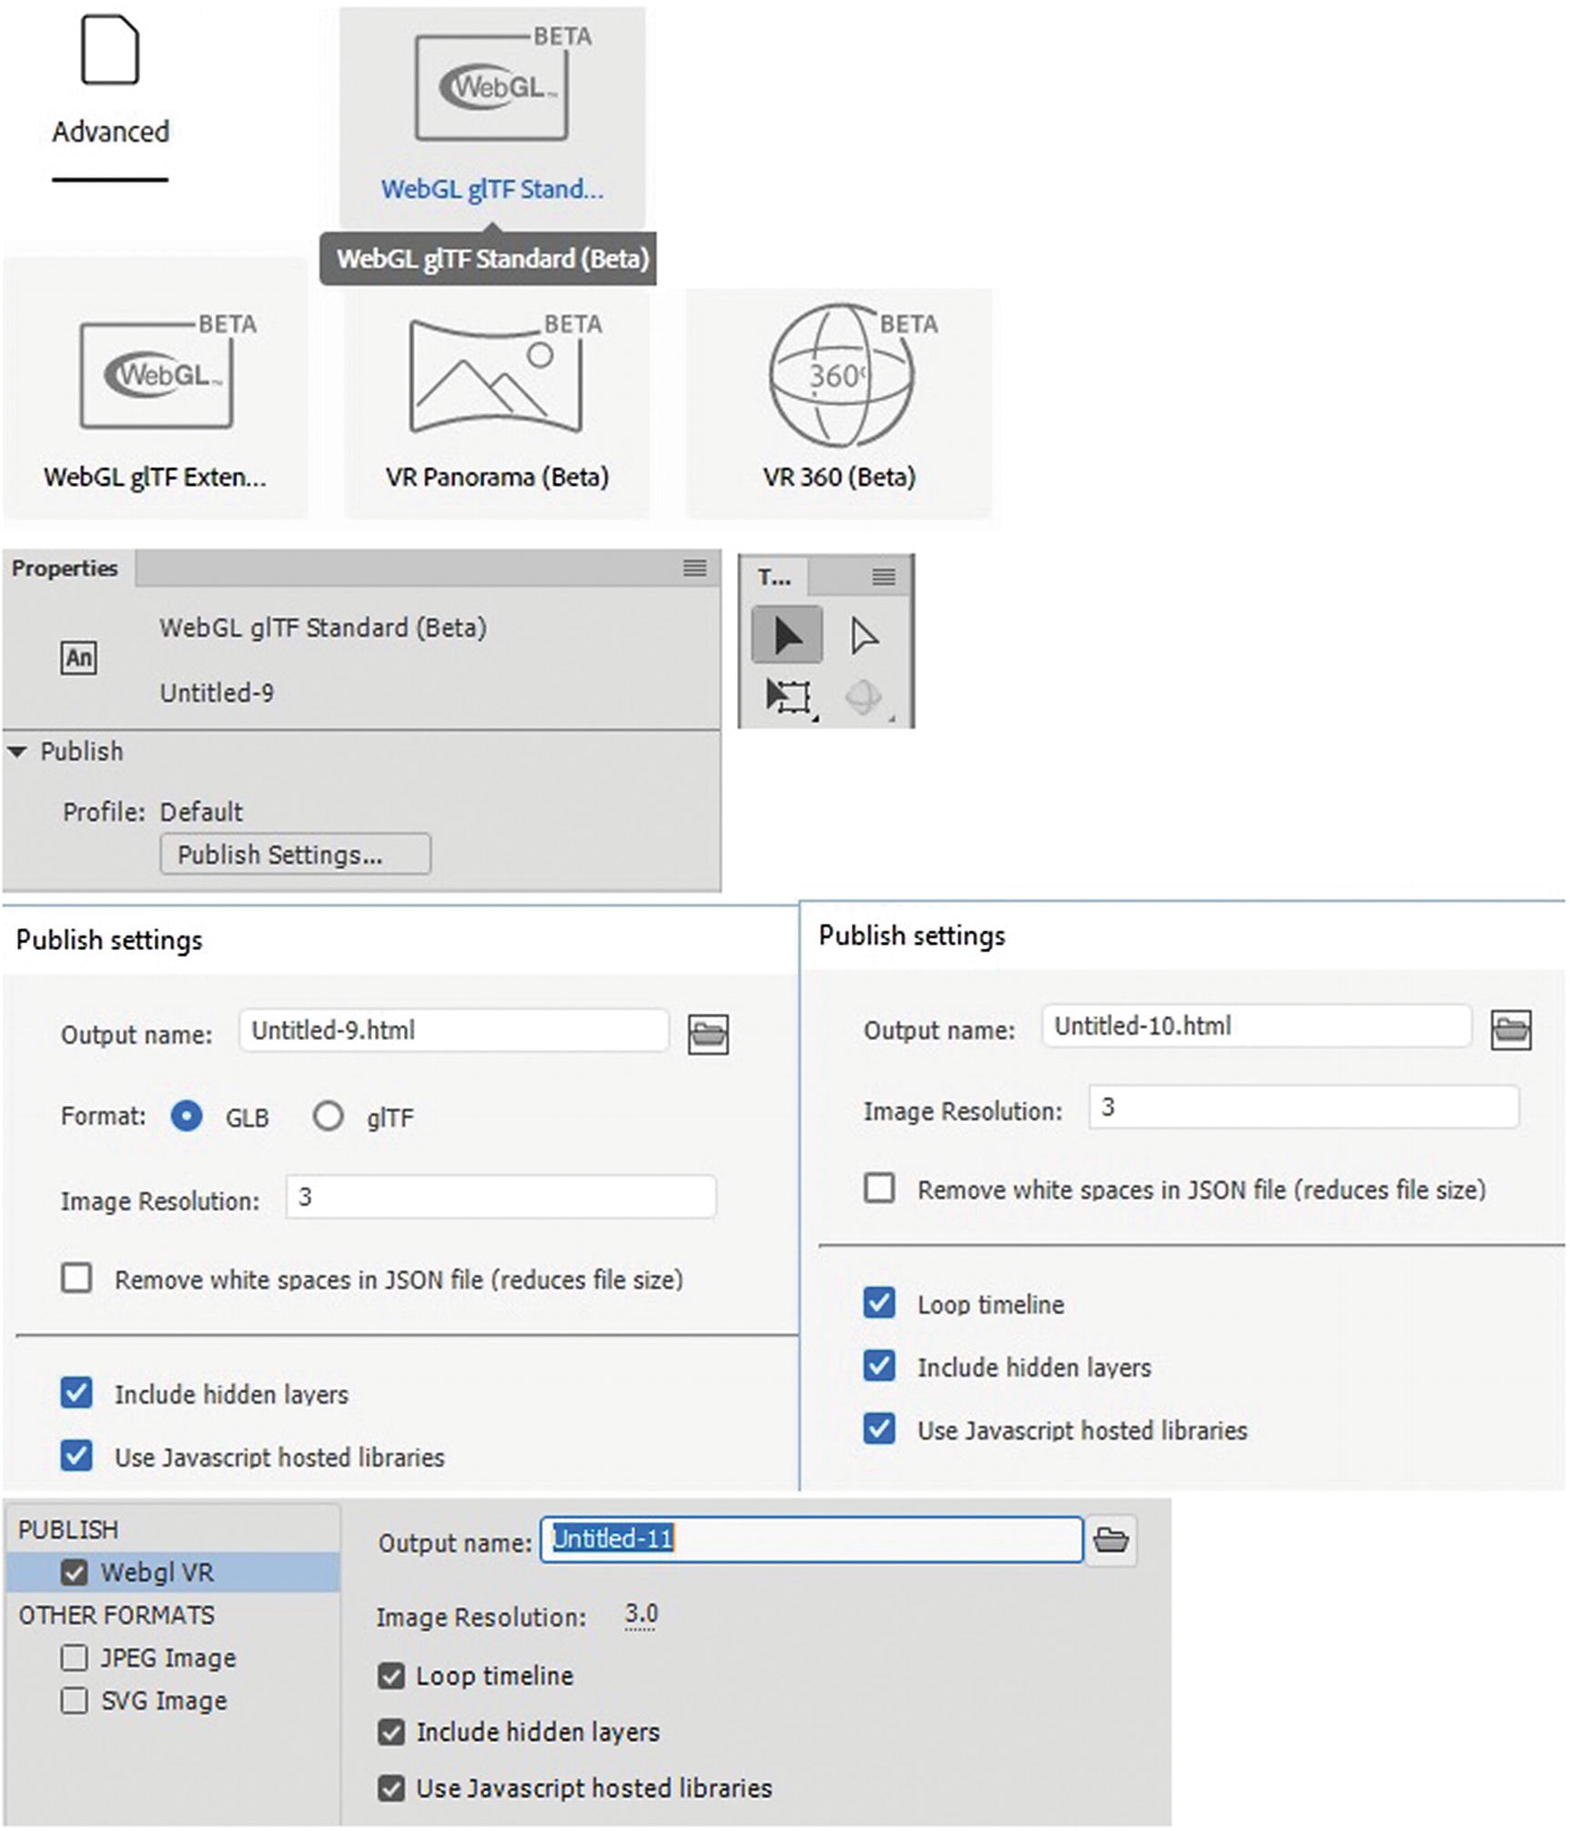
Options for various WebGL file types
As with HTML5 Canvas, you have the option to create along with certain WebGL files, JPEG images, and an SVG image.
For more information on WebGL publishing, visit
https://helpx.adobe.com/animate/using/creating-publishing-webgl-document.html .
Summary
This chapter covered a lot of options for exporting all or parts of the FLA files as images, animations, and video. You also looked at some file formats that you may not have been familiar with such as MOV and an OAM file. You also looked inside the HTML5 Canvas file (.html) and saw that it is linked to external JavaScript. It also has the options to be linked to sounds, external images, and video via components (e.g., video_canvas.html). Finally, you looked at other export options for the web.
In the next chapter, you look at a few miscellaneous tools that you can use in Animate for your own projects, and then you’ll finish Part 4 by putting your knowledge into practice.