Table of Contents for
The Modern Web
 The Modern Web
Published by
No Starch Press, 2013
The Modern Web
Published by
No Starch Press, 2013
- The Modern Web
- Cover
- The Modern Web
- Advance Praise for
- Praise for Peter Gasston’s
- Dedication
- About the Author
- About the Technical Reviewer
- Acknowledgments
- Introduction
- The Device Landscape
- The Multi-screen World
- Context: What We Don’t Know
- What You’ll Learn
- A. Further Reading
- 1. The Web Platform
- A Quick Note About Terminology
- Who You Are and What You Need to Know
- Getting Our Terms Straight
- The Real HTML5
- CSS3 and Beyond
- Browser Support
- Test and Test and Test Some More
- Summary
- B. Further Reading
- 2. Structure and Semantics
- New Elements in HTML5
- WAI-ARIA
- The Importance of Semantic Markup
- Microformats
- RDFa
- Microdata
- Data Attributes
- Web Components: The Future of Markup?
- Summary
- C. Further Reading
- 3. Device-Responsive CSS
- Media Queries
- Media Queries in JavaScript
- Adaptive vs. Responsive Web Design
- Viewport-Relative Length Units
- Responsive Design and Replaced Objects
- Summary
- D. Further Reading
- 4. New Approaches to CSS Layouts
- Multi-columns
- Flexbox
- Grid Layout
- The Further Future
- Summary
- E. Further Reading
- 5. Modern JavaScript
- New in JavaScript
- JavaScript Libraries
- Polyfills and Shims
- Testing and Debugging
- Summary
- F. Further Reading
- 6. Device Apis
- Geolocation
- Orientation
- Fullscreen
- Vibration
- Battery Status
- Network Information
- Camera and Microphone
- Web Storage
- Drag and Drop
- Interacting with Files
- Mozilla’s Firefox OS and WebAPIs
- PhoneGap and Native Wrappers
- Summary
- G. Further Reading
- 7. Images and Graphics
- Comparing Vectors and Bitmaps
- Scalable Vector Graphics
- The canvas Element
- When to Choose SVG or Canvas
- Summary
- H. Further Reading
- 8. New Forms
- New Input Types
- New Attributes
- Datalists
- On-Screen Controls and Widgets
- Displaying Information to the User
- Client-side Form Validation
- The Constraint Validation API
- Forms and CSS
- Summary
- I. Further Reading
- 9. Multimedia
- The Media Elements
- Media Fragments
- The Media API
- Media Events
- Advanced Media Interaction
- Summary
- J. Further Reading
- 10. Web Apps
- Web Apps
- Hybrid Apps
- TV Apps
- Webinos
- Application Cache
- Summary
- K. Further Reading
- 11. The Future
- Web Components
- The Future of CSS
- Summary
- L. Further Reading
- M. Browser Support as of March 2013
- The Browsers in Question
- Enabling Experimental Features
- Chapter 1: The Web Platform
- Chapter 2: Structure and Semantics
- Chapter 3: Device-Responsive CSS
- Chapter 4: New Approaches to CSS Layouts
- Chapter 5: Modern JavaScript
- Chapter 6: Device APIs
- Chapter 7: Images and Graphics
- Chapter 8: New Forms
- Chapter 9: Multimedia
- Chapter 10: Web Apps
- Chapter 11: The Future
- N. Further Reading
- Introduction
- Chapter 1: The Web Platform
- Chapter 2: Structure and Semantics
- Chapter 3: Device-Responsive CSS
- Chapter 4: New Approaches to CSS Layouts
- Chapter 5: Modern JavaScript
- Chapter 6: Device APIs
- Chapter 7: Images and Graphics
- Chapter 8: New Forms
- Chapter 9: Multimedia
- Chapter 10: Web Apps
- Chapter 11: The Future
- Index
- About the Author
- Copyright
The Constraint Validation API
Native form validation is great, but at times you may want to do more with it by perhaps adding some custom validation or creating your own error-reporting framework. The Constraint Validation API has a series of objects, properties, and methods aimed at giving you the flexibility to extend the browser’s validation system or to roll your own.
The first property is willValidate, which returns true or false if the element it’s called on will be validated—not if its value is valid, but if the validation process will be applied. You might find it more useful to think of the property as willBeValidated. By default, all form elements return true, unless they are explicitly set not to—for example, by using the disabled attribute.
You could use willValidate to run actions only on form elements that will be validated, as in this code:
var inputFields = document.querySelectorAll('input'),
    inputLen = inputFields.length,
    i;
for (i = 0; i < inputLen; i++) {
  if (inputFields[i].willValidate) {
    // Do something
  }
}
The simplest way to validate an element in a form is to use the checkValidity() method, which returns true or false depending on whether the element it’s called on will validate with its current value. This method is at the core of the following script, in which the function checkStatus is used to run the checkValidity() method and update the contents of a sibling p element with a check or cross, depending on its validation status.
The function is attached to the email input using a listener for the input event, which is new to HTML5. This event fires whenever the value of an input or textarea element is updated—sort of similar to the keypress event—but it allows for the user entering blocks of text before firing on a pause or on the use of auto-suggested values:
var email = document.getElementById('email');
function checkStatus(e) {
  var valid= e.currentTarget.checkValidity(),
  validMsg = e.currentTarget.nextSibling,
  status = (valid) ? '✓' : '×';
  validMsg.textContent = status;
}
email.addEventListener('input', checkStatus, false);
You can try this in the example file checkvalidity.html, which also runs the script on a tel input that accepts only numbers.
As well as the input event, HTML5 brings us the invalid event. This event is fired on an element with an invalid value when either the form is submitted or the checkValidity() method is run and returns a standard HTMLEvent object. That being the case, I could update the previous code to attach an extra event listener to each field, logging the invalid event whenever it occurs:
inputField[i].addEventListener('invalid', logInvalid, false);
If you want to get information about why a value doesn’t validate, you can use the validity property. This property returns a validityState object with a range of properties related to validity; for example, if the field is required but contains no value, the valueMissing property returns true; or, if there are no validation errors, the valid property returns true.
The following script builds on the previous one by displaying a status message if the checkValidity() method returns false. It uses the validity property to check if a few common statuses are true and outputs a custom message if so, or a message of “Unknown error” in other cases:
var email = document.getElementById('email');
function statusMsg(e) {
  var valid= e.currentTarget.checkValidity(),
      validStatus = e.currentTarget.validity,
      validMsg = e.currentTarget.nextSibling,
      status;
  if (valid) {
    status = '✓';
  } else {
    if (validStatus.patternMismatch) {
      status = 'Pattern mismatch';
    } else if (validStatus.typeMismatch) {
      status = 'Type mismatch';
    }
    …
  }
  validMsg.textContent = status;
}
email.addEventListener('input', statusMsg, false);
You can run this script for yourself in the file validitystate.html; check the console to see the validityState object, and explore the different true and false values. Figure 8-14 shows an example as logged in Firebug.
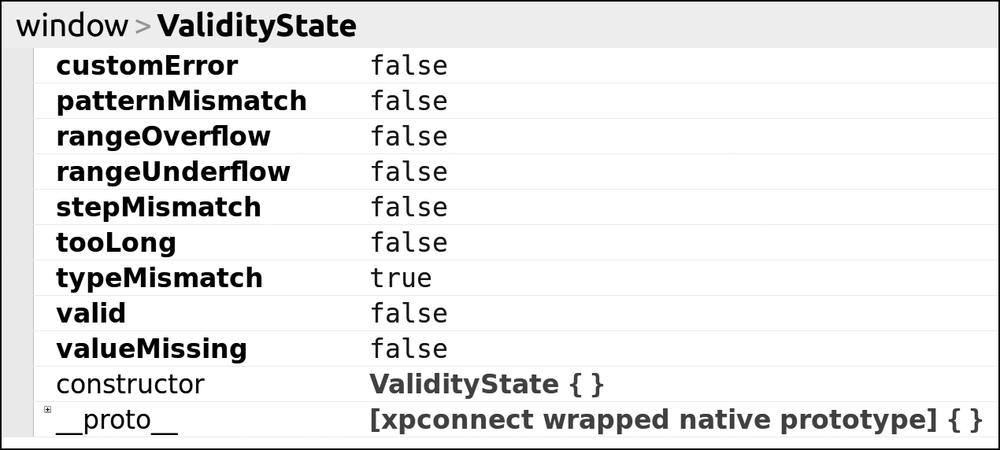
validityState object logged in Firebug, showing the current state of validity for the form field
Browsers that have native validation alerts create their own messages that appear on screen; for example, submitting an empty input that has the required attribute applied displays the message “Please fill in this field” in Firefox. The validationMessage property holds this message when the field is in an invalid state; if the value of the field is valid, the validationMessage property is an empty string.
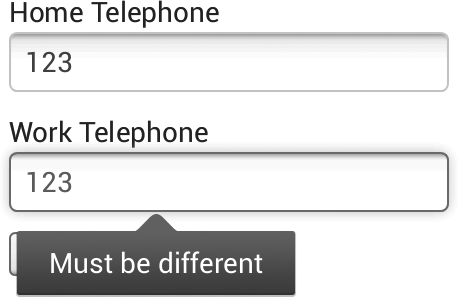
You can set the message using the setCustomValidity() method, which also allows you to set a custom validation rule. For example, in the following code, I have two tel input types, referred to as telHome and telWork, and I want to ensure that the two values are different. To do this, I add an input listener on telWork, and each time the user types in this field, the rule checks if the value is the same as telHome, and if it is, a custom validation message is created:
var telHome = document.getElementById('tel-home'),
    telWork = document.getElementById('tel-work');
telWork.addEventListener('input', function (e) {
  if (e.currentTarget.value === telHome.value) {
    telWork.setCustomValidity('Must be different');
  } else {
    telWork.setCustomValidity('');
  }
}, false);
Take a look at customvalidity.html to see this in action; you can see the result in Figure 8-15.