Table of Contents for
The Modern Web
 The Modern Web
Published by
No Starch Press, 2013
The Modern Web
Published by
No Starch Press, 2013
- The Modern Web
- Cover
- The Modern Web
- Advance Praise for
- Praise for Peter Gasston’s
- Dedication
- About the Author
- About the Technical Reviewer
- Acknowledgments
- Introduction
- The Device Landscape
- The Multi-screen World
- Context: What We Don’t Know
- What You’ll Learn
- A. Further Reading
- 1. The Web Platform
- A Quick Note About Terminology
- Who You Are and What You Need to Know
- Getting Our Terms Straight
- The Real HTML5
- CSS3 and Beyond
- Browser Support
- Test and Test and Test Some More
- Summary
- B. Further Reading
- 2. Structure and Semantics
- New Elements in HTML5
- WAI-ARIA
- The Importance of Semantic Markup
- Microformats
- RDFa
- Microdata
- Data Attributes
- Web Components: The Future of Markup?
- Summary
- C. Further Reading
- 3. Device-Responsive CSS
- Media Queries
- Media Queries in JavaScript
- Adaptive vs. Responsive Web Design
- Viewport-Relative Length Units
- Responsive Design and Replaced Objects
- Summary
- D. Further Reading
- 4. New Approaches to CSS Layouts
- Multi-columns
- Flexbox
- Grid Layout
- The Further Future
- Summary
- E. Further Reading
- 5. Modern JavaScript
- New in JavaScript
- JavaScript Libraries
- Polyfills and Shims
- Testing and Debugging
- Summary
- F. Further Reading
- 6. Device Apis
- Geolocation
- Orientation
- Fullscreen
- Vibration
- Battery Status
- Network Information
- Camera and Microphone
- Web Storage
- Drag and Drop
- Interacting with Files
- Mozilla’s Firefox OS and WebAPIs
- PhoneGap and Native Wrappers
- Summary
- G. Further Reading
- 7. Images and Graphics
- Comparing Vectors and Bitmaps
- Scalable Vector Graphics
- The canvas Element
- When to Choose SVG or Canvas
- Summary
- H. Further Reading
- 8. New Forms
- New Input Types
- New Attributes
- Datalists
- On-Screen Controls and Widgets
- Displaying Information to the User
- Client-side Form Validation
- The Constraint Validation API
- Forms and CSS
- Summary
- I. Further Reading
- 9. Multimedia
- The Media Elements
- Media Fragments
- The Media API
- Media Events
- Advanced Media Interaction
- Summary
- J. Further Reading
- 10. Web Apps
- Web Apps
- Hybrid Apps
- TV Apps
- Webinos
- Application Cache
- Summary
- K. Further Reading
- 11. The Future
- Web Components
- The Future of CSS
- Summary
- L. Further Reading
- M. Browser Support as of March 2013
- The Browsers in Question
- Enabling Experimental Features
- Chapter 1: The Web Platform
- Chapter 2: Structure and Semantics
- Chapter 3: Device-Responsive CSS
- Chapter 4: New Approaches to CSS Layouts
- Chapter 5: Modern JavaScript
- Chapter 6: Device APIs
- Chapter 7: Images and Graphics
- Chapter 8: New Forms
- Chapter 9: Multimedia
- Chapter 10: Web Apps
- Chapter 11: The Future
- N. Further Reading
- Introduction
- Chapter 1: The Web Platform
- Chapter 2: Structure and Semantics
- Chapter 3: Device-Responsive CSS
- Chapter 4: New Approaches to CSS Layouts
- Chapter 5: Modern JavaScript
- Chapter 6: Device APIs
- Chapter 7: Images and Graphics
- Chapter 8: New Forms
- Chapter 9: Multimedia
- Chapter 10: Web Apps
- Chapter 11: The Future
- Index
- About the Author
- Copyright
The canvas Element
The canvas element is so named because, like a blank canvas, it’s there to be drawn on. The drawing is done with JavaScript using a dedicated API, creating a tailor-made bitmap graphic. And it really is like a painter’s canvas in that once you’ve drawn on it, you can’t then manipulate the things you’ve drawn. They are not objects like SVG elements, just pixels on the screen; you can only draw over them.
The basic setup is incredibly simple: Add a canvas element to your markup—perhaps with a unique id that will make it a little easier to reference—with size attributes and fallback content for browsers that don’t support canvas (or JavaScript):
<canvas id="canvas" height="400" width="800">
  <p>Sorry, your browser doesn’t support canvas (or JavaScript)</p>
</canvas>
Note
A quick note of disambiguation: When referring specifically to the element I’ll use canvas; any other use of “canvas” throughout this book is a shorthand used to refer to the technique of drawing to a canvas element using the API.
All subsequent actions are performed with JavaScript. The first step is to select the canvas and create a context, which is a fancy way of saying that you’re going to draw on it. You do this using the getContext() method with a context as an argument, which for simple two-dimensional shapes is 2d. I’ll also add some feature testing to make sure the browser supports the canvas API. My code ends up looking something like this:
var el = document.getElementById('canvas');
if (el && el.getContext) {
  var context = el.getContext('2d');
  if (context) { … }
}
Then you begin drawing. As with SVG, drawings are carried out with a series of shapes and lines, using a coordinate system. For example, to draw a rectangle filled with a solid color you use the fillRect() method, which accepts four number arguments: The first two are x- and y-coordinates of the top-left corner; the next two are the width and height. The following code draws a 120×120 square, filled with a solid color, 20px from the top-left corner of the canvas element:
context.fillRect(20,20,120,120);
You can also change the appearance values of the objects you draw, using a series of properties in the API. These are applied the next time a method that draws to canvas is run. In the following code, I change the color of the fill and then set up a series of drop shadow properties that are rendered on the next rectangle drawn with fillRect() and all subsequent drawings until I change the properties again:
context.fillStyle = '#ff0000';
context.shadowOffsetX = 3;
context.shadowOffsetY = 3;
context.shadowBlur = 3;
context.shadowColor = 'rgba(0,0,0,0.5)';
context.fillRect(200,80,160,160);
Drawing circles is a little more complex, requiring the arc() method, which takes six arguments: the first two are the x- and y-coordinates of the center of the circle, the third is the radius, the fourth is the starting angle of the arc, the fifth is the finishing angle—I’m using p multiplied by 2 to draw a full circle—and the sixth and last argument is a Boolean to state whether the arc is drawn counterclockwise. When I’ve done all that, I use the stroke() method to draw the outline of my circle:
context.arc(360,240,160,0,Math.PI*2,false);
context.stroke();
You can see a few different shapes that I’ve drawn in the file canvas.html (and in Figure 7-8), but as with SVG, the canvas API includes so much that I can’t possibly hope to cover it in a single chapter of this book, so if you’re interested in learning more, I recommend taking a look at some of the great free resources available online, a few of which I list in Appendix H.

Image Manipulation
Canvas becomes extremely useful when manipulating images. You can load an image into a canvas and, once there, draw and manipulate it as you wish. Get the image data with the getImageData() method, which uses four arguments—the now familiar x, y, width, and height—to select the portion of the canvas you want to manipulate. Using this method inside a load event is a good idea; it ensures the script doesn’t run before the image you’re getting data from has finished loading.
In the next code snippet, I use querySelector() to find an image in the page and, when it has loaded, first draw it onto the canvas with drawImage() and then use getImageData() to select the whole canvas and assign it to the variable newImg:
var img = document.querySelector('img');
img.addEventListener('load', function () {
  context.drawImage(img,0,0);
  var newImg = context.getImageData(150,0,150,225);
}, false);
Once you have the image, you can begin to manipulate it using the data property. This is a huge array that contains information about every pixel in the image portion, where each item is a number from 0 to 255 representing the RGBA color model: The first item is the red value of the pixel, the second is the green, the third blue, and the fourth alpha. A fully opaque red pixel would be represented by the four array items [255,0,0,255]. These four values are repeated for every pixel in the image.
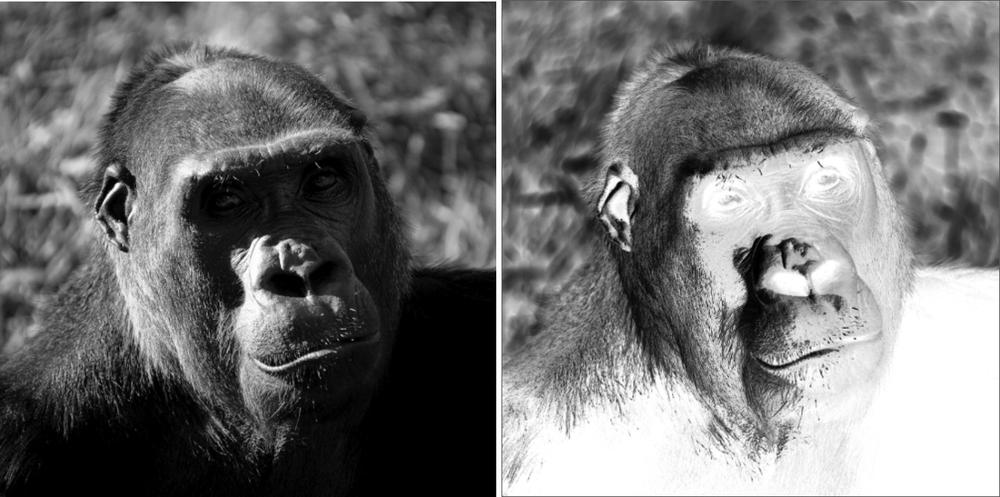
That means you can manipulate the color value of every single pixel, which is a pretty powerful ability to have. In the following code, I use a for loop to go through all the pixels and invert their values by subtracting their current value from 255. Once I’ve done this, putImageData() returns the modified image to the canvas at the same coordinates. You can see the result in Figure 7-9, and you can see for yourself how this looks in the file canvas-image.html.
var img = document.querySelector('img');
img.addEventListener('load', function () {
  context.drawImage(img,0,0);
  var i,
      newImg = context.getImageData(00,0,500,500),
      newLen = newImg.data.length;
  for (i=0;i<newLen;i+=4) {
    newImg.data[i] = 255 – newImg.data[i];
    newImg.data[i+1] = 255 – newImg.data[i+1];
    newImg.data[i+2] = 255 - newImg.data[i+2];
  }
  context.putImageData(newImg,0,0);
}, false);
Rather excitingly, you can combine the canvas element with the live video stream obtained from the getUserMedia() method I described in Chapter 6, providing image manipulation on the fly. Although I don’t have the space to go into that in any detail, I encourage you to look online for some great demos, such as Tim Taubert’s “Building a Live Green Screen with getUserMedia() and MediaStreams.” See Appendix H.
WebGL
You may have noticed that when I created the canvas context, I specified it was to be 2-D, which implies there is also a 3-D context—and there is, using a technology called WebGL to gain access to the device’s graphics card and create hardware-accelerated 3-D objects in the browser. The actual context name is webgl. Test for support using something like this:
var el = document.getElementById('canvas');
if (el && el.getContext) {
  var context = el.getContext('webgl');
  if (context) { … }
}
WebGL is not fully supported across every browser and may never be, and it uses a language that is extremely complicated for your average developer (me included), so obviously WebGL is far beyond the scope of this book. As before, if you’re interested in learning more, I advise you to take a look at some of the fantastic free online resources that exist.