Table of Contents for
The Modern Web
 The Modern Web
Published by
No Starch Press, 2013
The Modern Web
Published by
No Starch Press, 2013
- The Modern Web
- Cover
- The Modern Web
- Advance Praise for
- Praise for Peter Gasston’s
- Dedication
- About the Author
- About the Technical Reviewer
- Acknowledgments
- Introduction
- The Device Landscape
- The Multi-screen World
- Context: What We Don’t Know
- What You’ll Learn
- A. Further Reading
- 1. The Web Platform
- A Quick Note About Terminology
- Who You Are and What You Need to Know
- Getting Our Terms Straight
- The Real HTML5
- CSS3 and Beyond
- Browser Support
- Test and Test and Test Some More
- Summary
- B. Further Reading
- 2. Structure and Semantics
- New Elements in HTML5
- WAI-ARIA
- The Importance of Semantic Markup
- Microformats
- RDFa
- Microdata
- Data Attributes
- Web Components: The Future of Markup?
- Summary
- C. Further Reading
- 3. Device-Responsive CSS
- Media Queries
- Media Queries in JavaScript
- Adaptive vs. Responsive Web Design
- Viewport-Relative Length Units
- Responsive Design and Replaced Objects
- Summary
- D. Further Reading
- 4. New Approaches to CSS Layouts
- Multi-columns
- Flexbox
- Grid Layout
- The Further Future
- Summary
- E. Further Reading
- 5. Modern JavaScript
- New in JavaScript
- JavaScript Libraries
- Polyfills and Shims
- Testing and Debugging
- Summary
- F. Further Reading
- 6. Device Apis
- Geolocation
- Orientation
- Fullscreen
- Vibration
- Battery Status
- Network Information
- Camera and Microphone
- Web Storage
- Drag and Drop
- Interacting with Files
- Mozilla’s Firefox OS and WebAPIs
- PhoneGap and Native Wrappers
- Summary
- G. Further Reading
- 7. Images and Graphics
- Comparing Vectors and Bitmaps
- Scalable Vector Graphics
- The canvas Element
- When to Choose SVG or Canvas
- Summary
- H. Further Reading
- 8. New Forms
- New Input Types
- New Attributes
- Datalists
- On-Screen Controls and Widgets
- Displaying Information to the User
- Client-side Form Validation
- The Constraint Validation API
- Forms and CSS
- Summary
- I. Further Reading
- 9. Multimedia
- The Media Elements
- Media Fragments
- The Media API
- Media Events
- Advanced Media Interaction
- Summary
- J. Further Reading
- 10. Web Apps
- Web Apps
- Hybrid Apps
- TV Apps
- Webinos
- Application Cache
- Summary
- K. Further Reading
- 11. The Future
- Web Components
- The Future of CSS
- Summary
- L. Further Reading
- M. Browser Support as of March 2013
- The Browsers in Question
- Enabling Experimental Features
- Chapter 1: The Web Platform
- Chapter 2: Structure and Semantics
- Chapter 3: Device-Responsive CSS
- Chapter 4: New Approaches to CSS Layouts
- Chapter 5: Modern JavaScript
- Chapter 6: Device APIs
- Chapter 7: Images and Graphics
- Chapter 8: New Forms
- Chapter 9: Multimedia
- Chapter 10: Web Apps
- Chapter 11: The Future
- N. Further Reading
- Introduction
- Chapter 1: The Web Platform
- Chapter 2: Structure and Semantics
- Chapter 3: Device-Responsive CSS
- Chapter 4: New Approaches to CSS Layouts
- Chapter 5: Modern JavaScript
- Chapter 6: Device APIs
- Chapter 7: Images and Graphics
- Chapter 8: New Forms
- Chapter 9: Multimedia
- Chapter 10: Web Apps
- Chapter 11: The Future
- Index
- About the Author
- Copyright
New in JavaScript
From many new ways of DOM traversal to a whole new range of events, JavaScript has changed plenty in the past three or four years. If you don’t actively follow or keep up with the JavaScript community, you can easily miss it.
In this section, I run through some of the new features of JavaScript, chosen on the massively unscientific basis of how useful I think they are. This section includes by no means everything that’s new in the language—just a handful of methods, attributes, and events you might use often in your day-to-day web builds.
The async and defer Attributes
A browser’s default behavior is to load all page elements in order and execute JavaScript files as soon as they’re encountered, which blocks HTML parsing. Sites on slow connections, or those that include a lot of script to execute, can lag considerably. This is generally why best practice is to link to script files toward the end of your document, after the rest of the page has loaded.
A solution that prevents this blocking has been developed, however. The defer attribute, when added to the script element for external files (that is, when the src attribute is present), downloads scripts without pausing the parser but delays executing them until the HTML has finished loading. As defer is a Boolean attribute, no value is required:
<script src="foo.js" defer></script>
HTML5 has another new option, which is to execute the scripts asynchronously. As with deferred loading, external scripts are downloaded without pausing the parser; the difference is that the parser then executes those scripts as soon as possible. This approach is a kind of “best of both worlds” approach: not pausing the parser while downloading but not waiting until the end before executing. This option requires the async attribute, which is also Boolean:
<script src="foo.js" async></script>
One drawback is that your scripts may very well be executed in a different order from the way you call them in the document, so you can’t rely on dependencies between script files. But if order is not an issue and the script is self-contained, this option may be best.
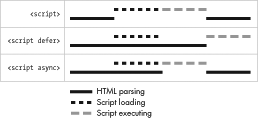
You can see the difference in the way the three approaches work in Figure 5-1. The first row shows default behavior, where HTML parsing is paused while the scripts are loaded and executed. The second row shows deferred execution, where the scripts are loaded without pausing the parser and then executed when the DOM is ready. In the final row, the parser still isn’t paused while the script is loading, but it is paused as it then executes.
The addEventListener Method
The standard way to add event handlers to elements used to be with the series of event properties, such as element.onclick or element.onmouseout, which were fine as things went but had the drawback of allowing only a single handler of that type on each element. The W3C created a more flexible approach in the form of the addEventListener() method.
Honestly, this method isn’t all that new, but only fairly recently, after being implemented in IE9 in 2011, has addEventListener() had a good level of support across browsers. A generic method, addEventListener() takes two mandatory and one (semi-)optional parameter:
el.addEventListener(type,listener,useCapture);
The type parameter is the type of event to listen for; the listener is the object that gets notified when the event occurs and is most commonly a function; and useCapture is a Boolean to indicate event bubbling. I won’t go into detail on the latter parameter, as describing event bubbling is beyond the scope of this book, but although the parameter is supposedly optional, you have to include it, as certain older browsers will throw an error if it’s not present. If you don’t need it or know what it is, set useCapture to false and don’t worry about it.
Here’s a quick example of a simple use of addEventListener(); this code listens for a click event and runs an anonymous function to log a message into the console when that even occurs:
el.addEventListener('click', function () {
  console.log('Click!');
},false);
Even at this basic level, addEventListener() is useful enough, but it’s even more valuable than it might seem, as you can use it to add multiple events of the same type to an element. This means you can use scripts from different sources without worrying about accidentally overwriting an event listener. The next example shows two named functions applied to the same element; each could be in a completely different script file yet still be executed when the element is clicked:
el.addEventListener('click', foo, false);
el.addEventListener('click', bar, false);
Using named functions (as I’ve done in this example) rather than anonymous functions is a good idea. Named functions are simply easier to refer to elsewhere in your scripts, which is essential when you want to remove event handlers as discussed in Removing Event Listeners.
The event Object
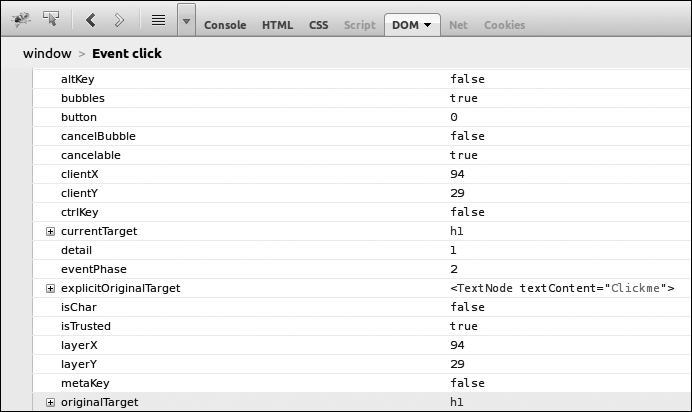
The addEventListener() method returns an object with details of the event after it’s been fired. You can access this object using an anonymous function with a unique identifier as an argument. This identifier will be the name of the object. In this example, I call it ev and log it to the console so you can see the result:
el.addEventListener('click', function (ev) {
  console.log(ev);
},false);
Figure 5-2 shows the event object output in Firebug. You can see a number of different property-value pairs, giving quite substantial information about the event as it happened (there’s more information off-screen too).
This method also works with named functions; you just have to supply the unique id value as an argument when defining the function:
var foo = function (ev) {
  console.log(ev);
};
el.addEventListener('click', foo, false);
Among the event object’s more useful properties is currentTarget, which holds information about the element that the event occurred on; you can then apply behavior to that element easily, as in this code where the element that is clicked has its color set to #F00:
el.addEventListener('click', function (ev) {
  ev.currentTarget.style.color = '#F00';
},false);
The event object is also useful when you want to stop a default action from occurring on an element. For example, you may attach an event to an a element that contains a link, but you don’t want the browser to follow the link before the function attached to the event has run. Use the preventDefault() method for this:
el.addEventListener('click', function (ev) {
  ev.preventDefault();
  …
},false);
Removing Event Listeners
Sometimes you want to remove a handler from an element to prevent it from firing again. You remove handlers with the removeEventListener() method, which has the same three parameters as addEventListener():
el.removeEventListener(type,listener,useCapture);
To remove an event, you have to provide removeEventListener() with the exact parameters used by the addEventListener() method, which is why I mentioned previously the importance of using named rather than anonymous functions. The following code illustrates what I mean; first an event listener is added to run the function foo, and then the listener is removed by using exactly the same parameters:
el.addEventListener('click',foo,false);
el.removeEventListener('click',foo,false);
You can remove anonymous functions from event handlers, but these methods are being deprecated in the latest revisions of JavaScript, so steering clear of them is best.
The DOMContentLoaded Event
The old way to initiate scripts when a page had finished loading was to use the load event, but this method had the drawback of only firing after every resource—images, stylesheets, and so on—had fully loaded, which could sometimes lead to quite a delay. Developers then created a custom event, domready, which fires when the DOM has loaded but before the resources.
The domready event was quickly adopted by many JavaScript libraries; it began to be adopted natively in browsers as DOMContentLoaded; and it is now standardized in HTML5. DOMContentLoaded is fired on the document object like so:
document.addEventListener('DOMContentLoaded', function () {…}, false);
Notably, the behavior layer of the site can be initiated much sooner, meaning the user can start exploring your site more quickly—especially useful over slow connections or for image-heavy pages that could take some time to load. If you have scripts that you want to run only when every resource has finished loading, you can continue to use load.
Input Events
The massive rise in the number of devices with touch-enabled (whether finger, stylus, or sausage) input has meant the creation of a new series of events to cater to them. Although click events are still fired by touch input, simply relying on them is not sufficient, as there are major differences in the ways that mouse- and touch-enabled devices operate. For example, when a user clicks his or her mouse button, a slight pause occurs as the browser waits to see if the action is a single or double click. This delay is small but noticeable on touch screens and makes them appear to be unresponsive.
The W3C is currently considering two different input event models: Touch Events is aimed squarely at touch input, has been under active development for some time, and is already implemented in some browsers, but this model has been criticized in some quarters and may also fall foul of some existing patents; Pointer Events is a new proposal for a unified input model that has been accepted for consideration by the W3C but not yet formally approved or implemented.
Which—if either—model eventually becomes the standard remains to be seen, although indications are that Pointer Events is preferred. Given the uncertainty, I’ll just briefly explain how each works.
Touch Events
The Touch Events Level 1 specification has four events:
-
touchstartfires when a finger (the word I’ll use from now on to avoid repeating the word “sausage”) touches the screen. -
touchendfires when the finger is removed from the screen. -
touchmovefires when a finger moves between two points on the screen. -
touchcancelfires when the user agent interrupts a touch or when the finger leaves the active area.
Touch Events Level 2, still in development as I write this, introduces two additional events:
-
touchenterfires when a finger already on the screen moves over the target element. -
touchleavefires when the finger moves out of the target area without leaving the screen.
To closely parallel a mouse click, you probably want to use the touchend event, which fires when the finger is lifted from the screen, denoting that the user has completed his or her action:
el.addEventListener('touchend', function () {…}, false);
Every time a touch event fires, it creates a TouchEvent object, which contains more information about the event. This information includes TouchList, an object containing the touches child object, which holds information about how many fingers are touching the screen, obviously useful for multitouch events. Bear in mind that each touch creates a touch event, and when using multitouch, each touch event includes all the preceding touches. So the TouchList object created when the first finger touches the screen holds information about touch 0; the TouchList created by the second finger holds information about touches 0 and 1; the TouchList of the third finger about touches 0, 1, and 2, and so on.
Pointer Events
As I mentioned, Pointer Events presents a unified approach to creating events regardless of the actual input mechanism—whether finger, mouse, stylus, or other. This approach is similar to DOM Mouse Events in the way that it records an action’s stages but uses the agnostic pointer* events: pointerdown, pointerup, pointercancel, pointermove, pointerover, and pointerout. For example, to fire an event when the pointer is released, use pointerup:
el.addEventListener('pointerup', function () {…}, false);
When fired, each event creates a pointerEvent interface that combines properties from the MouseEvent interface—currentTarget, coordinates where the event occurred, and so on—with a series of new properties, including the type of pointer used (pointerType), the amount of pressure applied, and the pointer’s tilt (where relevant).
Without an implementation, I can’t give any examples of these events in use, but certainly the spec makes sense and seems to logically extend existing events and be more general—and, therefore, more useful—than dedicated Touch Events. Although not confirmed as I write this, Pointer Events seems to be the specification that the W3C will develop. In the meantime, a number of community-built libraries exist to fill the functionality gap: among the multitude, the PointerEvents polyfill is the one to consider.
CSS Selectors in JavaScript
Selecting elements from the DOM used to be a little problematic. You had getElementById() and getElementsByTagName(), but too often getting the exact elements you wanted involved a lot of DOM traversal or filtering. Libraries like jQuery (I get to this in Pointer Events) solved this problem with methods that allow CSS selectors as arguments:
var foo = $('p.foo');
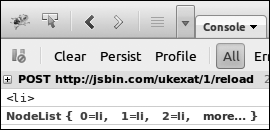
The obvious benefit this brings soon fed back into JavaScript through two new native methods: querySelector() and querySelectorAll(). Both work in a similar way, taking CSS selectors as arguments; the difference is that querySelector() selects only the first matched element, so its result is a single node, whereas querySelectorAll() matches all instances of the element, so its result is returned as a NodeList:
var foo = document.querySelector('p.foo');
var foo = document.querySelectorAll('p.foo');
In Figure 5-3 you can see the results of the different selectors logged in to the console; querySelector() is the first result, querySelectorAll() the second.
You can use any complex selector or series of selectors with these two methods; the only proviso is that they can’t be relative selectors—that is, they can’t begin with a combinator like > or +. This argument is, therefore, invalid:
var el = document.querySelectorAll('+ h2');
A proposal to resolve this problem is a pair of similar methods called find() and findAll(), which would work in basically the same way but allow selectors relative to the target. To create a valid version of the previous code, use this:
var foo = el.findAll('+ h2');
Although these aren’t really vital methods, they make DOM traversal a little easier, so I hope to see them broadly adopted soon.
The getElementsByClassName() Method
One fairly big (and surprising) gap in using JavaScript to access the DOM was a method for selecting elements by their class name. As with DOMContentReady, this absence led developers to write their own custom scripts to carry out that task, many of which consolidated around the name getElementsByClassName(). This solution was also standardized in HTML5, and the method is now present natively in modern browsers. getElementsByClassName() takes a single string value and returns a NodeList of all elements that have a class name matching the string:
var el = document.getElementsByClassName('foo');
You can also match multiple class names by separating them with spaces in the string; the following code selects all elements that have a class name of both foo and bar:
var el = document.getElementsByClassName('foo bar');
Interacting with Classes
With the introduction of the classList object, JavaScript has also made interacting with the class names of elements easier. Every element in the DOM has an associated classList, which is just what it sounds like: a list of all the classes applied to that element. To get the classList of an element and log it to the console, do this:
var el = document.querySelector('.foo');
console.log(el.classList);
The classList object contains a series of properties and methods for manipulating the classes. You can query for the existence of a class with the contains() method, which returns true if the provided class is present and false otherwise. You add a class with the add() method and remove one with remove(). The following code tests for the class name foo, adds it if it isn’t present, and removes it if it is:
if (el.classList.contains('foo') {
  el.classList.remove('foo');
} else {
  el.classList.add('foo');
}
A quicker way to do this is with the toggle() method; toggle() simply removes a class if it’s present or adds it if it’s not:
el.classList.toggle('foo');