Table of Contents for
Python: Penetration Testing for Developers
 Python: Penetration Testing for Developers
Published by
Packt Publishing, 2016
Python: Penetration Testing for Developers
Published by
Packt Publishing, 2016
- Cover
- Table of Contents
- Python: Penetration Testing for Developers
- Python: Penetration Testing for Developers
- Python: Penetration Testing for Developers
- Credits
- Preface
- What you need for this learning path
- Who this learning path is for
- Reader feedback
- Customer support
- 1. Module 1
- 1. Understanding the Penetration Testing Methodology
- Understanding what penetration testing is not
- Assessment methodologies
- The penetration testing execution standard
- Penetration testing tools
- Summary
- 2. The Basics of Python Scripting
- Python – the good and the bad
- A Python interactive interpreter versus a script
- Environmental variables and PATH
- Understanding dynamically typed languages
- The first Python script
- Developing scripts and identifying errors
- Python formatting
- Python variables
- Operators
- Compound statements
- Functions
- The Python style guide
- Arguments and options
- Your first assessor script
- Summary
- 3. Identifying Targets with Nmap, Scapy, and Python
- Understanding Nmap
- Nmap libraries for Python
- The Scapy library for Python
- Summary
- 4. Executing Credential Attacks with Python
- Identifying the target
- Creating targeted usernames
- Testing for users using SMTP VRFY
- Summary
- 5. Exploiting Services with Python
- Understanding the chaining of exploits
- Automating the exploit train with Python
- Summary
- 6. Assessing Web Applications with Python
- Identifying hidden files and directories with Python
- Credential attacks with Burp Suite
- Using twill to walk through the source
- Understanding when to use Python for web assessments
- Summary
- 7. Cracking the Perimeter with Python
- Understanding the link between accounts and services
- Cracking inboxes with Burp Suite
- Identifying the attack path
- Gaining access through websites
- Summary
- 8. Exploit Development with Python, Metasploit, and Immunity
- Understanding the Windows memory structure
- Understanding memory addresses and endianness
- Understanding the manipulation of the stack
- Understanding immunity
- Understanding basic buffer overflow
- Writing a basic buffer overflow exploit
- Understanding stack adjustments
- Understanding the purpose of local exploits
- Understanding other exploit scripts
- Reversing Metasploit modules
- Understanding protection mechanisms
- Summary
- 9. Automating Reports and Tasks with Python
- Understanding how to create a Python class
- Summary
- 10. Adding Permanency to Python Tools
- Understanding the difference between multithreading and multiprocessing
- Building industry-standard tools
- Summary
- 2. Module 2
- 1. Python with Penetration Testing and Networking
- Approaches to pentesting
- Introducing Python scripting
- Understanding the tests and tools you'll need
- Learning the common testing platforms with Python
- Network sockets
- Server socket methods
- Client socket methods
- General socket methods
- Moving on to the practical
- Summary
- 2. Scanning Pentesting
- What are the services running on the target machine?
- Summary
- 3. Sniffing and Penetration Testing
- Implementing a network sniffer using Python
- Learning about packet crafting
- Introducing ARP spoofing and implementing it using Python
- Testing the security system using custom packet crafting and injection
- Summary
- 4. Wireless Pentesting
- Wireless attacks
- Summary
- 5. Foot Printing of a Web Server and a Web Application
- Introducing information gathering
- Information gathering of a website from SmartWhois by the parser BeautifulSoup
- Banner grabbing of a website
- Hardening of a web server
- Summary
- 6. Client-side and DDoS Attacks
- Tampering with the client-side parameter with Python
- Effects of parameter tampering on business
- Introducing DoS and DDoS
- Summary
- 7. Pentesting of SQLI and XSS
- Types of SQL injections
- Understanding the SQL injection attack by a Python script
- Learning about Cross-Site scripting
- Summary
- 3. Module 3
- 1. Gathering Open Source Intelligence
- Gathering information using the Shodan API
- Scripting a Google+ API search
- Downloading profile pictures using the Google+ API
- Harvesting additional results from the Google+ API using pagination
- Getting screenshots of websites with QtWebKit
- Screenshots based on a port list
- Spidering websites
- 2. Enumeration
- Performing a ping sweep with Scapy
- Scanning with Scapy
- Checking username validity
- Brute forcing usernames
- Enumerating files
- Brute forcing passwords
- Generating e-mail addresses from names
- Finding e-mail addresses from web pages
- Finding comments in source code
- 3. Vulnerability Identification
- Automated URL-based Directory Traversal
- Automated URL-based Cross-site scripting
- Automated parameter-based Cross-site scripting
- Automated fuzzing
- jQuery checking
- Header-based Cross-site scripting
- Shellshock checking
- 4. SQL Injection
- Checking jitter
- Identifying URL-based SQLi
- Exploiting Boolean SQLi
- Exploiting Blind SQL Injection
- Encoding payloads
- 5. Web Header Manipulation
- Testing HTTP methods
- Fingerprinting servers through HTTP headers
- Testing for insecure headers
- Brute forcing login through the Authorization header
- Testing for clickjacking vulnerabilities
- Identifying alternative sites by spoofing user agents
- Testing for insecure cookie flags
- Session fixation through a cookie injection
- 6. Image Analysis and Manipulation
- Hiding a message using LSB steganography
- Extracting messages hidden in LSB
- Hiding text in images
- Extracting text from images
- Enabling command and control using steganography
- 7. Encryption and Encoding
- Generating an MD5 hash
- Generating an SHA 1/128/256 hash
- Implementing SHA and MD5 hashes together
- Implementing SHA in a real-world scenario
- Generating a Bcrypt hash
- Cracking an MD5 hash
- Encoding with Base64
- Encoding with ROT13
- Cracking a substitution cipher
- Cracking the Atbash cipher
- Attacking one-time pad reuse
- Predicting a linear congruential generator
- Identifying hashes
- 8. Payloads and Shells
- Extracting data through HTTP requests
- Creating an HTTP C2
- Creating an FTP C2
- Creating an Twitter C2
- Creating a simple Netcat shell
- 9. Reporting
- Converting Nmap XML to CSV
- Extracting links from a URL to Maltego
- Extracting e-mails to Maltego
- Parsing Sslscan into CSV
- Generating graphs using plot.ly
- A. Bibliography
- Index
In this section, we will try to glean information about the web software, operating system, and applications that run on the web server, by using error-handling techniques. From a hacker's point of view, it is not that useful to gather information from error handling. However, from a pentester's point of view, it is very important because in the pentesting final report that is to be submitted to the client, you have to specify the error-handling techniques.
The logic behind error handling is to try and produce an error in a web server, which returns the code 404, and to see the output of the error page. I have written a small code to obtain the output. We will go line-by-line through the following code:
import re
import random
import urllib
url1 = raw_input("Enter the URL ")
u = chr(random.randint(97,122))
url2 = url1+u
http_r = urllib.urlopen(url2)

content= http_r.read()flag =0
i=0
list1 = []
a_tag = "<*address>"
file_text = open("result.txt",'a')

while flag ==0:
  if http_r.code == 404:
    file_text.write("--------------")
    file_text.write(url1)
    file_text.write("--------------\n")

    file_text.write(content)
    for match in re.finditer(a_tag,content):

      i=i+1
      s= match.start()
      e= match.end()
      list1.append(s)
      list1.append(e)
    if (i>0):
      print "Coding is not good"
    if len(list1)>0:
      a= list1[1]
      b= list1[2]

      print content[a:b]
    else:
      print "error handling seems ok"
    flag =1
  elif http_r.code == 200:
    print "Web page is using custom Error page"
    break
I have imported three modules re, random, and urllib, which are responsible for regular expressions, to generate random numbers and URL-related activities, respectively. The url1 = raw_input("Enter the URL ") statement asks for the URL of the website and store this URL in the url1 variable. Next, the u = chr(random.randint(97,122)) statement creates a random character. The next statement adds this character to the URL and stores it in the url2 variable. Then, the http_r = urllib.urlopen(url2) statement opens the url2 page, and this page is stored in the http_r variable. The content= http_r.read()statement transfers all the contents of the web page into the content variable:
flag =0
i=0
list1 = []
a_tag = "<*address>"
file_text = open("result.txt",'a')
The preceding piece of code defines the variable flag
i and an empty list whose significance we will discuss later. The a_tag variable takes a value "<*address>". A file_text variable is a file object that opens the result.txt file in append mode. The result.txt file stores the results. The while flag ==0: statement indicates that we want the while loop to run at least one time. The http_r.code statement returns the status code from the web server. If the page is not found, it will return a 404 code:
file_text.write("--------------")
file_text.write(url1)
file_text.write("--------------\n")

file_text.write(content)
The preceding piece of code writes the output of the page in the result.txt file.
The for match in re.finditer(a_tag,content): statement finds the a_tag pattern which means the <address> tag in the error page, since we are interested in the information between the <address> </address> tag. The s= match.start() and e= match.end() statements indicate the starting and ending point of the <address> tag and list1.append(s). The list1.append(e) statement stores these points in the list so that we can use these points later. The i variable becomes greater than 0, which indicates the presence of the <address> tag in the error page. This means that the code is not good. The if len(list1)>0: statement indicates that if the list has at least one element, then variables a and b will be the point of interest. The following diagram shows these points of interest:
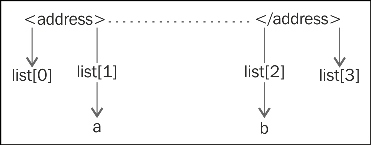
Fetching address tag values
The print content[a:b] statement reads the output between the a and b points and set flag = 1 to break the while loop. The elif http_r.code == 200: statement indicates that if the HTTP status code is 200, then it will print the "Web page is using custom Error page" message. In this case, if code 200 returns for the error page, it means the error is being handled by the custom page.
Now it is time to run the output and we will run it twice.
The output when the server signature is on and when the server signature is off is as follows:
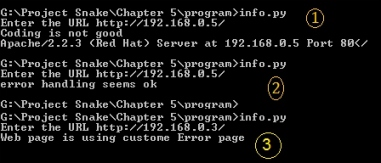
The two outputs of the program
The preceding screenshot shows the output when the server signature is on. By viewing this output, we can say that the web software is
Apache, the version is 2.2.3, and the operating system is Red Hat. In the next output, no information from the server means the server signature is off. Sometimes someone uses a web application firewall such as mod-security, which gives a fake server signature. In this case, you need to check the result.txt file for the full detailed output. Let's check the output of result.txt, as shown in the following screenshot:
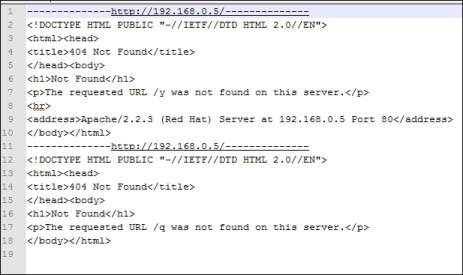
Output of the result.txt
When there are several URLs, you can make a list of all these URLs and supply them to the program, and this file will contain the output of all the URLs.
By viewing the header of the web pages, you can get the same output. Sometimes, the server error output can be changed by programming. However, checking the header might provide lots of information. A very small code can give you some very detailed information as follows:
import urllib
url1 = raw_input("Enter the URL ")
http_r = urllib.urlopen(url1)
if http_r.code == 200:
  print http_r.headers
The print http_r.headers statement provides the header of the web server.
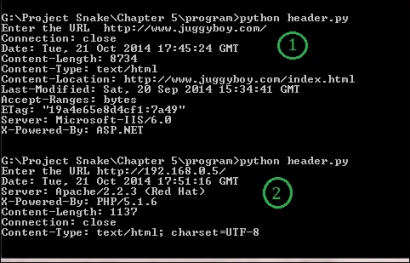
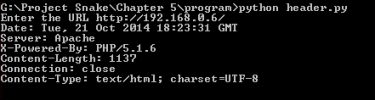
Getting header information
You will notice that we have taken two outputs from the program. In the first output, we entered http://www.juggyboy.com/ as the URL. The program provided lots of interesting information such as Server: Microsoft-IIS/6.0 and X-Powered-By: ASP.NET; it infers that the website is hosted on a Windows machine, the web software is IIS 6.0, and ASP.NET is used for web application programming.
In the second output, I delivered my local machine's IP address, which is http://192.168.0.5/. The program revealed some secret information, such as that the web software is Apache 2.2.3, it is running on a Red Hat machine, and PHP 5.1 is used for web application programming. In this way you can obtain information about the operating system, web server software, and web applications.
Now, let us look at what output we will get if the server signature is off:
When the server signature is off
From the preceding output, we can see that Apache is running. However, it shows neither the version nor the operating system. For web application programming, PHP has been used, but sometimes, the output does not show the programming language. For this, you have to parse the web pages to get any useful information such as hyperlinks.
If you want to get the details on headers, open dir of headers, as shown in the following code:
 >>> import urllib
>>> http_r = urllib.urlopen("http://192.168.0.5/")
>>> dir(http_r.headers)
['__contains__', '__delitem__', '__doc__', '__getitem__', '__init__', '__iter__', '__len__', '__module__', '__setitem__', '__str__', 'addcontinue', 'addheader', 'dict', 'encodingheader', 'fp', 'get', 'getaddr', 'getaddrlist', 'getallmatchingheaders', 'getdate', 'getdate_tz', 'getencoding', 'getfirstmatchingheader', 'getheader', 'getheaders', 'getmaintype', 'getparam', 'getparamnames', 'getplist', 'getrawheader', 'getsubtype', 'gettype', 'has_key', 'headers', 'iscomment', 'isheader', 'islast', 'items', 'keys', 'maintype', 'parseplist', 'parsetype', 'plist', 'plisttext', 'readheaders', 'rewindbody', 'seekable', 'setdefault', 'startofbody', 'startofheaders', 'status', 'subtype', 'type', 'typeheader', 'unixfrom', 'values']
>>>
>>> http_r.headers.type
'text/html'
>>> http_r.headers.typeheader
'text/html; charset=UTF-8'
>>>