Table of Contents for
Python: Penetration Testing for Developers
 Python: Penetration Testing for Developers
Published by
Packt Publishing, 2016
Python: Penetration Testing for Developers
Published by
Packt Publishing, 2016
- Cover
- Table of Contents
- Python: Penetration Testing for Developers
- Python: Penetration Testing for Developers
- Python: Penetration Testing for Developers
- Credits
- Preface
- What you need for this learning path
- Who this learning path is for
- Reader feedback
- Customer support
- 1. Module 1
- 1. Understanding the Penetration Testing Methodology
- Understanding what penetration testing is not
- Assessment methodologies
- The penetration testing execution standard
- Penetration testing tools
- Summary
- 2. The Basics of Python Scripting
- Python – the good and the bad
- A Python interactive interpreter versus a script
- Environmental variables and PATH
- Understanding dynamically typed languages
- The first Python script
- Developing scripts and identifying errors
- Python formatting
- Python variables
- Operators
- Compound statements
- Functions
- The Python style guide
- Arguments and options
- Your first assessor script
- Summary
- 3. Identifying Targets with Nmap, Scapy, and Python
- Understanding Nmap
- Nmap libraries for Python
- The Scapy library for Python
- Summary
- 4. Executing Credential Attacks with Python
- Identifying the target
- Creating targeted usernames
- Testing for users using SMTP VRFY
- Summary
- 5. Exploiting Services with Python
- Understanding the chaining of exploits
- Automating the exploit train with Python
- Summary
- 6. Assessing Web Applications with Python
- Identifying hidden files and directories with Python
- Credential attacks with Burp Suite
- Using twill to walk through the source
- Understanding when to use Python for web assessments
- Summary
- 7. Cracking the Perimeter with Python
- Understanding the link between accounts and services
- Cracking inboxes with Burp Suite
- Identifying the attack path
- Gaining access through websites
- Summary
- 8. Exploit Development with Python, Metasploit, and Immunity
- Understanding the Windows memory structure
- Understanding memory addresses and endianness
- Understanding the manipulation of the stack
- Understanding immunity
- Understanding basic buffer overflow
- Writing a basic buffer overflow exploit
- Understanding stack adjustments
- Understanding the purpose of local exploits
- Understanding other exploit scripts
- Reversing Metasploit modules
- Understanding protection mechanisms
- Summary
- 9. Automating Reports and Tasks with Python
- Understanding how to create a Python class
- Summary
- 10. Adding Permanency to Python Tools
- Understanding the difference between multithreading and multiprocessing
- Building industry-standard tools
- Summary
- 2. Module 2
- 1. Python with Penetration Testing and Networking
- Approaches to pentesting
- Introducing Python scripting
- Understanding the tests and tools you'll need
- Learning the common testing platforms with Python
- Network sockets
- Server socket methods
- Client socket methods
- General socket methods
- Moving on to the practical
- Summary
- 2. Scanning Pentesting
- What are the services running on the target machine?
- Summary
- 3. Sniffing and Penetration Testing
- Implementing a network sniffer using Python
- Learning about packet crafting
- Introducing ARP spoofing and implementing it using Python
- Testing the security system using custom packet crafting and injection
- Summary
- 4. Wireless Pentesting
- Wireless attacks
- Summary
- 5. Foot Printing of a Web Server and a Web Application
- Introducing information gathering
- Information gathering of a website from SmartWhois by the parser BeautifulSoup
- Banner grabbing of a website
- Hardening of a web server
- Summary
- 6. Client-side and DDoS Attacks
- Tampering with the client-side parameter with Python
- Effects of parameter tampering on business
- Introducing DoS and DDoS
- Summary
- 7. Pentesting of SQLI and XSS
- Types of SQL injections
- Understanding the SQL injection attack by a Python script
- Learning about Cross-Site scripting
- Summary
- 3. Module 3
- 1. Gathering Open Source Intelligence
- Gathering information using the Shodan API
- Scripting a Google+ API search
- Downloading profile pictures using the Google+ API
- Harvesting additional results from the Google+ API using pagination
- Getting screenshots of websites with QtWebKit
- Screenshots based on a port list
- Spidering websites
- 2. Enumeration
- Performing a ping sweep with Scapy
- Scanning with Scapy
- Checking username validity
- Brute forcing usernames
- Enumerating files
- Brute forcing passwords
- Generating e-mail addresses from names
- Finding e-mail addresses from web pages
- Finding comments in source code
- 3. Vulnerability Identification
- Automated URL-based Directory Traversal
- Automated URL-based Cross-site scripting
- Automated parameter-based Cross-site scripting
- Automated fuzzing
- jQuery checking
- Header-based Cross-site scripting
- Shellshock checking
- 4. SQL Injection
- Checking jitter
- Identifying URL-based SQLi
- Exploiting Boolean SQLi
- Exploiting Blind SQL Injection
- Encoding payloads
- 5. Web Header Manipulation
- Testing HTTP methods
- Fingerprinting servers through HTTP headers
- Testing for insecure headers
- Brute forcing login through the Authorization header
- Testing for clickjacking vulnerabilities
- Identifying alternative sites by spoofing user agents
- Testing for insecure cookie flags
- Session fixation through a cookie injection
- 6. Image Analysis and Manipulation
- Hiding a message using LSB steganography
- Extracting messages hidden in LSB
- Hiding text in images
- Extracting text from images
- Enabling command and control using steganography
- 7. Encryption and Encoding
- Generating an MD5 hash
- Generating an SHA 1/128/256 hash
- Implementing SHA and MD5 hashes together
- Implementing SHA in a real-world scenario
- Generating a Bcrypt hash
- Cracking an MD5 hash
- Encoding with Base64
- Encoding with ROT13
- Cracking a substitution cipher
- Cracking the Atbash cipher
- Attacking one-time pad reuse
- Predicting a linear congruential generator
- Identifying hashes
- 8. Payloads and Shells
- Extracting data through HTTP requests
- Creating an HTTP C2
- Creating an FTP C2
- Creating an Twitter C2
- Creating a simple Netcat shell
- 9. Reporting
- Converting Nmap XML to CSV
- Extracting links from a URL to Maltego
- Extracting e-mails to Maltego
- Parsing Sslscan into CSV
- Generating graphs using plot.ly
- A. Bibliography
- Index
Now that you have understood the basics of creating scripts in Python, let's create a script that will actually be useful to you. In later chapters, you will need to know your local and public IP addresses for each interface, hostname, Media Access Control (MAC) addresses, and Fully Qualified Domain Name (FQDN). The script that follows here demonstrates how to execute all of these. A few of the concepts here may still seem foreign, especially how IP and MAC addresses are extracted from interfaces. Do not worry about that; this is not the script you are going to write. You can use this script if you like, but it is here to show you that you can salvage components of scripts—even seemingly complex ones—to develop your own simple scripts.
Note
This script uses a technique to extract IP addresses for Linux/Unix systems by querying the details based on an interface that has been used in several Python modules and examples. The specific recipe for this technique can be found in many places, but the best documented reference to this technique can be found at http://code.activestate.com/recipes/439094-get-the-ip-address-associated-with-a-network-inter/.
Let's break down the script into its components. This script uses a few functions that make execution cleaner and repeatable. The first function is called get_ip. It takes an interface name and then tries to identify an IP address for that interface:
def get_ip(inter):
    s = socket.socket(socket.AF_INET, socket.SOCK_DGRAM)
    ip_addr = socket.inet_ntoa(fcntl.ioctl(s.fileno(), 0x8915, struct.pack('256s', inter[:15]))[20:24])
    return ip_addr
The second function, called get_mac_address, identifies the MAC address of a specific interface:
def get_mac_address(inter):
    s = socket.socket(socket.AF_INET, socket.SOCK_DGRAM)
    info = fcntl.ioctl(s.fileno(), 0x8927,  struct.pack('256s', inter[:15]))
    mac_address = ''.join(['%02x:' % ord(char) for char in info[18:24]])[:-1]
    return mac_address
As you can see, these functions rely on the low-level network interface language of the socket library. Your concentration should not be on understanding every detail about this function, but more on the flow of information, the types of variables being used, and how the libraries are integrated. The reason for this is that you are going to generate a script later that requires fewer components and replicates the activity of grabbing a public IP address later.
The third function gets the details of the host and returns them to the main part of the script. It determines whether the host is Windows or not so that the correct functions are called. The function accepts two lists, one for Ethernet interfaces and the wireless interfaces typical in Linux/Unix. These interfaces are processed through the previous functions called in this bigger function. This allows the decision-making to be handled by the get_localhost_details function, and then returns the values for the host that will be represented by the print statements at the end of the script:
def get_localhost_details(interfaces_eth, interfaces_wlan):
    hostdata = "None"
    hostname = "None"
    windows_ip = "None"
    eth_ip = "None"
    wlan_ip = "None"
    host_fqdn = "None"
    eth_mac = "None"
    wlan_mac = "None"
    windows_mac = "None"
    hostname = socket.gethostbyname(socket.gethostname())
    if hostname.startswith("127.") and os.name != "nt":
        hostdata = socket.gethostbyaddr(socket.gethostname())
        hostname = str(hostdata[1]).strip('[]')
        host_fqdn = socket.getfqdn()
        for interface in interfaces_eth:
            try:
                eth_ip = get_ip(interface)
                if not "None" in eth_ip:
                    eth_mac = get_mac_address(interface)
                break
            except IOError:
                pass
        for interface in interfaces_wlan:
            try:
                wlan_ip = get_ip(interface)
                if not "None" in wlan_ip:
                    wlan_mac = get_mac_address(interface)
                break
            except IOError:
                pass
    else:
        windows_ip = socket.gethostbyname(socket.gethostname())
        windows_mac = hex(getnode()).lstrip('0x')
        windows_mac = ':'.join(pos1+pos2 for pos1,pos2 in zip(windows_mac[::2],windows_mac[1::2]))
        hostdata = socket.gethostbyaddr(socket.gethostname())
        hostname = str(hostdata[1]).strip("[]\'")
        host_fqdn = socket.getfqdn()
    return hostdata, hostname, windows_ip, eth_ip, wlan_ip, host_fqdn, eth_mac, wlan_mac, windows_mac
The final function in this script is called get_public_ip, which queries a known website for the IP address that is connected to it. This IP address is returned to the web page in a simple, raw format. There are a number of sites against which this can be done, but make sure you know the acceptable use and terms of service authorized. The function accepts one input, which is the website you are executing the query against:
def get_public_ip(request_target):
    grabber = urllib2.build_opener()
    grabber.addheaders = [('User-agent','Mozilla/5.0')]
    try:
        public_ip_address = grabber.open(target_url).read()
    except urllib2.HTTPError, error:
        print("There was an error trying to get your Public IP: %s") % (error)
    except urllib2.URLError, error:
        print("There was an error trying to get your Public IP: %s") % (error)
    return public_ip_address
For Windows systems, this script utilizes the simple socket.gethostbyname(socket.gethostname()) function request. This does work for Linux, but it relies on the /etc/hosts file to have the correct information for all interfaces. Much of this script can be replaced by the netifaces library, as pointed out by the previous reference. This would greatly simplify the script, and examples of its use will be shown in the following Chapter. The netifaces library is not installed by default, and so you will have to install it on every host on which you want to run this script. Since you typically do not want to make any impact on a host's integrity, this specific script is designed to avoid that conflict.
Tip
The final version of this script can be found at https://raw.githubusercontent.com/funkandwagnalls/pythonpentest/master/hostdetails.py.
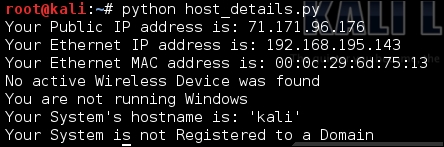
The following screenshot shows the output of running this script. Components of this script will be used in later chapters, and they allow the automated development of exploit configurations and reconnaissance of networks.
So your useful script is going take components of this script and only find the public IP address of the system you are on. I recommend that you try doing this prior to looking at the following code (which shows what the actual script looks like). If you want to skip this step, the solution can be seen here:
import urllib2

def get_public_ip(request_target):
    grabber = urllib2.build_opener()
    grabber.addheaders = [('User-agent','Mozilla/5.0')]
    try:
        public_ip_address = grabber.open(target_url).read()
    except urllib2.HTTPError, error:
        print("There was an error trying to get your Public IP: %s") % (error)
    except urllib2.URLError, error:
        print("There was an error trying to get your Public IP: %s") % (error)
    return public_ip_address
public_ip = "None"
target_url = "http://ip.42.pl/raw"
public_ip = get_public_ip(target_url)
if not "None" in public_ip:
    print("Your Public IP address is: %s") % (str(public_ip))
else:
    print("Your Public IP address was not found")
The output of your script should look similar to this:

Tip
This script can be found at https://raw.githubusercontent.com/funkandwagnalls/pythonpentest/master/publicip.py.