Table of Contents for
Python: Penetration Testing for Developers
 Python: Penetration Testing for Developers
Published by
Packt Publishing, 2016
Python: Penetration Testing for Developers
Published by
Packt Publishing, 2016
- Cover
- Table of Contents
- Python: Penetration Testing for Developers
- Python: Penetration Testing for Developers
- Python: Penetration Testing for Developers
- Credits
- Preface
- What you need for this learning path
- Who this learning path is for
- Reader feedback
- Customer support
- 1. Module 1
- 1. Understanding the Penetration Testing Methodology
- Understanding what penetration testing is not
- Assessment methodologies
- The penetration testing execution standard
- Penetration testing tools
- Summary
- 2. The Basics of Python Scripting
- Python – the good and the bad
- A Python interactive interpreter versus a script
- Environmental variables and PATH
- Understanding dynamically typed languages
- The first Python script
- Developing scripts and identifying errors
- Python formatting
- Python variables
- Operators
- Compound statements
- Functions
- The Python style guide
- Arguments and options
- Your first assessor script
- Summary
- 3. Identifying Targets with Nmap, Scapy, and Python
- Understanding Nmap
- Nmap libraries for Python
- The Scapy library for Python
- Summary
- 4. Executing Credential Attacks with Python
- Identifying the target
- Creating targeted usernames
- Testing for users using SMTP VRFY
- Summary
- 5. Exploiting Services with Python
- Understanding the chaining of exploits
- Automating the exploit train with Python
- Summary
- 6. Assessing Web Applications with Python
- Identifying hidden files and directories with Python
- Credential attacks with Burp Suite
- Using twill to walk through the source
- Understanding when to use Python for web assessments
- Summary
- 7. Cracking the Perimeter with Python
- Understanding the link between accounts and services
- Cracking inboxes with Burp Suite
- Identifying the attack path
- Gaining access through websites
- Summary
- 8. Exploit Development with Python, Metasploit, and Immunity
- Understanding the Windows memory structure
- Understanding memory addresses and endianness
- Understanding the manipulation of the stack
- Understanding immunity
- Understanding basic buffer overflow
- Writing a basic buffer overflow exploit
- Understanding stack adjustments
- Understanding the purpose of local exploits
- Understanding other exploit scripts
- Reversing Metasploit modules
- Understanding protection mechanisms
- Summary
- 9. Automating Reports and Tasks with Python
- Understanding how to create a Python class
- Summary
- 10. Adding Permanency to Python Tools
- Understanding the difference between multithreading and multiprocessing
- Building industry-standard tools
- Summary
- 2. Module 2
- 1. Python with Penetration Testing and Networking
- Approaches to pentesting
- Introducing Python scripting
- Understanding the tests and tools you'll need
- Learning the common testing platforms with Python
- Network sockets
- Server socket methods
- Client socket methods
- General socket methods
- Moving on to the practical
- Summary
- 2. Scanning Pentesting
- What are the services running on the target machine?
- Summary
- 3. Sniffing and Penetration Testing
- Implementing a network sniffer using Python
- Learning about packet crafting
- Introducing ARP spoofing and implementing it using Python
- Testing the security system using custom packet crafting and injection
- Summary
- 4. Wireless Pentesting
- Wireless attacks
- Summary
- 5. Foot Printing of a Web Server and a Web Application
- Introducing information gathering
- Information gathering of a website from SmartWhois by the parser BeautifulSoup
- Banner grabbing of a website
- Hardening of a web server
- Summary
- 6. Client-side and DDoS Attacks
- Tampering with the client-side parameter with Python
- Effects of parameter tampering on business
- Introducing DoS and DDoS
- Summary
- 7. Pentesting of SQLI and XSS
- Types of SQL injections
- Understanding the SQL injection attack by a Python script
- Learning about Cross-Site scripting
- Summary
- 3. Module 3
- 1. Gathering Open Source Intelligence
- Gathering information using the Shodan API
- Scripting a Google+ API search
- Downloading profile pictures using the Google+ API
- Harvesting additional results from the Google+ API using pagination
- Getting screenshots of websites with QtWebKit
- Screenshots based on a port list
- Spidering websites
- 2. Enumeration
- Performing a ping sweep with Scapy
- Scanning with Scapy
- Checking username validity
- Brute forcing usernames
- Enumerating files
- Brute forcing passwords
- Generating e-mail addresses from names
- Finding e-mail addresses from web pages
- Finding comments in source code
- 3. Vulnerability Identification
- Automated URL-based Directory Traversal
- Automated URL-based Cross-site scripting
- Automated parameter-based Cross-site scripting
- Automated fuzzing
- jQuery checking
- Header-based Cross-site scripting
- Shellshock checking
- 4. SQL Injection
- Checking jitter
- Identifying URL-based SQLi
- Exploiting Boolean SQLi
- Exploiting Blind SQL Injection
- Encoding payloads
- 5. Web Header Manipulation
- Testing HTTP methods
- Fingerprinting servers through HTTP headers
- Testing for insecure headers
- Brute forcing login through the Authorization header
- Testing for clickjacking vulnerabilities
- Identifying alternative sites by spoofing user agents
- Testing for insecure cookie flags
- Session fixation through a cookie injection
- 6. Image Analysis and Manipulation
- Hiding a message using LSB steganography
- Extracting messages hidden in LSB
- Hiding text in images
- Extracting text from images
- Enabling command and control using steganography
- 7. Encryption and Encoding
- Generating an MD5 hash
- Generating an SHA 1/128/256 hash
- Implementing SHA and MD5 hashes together
- Implementing SHA in a real-world scenario
- Generating a Bcrypt hash
- Cracking an MD5 hash
- Encoding with Base64
- Encoding with ROT13
- Cracking a substitution cipher
- Cracking the Atbash cipher
- Attacking one-time pad reuse
- Predicting a linear congruential generator
- Identifying hashes
- 8. Payloads and Shells
- Extracting data through HTTP requests
- Creating an HTTP C2
- Creating an FTP C2
- Creating an Twitter C2
- Creating a simple Netcat shell
- 9. Reporting
- Converting Nmap XML to CSV
- Extracting links from a URL to Maltego
- Extracting e-mails to Maltego
- Parsing Sslscan into CSV
- Generating graphs using plot.ly
- A. Bibliography
- Index
The era of wireless connectivity has contributed to flexibility and mobility, but it has also ushered in many security issues. With wired connectivity, the attacker needs physical access in order to connect and attack. In the case of wireless connectivity, an attacker just needs the availability of the signal to launch an attack. Before proceeding, you should be aware of the terminology used:
- Access Point (AP): It is used to connect wireless devices with wired networks.
- Service Set Identifier (SSID): It is a 0-32 alphanumeric unique identifier for a wireless LAN; it is human readable, and simply put, it is the network name.
- Basic Service Set Identification (BSSID): It is the MAC address of the wireless AP.
- Channel number: This represents the range of the radio frequency used by AP for transmission.
In this chapter, we will learn a lot of concepts such as:
- Finding wireless SSID
- Analyzing wireless traffic
- Detecting the clients of an AP
- The wireless deauth attack
- MAC flooding attack
802.11 and 802.11x are defined as a family of wireless LAN technologies by IEEE. The following are the 802.11 specifications based on frequency and bandwidth:
- 802.11: This provides bandwidth up to 1-2 Mbps with a 2.4 GHz frequency band
- 802.11.a: This provides bandwidth up to 54 Mbps with a 5 GHz frequency band
- 802.11.b :This provides bandwidth up to 11 Mbps with a 2.4 GHz frequency band
- 802.11g: This provides bandwidth up to 54 Mbps with a 2.4 GHz frequency band
- 802.11n: This provides bandwidth up to 300 Mbps with both the frequency bands
All components of 802.11 fall into either the Media Access Control (MAC) or the physical layer. The MAC layer is the subclass of the data link layer. You have read about the Protocol Data Unit (PDU) of the data link layer, which is called a frame.
First, however, let's understand the 802.11 frame format. The three major types of frames that exist in 802.11 are:
- The data frame
- The control frame
- The management frame
These frames are assisted by the MAC layer. The following image depicts the format of the MAC layer:

In the preceding image, the three types of addresses are shown. Address 1, Address 2, and Address 3 are the MAC addresses of the destination, AP, and source, respectively. It means Address 2 is the BSSID of AP. In this chapter, our focus will be on the management frame, because we are interested in the subtypes of the management frame. Some common types of management frames are the authentication frame, the deauthentication frame, the association request frame, the disassociation frame, the probe request frame, and the probe response frame. The connection between the clients and APs is established by the exchange of various frames, as shown in the following image:
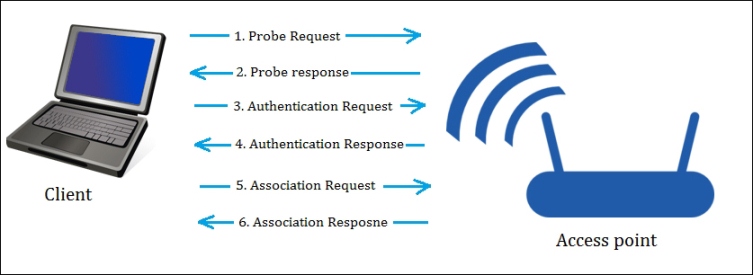
The Frame exchange
The preceding diagram shows the exchange of frames. These frames are:
- The Beacon frame: The AP periodically sends a beacon frame to advertise its presence. The beacon frame contains information such as SSID, channel number, BSSID, and so on.
- The Probe request: The wireless device (client) sends out a probe request to determine which APs are in range. The probe request contains elements such as the SSID of the AP, supported rates, vender-specific info, and so on. The client sends the probe request and waits for the probe response for some time.
- The Probe response: In the response of the probe request, the corresponding AP will respond with a probe response frame that contains the capability information, supported data rates, and so on.
- The Authentication request: The client sends the authentication request frame that contains its identity.
- The Authentication response: The AP responds with an authentication, which indicates acceptance or rejection. If shared key authentication exists, such as WEP, then the AP sends a challenge text in the form of an authentication response. The client must send the encrypted form of the challenged text in an authentication frame back to the AP.
- The Association request: After successful authentication, the client sends an association request that contains its characteristics, such as supported data rates and the SSID of the AP.
- The Association response: AP sends an association response that contains acceptance or rejection. In the case of acceptance, the AP will create an association ID for the client.
Our forthcoming attacks will be based upon these frames.
Now it's time for a practical. In the following section, we will go through the rest of the theory.
If you have done wireless testing by Back-Track or Kali Linux, then you will be familiar with the airmon-ng suits. The airmon-ng script is used to enable the monitor mode on wireless interfaces. The monitor mode allows a wireless device to capture the frames without having to associate with an AP. We are going to run all our programs on Kali Linux. The following screenshot shows you how to set mon0:
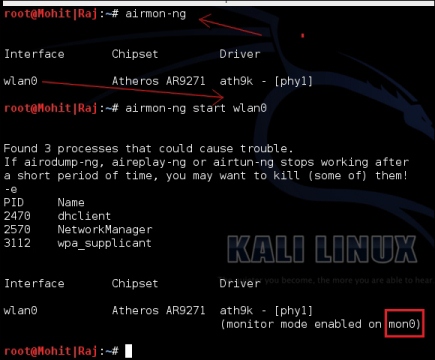
Setting mon0
When you run the airmon-ng script, it gives the wireless card a name such as wlan0, as shown in the preceding screenshot. The airmon-ng start wlan0 command will start wlan0 in the monitor mode, and mon0 captures wireless packets.
Now, let's write our first program, which gives three values: SSID, BSSID, and the channel number. Don't worry as we will go through this line by line:
import socket
sniff = socket.socket(socket.AF_PACKET, socket.SOCK_RAW, 3)
sniff.bind(("mon0", 0x0003))
ap_list =[]
while True :
fm1 = sniff.recvfrom(6000)
fm= fm1[0]
if fm[26] == "\x80" :
if fm[36:42] not in ap_list:
ap_list.append(fm[36:42])
a = ord(fm[63])
print "SSID -> ",fm[64:64 +a],"-- BSSID -> ", \
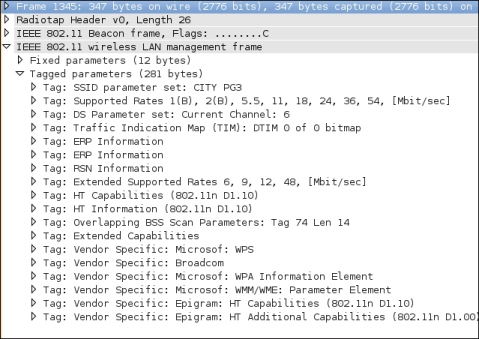
fm[36:42].encode('hex'),"-- Channel -> ", ord(fm[64 +a+12])The first line is as usual import socket. The next line is sniff = socket.socket(socket.AF_PACKET, socket.SOCK_RAW, 3). I hope you have read Chapter 3, Sniffing and Penetration Testing carefully. The only new thing is 3. The argument 3 represents the protocol number, which indicates ETH_P_ALL. It means we are interested in every packet. The next line sniff.bind(("mon0", 0x0003)) binds the mon0 mode and the protocol number 3. In the next line, we declared an empty ap_list =[] list, which will store the MAC addresses (SSID) of the APs. We are using a list to avoid any redundancy of APs. For continual sniffing, we have used an infinite while loop. The next fm1 = sniff.recvfrom(6000) statement gives data to fm1, and the next fm= fm1[0] statement takes only the first part of the frame, which contains long hexadecimal series of numbers; that is, a hex dump contains all elements of a frame, as shown in the following screenshot. The next if fm[26] == "\x80": statement tells if that the frame subtype is 8 bits, which indicates the beacon frame, as shown in the following screenshot:
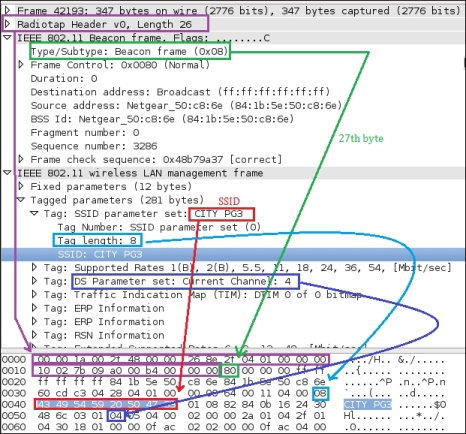
The Wireshark representation of the beacon frame
You might wonder why fm[26]. It means that the 27th byte contains a subtype because fm[0:25] means the first 26 bytes are taken by the Radiotap header. In the preceding screenshot, you can see Radiotap Header, Length 26, which means that the first 26 bytes have been taken by the Radiotap header. The next if fm[36:42] not in ap_list: statement is a filter that checks whether the fm[36:42] value, which is BSSID, is present in ap_list or not. If not, the next ap_list.append(fm[36:42]) statement will add the BSSID in ap_list. The next a = ord(fm[63]) statement gives the length of the SSID. In the next line, fm[64:64 +a] indicates that the AP's SSID resides in 64 to 64 plus the length of the SSID; the fm[36:42].encode('hex') statement converts the hexadecimal value to a readable hexadecimal value; the ord(fm[64 +a+12]) statement provides the channel number, which resides 12 numbers ahead of the SSID.
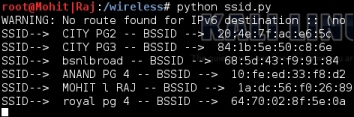
The output of the first_ssid_sniffer.py program is shown in the following screenshot:
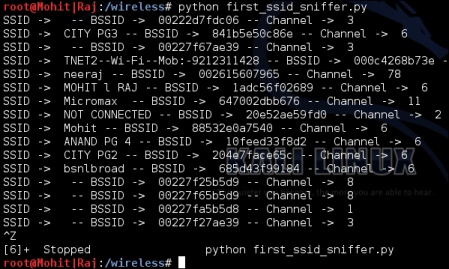
AP details
Now, let's write the code to find the SSID and MAC address of APs using scapy. You must be thinking that we performed the same task in raw packet analysis; actually, for research purposes, you should know about raw packet analysis. If you want some information that scapy does not know, raw packet analysis gives you the freedom to create the desired sniffer:
from scapy.all import *
interface = 'mon0'
ap_list = []
def info(fm):
  if fm.haslayer(Dot11):

    if ((fm.type == 0) & (fm.subtype==8)):
      if fm.addr2 not in ap_list:
        ap_list.append(fm.addr2)
        print "SSID--> ",fm.info,"-- BSSID --> ",fm.addr2

sniff(iface=interface,prn=info)
Let's go through the code from the start. The scapy.all import * statement imports all the modules of the scapy library. The variable interface is set to mon0. An empty list named ap_list is declared. In the next line, the info function is defined and the fm argument has been passed.
The if fm.haslayer(Dot11): statement is like a filter, which passes only the Dot11 traffic; Dot11 indicates 802.11 traffic. The next if((fm.type == 0) & (fm.subtype==8)): statement is another filter, which passes traffic where the frame type is 0 and the frame subtype is 8; type 0 represents the management frame and subtype 8 represents the beacon frame. In the next line, the if fm.addr2 not in ap_list: statement is used to remove the redundancy; if AP's MAC address is not in ap_list, then it appends the list and adds the address to the list as stated in the next line. The next line prints the output. The last sniff(iface=interface,prn=info) line sniffs the data with the interface, which is mon0, and invokes the info() function.
The following screenshot shows the output of the ssid.py program:
I hope you have understood the ssid.py program. Now, let's try and figure out the channel number of AP. We will have to make some amendments to the code. The new modified code is as follows:
from scapy.all import *
import struct
interface = 'mon0'
ap_list = []
def info(fm):
  if fm.haslayer(Dot11):
    if ((fm.type == 0) & (fm.subtype==8)):
      if fm.addr2 not in ap_list:
        ap_list.append(fm.addr2)
        print "SSID--> ",fm.info,"-- BSSID --> ",fm.addr2, \"-- Channel--> ", ord(fm[Dot11Elt:3].info)
sniff(iface=interface,prn=info)
You will notice that we have added one thing here, that is, ord(fm[Dot11Elt:3].info).
You might wonder what Dot11Elt is? If you open Dot11Elt in scapy, you will get three things, ID, len, and info, as shown in the following output:
root@Mohit|Raj:~# scapy
INFO: Can't import python gnuplot wrapper . Won't be able to plot.
WARNING: No route found for IPv6 destination :: (no default route?)
lWelcome to Scapy (2.2.0)
>>> ls(Dot11Elt)
ID         : ByteEnumField        = (0)
len        : FieldLenField        = (None)
info       : StrLenField          = ('')
>>>
class Dot11Elt(Packet):
  name = "802.11 Information Element"
  fields_desc = [ ByteEnumField("ID", 0, {0:"SSID", 1:"Rates", 2: "FHset", 3:"DSset", 4:"CFset", 5:"TIM", 6:"IBSSset", 16:"challenge",
  42:"ERPinfo", 46:"QoS Capability", 47:"ERPinfo", 48:"RSNinfo", 50:"ESRates",221:"vendor",68:"reserved"}),
  FieldLenField("len", None, "info", "B"),
  StrLenField("info", "", length_from=lambda x:x.len) ]
In the previous class code, DSset gives information about the channel number, so the DSset number is 3.
Let's not make it complex and let's simply capture a packet using scapy:
>>> conf.iface="mon0"
>>> frames = sniff(count=7)
>>> frames
<Sniffed: TCP:0 UDP:0 ICMP:0 Other:7>
>>> frames.summary()
RadioTap / 802.11 Management 8L 84:1b:5e:50:c8:6e > ff:ff:ff:ff:ff:ff / Dot11Beacon / SSID='CITY PG3' / Dot11Elt / Dot11Elt / Dot11Elt / Dot11Elt / Dot11Elt / Dot11Elt / Dot11Elt / Dot11Elt / Dot11Elt / Dot11Elt / Dot11Elt / Dot11Elt / Dot11Elt / Dot11Elt / Dot11Elt / Dot11Elt / Dot11Elt / Dot11Elt
RadioTap / 802.11 Data 8L 84:1b:5e:50:c8:6e > 88:53:2e:0a:75:3f / Dot11QoS / Dot11WEP
84:1b:5e:50:c8:6e > 88:53:2e:0a:75:3f (0x5f4) / Raw
RadioTap / 802.11 Control 13L None > 84:1b:5e:50:c8:6e / Raw
RadioTap / 802.11 Control 11L 64:09:80:cb:3b:f9 > 84:1b:5e:50:c8:6e / Raw
RadioTap / 802.11 Control 12L None > 64:09:80:cb:3b:f9 / Raw
RadioTap / 802.11 Control 9L None > 64:09:80:cb:3b:f9 / Raw
In the following screenshot, you can see that there are lots of Dot11Elt in the 0th frame. Let's check the 0th frame in detail.

Dot11Elt in the frame
Now, you can see that there are several <Dot11Elt. Every Dot11Elt has 3 fields. ord(fm[Dot11Elt:3].info) gives the channel number, which resides in the fourth place (according to the class code), which is <Dot11Elt ID=DSset len=1 info='\x04'. I hope you have understood the Dot11Elt by now.
In Wireshark, we can see which outputs are represented by Dot11Elt in the following screenshot:
Dot11Elt representation of Wireshark
The tagged parameters in the preceding screenshot are represented by Dot11Elt.
The output of the scapt_ssid.py program is as follows:
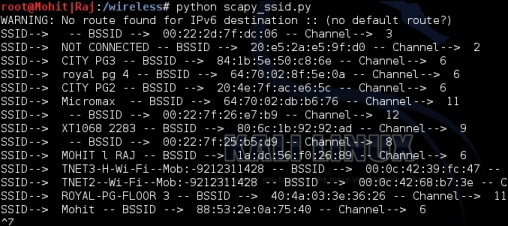
Output with channel
You might want to obtain all the clients of a particular AP. In this situation, you have to capture the probe request frame. In scapy, this is called Dot11ProbeReq.
Let's check out the frame in Wireshark:
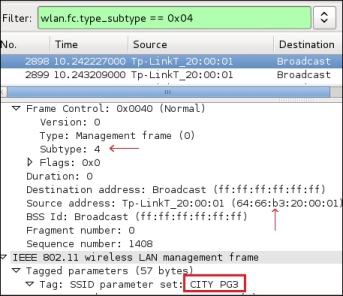
The probe request frame
The probe request frame contains some interesting information such as the source address and SSID, as highlighted in the preceding screenshot.
Now, it's time to see the code:
from scapy.all import *
interface ='mon0'
probe_req = []
ap_name = raw_input("Please enter the AP name ")
def probesniff(fm):
  if fm.haslayer(Dot11ProbeReq):
    client_name = fm.info
    if client_name == ap_name :
      if fm.addr2 not in probe_req:
        print "New Probe Request: ", client_name
        print "MAC ", fm.addr2
        probe_req.append(fm.addr2)
sniff(iface= interface,prn=probesniff)
Let's look at the new things added in the preceding program. The user enters the AP's SSID of interest that will be stored in the ap_name variable. The if fm.haslayer(Dot11ProbeReq): statement indicates that we are interested in the probe request frames. The if client_name == ap_name : statement is a filter and captures all requests that contain the SSID of interest. The print "MAC ", fm.addr2 line prints the MAC address of the wireless device attached to the AP.
The output of the probe_req.py program is as follows:
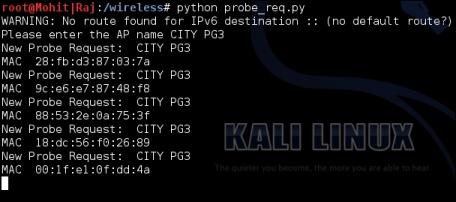
A list of wireless devices attached to AP CITY PG3