Table of Contents for
Python: Penetration Testing for Developers
 Python: Penetration Testing for Developers
Published by
Packt Publishing, 2016
Python: Penetration Testing for Developers
Published by
Packt Publishing, 2016
- Cover
- Table of Contents
- Python: Penetration Testing for Developers
- Python: Penetration Testing for Developers
- Python: Penetration Testing for Developers
- Credits
- Preface
- What you need for this learning path
- Who this learning path is for
- Reader feedback
- Customer support
- 1. Module 1
- 1. Understanding the Penetration Testing Methodology
- Understanding what penetration testing is not
- Assessment methodologies
- The penetration testing execution standard
- Penetration testing tools
- Summary
- 2. The Basics of Python Scripting
- Python – the good and the bad
- A Python interactive interpreter versus a script
- Environmental variables and PATH
- Understanding dynamically typed languages
- The first Python script
- Developing scripts and identifying errors
- Python formatting
- Python variables
- Operators
- Compound statements
- Functions
- The Python style guide
- Arguments and options
- Your first assessor script
- Summary
- 3. Identifying Targets with Nmap, Scapy, and Python
- Understanding Nmap
- Nmap libraries for Python
- The Scapy library for Python
- Summary
- 4. Executing Credential Attacks with Python
- Identifying the target
- Creating targeted usernames
- Testing for users using SMTP VRFY
- Summary
- 5. Exploiting Services with Python
- Understanding the chaining of exploits
- Automating the exploit train with Python
- Summary
- 6. Assessing Web Applications with Python
- Identifying hidden files and directories with Python
- Credential attacks with Burp Suite
- Using twill to walk through the source
- Understanding when to use Python for web assessments
- Summary
- 7. Cracking the Perimeter with Python
- Understanding the link between accounts and services
- Cracking inboxes with Burp Suite
- Identifying the attack path
- Gaining access through websites
- Summary
- 8. Exploit Development with Python, Metasploit, and Immunity
- Understanding the Windows memory structure
- Understanding memory addresses and endianness
- Understanding the manipulation of the stack
- Understanding immunity
- Understanding basic buffer overflow
- Writing a basic buffer overflow exploit
- Understanding stack adjustments
- Understanding the purpose of local exploits
- Understanding other exploit scripts
- Reversing Metasploit modules
- Understanding protection mechanisms
- Summary
- 9. Automating Reports and Tasks with Python
- Understanding how to create a Python class
- Summary
- 10. Adding Permanency to Python Tools
- Understanding the difference between multithreading and multiprocessing
- Building industry-standard tools
- Summary
- 2. Module 2
- 1. Python with Penetration Testing and Networking
- Approaches to pentesting
- Introducing Python scripting
- Understanding the tests and tools you'll need
- Learning the common testing platforms with Python
- Network sockets
- Server socket methods
- Client socket methods
- General socket methods
- Moving on to the practical
- Summary
- 2. Scanning Pentesting
- What are the services running on the target machine?
- Summary
- 3. Sniffing and Penetration Testing
- Implementing a network sniffer using Python
- Learning about packet crafting
- Introducing ARP spoofing and implementing it using Python
- Testing the security system using custom packet crafting and injection
- Summary
- 4. Wireless Pentesting
- Wireless attacks
- Summary
- 5. Foot Printing of a Web Server and a Web Application
- Introducing information gathering
- Information gathering of a website from SmartWhois by the parser BeautifulSoup
- Banner grabbing of a website
- Hardening of a web server
- Summary
- 6. Client-side and DDoS Attacks
- Tampering with the client-side parameter with Python
- Effects of parameter tampering on business
- Introducing DoS and DDoS
- Summary
- 7. Pentesting of SQLI and XSS
- Types of SQL injections
- Understanding the SQL injection attack by a Python script
- Learning about Cross-Site scripting
- Summary
- 3. Module 3
- 1. Gathering Open Source Intelligence
- Gathering information using the Shodan API
- Scripting a Google+ API search
- Downloading profile pictures using the Google+ API
- Harvesting additional results from the Google+ API using pagination
- Getting screenshots of websites with QtWebKit
- Screenshots based on a port list
- Spidering websites
- 2. Enumeration
- Performing a ping sweep with Scapy
- Scanning with Scapy
- Checking username validity
- Brute forcing usernames
- Enumerating files
- Brute forcing passwords
- Generating e-mail addresses from names
- Finding e-mail addresses from web pages
- Finding comments in source code
- 3. Vulnerability Identification
- Automated URL-based Directory Traversal
- Automated URL-based Cross-site scripting
- Automated parameter-based Cross-site scripting
- Automated fuzzing
- jQuery checking
- Header-based Cross-site scripting
- Shellshock checking
- 4. SQL Injection
- Checking jitter
- Identifying URL-based SQLi
- Exploiting Boolean SQLi
- Exploiting Blind SQL Injection
- Encoding payloads
- 5. Web Header Manipulation
- Testing HTTP methods
- Fingerprinting servers through HTTP headers
- Testing for insecure headers
- Brute forcing login through the Authorization header
- Testing for clickjacking vulnerabilities
- Identifying alternative sites by spoofing user agents
- Testing for insecure cookie flags
- Session fixation through a cookie injection
- 6. Image Analysis and Manipulation
- Hiding a message using LSB steganography
- Extracting messages hidden in LSB
- Hiding text in images
- Extracting text from images
- Enabling command and control using steganography
- 7. Encryption and Encoding
- Generating an MD5 hash
- Generating an SHA 1/128/256 hash
- Implementing SHA and MD5 hashes together
- Implementing SHA in a real-world scenario
- Generating a Bcrypt hash
- Cracking an MD5 hash
- Encoding with Base64
- Encoding with ROT13
- Cracking a substitution cipher
- Cracking the Atbash cipher
- Attacking one-time pad reuse
- Predicting a linear congruential generator
- Identifying hashes
- 8. Payloads and Shells
- Extracting data through HTTP requests
- Creating an HTTP C2
- Creating an FTP C2
- Creating an Twitter C2
- Creating a simple Netcat shell
- 9. Reporting
- Converting Nmap XML to CSV
- Extracting links from a URL to Maltego
- Extracting e-mails to Maltego
- Parsing Sslscan into CSV
- Generating graphs using plot.ly
- A. Bibliography
- Index
Network scanning refers to a set of procedures that investigate a live host, the type of host, open ports, and the type of services running on the host. Network scanning is a part of intelligence gathering by virtue of which an attack can create a profile of the target organization.
In this chapter, we will cover the following topics:
- How to check live systems
- Ping sweep
- TCP scanner
- How to create an efficient IP scanner
- Services running on the target machine
- The Concept of a port scanner
- How to create an efficient port scanner
You should have basic knowledge of the TCP/IP layer communication. Before proceeding further, the concept of the Protocol Data Unit (PDU) should be clear.
PDU is a unit of data specified in the protocol. It is the generic term for data at each layer.
- For the application layer, PDU indicates data
- For the transport layer, PDU indicates a segment
- For the Internet or the network layer, PDU indicates a packet
- For the data link layer or network access layer, PDU indicates a frame
- For the physical layer, that is, physical transmission, PDU indicates bits
Ping scan involves sending an ICMP ECHO Request to a host. If a host is live, it will return an ICMP ECHO Reply, as shown in the following image:
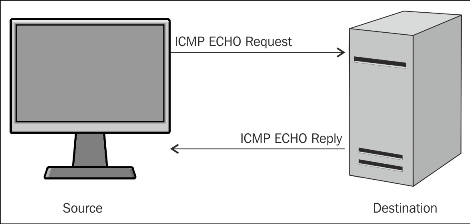
ICMP request and reply
The operating system's ping command provides the facility to check whether the host is live or not. Consider a situation where you have to test a full list of IP addresses. In this situation, if you test the IP one by one, it will take a lot of time and effort. In order to handle this situation, we use ping sweep.
Ping sweep is used to identify the live host from a range of IP addresses by sending the ICMP ECHO request and the ICMP ECHO reply. From a subnet and network address, an attacker or pentester can calculate the network range. In this section, I am going to demonstrate how to take advantage of the ping facility of an operating system.
First, I shall write a simple and small piece of code, as follows:
import os
response = os.popen('ping -n 1 10.0.0.1')
for line in response.readlines():
print line,
In the preceding code, import os imports the OS module so that we can run the OS command. The next line os.popen('ping -n 1 10.0.0.1') that takes a DOS command is passed in as a string and returns a file-like object connected to the command's standard input or output streams. The ping –n 1 10.0.0.1 command is a Windows OS command that sends one ICMP ECHO request packet. By reading the os.psopen() function, you can intercept the command's output. The output is stored in the response variable. In the next line, the readlines() function is used to read the output of a file-like object.
The output of the program is as follows:
G:\Project Snake\Chapter 2\ip>ips.py

Pinging 10.0.0.1 with 32 bytes of data:
Reply from 10.0.0.1: bytes=32 time=3ms TTL=64

Ping statistics for 10.0.0.1:
    Packets: Sent = 1, Received = 1, Lost = 0 (0% loss),
Approximate round trip times in milli-seconds:
    Minimum = 3ms, Maximum = 3ms, Average = 3ms
The output shows the reply, byte, time, and TTL values, which indicate that the host is live. Consider another output of the program for IP 10.0.0.2.
G:\Project Snake\Chapter 2\ip>ips.py
Pinging 10.0.0.2 with 32 bytes of data:
Reply from 10.0.0.16: Destination host unreachable.

Ping statistics for 10.0.0.2:
    Packets: Sent = 1, Received = 1, Lost = 0 (0% loss),
The preceding output shows that the host is not live.
The preceding code is very important for proper functioning, and is similar to the engine of a car. In order to make it fully functional, we need to modify the code so that it is platform independent and produce easily readable output.
I want my code to work for a range of IPs:
import os
net = raw_input("Enter the Network Address ")
net1= net.split('.')
print net1
a = '.'
net2 = net1[0]+a+net1[1]+a+net1[2]+a
print net2
st1 = int(raw_input("Enter the Starting Number "))
en1 = int(raw_input("Enter the Last Number "))
The preceding code asks for the network address of the subnet, but you can give any IP address of the subnet. The next line net1= net.split('.') splits the IP address in four parts. The net2 = net1[0]+a+net1[1]+a+net1[2]+a statement forms the network address. The last two lines ask for a range of IP addresses.
To make it platform independent, use the following code:
import os
import platform
oper = platform.system()
if (oper=="Windows"):
  ping1 = "ping -n 1 "
elif (oper== "Linux"):
  ping1 = "ping -c 1 "
else :
  ping1 = "ping -c 1 "
The preceding code determines whether the code is running on Windows OS or the Linux platform. The oper = platform.system() statement informs this to the running operating system as the ping command is different in Windows and Linux. Windows OS uses ping –n 1 to send one packet of the ICMP ECHO request, whereas Linux uses ping –c 1.
Now, let's see the following full code:
import os
import platform
from datetime import datetime
net = raw_input("Enter the Network Address ")
net1= net.split('.')
a = '.'
net2 = net1[0]+a+net1[1]+a+net1[2]+a
st1 = int(raw_input("Enter the Starting Number "))
en1 = int(raw_input("Enter the Last Number "))
en1=en1+1
oper = platform.system()

if (oper=="Windows"):
  ping1 = "ping -n 1 "
elif (oper== "Linux"):
  ping1 = "ping -c 1 "
else :
  ping1 = "ping -c 1 "
t1= datetime.now()
print "Scanning in Progress"
for ip in xrange(st1,en1):
  addr = net2+str(ip)
  comm = ping1+addr
  response = os.popen(comm)
  for line in response.readlines():
    if(line.count("TTL")):
      break
    if (line.count("TTL")):
      print addr, "--> Live"

t2= datetime.now()
total =t2-t1
print "scanning complete in " , total
Here, a couple of new things are in the preceding code. The for ip in xrange(st1,en1): statement supplies the numeric values, that is, the last octet value of the IP address. Within the for loop, the addr = net2+str(ip) statement makes it one complete IP address, and the comm = ping1+addr statement makes it a full OS command which passes to os.popen(comm). The if(line.count("TTL")): statement checks for the occurrence of TTL in the line. If any TTL value is found in the line, then it breaks the further processing of the line by using the break statement. The next two lines of code print the IP address as live where TTL is found. I used datetime.now() to calculate the total time taken to scan.
The output of the ping_sweep.py program is as follows:
G:\Project Snake\Chapter 2\ip>python ping_sweep.py
Enter the Network Address 10.0.0.1
Enter the Starting Number 1
Enter the Last Number 60
Scanning in Progress
10.0.0.1 --> Live
10.0.0.2 --> Live
10.0.0.5 --> Live
10.0.0.6 --> Live
10.0.0.7 --> Live
10.0.0.8 --> Live
10.0.0.9 --> Live
10.0.0.10 --> Live
10.0.0.11 --> Live
scanning complete in  0:02:35.230000
To scan 60 IP addresses, the program has taken 2 minutes 35 seconds.
Ping sweep works on the ICMP ECHO request and the ICMP ECHO reply. Many users turn off their ICMP ECHO reply feature or use a firewall to block ICMP packets. In this situation, your ping sweep scanner might not work. In this case, you need a TCP scan. I hope you are familiar with the three-way handshake, as shown in the following image:
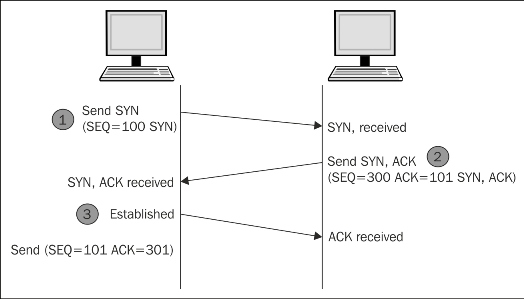
To establish the connection, the hosts perform a three-way handshake. The three steps in establishing a TCP connection are as follows:
- The client sends a segment with the SYN flag; this means the client requests the server to start a session.
- In the form of a reply, the server sends the segment that contains the ACK and SYN flags.
- The client responds with an ACK flag.
Now, let's see the following code of a TCP scan:
import socket
from datetime import datetime
net= raw_input("Enter the IP address ")
net1= net.split('.')
a = '.'
net2 = net1[0]+a+net1[1]+a+net1[2]+a
st1 = int(raw_input("Enter the Starting Number "))
en1 = int(raw_input("Enter the Last Number "))
en1=en1+1
t1= datetime.now()
def scan(addr):
  sock= socket.socket(socket.AF_INET,socket.SOCK_STREAM)
  socket.setdefaulttimeout(1)
  result = sock.connect_ex((addr,135))
  if result==0:
    return 1
  else :
    return 0

def run1():
  for ip in xrange(st1,en1):
    addr = net2+str(ip)
    if (scan(addr)):
      print addr , "is live"

run1()
t2= datetime.now()
total =t2-t1
print "scanning complete in " , total
The upper part of the preceding code is the same as the previous code. Here, we use two functions. Firstly, the scan(addr) function uses the socket as discussed in Chapter 1, Python with Penetration Testing and Networking. The result = sock.connect_ex((addr,135)) statement returns an error indicator. The error indicator is 0 if the operation succeeds, otherwise, it is the value of the errno variable. Here, we used port 135; this scanner works for the Windows system. There are some ports such as 137, 138, 139 (NetBIOS name service), and 445 (Microsoft-DSActive Directory), which are usually open. So, for better results, you have to change the port and scan repeatedly.
The output of the iptcpscan.py program is as follows:
G:\Project Snake\Chapter 2\ip>python iptcpscan.py
Enter the IP address 10.0.0.1
Enter the Starting Number 1
Enter the Last Number 60
10.0.0.8 is live
10.0.0.11 is live
10.0.0.12 is live
10.0.0.15 is live
scanning complete in  0:00:57.415000

G:\Project Snake\Chapter 2\ip>
Let's change the port number, use 137, and see the following output:
G:\Project Snake\Chapter 2\ip>python iptcpscan.py
Enter the IP address 10.0.0.1
Enter the Starting Number 1
Enter the Last Number 60
scanning complete in  0:01:00.027000
G:\Project Snake\Chapter 2\ip>
So there will be no outcome from that port number. Change the port number, use 445, and the output will be as follows:
G:\Project Snake\Chapter 2\ip>python iptcpscan.py
Enter the IP address 10.0.0.1
Enter the Starting Number 1
Enter the Last Number 60
10.0.0.5 is live
10.0.0.13 is live
scanning complete in  0:00:58.369000

G:\Project Snake\Chapter 2\ip>
The preceding three outputs show that 10.0.0.5, 10.0.0.8, 10.0.0.11, 10.0.0.12, 10.0.0.13, and 10.0.0.15 are live. These IP addresses are running on the Windows OS. So this is an exercise for you to check the common open ports for Linux and make IP a complete IP TCP scanner.
So far, you have seen the ping sweep scanner and the IP TCP scanner. Imagine that you buy a car that has all the facilities, but the speed is very slow, then you feel that it is a waste of time. The same thing happens when the execution of our program is very slow. To scan 60 hosts, the ping_sweep.py program took 2 minutes 35 seconds for the same range of IP addresses for which the TCP scanner took nearly one minute. They take a lot of time to produce the results. But don't worry. Python offers you multithreading, which will make your program faster.
I have written a full program of ping sweep with multithreading, and will explain this to you section-wise:
import os
import collections
import platform
import socket, subprocess,sys
import threading
from datetime import datetime
''' section 1 '''

net = raw_input("Enter the Network Address ")
net1= net.split('.')
a = '.'
net2 = net1[0]+a+net1[1]+a+net1[2]+a
st1 = int(raw_input("Enter the Starting Number "))
en1 = int(raw_input("Enter the Last Number "))
en1 =en1+1
dic = collections.OrderedDict()
oper = platform.system()

if (oper=="Windows"):
  ping1 = "ping -n 1 "
elif (oper== "Linux"):
  ping1 = "ping -c 1 "
else :
  ping1 = "ping -c 1 "
t1= datetime.now()
'''section 2'''
class myThread (threading.Thread):
  def __init__(self,st,en):
    threading.Thread.__init__(self)
    self.st = st
    self.en = en
  def run(self):
    run1(self.st,self.en)
'''section 3'''
def run1(st1,en1):
  #print "Scanning in Progess"
  for ip in xrange(st1,en1):
    #print ".",
    addr = net2+str(ip)
    comm = ping1+addr
    response = os.popen(comm)
    for line in response.readlines():
      if(line.count("TTL")):
        break
    if (line.count("TTL")):
      #print addr, "--> Live"
      dic[ip]= addr
''' Section 4  '''
total_ip =en1-st1
tn =20  # number of ip handled by one thread
total_thread = total_ip/tn
total_thread=total_thread+1
threads= []
try:
  for i in xrange(total_thread):
    en = st1+tn
    if(en >en1):
      en =en1
    thread = myThread(st1,en)
    thread.start()
    threads.append(thread)
    st1 =en
except:
  print "Error: unable to start thread"
print "\t
Number of Threads active:", threading.activeCount()

for t in threads:
  t.join()
print "Exiting Main Thread"
dict = collections.OrderedDict(sorted(dic.items()))
for key in dict:
  print dict[key],"-->" "Live"
t2= datetime.now()
total =t2-t1
print "scanning complete in " , total
The section 1 section is the same as that for the previous program. The one thing that is additional here is that I have taken an ordered dictionary because it remembers the order in which its contents are added. So if you want to know which thread gives the output first, then the ordered dictionary fits here. The section 2 section contains the threading class, and the class myThread (threading.Thread): statement initializes the threading class. The self.st = st and self.en = en statements take the start and end range of the IP address. The
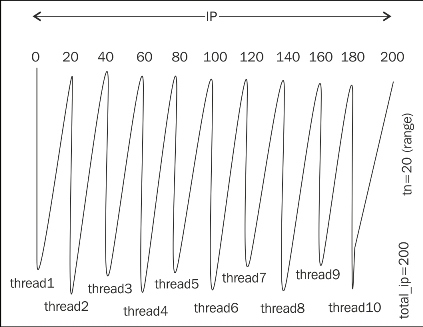
section 3 section contains the definition of the run1 function, which is the engine of the car, and is called by every thread with a different IP address range. The dic[ip]= addr statement stores the host ID as a key and the IP address as a value in the ordered dictionary. The section 4 statement is totally new in this code; the total_ip variable is the total number of IPs to be scanned. The significance of the tn =20 variable is that it states that 20 IPs will be scanned by one thread. The total_thread variable contains the total number of threads that need to scan total_ip, which denotes the number of IPs. The threads= [] statement creates an empty list, which will store the threads. The for loop for i in xrange(total_thread): produces threads.
en = st1+tn
  if(en >en1):
    en =en1
  thread = myThread(st1,en)
  thread.start()
  st1 =en
The preceding code produces the range of 20-20 IPs, such as st1-20, 20-40 ……-en1. The thread = myThread(st1,en) statement is the thread object of the threading class.
for t in threads:
  t.join()
The preceding code terminates all the threads. The next line dict = collections.OrderedDict(sorted(dic.items())) creates a new sorted dictionary dict, which contains IP addresses in order. The next lines print the live IP in order. The threading.activeCount() statement shows how many threads are produced. One picture saves 1000 words. The following image does the same thing:
Creating and handling of threads
The output of the ping_sweep_th_.py program is as follows:
G:\Project Snake\Chapter 2\ip>python ping_sweep_th.py
Enter the Network Address 10.0.0.1
Enter the Starting Number 1
Enter the Last Number 60
        Number of Threads active: 4
Exiting Main Thread
10.0.0.1 -->Live
10.0.0.2 -->Live
10.0.0.5 -->Live
10.0.0.6 -->Live
10.0.0.10 -->Live
10.0.0.13 -->Live
scanning complete in  0:01:11.817000
Scanning has been completed in 1 minute 11 seconds. As an exercise, change the value of the tn variable, set it from 2 to 30, and then study the result and find out the most suitable and optimal value of tn.
So far, you have seen ping sweep by multithreading; now, I have written a multithreading program with the TCP scan method:
import threading
import time
import socket, subprocess,sys
import thread
import collections
from datetime import datetime
'''section 1'''
net = raw_input("Enter the Network Address ")
st1 = int(raw_input("Enter the starting Number  "))
en1 = int(raw_input("Enter the last Number "))
en1=en1+1
dic = collections.OrderedDict()
net1= net.split('.')
a = '.'
net2 = net1[0]+a+net1[1]+a+net1[2]+a
t1= datetime.now()
'''section 2'''
class myThread (threading.Thread):
  def __init__(self,st,en):
    threading.Thread.__init__(self)
    self.st = st
    self.en = en
  def run(self):
    run1(self.st,self.en)

'''section 3'''
def scan(addr):
  sock= socket.socket(socket.AF_INET,socket.SOCK_STREAM)
  socket.setdefaulttimeout(1)
  result = sock.connect_ex((addr,135))
  if result==0:
    sock.close()
    return 1
  else :
    sock.close()

def run1(st1,en1):
  for ip in xrange(st1,en1):
    addr = net2+str(ip)
    if scan(addr):
      dic[ip]= addr
'''section 4'''
total_ip =en1-st1
tn =20  # number of ip handled by one thread
total_thread = total_ip/tn
total_thread=total_thread+1
threads= []
try:
  for i in xrange(total_thread):
    #print "i is ",i
    en = st1+tn
    if(en >en1):
      en =en1
    thread = myThread(st1,en)
    thread.start()
    threads.append(thread)
    st1 =en
except:
  print "Error: unable to start thread"
print "\t Number of Threads active:", threading.activeCount()
for t in threads:
  t.join()
print "Exiting Main Thread"
dict = collections.OrderedDict(sorted(dic.items()))
for key in dict:
  print dict[key],"-->" "Live"
t2= datetime.now()
total =t2-t1
print "scanning complete in " , total
There should be no difficulty in understanding the program. The following image shows everything:
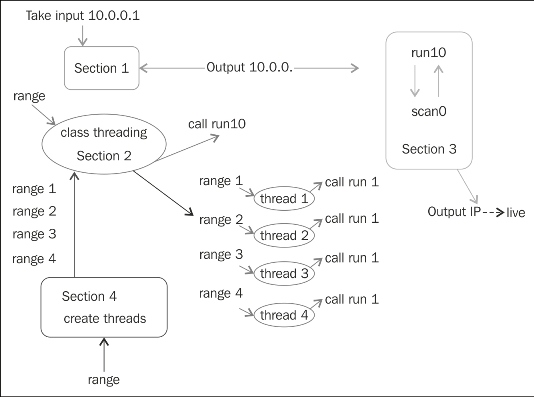
The IP TCP scanner
The class takes a range as the input and calls the run1() function. The section 4 section creates a thread, which is the instance of a class, takes a short range, and calls the run1() function. The run1() function has an IP address, takes the range from the threads, and produces the output.
The output of the iptcpscan.py program is as follows:
G:\Project Snake\Chapter 2\ip>python iptcpscan_t.py
Enter the Network Address 10.0.0.1
Enter the starting Number  1
Enter the last Number 60
        Number of Threads active: 4
Exiting Main Thread
10.0.0.5 -->Live
10.0.0.13 -->Live
scanning complete in  0:00:20.018000
For 60 IPs in 20 seconds, performance is not bad. As an exercise for you, combine both the scanners into one scanner.