Table of Contents for
Python: Penetration Testing for Developers
 Python: Penetration Testing for Developers
Published by
Packt Publishing, 2016
Python: Penetration Testing for Developers
Published by
Packt Publishing, 2016
- Cover
- Table of Contents
- Python: Penetration Testing for Developers
- Python: Penetration Testing for Developers
- Python: Penetration Testing for Developers
- Credits
- Preface
- What you need for this learning path
- Who this learning path is for
- Reader feedback
- Customer support
- 1. Module 1
- 1. Understanding the Penetration Testing Methodology
- Understanding what penetration testing is not
- Assessment methodologies
- The penetration testing execution standard
- Penetration testing tools
- Summary
- 2. The Basics of Python Scripting
- Python – the good and the bad
- A Python interactive interpreter versus a script
- Environmental variables and PATH
- Understanding dynamically typed languages
- The first Python script
- Developing scripts and identifying errors
- Python formatting
- Python variables
- Operators
- Compound statements
- Functions
- The Python style guide
- Arguments and options
- Your first assessor script
- Summary
- 3. Identifying Targets with Nmap, Scapy, and Python
- Understanding Nmap
- Nmap libraries for Python
- The Scapy library for Python
- Summary
- 4. Executing Credential Attacks with Python
- Identifying the target
- Creating targeted usernames
- Testing for users using SMTP VRFY
- Summary
- 5. Exploiting Services with Python
- Understanding the chaining of exploits
- Automating the exploit train with Python
- Summary
- 6. Assessing Web Applications with Python
- Identifying hidden files and directories with Python
- Credential attacks with Burp Suite
- Using twill to walk through the source
- Understanding when to use Python for web assessments
- Summary
- 7. Cracking the Perimeter with Python
- Understanding the link between accounts and services
- Cracking inboxes with Burp Suite
- Identifying the attack path
- Gaining access through websites
- Summary
- 8. Exploit Development with Python, Metasploit, and Immunity
- Understanding the Windows memory structure
- Understanding memory addresses and endianness
- Understanding the manipulation of the stack
- Understanding immunity
- Understanding basic buffer overflow
- Writing a basic buffer overflow exploit
- Understanding stack adjustments
- Understanding the purpose of local exploits
- Understanding other exploit scripts
- Reversing Metasploit modules
- Understanding protection mechanisms
- Summary
- 9. Automating Reports and Tasks with Python
- Understanding how to create a Python class
- Summary
- 10. Adding Permanency to Python Tools
- Understanding the difference between multithreading and multiprocessing
- Building industry-standard tools
- Summary
- 2. Module 2
- 1. Python with Penetration Testing and Networking
- Approaches to pentesting
- Introducing Python scripting
- Understanding the tests and tools you'll need
- Learning the common testing platforms with Python
- Network sockets
- Server socket methods
- Client socket methods
- General socket methods
- Moving on to the practical
- Summary
- 2. Scanning Pentesting
- What are the services running on the target machine?
- Summary
- 3. Sniffing and Penetration Testing
- Implementing a network sniffer using Python
- Learning about packet crafting
- Introducing ARP spoofing and implementing it using Python
- Testing the security system using custom packet crafting and injection
- Summary
- 4. Wireless Pentesting
- Wireless attacks
- Summary
- 5. Foot Printing of a Web Server and a Web Application
- Introducing information gathering
- Information gathering of a website from SmartWhois by the parser BeautifulSoup
- Banner grabbing of a website
- Hardening of a web server
- Summary
- 6. Client-side and DDoS Attacks
- Tampering with the client-side parameter with Python
- Effects of parameter tampering on business
- Introducing DoS and DDoS
- Summary
- 7. Pentesting of SQLI and XSS
- Types of SQL injections
- Understanding the SQL injection attack by a Python script
- Learning about Cross-Site scripting
- Summary
- 3. Module 3
- 1. Gathering Open Source Intelligence
- Gathering information using the Shodan API
- Scripting a Google+ API search
- Downloading profile pictures using the Google+ API
- Harvesting additional results from the Google+ API using pagination
- Getting screenshots of websites with QtWebKit
- Screenshots based on a port list
- Spidering websites
- 2. Enumeration
- Performing a ping sweep with Scapy
- Scanning with Scapy
- Checking username validity
- Brute forcing usernames
- Enumerating files
- Brute forcing passwords
- Generating e-mail addresses from names
- Finding e-mail addresses from web pages
- Finding comments in source code
- 3. Vulnerability Identification
- Automated URL-based Directory Traversal
- Automated URL-based Cross-site scripting
- Automated parameter-based Cross-site scripting
- Automated fuzzing
- jQuery checking
- Header-based Cross-site scripting
- Shellshock checking
- 4. SQL Injection
- Checking jitter
- Identifying URL-based SQLi
- Exploiting Boolean SQLi
- Exploiting Blind SQL Injection
- Encoding payloads
- 5. Web Header Manipulation
- Testing HTTP methods
- Fingerprinting servers through HTTP headers
- Testing for insecure headers
- Brute forcing login through the Authorization header
- Testing for clickjacking vulnerabilities
- Identifying alternative sites by spoofing user agents
- Testing for insecure cookie flags
- Session fixation through a cookie injection
- 6. Image Analysis and Manipulation
- Hiding a message using LSB steganography
- Extracting messages hidden in LSB
- Hiding text in images
- Extracting text from images
- Enabling command and control using steganography
- 7. Encryption and Encoding
- Generating an MD5 hash
- Generating an SHA 1/128/256 hash
- Implementing SHA and MD5 hashes together
- Implementing SHA in a real-world scenario
- Generating a Bcrypt hash
- Cracking an MD5 hash
- Encoding with Base64
- Encoding with ROT13
- Cracking a substitution cipher
- Cracking the Atbash cipher
- Attacking one-time pad reuse
- Predicting a linear congruential generator
- Identifying hashes
- 8. Payloads and Shells
- Extracting data through HTTP requests
- Creating an HTTP C2
- Creating an FTP C2
- Creating an Twitter C2
- Creating a simple Netcat shell
- 9. Reporting
- Converting Nmap XML to CSV
- Extracting links from a URL to Maltego
- Extracting e-mails to Maltego
- Parsing Sslscan into CSV
- Generating graphs using plot.ly
- A. Bibliography
- Index
The identification of targets, network surveillance, and active reconnaissance are all terms that you may see in place of each other, in an effort to describe the initial process of assessing an environment. Depending on the framework you are using, such as PTES, a custom company methodology, or some other industry standard, these terms may mean different things. The important thing to remember is that you are looking to see which hosts are live in the approved scope and what services, ports, and features they have open and responsive.
These facets will determine what activities you will perform going from here. All too often, this stage is short-lived, and assessors jump right into exploiting systems that they see responding to scans. Instead of being methodical and researching possible targets, new assessors jump in with both feet. This may have served them well in previous engagements where they got to the goal quickly, but there are other impacts of approaching assessments in this way that many assessors do not realize.
They may miss even the lower hanging fruit—systems that are even easier to exploit. So if you, as an assessor, do not see this and a malicious actor may see it, then you may have an uncomfortable conversation with a client a few months down the road about why you missed this vulnerability. Keep in mind, however, that a penetration test is a snapshot in time, and environments are always changing. Controls and restrictions in the environment are adjusted, and systems are often reallocated. So, it is possible to have old vulnerabilities cropping up in new assessments. Being methodical means that you may be able to find more than one low-hanging target, which may help you build a rapport with your clients and in turn receive more work. Most importantly, it will point to the root causes of the flaws in the client's that will continue to generate control lapses if they are not fixed.
The biggest impact you will see from an assessor from someone jumping the gun, so to speak, is that they may start exploiting systems that have no significant purpose in the organization. This means that although they cracked a box, it did not provide any value from moving through the networks, or the vulnerability was not exploitable, and as such, it could be considered a false positive. So, all of those initial scans have to be restarted, losing precious time and increasing the chances that the objectives of the engagement will not be met. To understand how to scan the network, you have to first understand the network frames, packets, messages, and datagrams so that you can manipulate each of them.
There are entire series of books dedicated to how networks communicate; this chapter will begin with some very basic information. If you have already understood this data, I encourage you to read through it as a refresher, just in case some new or different details are covered. Additionally, there are some references to the sizes of header components and payloads. These are specifics on how the network protocols are referenced, and how the protocols could be different depending on what data is being transmitted and/or the differences in specialty networks.
As a system generates data, it is sent down through the system's Transmission Control Protocol (TCP) / Internet Protocol (IP) stack. This packages the data into something that can be transmitted over the wire. If you have heard of the Open Systems Interconnect (OSI) model, then you know that this is how people discuss how systems process data, whereas the TCP/IP Model is the way systems actually operate.
There is a range of ports called the ephemeral port range. It varies from system to system in scope. These ports are also known as dynamic ports and are used by clients as the source ports for communication over a socket. They can also be destination ports for well-known services on servers, provided the known port is designed for communication brokerage as against destination. Services such as File Transfer Protocol (FTP) use this technique. The reason you must know this is that these ephemeral ports typically do not need to be scanned while you are trying and identifying targets, because they are rarely service initiators. As such, they are short-lived and are associated for specific communication streams only.
Tip
Remember that administrators often hide known services in these higher port ranges to try and create situations wherein the services will not be identified. This is known as security by obscurity. When it comes to scanning many hosts, you may need to avoid scanning these ranges because you have to spend more time doing so. If you have not identified many services, or there are a few hosts in the target network, you may want to include these in your scan range.
Layer 4 headers represent the TCP and User Datagram Protocol (UDP) headers and the targeting connection of ports for a specific IP. Layer 3 headers represent the IP and Internet Control Message Protocol (ICMP) headers. Layer 2 headers are related to frame headers, trailers, and the Address Resolution Protocol (ARP). The following diagram depicts the method of frame generation to communicate between two systems:
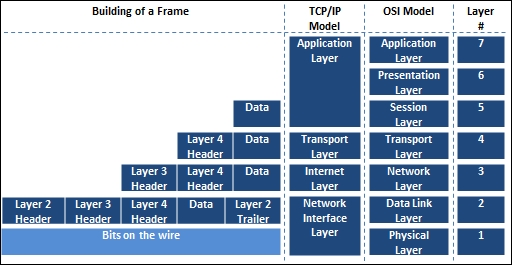
Now that you have seen how the frame is generated from the top down, let's move back up the stack to see how each component is deconstructed to get to the data. From there, you start with the Ethernet frame.
A frame is the way in which data travels from host to host, and there are a number of components that make up a frame. You can read a substantial amount of information related to frames, on wiki's and engineering documents, but there are a couple of things you need to understand. Frames communicate via a hardware address known as a Media Access Control (MAC) address. Frames are slightly different for wireless networks and Ethernet networks. Also, at the end of a frame is a checksum. It is a basic mathematical check meant to verify the integrity of data after it has been transmitted over the wire. The following is an screenshot of an Ethernet frame with the end destination of a TCP port:

The next screenshot represents the contents of a frame with the ending destination of a UDP port:

Frames are used to communicate within broadcast domains or locations inside default gateways, or prior to passing a router. Once a router is passed, the interface of its router's hardware address is used for the next broadcast domain. These are also typically sent in frames depending on the communication protocols between the devices. This is done over and over again until the frame reaches its destination delineated by the IP address. This is very important to understand because if you wish to run most Man-in-the-Middle (MitM) attacks with tools such as Responder or Ettercap, you have to be within the Broadcast Domain, as they are layer 2 attacks.
The concept of wireless attacks is very similar, as you must be within range of the Service Set Identifier (SSID) or the actual wireless network name. Your communication train is slightly different depending on the design of the wireless network, but you use Access Points (AP) that are differentiated by Basic Service Set Identifiers (BSSIDs), which is a fancy name for the MAC address of the AP.
Once you are associated and authenticated into the network through the AP, you are part of the Basic Service Set (BSS) or the component of the enterprise network, but are limited to the range of the AP.
If you move into a wireless network and associate with a new AP because the signal is better, you will be part of a new BSS. All BSS are part of the Enterprise Service Set (ESS); interestingly enough, if the wireless network contains more than one AP, it is an ESS. To be able to communicate with wireless engineers, you must understand that if you are in an enterprise wireless network, the SSID is actually known as an Enterprise SSID (ESSID). Now that you have an understanding of layer 2 headers, it's time to look at IP headers.
Note
Depending on whose network documentation you are reading, an ESS is created if there is a Distribution System (DS) and an AP, or two APs and a DS. A DS is just a fancy name for a nonwireless network that connects APs. This is important to keep in mind because depending on the brand of product a company is using, the lingo may be slightly different.
An IP header contains the data necessary for communicating through a network that uses IP addresses. This allows the communication to flow beyond Broadcast Domains. The following diagram shows an example header for IPv4 header:
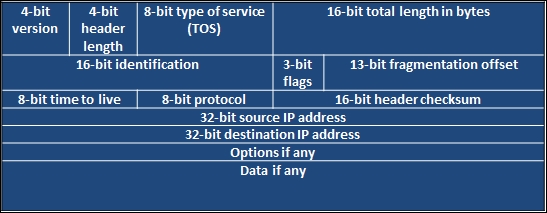
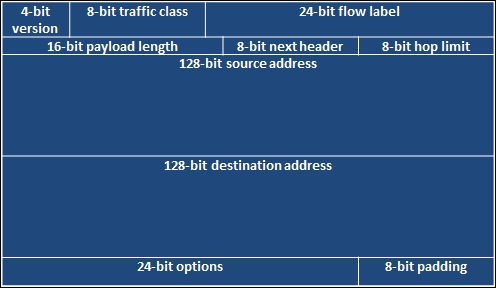
You may have read that IPv4 is nearing its end, or that it is getting to be that way. Well, the replacement, as you may have heard, is IPv6. This new address scheme provides a significant number of new host addresses, but as you can see in the comparison of the two header types, there are far less fields. One thing to know is that there are a large number of vulnerabilities associated with IPv6 compared to IPv4.
There are many reasons for this, but the most significant reason is that when organizations apply security concepts to their network, they forget that IPv6 is supported by default and is turned on. This means that when they configure protection mechanisms, they are usually using the IPv4 address. If IPv6 is enabled and the security devices are not aware of the different address types in the network or the associations with those devices, attacks can go unnoticed.
Think of it in this way: let's say you have a house with a front door and a back door, and there is a security guard only at the front door. The house has the same physical address, but the manners in which you get inside are completely different because it has two different doors. This security concept is very similar, and as such, organizations should remember that IPv6 can open up new holes into an organization if it does not consider the impact carefully. The following diagram shows an example of an IPv6 packet structure:
A TCP packet header is much larger than a UDP packet header, relatively speaking. It has to accommodate the necessary sequencing, flags, and control mechanisms. Specifically, the packet is there to handle session setup and teardown using a number of different flags. These flags can be manipulated to get responses from the target system as an attacker wants.
The following figure shows a TCP header:

Before you understand how to execute scans and identify hosts, you need to understand how the TCP communication stream works. TCP is a connection-oriented protocol, which means that a session is established between two systems. Once this has taken place, the information that was originally destined for communication can be sent, and when all of the data has been sent, the connection is closed.
The TCP handshake is also known as the three-way handshake. The meaning of this is that three messages are sent back and forth between two systems before a communication socket is established. These three messages are SYN, SYN-ACK, and ACK. The system that is trying to initiate a connection starts with a packet that has the SYN flag set. The answering system returns a packet with the SYN and ACK flag sets. Finally, the initiating system returns a packet to the original target system with the ACK flag set. In older systems, if the communication train was not completed, there could be unintended consequences. Today, most systems are smart enough to just reset (RST) the connection or close it gracefully.
Whereas TCP is a connection-oriented protocol, UDP is a simple connectionless-oriented protocol. As you can see in the following image, the header for UDP packets is significantly simpler. This is because there is far less overhead for UDP to maintain a socket as opposed to TCP.

UDP establishes a communication stream with a listening port. That port accepts the data and runs it up the TCP/IP stack as necessary. While TCP is needed for synchronized and reliable communication, UDP is not. Multimedia presentations are the best example of what UDP communication is used for. If you are watching a movie, you wouldn't care about a packet that might have been lost, because even if it is resent, it would make no sense to present it after the movie has moved on from the initial hiccup in presentation. Now that you have understood the basics of system communication, you need to understand how different flags are used to gather the required data using Nmap scan techniques.
Note
Each scan has a different purpose, and specific flags elicit different responses from operating systems depending on whether they are received out of order or not. The nmap port scanning techniques web page at http://nmap.org/book/man-port-scanning-techniques.html details this information succinctly.