Table of Contents for
Python: Penetration Testing for Developers
 Python: Penetration Testing for Developers
Published by
Packt Publishing, 2016
Python: Penetration Testing for Developers
Published by
Packt Publishing, 2016
- Cover
- Table of Contents
- Python: Penetration Testing for Developers
- Python: Penetration Testing for Developers
- Python: Penetration Testing for Developers
- Credits
- Preface
- What you need for this learning path
- Who this learning path is for
- Reader feedback
- Customer support
- 1. Module 1
- 1. Understanding the Penetration Testing Methodology
- Understanding what penetration testing is not
- Assessment methodologies
- The penetration testing execution standard
- Penetration testing tools
- Summary
- 2. The Basics of Python Scripting
- Python – the good and the bad
- A Python interactive interpreter versus a script
- Environmental variables and PATH
- Understanding dynamically typed languages
- The first Python script
- Developing scripts and identifying errors
- Python formatting
- Python variables
- Operators
- Compound statements
- Functions
- The Python style guide
- Arguments and options
- Your first assessor script
- Summary
- 3. Identifying Targets with Nmap, Scapy, and Python
- Understanding Nmap
- Nmap libraries for Python
- The Scapy library for Python
- Summary
- 4. Executing Credential Attacks with Python
- Identifying the target
- Creating targeted usernames
- Testing for users using SMTP VRFY
- Summary
- 5. Exploiting Services with Python
- Understanding the chaining of exploits
- Automating the exploit train with Python
- Summary
- 6. Assessing Web Applications with Python
- Identifying hidden files and directories with Python
- Credential attacks with Burp Suite
- Using twill to walk through the source
- Understanding when to use Python for web assessments
- Summary
- 7. Cracking the Perimeter with Python
- Understanding the link between accounts and services
- Cracking inboxes with Burp Suite
- Identifying the attack path
- Gaining access through websites
- Summary
- 8. Exploit Development with Python, Metasploit, and Immunity
- Understanding the Windows memory structure
- Understanding memory addresses and endianness
- Understanding the manipulation of the stack
- Understanding immunity
- Understanding basic buffer overflow
- Writing a basic buffer overflow exploit
- Understanding stack adjustments
- Understanding the purpose of local exploits
- Understanding other exploit scripts
- Reversing Metasploit modules
- Understanding protection mechanisms
- Summary
- 9. Automating Reports and Tasks with Python
- Understanding how to create a Python class
- Summary
- 10. Adding Permanency to Python Tools
- Understanding the difference between multithreading and multiprocessing
- Building industry-standard tools
- Summary
- 2. Module 2
- 1. Python with Penetration Testing and Networking
- Approaches to pentesting
- Introducing Python scripting
- Understanding the tests and tools you'll need
- Learning the common testing platforms with Python
- Network sockets
- Server socket methods
- Client socket methods
- General socket methods
- Moving on to the practical
- Summary
- 2. Scanning Pentesting
- What are the services running on the target machine?
- Summary
- 3. Sniffing and Penetration Testing
- Implementing a network sniffer using Python
- Learning about packet crafting
- Introducing ARP spoofing and implementing it using Python
- Testing the security system using custom packet crafting and injection
- Summary
- 4. Wireless Pentesting
- Wireless attacks
- Summary
- 5. Foot Printing of a Web Server and a Web Application
- Introducing information gathering
- Information gathering of a website from SmartWhois by the parser BeautifulSoup
- Banner grabbing of a website
- Hardening of a web server
- Summary
- 6. Client-side and DDoS Attacks
- Tampering with the client-side parameter with Python
- Effects of parameter tampering on business
- Introducing DoS and DDoS
- Summary
- 7. Pentesting of SQLI and XSS
- Types of SQL injections
- Understanding the SQL injection attack by a Python script
- Learning about Cross-Site scripting
- Summary
- 3. Module 3
- 1. Gathering Open Source Intelligence
- Gathering information using the Shodan API
- Scripting a Google+ API search
- Downloading profile pictures using the Google+ API
- Harvesting additional results from the Google+ API using pagination
- Getting screenshots of websites with QtWebKit
- Screenshots based on a port list
- Spidering websites
- 2. Enumeration
- Performing a ping sweep with Scapy
- Scanning with Scapy
- Checking username validity
- Brute forcing usernames
- Enumerating files
- Brute forcing passwords
- Generating e-mail addresses from names
- Finding e-mail addresses from web pages
- Finding comments in source code
- 3. Vulnerability Identification
- Automated URL-based Directory Traversal
- Automated URL-based Cross-site scripting
- Automated parameter-based Cross-site scripting
- Automated fuzzing
- jQuery checking
- Header-based Cross-site scripting
- Shellshock checking
- 4. SQL Injection
- Checking jitter
- Identifying URL-based SQLi
- Exploiting Boolean SQLi
- Exploiting Blind SQL Injection
- Encoding payloads
- 5. Web Header Manipulation
- Testing HTTP methods
- Fingerprinting servers through HTTP headers
- Testing for insecure headers
- Brute forcing login through the Authorization header
- Testing for clickjacking vulnerabilities
- Identifying alternative sites by spoofing user agents
- Testing for insecure cookie flags
- Session fixation through a cookie injection
- 6. Image Analysis and Manipulation
- Hiding a message using LSB steganography
- Extracting messages hidden in LSB
- Hiding text in images
- Extracting text from images
- Enabling command and control using steganography
- 7. Encryption and Encoding
- Generating an MD5 hash
- Generating an SHA 1/128/256 hash
- Implementing SHA and MD5 hashes together
- Implementing SHA in a real-world scenario
- Generating a Bcrypt hash
- Cracking an MD5 hash
- Encoding with Base64
- Encoding with ROT13
- Cracking a substitution cipher
- Cracking the Atbash cipher
- Attacking one-time pad reuse
- Predicting a linear congruential generator
- Identifying hashes
- 8. Payloads and Shells
- Extracting data through HTTP requests
- Creating an HTTP C2
- Creating an FTP C2
- Creating an Twitter C2
- Creating a simple Netcat shell
- 9. Reporting
- Converting Nmap XML to CSV
- Extracting links from a URL to Maltego
- Extracting e-mails to Maltego
- Parsing Sslscan into CSV
- Generating graphs using plot.ly
- A. Bibliography
- Index
We covered in previous chapters a good amount of information that highlights where Python can help optimize technical fieldwork. We even showed methods in which Python can be used to automate follow-on tasks from one process to another. Each of these will help you better spend your time on priority tasks. This is important because there are three things that potentially limit the successful completion of a penetration test: the time an assessor has to complete the assessment, the limits of the scope of the penetration test, and the skill of the assessor. In this chapter, we are going to show you how to automate tasks such as parsing eXtensible Markup Language (XML) to generate reports from tool data.
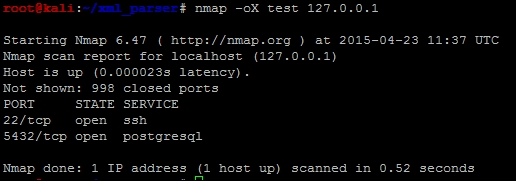
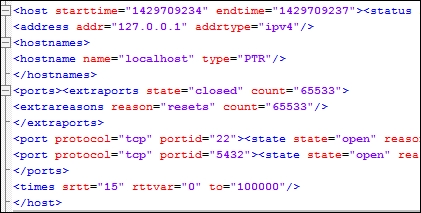
We are going to use nmap XMLs as an example to show how you can parse data into a useable format. Our end goal will be to place the data in a Python dictionary of unique results. We can then use that data to build structured outputs that we find useful. To begin, we need an XML file that can be parsed and reviewed. Run an nmap scan of your localhost with the nmap -oX test 127.0.0.1 command.
This will produce a file that highlights the two open ports using XML markup language, as shown here:
With an actual XML file, we can review the components of the data structure. Understanding how an XML file is designed will better prepare you to generate the code that will read it. Specifically, the descriptions here are based on what the etree library classifies the components of an XML file as. The etree library handles the XML data conceptually like a tree, with relevant branches, subbranches, and even twigs. In computer science terms, we call this a parent-child relationship.
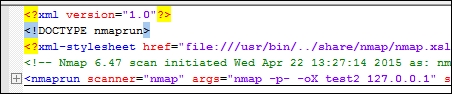
Using the etree library, you are going to load the data into variables. These variables will hold composite pieces of data within themselves. These are referred to as elements, which can be further dissected to find useful information. For example, if you load the root of an XML nmap structure into a variable and then print it, you will see the reference and a tag that describes the element and the data within it, as seen in the following screenshot:

Note
Additional details related to the etree library can be found at https://docs.python.org/2/library/xml.etree.elementtree.html.
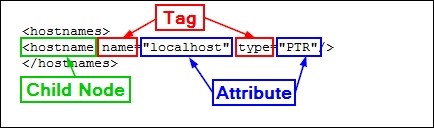
Each element can have a parent-child relationship with other nodes and even sub-children nodes, known as grandchildren. Each node holds the information that we are trying to parse. A node typically has a tag, which is the description of the data it holds, and an attribute, which is the actual data. To better highlight how this information is presented in XML, we have captured an element of the nmap XML, the hostname's node, and a single resulting child, as seen here:
As you look at an XML file, you may notice that you can have multiple nodes within an element. For example, a host may have a number of different hostnames for the same Internet Protocol (IP) address due to multiple references. As such, to iterate over all the nodes of an element, you need to use a for loop to capture all the possible data components. The parsing of this data is for producing an output, which is only as good as the data samples you have.
This means that you should take multiple sample XML files to get a better cross-section of information. The point is to get the majority of the possible data combinations. Even with samples that should cover the majority of issues that you will run into, there will be examples that are not accounted for. So, do not get discouraged if your script breaks in the middle of its use. Trace the errors and determine what needs to be adjusted.
For our tests, we are going to use multiple nmap scans and our Kali instance and output the details to XML file.
Tip
Python has a fantastic library, called libnmap, that can be used to run and schedule scans and even help parse output files to generate reports. More details on this can be found at https://libnmap.readthedocs.org/en/latest/. We could use this library to parse the output and generate a report, but this library works only for nmap. If you want to parse other XML outputs from other tools to add details to a more manageable format, this library will not help you.
When we are getting ready to write a parser, the first stage is to map the file that we are going to parse. So, we take notes of the likely ways in which we need to have our script interact with the output. After mapping the file, we place several print statements throughout the file to show what elements our script has stopped or broken its processing at. To better understand each element, you should load the example XMLs into a tool that allows proper XML viewing. Notepad++ works very well, provided you have the XML tools plugin installed.
Once you have loaded the file into Notepad++, you should collapse the XML tree down to its root. The following screenshot shows that the root of this tree is nmaprun:
After you expand it once, you get a number of subnodes, which can be further expanded and broken down.
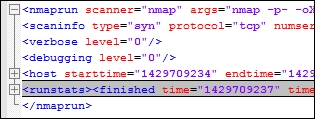
From these details, we see that we have to load the XML file into the handler and then walk through the host element. We should, however, consider the fact that this is a single host, so there will only be one host element. As such, we should iterate through the host element with a for loop to capture other hosts that would be scanned in future iterations.
When the host element is expanded, we can find that there are nodes for the address, hostnames, ports, and the time. The nodes we are interested in would be the address, hostnames, and ports. Both the hostnames and ports nodes are expandable, which means that they probably need to be iterated as well.
This screenshot highlights the details of the expanded XML tree, with the details that we care about:
For the address, we can see there are different address types, as highlighted by the addrtype tag. In nmap XML outputs, you will find the ipv4, ipv6, and mac addresses. If you want different address types in your output, you can get them by pulling the data with simple if-then statements and then loading it into the appropriate variables. If you just want an address to be loaded into a variable regardless of the type, you will have to create an order of precedence.
The nmap tool may or may not find a hostname for each target scanned. This depends on how the scanner attempted to retrieve the information. For example, if Domain Name Service (DNS) requests were enabled or the scan was against the localhost, a hostname may have been identified. Other instances of scans may not identify an actual hostname. We have to build our script to take into consideration the different outputs that may be provided depending on the scan. Our localhost scan, as seen in the following screenshot, did provide a hostname, so we have information that we can extract in this example:

Thus, we have determined that we are going to load the hostnames and addresses into variables. We are going to look at the ports element to identify the parent and child node data we are going to extract. The XML nodes in this area of the tree have a large amount of data since they have to be represented by numerous tags and attributes, as shown in this screenshot:

While looking at the details of these nodes, we should consider what components we would like to extract. We know that we will have to iterate all the ports, and we can uniquely identify the ports by the portid tag, which represents the port number, but we have to consider what data is useful to us as assessors. The protocol of the port, such as Transmission Control Protocol (TCP) and User Datagram Protocol (UDP), is useful. Also, the state of the port and whether it is open, closed, filtered, or open|filtered is important. Finally, the name of the service that may have been identified would be good to catalogue in a report.
Tip
Remember that a service name may be inaccurate, depending on the type of scan. If there is no service detection, nmap uses the defaults described in Linux's /etc/services file for those ports. So, if you are generating reports for a client as part of a footprinting exercise, make sure that you enable some form of service detection. Otherwise, the data that you provide could be considered inaccurate.
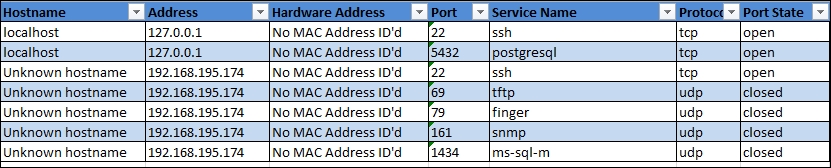
After reviewing the XML file, we have determined that in addition to the addresses and hostnames, we are also going to capture every port number, the protocol, the service attached to it, and the state. With these details, we can consider how we want to format our report. As previous images have shown, data from the nmap XMLs is not narrative in format, so a Microsoft Word document will not be as useful as a spreadsheet—potentially.
Therefore, we have to consider the manner in which the data will be represented in the report: a line per host or a line per port. There are benefits and trade-offs for each of these representations. A line-by-line host representation means that composite information is easy to represent, but if we want to filter our data, we can only filter on unique information about the host or port groups, and not on individual ports.
To make this more useful, each line in the spreadsheet will represent a port, which means that the particulars of each port can be represented on a line. This can help our clients filter on each item that we extract from the XML to include the hostname, address, port, service name, protocol, and port state. The following screenshot shows what we will be working towards:
Since we are writing a parser and a report generator, it would be good to create two separate classes to handle this information. The added benefit is that the XML parser can be instantiated, which means that we can use the parser to run against more than one XML file and then combine combine each iteration into holistic and unique results. This is extremely beneficial for us, since we typically run more than one nmap scan during an engagement, and combining results and eliminating duplicates can be a rather laborious process. Again, this is an ideal example in which scripting can make our lives easier.